
BM5750HD - Baby monitor VTECH - Free user manual and instructions
Find the device manual for free BM5750HD VTECH in PDF.


| Product Type | Baby Monitor |
| Brand | VTech |
| Model | BM5750HD |
| Parent Unit Display | 5-inch High Definition Color LCD |
| Display Resolution | 1280 x 720 pixels (IPS) |
| Camera Features | Pan, Tilt, and Zoom (2x digital zoom) |
| Night Vision | Infrared LEDs for black-and-white night vision |
| Frequency | 2405 - 2475 MHz |
| Channels | 32 |
| Sound Sensitivity Levels | 3 levels (Low, Medium, High) |
| Sound Detection Alert | Yes, with adjustable sensitivity |
| Temperature Sensor | Yes, with alert range setting |
| Motion Detection Alert | Yes |
| Monitoring Modes (BM5750HD-2 only) | Single CAM, Patrol, Split mode |
| Lullabies and Soothing Sounds | 5 melodies and 4 soothing sounds with timer |
| Talk-Back Function | Two-way communication via TALK button |
| Parent Unit Battery | 3.7V 5000mAh Lithium-ion (built-in) |
| Battery Standby Time | Varies by use, up to several hours |
| Power Adapter (Parent Unit) | 5V DC @ 2A |
| Power Adapter (Baby Unit) | 5V DC @ 1A |
| Range (Nominal) | Up to 300m (open space, varies with environment) |
| Wall Mountable | Yes, with included wall mount bracket |
| Safety Cautions | Keep cords >3 ft from child; never place in crib |
| Warranty | 24 months from date of purchase (Voluntary Product Warranty) |
Frequently Asked Questions - BM5750HD VTECH
User questions about BM5750HD VTECH
0 question about this device. Answer the ones you know or ask your own.
Ask a new question about this device
Download the instructions for your Baby monitor in PDF format for free! Find your manual BM5750HD - VTECH and take your electronic device back in hand. On this page are published all the documents necessary for the use of your device. BM5750HD by VTECH.
USER MANUAL BM5750HD VTECH
Full Colour Pan & Tilt Video Monitor
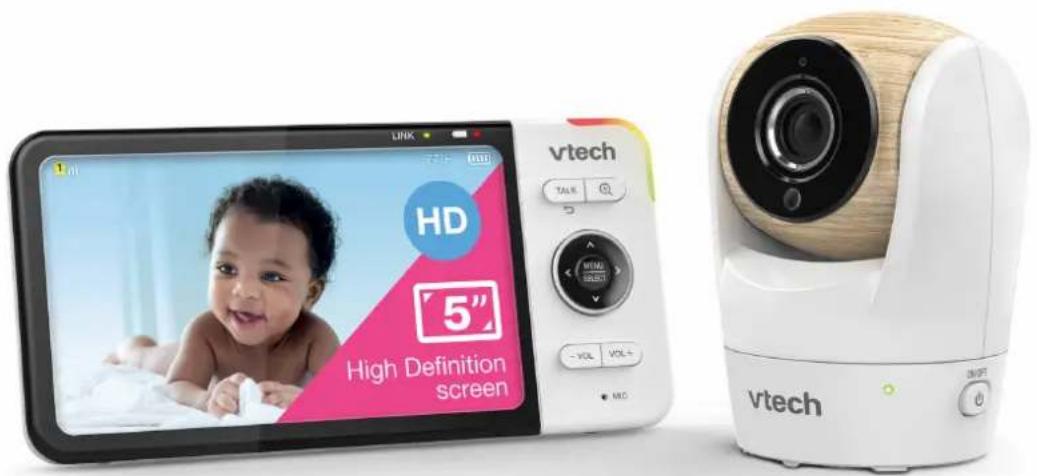
User Guide
This guide contains important information.
Please keep it for future reference.
Contents
Important Safety Instructions....3
Setup....5
What's Included? 5
Overview....6
Parent Unit Icons....10
Connect the Baby Monitor....14
Charge the Parent Unit Battery....15
Position the Baby Monitor....16
Basic Operation....17
Power on/off....17
Use the Menu 19
Adjust Speaker Volume ....20
Talk to Your Baby via the Baby Unit....20
Zoom, Pan and Tilt the Camera....21
Turn on/off the Parent Unit Screen 22
Advanced Operation 22
Sound Sensitivity and Sound Activation 22
Sound activated screen and audio 23
Dim Mode 24
Night Vision....24
Monitoring Modes (BM5750HD-2 only) 25
Additional Information 26
Wall Mount (Optional) 26
General Product Care....29
Storage 29
Technical Specifications....29
Customer Service and Product Warranty 30
Disposal of Batteries and Product 31
Important Safety Instructions
The applied nameplate is located at the bottom of the baby unit's base. When using your equipment, basic safety precautions should always be followed to reduce the risk of fire, electric shock and injury, including the following:
- Follow all warnings and instructions marked on the product.
- Adult setup is required.
- CAUTION: Do not install the baby unit at a height above 6.5 feet (2 meters).
-
This product is intended as an aid. It is not a substitute for responsible and proper adult supervision and should not be used as such.
-
This product is not intended for use as a medical monitor.
-
Do not use this product near water. For example, do not use it next to a bath tub, wash bowl, kitchen sink, laundry tub or swimming pool, or in a wet basement or shower.
-
CAUTION: Use only the battery provided. There may be a risk of explosion if a wrong type of battery is used for the parent unit. The battery cannot be subjected to high or low extreme temperature and low air pressure at high altitude during use, storage or transportation. Disposal of battery into fire or a hot oven, or mechanically crushing or cutting or the battery can result in an explosion. Leaving the battery in an extremely high temperature surrounding environment can result in an explosion or the leakage of flammable liquid of gas. Battery subjected to extremely low air pressure may result in an explosion or the leakage of flammable liquid or gas. Dispose of used battery according to the information in The RBRC seal.
-
Use only the adapters included with this product. Incorrect adapter polarity or voltage can seriously damage the product.

Baby Unit Output: 5V DC 1000mA
VTech Telecommunications Ltd.
Model: VT05EAU05100
Parent Unit Output: 5V DC 2A
VTech Telecommunications Ltd.
Model: VT07EAU05200

3.7V 5000mAh, 18.5Wh Lithium-ion battery
Zhuhai Great Power Energy Co., Ltd.
-
The power adapter is intended to be correctly oriented in a vertical or floor mount position. The prongs are not designed to hold the plug in place if it is plugged into a ceiling, under-the-table or cabinet outlet.
-
For pluggable equipment, the socket-outlet (power adapter) shall be installed near the equipment and shall be easily accessible.
- Unplug this product from the wall outlet before cleaning. Do not use liquid or aerosol cleaners. Use a damp cloth for cleaning.
- Do not cut off the power adapters to replace them with other plugs, as this causes a hazardous situation.
- Do not allow anything to rest on the power cords. Do not install this product where the cords may be walked on or crimped.
- This product should be operated only from the type of power source indicated on the marking label. If you are not sure of the type of power supply in your home, consult your dealer or local power company.
- The equipment is to be supplied from an identified USB port complying with the requirements of Limited Power Source.
- Do not overload wall outlets or use an extension cord.
- Do not place this product on an unstable table, shelf, stand or other unstable surfaces.
- This product should not be placed in any area where proper ventilation is not provided. Slots and openings in the back or bottom of this product are provided for ventilation. To protect them from overheating, these openings must not be blocked by placing the product on a soft surface such as a bed, sofa or rug. This product should never be placed near or over a radiator or heat register.
- Never push objects of any kind into this product through the slots because they may touch dangerous voltage points or create a short circuit. Never spill liquid of any kind on the product.
- To reduce the risk of electric shock, do not disassemble this product, but take it to an authorized service facility. Opening or removing parts of the product other than specified access doors may expose you to dangerous voltages or other risks. Incorrect reassembling can cause electric shock when the product is subsequently used.
- You should test the sound reception every time you turn on the units or move one of the components.
- Periodically examine all components for damage.
-
There is a very low risk of privacy loss when using certain electronic devices, such as baby monitors, cordless telephones, etc. To protect your privacy, make sure the product has never been used before purchase, reset the baby monitor periodically by powering off and then powering on the units, and power off the baby monitor if you will not use it for some time.
-
Children should be supervised to ensure that they do not play with the product.
- The small parts of this monitor can be swallowed by babies or small children. Keep these parts out of reach of children.
- The product is not intended for use by persons (including children) with reduced physical, sensory or mental capabilities, or lack of experience and knowledge, unless they have been given supervision or instruction concerning use of the appliance by a person responsible for their safety.
SAVE THESE INSTRUCTIONS
Cautions
- Use and store the product at a temperature between 32^ and 104^ .
- Burn hazard, fire hazard, explosion hazard associated with mishandling of the battery.
- Do not expose the product to extreme cold, heat or direct sunlight. Do not put the product close to a heating source.
- Warning—Strangulation Hazard—Children have STRANGLED in cords. Keep this cord out of the reach of children (more than 3 ft (0.9m) away). Do not remove this tag.
- Never place the camera unit(s) inside the baby's crib or playpen. Never cover the camera unit(s) or parent unit with anything such as a towel or a blanket.

- Other electronic products may cause interference with your camera unit. Try installing your camera unit as far away from these electronic devices as possible: wireless routers, radios, cellular telephones, intercoms, room monitors, televisions, personal computers, kitchen appliances and cordless telephones.
Precautions for users of implanted cardiac pacemakers
Cardiac pacemakers (applies only to digital cordless devices):
Wireless Technology Research, LLC (WTR), an independent research entity, led a multidisciplinary evaluation of the interference between portable wireless devices and implanted cardiac pacemakers. Supported by the U.S. Food and Drug Administration, WTR recommends to physicians that:
Pacemaker patients
- Should keep wireless devices at least six inches from the pacemaker.
- Should NOT place wireless devices directly over the pacemaker, such as in a breast pocket, when it is turned ON.
WTR's evaluation did not identify any risk to bystanders with pacemakers from other persons using wireless devices.
Electromagnetic fields (EMF)
This VTech product complies with all standards regarding electromagnetic fields (EMF). If handled properly and according to the instructions in this user's manual, the product is safe to be used based on scientific evidence available today.
Setup
What's Included?
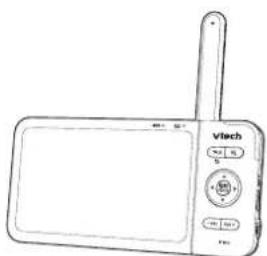
natural_image
Line drawing of a handheld electronic device labeled 'Vitech' with control buttons and a screen (no readable text or symbols beyond labels)Parent Unit
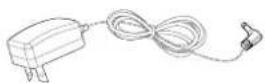
Parent Unit Adapter
Quick Start Guide
Learn to set up your units and have all detailed instructions on using your audio baby monitor.
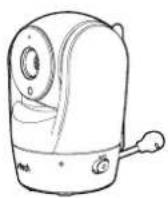
Baby Unit
natural_image
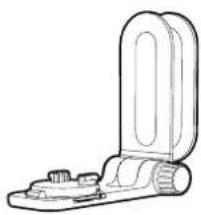
Line drawing of a mechanical clamp or bracket component (no text or symbols)Wall Mount Bracket
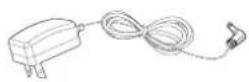
Baby Unit Adapter
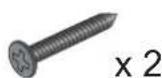
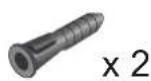
1 set for BM5750HD
2 sets for BM5750HD-2
Overview
Baby Unit
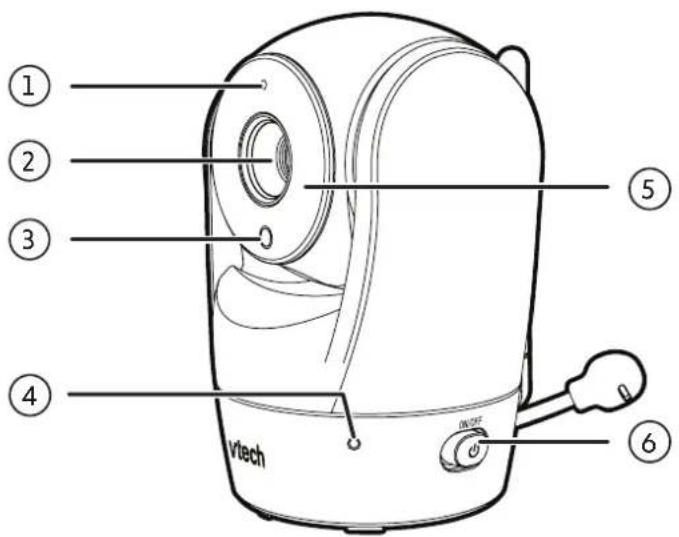
| 1 Microphone |
| 2 Camera Lens |
| 3 Light Sensor |
| 4 LED IndicatorOn when the baby unit is turned on and is paired to the parent unit.Flashes when the baby unit is not being viewed; or when the link to the parent unit is lost. |
| 5 Infrared LEDsAllow you to see clearly in a dark environment. |
| 6 ON/OFF SwitchPower it on or off. |
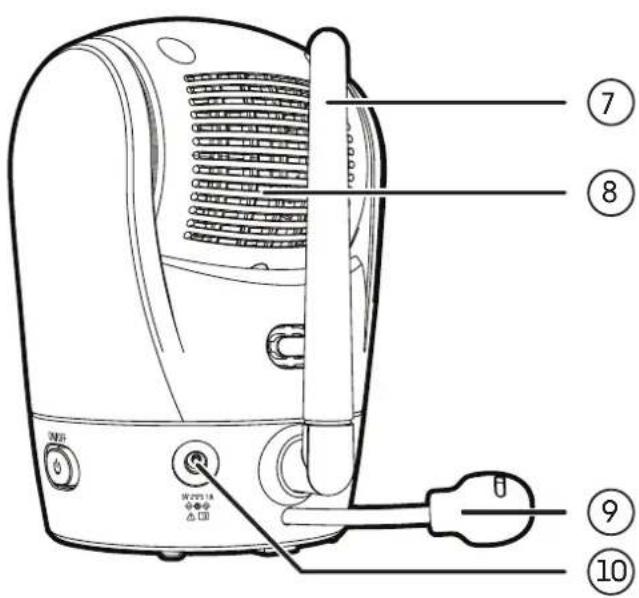
| 7 Antenna |
| 8 Speaker |
| 9 Temperature Sensor |
| 10 Power Jack |
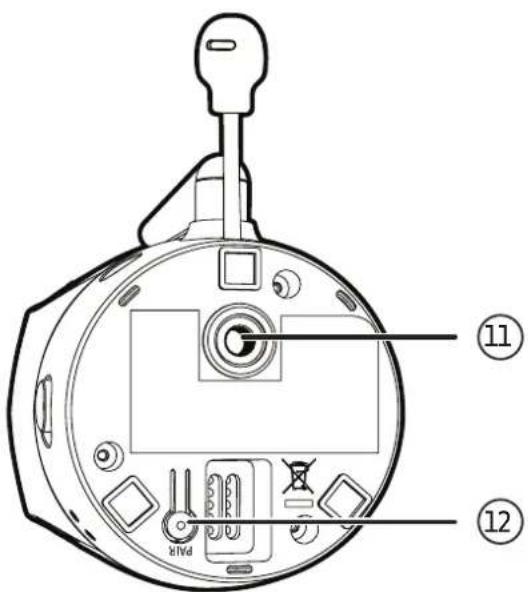
| 11 Wall Mount Slots |
| 12 PAIRThe parent unit and baby unit(s) provided are already paired. |
Parent Unit
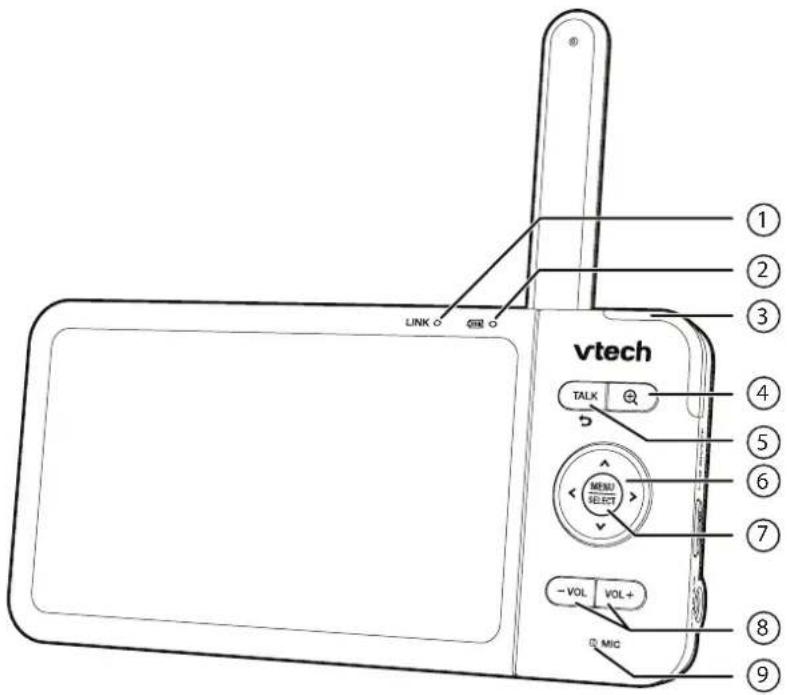
| 1 LINK LED LightOn when the parent unit is linked to the baby unit.Flashes when the link to the baby unit is lost. | ||
| 2 |  LED lightOn when the parent unit is connected to AC power, and the battery is charging.Flashes when the parent unit battery is low and needs to be charged. LED lightOn when the parent unit is connected to AC power, and the battery is charging.Flashes when the parent unit battery is low and needs to be charged. | |
| 3 3 - | Level Sound Indicator LightGreen: low sound level is detected by the baby unit.Green and amber: moderate sound level is detected by the baby unit.Green, amber and red: high sound level is detected by the baby unit. | |
| 4 Zc |  Press to zoom in/out.While in a sub-menu, press to view the help menu. Press to zoom in/out.While in a sub-menu, press to view the help menu. | |
| 5 | TALK /SPress and hold to talk to the baby unit.While in a sub-menu, press to exit. | |
| 6 |  | > | √ Arrow keysPress to navigate leftward, upward, rightward or downward, within the main menu and sub-menus.While viewing a zoomed image, press to move the image leftward, upward, rightward or downward.While in normal viewing mode, press the arrow button to pan and tilt the baby unit, or hold-on to the button to move continuously. | > | √ Arrow keysPress to navigate leftward, upward, rightward or downward, within the main menu and sub-menus.While viewing a zoomed image, press to move the image leftward, upward, rightward or downward.While in normal viewing mode, press the arrow button to pan and tilt the baby unit, or hold-on to the button to move continuously. | |
| 7 ME |  | SELECTPress to enter the main menu.While in a menu, press to choose an item, or save a setting. | SELECTPress to enter the main menu.While in a menu, press to choose an item, or save a setting. | |
| 8 |  _ - | VOL + Increase or decrease parent unit volume. _ - | VOL + Increase or decrease parent unit volume. | |
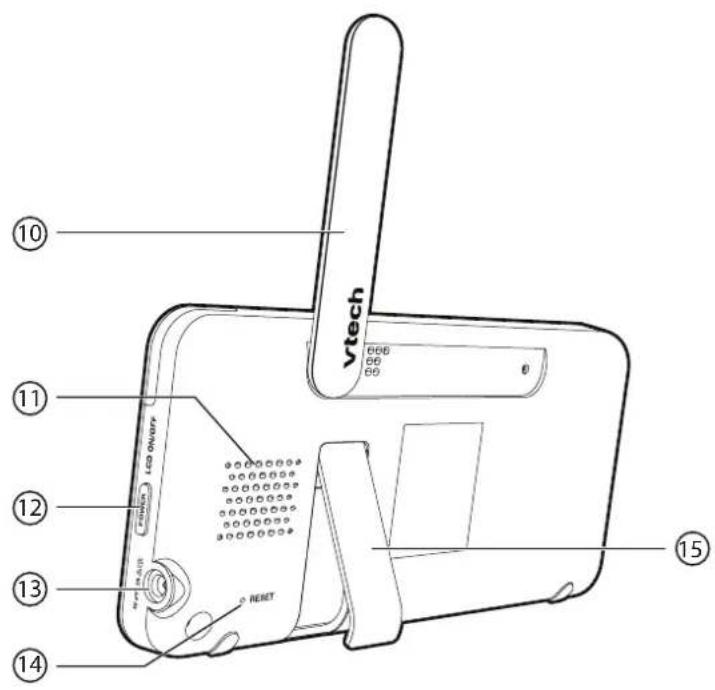
| 9 Microphone | ||
| 10 Antenna | ||
| 11 Speaker | ||
| 12 |  Power | LCD ON/OFF Power | LCD ON/OFF | |
| 13 Power Jack | ||
| 14 RESET Force reboot the parent unit. | ||
| 15 Stand | ||
| Parent Unit Icons | ||
| Main Menu | Sub-menu | Options |
| Monitoring mode (For BM5750HD-2 only) | ||
 |     | • Baby unit 1 in Single mode• Baby unit 2 in Single mode• Patrol mode• Split mode |
| Melodies and soothing sounds | ||
 | Melodies and Soothing Sounds• Select play all melodies, or play one of the five melodies and four soothing sounds. | |
Timer    • You can also set the timer to stop playing after 15, 30 or 60 minutes, or playing non-stop. • You can also set the timer to stop playing after 15, 30 or 60 minutes, or playing non-stop. | ||
| Alerts - Sound, Motion and Temperature | ||
 | Sound• Select sound Sensitivity level.• Turn on/off Sound Detection Alert.• Turn on/off Auto Wake Up function.(See Sound Detection and Auto Wake Up section) | |
| Motion• Turn on/off Motion Alert.• Select motion Sensitivity level.(See Motion Detection section) | ||
 | Temperature• Turn on/off Temperature Alert.Set the parent unit to beep whenever the room temperature detected by the baby unit falls outside of the set temperature range.• Select Minimum temperature for alert range.• Select Maximum temperature for alert range.• Select temperature Format.Set temperature display in Fahrenheit (°F) or Celsius (°C). | |
| Parent unit settings | ||
 | • Adjust parent unit screen Brightness.• Turn on/off Dim Mode. | |
| Baby unit settings | ||
 | • Turn on/off baby unit's Status LED.• Select Field of View.Choose Wide angle ▲ Standard . ▲• Adjust baby unit's speaker Volume. | |
| General settings | ||
 | • Turn on/off Low Battery Alert Tone.Set the parent unit to beep when the battery is low.• Turn on/off No Link Alert Tone.Set the parent unit to beep when the link between the parent unit and the baby unit is lost. | |
| Status icons | ||
 or or | Current view statusThe baby unit number that is being viewed when in: Single CAM mode.Patrol mode (* For BM5750HD-2 only).Split mode (* For BM5750HD-2 only). | |
 | Split mode(* For BM5750HD-2 only) | |
 | Patrol mode(* For BM5750HD-2 only) | |
 | Night vision feature is activated automatically. | |
 | Motion alert is turned on. | |
 | Sound detection alert is turned on. | |
 | Melodies or soothing sound are turned on. | |
 | Parent unit speaker is muted. | |
| [IMAGE] | Temperature alert is turned on. | |
| Alert icons | ||
 | • Displays when parent unit's battery is low and needs charging. | |
 | • Displays when motion is detected at a baby unit. | |
 | • Displays when sound is detected at a baby unit. | |
 | • Baby unit detects temperature exceeds the set maximum. | |
 | • Baby unit detects temperature is lower than the set minimum. | |
Connect the Baby Monitor
Connect the parent unit and baby unit to a power supply with the included power adapters.
Notes:
• The rechargeable battery in the parent unit is built-in.
- Use only the power adapters supplied with this product.
- Make sure the parent unit and the baby unit are not connected to the switch controlled electric outlets.
- Connect the power adapters in a vertical or floor mount position only. The adapters' prongs are not designed to hold the weight of the parent unit and the baby unit, so do not connect them to any ceiling, under-the-table, or cabinet outlets. Otherwise, the adapters may not properly connect to the outlets.
- Make sure the parent unit, the Baby Unit and the power adapter cords are out of reach of children.
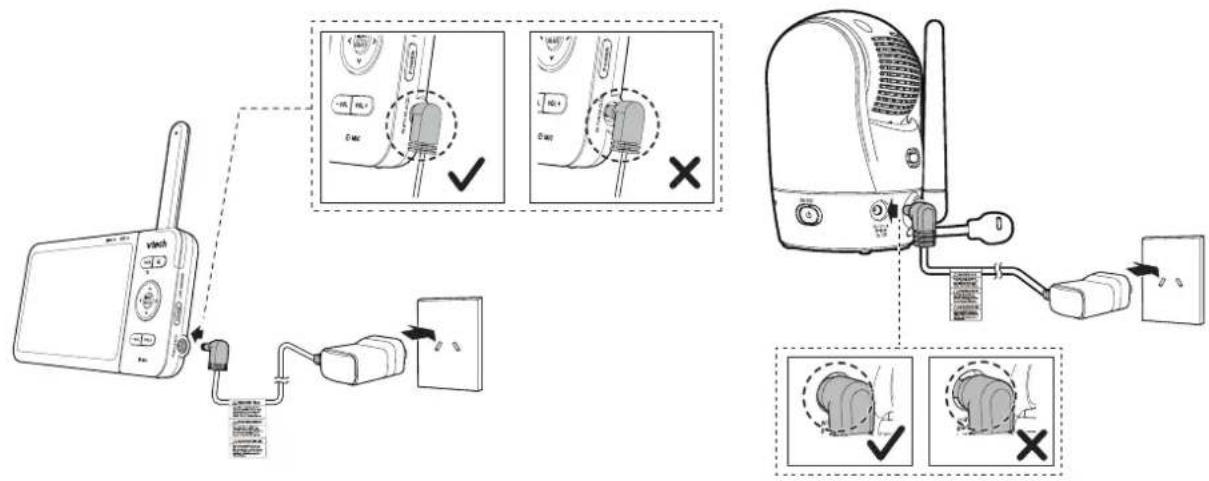
Charge the parent unit battery before use
When you have connected and turned on the parent unit, the battery will be charged automatically.

Notes
- Before using the baby monitor for the first time, charge the parent unit battery for 12 hours.
When the parent unit battery is fully charged, the battery icon becomes solid 📄 - It takes longer to charge the battery when the parent unit is turned on. To shorten the charging time, turn the parent unit off while charging.
- The standby time varies depending on the sensitivity level you set, your actual use and the age of the battery.
The battery icon indicates the battery status (see the following table).
| Battery indicators Battery status Action | ||
| The screen displays □. The light flashes. | The battery has very little charge and may be used for only a short time. | Charge without interruption (about 30 minutes). |
| The battery icon becomes solid [IMAGE] | The battery is fully charged. | To keep the battery charged, connect it to AC power when not in use. |
Positioning the Baby Monitor
Caution: Keep the baby unit out of the reach of your baby. Never place or mount the baby unit inside the baby's crib or playpen.
Place the baby unit more than 3 feet (1m) away from your baby.
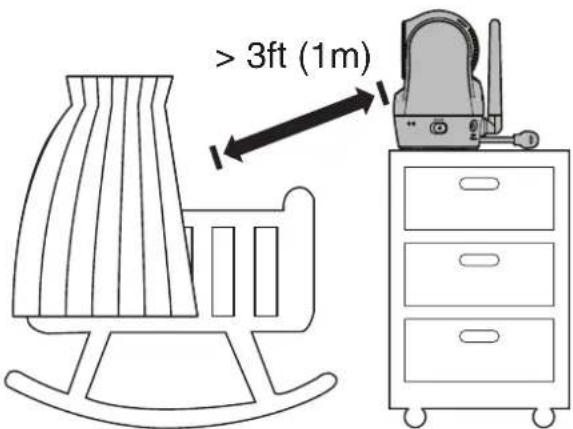
Cautions:
- The default volume of your parent unit is level 4, and the maximum volume is level 7. To avoid causing high-pitched screeching noise from your baby monitor:

- Make sure your baby unit and parent unit are more than 3 feet (1m) apart;
- Turn down the volume of your parent unit.
- To avoid interference from other electronic devices, place your baby monitor at least 3 feet (1m) away from devices such as wireless routers, microwaves, cell phones and computers.
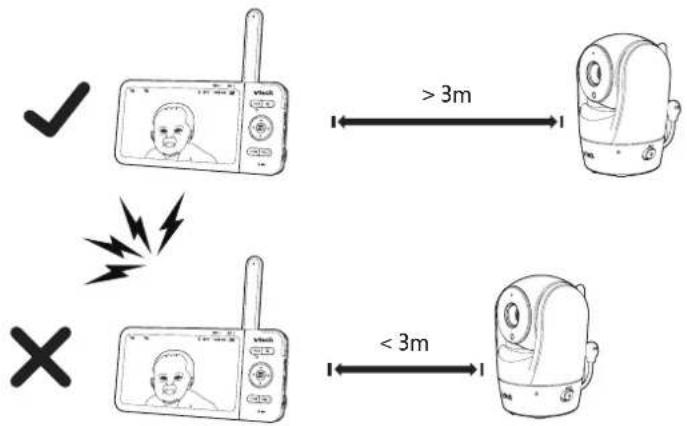
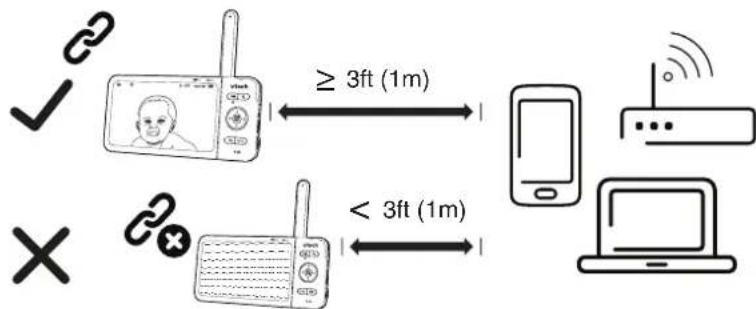
flowchart
graph TD
    A["Phone with ID"] -->|≥ 3ft (1m)| B["Smartphone"]
    C["Router"] -->|≤ 3ft (1m)| D["Laptop"]
    style A fill:#f9f,stroke:#333
    style C fill:#f9f,stroke:#333
    style B fill:#ccf,stroke:#333
    style D fill:#ccf,stroke:#333
Basic Operation
Power on/off
- Slide the power switch to ON to turn on your baby unit. Slide to the opposite direction to turn off.
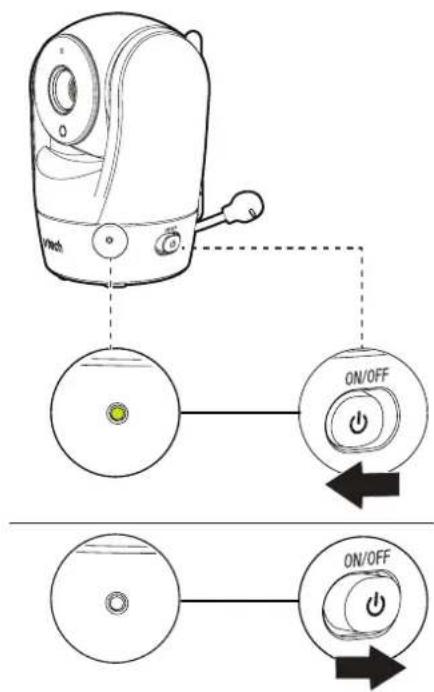
Notes:
- When powering up, the baby unit's status LED turns on. It will turn off after a while and keeps off.
- The status LED is set to off by default. If you want to keep the LED on, press MENU/SELECT, then go to a Status LED and turn it on.
-
Camera lens and surface may get warm during normal operation.
-
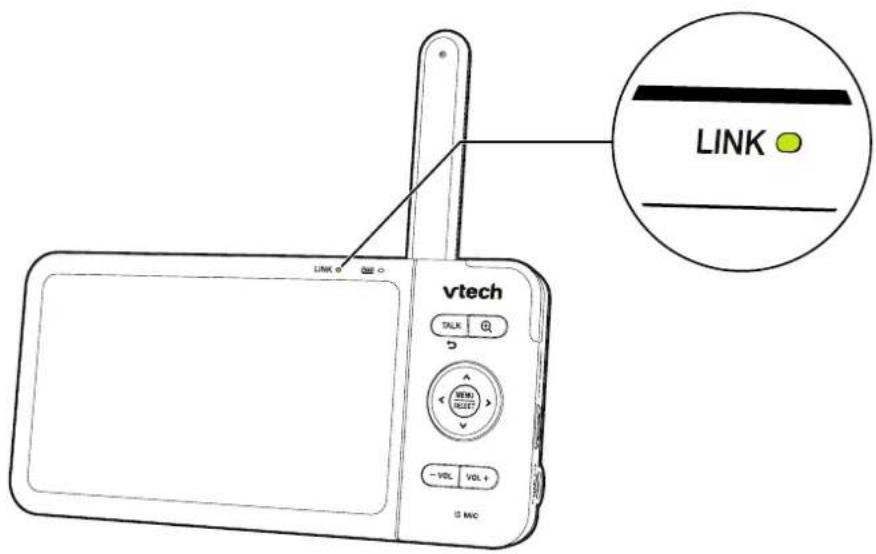
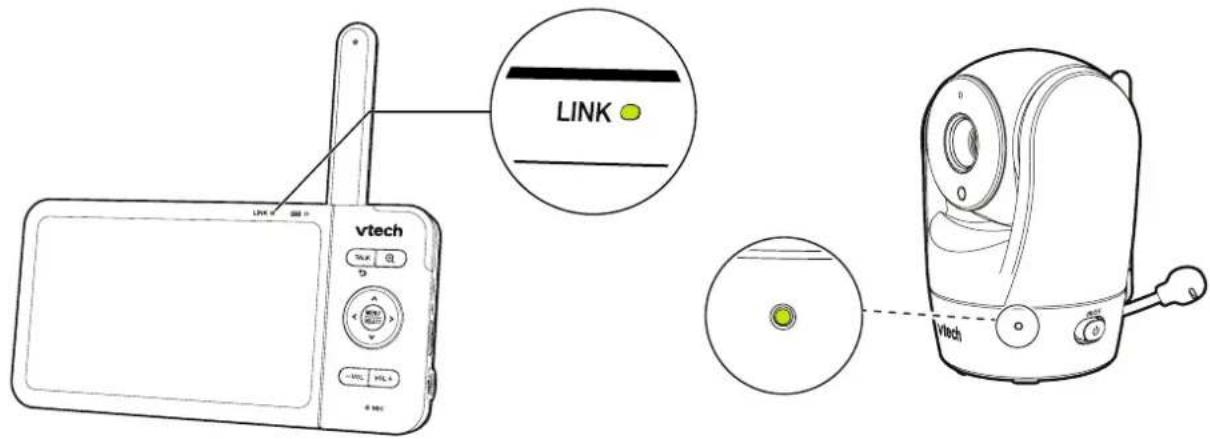
Press and hold ⏻ Power to turn on the parent unit, the welcoming screen appears and the LINK LED flashes.
-
Once your baby unit and parent unit are powered on, the parent unit and baby unit will pair each other automatically. When they are connected successfully, the LINK LED lights steadily. And your parent unit displays image from the baby unit.
-
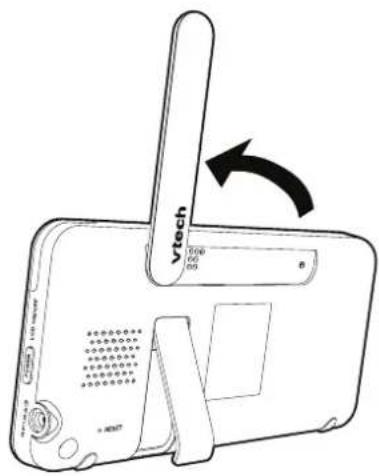
Raise the parent unit antenna for better reception.
Status Check
Once your baby unit and parent unit are powered on, the parent unit and baby unit will pair each other automatically. When they are connected successfully, the LINK LED lights steadily. And your parent unit streams live video from the baby unit.
The power LED light of baby unit turns on.
Use the Menu
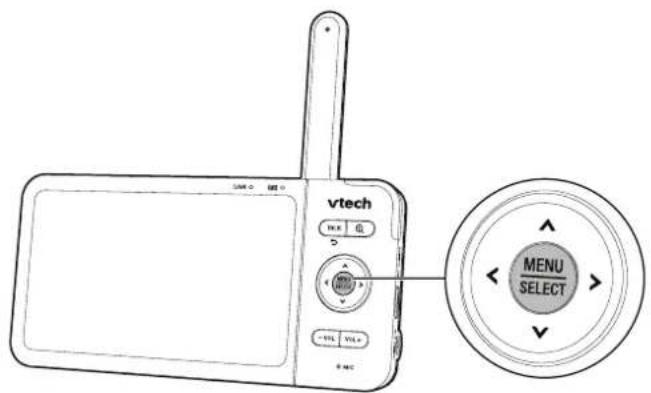
Press MENU to enter the menu, choose a menu item, or save a setting. You can use the parent unit for advanced settings or operations, such as to play or stop the baby unit lullaby, or to adjust the baby unit sound sensitivity.
While in the menu:
- Press ∧, √ok to scroll among the menu options.
- Press SELECT to select an item, or to save a setting.
- Press TALK to return to the live video.
- Press to go to the Help & info page.
Adjust Speaker Volume
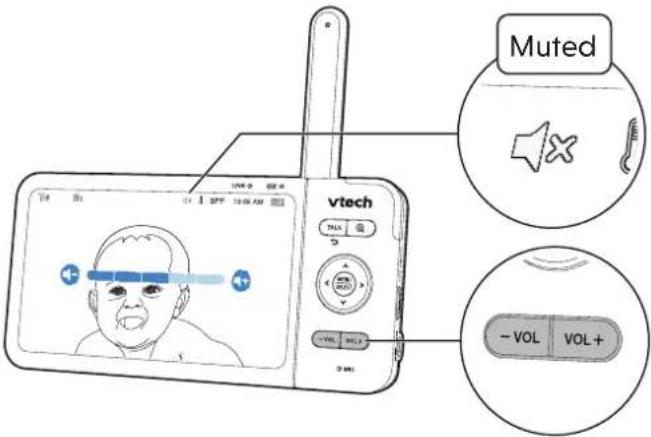
Press - VOL/ VOL + to adjust your parent unit speaker volume. It determines the volume of sound transmitted from your baby unit.
Talk to Your Baby via the Baby Unit
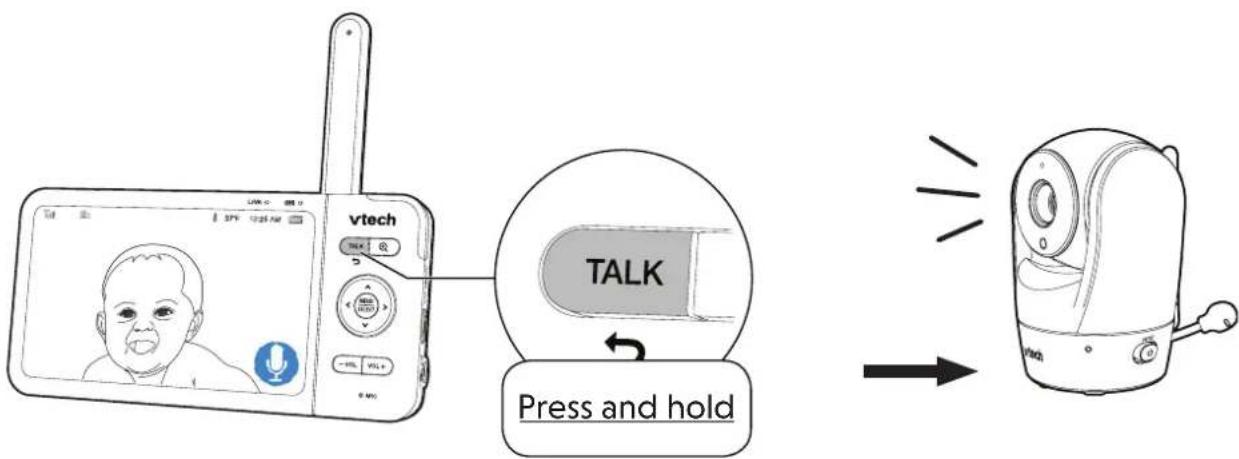
- Press and hold the TALK key.
- When the icon displays on screen, speak to your parent unit. Your voice is transmitted to the baby unit.
- When finish talking, release the TALK key and hear your baby again.
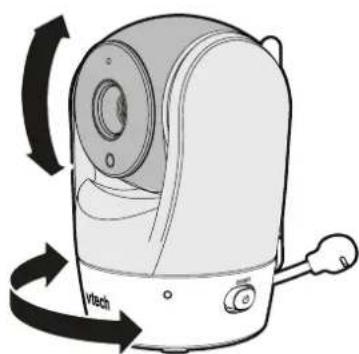
Zoom, pan and tilt the camera
How to pan and tilt the camera:
- Press < on the parent unit to move the camera leftward; or press and hold < to move the camera leftward continuously.
- Press >on the parent unit to move the camera rightward; or press and hold to move the camera rightward continuously.
- Press an the parent unit to move the camera upward; or press and hold to move the camera upward continuously.
- Press on the parent unit to move the camera downward; or press and hold to move the camera downward continuously.
OR
- Adjust the angle of the baby unit manually to aim at your baby.
natural_image
Diagram of a vintage remote control device with rotating buttons and a labeled 'vitech' button (no text or symbols beyond label)How to zoom the camera Image:
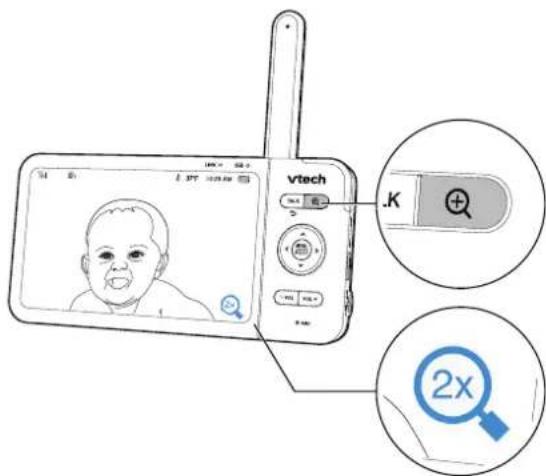
- Press on the parent unit to zoom in or out.
- Press and hold A to move the zoomed iamge upward or downward.
- Press and hold or to move the zoomed iamge leftward or rightward.
Turn on/off the Parent Unit Screen
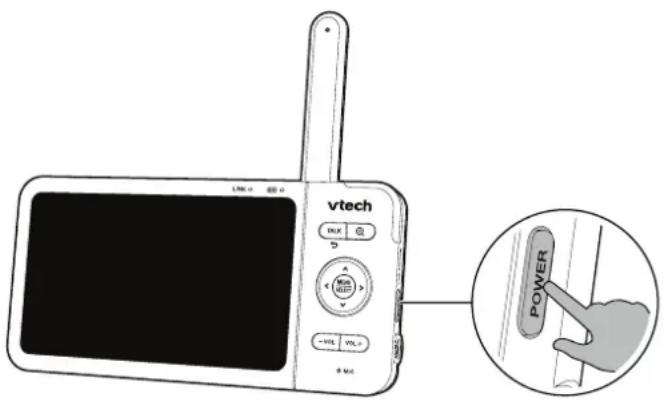
You can turn on or off the parent unit screen without powering off the parent unit. You can still hear sound from the baby unit.
- Press POWER on the parent unit to turn off the screen.
- Press any keys on the parent unit to turn on the screen again.
Sound Sensitivity and Sound Activation
Sound Detection
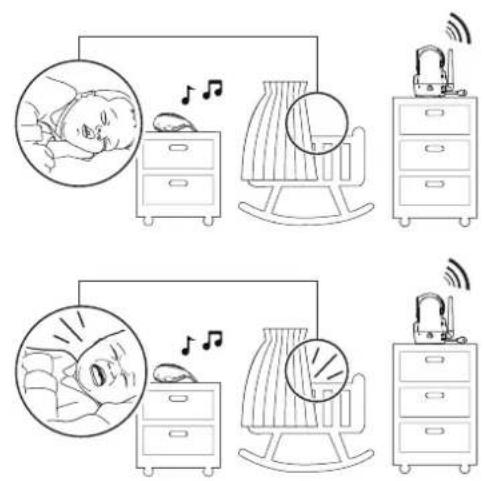
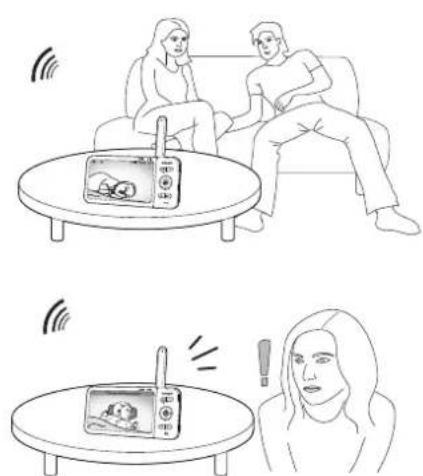
You can turn on Sound Detection Alert and adjust the Sound Sensitivity to detect sounds and turn on the parent unit while its screen is switched off or dimmed.
When the baby unit detects sounds that exceed certain levels, the parent unit screen will turn on and the baby unit starts transmitting the sounds to the parent unit, and you can see and hear your baby.
If you have turned on Sound Detection Alert, the parent unit beeps when the baby unit detect sounds.
| Sound Sensitivity level | Level 3(Highest) | Level 2(Medium) | Level 1(Lowest) |
| Description | The parent unit screen and speaker turn on for very small sounds, including background noises from your baby's room. | The parent unit screen and speaker turns on for loud babbling and louder sounds from your baby.The parent unit remains quiet when your baby makes soft sounds. | The parent unit screen and speaker turn on for loud crying or screeching sounds from your baby. The parent unit remains quiet when your baby makes soft sounds. |
Sound activated screen and audio - Auto Wake Up
When Auto Wake Up is turned on, the parent unit screen stays off to save power when the baby unit detects no sound.
Once the baby unit detects sounds that are louder than the chosen sound sensitivity level, the parent unit screen and speaker turn on automatically. The parent unit will then turn off again after 50 seconds of no sound detection.

Notes
- If you have muted the parent unit speaker, only the parent unit screen will turn on when a sound is detected.
- If you have turned on Auto Wake Up but turned off Sound Detection Alert, the parent unit will wake up when the baby unit detects sounds that are louder than the chosen sound sensitivity level.
natural_image
Illustration of two scenes: top shows a couple watching a radio on a coffee table, bottom shows a person reacting with a megaphone (no text or symbols)Dim Mode
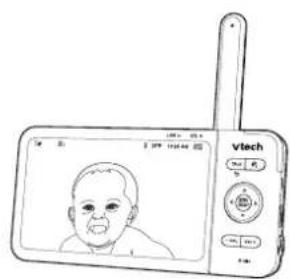
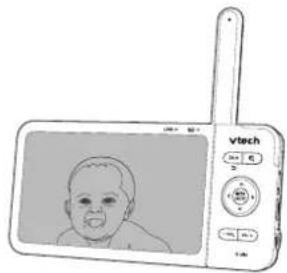
The parent unit display will dim to conserve energy after 5 minutes of inactivity, in which there is neither key pressed nor alert received from the baby unit.

5 minute inactivity

Press any buttons
natural_image
Line drawing of a Vtech smartphone displaying a baby's face with a antenna (no text or symbols on the device body)Night Vision
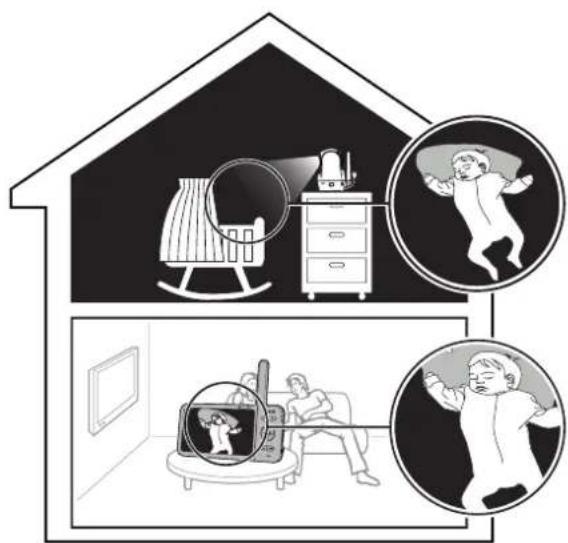
The baby unit has infrared LEDs that allow you to see your baby clearly at night or in a dark room. When the baby unit being viewed detects low light levels, the infrared LEDs are switched on automatically. The images from the baby unit are in black and white, and appears on the screen.
natural_image
Illustration of a bedroom scene with furniture, sleeping figures, and a person relaxing (no text or symbols)
Notes
- It is normal if you see a short white glare on your parent unit screen as the baby unit is adapting to the dark environment.
- When the infrared LEDs are on, the images are in black and white. This is normal.
Tip
- Depending on the surroundings and other interfering factors, like lightings, objects, colors and backgrounds, the video quality may vary. Adjust the baby unit's angle or place the baby unit at a higher level to prevent glare and blurry display.
For BM5750HD-2 only
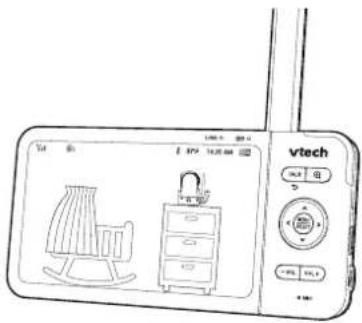
Change different views - Single CAM

- Select baby unit 1 on baby unit 2 to view the image from the baby unit.
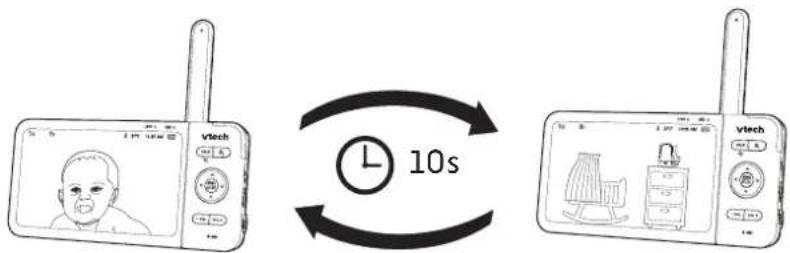
Change different views - Patrol

- Select Patrol mode as your monitoring mode to alternately view the image from baby units and every 10 seconds.
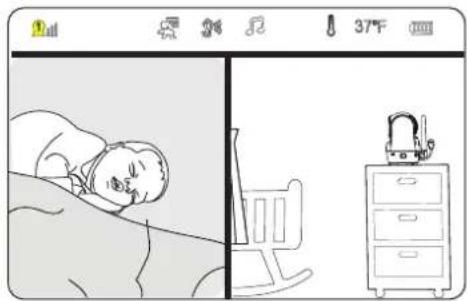
Change different views - Split

Select Split mode as your monitoring mode to view the images from both baby units at once.
Note
- While in Split mode, you can press < or > to highlight the view of the baby unit 1 or baby unit 2 and hear the sounds transmitted from the baby unit.
natural_image
Illustration of a sleeping person in bed next to a refrigerator with a lamp (no text or symbols)Additional Information
Wall Mount (Optional)
Notes:
- Check for reception strength and camera angle of the baby unit before drilling the holes.
-
The types of screws and plugs you need depend on the composition of the wall. You may need to purchase the screws and plugs separately to mount your baby units.
-
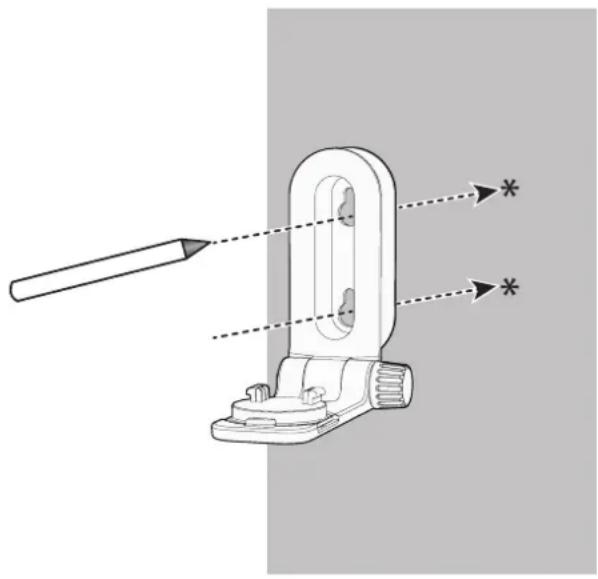
Place the wall mount bracket on a wall and then use a pencil to mark two holes in parallel. Remove the wall mount bracket and drill two holes in the wall (7/32 inch drill bit).
natural_image
Technical diagram of a mechanical clamp or bracket with a pencil and dimension lines, no text or symbols present- If you drill the holes into a stud, go to step 3.
If you drill the holes into an object other than a stud, insert the wall plugs into the holes. Tap gently on the ends with a hammer until the wall plugs are flush with the wall.

natural_image
Simple diagram of two identical pipes with three ends, no text or symbols present- Align the wall mount bracket and screws with the holes in the wall as shown. Tighten the screw in the middle hole first, so that the wall mount bracket position is fixed. You can tighten the other screw in the top hole.
OR
Insert the screws into the holes and tighten the screws until only 1/4 inch of the screws are exposed.
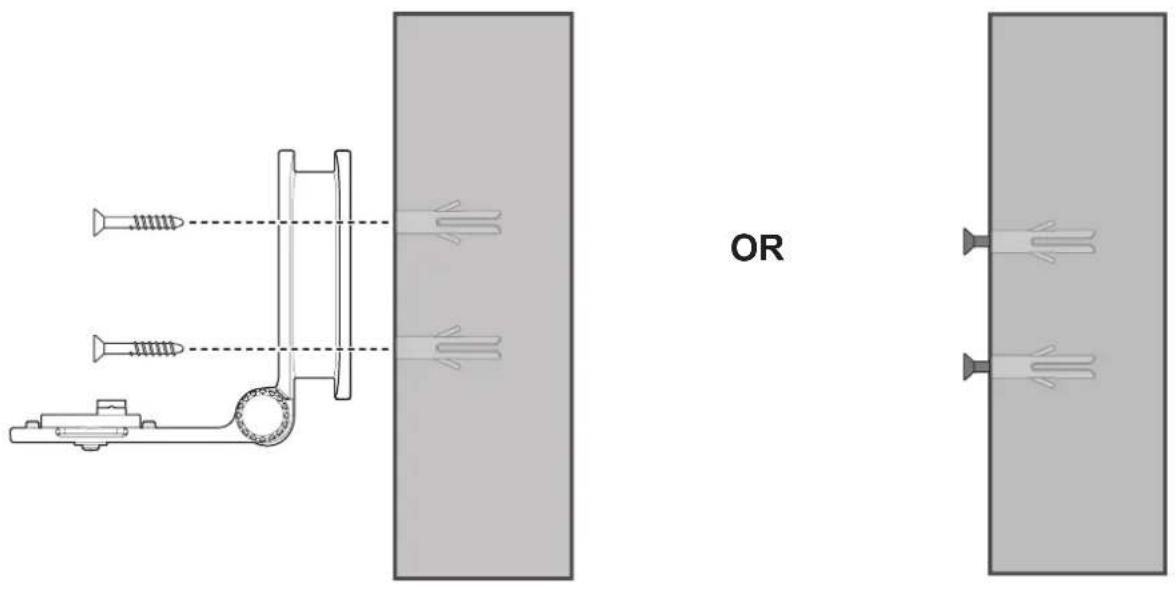
natural_image
Technical diagram showing two mechanical components connected to a vertical panel, with no visible text or symbols.- Place the baby unit on the wall mount bracket, and then slide it forward until it locks into place. Connect the power adapter to the baby unit and a power supply not controlled by a wall switch.
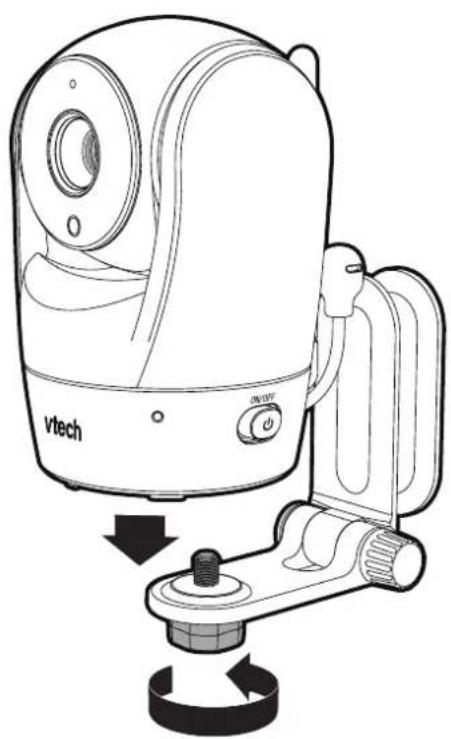
Place the baby unit on the wall mount bracket, and then slide it forward until it locks into place. Align the holes on the wall mount bracket with the screws on the wall, and slide the wall mount bracket down until it locks into place.
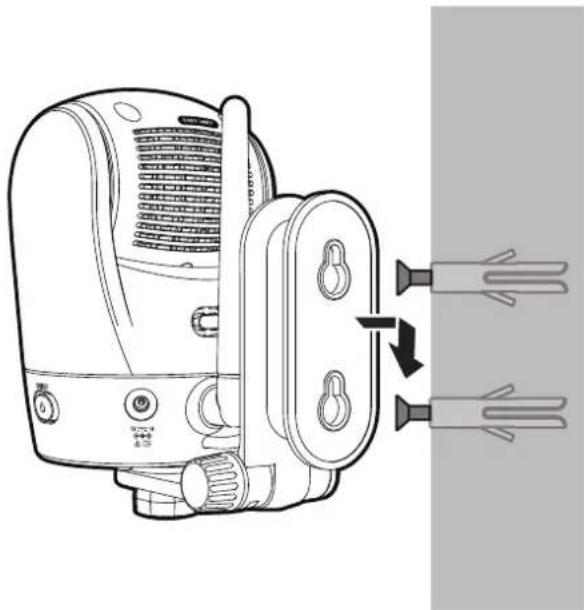
natural_image
Technical line drawing of a vacuum cleaner with attached wires, showing internal components and mounting points (no text or symbols)- You can maximize your baby unit's viewing angles by tilting the wall mount bracket. Hold the baby unit, and then rotate the knob in anticlockwise direction. This will loosen the joint of the wall mount bracket.
Tilt your baby unit up or down to adjust to your preferred angle. Then, rotate the knob in clockwise direction to tighten the joint and secure the angle.
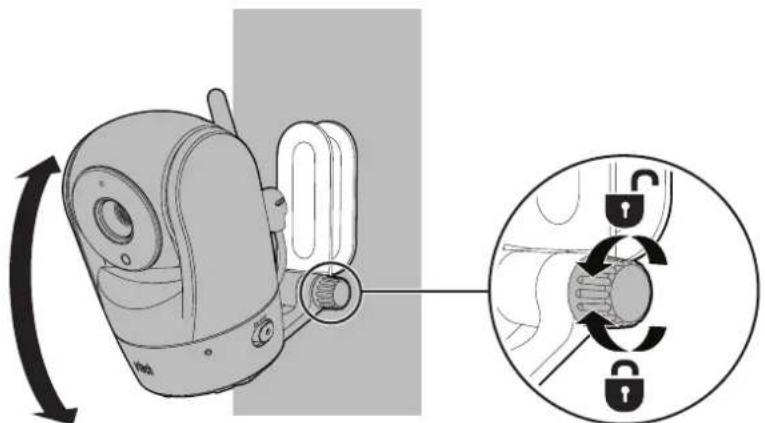
natural_image
Diagram of a washing machine with a close-up inset showing the mechanism of rotation and lock switch (no text or symbols present)General product care
To keep this product working well and looking good, follow these guidelines:
- Avoid putting it near heating appliances and devices that generate electrical noise (for example, motors or fluorescent lamps).
- DO NOT expose it to direct sunlight or moisture.
- Avoid dropping the product or treating it roughly.
- Clean with a soft cloth.
- DO NOT immerse the parent unit and the baby unit in water and do not clean them under the tap.
- DO NOT use cleaning spray or liquid cleaners.
- Make sure the parent unit and the baby unit are dry before you connect them to the mains again.
Storage
When you are not going to use the HD video monitor for some time, store the parent unit, the baby unit and the adapters in a cool and dry place.
Technical Specifications
| Frequency 2405 - 2475 MHz | |
| Channels 32 | |
| LCD 7” Colour LCD | (IPS 1280 x 720 pixels) |
| Nominal effective range | Actual operating range may vary according to environmental conditions at the time of use. |
| Power requirements Parent | unit: 3.7V 5000mAh, 18.5Wh Lithium-ion batteryBaby unit power adapter: Output: 5V DC @ 1AParent unit power adapter: Output: 5V @ 2A |
Customer service and product warranty
IMPORTANT
Please retain this booklet with your sales receipt as proof of the date of purchase.
Customer Service
If you require assistance in operating this product, please call the TecHelp Information Line on 1300 369 193 or contact VTech by e-mail at: tcpsupport_au@vtech.com.
Voluntary Product Enquiry
In addition to your Statutory Rights and subject to the conditions below, VTech warrants that this product will be free from any defect in materials or workmanship under conditions of normal use for a period of 24 months from date of purchase.
VTech does not warrant that the product will be free from defects if defects are caused by an accident, misuse, abuse, improper installation or operation, vermin infestations, lack of reasonable care, unauthorised modification, loss of parts, tampering or attempted repair by a person not authorised by VTech; or where the product has been damaged by lightning or a mains power surge. To make a claim under this Voluntary Product Warranty you must call the TecHelp Information Line on 1300 369 193 or contact VTech by e-mail at: tcpsupport_au@vtech.com where a Customer Service Representative will inform you of the product return process. You will need to ensure that:
- You provide proof of purchase;
- Your product is suitably packaged (original packaging is not required); and
- You have included all components from the original purchase.
For your records
Date of purchase:
Place of purchase:
Serial number:
For Voluntary Product Warranty purposes, proof of purchase is required so please keep your receipt.
The benefits conferred by this Voluntary Product Warranty are in addition to other rights and remedies that are available to you under law, which cannot be excluded. The processes for this Voluntary Product Warranty in no way limit your rights which arise as a result of your Statutory Rights.
This Voluntary Product Warranty is given by:
VTech Telecommunications (Australia) Pty Ltd ABN 70 136 672 627
Address: 24 Gilby Road, Mount Waverley 3149
IMPORTANT NOTE: THIS IS NOT A PRODUCT RETURN OR SERVICE ADDRESS – PLEASE CONTACT TECHELP BY PHONE OR EMAIL FOR PRODUCT AND WARRANTY SUPPORT. NO LIABILITY WILL BE ACCEPTED BY VTECH FOR PRODUCTS RETURNED TO THIS ADDRESS UNDER THIS VOLUNTARY PRODUCT WARRANTY.
Phone number: 1300 369 193
Email address: tcpsupport_au@vtech.com
Statutory Rights
Our goods come with guarantees that cannot be excluded under the Australian Consumer Law. You are entitled to a replacement or refund for a major failure and compensation for any other reasonably foreseeable loss or damage. You are also entitled to have the goods repaired or replaced if the goods fail to be of acceptable quality and the failure does not amount to a major failure.
Disposal of batteries and product

The crossed-out wheelie bin symbols on products and batteries, or on their respective packaging, indicates they must not be disposed of in domestic waste as they contain substances that can be damaging to the environment and human health.
The chemical symbols Hg, Cd or Pb, where marked, indicate that the battery contains more than the specified value of mercury (Hg), cadmium (Cd) or lead (Pn) set out in Battery Directive (2006/66/EC).

The solid bar indicates that the product was placed on the market after 13th August, 2005.
Help protect the environment by disposing of your product or batteries responsibly.
- Full Colour Pan & Tilt Video Monitor
- User Guide
- Contents
- Important Safety Instructions....3
- Setup....5
- Basic Operation....17
- Advanced Operation 22
- Additional Information 26
- Important Safety Instructions
- SAVE THESE INSTRUCTIONS
- Cautions
- Precautions for users of implanted cardiac pacemakers
- Pacemaker patients
- Electromagnetic fields (EMF)
- Setup
- What's Included?
- Overview
- Baby Unit
- Parent Unit
- Connect the Baby Monitor
- Notes:
- Charge the parent unit battery before use
- Notes
- Positioning the Baby Monitor
- Cautions:
- Basic Operation
- Power on/off
- Status Check
- Use the Menu
- Adjust Speaker Volume
- Talk to Your Baby via the Baby Unit
- Zoom, pan and tilt the camera
- How to pan and tilt the camera:
- How to zoom the camera Image:
- Turn on/off the Parent Unit Screen
- Sound Sensitivity and Sound Activation
- Sound Detection
- Sound activated screen and audio - Auto Wake Up
- Dim Mode
- Night Vision
- Tip
- For BM5750HD-2 only
- Change different views - Single CAM
- Change different views - Patrol
- Change different views - Split
- Note
- Additional Information
- Wall Mount (Optional)
- OR
- General product care
- Storage
- Customer service and product warranty
- IMPORTANT
- Customer Service
- Voluntary Product Enquiry
- For your records
- Statutory Rights
- Disposal of batteries and product
Brand : VTECH
Model : BM5750HD
Category : Baby monitor