
VM333-2 - Baby monitor VTECH - Free user manual and instructions
Find the device manual for free VM333-2 VTECH in PDF.


| Product Type | Baby Monitor |
| Brand | VTech |
| Model | VM333-2 |
| Parent Unit Dimensions | Approx. 4.9 x 2.8 x 1.2 inches (125 x 70 x 30 mm) |
| Baby Unit Dimensions | Approx. 3.5 x 2.4 x 1.6 inches (90 x 60 x 40 mm) |
| Parent Unit Weight | Approx. 3.5 oz (100 g) |
| Baby Unit Weight | Approx. 4.2 oz (120 g) |
| Power Source | Parent Unit: Rechargeable battery (included), AC adapter; Baby Unit: AC adapter only |
| Battery Type (Parent Unit) | Lithium-ion rechargeable, 3.7V, 700mAh |
| Maximum Range | Up to 1,000 feet (300 m) outdoors |
| Audio Features | Two-way talk, sound-activated LED indicators, volume control |
| Additional Features | Night light, lullabies, temperature sensor, low battery alert, out-of-range alert |
| Cleaning and Maintenance | Wipe with a soft, dry cloth. Do not immerse in water or use harsh chemicals. |
| Safety | Lead-free materials, compliance with FCC safety standards for radio frequency exposure |
| Spare Parts Availability | Replacement batteries, AC adapters, and belt clips available from VTech customer service |
| Warranty | 1-year limited warranty from date of purchase |
Frequently Asked Questions - VM333-2 VTECH
User questions about VM333-2 VTECH
0 question about this device. Answer the ones you know or ask your own.
Ask a new question about this device
Download the instructions for your Baby monitor in PDF format for free! Find your manual VM333-2 - VTECH and take your electronic device back in hand. On this page are published all the documents necessary for the use of your device. VM333-2 by VTECH.
USER MANUAL VM333-2 VTECH
on purchasing your new VTech product. Before
using this product, please read Important
safety instructions below.
For support, shopping, and
www.vtechbones.com
,
Register online to g
5-month warranty:
Visit www.vtechphones.com.
Registration
Register your product online for
enhanced warranty support.
Product news
Learn about the
products.
Install the battery
You can power up the parent unit by connecting it to AC power or to the rechargeable battery provided. Even if the parent unit is connected to AC power, we recommend you also install the battery. This guarantees continual operation in case of a power outage.
Install the battery as shown below. 1. With the label THIS SIDE UP facing up, insert the small tabs of the battery into the slots inside the battery compartment. Make sure the metallic contact is correctly oriented as shown below. Push the battery into the battery compartment until it clicks securely into place.


Replace the battery To replace the battery, press down on the large tab of the battery and pull it out of the battery compartment, then follow the steps above to install the battery.


The operating time for using the
to monitor your baby for a long time, we
recommend you connect the parent unit to AC power.
If the parent unit will not be used for a long
time, disconnect and remove the battery to prevent possible leakage.
Use only the battery supplied with this
product.

ect and charge the
cy
,
Use only the parent unit power adapter of the baby unit power adapter supplied with
this product.
The parent unit power adapter and baby unit power adapter are intended to be
correctly oriented in a vertical or floor mou position. The presence are not designed to
hold the plug in place if it is plugged into a
canning, under-the-table of cabinet outlet.
and the power adapter cord are out of rear
Connect the baby unit

Connect the parent unit

Charge the parent unit battery Once you have installed the parent unit and its battery, press and hold do turn it on. The battery icon indicates the battery status (see the table below). The parent unit battery is fully charged after 12 hours of continuous charging. The standby time varies depending on the sensitivity level you set, your actual use and the age of the battery.
When the parent unit is operating in battery mode and the battery is low, you need to charge the parent unit without interruption for at least 30 minutes to give the parent unit enough charge to use for a short time. When operating in low battery condition, the parent unit displays Battery low and ☐the parent unit plays short beeps to alert you.
The following table summarizes the battery
charge indicators and actions to take.
| Battery indicators | Battery status | Action |
| The battery icon is off and displays. | No battery is installed but operates using AC power, or the battery has been installed incorrectly. | Install the parent unit battery. Charge without interruption (at least 30 minutes). |
| The screen displaysBattery low and □the■ light flashes. | The battery has very little charge and may be used for only a short time. | Charge without interruption (about 30 minutes). |
| The battery icon becomes solid ■ | The battery is fully charged. | To keep the battery charged, connect it to AC power when not in use. |

When you charge the battery initially or it is
for 12 hours continuously. It takes longer to
charge the battery when the parent unit is turned on. To shorten the charging time, tu
the parent unit off while charging.

TO U20

- see

test the baby monitor before initial use,

gular times thereafter. Our baby monitor:

the parent unit and the baby unit in the

room to test the product.

and hold den the parent unit the

displays Please Wait....

ON/OFF on the baby unit to turn it on.

arent unit displays an image from the

hit. Your baby monitor is now ready

Make sure the behavior in at least 0 feet.
away from the parent unit.
If both units are not connected, the parent unit displays his link for a few seconds.
Then it displays Please Wait... and
flashes.
[Non-Text]
Positioning the baby monitor
Place the parent unit within the operating range of the baby unit. We recommend the parent unit is at least 3 feet away from the baby unit to avoid audio feedback. If you still experience audio feedback, move the parent unit and the baby unit farther apart.
Note For better image quality, do not place the baby unit too far away from your baby.
-
Operating range
The operating range of the baby monitor is up
to 1,000 feet outdoors or 150 feet indoors. The actual operation means may vary depending on the
actual operating range may vary depending on the environmental conditions and other interferences.
such as walls, doors and other obstructions.
(No text)
Overview
1. 2017年1月1日
Baby unit overview
Rotatable camera head
Antenna
V
[NO TEXT]
Camera
Temperature sensor
(1) 1/2 (2) 1/3 (3) 1/4 (4) 1/5 (5)
Light
ONIOFF
Speaker + (Volume up)
- (Volume down)

Parent unit overview
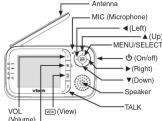
@Zoom)/BACK
Parent unit lights

Parent unit display icons

| 'or ' or ' | Current view status: Displays the number of the baby unit that is being viewed when in Single baby unit. Displays the highlighted baby unit when in Patrol Mode. |
| Zoom: Displays when the camera at the baby unit has zoomed in. | |
| Temperature alert: Displays when the temperature alert is set to on. | |
| 57°F | Real-time temperature: Displays real-time temperature of the selected baby unit. |
| Sound level indicators: Displays the sound level according to the temperature, where there is sound transmitted from the baby unit. | |
| Speaker volume: Displays the speaker volume of the parent until turned off. | |
| Speaker volume: Displays the speaker volume level while adjusting. | |
| Battery status: □-□-□-□-□-□-□-□-□-□-□-□-□-□-□-□-□-□-□-□-□-□-□-□-□-□-□-□-□-□-□-□-□-□-□-□-□-□-□-□-□-□-□-□-□-□-□-□-□-□-□- |
Parent unit main menu icons
| Monitoring mode |
| You can choose to monitor in single (baby unit) baby unit on Patrol. Many of the area are more than one baby units in your system. |
| Language |
| Can select a language (English, French or Spanish) to be used in all screen displays. |
| Display |
| - You can change the brightness of the parent unit screen.- You can change the contrast of the parent unit screen. |
| Alert tone |
| - You can set whether the parent unit beeps whenever the parent unit appears before the sound. - You can set whether the parent unit beeps whenever the link between the parent unit is lost. - You may turn on the sound alert so that the parent unit beeps as soon as both beeps detectable sounds which light up four sound level indicators on the parent unit when present the volume is turned off manually. |
| Temperature |
| - You can set the desired minimum room temperature of the baby unit. - You can set the desired maximum room temperature of the baby unit. - You can set whether the parent unit beeps whenever the temperature is on of the preset temperature range. - You can set the temperature scale of the baby unit. |
| Sensitivity |
| - You can use the parent unit to change sound sensitivity level of the baby units. |
| Sound activation- You can set the screen to be turned on automatically whenever there are sounds delayed from the baby units when the parent unit screen is turned off manually. | |
| Vibration- You may turn on the vibration alert so that the parent unit vibrates as soon as the baby unit sound which light up three sound level indicators on the parent unit. | |
| Pear/unpair- The baby units and parent unit provided are already paired. You can add or replace baby units (V830, purchased separately) to your baby monitor system. | |
| Parent unit display messages | |
| Battery low | When the parent unit is powered by the rechargeable battery and the parent level is low, it needs to be recharged. |
| Failed to connect | The parent unit fails to switch to the next baby unit in Single Baby Unit in Single Baby Unit in Single Mode. |
| No Link | The selected baby unit slot is not linked to the parent unit. |
| Pairing failed | The selected baby unit cannot be repeated with the parent unit. |
| Confirm to unjust | You try to upper the baby unit(s). The operation needs your confirmation. |
| Pairing completed | The selected baby unit has been hooped with the parent unit. |
| Unpacking completed | The selected baby unit(s) has been unpaired with the parent unit. |
| Please Wait... | The link between the parent unit and the selected baby unit is lost, or the selected baby unit is out of range, or the selected baby unit slot is empty. When you have only one paired baby unit and the link is lost, or you have multiple paired baby units and the links are lost. |
| Temperature too low | The temperature detected from the selected baby unit is below the set minimum temperature. |
| Temperature too high | The temperature detected from the selected baby unit is above the set maximum temperature. |
| Using the baby monitor | |
| Power on or off the baby unit | |
| • Slide ON/OFF to the left to turn on the baby unit. The ON/OFF LED light turns on. | |
| • Slide ON/OFF to the right to turn off the baby unit. The ON/OFF LED light turns off. | |
| Power on or off the parent unit | |
| • Press and hold do turn on the parent unit. The LINK light turns on. | |
| • Press and hold again to turn off the parent unit. The LINK light turns off. | |
| Note | The LINK light flashes when the parent unit cannot link to the selected baby unit. |
| Turn on or off the parent unit screen |
| You can turn on or off the parent unit screen without powering off the parent unit. You can still hear sound from the baby unit. |
| • Press ⏻ on the parent unit at any time. |
Adjust speaker volume for parent
unit
You can change the speaker volume from
Volume 1 to Volume 5, of tannit. on.
When the speaker volume is set to off,
Applicable, and the 45% items are
-
Page 101 when the parent unit is not
-
Please VOL when the parent unit is not in use.
-
Press ▲ ▼ ⚠ ▶ adjust the speaker
volume.
Adjust repeaker volume for baby
unit
You can change the speaker volume
To adjust the speaker volume:
Press + or = on the baby unit at any time
[Non-Text]
Adjust display
LCD brightness
You can change the brightness of the parent uni
screen from Level 1 to Level 3.
To set the brightness of the parent unit screw
-
Please mention/please if the parent and is not in use.
-
Press ▼ or ▲ to choose DISPLAY, then press
MENU/SELECT to select.
- Press ▼ of ▲ to choose Brightness.
-
Press for ▶ to choose the desired level of
-
Press your ▶ to choose the desired level of brightness, then press MENU/SELECT to
confirm your selection.
LCD contrast
You can change the contrast of the parent unit
screen from Level 1 to Level 5.
To set the contrast of the parent unit screen:
-
Press MENU/SELECT when the parent unit is not in use
-
Press ▼ or ▲ to choose DISPLAY, then press
MENUSELECT to select.
-
Press ▼ or ▲ to choose Contrast.
-
Press up to choose the desired level of contrast, then press MENU/SELECT to
confirm your selection.
[Non-Text]
Set the language
You can select a language (English, French or
Spanish) to be used in all screen displays.
To change the language:
-
Press MENOVSELECT when the parent unit is not in use
-
Press ▼r ▶ to choose LANGUAGE
(Langue if French is set, or Idioma if
- Passes for No changes English, For
or Español.

Monitoring mode
You can choose to monitor in Single Baby
unit, Split Baby unit or Patrol Mode if there
are more than one baby units in your system.
To change the monitoring mode:
not in use.
- Press ▼ or ▲ to choose MONITORING
MODE, then press MENU/SELECT TO select
- Press ↓ or ▲ to choose Single Baby unit, Split Baby unit or Patrol Mode
• Single Baby unit - Press ▼or
choose a desired baby unit. The parent
You may change to view images from
different baby units by pressing view in the mode.
- Split Baby unit - The parent unit displays
multiple baby unit images in a maximum
four in one street. If there are more than four baby units in your system images.
will be shown on two split screens, which
alternates with each other automatically.
Patent mobile. The parent unit patents to display images from different baby units
in every 7 seconds. You may change to view images from different baby units, av
though the scanning period is not expired
by pressing VIEW in this mode.
- Press MENU/SELECT to confirm your selection

note monitoring mode is not applicable when there is only one baby unit.
-
[Non-Text]
[Non-Text]
View
You can change the screen to view images from
different baby units.
To view different baby units while in Single
Press www repeatedly to switch to the desired
baby unit. The switching is in chronological
order: Baby unit 1 to Baby unit 4.
To view different Baby units while in Split Baby unit:
Press [viiw] repeatedly to enlarge and switch
to the desired baby unit. The switching is in
- The Split Baby unit mode resumes after
a while.
To view different baby units while in Patrol
Press [v:v] repeatedly to switch to the desired
baby unit even if the scanning period on
a particular baby unit is not expired. The switching is in chronological order: Baby unit 1
to Baby unit 4.
If the switching fails, the screen displays
Note: Failed to connect. Try the switching again

Zoom
You can room in so brightly viewing images.
from baby unit in Single Baby unit and
Patrol mode.
To zoom in or out:
Press @ to zoom in. Press ▲, ▼, ◀ or ▶ to mo the zoomed image versus downward lefty
or rightward correspondingly. Press @ again
zoom out.
In Split Baby unit, it's not available.

[Non-Text]
[Non-Text]
[Non-Text]
Talk to the baby unit
You can broadcast messages from the parent
unit to any one of the baby units.
To talk to the baby unit:
Press and hold TALK when the parent unit is in Single Baby unit or viewing particular baby.
unit in Patrol Mode. Speak towards the MIC
(microphone) on the parent unit. The TALK light is on when the voice connection to the baby up
is made. Your voice is broadcast to the baby
Unit. Release the key to stop the broadcast. 4. Proo ▼ or ▶ to choose On or Off, then proo
The TALK feature does not work in Split PBU/vait MENU/SELECT to confirm your selection.

Night vision
7.1
The baby unit automatically uses the light from
its infrared LEDs for transmitting images to the
parent unit when it is turned on in a dark room.
However, it only transmits black-and-white images. 1. Press MENU/SELECT when the parent unit is
not in use.
Set the alert tone 2. Press ▼ or ▲ choose ALERT TONE, then press MENU SELECT to select
Low battery tone alert 3. Press ▼ to choose Sound Alert.
You can set whether the parent unit beeps 4. Press ◀ or ▶ to choose On or Off, then press
whenever the parent unit operates in low battery MENU/SELECT to confirm your selection.

To set the low battery tone alert
-
1000 MEANS/SEEST WHEN THE not in use.
-
Press ▼ or ▲ to choose ALERT TONE, then
press MENUSELECT TO SELECT.
-
Press for ▲house Low Battery Tone, and 69°F (20°C).
-
Press ▶ to choose off or off, then press MENU/SELECT to confirm your selection To set the minimum temperature of the baby
-
Boxe MENU/Extract when the parent unit is
not in use.
- Press ▼ or ▲ to choose TEMPERATURE,
When press MEN/SELECT to select.
-
Press MENU SELECT to select.
-
Press ▼ or ▲o choose a desired baby unit
or all baby units.
- Press for 20 choose the desired temperature, then press µ W/REFLECT to
confirm your selection.
Maximum temperature
You can set the desired maximum room
temperature of the baby unit. The maximum temperature can be set between 70°F (81°F)
temperature can be out between 10 °F (21 °C) and 86 °F (30 °C).
To set the maximum temperature of the baby
unit:
-
Press MENU/SELECT when the parent unit is not in use
-
Press ▶ 4p choose TEMPERATURE
then press MENU/SELECT to select.
- Press ▼r ▲o choose Maximum, then
press MEN/SELECT TO SELECT.
or all baby units.
- Press ◀r ▶to choose the desired
temperature, then press MENU/SELECT to confirm your selection.

Temperature alert
You can set whether the parent unit beeps when over the temperature is out of the peace
whenever the temperature is out of the product temperature range.
To set the temperature alert of the baby unit:
- Press MENU/SELECT when the parent unit is 3. Press ▼r ▲o choose a desired baby unit
not in use.
-
Press ▼ to choose TEMPERATURE, then press MENU/SELECT to select
-
Press ▼r. 4o choose Alert, then press
MENU/SELECT to select.
-
Press ▼ or ▲ choose a desired baby unit
-
Drops, for > to charge On or Off, then were
MENU/SELECT to confirm your selection. manually, you can set the screen to be turned
Temperature format of automatically whenever there are sounds detected from the baby unit. The parent unit
You can get the temperature angle of the baby.
You cannot be temperature scale of the baby unit.
Vibration
You may turn on the vibration alert so that the parent unit vibrates as soon as the baby unit detects sounds which light up three sound level indicators on the parent unit.
To change the vibration setting: 1. Press MENU/SELECT when the parent unit is not in use.
- Press ▼or ▲ choose VIBRATION, then
press MENUSELECT TO SELECT. 3. Press ▼or ▲ choose On if speaker is off Always on or Off.
- On if speaker is off - The parent unit vibrates once whenever the baby units detect sounds which light up three sound level indicators while the speaker of the parent unit is turned off.
- Always on - The parent unit vibrates once whenever the baby units detect sounds which light up three sound level indicators. - Off - The parent unit will not vibrate even if
the baby units detect sounds. 4. Press MENU/SELECT to confirm your selection.

If you set the sensitivity level to Level 5, the baby unit will be very sensitive and detect any sounds including background noises. These background noises may disrupt the silence and prevent the vibration feature to work properly.
Pair and unpair the baby unit Pair new baby unit
The baby units and parent unit provided are already paired. You can add or replace baby units (VM303, purchased separately) to your baby monitor system.
You can pair a maximum of four baby units to your parent unit. Each new baby unit must be paired to the parent unit before use.
Make sure you power on t
parent unit before pairing.
To pair a baby unit:
-
On the idle parent unit, press MENU/SELECT
-
Press for ▲ choose PAIR/UNPAIR, then press MENU/SELECT to select.
-
Press for to choose Pair Baby unit, then
press MENUSELECT to select.
FCC Part 15
This equipment has been tested and found to comply with the requirements for a Class B digital device under Part 15 of the Federal Communications Commission (FCC) rules. These requirements are not recommended to be considered that the equipment is being harmful interference in a residential installation. This equipment generates, uses and can radiate radio frequency energy and, if not installed and used in accordance with the instructions, may cause harmful interference to radio communications. However, there is no guarantee that interference will not occur in a particular way. The equipment is designed to be useful because harmful interference to radio or television reception, which can be determined by turning the equipment off and on, the user is encouraged to try to correct the interference by one or more of the following measures: - Recruit or relocate the receiving antenna. - Increase the separation between the equipment
- Connect the equipment into an outlet on a circuit different from that to which the receiver is connected. - Consult the dealer or an experienced radio/TV technician for help.
Changes or modifications to this equipment not expressly approved by the party responsible for compliance could void the user's authority to operate the equipment.
This device complies with Part 15 of the FCC rules. Operation is subject to the following two conditions: (1) this device may not cause harmful interference, and (2) this device must accept any interference received, including interference that may cause undesired operation.
To ensure safety of users, the FCC has established criteria for the amount of radio frequency energy that can be safely absorbed by a user or bystander according to the intended usage of the product. This product has been tested and found to comply with the FCC criteria. The baby unit shall be installed and used such that parts of all persons' body are maintained at a distance of approximately 9 in (20 cm) or more.
8 in (20 cm) or more. This Class B digital apparatus complies with Canadian
requirement: CANICES-3 (R)NMR-3(R)
GANIELSO (B)AH Industry Canada
This device complies with Industry Canada licence-
exempt RSS standard(s). Operation is subject to the following two conditions: (1) this device may not cause harmful interference, and (2) this device must accept any interference received, including interference that may cause undesired operation.
Privacy of communications may not be ensured who using this product.
The term "IC:" before the certification/registration number only signifies that the Industry Canada technical specifications were met. This product meets the applicable Industry Canada technical specifications.
- Press ▼or ▲ choose a desired baby unit
slot, then press MENU/SELECT.
-
Make sure the new baby unit is turned on. On the new baby unit, immediately press and hold PAIR when the parent unit screen displays Press and hold PAIR on Baby Unit to start Pairing. Parent unit screen displays Pairing...Please Wait... and emits beep sound every two seconds. The LED light on
-
When pairing is successful, the screen displays Pairing completed. You hear a confirmation tone. The LED light on the new baby unit turns green. The parent unit returns to the previous menu.
• If pairing fails, the screen displays Pairing
note failed. Try the pairing process again. - During registration, you may press @p cancel the registration when parent unit screen displays Pairing... Please Wait... - Only one baby unit can be paired at a time. Unpair baby unit
Onpan baby unit Make sure you power on the baby unit and the
make sure you power on the baby unit and the parent unit before unpairing the baby unit.
To unpair a baby unit:
- On the idle parent unit, press MENU/SELECT.
-
Press ▼or ▲ choose PAIR/UNPAIR, then press MENU/SELECT to select
-
Press ▶c. ▶ choose Unpair Baby unit
then press MENU/SELECT to select.
- Press ▼or ▲ choose a desired baby unit as all baby units, then press www.IRELEOT
of all baby units, then press MENDSELECT.
-
When the screen displays confirm to unpair?, press menu/SELECT.
-
When unpairing is successful, the screen
displays Unpairing completed. The LED light on the selected baby unit flashes slowly. Then, the parent unit returns to the previous menu.
General product care
| Storage |
| When you are not going to use the baby monitor for some time, remove the rechargeable battery from the first part of the second part of the parent unit, the baby unit and the adapters in a cool and dry place. |
Frequently asked questions
| Below are the questions most frequently asked about the baby monitor. If you cannot answer to your question, contact another patient by visiting our website at www.vtechphones.com or calling 1 (800) 595-9511. | |
| Why does the baby monitor not respond normally? | Try the following (in the order listed) for common sure:1. Disconnect the power to the parent unit and the parent unit.2. Remove the batteries in the parent unit. Then install the batteries again.3. We wait a few minutes before connecting power back to the baby unit and the parent unit.4. Turn on the baby units and the parent unit.5. Wait for the parent unit to synchronize with the baby units. Allow up to one minute for this to take place. |
| Why don’t the power-on light of the baby unit and put on it when I switch on the units? | Perhaps the rechargeable battery of the parent unit is not connected to its own. It is not connected to its own. This will be used on the appliance plug into the parent unit and put on the adapter in a well socket. They prevent the switch on the parent unit and to establish connection with the baby unit. |
| Perhaps the baby unit is not connected to the mains. Connect the baby unit to this. Then set ON/OFF switch ON to switch on the baby unit and to be seen connection with the parent unit. | |
| Why does the baby monitor produce a high-pitched noise? | The unit may be too close to each other. Make sure that the baby unit at least 1 multiple hours from each other. |
| Why does the parent unit too quickly to other sounds? | The baby unit also picks up to the level of your baby. Adjust the lower level or adjust the appearance on the parent unit. |
| Why don’t I hear a sound/why can’t I hear my baby cry? | You may have set the sound/why can’t low level. If you do so, the baby unit is too much more sounds that is too soft or light. You may need to adjust the sensitivity level to a happy. |
| Why does the parent unit beep? | The unit may be out of range. Move the parent unit and other baby units (but not less than 3 hours) |
| If the parent unit is powered by the provided battery, I tried too quickly enough charge for the parent unit to perform normally. Charge the parent unit in the parent form for up to 12 hours. |
| Why can't I establish a connection? Why is the connection lost every now and then? Why are there sound interruptions? | The baby units may be out of range. Move the parent unit closer to the baby units (but not less than 3 feet). |
| Other electronic products may cause interference with your baby monitor. Try installing your baby monitor as far away from these electronic devices as possible. |
Important safety instructions
1.00
When using your equipment, basic safety precautions should always be followed to reduce the risk of fire, electric shock and injury, including the following:
1. Follow all warnings and instructions marked
on the product.
2. Adult setup is required
3. This product is intended as an aid. It is not
a substitute for responsible and proper adult supervision and should not be used as such
4. This product is not intended for use as a
Medical monitor.
5. Do not use this product near water. For
example, do not use it next to a bath tub, wash bowl, kitchen sink, laundry tub or
swimming pool, or in a wet basement or
shower.
6. CAUTION: Use only the batteries indicated
in this manual. There may be a risk of explosion if a wrong time of battery is used.
explosion if a wrong type of battery is used for the parent unit. Use only the supplied
for the parent unit. Use only the supplied rechargeable battery or replacement battery
pack (BT298555) for the parent unit. Do
not dispose of batteries in a fire. They may
explode. Dispose of used battery according
to the information in The RBRC® seal.
7. Use only the adapters included with this product. Incorrect adapter polarity or voltage
product. Incorrect adapter polarity of voltage can seriously damage the product
Baby unit power adapter: Input 100-240V
AC 50/60 Hz; output: 6V DC 1A Parent unit
power adapter: Input 100-120V AC 50/60 Hz
output: 6V DC 800 mA.
8. The power adapters are intended to be correctly oriented in a vertical or floor mount
correctly checked in a verbal or floor mount position. The prongs are not designed to hol
position: The change is not designed to be
What does this limited warranty cover?
The manufacturer of this VTech Product warrants to
the holder of a valid proof of purchase ("Consumer" or
you ) that the Product and all accessories provided in the sales package ("Product") are free from
in this sales portfolio ( Product ) are not from defects in material and workmanship, pursuant to the
following terms and conditions, when installed and
used normally and in accordance with the Product
operating instructions. This limited warranty extends only to the Consumer for Products purchased and
used in the United States of America and Canada.
What will v tech do if the Product is not free from defects in materials and workmanship during
the limited warranty period ("Materially Defective
Product")?
During the limited warranty period, VTech's authorized
service representative will repair or replace at
V Tech's option, without charge, a maternally defective Product. If we repair the Product, we may use new
Product. If we repair the Product, we may use how or refurbished replacement parts. If we choose to
replace the Product, we may replace it with a new or
refurbished Product of the same or similar design.
We will retain defective parts, modules, or equipment. Repair or replacement of the Product, at VTech's
option, is your exclusive remedy. VTech will return the
repaired or replacement Products to you in working
condition. You should expect the repair or replacement to leave approximately 30 days.
to take approximately 30 days.
How long is the limited warranty period?
The limited warranty period for the Product extends
for ONE (1) YEAR from the date of purchase. If VTect
repairs or replaces a Matenally Defective Product under the terms of this limited warranty. This limited
under the terms of this entity warranty, this limited warranty also applies to the repaired or replacement
Product for a period of either (a) 90 days from the
date the repaired or replacement Product is shipped by
you of (b) the time remaining on the original one-year warrants; whichever is longer.
Warranty, whatever is longer;
What is not covered by this limited warranty?
This limited warranty does not cover:
- Product that has been subjected to misuse,
accident, shipping or other physical damage, improper installation, abnormal operation or
improper installation, abnormal operation of handling, neglect, inundation, fire, water or other
liquid intrusion; or
- Product that has been damaged due to repair,
alteration or modification by anyone other than an authorized service representative of VFTery or
-
Product to the extent that the problem experienced
-
Product to the claim that the problem experiences
the plug in place if it is plugged into a ceiling,
under-the-table of cabinet outlet.
- Orplug this product from the wall outlet before cleaning. Do not use liquid or aerosol 23. The product is not intended for use by persons (including children) with reduced
cleaners. Use a damp cloth for cleaning.
- Unplug the power cords before replacing
Batteries.
- Do not cut on the power adapters to replace them with other plugs, as this causes a
hazardous situation
- Do not allow anything to rest on the power
cords. Do not install this product where the
cords may be walked on or crimped.
- This product should be operated only from
the type of power source indicated on the working label. If you are not sure of the type 2. Do not assume the product to outcome said
marking label. If you are not sure of the type of power supply in your home, consult your
-
power supply in your home, unless your dealer or local power company. Heat of direct sunlight. Do not put the product close to a heating source.
-
Do not overload wall outlets or use an 3. Batteries should not be exposed to excessive
extension cord. heat such as bright sunshine or fire.
- Do not place this product on an unstable 4. Make sure the baby unit(s) and the adapter
table, shelf, stand or other unstable surfaces. cord(s) are always out of reach of the baby,
- This product should not be placed in any area where proper ventilation is not provided at least 3 feet away from the baby of crib, to avoid a possible strangulation hazard.
Slots and openings in the back or bottom 5 Never place the baby unit(s) inside the
- Never place the baby drill(s) inside the baby's crib or playpen. Never cover the baby
To protect them from overheating, these unit(s) or parent unit with anything such as a
openings must not be blocked by placing the towel or a blanket.
product on a soft surface such as a bed, soda 6. Other electronic products may cause
or fog. This product should never be placed near or over a radiator or heat register. Interference with your baby monitor. Toy installing your baby monitor as far
-
Never push objects of any kind into this
-
Never push objects of any land into this product through the slots because they may away from these streamers as visible as possible: wireless routers, radios, cellular
touch dangerous voltage points or create a telephone, intercoms, room monitors,
short circuit. Never spill liquid of any kind on televisions, personal computers, kitchen
the product. appliances and cordless telephones.
- To reduce the risk of electric shock, do Precautions for users of implanted cardiac
not disassemble this product, but take it to pacemakers
an authorized service facility. Opening or comoving parts of the product after then Cardiac pacemakers (applies only to digital cord-
removing parts of the product other than expected access does may expose you to (less devices):
specified access doors may expose you to dangerous voltages or other risks. Incorrect Wireless Technology Research, LLC (WTR),
reassembling can cause electric shock an independent research entity, led a multidis-
when the product is subsequently used. ciplinary evaluation of the interference between
- You should test the sound reception every portable wireless devices and implanted cardiac pacemakers. Supported by the U.S. Food and
time you turn on the units or move one of the pacemakers. Supported by the U.S. Food and Drug Administration. WTR recommends to play-
components. Drug Administration, WTT recommendations to physicians that:
- Periodically examine all components for Pacemaker patients
damage. • Should keep wireless devices at least six
- Be aware of possible loss of privacy while should keep wireless devices at least six inches from the pacemaker.
using public airwaves. Conversations may • Should NOT place wireless devices directly
be picked up by other nursery monitors, should NOT place wireless devices directly over the pacemaker, such as in a breast
cordless phones, scarifiers, etc. over the pabomator, soon as in a breast pocket, when it is turned ON.
-
Children should be supervised to ensure that WTR's evaluation did not identify any risk to
-
2017-12-2018: and 2018-03-29, 2019-04-26
bustanders with pacemakers from other persons
using wireless devices.
Electromagnetic fields (EMD)
Electromagnetic fields (EMF)
This V Tech product complies with all standards regarding electromagnetic fields (EMF).
regarding electromagnetic fields (LMF). If handled properly and according to the
in handled property and according to the instructions in this user's manual, the product
is safe to be used based on scientific evidence
available today. The RBAC ® seal on the lithium-ion
battery indicates that VTech Communications, Inc. is voluntarily participating in an industry program to
is voluntarily participating in an industry program to collect and recycle these batteries at the end of their
useful lives, when taken out of service within the
United States and Canada.
(No text)
The BRPC® seal
The RDRC seal
The BBRC® program provides a convenient alternative
to placing used lithium-ion batteries into the trash or
municipal waste, which may be illegal in your area.
VTech's participation in RBRC b makes it easy for
you to drop off the spent battery at local retailers
participating in the HBRC® program or at authorized VTech product service centers. Please call
1 (800) 8 BATTERY TM for information on Li-ion battery
recycling and disposal bans/restrictions in your
area. VTech's involvement in this program is part of its commitment to protecting our environment and
its commitment to protecting our environment and conserving natural resources
BBRC® is a registered trademark of Rechargeable
Harris is a registered trademark of nonchargeable Battery Recycling Corporation.


600 200 85
2023
(No text)
ECC and IC regulations
100 and
FCC Post 15
This equipment
This equipment has been tested and found to comply with the requirements for a Glass B digital device.
under Part 15 of the Federal Communications
Commission (FCC) rules. These requirements are
Intended to provide reasonable protection against harmful interference in a residential installation. This
In front of the equipment generates, uses and can radiate radio
frequency energy and, if not installed and used in
accordance with the instructions, may cause harmful
interference to radio communications. However, there is no guarantee that interference will not occur in a
to be guaranteed that manufacturer the not close in a particular installation. If this equipment does cause
harmful interference to radio or television reception.
(1)



frequency control
Tenermit Rebyum 0400-75 0470-975 MHz
transmit Baby unit: 2409.75 - 2473.875 MHz frequency Parent unit: 2409.75 - 2473.875 MHz
frequency
Channels 24
LCD 2.8" Color LCD
(QVGA 320x240 pixel)
Biominal
Nominal maximum power showed by FCC effective range and IC. Actual operating range may
GENERAL ranges and non-essential spending ranges may vary according to environmental
[Non-Text]
Power Parent unit: 3.7V Li-polymer battery
requirements
Input: 100-240V AC 50/60H
Output: 6V DC © 1A
Parent unit power adapter:
Input: 100-120V AC SuredA Output: 6V DC @ 800mA
Supl. 04 DE 6:00am
[Non-Text]
[Non-Text]
[Non-Text]
[Non-Text]
[Non-Text]
[Non-Text]
[Non-Text]
[Non-Text]
[Non-Text]
[Non-Text]
[Non-Text]
[Non-Text]
[Non-Text]
[Non-Text]
[Non-Text]
[Non-Text]
[Non-Text]
[Non-Text]
[Non-Text]
[Non-Text]
[Non-Text]
M
V Da
And your life.
VTech Communications, Inc.
A member of THE VTECH GROUP OF COMPANIES.
VTech is the registered trademark of VTech Holdings Limited
Specifications are subject to change without notice.
© 2014 for VTech Communications, Inc. All rights reserved. 05/14. VM333. CJB. V5.0
Document order number: 91-007383-050-100

FCC Part 15
This equipment has been tested and found to comply with the requirements for a Class B digital device.
under Part 15 of the Federal Communications
Commission (FCC) rules. These requirements are intended to provide reasonable protection against
harmful interference in a residential installation. This
equipment generates, uses and can radiate radio frequency energy and, if not installed and used in
accordance with the instructions, may cause harmful interference to radio communications. However, there
Interference is radio communicators. However, there is no guarantee that interference will not occur in a
particular installation. If this equipment does cause harmful interference to radio or television reception.
which can be determined by turning the equipment
on and on, the user is encouraged to try to correct the interference by one or more of the following measures:
- Recorient or relocate the receiving antenna.
- Increase the separation between the equipment and receiver.
- Connect the equipment into an outlet on a circuit diff. forest from that to which the receivers is connected
- Consult the dealer or an experienced radio/TV
technician for help.
Changes of modifications to this equipment not expressly approved by the party responsible for
compliance could void the user's authority to operate the environment.
This device complies with Part 15 of the FCC rules.
Operation is subject to the following two conditions: (1)
this device may not cause harmful interference, and (2) this device must report any interference received.

- INSTALL THE BATTERY
- CONNECT THE BABY UNIT
- CONNECT THE PARENT UNIT
- POSITIONING THE BABY MONITOR
- OPERATING RANGE
- OVERVIEW
- 2017年1月1日
- BABY UNIT OVERVIEW
- PARENT UNIT OVERVIEW
- PARENT UNIT LIGHTS
- PARENT UNIT DISPLAY ICONS
- PARENT UNIT MAIN MENU ICONS
- ADJUST SPEAKER VOLUME FOR PARENT
- ADJUST REPEAKER VOLUME FOR BABY
- ADJUST DISPLAY
- LCD CONTRAST
- SET THE LANGUAGE
- MONITORING MODE
- VIEW
- ZOOM
- TALK TO THE BABY UNIT
- NIGHT VISION
- 7.1
- MAXIMUM TEMPERATURE
- TEMPERATURE ALERT
- VIBRATION
- PAIR AND UNPAIR THE BABY UNIT PAIR NEW BABY UNIT
- FCC PART 15
- IMPORTANT SAFETY INSTRUCTIONS
Brand : VTECH
Model : VM333-2
Category : Baby monitor