PC36HD - Tablet MPMAN - Free user manual and instructions
Find the device manual for free PC36HD MPMAN in PDF.

User questions about PC36HD MPMAN
0 question about this device. Answer the ones you know or ask your own.
Ask a new question about this device
Download the instructions for your Tablet in PDF format for free! Find your manual PC36HD - MPMAN and take your electronic device back in hand. On this page are published all the documents necessary for the use of your device. PC36HD by MPMAN.
USER MANUAL PC36HD MPMAN
Thank you for purchasing this product. Please read these operating instructions carefully in order to use the digital video camera correctly. Keep the instructions in a safe place after reading so that you can refer to them later.
Precautions
Before using the camcorder, please ensure that you read and understand the safety precautions described below.
- Do not try to open the case of the camcorder or attempt to modify this camcorder in any way. Maintenance and repairs should be carried out only by authorized service providers.
- Keep the camcorder away from water and other liquids. Do not use the camcorder with wet hands. Never use the camcorder in the rain or snow. Moisture creates the danger of electric shock.
- Use only the recommended power accessories. Use of power sources not expressly recommended for this equipment may lead to overheating, distortion of the equipment, fire, electrical shock or other hazards.
1. Parts of the camcorder
1. Configuration & Installation
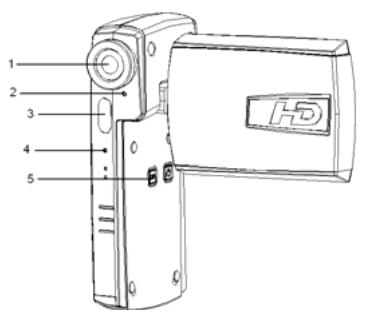
| 1 | Lens |
| 2 | Self-Timer Lamp |
| 3 | Flash Lamp |
| 4 | Microphone |
| 5 | Display Button |
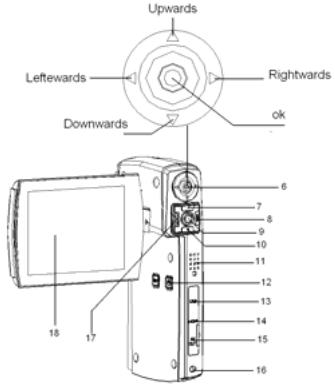
| ▲ | Upwards |
| ← | Leftwards |
| ▶ | Rightwards |
| ▼ | Downwards |
| ◎ | OK |
| 6 | Joystick |
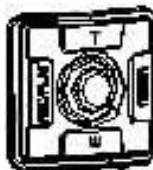
| 7 | T / Zoom in Button |
| 8 | Menu Button |
| 9 | Shot Button |
| 10 | W / Zoom out Button |
| 11 | Speaker |
| 12 | Power Button |
| 13 | USB Jack |
| 14 | HDMI Jack |
| 15 | AV out |
| 16 | Strap Mount |
| 17 | Mode Button |
| 18 | LCD Monitor |
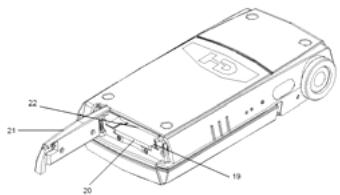
| 19 | Battery Holder |
| 20 | SD Card Slot |
| 21 | Battery & SD Card Door |
| 22 | Battery Room |
2. Preparing for using
Installing the Battery
- Slide the battery cover open as illustrated.
- Place the accessory lithium-ion battery into the compartment. Note that the metallic contacts must be aligned with the contacts in the compartment.
- After the battery is properly installed, replace the battery cover.

Charging the battery
Please charge the battery at least 8 hours for first time use.
- Connect one end of the supplied USB cable to the USB port of the camcorder and the other end to a powered PC. Make sure the camcorder is powered off.
- The charging LED turns red and the charge starts.
- When the charging is interrupted or the battery pack is fully charged,
the charging LED will turn off.
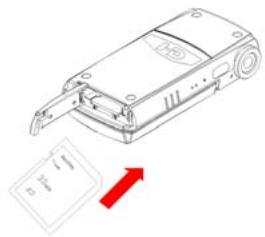
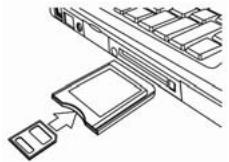
Inserting the Memory Card
This camcorder has an internal memory, it can only record a few pictures or movie clips. If you want record more you have to use a SD or MMC card. Turn off the camcorder before inserting or removing the memory card. Be sure to orient the card correctly when inserting it. Never try to force the memory card into the slot when you feel resistance. The memory card has a write protect switch, which used to protect data from accidental deletion. Therefore, whenever you want to record, format or delete files in the SD card, disable the write protection beforehand.
- Turn off the camcorder.
- Slide the battery cover and then you will see the SD card slot.
- Insert the memory card as illustrated.
- Close the battery cover.
To release the memory card press the edge of the card gently.
Format the memory card
It is important to format the memory card when it is the first time you use this camcorder. All data will be deleted including protected files. Be sure to download important files to your computer before formatting.
1: Turn the power on, and set the camcorder to the Setup Menu.(See the details on 23)
2: Push the joystick upward or downward to select [Format] then push the joystick rightward to launch the submenu.
3: Push the joystick upward or downward to select the item [YES] and then press the OK button to erase all data.
Setting the Language
When using the camcorder for the first time after purchasing it, be sure to choose a language and set the date & time before using the camcorder.
1: Turn the power on, and set the camcorder to the Setup Menu.(See the details on 23)
2: Push the joystick upward or downward to select [Language] then move the joystick rightward to launch the submenu.
3: Push the joystick upward or downward to select the desired language and then press the OK button to confirm the setting.
4: Press the MENU button to close the menu.
Setting the date and time
1: Turn the power on, and set the camcorder to the Setup Menu. (See the details on 23)
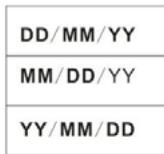
2: Push the joystick upward or downward to select [Date/Time] then push the joystick rightward to launch the submenu: Date Format, Date Setup. DD/MM/YY
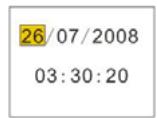
3: Select a date format by using the joystick. And then select [Date Setup].
4: Push the joystick upward or downward to change the highlighted value. Push the joystick leftward or rightward to move the cursor between settings.
5: Press the OK button to confirm the setting.
6: Press the MENU button to close the menu.
The date and time can be only added to still images by setting the
Monitor screen display
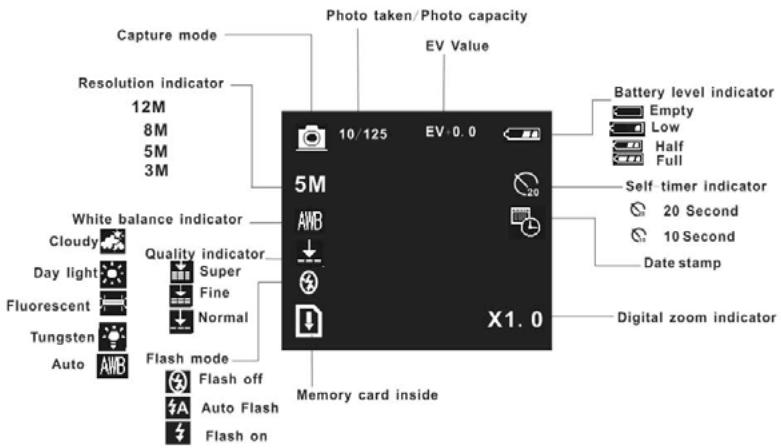
Capture
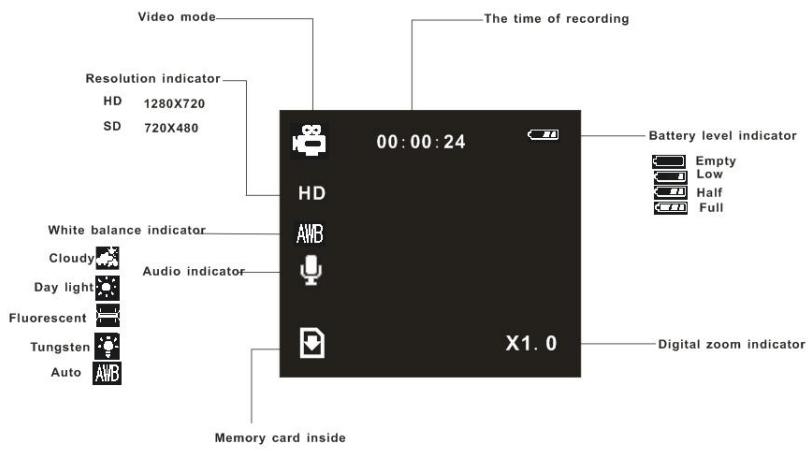
Video record mode
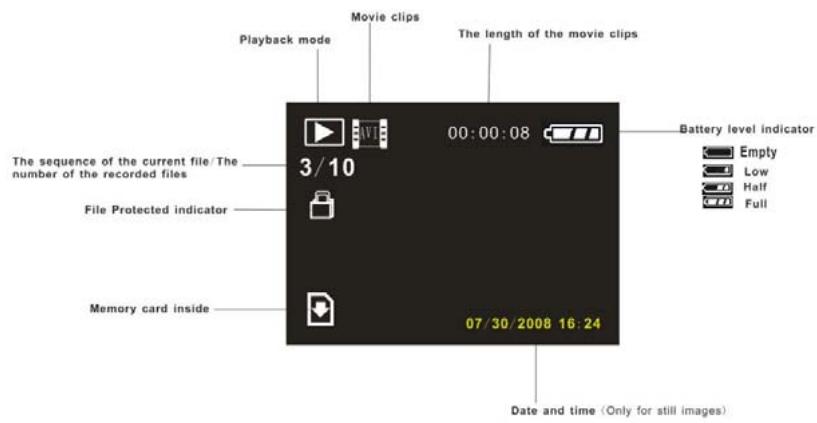
Playback mode
3. Using this camcorder
Turning the Camcorder On and Off
- Open the LCD panel. Press the POWER button to turn on the camcorder.
- Press the POWER button again to turn the camcorder off.
To save battery power, the LCD monitor automatically turns off 30 seconds after the last control accessed (factory-preset setting). Press any button other than the power button to turn on the LCD monitor. After the power saving function has been active for the set time, the power will turn off completely. Press the Power button to power the camera back on. You can change the power-off time by setting the function [Auto off] in the Setup menu.
Change the record mode
There are three record modes in this camcorder.
1: Press the POWER button to turn on the camcorder.
2: Press the MODE button to change the mode. Each time the MODE button is pressed the mode icon is changed.
| Display | Title | Description |
| Capture mode | For taking still photos. | |
| Video mode | For recording movie clips. | |
| Audio mode | For recording audio files. |
- You can quickly switch the camcorder to video mode or playback mode by using the video/playback switch. Push the video/playback switch downward to set the camcorder to playback mode and push it upward to set it to video mode.
Recording a video clip
1: Turn on the camcorder and set the camcorder to video record mode

2: Press the SHUTTER button to start recording. Press the SHUTTER again to end the recording. If the memory is full the video camera will stop
recording automatically.
3: You can press T button or W button to adjust the focus. When the picture is enlarged press the SHUTTER button to lock the zoom ratio and end the recording.

- On the upper of the LCD monitor displays the recorded time.
Taking still images
- Turn on the camcorder.
- Press the MODE button to set the camcorder to capture mode, the icon appears on the LCD screen.
- Adjust the focus: press T button or W button to adjust the focus.
-
Hold the camcorder steady and then press the SHUTTER button completely down to take a picture.
-
Automatically the number displayed on the
screen is increased by one. For example, if the screen displays 3/20 when the camera is powered on, after one photo has been captured, 4/20 will appear. If the memory is full, "Memory Full " will appear on screen.
- Make sure that your fingers do not cover the lens.
Using the Self-timer
Use the self-timer to set a delay from the time the shutter button is pressed to the time the image is shot.
1: Turn the power on, and set the camcorder to the Capture mode.
2: Press the MENU button to display the capture menu.
3: Using the joystick to select the item [Self Timer]. And move the joystick rightward to launch the submenu:
Disable: Don't use self-timer.

10 Seconds: The shutter release will delay for 10 seconds.

20 Seconds: The shutter release will delay for 20 seconds.
4: Move the joystick upward or downward to select the self timer.
5: Press the OK button to confirm the setting, and then press the MENU button to close the menu.
6: Press the SHUTTER button to take picture.
Using the Flash
The flash is not only for taking pictures when there is insufficient light, but also for when the subject is in shade or with backlight conditions. Pressing the flash button cycles your camera through the various flash modes. The flash will not activate during continuous shooting or movie recording.
1: Set the camcorder to the Capture mode.
2: Press the FLASH/DELETE button to change the flash mode. Each time the flash button is pressed, the flash icon changes.
| Auto: Automatically turn on/of | |
| Flash on: Force on the flash | |
| Flash off: Force off the flash |
3: Press the SHUTTER button to take a picture.
- When the battery level is low the flash strobe will not work.
- The LCD screen is black when the flash is charging. The next image can be shot only when charging is completed.
Recording audio
1: Turn the camcorder on and set it to audio record mode.
2: Press the SHUTTER button to start recording.
3: Press the SHUTTER again to end the recording. If the memory is full the video camera will stop recording automatically.
- On the center of the LCD monitor displays the recorded time.
- There is no menu in audio record mode.
4.Using the menu in record mode
When a menu is displayed, the joystick is used to make the desired setting. The audio record mode doesn't have a menu.
Menu in capture mode
1: Turn on the camcorder and set it to capture
mode.
2: Press the MENU button to display the menu.
3: Move the joystick upward or downward to select an item.
4: Push the joystick rightward to enter the submenu.
5: Use the joystick to select the desired item.
6: Press the OK button to confirm the setting.
7: Press the MENU button to close the menu.
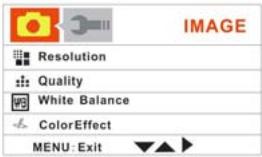
Capture menu list
| Menu item | Function |
| Resolution | There are five options for choice: [12M]/[8M] /[5M]/[3M]. |
| Quality | Select a lower image quality to decrease the image size in order to capture more images. There are three options for choice: [Super] /[Fine] /[Normal]. |
| White Balance | Adjust the white balance to suit different light sources. There five items for option: [Auto]/[Daylight]/ [Cloudy] / [Fluorescent] / [Tungsten]. |
| Color Effect | Set the color effect to add a color tone to the picture. [color]: Reflects the true color of the object. [Sepia]: Adds a sepia color tone to the picture. [Monochrome]: The pictures only have two colors: white and black. |
| Exposure | Set the exposure value manually to compensate for unusual lighting conditions such as indirect indoor lighting, dark backgrounds, and strong backlighting. The exposure value range is -2.0 to 2.0. |
| Date Stamp | This function can be used to add a date to your pictures as you take them. There are two items for option: [On]: Add the recording date & time to printed images. [Off]: Do not add the recording date & time to printed images. |
| Self Timer | Use the self-timer to set a delay from the time the shutter button is pressed to the time the image is shot. [Disable]/[10 SEC]/[20SEC]. |
| Burst | Use this function to take 3 pictures continuously. |
| Snapshot | [Single]: Press the shutter button once to take one picture. [Burst]: Press the shutter button once to take three pictures continuously. |
Menu in video mode
1: In video record mode press the MENU button to display the menu.
2: Move the joystick upward or downward to select an item.
3: Push the joystick rightward to enter the submenu.
4: Use the joystick upward or downward to select the desired item.
5: Press the OK button to confirm the setting.
6: Press the MENU button to close the menu.
| Menu item | Function |
| Resolution | Select small movie size to record longer time. There are two items for option:[1280x720]/[720x480]. |
| Frame Rate | Select low frame rate to record longer time. There are |
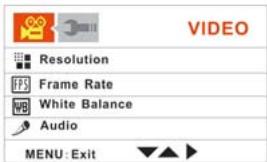
| two items for option: [30FPS]/[15FPS]. | |
| White Balance | See the details on page 20. |
| Audio | [Enable]: Voice is recorded when recording movie clip.. [Disable]: No voice is recorded when recording movie clips. |
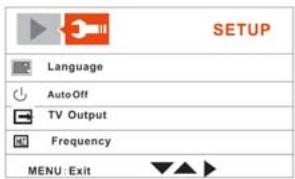
Setup menu
You can set the system items in setup menu.
1: Turn the power on and press the MENU button to display the menu.
2: Push the joystick rightward to select [Setup].

3: Move the joystick upward or downward to select an item.
4: Push the joystick rightward to enter the submenu.
5: Push the joystick upward or downward to select the desired item.
6: Press the OK button to confirm the setting.
7: Press the MENU button to close the menu.
| Menu item | Function |
| Language | Select a language for the Display menu and other information from the following languages: [English]: English, [Français]: French, [Deutsch]:German, [Italiano]: Italian, [Espanol]: Spanish, [Portuguãs]: Portuguese. [Nederlands]: Dutch |
| Auto off | To save power, the camcorder is turned off automatically after a period of time. There are four options: [Disable] / [1Min] / [3Min]/[5 Min]. |
| TV output | You can review images on a television with the supplied AV cable. TV Out should be set to either NTSC or PAL depending on your region. [NTSC]: America, Japan and others; [PAL]: Europe, Oceania and others. |
| Frequency | Light Frequency should be set to either 60Hz or 50Hz depending on your region. [50HZ] / [60HZ]. |
| Date/Time | Refer to page 9. |
| Buzzer | Sets the operation sound on and off. [Enable] / [Disable] |
| Format | To erase all data stored on the memory card if you are using a memory card, or all data stored in the internal memory if there is no card inserted. All data will be deleted including protected files. Be sure to download important files to your computer before formatting. [Yes] / [No]. |
| Default Settings | To reset the entire menu and button operation settings to initial default. |
| USB Mode | You can use this camera as a PC camera or removable disk. [PC Camera]:Use as a PC camera; [Mass storage]: Use as a removable disk. |
| Firmware version | This function will show the software version. |
5.Playback
Playing back movie clips
1: Set the camcorder to playback mode.
2: Push the joystick leftward or rightward to select the movie clips you want to playback.
3: Press the SHUTTER button to start playing. Press the OK button to pause it and press it again to continue. Push the joystick rightward to fast forward and push the joystick leftward to back forward.
4: Push the joystick upward or downward to adjust the volume.
Playback still image
1: Set the camcorder to playback mode.
The latest recorded file appears on the LCD screen. If there are no images stored, a message [No Image] appears.
2: Push the joystick leftward or rightward to preview the previous or next image.
3: Zooming:
Press T button or W button to zoom in or zoom out the image. When the picture is enlarged press the SHUTTER button to lock the zoom ratio and then you can push the joystick upward/downward/Leftward/Rightward to browse the details of the image.
Playing back audio files
1: Set the camcorder to playback mode.
2: Push the joystick leftward or rightward to select the audio file you want to playback.
3: Press the SHUTTER button to start playing. Press the SHUTTER button to pause it and press it again to continue.
Other function in playback mode
Viewing Thumbs nails
Press W button to view the file in thumbnails mode. Move the joystick upward/downward/leftward/rightward to select a file. Press T button to view
the file in full screen.
Delete files
If you want to delete a single file you have to select the file first and then press the MENU button to display the menu. Select "Delete Current" or "Delete All" and then Push the joystick rightward to enter the submenu. Move the joystick leftward to select "Yes" and then press the OK button to delete the file or delete All files
Menu in playback mode
1: In playback mode press the MENU button to display the menu.
2: Move the joystick upward or downward to select an item.
3: Push the joystick rightward to enter the submenu.
4: Move the joystick upward or downward to select the desired item.
5: Press the OK button to confirm the setting.
6: Press the MENU button to close the menu.
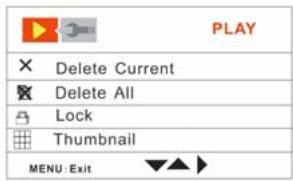
| Menu item | Function |
| Delete Current | Use this function to delete a single file. [Yes]/[No]. |
| Delete All | Use this function to delete all files. [Yes]/[No]. |
| Lock | Use this function to protect the files from being deleted by accident. [Lock Current]: Lock the current file. [Unlock Current]: Unlock the current file. [Lock all]: Lock all files. [Unlock All]: Unlock all files. |
| Thamburger | View all files in thumbnail mode. [2x2]: The LCD screen display 4 files a page. [3x3]: The LCD screen display 9 files a page. |
| Rotate | Use this function to rotate the images. [90]:Rotate the image 90 degrees in clockwise. [180]: Rotate the image 180 degrees in clockwise. [270]: Rotate the image 270 degrees in clockwise. |
| Slide show | Play the files automatically. |
| [On]: Select this item to start playing. [Setup]: Set the direction and Interval time of the slide show. [Direction]: [Backward] / [Forward]. [Interval]: [I Sec] / [10 Sec]. | |
| Use this function to print the images.[Yes]/[No] |
6. Making connections
Connecting the Camcorder to a TV
When plug in the TV-out cable (supplied) to the camcorder output jack the LCD screen turns black, Connect the camcorder to a TV and the TV screen now performs as the camcorder LCD screen.
- Connect the camcorder to a TV via the TV-out cable (supplied)
- Turn on the TV and the camcorder, and then set the TV to "AV" mode.
-
When the camcorder is set to record mode, you can preview the subjects you want to record on the TV screen.
-
When the camcorder is set to Playback mode, you can review all the pictures, video and audio clips stored in the camera on the TV.
Connecting the Camcorder to a HDTV
HD-TV hereby means the HDTV built-in component input ports, thus can perform HD (720P) high resolution quality while connected.
- Connect the camcorder to HDTV by the HDMI-cable.
- Power on HDTV and switch to HDMI-mode.
- Power ON the camcorder. Set the camcorder in playback mode.
Push the joystick leftward or rightward to select the file demanded.
- Press SHUTTER button to "Play" the selected video file on HDTV, press it again to "Stop" the playing.
- Press the OK button to "Pause", press it again to "Continue" the playing.
- Push the joystick leftward to reward, push the joystick rightward to forward.
- Push the joystick upward or downward to adjust the volume.
Connecting the Camcorder to a PC
There are two ways to download files from the camcorder's internal memory or memory card to a computer:
- By inserting the memory card into a card reader
- By connecting the camera to a computer using the supplied USB cable.
Using a Card Reader
1: Eject the memory card from the camcorder and insert it into a card reader that is connected to a computer.
2: Open [My Computer] or [Windows Explorer] and
double-click the removable disk icon that represents the memory card.
3: Copy images from the card into a directory of your choice on the computer's hard disk.
Connecting the Camcorder to a PC with the USB Cable
1: Connect the supplied USB cable to the computer's USB port and turn on
the camcorder. A message "Mass storage" or "PC Camera" appears on the screen when connection to the computer has been successfully completed. Press the OK button to set the camcorder to "Mass storage" mode.
2: Open [My Computer] or [Windows Explorer]. A "Removable Disk" appears in the drive list. Double-click the "Removable Disk" icon to view its contents. Files stored on the camera are located in the folder named "DCIM".
3: Copy the photos or files to your computer.
7. Software Installation
Installing the Software
The bundled software CD has the drivers and software that come with video camera.
Insert the CD into your CD-ROM drive. The autorun menu appears:
The following software is listed:
- Install Driver: Installs software for PC camera
- Arcsoft Mediaimpression: Installs software for editing movie clips and photos.
Click the items in the autorun menu to install the software.
If the autorun menu does not appear automatically, open the CD-ROM in [My Computer] or [Windows Explorer] and double-click the file named [autorun.exe] to start the program. You can also click [Run] in the Windows Startup menu, enter "D:\autorun.exe" (where D is your CD-ROM drive letter) in the text box, and click [OK].
Install Driver
(1) Insert the CD to your PC, Click "Install Driver" to install the driver;

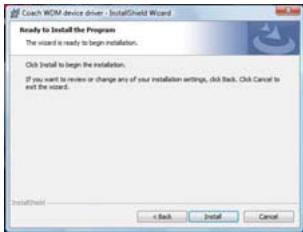
(2)Click "Next" and then click "Install" to install the driver;
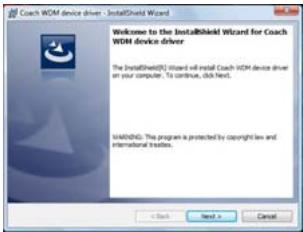
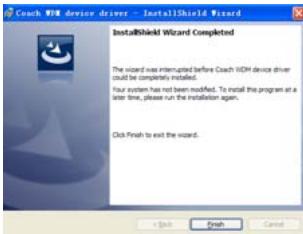
(3) Click "Finish" to complete the installation
(4) Connect the camcorder to PC by the USB-cable,then Power on;
(5) Use the OK button to set the camcorder to [PC Camera] mode.
(6) An interface "Installing device driver software" appears;
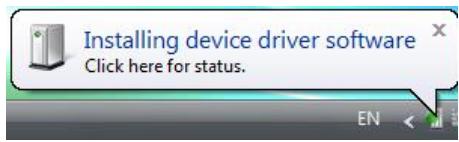
(7) Select "Install the software automatically (Recommended)";
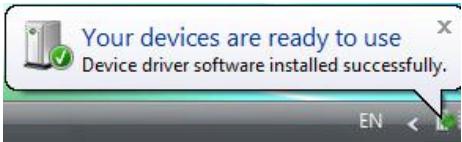
(8) If "Your devices are ready to use" interface appears, The installation is finished and now you can use the PC-Camera function.
How to use the PC Camera function
- Power ON, connect the camcorder with the PC by USB-cable.
- Press the OK button to set the camcorder to PC Camera mode.
-
Double click the icon "My Computer" (on the PC-desktop).
-
Double click the icon

Then you can start to use the PC-Camera function.
8. Troubleshooting
| Power does not turn on. | |
| 1.Battery is insufficient to power on. | ★Recharge the battery. |
| The camcorder does not take pictures. | |
| 1.Memory is full. | ★Insert a new memory card. |
| 2.Memory card is not formatted correctly. | ★Format the memory card again |
| or use a new card. | |
| Image is blurry or out of focus. | |
| 1.The camcorder was moving when the image was captured. | ★Hold the camcorder steady when shooting picture. |
| Image is not displayed on the LCD monitor. | |
| 1.A memory card with non-PICT images (recorded with other camera) is loaded. | ★This camcorder cannot display non-PICT images. |
| Recorded files are not saved in memory. | |
| 1.The camcorder was turned off before the files are saved in memory. | ★If the battery low indicator appears on the LCD monitor, recharge the battery immediately. |
9. Technical Specifications
| Sensor | 5 Mega Pixel CMOS; |
| Display | 2.7” TFT Color LCD Display |
| Focus Range | 200cm ~ infinity |
| Aperture | F3.1, Fixed Focus |
| Shutter | Electronic Shutter: 1/2 ~ 1/1800 sec. |
| File Format | Sill Image: JPEG (EXIF 2.2 compatible) Video: MP4 ; Audio: WAV |
| Resolution | Still Image: 1600x1200 (2M) / 2592x1944 (5M), 3400x2550(8M)by interpolation / 4032x3024 (12M) by interpolation; Video: 1280x720 HD / 640x480 / 320x240 |
| Exposure Control | Auto |
| White Balance | Auto / Daylight / Tungsten / Fluorescent / |
| Self Timer | 5 sec / 10 sec |
| Flash Mode | Flash off / Flash on / Flash auto |
| Storage Internal | 32 MB |
| Storage External | SD / MMC |
| TV System | PAL / NTSC |
| Power Supply | Lithium Battery |
| Operating Temperature | 0°C up to 40°C |
| Storage Temperature | -20°C up to +60°C |
| Microphone | Built-in |
| Speaker | included |
| Dimension | Camera Body: 122 x 61 x 28 mm |
| Weight | Camera Body w/o battery: approx. 85 g |
www.mpmaneurope.com