MP70HD - Tablet MPMAN - Free user manual and instructions
Find the device manual for free MP70HD MPMAN in PDF.


User questions about MP70HD MPMAN
0 question about this device. Answer the ones you know or ask your own.
Ask a new question about this device
Download the instructions for your Tablet in PDF format for free! Find your manual MP70HD - MPMAN and take your electronic device back in hand. On this page are published all the documents necessary for the use of your device. MP70HD by MPMAN.
USER MANUAL MP70HD MPMAN
Congratulations on your purchase of the Video & MP3 player. This guide is provided to help you get started quickly with your player; please read it carefully and save it for future reference.
Package Contents
Please make sure that the items shown below are included in the package. Should an item be missing, please contact the local retailer from which you purchased this product.
- Portable HD Video Player
Remote control
喜 AV cable
USB cable
Carrying pouch
Professional stereo earphones
+ Power adapter

This package may contain plastic bags or other materials that pose a hazard to children. Be sure to safely dispose of all packing materials after opening.
Features
Experience video, music, photos, and text on a high-resolution LCD screen
Advanced processor supports a wide range of popular media formats
Connect and enjoy 1080p HD video at home on your TV
Expandable memory with optional microSD card
Rechargeable lithium-polymer battery provides 3 hours of video playback **
FM radio and calendar app included
Integrated stereo speakers and 3.5 ~mm headphone jack
USB 2.0 Hi-speed for fast file transfers
1080p output requires an HDMI cable and a 1080p-capable display.
** Standard video: AVI/MPEG-4 (1080i) at the default volume.
Standard audio: MP3 (128 kbps, 44.1 kHz at the default volume.

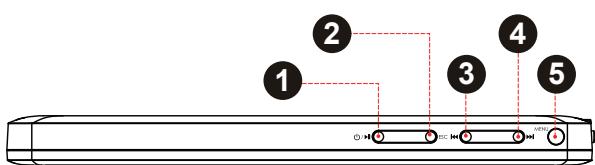
Getting to Know Your Player
| Name | Icon | Action | Description | |
| 1 | Power/Play button | [POWER] | Press & hold | Turn the player on or off. |
| [PLAY] | Press | Start, pause, or resume media playback. | ||
| 2 | Escape button | [ESC] | Press | Return to the previous screen. |
| Press & hold | Return to the Home screen. | |||
| 3 | Previous/Reverse button | [PREV] | Press | Skip to the previous track. Browse up a menu list. |
| Press & hold | Scan in reverse quickly through the current track. | |||
| 4 | Next/Forward button | [NEXT] | Press | Skip to the next track. Browse down a menu list. |
| Press & hold | Scan forward quickly through the current track. | |||
| 5 | Menu/OK | [MENU] | Press | Display an option menu, if available. Select an item from a menu list. |
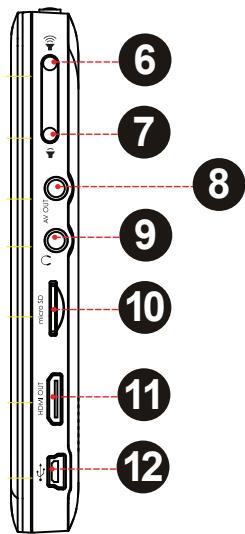
| Name | Icon | Action | Description | |
| 6 | Volume Up button | [VOL +] | Press | Increase the volume level. |
| Press & hold | Quickly increase the volume level. | |||
| 7 | Volume Down button | [VOL -] | Press | Decrease the volume level. |
| Press & hold | Quickly decrease the volume level. | |||
| 8 | Video Output connector | Connect to a TV or other display. This connection carries video only; a separate connection is necessary for audio. An included 3.5mm video output cable is required to make this connection. | ||
| 9 | Headphone Output connector | Connect a pair of headphones or earphones for private listening. The speaker output will be disabled automatically when this connection is made. | ||
| 10 | microSD card slot | Load a microSD memory card. | ||
| 11 | HDMI output connector | Connect to a TV or other display. This connection carries video and audio. | ||
| 12 | USB connector | Connect to a computer to transfer files or to charge the player. |
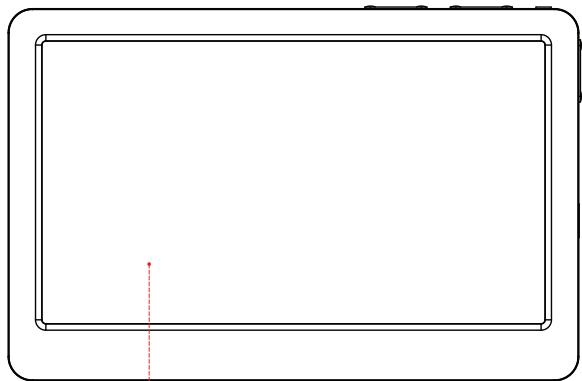
Name
Description
13 LCD screen
High-resolution display.
14 Remote sensor
To use the remote control, point it at the sensor.
15 Stereo speakers
The stereo speaker output is automatically disabled when a pair of headphones or earphones is connected to the player.

13
14
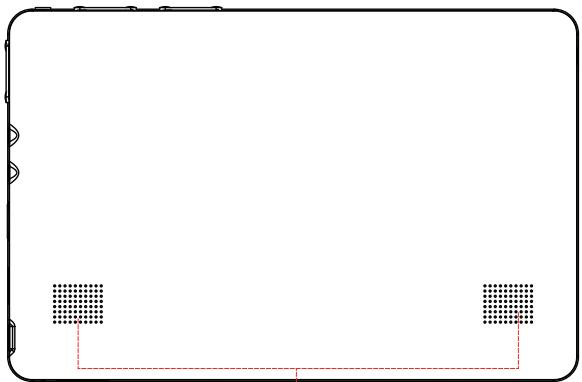
15
Remote Control at a Glance
| Name | Action | Description | |
| 1 | [HDMI OUT] | Press | Turn HDMI output on or off. |
| 2 | [PLAY] | Press | Start, pause, or resume media playback. |
| 3 | [VOL+] | Press | Increase the volume level. |
| 4 | [VOL-] | Press | Decrease the volume level. |
| 5 | [MENU] | Press | Display an option menu, if available. |
| 6 | [UP] | Press | Browse menu items. |
| 7 | [LEFT] | Press | Next: Skip to the previous track. Escape: Return to the previous screen when browsing a menu. |
| Press & hold | Reverse: Scan in reverse quickly through the current track. | ||
| 8 | [RIGHT] | Press | Next: Skip to the next track. OK: Select an item from an option menu. |
| Press & hold | Forward: Scan forward quickly through the current track. | ||
| 9 | [DOWN] | Press | Browse menu items. |
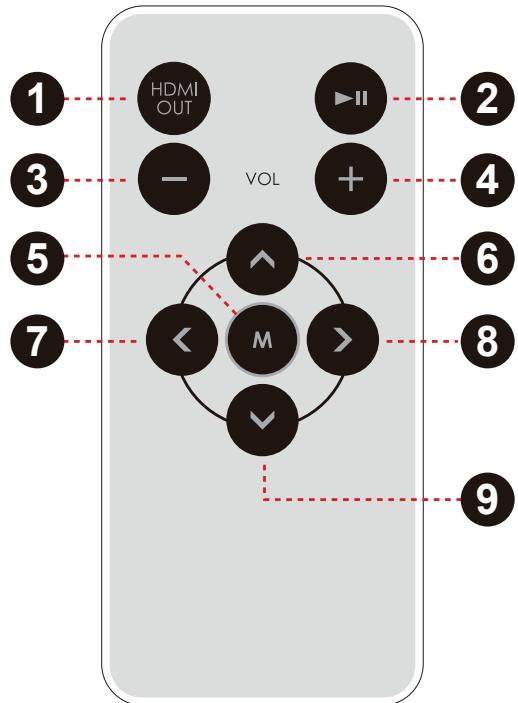
Using the Remote Control
Point the remote at the remote sensor of the photo frame at a distance of no more than 10ft and at an angle no greater than 45 degrees.

Do not spill water on the remote control.
Do not use the remote control for other equipment at the same time.
Installing a Battery in the Remote Control
The remote control requires one "CR2025" battery. To load a battery in the remote:
- Slide the compartment out in the direction of the arrow.
- Place the battery in the compartment with the positive side (+) facing up.
- Push the compartment in to close.
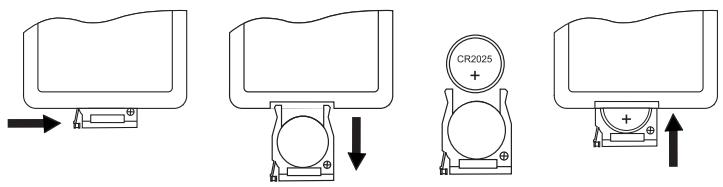
Inserting a Memory Card
This unit accepts microSD or microSDHC memory cards. Insert a memory card into the microSD card slot to:
Increase the memory capacity of your player
Play media files stored on the memory card (e.g., music, video, or photo files).
To insert a memory card:
- Align the memory card with the card slot. The metal contacts of the memory card should face up towards the LCD screen.
- Slide the card into the spring-loaded slot. Push the card in until it clicks into place.

Do not attempt to insert objects other than a microSD or microSDHC memory card into the card slot. A compatible memory card should fit easily into the card slot; if you encounter resistance, check the alignment of the card. Do not attempt to force the card in.
Avoid touching the gold contacts of the memory card.
To release and remove a memory card:
- Push the card further into the slot until you hear a click. The card will spring out of the slot.
- Grasp the card by its edge to remove it.

To avoid damage and data corruption, do not remove a memory card while data is being written to or read from the card. For example, do not remove a card while playing a music file stored on the card.

Getting Started
Charging the Player
The player comes with a built-in rechargeable lithium-polymer battery.
Charge the battery fully before using it for the first time. If the player has not been used in a while, the battery may need to be recharged overnight (about 8 hours).
To charge the battery:
- Plug the small end of the included USB cable into the player's USB connector.
- Plug the large end of the USB cable into a computer's USB 2.0 Hi-speed port. The LCD screen will turn on and display the message USB connecting.
a. The computer must be turned on, and;
b. The USB port must be a high-power port. High-power ports can usually be found on the main computer unit.
- Disconnect the player when it is fully charged.

The computer must be powered on and not in sleep mode in order to charge the battery.
The player will not charge if it is connected to a low-power USB port. Low-power ports may be found on a peripheral device that is connected to the computer (e.g., a keyboard).
If the player is connected to the computer through a USB hub, the hub must be self-powered to charge the battery.
TIP
You can press and hold [ESCAPE] after the player is connected to cancel the data connection and switch to USB power mode. This will allow you to use the player normally while drawing power from the computer.

The battery used in this device may present a fire or chemical burn if mistreated. Do not disassemble, incinerate, or heat the battery. Do not leave the battery in a place subject to direct sunlight, or in a car with its windows closed. Do not connect the player to a power source other than that which is indicated here or on the label as this may result in the risk of fire or electric shock.
Turning the Player On/Off
To turn the player on, press and hold the
To turn the player off, press and hold the

If the player stops responding or otherwise behaves abnormally, press and hold [POW-ER] for several seconds to turn it off. Wait a few seconds, then turn the player on again.
Home Screen at a Glance
When you turn the player on, you will see the Home screen.
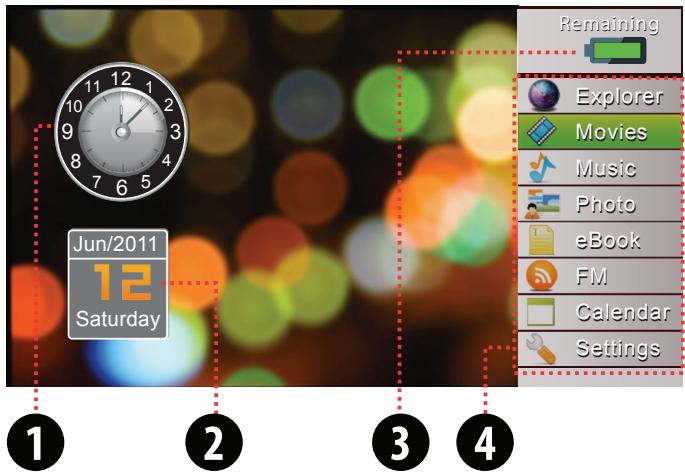
| 1. Clock | The time can be adjusted in Calendar mode. |
| 2. Date | The date can be adjusted in Calendar mode. |
| 3. Power indicator | Shows the battery level, or the charge status if the player is connected to a power source. |
| 4. Function modes | Press [PREV] or [NEXT] to browse the function mode list. Press [MENU] to launch the selected function mode. |
About the Function Modes
Select a function mode from the Home screen to launch it.
Press [PREV] or[NEXT] to browse the function mode list.
Press [MENU] to launch the selected function mode
| Explorer | Find and play all files on the player. |
| Movie | Find and play movie files on the player. |
| Music | Find and play music files on the player. |
| Photo | Find and display photo files on the player. |
| eBook | Find and display text files on the player. |
| FM | Listen to FM radio. |
| Calendar | Display a calendar. |
| Settings | Adjust the player's options. |

This guide will briefly describe the Movie, Music, Photo, and FM modes.
For a description of all of the player's function modes, please refer to the instruction manual.

Playing Media Files
Your player supports playback of movie, music, photo and text files stored on the player's internal memory or on a microSD card.

To learn how to transfer files onto your player, please refer to the section Connecting to a Computer.
Movie Mode
Select "Movie" from the Home screen to find and play movie files.
The player will launch a file browser. Only movie files will be displayed.
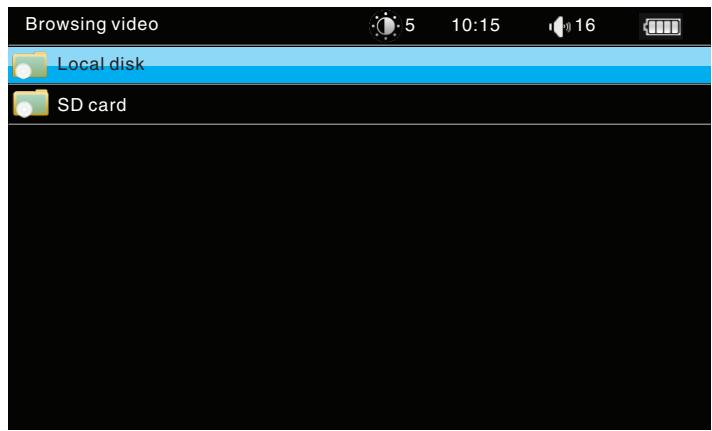
Select "Local Disk" to browse files stored on the player's internal memory.
If a memory card has been installed, select "SD card" to browse files stored on the card.
To browse files:
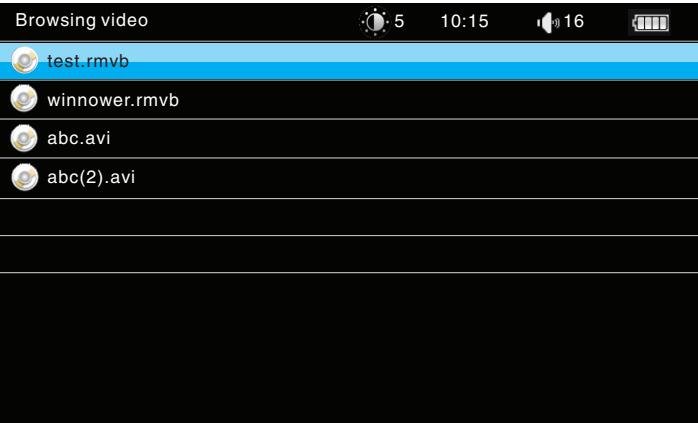
Press [PREV] or [NEXT] to browse through the list.
Press [MENU] to select an item.
Select a folder to view its contents.
(If the selected folder does not contain any movie files or folders, you will not be able to open it.)
Select a movie file to play the file. (If you have played the movie before, you
will be given a choice to "Play from break-point". Select YES to play the movie from where you stopped last.)
Press [ESC] to return to the previous screen.
When your movie file has started playing:
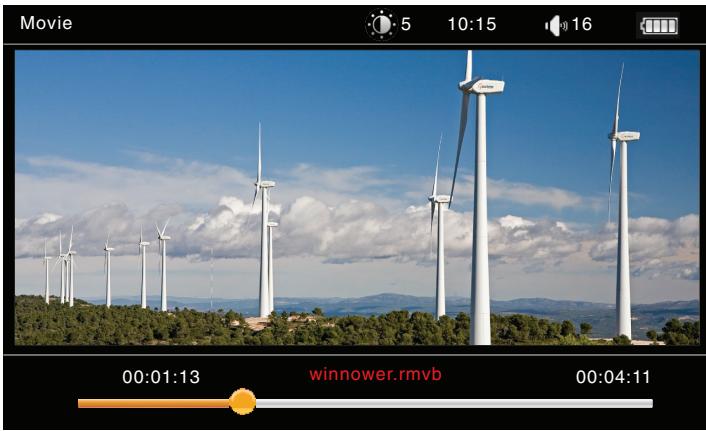
Press [NEXT] to skip to the next file; press [PREV] to skip to the previous file.
Press and hold [PREV] or [NEXT] to quickly scan through the file. Some files may not allow scanning.
Press [PLAY] to pause playback; press [PLAY] again to resume playback.
Press [ESC] to stop playback and return to the file browser.
Press [MENU] to access the movie options menu.
Press [PREV] or [NEXT] to browse the options list; press [MENU] to select an option.
Press [ESC] to exit the menu and return to your video.
| Option | Description |
| Stop playback and return to the file browser. | |
| Change the audio track. The file must support alternate audio tracks. | |
| View detailed file information. | |
| A | Change the subtitle track. The file must support subtitle tracks. |
| Option | Description |
| · | Adjust the screen brightness. |
| · | Change the video display format. |
| · | Change the repeat mode. |
| · | Adjust the stereo balance. |
| · | Adjust the subtitle font size. The file must support subtitle tracks. |
| A· | Change the subtitle font color. The file must support subtitle tracks. |
| · | Adjust the video sharpness. |
Music Mode
Select "Music" from the Home screen to find and play music files.
The player will launch a file browser. Only music files will be displayed.
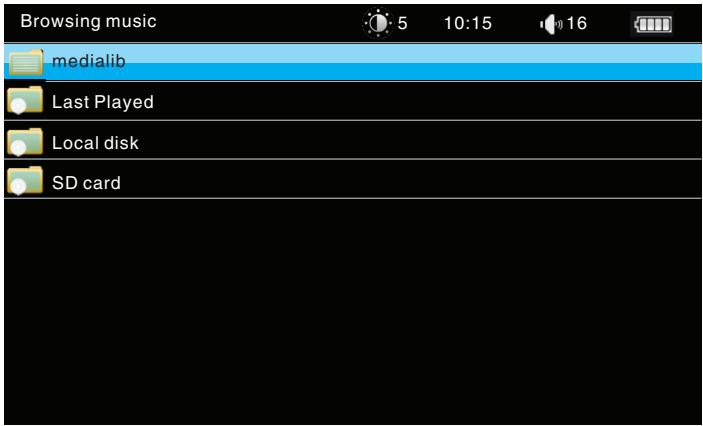
Select "medialib" to find music stored on the player's internal memory by category (e.g., Artist, Album, Genre, Star, Year, or All music).
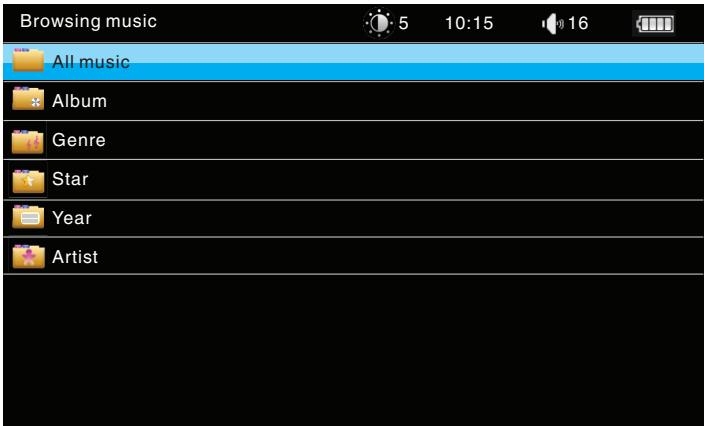
Your music files must be encoded with category information (sometimes known as ID3 or metadata).
Music files stored on a memory card will not be found.
Select "Playing" to go to the music player screen. (This option is only available if a song is currently playing).
Select "Last Played" to play the last song that was played. (This option is only available if you have previously played a song.)
Select "Local Disk" to browse music files stored on the player's internal memory.
If a memory card has been installed, select "SD card" to browse music files stored on the card.
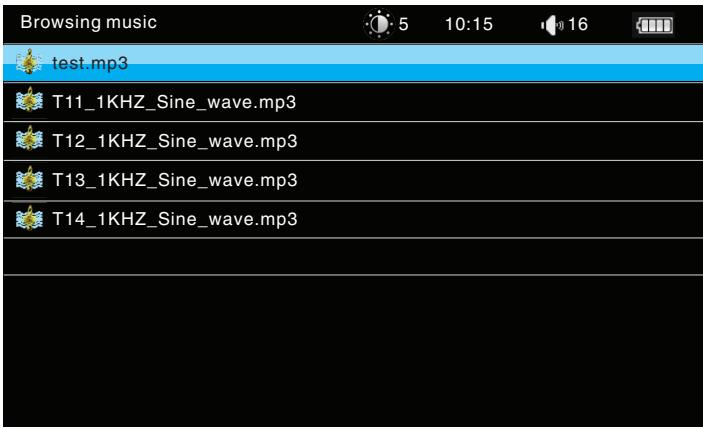
To browse files:
Press [PREV] or [NEXT] to browse through the list.
Press [MENU] to select an item.
Select a folder to view its contents. (If the selected folder does not contain any music files or folders, you will not be able to open it.)
Select a music file to play the file.
Press [ESC] to return to the previous screen.
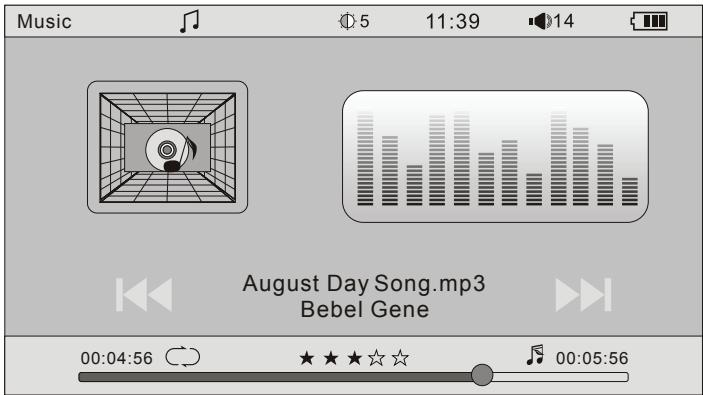
When your music file has started playing:
Press [NEXT] to skip to the next file; press [PREV] to skip to the previous file.
Press and hold [PREV] or [NEXT] to quickly scan through the file.
Press [PLAY] to pause playback; press [PLAY] again to resume playback.
Press [ESC] to return to the file browser. (Music will continue to play.)
Press [MENU] to access the music options menu.
Press [PREV] or [NEXT] to browse the options list; press [MENU] to select an option.
Press [ESC] to exit the menu and return to the music player screen.
| Option | Description |
| Stop playback and return to the file browser. | |
| Change the repeat mode. | |
| Change the equalizer preset. |
| Option | Description |
| ←→ | Change the visualizer mode. (Lyric mode requires a file that supports lyrics. If a lyric track is not found, the player will default to spectrum mode.) |
| ·○· | Adjust the screen brightness. |
| ☆☆ | Rate the current track (from 1 to 5 stars). |
| A | Adjust the lyric font appearance. |
Photo Mode
Select "Photo" from the Home screen to find and display photo files.
The player will launch a file browser. Only photo files will be displayed.
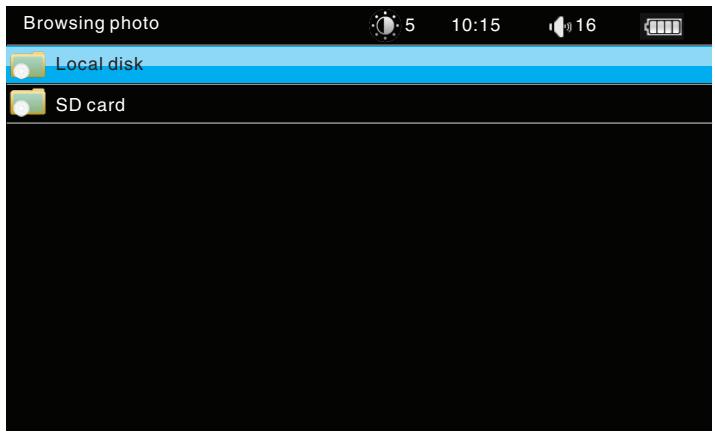
Select "Local Disk" to browse photo files stored on the player's internal memory.
If a memory card has been installed, select "SD card" to browse photo files stored on the card.
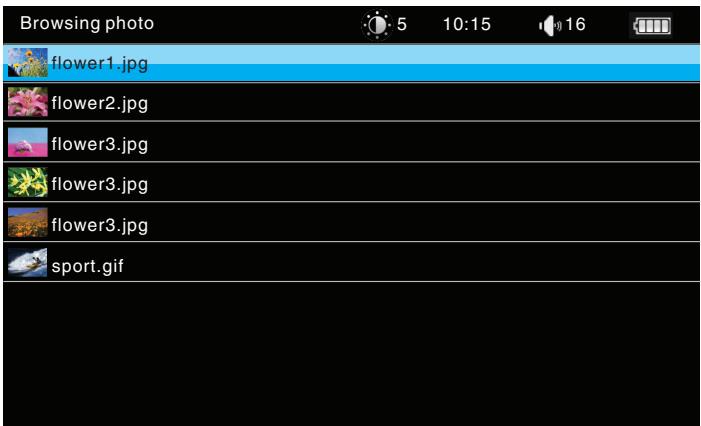
To browse files:
Press [PREV] or [NEXT] to browse through the list.
Press [MENU] to select an item.
Select a folder to view its contents. (If the selected folder does not contain any photo files or folders, you will not be able to open it.)
Select a photo file to display the file.
Press [ESC] to return to the previous screen.
When your photo file is displayed:
Press [NEXT] to skip to the next file; press [PREV] to skip to the previous file.
Press [PLAY] to turn start or stop slideshow mode. (Controls are limited to [PLAY] and [ESC] while a slideshow is playing.)
Press [ESC] to return to the file browser.
Press [MENU] to access the photo options menu.
Press [PREV] or [NEXT] to browse the options list; press [MENU] to select an option.
Press [ESC] to exit the menu and return to the music player screen.
| Option | Description |
| ←P | Stop playback and return to the file browser. |
| →II | Start slideshow mode. |
| View transform options (zoom, rotate). |
| Option | Description |
| View detailed file information. | |
| View photo thumbnails. | |
| Select a music file to play while viewing your photos. | |
| Change the slideshow transition effect. | |
| Change the slideshow timer. | |
| Change the repeat mode. | |
| Adjust the screen brightness. | |
| Use the current photo as the player's background wallpaper. |

Listening to FM Radio
Select "FM" from the Home screen to listen to FM radio broadcasts.
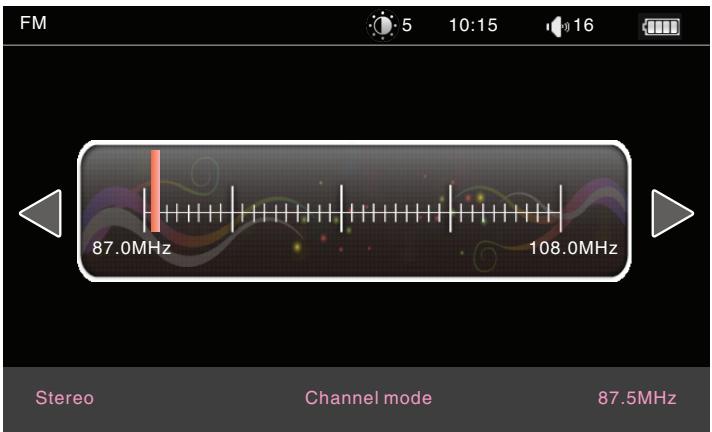

In order to receive FM stations, a pair of headphones or earphones must be connected to the player's headphone jack.
To get started listening to the radio quickly:
- Select "FM" from the Home screen. The FM radio will launch.
- Press [Menu] to access the FM options menu.
- Press [Next] once, and then press [Menu] to select "Channel" mode. Wait a few seconds as the player searches for available stations and saves them automatically as preset stations.
- Press [ESC] to exit the FM options menu.
- Press [PREV] or [NEXT] to tune to a preset station.

The player will always search for and save stations automatically before entering "Channel" mode.
For precise tuning, change the tuning method to "Manual" mode.
- Press [Menu] to access the FM options menu.
- Press [MENU] to select "Manual" mode.
- Press [ESC] to exit the FM options menu.
- Press [PREV] or [NEXT] to tune to a station.

Connecting to a Computer
Connect the player to a computer to transfer files to the player.
The player's battery will be charged when it is connected to a computer.

The computer must be powered on and not in sleep mode in order to charge the battery.
The player will not charge if it is connected to a low-power USB port.
If the player is connected to the computer through a USB hub, the hub must be self-powered to charge the battery.
When the player is connected and charging, the notice "USB connecting" will be displayed its screen.
The computer will automatically detect the player. It may take a few minutes for the computer to configure the drivers for the player.
- The player's internal storage will be recognized by the computer as a Removable Storage drive. Use the computer's basic operating system commands to transfer files between your player and the computer, or to manage files directly on the player.
Using the included USB cable:
- Connect the smaller end of the cable to the USB connector located on the right side of the player.
- Connect the larger end of the cable to a USB 2.0 Hi-speed port on a computer.

If your computer is running the Windows operating system, it might display an "Autoplay" screen when connected. Click "Open device to view files using Windows Explorer" to start managing files on your player.
You can press and hold [ESC] after the player is connected to cancel the data connection and switch to USB power mode. This will allow you to use the player while drawing power from the computer.

Connecting to a TV
Connect the player to a TV to enjoy your player in the comfort of your living room. Use an HDMI cable to connect the player to a TV.

For component and composite video connections, additional cables are required.
Before connecting your player to the TV, you will have to adjust a few display settings on the player.
Make sure that the player is set to output over HDMI.
For optimal visual performance, make sure that the video output resolution of the player matches the capabilities of the TV.
To adjust the display settings:
-
From the Home screen, select Settings to show the settings menu.
-
Select Output to show the Output settings.
Check HDMI_1080P if your TV is capable of displaying 1080p video.
Check HDMI_720P if your TV is capable of displaying 720p or 1080i video.
To connect the player to the TV:
- Plug the small end of the HDMI cable into the mini HDMI connector of the player.
- Plug the large end of the HDMI cable into the HDMI port on the TV.
- Turn on the TV, and set its display mode to the HDMI port that the player is connected to.
The player's display will be output to the TV screen.

If you need help setting the display mode of the TV, please refer to the documentation provided by the TV manufacturer.
When you are done, simply disconnect the HDMI cable and output will return to the player's LCD screen. Alternately, you may set the Output option to LCD in the settings menu.
Design, specifications, and manual are subject to change without notice.
| Memory | Internal flash memory microSD card slot (max. 16GB supported) |
| Display | 7.0” TFT LCD (800 x 480) |
| Play Modes | Video Music Photo Text |
| Video Output | Mini HDMI, type C (1080p max) 3.5mm video |
| Audio Output | 3.5 mm headphone Stereo speakers |
| Tuner | FM radio |
| PC Interface | USB 2.0 Hi-speed |
| File System Support | FAT32 NTFS |
| OS Support | Microsoft Windows 7 Microsoft Windows Vista Microsoft Windows XP Macintosh OS X |
| Power | Rechargeable Li-poly battery |

Mpmanager
For Video and music synchronisation and conversion, please use MPMANAGER software supplied in the CD ROM.
This software can be used also for UPDATE of your player
MPMANAGER manual is included in your CDROM.

Troubleshooting & Support
If you have a problem with this device, please check the troubleshooting instructions below.
The player does not turn on.
Ensure that the player is fully charged. Try charging the player overnight (8 hours).
Reset the player. Press and hold [POWER] for several seconds to turn it off. Wait a few seconds, then turn the player on again.
The buttons do not work.
Reset the player. Press and hold [POWER] for several seconds to turn it off. Wait a few seconds, then turn the player on again.
I cannot transfer files to the player.
Ensure that your computer is running a supported operating system.
If using a USB extension cable, ensure that it is securely attached to the player and the PC, or try using another USB cable.
Ensure that the player's memory capacity is not full.
There is no sound during playback.
Check the volume level.
Ensure that the headphones are attached securely to the player.
The sound quality of the music is poor.
Try playing the file on your computer. If the sound quality is still poor, try downloading the file again or re-encoding the file yourself.
Ensure that the bit rate of the file is not too low. The higher the bit rate of the file, the better it will sound. The minimum recommended bitrate is 128kbps for MP3s and 96kbps for WMAs.
Try lowering the volume of the player.
Ensure that the headphones are attached securely to the player.
The player will not play my music file.
Ensure that the file is in a compatible format.
The file may be copy-protected and you no longer have authorization to play this file. If you feel this is in error, please contact the service from which you downloaded the file.
The LCD characters are corrupted or something is wrong with the display.
Ensure that the correct menu language has been set.
Reset the player. Press and hold [POWER] for several seconds to turn it off. Wait a few seconds, then turn the player on again.
The player has malfunctioned.
Reset the player. Press and hold [POWER] for several seconds to turn it off. Wait a few seconds, then turn the player on again.
For more information please check our website www.mpmaneurope.com
C E