USER MANUAL MP40HD MPMAN
Appearance and keys 4
Operation instructions .... 5
Brower 6
Movie 7
Music 9
Picture 12
E-book 13
Radio 15
Sound recording 16
Adjusting volume 16
Calculator 16
Music shortcut 17
Calendar 17
Search 17
Settings 18
Using memory card 19
Troubleshooting 20

Features
- 4.3" true color touch screen, slide effect showing the fashion style;
- The provided remote control makes the operation easier;
- Support TV-OUT HD output, enabling sharing joy with your family and friends;
- Support music playing in MP3, WMA, WAV, RA, AAC, OGG, APE, etc;
- Support HD video playing in FLV, AVI, DAT, 3GP, MP4, RMVB, ASF, RM, MOV, etc;
- Support picture browsing in JPEG, BMP, GIF, etc;
- Support FM radio and channel storage;
- Inbuilt microphone, super long sound recording;
· Integrate search engine, allowing searching the multimedia files in the player;
- Support additional functions such as calendar, calculator, etc;
- Support e-book and bookmark;
- Support microSD card extension;
- Support multitask, allowing reading e-book while listening to music;

The specifications and design are subject to changes without prior notice.

Precautions
- Do not use the player in the environment with extreme temperature, moist or dry environment
- Battery life may vary according to the using condition, manufacturer and production time
- Please charge in the following conditions:
A. Battery state icon is blank and the keys are invalid
B. The system turns off automatically and turns off quickly after restarted
C. Only use qualified charger to charge
D. To charge for the first time, use up the power supply and then charge fully; from the second charging, the time takes about four hours
E. Remove the charger in time after charging
F. Do not charge for more than eight hours
- Do not disconnect during formatting or uploading/downloading, or else program error may occur.
- When it is used as mobile hard disk, please save and export the files in proper operation, or else the files may be lost and we won't be responsible.
- Do not disassemble the player. Contact the dealer if there is any problem.
Note: 1. The pictures in this manual may be different from the player due to the difference of software version.
2. The rated capacity and actual capacity may be different due to the player system.
3. The player may turn off automatically because of static interference. The player will be normal after restarted manually.

Appearance and keys
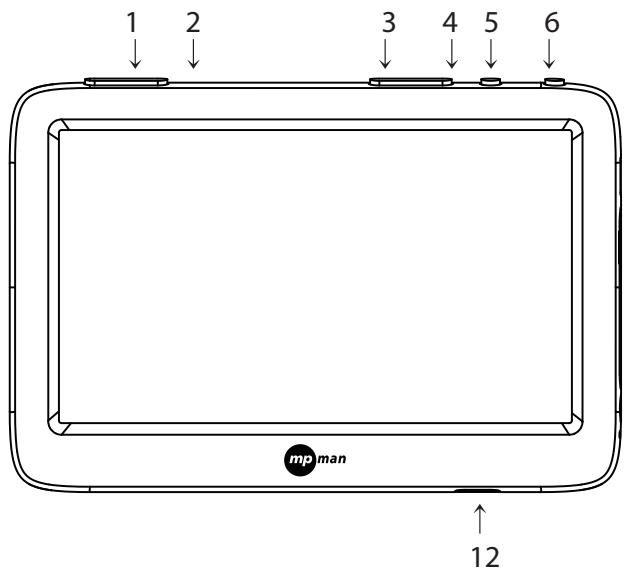
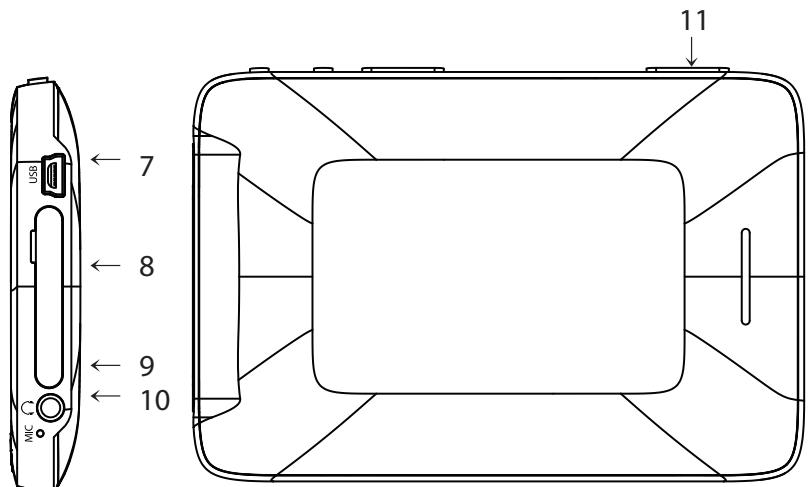
- VOL-
- OK/Back
-
Microphone
-
VOL+
- USB/charging interface
-
Speaker
-
PREV./FR
- TF slot
- Remote receiver
4/ Next/FF
9. Earphone/Video out port

Operation instructions
Basic operation
- Turning on: Press and hold the ▶II key to show the start interface and enter the main interface.
- Turning off: Press and hold the ▶II key to show the power off interface and turn off the player.
- Reset: In operating state, press and hold the ▶■ key to reset if the player can't work normally.
- Slide: In the main interface, slide left/right to switch the main interface; click and drag the icon to arrange.
(Note: Due to the page limit, this manual takes the keys on the player for the example. For the operation with the remote control, please follow the definition of the remote control) Software operation instructions

Explorer
In "Explorer" module, all the files are listed. Click to enter level by level and list all the files in current folder;
- Click a file or folder to open;
-
Click 📋 to pop up browser setting menu, and select Back, Files sorting, or File setting;
-
Back: Click ➕ to return to previous menu;
— Files sorting: Click 📄 to sort all files;
-
File setting: Click 📋 to delete/copy/paste the selected file;
-
Click 📋 on the right of the file or folder to pop up the menu, and select Copy, Paste, Delete or Cancel; and click to enter the function.
- Click the “←” icon in the upper left corner of the screen to exit the browser interface.

Movie
In main menu interface, select "Movie" option, click to enter video files list, slide up/down to select the video file to play, and click to enter video playing interface.
- Click the ▶ icon in the playing interface to play or pause;
- Click the ◀◀ / ▶▶ icon in the playing interface to select previous track or next track; press and hold the ◀◀ / ▶▶ key to fast rewind or fast forward;
- Click the speaker symbol in the state bar in the top of the screen, and drag the slider to adjust the volume;
- During video playing, click 📄 to list the video setting menu, select "Back", "Output option", "Sound track", "Caption", "Brightness", "Zooming mode", "Playing mode", "Sound channel", "Caption size" or "Caption color", and click to enter the setting interface.
- Back: Click 📄 to return to previous menu;
- Output option: Click ☐ to enter TV output options, including LCD (output to the player; in TV mode, select LCD to switch to the player directly), PAL and NTSC (output to TV);
- Sound track: Click 🎧 to enter multi-track setting interface; if current video file has multi-track, you can select the sound track of the video file;
- Caption display: Click A to enter caption display setting interface; if the current played video file has external caption or built-in caption, but the user doesn't want to display the caption, enter Caption display and select OFF to hide the caption;

Movie
- Brightness: Click 📷 to enter brightness setting interface, and click left/right arrow to select the brightness from "1-15";
- Zooming mode: Click ☐ to enter zooming mode setting interface, select "Full screen (video scale)", "Full screen (screen scale)", "Aspect ratio (4:3)", "Aspect ratio (16:9)", or "Original size", click OK, and the video will be displayed according to the select mode;
- Playing mode: Click 📋 to enter playing mode setting interface, select "Single track", "Single repeat", "Repeat all", "Sequence" or "Random", click OK, and the current video will be displayed in selected mode;
- Sound channel: Click 📄 to enter sound channel setting interface, select "Stereo", "Left channel", or "Right channel", and the video will be played in selected channel;
- Caption size: Click 📄 to enter caption size setting, select "Caption zoom-in" or "Caption zoom-out", and click OK;
- Caption color: Click 🎨 to enter caption color setting interface, select "Original", "Red" or "Black", and click OK.
***While playing video, click F to exit the video being played; when enter the video again, the resume playing selection box pops up; click to select "Yes" or "No"; click "Yes" to play the video from the position exited last time; click "No" to play from the start;

Music
In the main menu, click "Music" and select desired music from "Media library" or "Local disk".
— Media library: Sort all the music files according to Artist, Album, Genre, Star, Year or All, and the user can find desired music files quickly;
— Artist: List all artist names and unknown artists, sort the music according to artist names, and all the music files of the artists can be found;
— Album: List all album names and unknown albums, sort the music according to album name, and all the music files of the album can be found;
— Genre: Sort all the music files according to the genre, and all the music files of the genre can be found;
— Star: Sort all the music files according to the star, and all the music files of the star can be found;
– Year: Sort all the music files according to the time, and all the music files of the year can be found;
— All songs: List all the music files in the player;
Enter the music files list directly, slide up/down to select desired music file, and click to enter music playing interface.

Music
- Click the ◀◀ / ▶▶ icon in the playing interface to play or pause;
- Click the ◀◀ / ◀◀ icon in the playing interface to select previous track or next track; press and hold the ◀◀ / ◀◀ key to fast rewind or fast forward;
- Click the speaker symbol 📋 in the state bar in the top of the screen, and drag the slider to adjust the volume;
- Click the 📋 symbol in the status bar in the bottom of the screen to switch the playing mode;
- Click the 📂 symbol in the status bar in the bottom of the screen to switch the equalizer;

Music
- Click 📋 in the lower left of the screen to list the music function setting interface, select "Back", "Playing mode", "EQ", "Spectrum and lyrics switch", "Star" or "Lyrics color", and click to enter the setting interface.
- Back: Click → to return to previous menu;
- Playing mode: Click 📋 to enter the playing mode setting interface, select "Single track", "Single repeat", "Repeat all", "Sequence" or "Random", click OK and the music will be played in the selected mode;
- EQ setting: Click 📂 to enter equalizer setting interface, slide up/down to select "Nature", "Bass", "Pop", "Rock", "Classic", "Jazz", "Language", "Dance", or "Soft", click OK and the music will be played in the selected equalizer;
- Spectrum and lyrics switch: Click ☐ to enter lyrics and spectrum switch setting interface, select "Spectrum", or "Lyrics", click OK and the lyrics or spectrum will be displayed in selected mode;
— Star: Click 📂 to enter the star setting interface, and click OK to select the music according to star;
- Lyrics color: Click A to enter lyrics color setting interface, select "Blue background red characters, Red background blue characters, Yellow background green characters, Green background yellow characters, Orange background green characters, Red background yellow characters, or Blue background green characters", click OK and display the lyrics in selected color.

Photo
In the main menu interface, select "Photo" option, click to enter picture thumbnail interface, slide up/down to select the picture and click to enter the browsing interface;
- When browsing pictures, click to left/right, to switch to previous/next picture;
- When browsing pictures, click the screen center to show/hide picture setting menu, select "Back", "Auto play", "Zoom/rotate", "Thumbnail", "Switch music", "Switch effect", "Browsing time", "Playing sequence", or "Desktop setting", and click an icon to enter the setting interface.
- Back: Click ➕ to return to previous menu;
- Auto playing: Click ▶ to enter the auto playing interface, and the pictures play automatically; click any position on the screen to pause;
- Zooming/rotation: Click 📋 to enter the option, and zoom in/out the pictures or rotate the pictures clockwise or counterclockwise;
- Thumbnail: Click 📋 to enter this option, and display the thumbnails of all pictures;
- Switching music: Click 🎯 to enter this option and insert music, so that you can listen to the music while viewing pictures;
- Switching effect: Click 📄 to enter "Switching effect" option and set the switching effect, including default, fade, horizontal blinds, vertical blinds, drag up, drag down, drag left, drag right, expand up, expand down, expand left, expand right, mosaic, zoom in, zoom out, random, etc.
- Browsing time: Click ☒ to enter "Browsing time", and set the time to 1sec, 3 sec, 5sec, or 10sec;
- Playing sequence: Click 📋 to enter "Playing sequence" and select "Next", "Prev." or "Random";
- Desktop setting: Click 📋 to enter "Desktop setting" option and set current picture as the desktop background.

E-book
In the main menu, select "E-book" option and enter the e-book list, slide up/down to select desired e-book, and click to enter the e-book reading interface;
- Click Up/Down to turn pages;
-
Click any position in the center of the screen to call out the setting menu, select "Back", "Auto browsing", "Rotate", "Add bookmark", "Open bookmark", "Character size", "Character color", "Page switching mode", "Background setting", "Switch music", "Auto browsing time", "Speech sound setting", "Speech switch setting" or "Word spacing setting".
-
Back: Click ➕ to return to previous menu;
- Auto browsing: Click ▶II to enter the auto browsing state, and click again to return to manual browsing;
- Rotate: Click 📁 to enter the "Rotate" interface, and select "Right" or "Left";
- Add bookmark: Click 📄 to enter the "Add bookmark" interface, select a bookmark from the eight bookmarks, and click OK to save the bookmark;
- Open bookmark: Click 📄 to read the saved bookmarks, select the bookmark number and click OK to read;
- Character size: Click A to enter e-book font size setting interface, select "Big" or "Small", and click OK to save the setting;
- Character color: Click A to enter e-book character color setting interface, select "Black", "Blue", "Green", "Red" or "White", and click OK to save the setting;

E-book
- Page turning mode: Click 📄 to enter e-book page turning mode setting interface, select "Direct" or "Slide", and click OK to save the setting;
- Background setting: Click 📄 to enter e-book background setting interface, select "Background 1", "Background 2", "Background 3" or "Background 4", and click OK to save the setting;
- Switch music: Click 🎯 to enter this option and insert music, and you can listen to the music while reading e-book;
- Auto browsing time setting: Click ✗ to enter the option and set the time of auto browsing.
- Speech sound setting: Click to enter this option and set the reading sound.
- Speech switch setting: Click to enter this option and enable/disable reading.
- Word spacing setting: Click 📋 to enter word spacing setting, select an option and click OK to save.

FM radio
In the main menu interface, select the "FM" option and click to enter the radio interface.
- Click the ◀◀ /▶▶ icons in the radio interface to scan radio channels;
- Click the speaker symbol in the state bar in the bottom of the screen, and drag the slider to adjust the volume;
-
Click the icon in the lower left corner to show the radio setting menu, select "Back", "Channel list", "Auto scan", or "Store channel", and click to enter the interface.
-
Back: Click → to return to previous menu;
- Channel list: Click ☐ to show the stored channels;
- Auto-scan: Click to enter automatic scanning state;
- Store channel: Click 📄 to store current channel in the list;

Record
In the main interface, select "Sound recording" and click to enter the sound recording interface;
- Enter sound recording interface, click 📄 to start/pause, click 📄 to stop and save the recording file automatically;
- Click 📋 in the lower left corner to show sound recording setting menu, select "Sound quality" and click to enter the interface.
- Click the speaker symbol in the state bar in the lower right of the screen, and drag the slider to adjust the volume.
- Sound quality: Click 📄 to enter sound quality menu and set the quality;

Adjusting volume
In the main interface, select the "Volume" option and click to enter the interface;
- Drag the slider to adjust the volume.

Calculator
In the main interface, select the "Calculator" option and click to enter the interface;
- Type the numbers accordingly and click calculate the show the result
- Click 📋 to exit the calculator and return to previous menu.

Music shortcut
In the main interface, select the "Music shortcut" option and click to enter the interface;

Calendar
In the main interface, select the "Calendar" option and click to enter the interface;
- Setting date and time: Click the 📋 icon in the lower left of the screen to show the calendar setting menu, click the arrow to set the date and time, and click OK to save.

Search
In the main interface, select the "Search" option and click to enter the interface;
- Type the filename in the address bar accordingly, and show the results in list (click a file to open or play).
Note: Search is only available for music and video files.
- Click the 📄 icon to return to the main interface.

Settings
In the main interface, select the "Settings" option and click to enter the interface; slide to select an option or sub-option, and click to enter the interface or save the setting;
- Power: The user can enter this mode to check the current, voltage and status when the battery is being used or charged;
- Language: Enter "Language" option and select Simplified Chinese, English or Traditional Chinese;
- Auto OFF: Enter "Schedule power off" option, and select 5min, 10min, 30min, 1 hour, or Always on;
- Screen shutdown: Click to enter "Screen saver" and select 10sec, 15sec, 30sec, 1min, 5min or Always on;
• Key tone: Enable or disable key-pressing tone in this option;
- Brightness: Enter the "Brightness" option and select from 15 levels;
- Calibration: Click to enter "Calibration" mode, click the cross center with the stylus or finger tip, and return to the setting menu automatically after calibration; if it deviates from the cross center, you need to continue to calibrate;
- System info: View the model, capacity, free space and software version;
- Restore default: Restore the system to default.

Using memory card
The player integrates memory and supports microSD card extension. Insert the memory card into the player properly according to the icon.
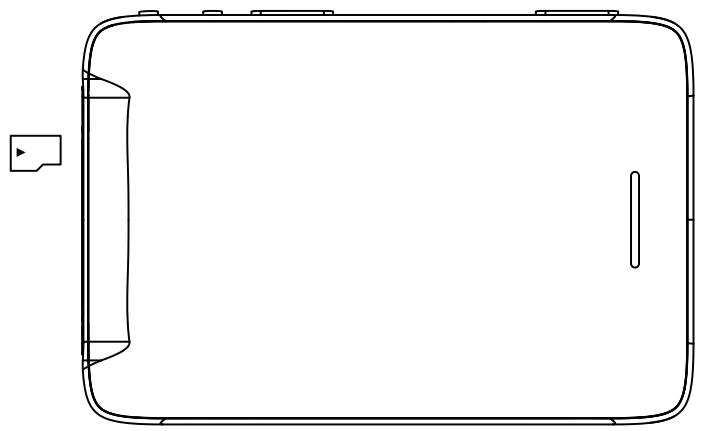
When the player is reading the files in the memory card, do not take out the card,
or else the data in the memory card will be lost or the card will be damaged. Please take out the memory card when the player is stopped or turned off.

Troubleshooting
-
The player can't be turned on normally
-
Check the battery status and recheck after connecting the power adapter;
- Reset the power and restart the player;
-
If the player still can't be started, please contact the customer service personnel.
-
Can't hear sound with the earphone
-
Please check whether the volume is set to 0.
-
Check whether the connection of earphone is proper.
-
Loud noise
-
Check whether the earphone plug is clean and dirt may cause noise
-
Check whether the music file is damaged
-
Mess code on the screen
- Please check whether the language setting is proper.
-
FM receiving effect is poor
-
Adjust the position of earphone and player
-
Turn off the electric devices nearby
• The earphone can be used as antenna
-
Can't connect to PC
-
Check whether the connection between the PC and the player is proper
- Pull out and reinsert the USB cable
-
Check whether the USB cable is damaged
-
The playing is incoherent or skips tracks automatically
- Check whether the original file is intact and can be played normally in PC; if not, re-download the file

Specification
| DX8 | Description |
| Display | 4.3 inch 480x272 TFT touch screen |
| Capacity | 2 / 4 / 8 / 16GB (FAT32, exFAT support) |
| TV-out | HDMI (720p) port |
| Remote controller | Yes |
| Video format | AVI, MKV, WMA, ASF, MP4, RM, RMVB, MPG, PSP, DAT, VOB, PMP, MOV, M2V, QT, M2A |
| Video codec | H.264 (BP/MP/HP), MPEG2 (MP), MPEG4(SP/ASP), XviD (SP/AP), VC-1 (SP/MP/AP),WMA9 (SP/MP/AP), MPEG1, M-JPEG (B) |
| Frame | 20fps |
| Audio format | MP3, WMA, WMV, WAV, OGG, FLAC, APE |
| Audio codec | MP1, MP2, MP3, AAC, FLAC, SIPR, ATRC, AC3 |
| Photo | JPG, BMP, GIF |
| Text | txt |
| Subtitle display | smi format |
| Lyric display | lrc format |
| Slot | microSD slot recognizing up to 32GB |
| USB | USB host 2.0 high speed |
| Battery | 1200mAh, rechargeable battery |
| Speaker | Built-in |
| OS | Windows 7 / 2000 / XP / Vista |
| Power adapter | DC 5V, 1A |
| Dimension | 115 x 77 x 12mm (WxHxD) |
| Weight | 124g |

MPMANAGER
For movie and music synchronisation and conversion, please use MPMANAGER software supplied in the CD ROM.
This software can be used also for UPDATE of your player
MPMANAGER manual is included in your CDROM.
www.mpmaneurope.com
CE