MS413 - Pump Maruyama - Free user manual and instructions
Find the device manual for free MS413 Maruyama in PDF.


| Product Type | Power Sprayer (Pump) |
| Brand | Maruyama |
| Model | MS413 |
| Power Source | Engine-driven (V-belt connection) |
| Cylinder Material | MAC-processed ceramic |
| Piston Packing Material | Special chemical-resistant rubber |
| Recommended Engine Power | Equal to or higher than pump required power |
| Oil Type | SAE 10W-30 (SC classification or better) |
| Lubricating Ports | 3 ports at top front of crankcase |
| Pressure Regulator | Adjustable knob with pressure gauge indicator |
| Suction Lift Height | Maximum 3 m |
| Overflow Port | Must remain open; no stopcock or valve |
| Standard Accessories | Strainer, strap, oiler, suction hose, overflow hose, nipple (for 613/653/753) |
| First Oil Change | After 50 hours of operation |
| Subsequent Oil Changes | Every 100 hours or at least once a year |
| Safety Features | Warning labels, belt cover requirement, emergency stop |
| Maintenance | Flush with plain water after use; drain completely for storage |
Frequently Asked Questions - MS413 Maruyama
User questions about MS413 Maruyama
0 question about this device. Answer the ones you know or ask your own.
Ask a new question about this device
Download the instructions for your Pump in PDF format for free! Find your manual MS413 - Maruyama and take your electronic device back in hand. On this page are published all the documents necessary for the use of your device. MS413 by Maruyama.
USER MANUAL MS413 Maruyama
natural_image
Technical line drawing of a mechanical pump assembly (no text or symbols)Please be sure to read this instruction manual before using the product. Please keep this manual carefully as a permanent reference.
When Loaning the Equipment to Another Person or Having Someone Else Operate It
- When Loaning the Equipment to Another Person or Having Someone Else Operate It
Instruct them beforehand in proper operation of the equipment, and explain one by one all of the triangular warning labels that are attached to it. Don't let your generosity cause problems: Hand over the Instruction Manual and Work Safety Manual together with the equipment. Instruct the operator to read and understand the instructions thoroughly and learn the operating procedure before using the equipment.
Please take particular care to explain the warnings about improper use.
This also applies to your family members.

natural_image
Two men in baseball uniforms exchanging a bag, with grass and crown nearby (no text or symbols)Table of Contents
- Working Safely....1
Important Points for Operation....2
Important Points for Set-Up 3
Important Points for Handling the Engine & Important Points for after Use....5
- Nomenclature and Functions of Working Parts....6
Parts Nomenclature....6
Making Sure All Standard Accessories are Present/List of Standard Accessories/
Functions of Working Parts/ ⚠ Warning Labels....7
- Handling and Operation 8
Preparation & Inspection \~ Spraying 8
Preparation & Inspection \~ Spraying Stopping 9
- Cleaning, Maintenance, and Storage 11
Power Sprayer Troubleshooting 13
- Specifications....15

WARNING
- When you need to attach an engine to this product, please ask your nearest dealer to handle it.
- When operating with a V-pulley and V-belt or similar set-up, make sure to cover the rotating parts and arrange the equipment so those parts are difficult to come into contact with even when checking their operation.
(Leave the cover on both during operation and while checking operation. If a belt cover cannot be attached, then make sure to take other measures, such as putting up a fence around the machine.)
• Make sure to turn the machine OFF before inspecting or adjusting it.

CAUTION
- Set-up the power sprayer for use within the specifications for crankshaft speed, pressure, and liquid volume.
Using the equipment outside the specified ranges may damage the power sprayer or result in accidents.
- Use an engine with a rated power output that is equal to or higher than the power required by the sprayer. When the engine power is equal to or lower than the power required by the sprayer, the sprayer may not achieve full performance.
- Set up the power sprayer so that the oil gauge is easy to check.
CAUTION
- For fixed installation of the power sprayer, use bolts of the proper size and quality, and tighten them firmly.
Unstable installation of the power sprayer and engine will result in vibration that can have a bad effect on the power sprayer.
- Select a proper size V-pulley and V-belt suitable for the power required.
- Use a V-pulley with shaft bore and keyslot dimensions suited to the shaft.
A loose V-pulley bore or keyslot can result in harmful vibration and cause accidents, so be sure to use the proper size.
- Attach the V-pulley so the end of the shaft does not quite reach the face of the pulley, and tighten the bolt securely, using a washer. When necessary, use a setscrew on the V-pulley.
- Align the engine and the power sprayer so their V-pulleys are in a straight line.
The V-belt will come under excessive strain if it is not in a straight line when viewed from above, causing possible dislocation or damage to the belt.
• Make sure the V-belt is neither too loose nor too tight.
If the belt is too tight, it may damage the bearing.
If it is too loose, it may cause slipping, belt damage, or dislocation.
- When using two or more V-belts, make sure they are the same type and circumference.
- When replacing a V-belt, replace all of them at the same time.

DANGER
- Use screws of the same type and size to attach hoses and nozzles, and attach them securely, always using gaskets.
- The use of screws of an improper size or type, lost or damaged gaskets, and loose screws can result in exposure to chemicals. Over-tightening screws can cause gaskets to protrude or be damaged, also resulting in exposure to chemicals. Therefore, be sure to tighten screws properly.
- Be sure to check operation with plain water before mixing in chemicals.
SUCTION
- The suction hose diameter should be determined by the suction port diameter. When the pipe diameter is narrowed by valves or other devices, use a suction hose that is one size larger.
CAUTION
Narrowing down the suction hose diameter unnecessarily can cause deterioration of performance and accidents.
- Keep the suction intake lifting height within 3 m.
SPRAYING
- Select sprayer hose that can handle the operating pressure.
HOSES
- Make sure that the suction hose and overflow hose are inserted well into the tank and fix them in place securely with a strap.
- When connecting a hose, always make sure there is a gasket in place.

WARNING
Attach only an overflow hose to the overflow port. Be absolutely sure not to attach any stopcock or valve and block the overflow completely, in particular, because this can wreck the machine and possibly cause injury.
NOZZLES
- Select nozzles with a delivery rate that assures an overflow volume of about 30%.

DANGER
- Using nozzles not suited to the pump specifications, removing standard equipment from the sprayer, or forcing the operation or handling of the sprayer, can not only keep the sprayer from putting out full performance but may cause malfunctions or in some cases even damage and injury. Therefore, be absolutely sure to avoid this kind of use.

CAUTION
- Never point the nozzle toward a person, since it may expose the person to chemicals.
Important Points for Handling the Engine & Important Points for after Use
When the Power Sprayer is Installed with an Engine

DANGER
- The fuel is flammable. Do not allow any open flame near the operating location.
- Always be sure to stop the engine and let it cool down before refueling. Thoroughly wipe up any spilled fuel.
- Do not allow lit cigarettes or any other flame nearby when refueling or maintaining the engine.
- After refueling, move the fuel container at least 3 m away before starting and operating the equipment.
- Do not add fuel beyond the standard capacity, or shake up the equipment, or tilt it.

WARNING
- The engine exhaust is harmful. Do not operate the engine indoors, as there is a danger of carbon monoxide poisoning. Be careful not to inhale the engine exhaust.

CAUTION
- The engine is very hot while running and immediately after stopping. Touching the muffler or cylinder fins could cause burns.
- High voltage electricity passes through the spark plugs while the engine is running. This is very dangerous, so be absolutely sure not to touch the spark plugs or plug cables.
CAUTION
Please follow all the above cautions strictly, and also carefully read the instruction manual for the engine itself for further information.
Important Points for after Use
- Any chemicals remaining after work should be placed in a tightly sealed container and stored carefully in a secure location that cannot be accessed by other people.
- After finishing work, operate the sprayer with plain water and then drain the pump, hoses, and so on. (Don't forget to clean and maintain protective masks, glasses, gloves, and other gear after finishing work.)
- When washing the equipment and other items, take the same careful precautions to avoid damage and exposure that you would when working with the chemicals themselves.
- When the equipment is used with an engine, drain out all fuel left in the engine after use.
- If any part of the equipment has been damaged, have it repaired at a dealer or through this company's sales office before storing it.
- Store the equipment in a low humidity location and protect the equipment from dust and debris.
2. Nomenclature and Functions of Working Parts
Parts Nomenclature
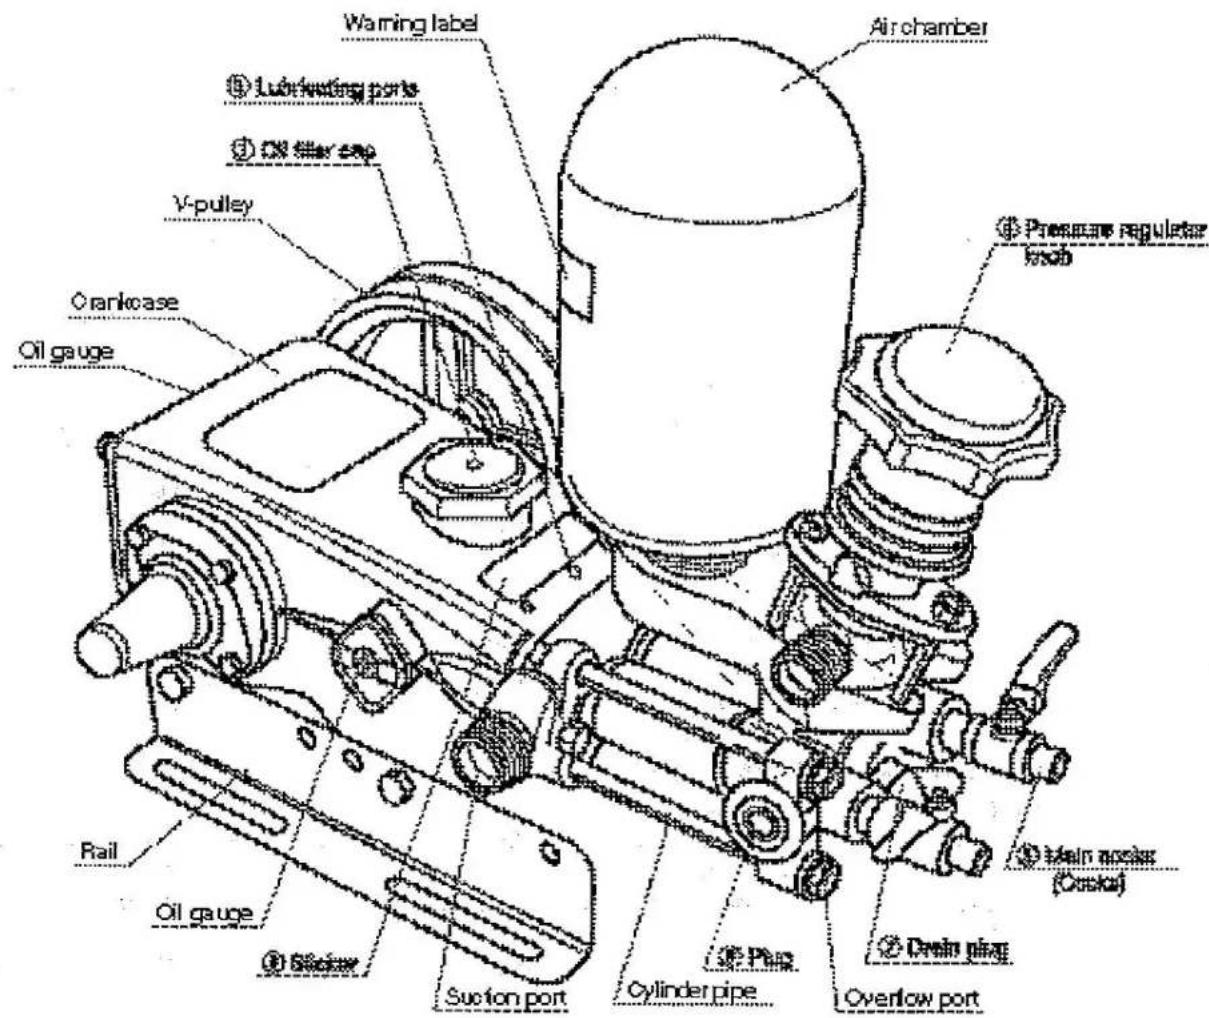
Making Sure All Standard Accessories are Present / List of Standard Accessories / Functions of Working Parts / Warning Labels
Making Sure All Standard Accessories are Present
After opening the carton, first make sure that all standard accessory items are present. If anything is missing or damaged, please immediately inform the dealer you purchased the product from. The sizes and quantities of the accessory items are listed in the tables of specifications on page 15.
List of Standard Accessories

Product Features
• The chemicals always flow in a single direction, so the suction mechanism will not be overburdened.
• The cylinder is MAC-processed (ceramic) for durability.
- The piston packing is made from a special rubber with chemically resistant properties.
Functions of Working Parts / ⚠ Warning Labels
1) Oil filler cap Before using the sprayer, be sure to open the filler cap and add oil (SAE 10W-30 equivalent, SC classification or better). See specifications on page 15 for the amount of oil.
2) Warning labels
- Keep labels clean so the contents are always visible.
- If a warning label gets damaged, please exchange it for a new label.
- When replacing a part that has a warning label on it, make sure to place the label in the same location on the replacement part.
- Before using the sprayer, be sure to read and understand the instructions first.
- When using the sprayer with an engine attached, be sure to attach a belt cover.
3) Lubricating ports Before using the equipment, put 3-5 drops of oil (SAE 10W-30 equivalent) into each lubricating port.
4) Pressure regulator knob This is the knob for adjusting sprayer pressure.
- Turning the knob clockwise increases the pressure.
- Turning the knob counterclockwise reduces the pressure.
5) Main cocks The sprayer hoses attach to these cocks. Turning the lever above a cock 90° will open the cock.
6) Plug When using the sprayer for watering, remove this plug first.
7) Drain plug Loosen this plug in order to drain the sprayer.
This allows the liquid inside to drain out.
8) Sticker This sticker shows the product serial number.
CAUTION
3. Handling and Operation
Preparation & Inspection \~ Spraying

CAUTION
This power sprayer does not come with oil in it. Be sure to fill with oil before using it.
- Fill with oil (SAE 10W-30 equivalent, SC classification or better) until the level comes up inside the red circle on the oil gauge at the rear of the pump or until the level comes up into the area between the line marks on the oil gauge on the side of the pump.
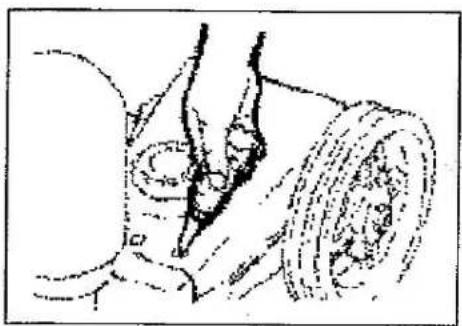
- Put 3-5 drops of oil (SAE 10W-30 equivalent) into each of the three holes (lubricating ports) at the top front of the crankcase.
natural_image
Medical illustration showing anatomical structures with no visible text or labels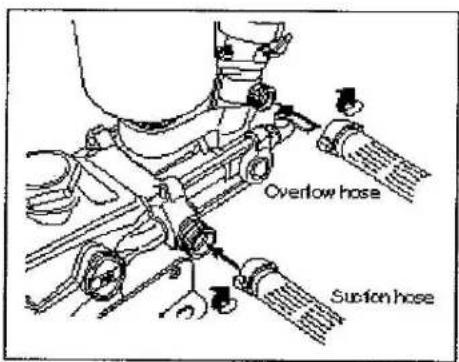
CAUTION
Check to be sure gaskets are used when attaching the suction hose and overflow hose. Lack of a gasket on the suction hose, in particular, can cause equipment vibration and suction problems that may shorten pump life.

- When a strainer is required, use the one that comes with the sprayer as a standard accessory. (Please check with the nearest dealer or with this company's sales office before using any other strainer.)
Preparation & Inspection \~ Spraying

natural_image
Illustration of a medical procedure involving a tool and a bowl (no text or symbols)- When starting to use the sprayer, test it first with plain water to make sure the sprayer is operating normally.

CAUTION
If the power sprayer operates abnormally in any way, turn it off immediately and refer to the troubleshooting section on pages 13-14 to diagnose and resolve the problem.
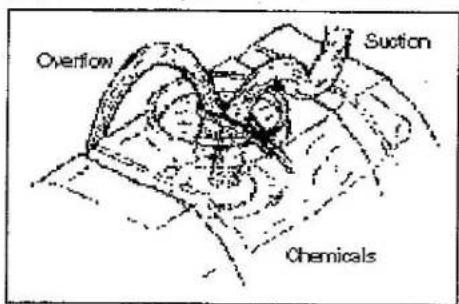
- When inserting the suction hose in the chemical tank, set it so that the lifting height is within 3 m.

CAUTION
It can be dangerous if the suction hose or overflow hose thrash around out of control, so use the provided strap
- Check to be sure that the strainer is inserted completely into the liquid in the tank.
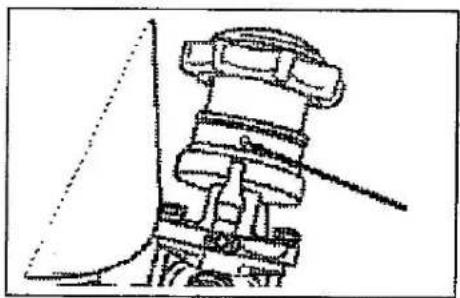
- Lift up the lever on the pressure regulator valve to the Start position as shown in the illustration.

natural_image
Technical line drawing of a mechanical assembly or device (no visible text or symbols)- Turn the knob to align the "0" point with the indicator.
CAUTION
Be careful not to start running the sprayer with positive pressure, since running it when there is nothing to pump can damage the piston packing.
- Close the main cocks.

CAUTION
If the pump starts running with the main cocks open, chemicals may suddenly spurt out of the cock area or the nozzle may start thrashing out of control. This is dangerous, so always be sure to close the main cocks.
Preparation & Inspection \~ Spraying \~ Stopping

natural_image
Technical line drawing of a mechanical component or bracket (no text or symbols visible)- Be sure to attach the belt cover when starting and operating the equipment.
WARNING
Rotating parts can cause accidents when objects are caught up in them, so always make sure that the belt cover is attached. If a cover cannot be attached, then be sure to take other measures, such as putting up a fence around the machine.
- Turn the lever on the pressure regulator valve down to the Run position.

CAUTION
Make absolutely sure that there is suction at this point. If the sprayer runs for one minute or more without anything to pump (running empty) after starting, it will damage the piston packing. In this case, stop the sprayer and refer to the troubleshooting section on pages 13-14 to diagnose and resolve the problem, then try again.
- Turn the knob to align the desired pressure value with the indicator.

CAUTION
When more than one person is working, they should signal each other in advance whenever opening the main cocks. This is because the sudden rise in pressure can backlash on anybody holding a nozzle, and this is dangerous.

natural_image
Technical line drawing of two mechanical components with no visible text or symbolsStopping
- In order to stop the pump, turn the pressure regulator knob to "0" and return the lever on the pressure regulator valve to the Start position.
The pressure regulator operates using a compression spring. If there is still pressure inside any hose, the remaining liquid may spurt out when disconnecting the hose.

natural_image
Technical line drawing of a mechanical assembly (no text or symbols)4. Cleaning, Maintenance, and Storage

natural_image
Medical illustration showing a surgical procedure with an incision and surrounding tissue (no text or labels)- When finished working, let the pump take in plain water to flush out any chemicals remaining inside and clean it. This helps prevent problems when starting the pump up for the next work season.
CAUTION
When handling the water used to flush out the equipment, take the same careful precautions to avoid damage and exposure that you would when working with the chemicals themselves.
Carefully read the handling and safety instructions for the chemicals to learn how to handle them properly.
- Remove the nozzles from the hoses and lift the suction strainer out of the water, then run the sprayer at low speed with the main cocks open to drain it. (Set the pressure regulator knob to "0" and turn the lever to Start.)

natural_image
Illustration of a medical procedure involving a tool and a container (no text or symbols)CAUTION
To protect the equipment, do not run it empty for any longer than a minute at most.
Cleaning, Maintenance, and Storage

- Be sure to disconnect the suction hose and overflow hose, because leaving them attached will damage the gaskets, which can cause problems. The disconnected suction and overflow hoses should be stored properly.

natural_image
Technical line drawing of a mechanical assembly (no text or symbols visible)- Store the equipment without any tension on the compression spring. In order to maintain the accuracy of the pressure values on the knob, the knob should be turned to "0" and the lever on the pressure regulator valve should be put at the Start position.
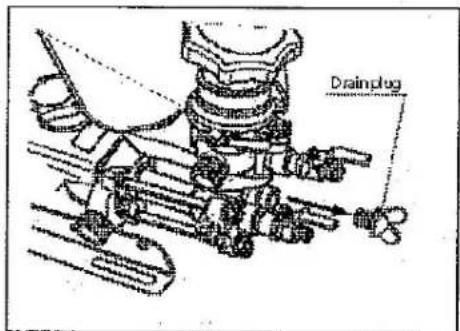
- Drain all liquids from the equipment completely before storing to protect it from freezing damage during the winter.
Specifically, loosen the drain plug as shown in the illustration and completely drain all liquid from inside the unit. Then clean, maintain, and store the equipment.

natural_image
Illustration of a robotic arm with a tool and two circular insets showing cross-sectional views (no text or symbols)CAUTION
Make sure the oil has cooled down before draining it.
- Make absolutely sure that the equipment has stopped working before starting to change the oil.
- The first oil change should be made after 50 hours of operation. From the second time on, change the oil after every 100 operating hours.
Oil breaks down, so it should be changed (SAE 10W-30 equivalent, SC classification or better) at least once a year even if the equipment is operated for fewer hours than indicated above.
Power Sprayer Troubleshooting
- This power sprayer troubleshooting section shows how to diagnose and resolve problems that may occur in the course of normal operation. If you experience a problem, take the steps indicated for the applicable diagnosis.
When you can't determine the cause of a problem or if you have any difficulty, please feel free to contact your nearest dealer or this company's sales office. Please have the following information ready:
- Model designation
- Serial number
- Description of problem (What happened? What were you doing when it happened? What were the conditions when it happened?)
For items marked with *, please request adjustment or repair from your nearest dealer or from this company's sales office.

WARNING
Do not change the setting of the screw that is under the cap on the top of the pressure regulator knob. This screw absolutely must not be changed, since that will raise the pressure above rated specifications, damage the machine, and possibly cause injury.
| Condition | Cause | Solution | |
| (1)Suction is low or absent | Power train | Belt is slipping | Adjust or replace |
| Up to suction port | Suction strainer is blocked with debris | Clear and clean | |
| Suction hose is damaged or crooked | Repair or replace | ||
| Suction hose connector gasket is bad | Repair or replace | ||
| Connection is bad | Connect properly | ||
| Suction hose is too long | Replace | ||
| Suction side lifting height is too high | Lower the lifting height | ||
| Suction & pressure parts (Cylinder part) | Debris is stuck in inlet or discharge valve | Clean | |
| Inlet or discharge valve is assembled improperly | Assemble properly | ||
| Inlet or discharge valve is damaged or worn | Repair or replace | ||
| Discharge valve spring is damaged | Replace | ||
| Piston packing is damaged | Replace | ||
| O-ring is damaged | Replace | ||
| Seal and packing are damaged | Replace | ||
| Pressure regulator part | Pressure regulator valve lever is in Run position | Return lever to Start position | |
| Pressure regulator is stuck | Disassemble and clean | ||
Power Sprayer Troubleshooting
| Condition | Cause | Solution | |
| (2)Pressure will not increase | Suction & pressure part | Insufficient liquid supplied to intake | Diagnose under (1) |
| Pressure regulator part | Pressure regulator valve ball or valve seat damaged | Replace | |
| Pressure regulator valve rod is bad | Adjust or replace | ||
| Pressure regulator valve spring is bad | Repair or replace | ||
| Pressure regulator valve spring is damaged or weak | Replace | ||
| (3)Pressure falls when an output cock is opened | Nozzle | Nozzle is worn | Replace |
| Nozzle sprays too much liquid | Replace with suitable nozzle | ||
| Power sprayer | Intake liquid amount is too small | Diagnose under (1) | |
| Hose | Sprayer hose is too long | Make it the proper length | |
| Sprayer hose is too narrow gauge | Make it the proper gauge | ||
| Water is leaking at hose connecting parts | Repair or replace | ||
| (4) Sprayer hose vibrates | Air chamber is filled with water | Let air in (run without intake for no more than one minute) | |
| Pressure regulator valve works poorly | Disassemble or adjust | ||
| Faults in intake or pressure assemblies (Stopped up, slack) | Disassemble or adjust | ||
| Nozzle stopped up | Clean | ||
| (5) Noise | V-pulley installation bolt is loose | Tighten or replace | |
| Conrod bolt or other bolt is loose | Tighten | ||
| Bearings are damaged | Replace | ||
| Pressure regulator valve is assembled wrong | Adjust | ||
| Air is being drawn in | Inspect | ||
| (6) Liquid or oil leakage | O-rings are damaged | Replace | |
| Seal and packing are damaged | Replace | ||
| Oil seal is damaged | Replace | ||
| Clamping or assembly are incorrect | Disassemble or adjust | ||
- When Loaning the Equipment to Another Person or Having Someone Else Operate It
- Table of Contents
- WARNING
- CAUTION
- DANGER
- SUCTION
- SPRAYING
- HOSES
- NOZZLES
- Important Points for Handling the Engine & Important Points for after Use
- Important Points for after Use
- Nomenclature and Functions of Working Parts
- Making Sure All Standard Accessories are Present / List of Standard Accessories / Functions of Working Parts / Warning Labels
- Making Sure All Standard Accessories are Present
- Product Features
- Functions of Working Parts / ⚠ Warning Labels
- Handling and Operation
- Preparation & Inspection \~ Spraying
- Preparation & Inspection \~ Spraying \~ Stopping
- Stopping
- Cleaning, Maintenance, and Storage
- Cleaning, Maintenance, and Storage
- Power Sprayer Troubleshooting
Brand : Maruyama
Model : MS413
Category : Pump