
Gravity Feeder Kit - Video camera Moultrie - Free user manual and instructions
Find the device manual for free Gravity Feeder Kit Moultrie in PDF.


| Product Type | Gravity Feeder Kit for game cameras |
| Brand | Moultrie |
| Model | Gravity Feeder Kit |
| Compatibility | Moultrie Quick-Lock hopper and 30/55-gallon barrels |
| Maximum Feed Capacity (30-gal barrel) | 200 lbs |
| Maximum Feed Capacity (55-gal barrel) | 400 lbs |
| Adjustable Flow Rate | Yes, by sliding feed chutes up/down |
| Recommended Feed Types | Corn (restricted flow) and protein pellets (full flow) |
| Hardware Included | Galvanized carriage bolts, stainless steel flat washers, galvanized wing nuts, hex bolts, hex nuts, down tube, feed chutes, lock ring, hose clamp |
| Assembly Required | Yes, with provided hardware |
| Mounting Options | On Moultrie Quick-Lock hopper or barrel with adapter |
| Belly Band Included | Yes, for barrel mounting |
| Leg Sections Provided | Up to 4 sections per leg (3 sections recommended) |
| Device Mounting on Lid | Up to 3 devices (e.g., game camera, feeder power panel) |
| Warranty | 1-year, activation required online |
| Material | Galvanized steel and stainless steel hardware |
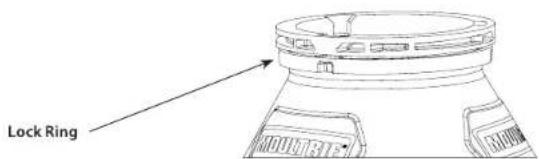
| Lock Ring | Prevents twisting off; must be installed with void facing down |
| Hose Clamp | For securing lock ring |
| Maintenance | Periodic inspection and tightening of hardware |
| Safety Notes | Do not exceed feed capacity; ensure lock ring installed correctly |
Frequently Asked Questions - Gravity Feeder Kit Moultrie
User questions about Gravity Feeder Kit Moultrie
0 question about this device. Answer the ones you know or ask your own.
Ask a new question about this device
Download the instructions for your Video camera in PDF format for free! Find your manual Gravity Feeder Kit - Moultrie and take your electronic device back in hand. On this page are published all the documents necessary for the use of your device. Gravity Feeder Kit by Moultrie.
USER MANUAL Gravity Feeder Kit Moultrie
Instructions for Moultrie Gravity Feeder Kit
THANK YOU for your purchase of a Moultrie Gravity Feeder Kit. Please read this sheet before operating the unit. If you should have any questions about this product or any other Moultrie product, please contact us using the information on the back of this sheet. Allow us to better serve you by activating your 1-year warranty online at http://www.moultriefeeders.com/warranty
HARDWARE INCLUDED:
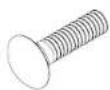
Galvanized Carriage Bolts
Qty. 6
(¼"-20×1)

Stainless Steel Flat Washers
Qty. 9
(1/4")
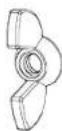
Galvanized Wing Nuts
Qty. 6
(1/4"-20)
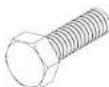
Galvanized Hex Bolts
Qty. 3
(¼"-20×7/8")
(if kit provided with adapter)

Galvanized Hex Nuts
Qty. 3
(1/4" - 20)
PROVIDED PARTS:
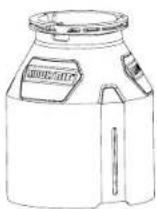
Down Tube
Qty. 1
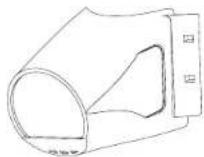
Feed Chutes
Qty. 3
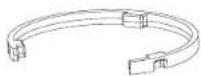
Lock Ring
Qty. 1
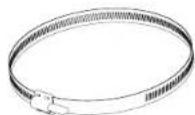
Hose Clamp
Qty: 1
1 ASSEMBLE THE KIT
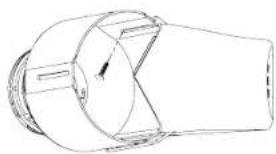
A Align one of the down tube slots with one of the feed chutes (as shown in the picture).
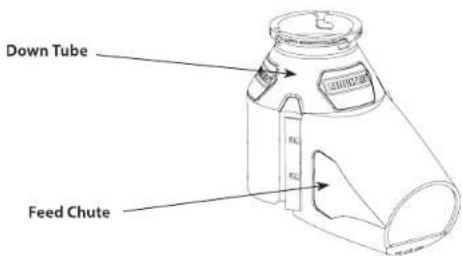
B Insert a 14 "-20 carriage bolt from the inside of the down tube through the slot and through the top or bottom hole in the feed chute flange. Start with the flange that aligns flush with the surface of the down tube. (Make sure the square part of the carriage bolt head is flush against the inside of the down tube slot so that it locks in place and will not turn.)
NOTE: Installing carriage bolts in this direction eases adjustment of feed flow as you do not have to reach inside the kit to adjust. If you do not prefer to have the wing nuts on the outside, just install the carriage bolts in the reverse direction (this will eliminate the opportunity for fine adjustments later).
natural_image
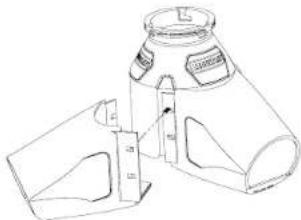
Technical line drawing of a mechanical component with no visible text or symbolsC Overlay a second feed chute overlapping the previously installed feed chute flange, allowing the carriage bolt to pass through the hole.
natural_image
Line drawing of a bottle and two plastic bags (no text or symbols)
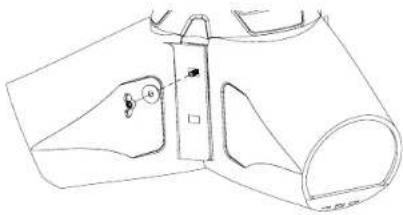
On the outside of the outermost feed chute flange, install one stainless steel flat washer and one 14 "-20 wing nut.
NOTE: Leaving these wing nuts loose will assist in aligning all parts and adjusting the kit into place before tightening down.
natural_image
Technical line drawing of a mechanical component with no visible text or symbols
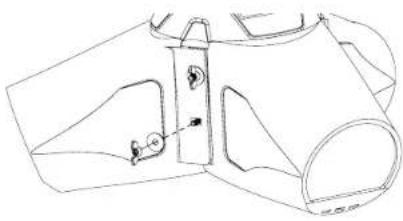
Install a second carriage bolt, stainless steel flat washer, and galvanized wing nut through the same down tube slot, but through the other hole in the feed chute flange.
natural_image
Line drawing of a mechanical component with no visible text or symbols
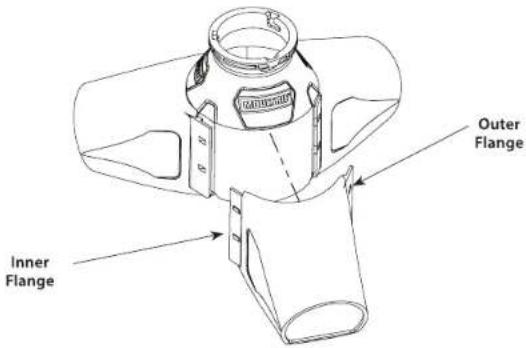
Align third feed chute with down tube and match the flanges with the other two chutes. The outer flange will overlap and the inner flange will go under the other flange.

Install two more carriage bolts in the down tube slot and feed chute flange holes. Then add flat washers and wing nuts on the outside flange, making sure to leave wing nuts loose.
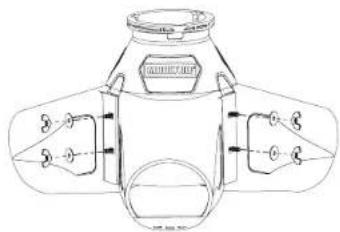

Line up and install the last two remaining carriage bolts, flat washers, and wing nuts into the remaining down tube slot and feed chute flange holes.

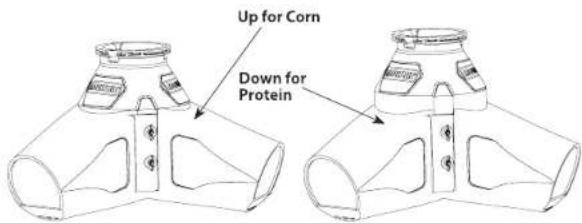
Adjust the chutes up or down to the desired flow rate for your feed (all the way up to constrict flow if running corn, all the way down to provide more flow for protein pellets) and tighten two wing nuts finger tight.

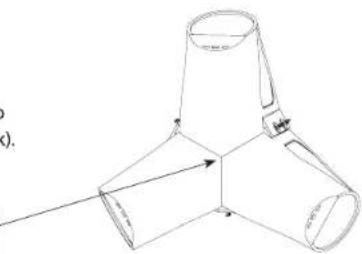
When tightening remaining wing nuts, make sure to hold the chutes together to ensure that all chutes meet up in the middle on the bottom (the chutes interlock).
natural_image
Pure technical line drawing of a three-bladed mechanical component with no text or symbolsMake sure chutes meet here while tightening wing nuts

REMOVE LOCK RING

If installed on the down tube already, remove the lock ring.
3 ASSEMBLE MOULTRIE QUICK-LOCK HOPPER
A Place hopper bottom flat on the ground, and slide the three provided square leg brackets into the hopper as shown.
Make sure to fully insert brackets as far as you are able to ensure the strength of the feeder.
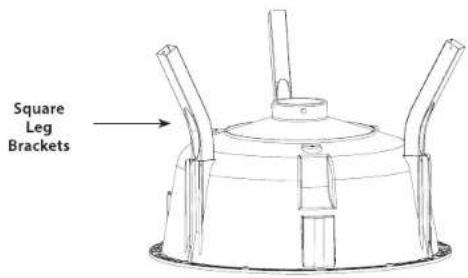
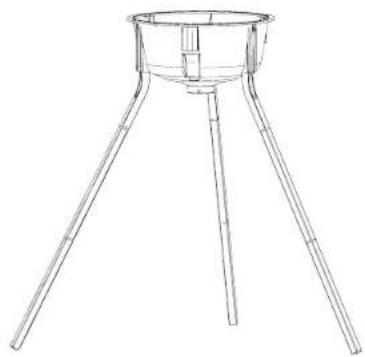
B Insert two (2) leg sections into each of the square leg brackets. Tap leg sections into place to ensure tight fit.
Flip hopper bottom assembly upside-down so that all three (3) legs are on the ground.
natural_image
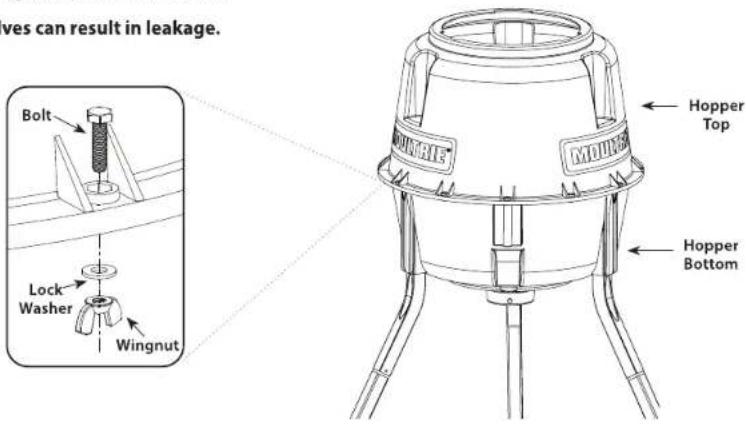
Line drawing of a simple three-legged tripod table with a circular top (no text or symbols)C Align holes of hopper top, then press sides of hopper bottom until it snaps snugly in place. Insert bolt through each hole, place lock washer on bolt and screw wingnut onto bolt until tight. Repeat for all 12 bolts.
Note: Failure to properly secure two halves can result in leakage.
Fill with corn/feed. Do not exceed 200 lbs.
Install lid by aligning handles with notches in hopper top. Twist until lid rests flush against lid stop.
To install a Moultrie game camera or Feeder Power Panel (sold separately), thread included 1/4"-20 x 1" Phillips-head bolt upward through hole in lid handle and tighten bolt. Lid will hold up to 3 devices.
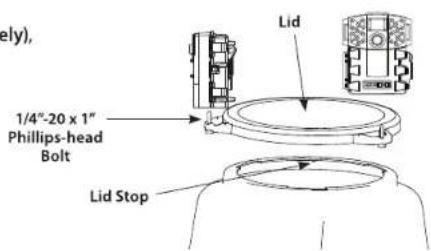

DO NOT EXCEED 200 LBS OF FEED
4 INSTALL KIT ON QUICK-LOCK HOPPER
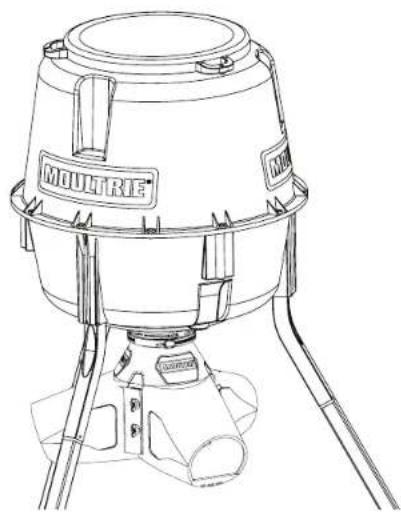
A After removing lock ring, twist the Gravity Feeder Kit onto the hopper.
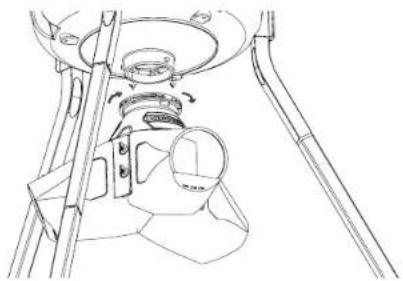
natural_image
Technical line drawing of a mechanical assembly with no visible text or symbolsB Install the lock ring onto the Gravity Feeder Kit.
a. Install the middle spacer first, then the side spacers.
b. Be sure to install the lock ring with the void facing down to prevent the kit from twisting off.
c. Give a twist test with your hands on the feed chutes to ensure that the lock ring was installed properly. If the Gravity Feeder Kit can twist off with ease, please turn the lock ring over and re-install.
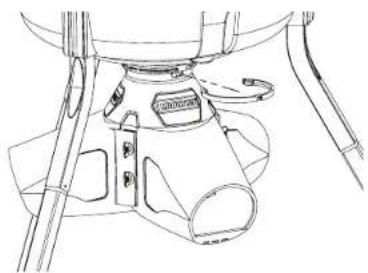
natural_image
Line drawing of a bicycle's seat and dashboard assembly (no text or symbols)NOTE: Do not overextend ring as you can damage the part.
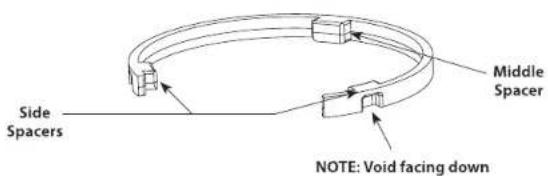
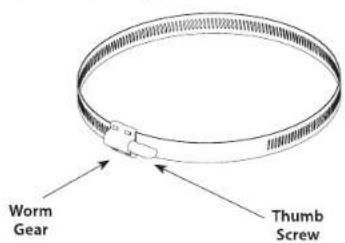
C Install the Hose Clamp over locking ring.
a. Turn thumb screw counterclockwise until worm gear releases the hose clamp.
b. Wrap hose clamp around outside of the lock ring.
c. Insert hose clamp into hose clamp worm gear.
d. Tighten thumb screw until snug.
NOTE: Do not overtighten.
natural_image
Line drawing of a Moutier electric motor with attached motors and legs (no text or symbols)5 ASSEMBLE WITH MOULTRIE QUICK-LOCK ADAPTER
55-Gallon or 30-Gallon Barrel
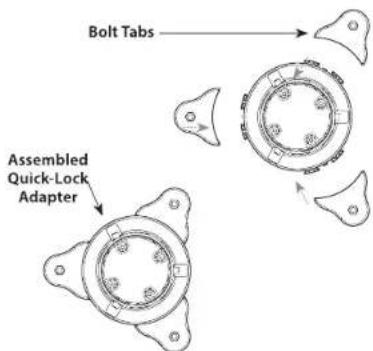
a. Assemble Quick-Lock adapter by snapping bolt tabs in place as shown.
b. Turn the metal drum upside down and mount Quick-Lock adapter using three (3) ¼"-20 x 7/8" bolts, nuts, and washers provided in the pre-drilled holes (Moultrie barrel only). Or use the Quick-Lock adapter as a template to mark and drill the mounting holes (non-Moultrie barrel).
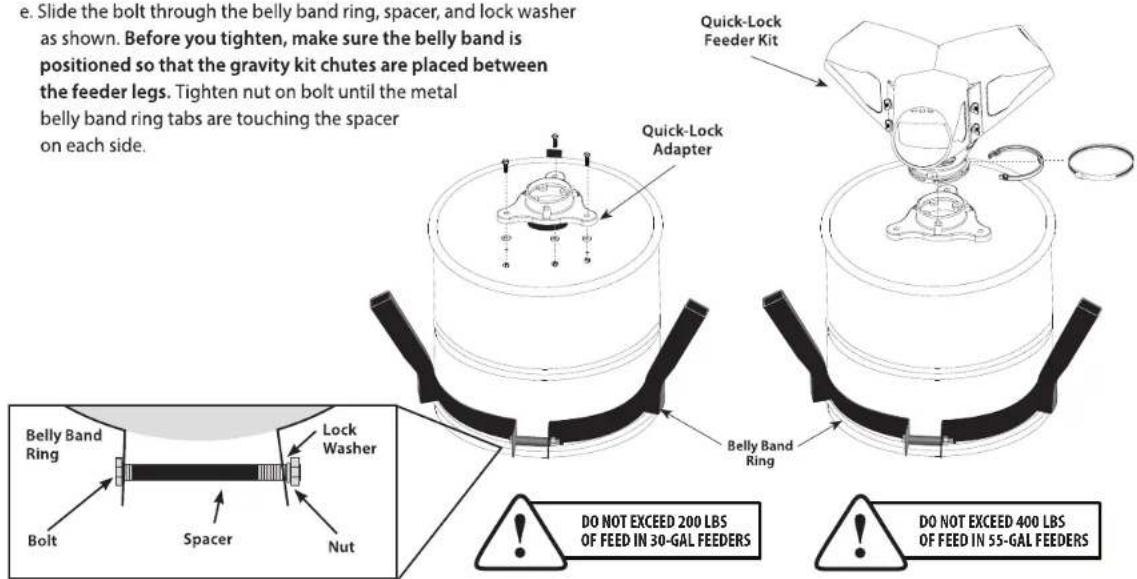
c. Connect Quick Lock feeder kit to assembled adapter as shown in Section 4.
d. Slide the belly band ring around the perimeter and make sure that the belly band is snug against the bottom-most structure ring as shown to ensure proper height of the gravity feeder kit (Moultrie barrel only).
e. Slide the bolt through the belly band ring, spacer, and lock washer as shown. Before you tighten, make sure the belly band is positioned so that the gravity kit chutes are placed between the feeder legs. Tighten nut on bolt until the metal belly band ring tabs are touching the spacer on each side.
6 STAND UP FEEDER (MOULTRIE BARREL) AND INSTALL LID
A Place barrel on side.
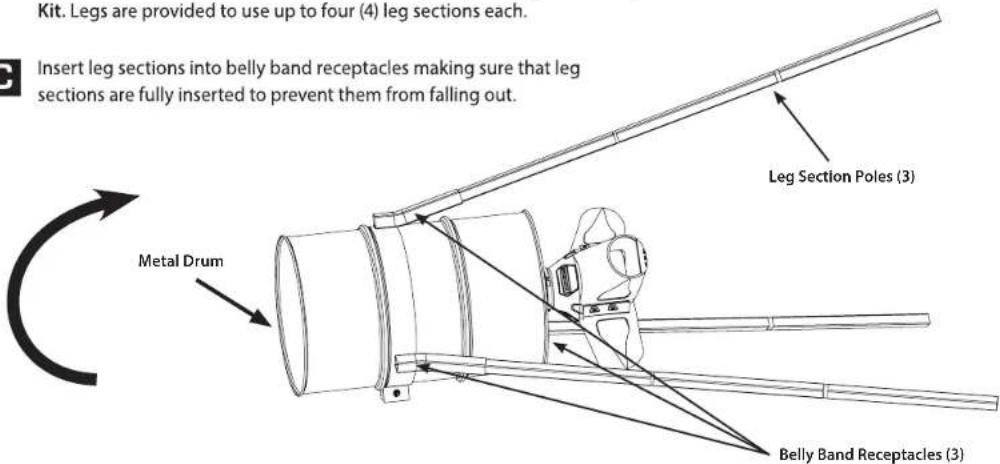
B Assemble three leg poles using three (3) leg sections each. Three (3) sections each are recommended for the proper feeding height using the Gravity Kit. Legs are provided to use up to four (4) leg sections each.
Insert leg sections into belly band receptacles making sure that leg sections are fully inserted to prevent them from falling out.
D With two leg poles against the ground, carefully stand up the feeder assembly.
E After filling, install the lid using the lid band and connecting bolt.
MOULTRIE®
Contact our U.S.-based customer service at www.moultriefeeders.com/support
12262019 / MFG-13338
- Instructions for Moultrie Gravity Feeder Kit
- HARDWARE INCLUDED:
- PROVIDED PARTS:
- ASSEMBLE THE KIT
- REMOVE LOCK RING
- ASSEMBLE MOULTRIE QUICK-LOCK HOPPER
- INSTALL KIT ON QUICK-LOCK HOPPER
- ASSEMBLE WITH MOULTRIE QUICK-LOCK ADAPTER
- 55-Gallon or 30-Gallon Barrel
- STAND UP FEEDER (MOULTRIE BARREL) AND INSTALL LID
Brand : Moultrie
Model : Gravity Feeder Kit
Category : Video camera