
Quick-Lock Feeder Kit - Video camera Moultrie - Free user manual and instructions
Find the device manual for free Quick-Lock Feeder Kit Moultrie in PDF.


| Product Type | Directional Game Feeder Kit |
| Brand | Moultrie |
| Model | Quick-Lock Feeder Kit |
| Power Source | 6V Alkaline or Rechargeable Battery (Moultrie MFHP12406 recommended) |
| Battery Connection | Red (+) and Black (-) Alligator Clips with rubber protectors |
| Timer Programming | Up to 10 feed times, 1-60 seconds each, programmable by day of week |
| Motor Speed | Adjustable (selectable via timer settings) |
| Test Mode | Yes, with adjustable duration and motor speed |
| Compatible Containers | Moultrie 30/55-gallon barrel, 6.5-gallon bucket, or Moultrie 30-Gallon Quick-Lock Hopper |
| Maximum Feed Capacity | 200 lbs (30-gal), 400 lbs (55-gal) |
| Mounting | Quick-Lock adapter system for barrels; leg brackets for hopper |
| Leg Configurations | 2, 3, or 4 sections for 5', 7', or 8' fill height (hopper models) |
| Lid Accessory Mount | 1/4-20 threaded hole for game camera or Feeder Power Panel (sold separately) |
| FCC Compliance | Part 15 Class B digital device |
| Warranty | 1-year (requires online activation) |
| Weight (approx.) | 5-7 lbs (feeder kit only) |
| Dimensions (approx.) | 12 x 12 x 12 inches (feeder unit) |
| Manual Languages | English (PDF download available) |
| Country of Origin | Not specified, likely China or USA |
Frequently Asked Questions - Quick-Lock Feeder Kit Moultrie
User questions about Quick-Lock Feeder Kit Moultrie
0 question about this device. Answer the ones you know or ask your own.
Ask a new question about this device
Download the instructions for your Video camera in PDF format for free! Find your manual Quick-Lock Feeder Kit - Moultrie and take your electronic device back in hand. On this page are published all the documents necessary for the use of your device. Quick-Lock Feeder Kit by Moultrie.
USER MANUAL Quick-Lock Feeder Kit Moultrie
Instructions for Moultrie Directional Quick-Lock Feeder Kit
Thank you for your purchase of a Moultrie Directional Quick-Lock Feeder Kit. Please read this sheet before operating the unit. If you should have any questions about this product or any other Moultrie product, please contact us using the information on the back of this sheet. Allow us to better serve you by activating your 1-year warranty online at http://www.moultriefeeders.com/warranty.
A CONFIGURING AND TESTING FEEDER
INSTALL BATTERY: Open Kit by removing wingnut located on the bottom and remove outer case. Install a 6-Volt Alkaline (ex. Energizer™) or Moultrie rechargeable battery (MFHP12406) by attaching the Red Alligator Clip to the positive terminal (+) and the Black Alligator Clip to the negative (-) terminal, making sure that the leads do not touch. Note: Make sure the rubber protectors are around the gator clips after installation onto the battery. This helps protect the gator clips from touching which can cause damage. We recommend using our Moultrie MFHP12406 6V 5ah battery.
CAUTION: DO NOT REVERSE POLARITY OF THE BATTERY LEADS. DO NOT LET THE BATTERY LEADS COME IN CONTACT WITH ONE ANOTHER WHILE CONNECTED TO A BATTERY. THIS CAN CAUSE PERSONAL INJURY OR PROPERTY DAMAGE. IN NO EVENT SHALL PRADCO BE LIABLE FOR ANY DIRECT, INDIRECT, PUNITIVE, INCIDENTAL, SPECIAL CONSEQUENTIAL DAMAGES, TO PROPERTY OR LIFE, WHATSOEVER ARISING OUT OF OR CONNECTED WITH THE USE OR MISUSE OF THIS PRODUCT. YOUR USE OF THIS PRODUCT IS AT YOUR OWN RISK.
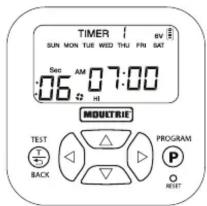
2 SET CURRENT TIME: Press the PROGRAM button and SET CURRENT TIME will appear. Press UP or DOWN to set the hour, then press RIGHT to go to the minutes. Press UP or DOWN to set the minutes. Press the BACK button to return to the Main Menu, or press PROGRAM to proceed through the settings.
NOTE: The timer is capable up to 10 feed times, each 1-60 seconds each, and each can operate on any day of the week where each day can be toggled ON/OFF.
3 SET CURRENT DAY: Press the PROGRAM button until the Set Current Day screen appears. Press LEFT or RIGHT to select the current day. Press BACK to return to the Main Menu, or press PROGRAM to proceed through the settings.
4 SET EST. FEED REMAINING: Press the PROGRAM button until the Est. Feed Remaining screen appears. Press UP or DOWN to select the amount of feed you have in the feeder. Press BACK to return to the Main Menu, or press PROGRAM to proceed through the settings.
5 SET FEED TIME: Press the PROGRAM button until the desired Feed Timer appears at the top of the screen. Press the DOWN button until the feed time is flashing. Press PROGRAM to enter edit mode. Press UP or DOWN to set the hour. Press the RIGHT button to go over to the minutes. Press UP or DOWN to set the minutes. Press PROGRAM or BACK to return to the Feed Timer. The factory settings include two feeder times 7am and 6pm, each for 6 seconds.
6 SET DAYS OF THE WEEK: After setting the feed time, press UP so the days of the week start flashing. Press PROGRAM to enter edit mode. By default all days should be enabled. Press LEFT or RIGHT to highlight the desired day. Press DOWN to disable the selected day. Press UP to re-enable the selected day. Once all desired days are selected, press PROGRAM or BACK to return to the Feed Timer.
7 SET RUN DURATION: Press DOWN and LEFT until the RUN DURATION seconds are flashing. Press PROGRAM to enter edit mode. Press UP or DOWN to set desired feed duration. Press PROGRAM or BACK to return to the Feed Timer.
8 SET MOTOR SPEED: Press UP or DOWN until the motor speed setting is flashing at the bottom of the screen. Press PROGRAM to enter edit mode. Press RIGHT or LEFT to select the desired motor setting. Press PROGRAM or BACK to return to the Feed Timer.
When the Feed Timer is blinking at the top of the screen, press PROGRAM or RIGHT to advance to the next feed timer. Repeat for all required feed times.
9 TEST FEEDER: Press the BACK button to reach the Main Menu. Press the TEST button to enter the Test Mode. The Test duration will appear (this will be the same as the duration as Feed Timer 1). Press UP or DOWN to set the Test Duration. Press PROGRAM. Press RIGHT or LEFT to select desired motor speed. Press PROGRAM to perform test. After a 5 second countdown, the test will commence.
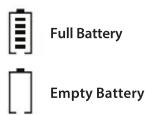

If mounting the Moultrie Quick Lock Feeder Kit to:
- a Moultrie 30 or 55-gallon barrel* or Moultrie 6.5-gallon bucket, refer to Section B.
• a Moultrie 30-Gallon Quick-Lock Hopper, refer to Section C. - any other containers, please visit our website at www.moultriefeeders.com
B ASSEMBLE WITH MOULTRIE QUICK-LOCK ADAPTER
55-Gallon or 30-Gallon Barrel\*
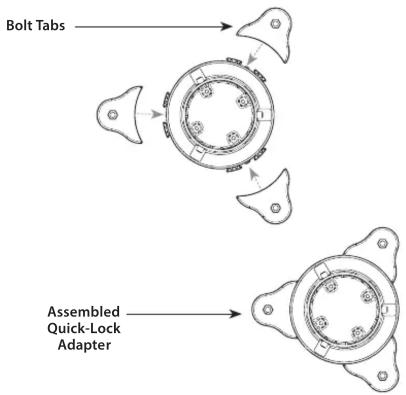
a. Assemble Quick-Lock adapter by snapping bolt tabs in place as shown.
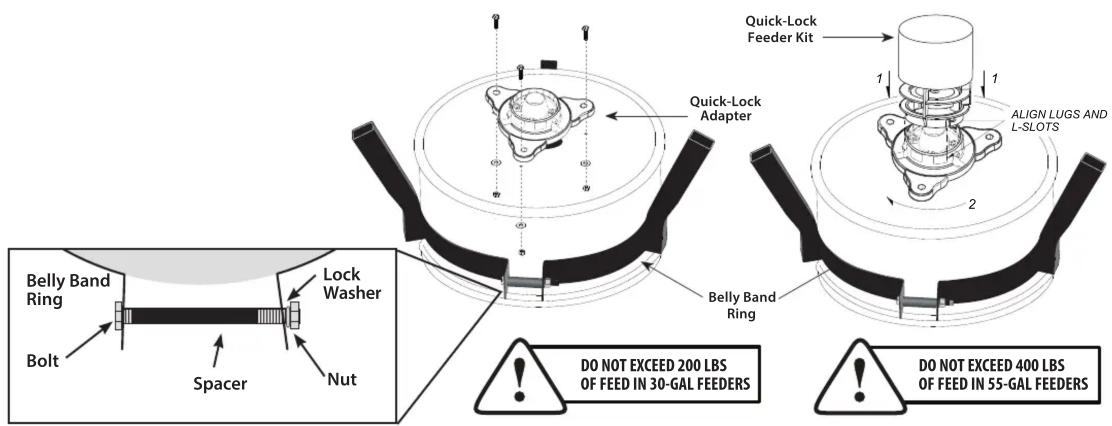
b. Turn the metal drum upside down and slide the belly band ring around perimeter and make sure that belly band is snug against the bottom structure ring as shown (Moultrie barrel only).
c. Slide the bolt through the belly band ring, spacer and lock washer as shown. Tighten nut on bolt until metal belly band ring tabs are touching spacer on each side.
d. Mount Quick-Lock adapter using (3) 1/4" x 1" bolts, nuts and washers provided in the pre-drilled holes (Moultrie barrel only). Or use the Quick-Lock adapter as a template to mark and drill the mounting holes (non-Moultrie barrel).
e. Connect Quick-Lock feeder kit to assembled adapter as shown.
*Can also be used on a 6.5-gallon bucket.
NOTE: DO NOT LOAD FEEDER until it is standing up and in place (see Section C-4).
C ASSEMBLE MOULTRIE 30-GALLON QUICK LOCK HOPPER
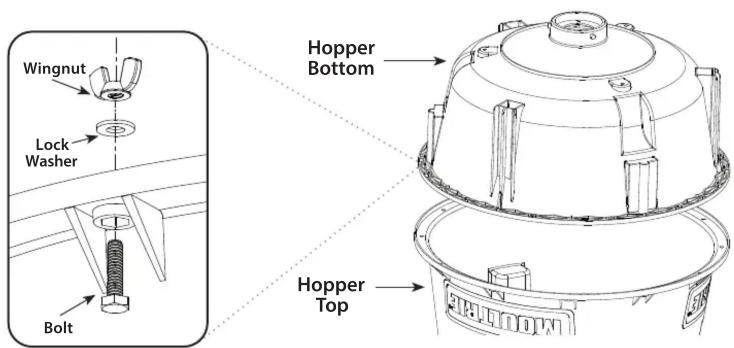
1 Flip hopper top upside-down and mate to hopper bottom.
Align holes, then press sides of hopper bottom until it snaps snugly in place. Insert bolt upward through each hole, place lock washer on bolt and screw wingnut onto bolt until tight. Repeat for all 12 bolts.
Note: Failure to properly secure two halves can result in leakage.
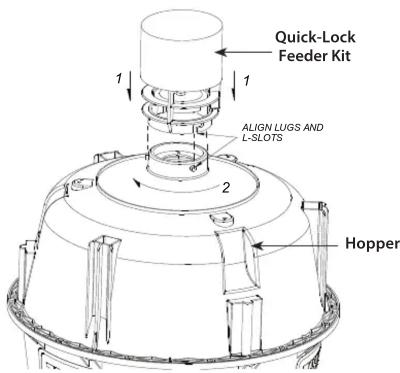
2 Connect Quick-Lock feeder kit to assembled hopper as shown.
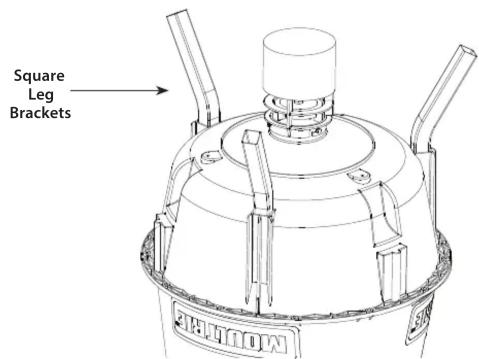
3 Slide the three provided square leg brackets into the hopper as shown. Make sure to push the brackets into the hopper as far as they will go to ensure stability.

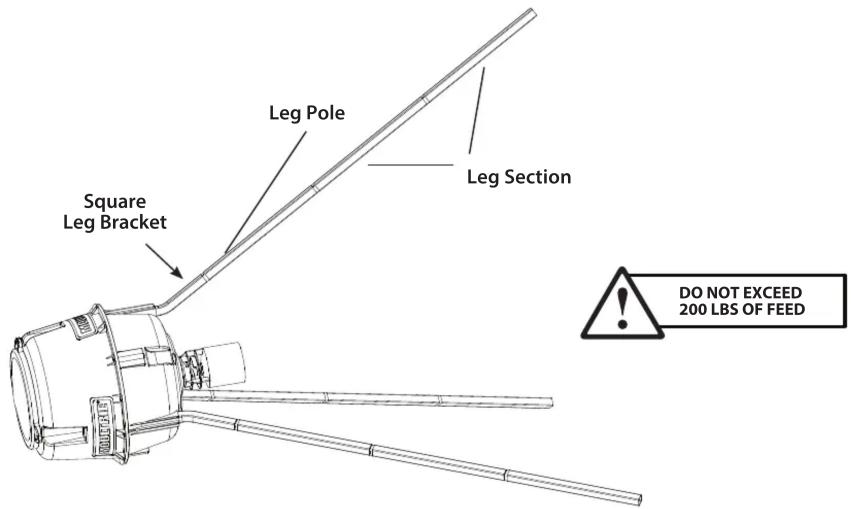
Stand Up Feeder and Install Lid
Place hopper on side. Assemble three leg poles using two leg sections each for the Moultrie Deer Feeder Classic, Pro and Directional. For the Moultrie Deer Feeder Elite and Unlimited, you have three height options; assemble two leg sections (5' fill height), three leg sections (7' fill height), or four leg sections (8' fill height).
Install a leg pole on the inside of each of the square leg brackets and tap into place to ensure a snug fit. Make sure to have all leg sections connected properly with the sections inserted as far as they will go. With two leg poles against the ground as shown, carefully stand up the feeder assembly.
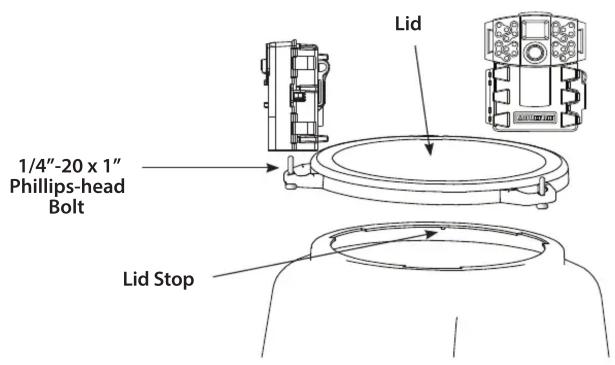
Install lid by aligning handles with notches in hopper top. Twist until lid rests flush against lid stop.
To install a Moultrie game camera or Feeder Power Panel (sold separately), thread included 1/4"-20 x 1" Phillips-head Bolt upward through hole in lid handle and tighten bolt. Lid will hold up to 3 devices.
FCC COMPLIANCE
This device complies with part 15 of the FCC Rules. Operation is subject to the following two conditions: (1) This device may not cause harmful interference, and (2) this device must accept any interference received, including interference that may cause undesired operation.
For devices approved under Part 15, the user's manual or instruction manual for an intentional or unintentional radiator shall caution the user about changes or modifications to the device (Section 15.21).
NOTE: This equipment has been tested and found to comply with the limits for a Class B digital device, pursuant to part 15 of the FCC Rules. These limits are designed to provide reasonable protection against harmful interference in a residential installation. This equipment generates, uses and can radiate radio frequency energy and, if not installed and used in accordance with the instructions, may cause harmful interference to radio communications. However, there is no guarantee that interference will not occur in a particular installation. If this equipment does cause harmful interference to radio or television reception, which can be determined by turning the equipment off and on, the user is encouraged to try to correct the interference by one or more of the following measures:
– Reorient or relocate the receiving antenna.
— Increase the separation between the equipment and receiver.
- Connect the equipment into an outlet on a circuit different from that to which the receiver is connected.
— Consult the dealer or an experienced radio/TV technician for help.

Our Service Department will gladly answer any questions you have.
www.moultriefeeders.com/support
10212022 / MFG-13264 • MFG-13281 • MFG-13282
- Instructions for Moultrie Directional Quick-Lock Feeder Kit
- A CONFIGURING AND TESTING FEEDER
- If mounting the Moultrie Quick Lock Feeder Kit to:
- B ASSEMBLE WITH MOULTRIE QUICK-LOCK ADAPTER
- 55-Gallon or 30-Gallon Barrel\*
- C ASSEMBLE MOULTRIE 30-GALLON QUICK LOCK HOPPER
- Flip hopper top upside-down and mate to hopper bottom.
- Connect Quick-Lock feeder kit to assembled hopper as shown.
- Slide the three provided square leg brackets into the hopper as shown. Make sure to push the brackets into the hopper as far as they will go to ensure stability.
- Stand Up Feeder and Install Lid
- FCC COMPLIANCE
Brand : Moultrie
Model : Quick-Lock Feeder Kit
Category : Video camera