P1 - Action Camera Rexing - Free user manual and instructions
Find the device manual for free P1 Rexing in PDF.


| Product Type | Action Camera |
| Brand | Rexing |
| Model | P1 |
| Video Resolutions | 1920x1080P 30FPS, 1280x720P 30FPS, 800x600P 30FPS |
| Photo Resolutions | 8000x4500, 5200x3900, 4608x3456, 4000x3000 |
| Video Format | AVI (H.264 compression) |
| Battery Life | Continuous recording: up to 11 hours; Standby: up to 20 hours |
| Power Input | 5V/1A via USB or charger |
| Storage | Built-in memory (capacity varies); TF card support |
| Lens Aperture | F2.1 |
| Night Vision | IR night vision with manual or auto switching |
| Loop Recording | Yes (can be enabled/disabled) |
| Video Lock | Yes (prevents deletion in loop mode) |
| Voice Recording | Separate audio recording mode |
| Flashing Light | Red/blue alternating with alarm sound |
| White Light | Yes (for illumination) |
| Impact Resistance | Withstands free fall from 1.5 m |
| Operating Temperature | -10°C to +45°C (recording/charging not above 45°C) |
| Storage Temperature | -40°C to +60°C |
| Mounts Included | Shoulder mount, chest mount |
| Maintenance | Clean with dry soft cloth; avoid liquids |
| Safety | Read manual; avoid high temperatures; use approved accessories |
| Spare Parts / Repair | Contact authorized service center; see www.rexingusa.com |
| General Information | FCC compliant; specifications subject to change |
Frequently Asked Questions - P1 Rexing
User questions about P1 Rexing
0 question about this device. Answer the ones you know or ask your own.
Ask a new question about this device
Download the instructions for your Action Camera in PDF format for free! Find your manual P1 - Rexing and take your electronic device back in hand. On this page are published all the documents necessary for the use of your device. P1 by Rexing.
USER MANUAL P1 Rexing
The information in this manual is subject to change without notice.
About This Manual
This device provides high-quality digital recording using Rexing's high standards of design, construction and technological expertise. This user manual describes the device's functions and features in detail. Please read this manual before using the device to ensure safe and proper use. Note that all descriptions included here are based on the device's default settings.
- Images and screenshots may differ in appearance from the actual product. Content may differ from the final product or from software provided by service providers and is subject to change without prior notice.
- For the latest version of this manual, refer to the Rexing website at www.rexingusa.com/support/product-support
• Available features and additional services may vary by device and software. - Applications and their functions may vary by country, region, or hardware specifications.
- Rexing is not liable for performance issues caused by applications from any provider other than Rexing.
- Rexing is not liable for performance issues or incompatibilities caused by failure to install the device
as stated in this manual. Attempting to customize the installation may cause the device or applications to work improperly which may result in device malfunctions and data corruption or loss. These actions are violations of your Rexing agreement and will void your warranty.
- Default applications that come with the device are subject to updates and possible discontinuation of support without prior notice. If you have questions about an application provided with the device, contact an authorized Rexing Service Center.

/rexingusa

@rexingdashcam

www.rexingusa.com/support/registration/
Table of Contents
page
About This Manual 2
Table of Contents 4
- What's in the box? 6
- Camera Overview 8
- LCD Screen Indications 10
- Charging the Device 11
- Basic Operation 12
- Camera Shooting 18
- Product Parameters 24
- Troubleshooting 26
- Name and Content Identification of Toxic or Harmful Substances or Elements 27
目次
page
概要 28
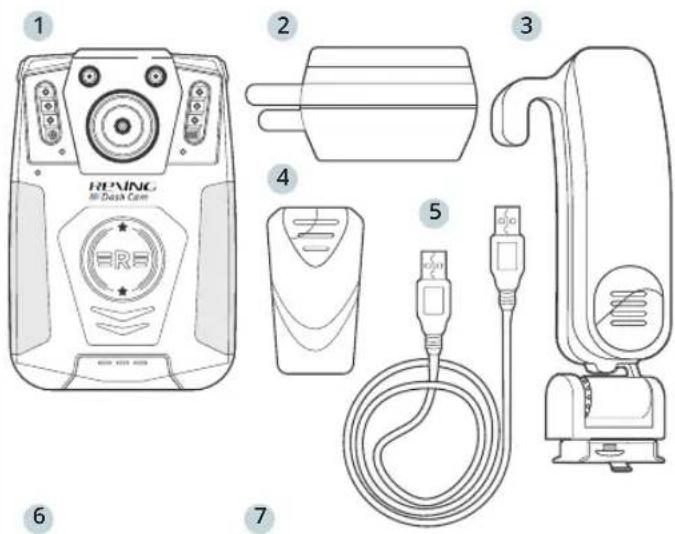
1. What's in the box?
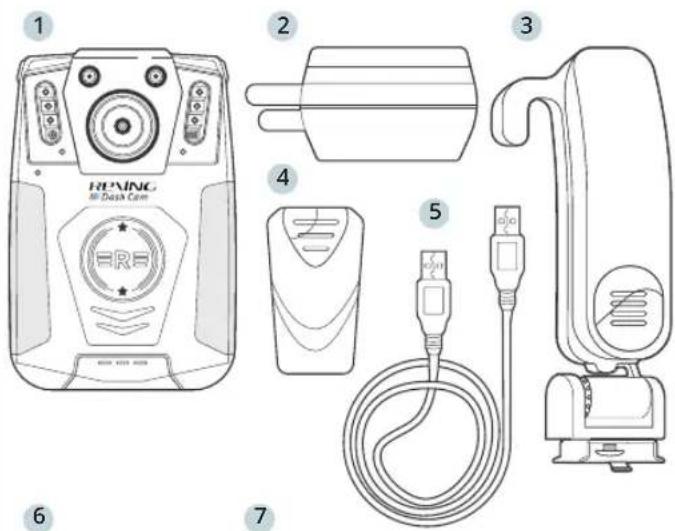
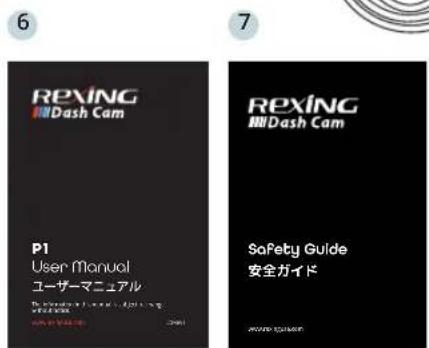
- Rexing P1 Body Camera
- Power Adapter
- Shoulder Mount
- Chest Mount
- USB Cable
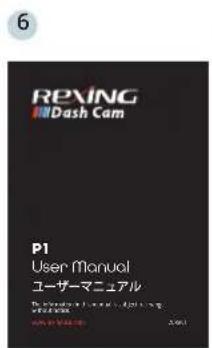
- User Manual
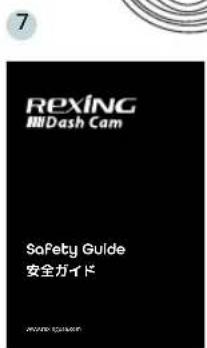
- Safety Guide
The items supplied with the device and any available accessories may vary depending on your region. Appearances and specifications are subject to change without prior notice. Availability of accessories is subject to change.
All supplied items are designed for use only with this device and may not be compatible with other devices. Malfunctions resulting from the use of unapproved accessories are not covered by the warranty service.
For more information about available accessories, refer to www.rexingusa.com.
2. Camera Overview
Device Layout
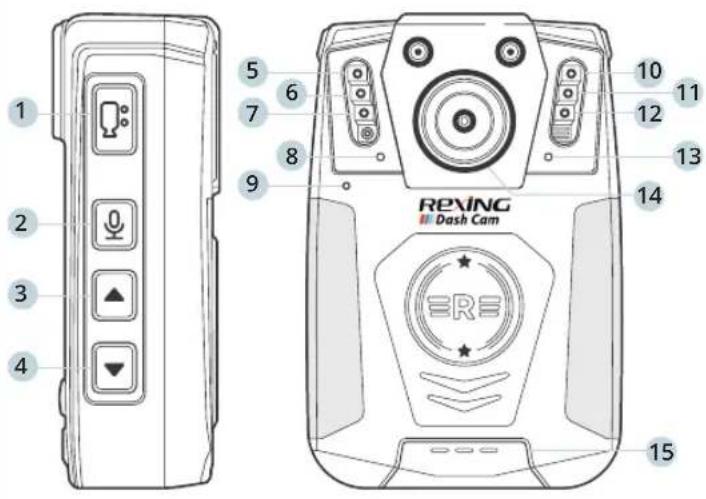
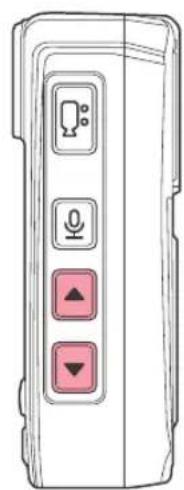
- Camera Shooting Key
- Voice Recording Key
- Scroll UP Key
-
Scroll DOWN Key
-
Red Flashing Light
- IR Light
- White Light
- Power Indicator Light
- Microphone
- Blue Flashing Light
- IR Light
- COMOS
- Working Indicator Light
- Camerra Shooting Key
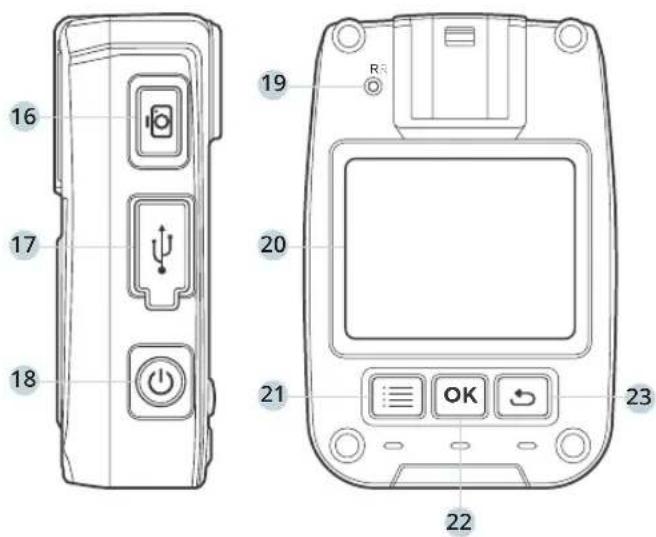
- Speaker
- Picture Taking Key
- Mini USB Port
-
Power Switch
-
Reset Key
- Display
- Menu Key
- Enter Key
- Return Key
3. LCD Screen Indications
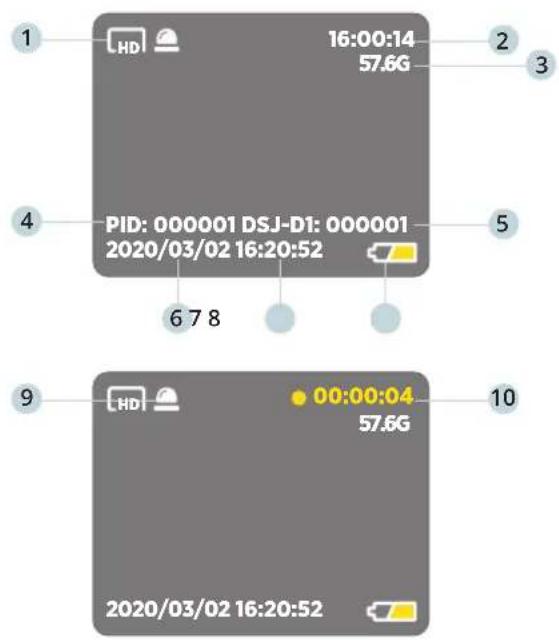
- Video Shoot Resolution
- Memory Time Remaining
- Available Memory Space
- Police ID Number
-
Device ID Number
-
System Date
- System Clock
- Battery Level Icon
- IR Light Indicator
- Current Video Duration
4. Charging the Device
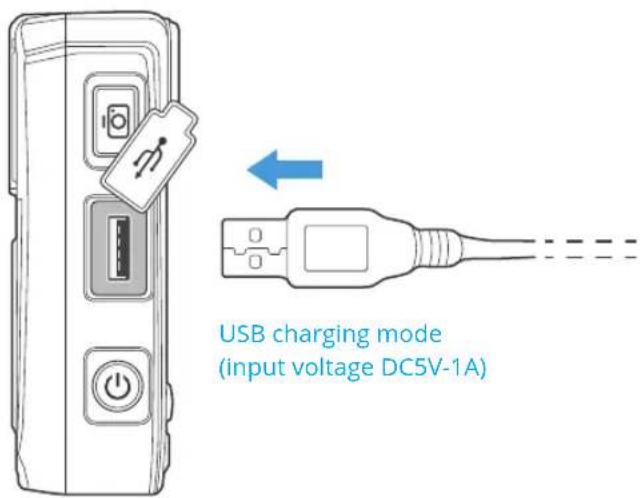
The device can be charged in the following two ways:
- Connect the device to its charger where shown.
- Connect the device to a computer.
As shown in the figure above, charge the device by connecting it to a computer with the USB cable. When charging, the working indicator light shows green, and the power indicator light shows blue. The indicator lights extinguish after charging.
5. Basic Operation
natural_image
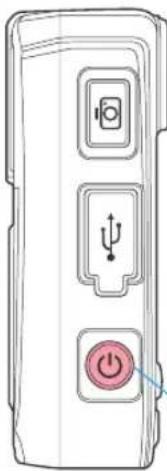
Diagram of a device rear panel with three labeled buttons (hook, USB, and power button) and a red arrow pointing to the power button.Power on
With the camera is in its power-off state, press the ON/OFF key to start the device. The device displays a preview screen after starting. The working indicator light turns green. If no operation is performed within 60 seconds after starting, the device enters screen saver mode as its default. The device automatically enters screen saver mode 60 seconds after it starts to shoot.
ON/OFF
Power off
With the camera in its power-on state, depress the ON/OFF key to power off the device. All indicator lights will extinguish. Press the ON/OFF key to enter screen saver mode.
Standby
With the camera in its power-on state, if no operation is performed within 60 seconds after starting, the device automatically enters screen saver mode; in this mode, the screen goes off and the working indicator light turns green. Press any key to illuminate the screen.
Menu Setup
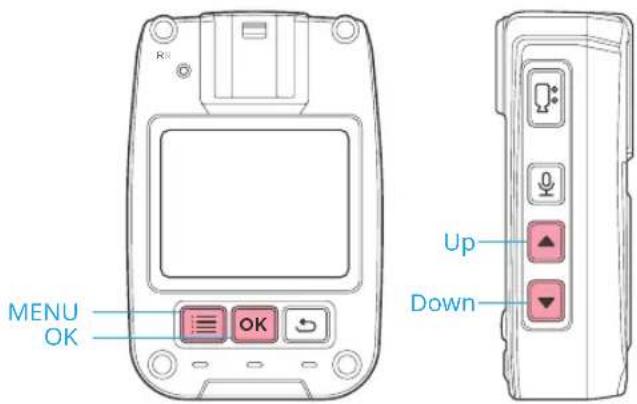
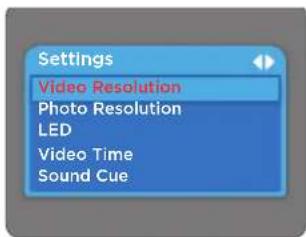
With the camera in its standby state, press the MENU key to enter the MENU setup interface. Press the UP or DOWN key to select the desired function. Press the OK key to confirm your option. Use the UP or Down key to change your option. Press the OK key again to confirm your selection(s). The device automatically saves any setup changes. Detailed system options are not described hereinafter. The screen display is shown below:
Video shoot resolution
Press the OK key to enter the to-be-altered function. Press the UP or DOWN key to select a value from the following: 1920x1080P 30FPS, 1280x720P 30FPS, or 800x600P 30FPS. The system default is 1280x720P 30FPS. Press the OK key to confirm your selection.
Picture taking resolution
Press the OK key to enter the to-be-altered function. Press the UP or DOWN key to select a value from the following: 8000X4500, 5200X3900, 4608X3456, and 4000X3000. The system default is 5200X3900.
Press the OK key to confirm your selection.
IR switching
Press the OK key to enter the to-be-altered function. Press the UP or DOWN key to select between Auto and Manual. The system default is Manual. Press the OK key to confirm your selection.
Video-shooting duration
Press the OK key to enter the to-be-altered function. Press the UP or DOWN key to select a value from the following: 1, 2, 3, 5, 10, 20, or 30 minutes. The system default is 5 minutes.
Press the OK key to confirm your selection.
Voice prompt
Press the OK key to enter the to-be-altered function. Press the UP or DOWN key to select between ON and OFF. The system default is ON.
Press the OK key to confirm your selection.
Timed power-off
Press the OK key to enter the to-be-altered function. Press the UP or DOWN key to select a value from the following: 1, 3, 5 and 10 minutes. The system default is 3 minutes. Press the OK key to confirm your selection.
Loop recording
When this function is ON, old video files will be overwritten when memory is insufficient. Press the OK key to enter the to-be-altered function. You can select ON or OFF. The system default is ON. Press the OK key to confirm your selection.
On-board mode
Press the OK key to enter the to-be-altered function. Press the UP or DOWN key to select between ON and OFF. The system default is OFF. Press the OK key to confirm your selection.
Auto screen off
When this function is enabled, the screen will be powered off at a set time. Press any key to restore power to the screen. Press the OK key to enter the to-be-altered function. Press the UP or DOWN key to select a value from the following: 1, 3, and 5 minutes. The system default is 1 minute. Press the OK key to confirm your selection.
Factory setup
Press the OK key to enter the to-be-altered function. Press the UP or DOWN key to select between YES or NO. The system default is NO. Press the OK key to confirm your selection.
Password setup
Press the OK key to enter the password entry function. The system default password is six zeros (000000). Input a password to modify it. Press the UP or DOWN key to key in specific inputs. Press the OK key to confirm your password.
Police ID setup
Press the OK key to enter the password entry function. The system default password is six zeros (000000). Input current a password to change the police ID. Press the UP or DOWN key to key in specific inputs. Press the OK key to confirm your password.
Time setup
Press the OK key to enter the password entry function. The system default password is six zeros (000000). Input your current password to modify the time. Press the UP or DOWN key to key in specific inputs. Press the OK key to confirm your input.
Machine code setup
Press the OK key to enter the password entry function. The system default password is six zeros (000000). Input your current password to change machine code. Press the UP or DOWN key to key in specific inputs. Press the OK key to confirm your input.
Language
Press the OK key to enter the to-be-altered function. Press the UP or DOWN key to select between English and Chinese. The system default is Chinese. Press the OK key to confirm your selection.
System information
Press the OK key to view system information.
6. Camera Shooting
Camera shooting
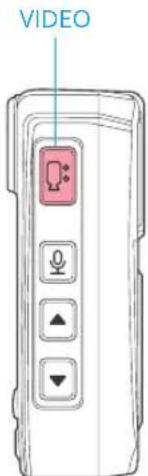
Press the VIDEO key under the preview screen in the power-on state, or depress the VIDEO key for 3 seconds in the power-off state to start camera shooting. The red indicator light in upper right corner starts to flash slowly during recording, and, together with the red time indication, shows recording duration. The operating status indicating light turns red and starts to flash. Press the VIDEO key again to stop camera shooting. The working indicator light turns green; the video file is automatically saved to the TF card, the screen goes back to shooting preview, and the video file is saved to the memory card with a time indication and AVI as its suffix. To check the video, refer to the section Video Review/Playback.
Video lockup
Depressing the VIDEO key during camera shooting can lock up the current video. Depress the VIDEO key again to unlock it. The camera shooting function is not interrupted during this process. A locked video cannot be deleted under the loop recording mode.
Taking pictures
In the power-on state, Press the
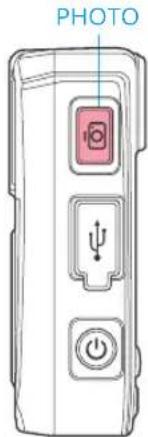
PHOTO key under the preview screen to take a picture; the picture is saved automatically. There is an audible snap when taking a picture. A picture is taken with each press of the PHOTO key.
These pictures are saved to the memory card with a time indication and JPG as the suffix. To check the pictures, refer to the section Video Review/Playback.
Solo voice recording
In the power-on state, Press the
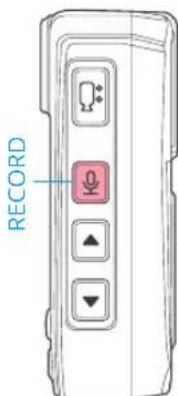
RECORD key under the preview screen or depress the key for 3 seconds to start solo voice recording. The screen shows a recording symbol during recording. The working indicator light turns orange and starts to flash. Press the RECORD key again to stop solo recording and the working indicator light turns green. The audio file is automatically saved to the TF card. The screen goes back to preview.
IR Night Vision Mode
Default IR night vision mode is a Manual function and the IR night vision indicator is off after starting the device. The optical filter switch uses a color filter, which is suitable for application at daytime. Use the optical filter switch to manually switch to IR night vision mode at night. In the power-on state, hold the UP key under the preview screen to enable IR mode. Now the IR light is ON and shows red. The image changes into a black and white image under the preview screen or during camera shooting. Hold the UP key again to turn off the IR mode. Now the IR light is OFF and the image restores color image under the preview screen or during camera shooting. Pressing the UP key allows you to switch between daytime working mode and night working mode. If automatic switching is desired, you may set the IR control to Auto in the menu. Now, the recorder may automatically switch to IR night vision mode according to ambient the brightness of light.
Deleting a File
You cannot delete any video file from the memory card by using the device itself. To delete a video file, you must connect the device to a computer and delete it from the USB drive via the computer.
Videos and Photos Review/Playback
In the standby mode, press the RETURN key to check the playback list. Use the UP or DOWN key to select a desired item as shown below:
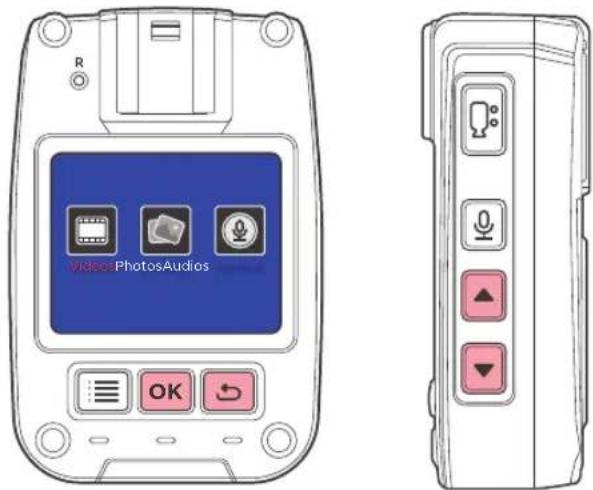
Press the OK key to check the playback list. Use the UP or DOWN key to select a file to play.
During playback, press the OK key to pause or play. Press the RETURN key to return to the previous menu.
Computer Playback
When the device is connected with a computer via the Mini-USB cable, the computer will recognize the device as a USB Drive where you can find videos and photos are saved under two separate folders. Open the folder, and you'd be able to review the video/photo from the list.
Reset & Restart
When the device system crashes or gives no response due to improper operation or other special reasons, you may press the RESET key (be careful to apply light pressure) with a pen tip, toothpick, or other similar article. The device switches off after the reset key is pressed. Now, you can restart the device. Previous settings will be resumed after the restart.
Notes on the Indicators
- In the power-on state, the power indicator is not shown in the preview screen.
- In the power-on state, the working indicator light turns red and flashes slowly under camera shooting mode.
-
In the power-on state, the working indicator light turns orange and flashes slowly under recording mode.
-
When the data cable is connected, the working indicator light turns green and the power indicator light turns blue.
- In the charging state, the power indicator light turns blue and it extinguishes after charging.
- In the power-on state, the power indicator light flashes during each shot.
Instructions for IR light, flashing light, and white light
In the power-on state, hold the UP key to turn ON/OFF the IR indicator light, which is used to provide additional illumination when shooting at night. Please make sure that the IR Switching is set to Manual to enable this function.
In the power-on state, hold the ENTER key to turn ON/OFF the flashing light. The device alternately flashes a red and blue light in addition to sounding a warning alarm. This alarm functions in case of emergency.
In the power-on state, hold the DOWN key to turn ON/OFF the white light. The device gives out a white light for illumination.
- Product Parameters
| Lens | F2.1 aperture, high resolution,multilayer filter, wide angle lens |
| Lanuage Selection | Japaneses/Simplified Chinese/English |
| Video recording | 1920x1080P 30PFS1280x720P 30PFS800x600P 30PFS(three adjustable levels) |
| Video rec. format | AVI |
| Video compression | H.264 |
| Storage card | Built-in |
| Video bitrate | 8 Mbit/sec |
| Power | 5V/1A |
| Battery | Built-in |
| RAM capacity | See decal affixed on the device. |
| Duration | Continuous working hours: 11 hrsStandby hours: 20 hrs |
| Protection grade | Expert |
| Fall impact grade | Withstands free-fall from a height of 1.5 m |
| Storage temp. | -40 °C ~+60 °C |
| Ambient temp. | -10~+45 °C(Recording and charging must not be performed in temperatures above 45 °C.) |
| Operating system | Windows XP/7/8 SP3/Vista and Mac 10.5 or above |
8. Troubleshooting 9. Name and Content Identification
The device cannot be started, and it gives no response to any operation.
- Connect the device to its charger and recheck its operation after charging for 4 hours.
- Check the charger and its cable for any abnormalities.
- Press the reset key to resume factory settings and recheck device operation.
- If the problem persists, contact after-sale service personnel and return it to the vendor for repair.
Flushing image
- Switch off the device and restart it.
of Toxic or Harmful Substances or Elements
| Toxic/Harmful Substances Shell and other or Elements LCD module | Circuit board asssy. | Battery | components | |
| Lead (Pb) | X | X | X | O |
| Mercury (Hg) | X | O | O | O |
| Cadmium (Cd) | O | O | X | O |
| Hexavalent chromiu (Cr6+) | O | O | O | O |
| Polynickel biphenyl (PBB) | O | O | O | O |
| Polybro-minated diphenyl ethers (PBDE) | O | O | O | O |
O: Indicates that the content of toxic and hazardous substances in all homogeneous materials of the component is below the limit requirements specified in SJT 11363-2006.
X: Indicates that the content of toxic and hazardous substances in at least one homogeneous material of the component exceeds the limit requirement specified in SJ/T 11363-2006.
The environmental protection life of the complete unit is 10 years, and the environmental protection life of lithium battery module is 5 years.
概要

www.rexingusa.com/support/registration/
1. 本製品の同梱物
natural_image
Diagram of a device rear panel with three labeled buttons (hook, USB, and power button) and a pointer, no text or symbols present.電源オン
錄画解像度
natural_image
Line drawing of a handheld device with four function buttons (no text or symbols)This device complies with part 15 of the FCC Rules. Operation is subject to the following two conditions: (1) This device may not cause harmful interference, and (2) this device must accept any interference received, including interference that may cause undesired operation.
Changes or modifications not expressly approved by the party responsible for compliance could void the user's authority to operate this equipment.
REXING®




- About This Manual
- Table of Contents
- 目次
- What's in the box?
- Camera Overview
- Device Layout
- LCD Screen Indications
- Charging the Device
- The device can be charged in the following two ways:
- Basic Operation
- Power on
- Power off
- Standby
- Menu Setup
- Video shoot resolution
- Picture taking resolution
- IR switching
- Video-shooting duration
- Voice prompt
- Timed power-off
- Loop recording
- On-board mode
- Auto screen off
- Factory setup
- Password setup
- Police ID setup
- Time setup
- Machine code setup
- Language
- System information
- Camera Shooting
- Camera shooting
- Video lockup
- Taking pictures
- Solo voice recording
- IR Night Vision Mode
- Deleting a File
- Videos and Photos Review/Playback
- Computer Playback
- Reset & Restart
- Notes on the Indicators
- Instructions for IR light, flashing light, and white light
- Troubleshooting 9. Name and Content Identification
- Flushing image
- 概要
- 本製品の同梱物
- 電源オン
- 錄画解像度
Brand : Rexing
Model : P1
Category : Action Camera