
Thrill - Software NATIVE INSTRUMENTS - Free user manual and instructions
Find the device manual for free Thrill NATIVE INSTRUMENTS in PDF.


| Product Type | Virtual Instrument / Sample Library |
| Brand | Native Instruments |
| Model | Thrill |
| Category | Software |
| Platform | Kontakt or Kontakt Player (full version compatible) |
| Format | Standalone, VST2, VST3, AU, AAX |
| Sound Content | Cinematic and thriller-style sounds, including hits, drones, textures, and pulses |
| Number of Presets | 150+ |
| System Requirements (Windows) | Windows 7 or higher (64-bit), 4 GB RAM, 2 GB free disk space, Intel Core i5 or equivalent |
| System Requirements (macOS) | macOS 10.12 or higher, 4 GB RAM, 2 GB free disk space, Intel Core i5 or Apple Silicon (native) |
| Installation Method | Native Access (download and activate) |
| Updates | Automatic via Native Access |
| License Type | Single-user perpetual license |
| Documentation | PDF user manual included |
| Support | Online knowledge base and community forum |
| Repair and Spare Parts | Not applicable (software product; updates provided digitally) |
| Power Supply | No external power needed (runs on computer) |
Frequently Asked Questions - Thrill NATIVE INSTRUMENTS
User questions about Thrill NATIVE INSTRUMENTS
0 question about this device. Answer the ones you know or ask your own.
Ask a new question about this device
Download the instructions for your Software in PDF format for free! Find your manual Thrill - NATIVE INSTRUMENTS and take your electronic device back in hand. On this page are published all the documents necessary for the use of your device. Thrill by NATIVE INSTRUMENTS.
USER MANUAL Thrill NATIVE INSTRUMENTS
The information in this document is subject to change without notice and does not represent a commitment on the part of Native Instruments GmbH. The software described by this document is subject to a License Agreement and may not be copied to other media. No part of this publication may be copied, reproduced or otherwise transmitted or recorded, for any purpose, without prior written permission by Native Instruments GmbH, hereinafter referred to as Native Instruments.
“Native Instruments”, “NI” and associated logos are (registered) trademarks of Native Instruments GmbH.
Mac, macOS, GarageBand, Logic, iTunes and iPod are registered trademarks of Apple Inc., registered in the U.S. and other countries.
Windows, Windows Vista and DirectSound are registered trademarks of Microsoft Corporation in the United States and/or other countries.
All other trademarks are the property of their respective owners and use of them does not imply any affiliation with or endorsement by them.
Document authored by: Adam Hanley
Software version: 1.0 (05/2017)
Document Version: 1.0
Special thanks to the Beta Test Team, who were invaluable not just in tracking down bugs, but in making this a better product.
NATIVE INSTRUMENTS GmbH
© NATIVE INSTRUMENTS GmbH, 2017. All rights reserved.
Table of Contents
1 Welcome to THRILL 5
2 About the Library 6
3 The Main Interface ....7
3.1 The XY Pad 8
3.2 The Thrill Controls 8
3.3 Browsing for Sounds 10
4 The Source Page 13
4.1 Atmosphere 14
4.2 Cluster 19
4.3 Key Split and Octave Settings 23
5 The Effects Page 25
5.1 Mod FX 26
5.2 EQ 28
5.3 Space 29
6 The Master Page 32
6.1 Effects 32
6.2 Control Setup 34
7 Credits....37
1 Welcome to THRILL
Thank you for purchasing THRILL, a real-time cinematic tension instrument. We hope this instrument and sound design tool inspires you.
THRILL is a performance instrument for playing spine-chilling atmospheres, clusters, and hybrid textures. By using the intuitive X-Y performance control you can expressively morph and modulate over 1000 complex sample sets that evolve and increase their intensity. The modulation engine gives control over different blend modes, a variety of modulation parameters like pitch and pan, up to five effects, EQ, and reverb. Every detail can be adjusted and personalized manually, or sounds can be created by chance by using the randomize feature. The sample sets and modulations are performed together using an X-Y pad for a completely new way to design and play cinematic textures and builds.
An indispensable scoring tool for big-screen soundtracks, game scores, sound installations, or live theater productions, THRILL's all-original content features orchestral recordings and hybrid sound-design based on ambiences, custom-built instruments, voices, pitched metal, synthesized drones, and more.
2 About the Library
While THRILL uses musical sources, it is not strictly a musical instrument, but is more of a performance effect engine. Most Snapshots will not even use the note information from your MIDI keyboard; the MIDI is only used to trigger the sound.
The power of THRILL comes from the XY Pad – with this you can control the tension and drama of the sound, as well as morph between the two halves of the sound. The concept being that you hold a sound and then adjust its Thrill Factor with the XY Pad in sync with your project. Because of this, THRILL is a tool well suited to scoring film, television, and video games.
THRILL's sound engine is based on blending two identical sound generators. These generators are called Thrills and contain a combination of samples and effects.
Most control pages in the instrument are divided into three sections with the XY pad in the center, and the controls for Thrill A and Thrill B on the left and right of the pad.
3 The Main Interface
When you first open the THRILL instrument, you will see the Main Page of the interface.
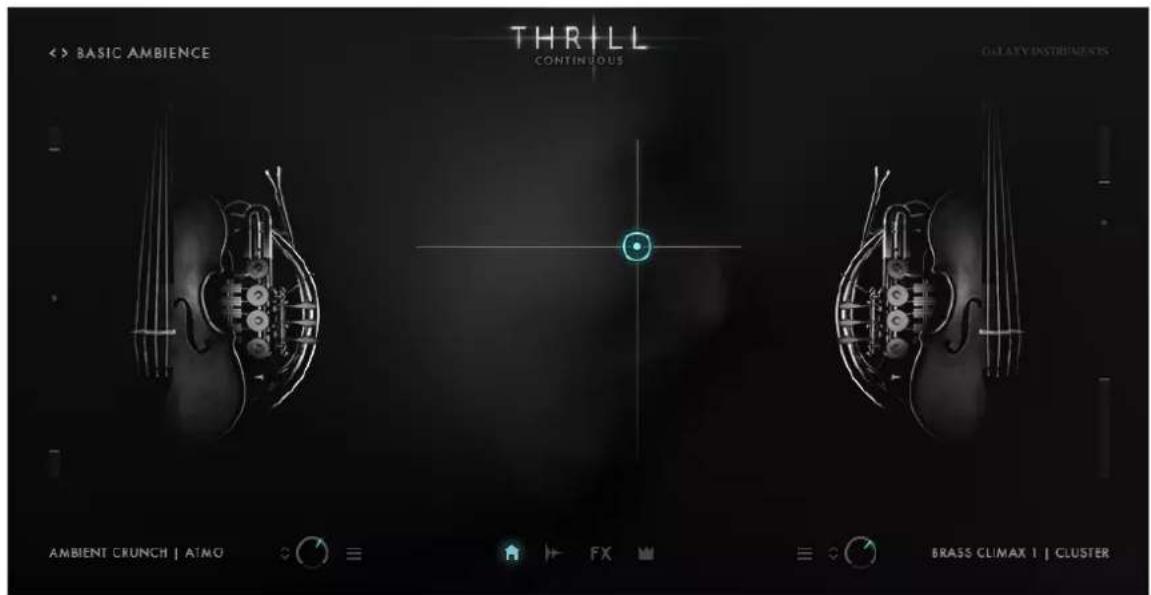
The Main Interface
This page contains only a handful of controls, but that does not mean that the Main Page is limited, rather that it has been refined to just the main performance controls for the instrument.
The interface is roughly split into three equal parts:
- In the center of the instrument is the XY pad, a 2 dimensional performance control.
- To the left are the controls for Thrill A.
- To the right are the controls for Thrill B.
To the top right of the Main Page are controls that give you access to the Main Presets – presets that contain values for all parameters in the instrument.
▶ Click on the left and right arrows to cycle through presets.
▶ Click on the preset name to open the Preset Browser (read ↑3.3, Browsing for Sounds for more information on the Preset Browser)
3.1 The XY Pad
Since THRILL is a tool for creating dramatic sound effects, most performance aspects are covered almost entirely by the XY pad.
▶ Move the cursor in the Y axis to control the Thrill Factor, a combination of effects, dynamics, and atonality.
▶ Move the cursor in the X axis to morph between the two Thrills, which are sound sources with independent effects and sound parameters.
3.2 The Thrill Controls
To the left and right of the XY pad are icons that display the type of sound loaded into the two Thrills.
Beside each of these icons are sliders that define the dynamic range of the Thrill:
▶ Click and drag the lower slider to set the minimum dynamic level of the Thrill, this will be the dynamic level used when the Thrill Factor is at its lowest value.
▶ Click and drag the upper slider to set the maximum dynamic level of the Thrill, this will be the dynamic level used when the Thrill Factor is at its highest value.
The dot between the two sliders shows the current dynamic level of the Thrill.
Below each Thrill icon is a selection of controls for that Thrill.

The Thrill Controls
- The knob controls the volume level of the Thrill.
- The arrows beside the knob control the modulation amount for the volume level. Clicking and dragging on this control will set how much the Thrill Factor will control the Thrill volume.
- The menu icon opens the random menu; more on this below.
- The text label not only displays the name of the currently loaded Thrill, but clicking on it will open the Thrill browser (read ↑3.3, Browsing for Sounds for more information on the Preset Browser)
Randomizing a Thrill
It is possible to randomize a Thrill, or parts of a Thrill, via the randomization menus.
▶ Click on the menu icon beside the Thrill volume knob to open the randomization menu for the Thrill.
→ The randomization menu will appear.
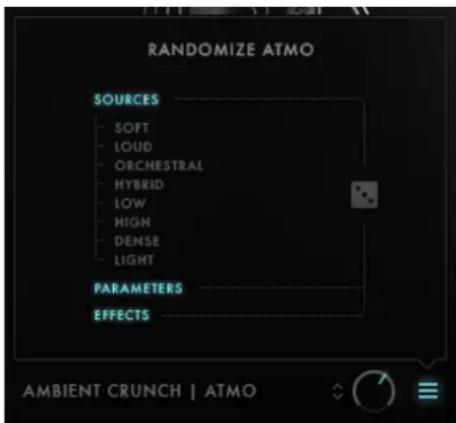
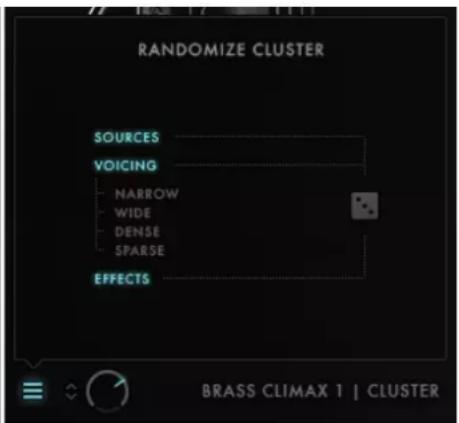
On The Left is the Randomization Menu for an Atmospheric Sound, on the Right is the Menu for a Cluster
The contents of the menu will depend on the type of sound that is currently loaded, but the general functionality is the same for both.
The contents of the menu lets you select which parts of the Thrill will be randomized.
In the SOURCES section for an atmospheric sound, selecting from the list of categories will narrow the source randomization to only those from the highlighted categories.
- Click on the menu contents to toggle the randomization of those areas on or off.
- Click on the dice button to randomize the selected parts of the Thrill.
→ The parameters of the Thrill will be randomized and an undo option will appear in the menu.
▶ Click on the undo button to revert the Thrill parameters to their previous settings.
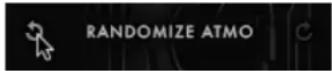
→ After undoing a randomization a redo button will appear.
▶ Click on the redo button to return to the randomized setting.

Note that when you close the randomization menu, the undo/redo data will be discarded, so make sure you are happy with the settings before you close the menu.
3.3 Browsing for Sounds
There are three levels at which you can browse and load presets:
- Main Presets – these contain settings for the whole instrument.
- Thrill Presets – these contain settings for only one of the Thrills.
- Sources – these contain just the sample information and settings for the most basic parameters.
While the scope of each preset type varies, their browser functionality remains largely the same. As such, this chapter will look at the basic functionality of all browsers at once.
Accessing a Browser
To access any browser, click on the relevant label or icon of the currently loaded preset. The locations of these access points are as follows:
- Main Presets – the preset name display to the top left corner of the Main Page.
- Thrill Presets – the name displays in the bottom left and bottom right corners of all pages.
- Sources – the source icons in the upper left and upper right quadrants of the Source Page.
Browsing and Loading Presets
| TYPE | DYNAMIC | CATEGORY | CHARACTER | PRESET | INFO |
| ATMOSPHERE | SOFT | ORCHESTRAL | LOW | - DEFAULT | ALL |
| CLUSTER | MEDIUM | - STRINGS | FULL | ABANDONED | VIBRAPHONE & METAL |
| LOUD | - BRASS | HIGH | BASSES & DRUMS | LOW STRINGS & GRAN CASSA | |
| WIDE | - WOODWINDS | SMOOTH | BEYOND | SUPER LOW STRINGS & AMBIENCE | |
| - PERCUSSION | AGGRESSIVE | DISTANT STORM | HYBRID AMBIENT & PERCUSSION | ||
| - TUTTI | DIRTY | FAST DENSE HIGH | STRINGS | ||
| COMPLEX | FAST STRINGS | FULL STRINGS | |||
| HYBRID | DENSE | FLICKERING | TUTTI | ||
| - ORCHESTRAL | LIGHT | FULL ORCHESTRA 1 | TUTTI | ||
| - PERCUSSION | STATIC | GLOCKENSTRINGS | GLOCKENSPIEL & STRINGS | ||
| - CIRCUITS | MOVING | HEAVY ORCHESTRA | BRASS & STRINGS | ||
| - AMBIENT | ATIONAL | LOST AT SEA | LOW WOODWINDS | ||
| - VOICES | MYSTICAL | LOW & SMOOTH | LOW WOODWINDS AND BRASS | ||
| PAINFUL | LOW STAMPEDE | LOW STRINGS | |||
| SPHERICAL | METALLIC SHIMMER | HYBRID PERCUSSION & HIGHEST STRINGS | |||
| EXPERIMENTAL | RANDOM ACCENTS | FULL STRINGS | |||
| THREATENING | REVERBED BRASS | BRASS SECTION | |||
| NOISY | BUBBER SHAKES | GRAN CASSA & HYBRID PERCUSSION | |||
| DARK | SHIMMER SPHERE | STRINGS & HYBRID GUITAR |
The Thrills Browser
Browsing and loading presets is a three step process:
-
Use the tags on the left side of the browser to refine your search. Presets that match the selected tags will be displayed on the right side of the browser in the PRESET column. Note that selecting multiple tags will refine the search to results that contain both tags (sometimes selecting conflicting tags will yield no results)
-
Select a preset in the PRESET column by clicking on it.
- Click on the tick icon to the top right of the browser to load the preset and close the browser.
- Alternatively, you can double-click a preset to directly load it and close the browser.
4 The Source Page
The Source Page is where you can edit the core parameters of the THRILL instrument.
▶ Click on the waveform icon at the bottom of the instrument interface to open the Source Page.
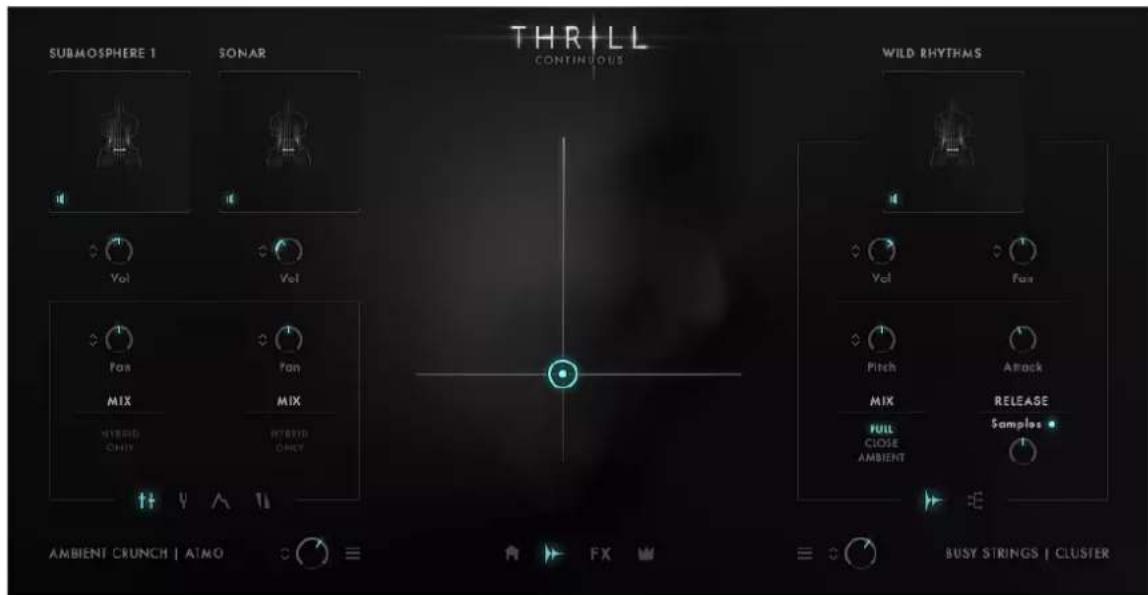
The Source Page
The Source Page is divided into three main sections:
- In the middle is the XY Pad.
- To the left of the XY Pad are the controls for Thrill A.
- To the right of the XY Pad are the controls for Thrill B.
The available controls for Thrill A and Thrill B can be the same, may differ depending on which type of Thrill the Thrill slot is using.
There are two types of Thrills:
- Atmospheres – atonal or noisy sources that cannot be played with a controllable pitch. These can have two atmosphere sources blended together.
- Clusters – tonal sources that, in addition to their effects and volume, can also have their pitch spread controlled by the instrument's Thrill Factor.
The controls are function of each of these Thrill types differ quite a lot, and so each will be looked at separately in the following sub-chapters.
Many of the Thrill parameters on the Source Page can be modulated by the Thrill Factor (the Y axis of the XY pad). Parameters that can be modulated are identifiable by the arrows to the left of the parameter knob.
▶ To set the modulation amount, click and drag on the arrows.

→ A cyan indicator around the knob will display the modulation amount.
4.1 Atmosphere
Atmospheres are sounds without a clear tone, like atonal swarms or noise. If a Thrill is set to be an Atmosphere, it can use a blend of two sound sources.
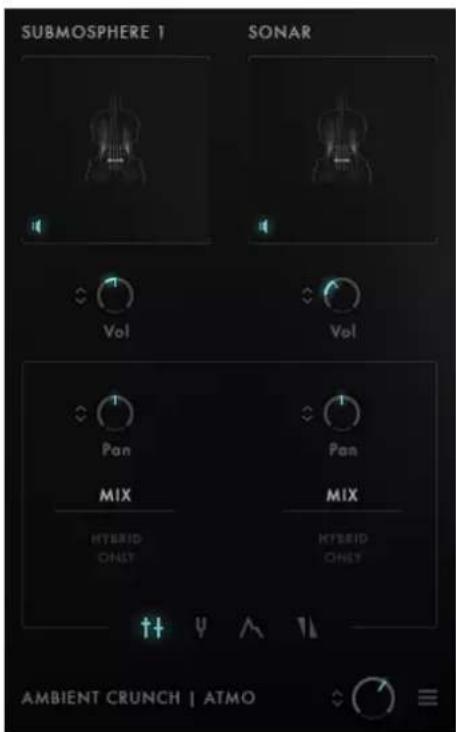
Atmosphere Controls
Each source is represented by an image. Controls inline and below these images are usually linked to that source.
To change a source, click on the source image to open the Source Browser (read ↑3.3, Browsing for Sounds for more information on the Preset Browser)
▶ To toggle a source on or off, click on the speaker icon to the bottom left of the source image.
→ A source is active when this icon is glowing cyan, and inactive when it is a dull grey.
The first control below each image is the Vol control, which controls the volume level of each source.
Below the Volume controls is a tabbed display with four sub-pages of controls.
▶ Click on one of the four icons to change the displayed sub-page.
Mix
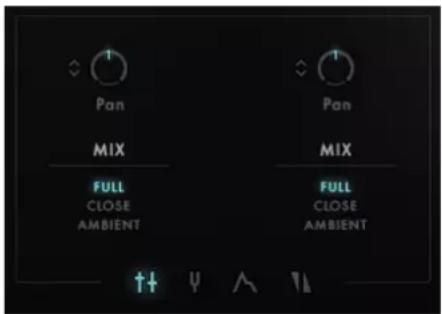
The Mix Controls
The Mix sub-page has two controls for each Source:
- Pan – sets the position of the source in the stereo field.
-
Mix – the buttons here let you choose between three mix variations:
-
FULL – selects a mix of multiple microphone sources.
- CLOSE – selects a mix that concentrates on closer microphone sources.
- AMBIENT – selects a mix that concentrates on far microphone sources.
Note that Hybrid sources do not provide different microphone options.
Tuning
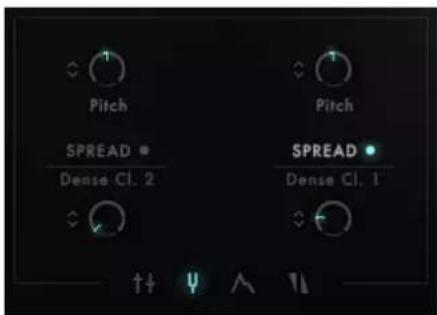
The Tuning Controls
The Tuning sub-page has two parameters for each Source:
- Pitch – defines the transposition amount for the source.
- SPREAD – an effect that generates additional voices, detuned to create a wider spectrum of sound.
The SPREAD parameter is divided into three controls:
- The SPREAD label toggles the spread effect on or off.
- The menu below that can be used to select the spread character.
- The knob controls the volume of the newly generated spread voices.
Envelope
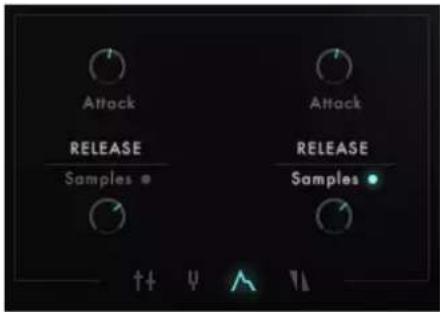
The Envelope Controls
On the envelope sub-page you can define how the volume of each source changes over time.
Each source has three controls:
- Attack – defines the attack (fade-in) time for the envelope.
- RELEASE Samples – when active, releasing a note will trigger a sampled release for a more natural sound.
- RELEASE Knob – when Samples is not selected, this knob defines the fade-out time after a note is released. When Samples is selected, this knob controls the volume of the release samples.
Blend
The blend sub-page is where you can define how the Thrill Factor influences the volume of each source.
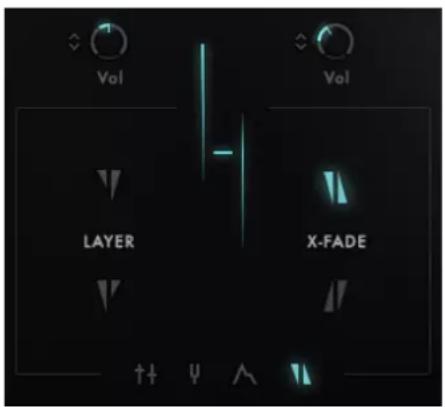
The Blend Controls
There are two main options for how blend will work, each with two secondary options for defining the source order.
The main blend modes are:
- PARALLEL – both sources will play at matched levels over the Thrill factor range. Parallel mode is engaged when all 4 blend option buttons are disabled.
- LAYER – the options on the left will set the blend so that one source has its volume modulation delayed, so that it will blend in later than the other source. The options here define which source will be delayed:
- The top option will delay the left source.
- The bottom option will delay the right source.
- The central slider will define the delay amount.
- X-FADE – the options on the right will set the blend mode to cross-fade between the two sources:
• The top option will set the cross-fade so that the right source will be used when the Thrill Factor is low. As the Thrill factor is increased, the right source will fade out and the left source will fade in.
- The bottom option will set the cross-fade so that the left source will be used when the Thrill Factor is low. As the Thrill factor is increased, the left source will fade out and the right source will fade in.
- The central slider will define the center point of the cross-fade.
4.2 Cluster
Clusters use tonal content, the pitch of which can be defined by the MIDI note used to trigger the sound. Additional voices can be assigned to the cluster, and their pitches or volumes can be affected by the Y axis so that increasing the Thrill Factor will increase the atonality of the sound.
Clusters have two control sub-pages, accessed via icons at the bottom of the control area.
Source
In the source sub-page you can control the main mix parameters of the cluster and the sound source.
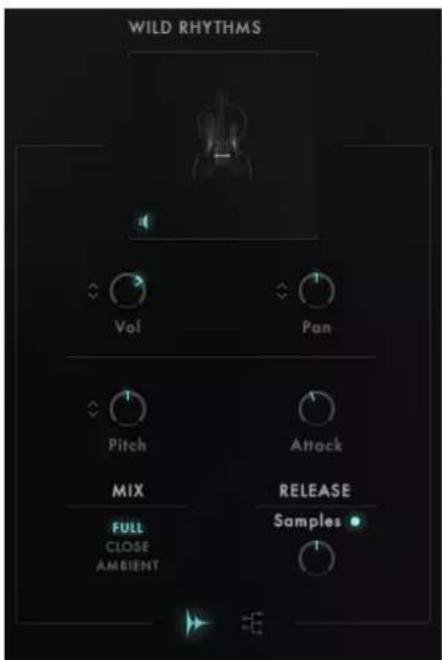
The Source Controls
The source is represented by an image.
To change a source, click on the source image to open the Source Browser (read ↑3.3, Browsing for Sounds for more information on the Preset Browser)
▶ To toggle a source on or off, click on the speaker icon to the bottom left of the source image.
→ A source is active when this icon is glowing cyan, and inactive when it is a dull grey.
Below the source image, the next two controls are mix parameters:
- Vol – controls the output volume of the source.
- Pan – sets the position of the source in the stereo field.
To the lower left are additional mix controls:
- Pitch – defines the transposition amount for the source.
-
Mix – the buttons here let you choose between three mix variations:
-
FULL – selects a mix of multiple microphone sources.
- CLOSE – selects a mix that concentrates on closer microphone sources.
- AMBIENT – selects a mix that concentrates on far microphone sources.
To the lower right are the envelope controls:
- Attack – defines the attack (fade-in) time for the envelope.
- RELEASE Samples – when active, releasing a note will trigger a sampled release for a more natural sound.
- RELEASE Knob – when Samples is not selected, this knob defines the fade-out time after a note is released.
Tuning
In the tuning sub-page you can define and control each voice in the cluster.
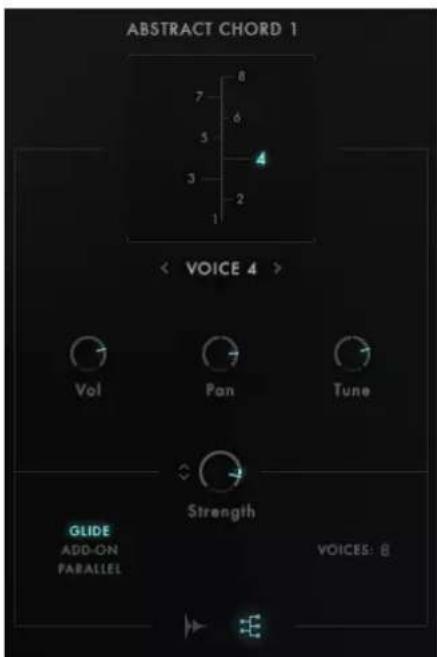
The Tuning Controls
A cluster note can contain between 1 and 8 additional voices. The number of additional voices is defined in the VOICES menu located to the bottom right of the sub-page.
The voices and their tunings are illustrated in the Cluster Voicing Tree at the top of the subpage.
The Cluster Voicing Tree can be used to edit the tuning of each additional voice simply by dragging the corresponding number horizontally. Holding down the [Alt] key while tuning a voice will snap the value to halftones for the easy setup of musical intervals.
Below the image you have a handful of controls for the voice parameters:
- The menu below the image is where you select a voice for editing.
- You can also cycle through voices using the left and right arrow buttons.
- The Vol knob sets the volume level of the voice.
- The Pan knob sets the stereo position of the voice.
- The Tune knob sets the transposition of the voice.
In the bottom left corner of the sub-page are three options for how the Thrill Factor will influence the voices:
- GLIDE – at the lowest setting, all voices will play at the root pitch of the sound; as the Thrill Factor increases, the pitches of the voices will glide to their Tune setting.
- ADD-ON – at the lowest setting, only the first voice will sound; as the Thrill Factor increases, the additional voices will be added to the sound, one after the other.
- PARALLEL – all voices play at their Tune setting and the Thrill Factor only controls the intensity of the cluster.
The Strength knob sets the volume of the additional cluster voices, while keeping the volume ratios of the Cluster Tree intact. By modulating the Strength parameter, the Cluster starts with the incoming midi note and builds up by fading in the additional cluster voices according to the modulation setting.
4.3 Key Split and Octave Settings
If both of the loaded Thrills are Clusters, then the Key Split and Octave Settings will be unlocked.

The Key Split and Octave Settings (highlighted in red)
The Key Split and Octave controls appear at the bottom of the Settings Page and control the keyboard layout and transposition of the Thrills.
- The Octave controls (located beside the Randomization menus) can be used to transpose the Thrills by octaves. Note that the settings are shown in feet (a standard from pipe organs and early synthesizers), so higher numbers will produce lower sounds, and vice versa.
- When active, the SPLIT button will divide the keyboard, placing Thrill A on the keys lower than the split key, and Thrill B on the keys higher than or equal to the split key.
- The split key is defined using the value to the right of the SPLIT button. Click and Drag the note to set the split point. Note that this control is only active when key split mode is active.
Changes made with these controls will be reflected on KONTAKT's virtual keyboard, and on the KOMPLETE KONTROL S-SERIES Light Guide.
5 The Effects Page
The Effects Page is where you can edit the effects for each of the two Thrills.
▶ Click on the FX icon at the bottom of the instrument interface to open the Source Page.
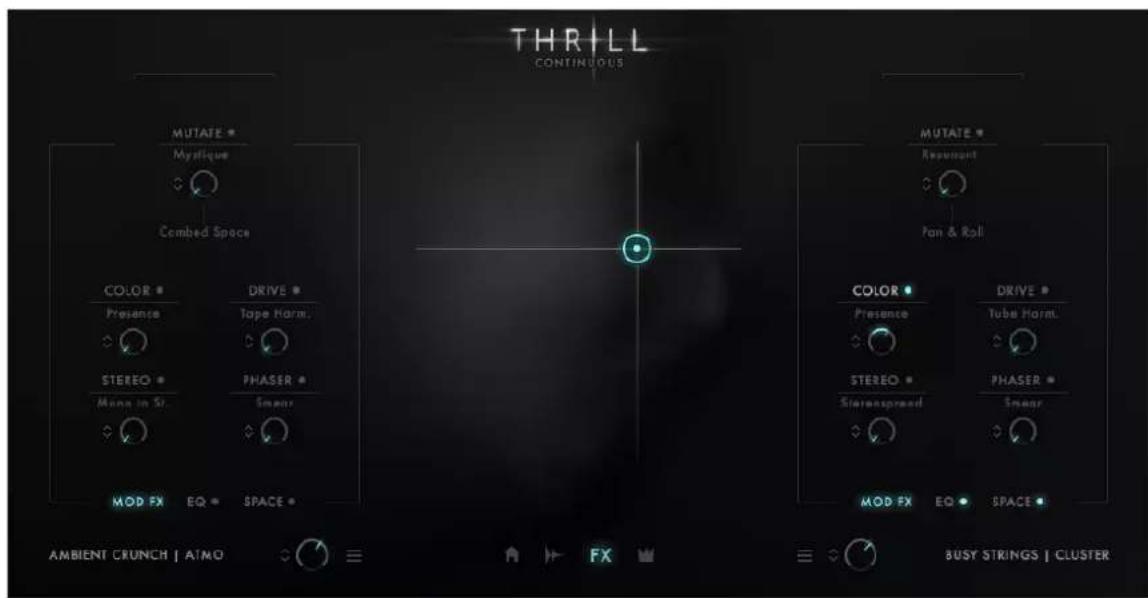
The Effects Page
The FX Page is divided into three main sections:
- In the middle is the XY Pad.
- To the left of the XY Pad are the controls for Thrill A.
- To the right of the XY Pad are the controls for Thrill B.
Each Thrill has three sub-pages of effects, accessed by three tabs below the effect controls:
- MOD FX – a collection of special, single-knob effects that can be modulated by the instrument's Thrill Factor.
- EQ – a four-band EQ for fine-tuning the timbre of the Thrill.
- SPACE – a reverb or delay effect for placing the Thrill in a virtual space.
▶ Click on the circular button beside the EQ and SPACE tabs to turn their respective effects on or off.
→ When the button is glowing cyan, the effect is on; when it is a dull grey, the effect is off.
5.1 Mod FX
Each Thrill has five Mod FX:
- MUTATE – a convolution based effect.
- COLOR – effects that control the timbre or tonality of the Thrill.
- DRIVE – distortion, saturation, and lofi effects.
- STEREO – effects that influence the stereo field of the Thrill.
- PHASER – modulation style effects: phasers, flangers, and choruses.
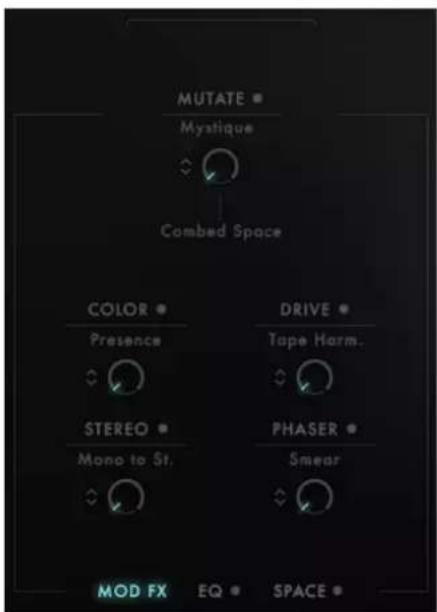
The Mod FX
▶ Click on the Mod FX name to turn the effect on or off.
→ The effect is on when the name is glowing cyan, and is off when the name is a dull grey.
All of the Mod FX have multiple modes.
- Click on the label below the Mod FX name to open a menu of available modes.
- Select a mode by clicking on it.
→ The Mod FX will be updated to the selected mode.
The MUTATE effect has one extra control for selecting the effect mode. The main mode menu selects the effect category and the second menu (located below the effect's knob) selects the specific effect type.
All of the Mod FX are controlled by a single knob, which can then be modulated by the instrument's Thrill Factor.
▶ To set the modulation amount for a Mod FX knob, click and drag on the arrows to the left of the knob.
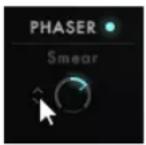
→ A cyan indicator around the knob will display the modulation amount.
5.2 EQ
The EQ effect allows you to manipulate the timbre of the Thrill by giving you access to the gain level for four bands of frequencies.
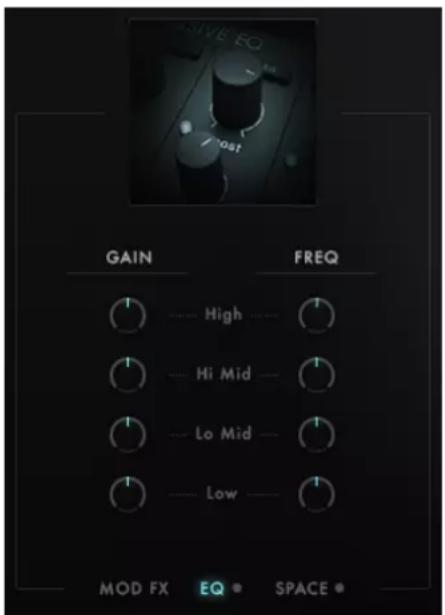
The EQ Controls
Each EQ band has two controls:
- GAIN – the gain level of the EQ band.
- FREQ – the central frequency of the EQ band.
5.3 Space
The Space effect is a convolution reverb that uses impulse responses to place each Thrill in a virtual space.
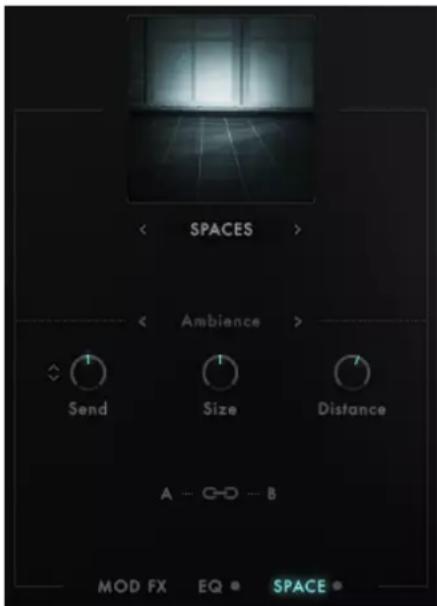
The Space Controls
To make impulse response selection easier to manage, the impulse responses are split into six categories.
To select an impulse response:
- Click on the menu below the main display image to select a category.
- Click on the menu below that to select an impulse response.
→ The selected impulse response will be loaded into the Space effect.
You can also cycle through the categories and impulse responses using the left and right arrows beside the menus.
The Space effect has four additional controls:
- Send – controls the amount of signal being sent from the Thrill to the Space effect. The send level can be modulated by the Thrill factor in a similar manner as the Mod FX.
- Size – sets the size (and therefore length) of the impulse response.
- Distance – controls the amount of delay between the input signal and the effect signal; this is commonly known as Pre-Delay.
- Link – the chain icon links the Space effects for Thrill A and Thrill B. When active, the settings for Thrill A will be used for both Thrills, and the controls for Thrill B will be disabled.
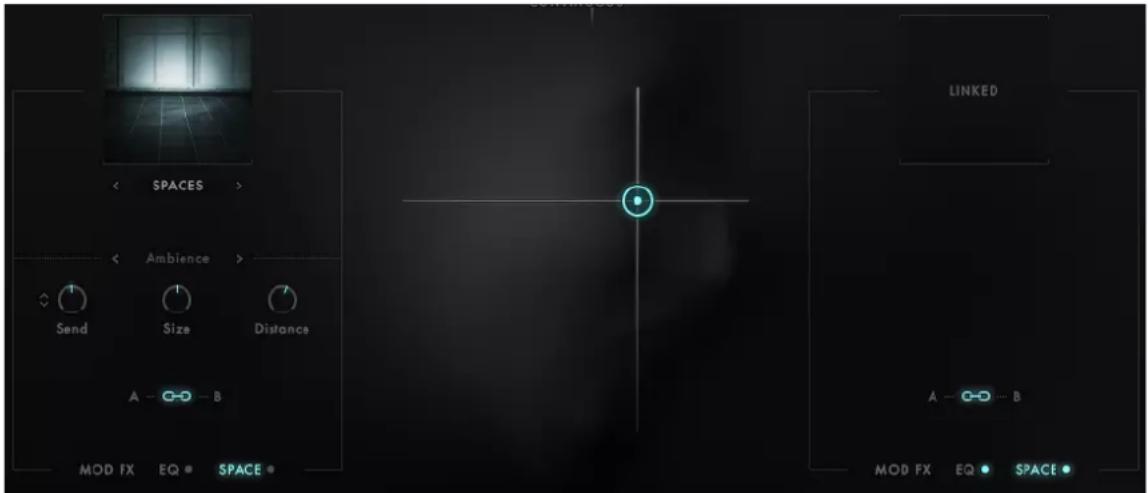
The Effects Page with Space Link Active
If the ECHO category is selected for the Space effect, the Size and Distance Knobs are replaced:
- Delay Time – sets the time between the input signal and the delayed signal, i.e. the time between echoes.
- Ping Pong – toggles the ping pong effect on or off. When on, the echoes will bounce between the left and right stereo channels.
6 The Master Page
The Master Page is where you can apply effects to the instrument output, as well as adjust parameters for controlling the XY pad.
- Clicking on the crown icon at the bottom of the interface will open the Master Page.
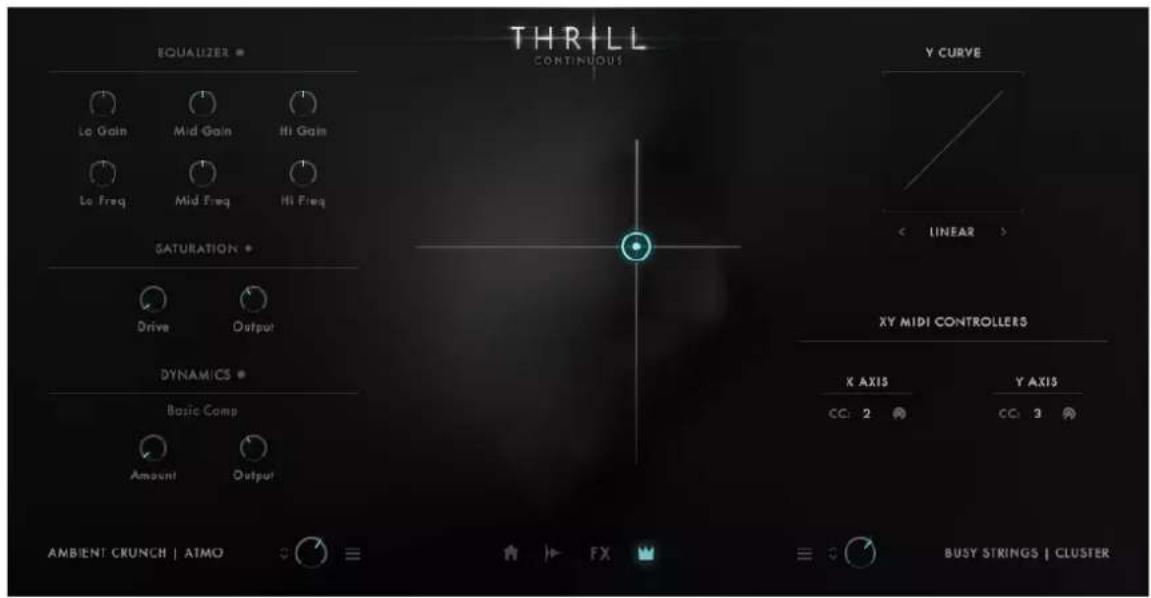
The Master Page
Unlike the other control pages the left and right sides of the Master Page are not mirrored controls for the two Thrills. Instead, the left side contains the Master Effects and the right side contains the XY control setup.
6.1 Effects
THRILL has three master effects, which are applied to the main output of the instrument.
▶ To turn a master effect on or off, click on its name.
→ When the dot beside the name is glowing cyan, the effect is active; when the dot is a dull grey, the effect is disabled.
Equalizer
The master equalizer is a three band equalizer that allows you to tweak the timbre of the instrument.
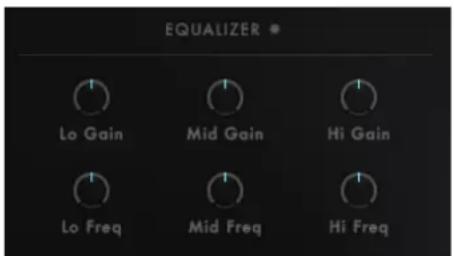
The Master EQ
Each band has two controls:
- Gain – the gain level of the band.
- Freq – the central frequency of the band.
Saturation
The saturation effect applies harmonic distortion to the output. At low levels this will add gentle warmth, and at higher levels it will make the sound growl.
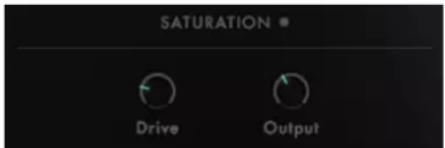
The Master Saturator
The saturation effect has two controls:
- Drive – controls the overdrive amount; i.e. the intensity of the effect.
- Output – controls the effect output volume.
Dynamics
The dynamics effect is a multi-mode compressor/limiter.
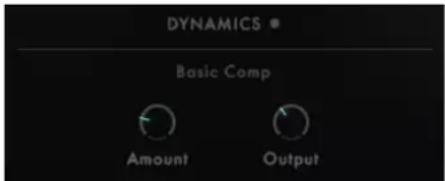
The Dynamics Controls
Click on the label below the effect name to open a menu of compressor and limiter modes.
Each mode is controlled by the same two parameters:
- Amount – controls the compression amount; i.e. the intensity of the effect.
- Output – controls the effect output volume.
6.2 Control Setup
The control setup area allows you to define MIDI control of the XY Pad, as well as the control response of the Thrill Factor.
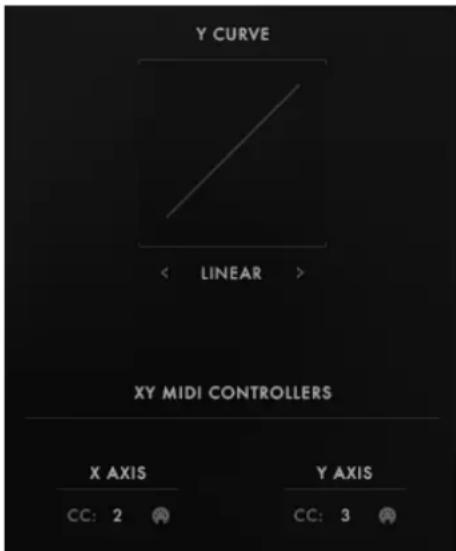
The Settings Controls
The top control, Y CURVE, is used to set the response of the Thrill Factor. The menu below the display is used to select the response curve. It has three settings:
- Linear – the output Y value matches the input exactly.
- Hard – the output value will reach high values faster.
- Soft – the output value has more detail in the lower range and only reaches high values at the end of the Y axis range.
The lower section, XY MIDI CONTROLLERS, is used to assign MIDI control for the X and Y axis for the XY Pad.
There are two ways to assign a MIDI controller:
- Manually select a MIDI control number by clicking and dragging on the numbers.
- Via the MIDI learn button.
To set a MIDI control assignment using MIDI learn:
-
Click on the MIDI learn button for the axis you wish to control.
-
Move the MIDI control you wish to use on your MIDI controller.
→ The MIDI learn button will deactivate automatically and the MIDI controller will be assigned to the chosen axis.
Note that if you are using a MIDI device that sends 2 controllers at the same time, the learn feature cannot work and you will have to assign the controllers by dragging the CC number values up or down.
7 Credits
Produced by UIi Baronowsky for GALAXY INSTRUMENTS and NATIVE INSTRUMENTS
Co-Produced by Stephan Lembke
Production Assistant: Achim Reinhardt
Product Design: Frank Elting, Uli Baronowsky
Product Design Support: Stephan Lembke, Achim Reinhardt, Ingo Hermes
KSP Programming: Klaus Baetz
User Interface Design: Martin Bartsch, Fabian Ruf
Orchestral Recordings: Bratislava Symphony Orchestra (80 piece orchestra)
Conductor: David Hernando Rico
Recording Studio: Studio 1 of the Slovak Radio in Bratislava
Recording Engineer: Martin Roller
Orchestral Soundscapes developed and orchestrated by Stefan Behrisch
Additional Orchestration and Consultation: Mark Joggerst
Sound Design and all other Recordings: Galaxy Instruments
Additional Sound-Design: Tilman Hahn, Jonathan Kranz, Heiko Lohmann
Additional Musicians: Bodek Jahnke, Ishikawa San, Alexander Schubert, Petra Kleinwächter, Sabine van Baaren
Product Management at Native Instruments: Christian Wachsmuth
Marketing Manager: Tom Evans, Philipp Dransfeld
Quality Assurance: Bymski
Video: Shane Mason
Artwork: Yvonne Hartmann
Manual: Adam Hanley
Finalization and Encoding: Carlos Ruiz
Editing & Recording Assistance: Ingo Hermes, Achim Reinhardt, Kosta Bykov, Seamus Schulze, Christian Kaltenhofer
Website: www.galaxy-instruments.com
Special Thanks: Frank Elting, Christian Wachsmuth, Tom Evans, Shane Mason, Robert Linke, Patrick Arp, Tobias Menguser, Philipp Dransfeld and everybody at NI, Bernd Keul, Neon & Landa (Wobblophones), Markus Riegler, Emil Klotsch, Ingo Hermes, Achim Reinhardt, Monika and Lillianna Dömer, Annika and Wilma Lembke.
- NATIVE INSTRUMENTS GmbH
- Table of Contents
- Welcome to THRILL
- About the Library
- The Main Interface
- The XY Pad
- The Thrill Controls
- Randomizing a Thrill
- Browsing for Sounds
- Accessing a Browser
- The Source Page
- Atmosphere
- Mix
- Tuning
- Envelope
- Blend
- Cluster
- Source
- Key Split and Octave Settings
- The Effects Page
- Mod FX
- EQ
- Space
- The Master Page
- Effects
- Equalizer
- Saturation
- Dynamics
- Control Setup
- Credits
Brand : NATIVE INSTRUMENTS
Model : Thrill
Category : Software