
Aurora - Software NATIVE INSTRUMENTS - Free user manual and instructions
Find the device manual for free Aurora NATIVE INSTRUMENTS in PDF.

| Product Type | Music Production Software |
| Brand | Native Instruments |
| Model | Aurora |
| Category | Software |
| Platform | Windows and macOS |
| License Type | Commercial, single-user |
| Version | Latest (refer to official website) |
| Main Features | Sound synthesis, sample playback, effects processing, MIDI sequencing |
| System Requirements | Intel Core i5 or equivalent, 8 GB RAM, 20 GB free disk space |
| Language Support | English, French, German, Spanish, Japanese, Chinese |
| Installation Method | Download from Native Access application |
| Updates | Free updates for licensed users via Native Access |
| Technical Support | Online knowledge base, email, community forum |
| User Manual | Free PDF manual available for download |
Frequently Asked Questions - Aurora NATIVE INSTRUMENTS
User questions about Aurora NATIVE INSTRUMENTS
0 question about this device. Answer the ones you know or ask your own.
Ask a new question about this device
Download the instructions for your Software in PDF format for free! Find your manual Aurora - NATIVE INSTRUMENTS and take your electronic device back in hand. On this page are published all the documents necessary for the use of your device. Aurora by NATIVE INSTRUMENTS.
USER MANUAL Aurora NATIVE INSTRUMENTS
1. Welcome to Aurora
Aurora is a state-of-the-art reverb plugin that combines world-class reverb algorithms with adaptive unmasking.
The unmask processor dynamically carves space for the main signal so mixes remain clear and present, while still adding rich, three-dimensional depth. This is achieved by running a psychoacoustic analysis to understand the frequencies where the brain will perceive the reverb to be masking the dry signal. The reverb is separated into spectral bins, which react to the dry signal and duck in real-time.
Aurora contains a world-class algorithmic reverb engine from Exponential Audio. This character-style architecture is based on vintage studio hardware. It's designed to be a noticeable, spacious effect, like a vocal that hangs in the air. Aurora's high quality algorithms are free from artifacts of low quality reverb algorithms that can sound metallic, resonant, or artificial.
The interface is designed to be fast and intuitive, but also powerful and flexible. Aurora's streamlined control set makes it easy to dial-in a useful reverb sound and fit it into your mix. The descriptive metering shows your reverb, dry signal, and unmask processing so you can connect visually with the audio. Aurora can easily be applied directly on tracks thanks to its internal bussing system, or applied to a typical reverb bus channel routing workflow.
This document describes all features in detail, starting with the overview.
Document conventions
In this document the following formatting is used to highlight useful information:
| Italics | Indicates paths to locations on your hard disk or other storage devices. |
| Bold Highlights important names, concepts, and software interface elements. | |
| [Brackets] References keys on the computer keyboard. | |
| ▶ | Denotes a single step instruction. |
| → | Denotes the expected result when following instructions. |
The following three icons denote special types of information:

The light bulb icon indicates a useful tip, suggestion, or interesting fact.

The information icon highlights essential information in a given context.

The warning icon alerts you of potential risks and serious issues.
2. Overview
The Aurora interface consists of the Reverb controls on the left side, the Display section in the center, and the Unmask controls on the right side. The header at the top gives you access to presets and global functions.
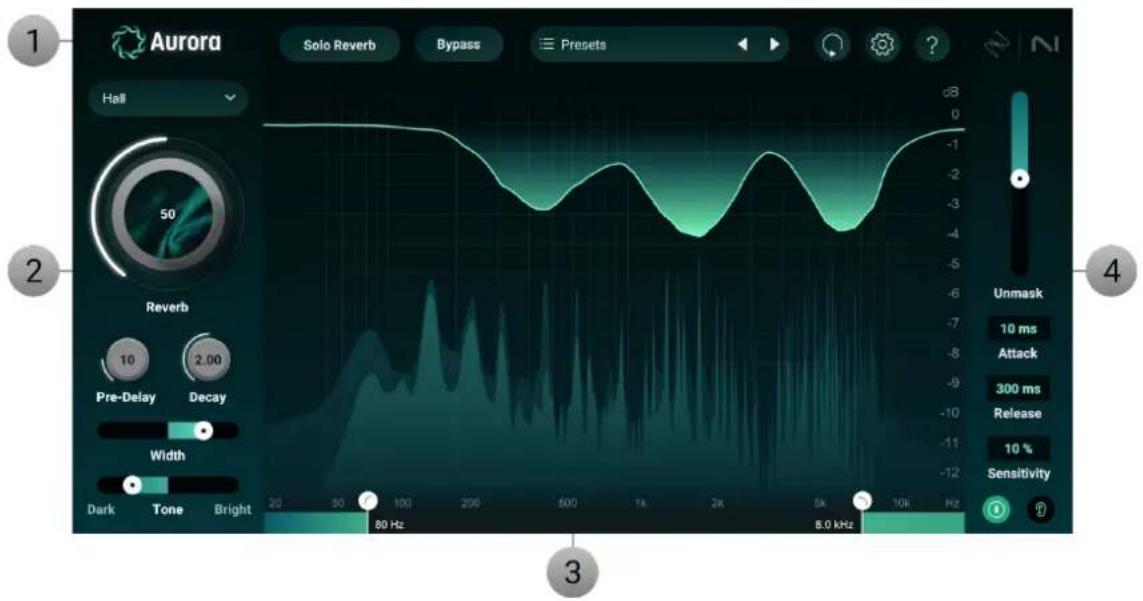
- Header: Contains global controls including the Preset selector. For more information, refer to Header.
- Reverb controls: Lets you set the mode, adjust the overall amount of reverb, and fine-tune key parameters. For more information, refer to Reverb controls.
- Display section: Visualizes the frequency spectrum for the reverb and dry signals along with the unmask processing. Also includes high cut and low cut filters for the reverb. For more information, refer to Display section.
- Unmask controls: Lets you adjust the overall amount of Unmask processing, fine-tune key parameters, enable and disable, and monitor the unmask delta signal. For more information, refer to Unmask controls.
3. Reverb controls
The Reverb controls on the left side of the interface let you select the reverb mode algorithm, adjust the overall amount of reverb, and fine-tune key reverb parameters including the pre-delay, decay time, width, and tone.
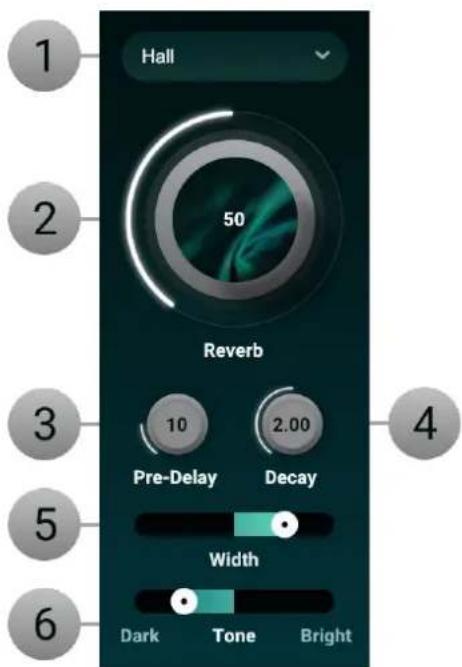
- Reverb Mode Algorithm: Adjusts many of the internal characteristics of the plugin to simulate different types of spaces. The six reverb mode algorithms include:
- Hall: Emulates the acoustics of large concert halls or performance spaces. It features a spacious, reflective character that adds grandeur and depth to the sound. It's ideal for creating a sense of vastness and can make instruments and vocals feel more expansive.
- Chamber: Simulates the sound of a smaller, acoustically treated room or chamber, often with reflective surfaces. The size is smaller than that of a hall, and the reverb tail is more controlled, offering a balanced, yet intimate sound. It's great for adding a subtle sense of space without overwhelming the original signal.
- Room: Represents the sound of a typical room with moderate reflections. It's designed to provide a natural, realistic sense of space, making it suitable for subtle use. The size and reflections are more restrained compared to hall or chamber modes, offering a more direct and less ambient effect.
- Plate: Emulates the sound of a classic plate reverb unit. It produces a smooth, dense, and sometimes metallic reverb effect. Plate reverbs are known for their distinctive, rich character and are commonly used to add warmth and presence to vocals and instruments.
- Ambience: Adds a subtle, background reverb that enhances the overall sense of space without significantly altering the direct signal. It's great for creating a sense of depth and atmosphere while maintaining clarity and focus in the mix. Ambience reverb is often used to add a gentle, enveloping quality to recordings.
- Cathedral: Simulates the expansive reverb found in large, reverberant cathedrals or churches. It features an extended size and a lush, resonant character that creates a dramatic, almost ethereal effect. Cathedral reverb is ideal for adding a grand, majestic quality to recordings, making it suitable for dramatic or orchestral music.
- Reverb Amount: Controls the amount of reverb. It is not a wet/dry knob. Aurora has an internal bussing system and this knob controls the gain of the reverb bus. The result is like if you were to create a reverb bus in your DAW, send the full signal to the bus with a 100% wet reverb, and control the gain of that bus channel. 50% of the Reverb knob is like -6 dB gain on a reverb bus. 0% is -infinity gain and 100% is 0 dB of gain. The dry signal passes through fully and this knob adds in the reverb signal. The intention is to make Aurora easy to use as an insert effect on channels and summing busses, rather than having to go through the routing workflow of setting up a reverb bus. However, if you prefer the workflow of using a reverb bus in your DAW, this can still be achieved by activating the Solo Reverb button in the header. This will mute the dry signal from passing through. When Solo Reverb is active, the Reverb Amount knob simply acts as a gain control for the reverb.
- Pre-Delay: Controls the length of a delay in milliseconds added to the reverb. This is the difference in time between the direct audio signal and the reflections reaching the ear of the listener. It can be useful in creating separation between the dry signal and the reverb in addition to the unmask processing.
- Decay: Controls the length of the reverb tail in seconds. This is how long it will take the reverb to fade out and effects the listener's perception of depth and space.
- Width: Controls the stereo spread of the reverb tail. Low amounts of widths will focus the reverb tail in the center of the stereo image. High amounts of width will create an impressive sense of envelopment, but will be less audible when playing back in mono.
- Tone: Tilts the frequency balance of the reverb. Dark will tilt the spectrum more towards low, bass frequencies and roll off highs while the Bright side of the control will tilt the balance more towards treble and gently roll off the bass.
4. Display section
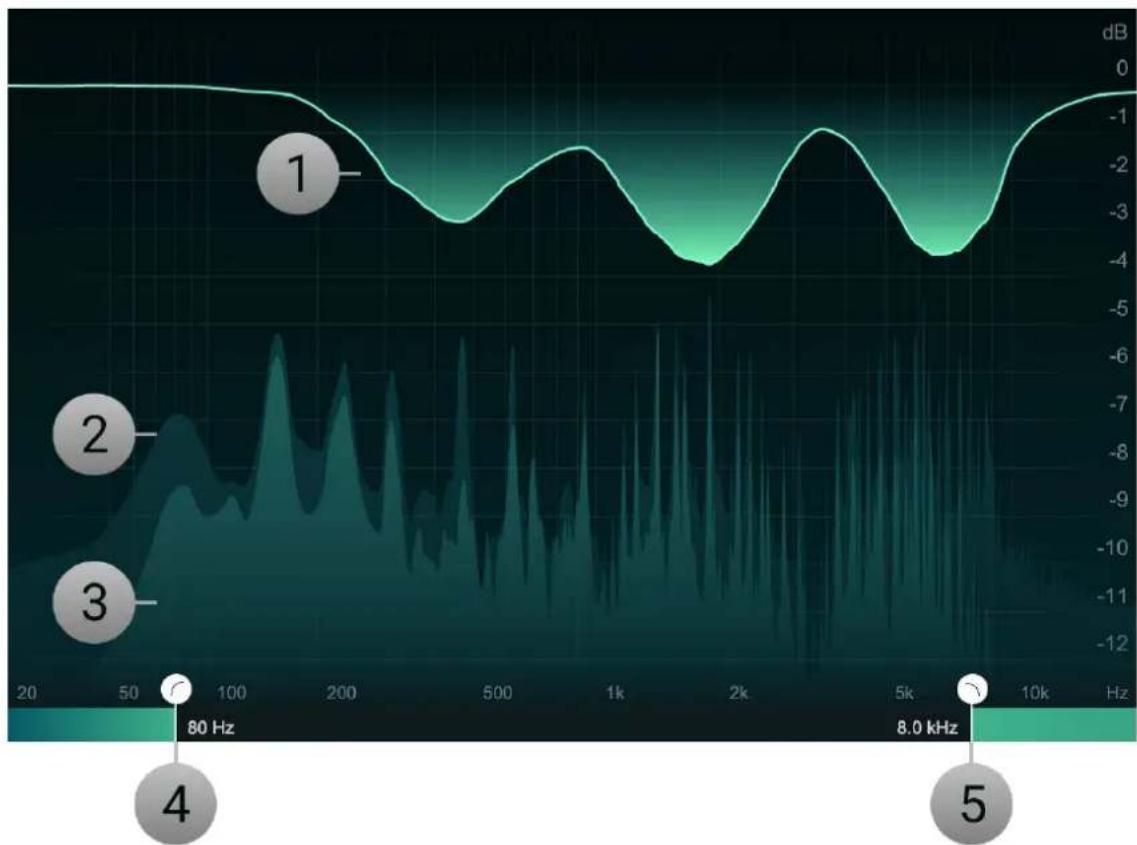
The Display section visualizes the frequency spectrum for the reverb and dry signals along with the unmask processing. You can also adjust high cut and low cut filters for the reverb.
line
| Frequency | Value (dB) | | --------- | ---------- | | 80 Hz | -1.0 | | 8.0 kHz | -1.0 |- Unmask Difference Meter: Visualizes the adaptive spectral unmasking. This ducking is applied only to the reverb signal, the dry signal is unaffected. The level of reduction is shown on the magnitude axis on the right.
- Dry Spectrum Analyzer: Visualizes the frequencies of the dry signal.
- Reverb Spectrum Analyzer: Visualizes the frequencies of the reverb signal.
- Low-cut Filter: Removes low frequencies from the reverb signal. This is a 24 dB/oct flat high-pass filter.
- High-cut Filter: Removes high frequencies from the reverb signal. This is a 24 dB/oct flat low-pass filter.
5. Unmask controls
The Unmask controls on the left side of the interface let you adjust the overall amount of Unmask processing, fine-tune key parameters, enable and disable, and monitor the unmask delta signal.
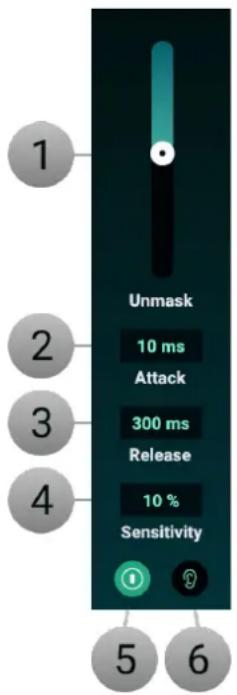
- Unmask Amount: Controls the overall depth of the unmask processing.
- Attack: Adjusts how quickly unmask responds the the incoming signal.
- Release: Adjusts how long it takes unmask ducking to return to baseline of no reduction.
- Sensitivity: Controls the masking threshold in the psychoacoustic model. Increased sensitivity will result in more unmasking and decreased sensitivity will result in less unmask processing being applied. The unmask processor is input-gain dependent. This means that if you are bussing a small amount of signal to Aurora, you may need to increase the sensitivity for unmask processing to occur.
- Power: Deactivates the unmask processing for a quick before/after comparison of the effect.
- Delta: Monitors the difference from the unmask processing. This delta signal is what is being removed from the reverb to make space for the dry signal. Please note that if the unmask Power is disabled, the Delta button will have no signal because the unmask processing is not activated.
6. Header
The Header gives you access to presets, global functions, and the Options window.

- Solo Reverb: Mutes the dry signal. When using Aurora on a reverb bus as a send effect, it is recommended to enable the Solo Reverb option.
- Bypass: Deactivates the processing of the plugin, letting you to hear the unaffected input signal.
- Preset selector: Shows the name of the current preset. Clicking the name opens the dropdown menu that lets you browse and manage presets. By clicking on the left and right arrows you can load the previous or next preset in the list, respectively. For more information, refer to Presets.
- Reset: Returns Aurora to its default settings.
- Options: Opens the Options window that shows the software version and gives access to options including tooltips and usage data, as well as your license. For more information, refer to Options.
- Help (?): Opens the Aurora online manual in your web browser.
Presets
The Preset selector lets you browse and manage presets.
▶ To open the Preset selector, click the preset name in the Header.

The Preset selector consists of the following elements and controls:
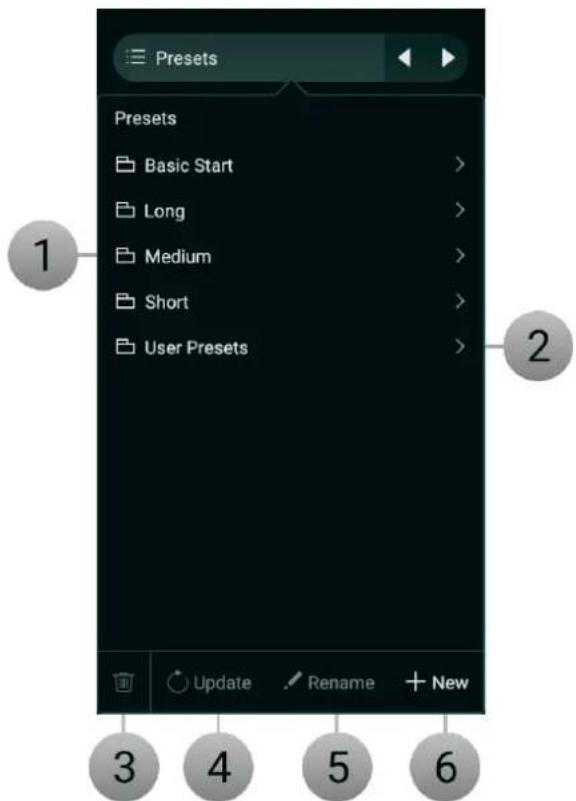
- Preset list: Shows all presets, sorted by category. Clicking a category shows the presets in this category. Clicking a preset loads all of its settings.
-
User Presets: Shows all user presets. User presets are saved in the following user preset folders.
-
macOS: /Users/
/Documents/iZotope/Aurora/Presets -
Windows: User\
\Documents\iZotope\Aurora\Presets -
Delete: Deletes the selected user preset. If a factory preset is selected, this function is not available and grayed out.
- Update: Saves any changes you have made to the selected user preset. If a factory preset is selected, or the preset's settings have not been changed, this function is not available and grayed out.
- Rename: Renames the selected user preset. If a factory preset is selected, this function is not available and grayed out.
- New: Saves a new user preset in the user preset folder.
Options
The Options window lets you check the plugin's software version and gives you access to options including tooltips and usage data, as well as your license.
▶ To open the Options window, click the Options button (cog wheel icon) in the Header.

The following options are available:
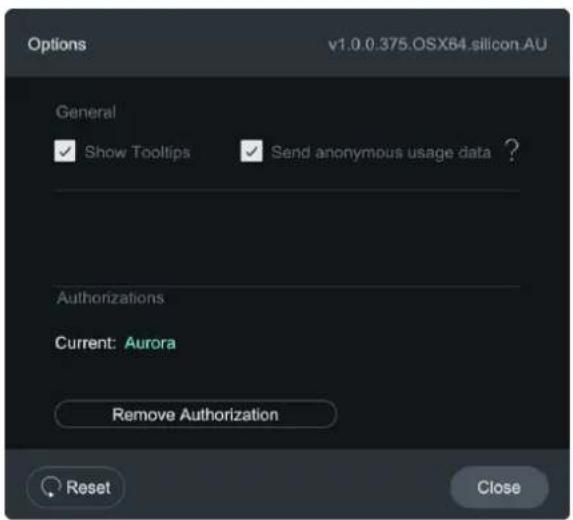
- General:
- Show tooltips: Activates or deactivates the tooltips in the user interface. When activated, hovering over a control shows a brief description of its functionality.
- Send anonymous usage data: Activates or deactivates anonymous usage data tracking. When activated, this information helps us improve the software.
License:
• Current: Shows the current license status of the plugin.
- Remove Authorization: Removes the current product authorization, letting you authorize the plugin using another serial number.

Brand : NATIVE INSTRUMENTS
Model : Aurora
Category : Software