
VP18 - Armoire chauffante alimentaire Vulcan - Free user manual and instructions
Find the device manual for free VP18 Vulcan in PDF.


| Product Type | Food Heated Holding Proofer Cabinet |
| Model | VP18 |
| Series | V Series |
| Electrical Supply | 110/120 V or 208/240 V, single phase, 50/60 Hz |
| Power Consumption | 1200 W (at 120 V model) |
| Amperage | 10 A (at 120 V model) |
| Power Cord | 8 ft cord with NEMA 5-20 (120 V) or NEMA 6-15 (208/240 V) plug |
| Modes | Proofing and Holding |
| Temperature Control | Thermostat with settings 1 to 10; Proofing recommended 1-4, Holding 5-10 |
| Display | Analog thermometer indicating interior temperature |
| Controls | ON/OFF switch, Proof/Hold switch, thermostat dial |
| Indicator Light | Red LED in ON/OFF switch for power status |
| Capacity | 20 tray slides (adjustable), holds standard 18" x 26" pans |
| Water Pans | 2 included (10"x12"x2.5"), one inside cabinet for humidity, one underneath for condensation |
| Construction | Stainless steel interior and exterior |
| Mobility | Wheels with front brakes |
| Safety Features | Three-prong grounding plug, lockout/tagout procedure |
| Preheat Time (Proofing) | Approximately 30-45 minutes |
| Preheat Time (Holding) | Approximately 25 minutes |
| Cleaning | Mild soap and water; avoid harsh chemicals or abrasive pads |
| Certifications | UL listed, NSF/ANSI 4, Energy Star (on some models) |
| Manual Pages | 24 pages (English) |
Frequently Asked Questions - VP18 Vulcan
User questions about VP18 Vulcan
0 question about this device. Answer the ones you know or ask your own.
Ask a new question about this device
Download the instructions for your Armoire chauffante alimentaire in PDF format for free! Find your manual VP18 - Vulcan and take your electronic device back in hand. On this page are published all the documents necessary for the use of your device. VP18 by Vulcan.
USER MANUAL VP18 Vulcan
V SERIES FOOD HEATED HOLDING PROOFER CABINET
MODEL:
VP18
ML-138089

natural_image
Exterior view of a VEGAN oven with red top and control panel (no visible text or symbols on the cabinet body)For additional information on Vulcan-Hart or to locate an authorized parts and service provider in your area, visit our website at www.vulcanequipment.com
VULCAN-HART 3600 NORTH POINT BLVD.
DIVISION OF ITW FOOD EQUIPMENT GROUP, LLC BALTIMORE, MD 21222
IMPORTANT FOR YOUR SAFETY
THIS MANUAL HAS BEEN PREPARED FOR PERSONNEL QUALIFIED TO INSTALL ELECTRICAL EQUIPMENT, WHO SHOULD PERFORM THE INITIAL FIELD START-UP AND ADJUSTMENTS OF THE EQUIPMENT COVERED BY THIS MANUAL.
FOR YOUR SAFETY
DO NOT STORE OR USE GASOLINE OR OTHER FLAMMABLE VAPORS OR LIQUIDS IN THE VICINITYOF THIS OR ANY OTHER APPLIANCE.

WARNING
Improper installation, adjustment, alteration, service, or maintenance can cause property damage, injury, or death.
Read the installation, operating and maintenance instructions thoroughly before installing or servicing equipment.
IN THE EVENT OF A POWER FAILURE,
DO NOT ATTEMPT TO OPERATE THIS DEVICE
TABLE OF CONTENTS
IMPORTANT FOR YOUR SAFETY 1
GENERAL 3
INTRODUCTION 3
INSTALLATION 3-4
ELECTRICAL REQUIREMENTS 5
OPERATION 6
CONTROLS 6
PROOFING OPERATING INSTRUCTIONS....7
DOUGH PREPARATION 8
PROOFING SHUTDOWN 8
HOLDING OPERATING INSTRUCTIONS 9
HOLDING SHUTDOWN 9
CLEANING....10
DAILY CLEANING 10
LOCKOUT / TAGOUT PROCEDURE 10
TROUBLESHOOTING 11
SERVICE & PARTS INFORMATION .... 11
GENERAL
INTRODUCTION
Vulcan-Hart Holding & Transport and Proofing Cabinets are produced with quality workmanship and material. Proper installation, usage, and maintenance of your cabinet will result in many years of satisfactory performance.
It is suggested that you thoroughly read this entire manual and carefully follow all of the instructions provided.
INSTALLATION
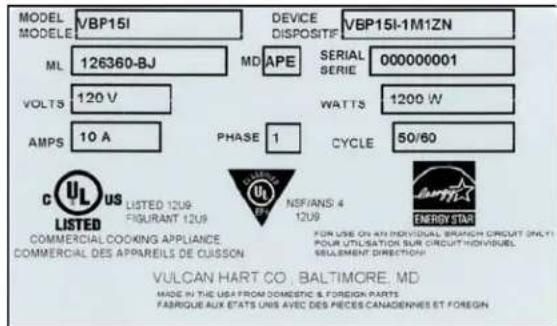
Before installing, verify that the electrical service agrees with the specifications on the rating plate located on the lower back corner of the cabinet. (Fig. 4) If the supply and equipment requirements do not agree, do not proceed with unpacking and installation. Contact your Vulcan-Hart Customer Service Department immediately.
UNPACKING:
The Cabinet was inspected before leaving the factory. The transportation company assumes full responsibility for safe delivery upon acceptance of the shipment. Immediately after unpacking, check for possible shipping damage to the cabinet.
If the cabinet is found to be damaged, save the packaging material and contact the carrier within 15 days of delivery.
Carefully unpack and place in a work accessible area as near the installation position as possible.
-
Open the door and carefully remove any packaging materials. Remove 20 Tray Slides and 2 Water Pans. (10"x12"x2½")
-
Peel off all vinyl protection film.
-
Install desired number of Tray Slides. Make sure the hook on the end of the tray slide is up. (Fig. 1)

natural_image
Close-up of a metal rack with metal bands, no visible text or symbols(Fig. 1)
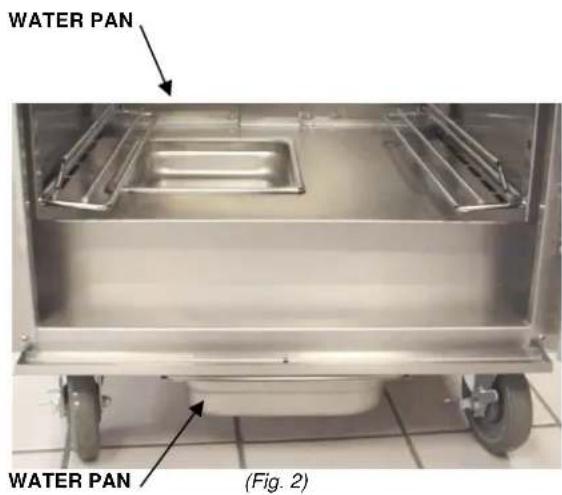
- Insert one (1) Water Pan in opening at the bottom of the cabinet and insert one (1) Water Pan through slides underneath the cabinet. (Fig. 2)
CLEANING:
The cabinet should be thoroughly cleaned prior to putting into service.
Use a mild soap and water solution to clean the interior of the unit. Never use harsh chemicals or abrasive pads to clean the unit. See cleaning instructions in this manual.
LOCATION:
For efficient cabinet operation, choose a location that will provide easy loading and unloading without interfering with the final assembly of food orders.
The installation location must be level and allow adequate clearances for servicing and proper operation.
(Fig. 3)

natural_image
Interior view of a stainless steel oven with control panel and side-mounted dish (no visible text or labels)(Fig. 3)
When cabinet is in position, secure the brakes on the front two wheels. These brakes should always be locked when the cabinet is in use.
ELECTRICAL REQUIREMENTS
ELECTRICAL CODES & STANDARDS:
The cabinet must be installed in accordance with:
In the United States of America:
- State and Local Codes.
- National Electrical Code, ANSI/NFPA-70 (latest edition.) Copies
may be obtained from: The
National Fire Protection
Association, 1Batterymarch Park, Quincy, MA 02269.
1-617-770-3000 www.nfpa.org
In Canada:
- Local Codes.
- Canadian Electrical Code, CSA
C22.1 (latest edition.) Copies
may be obtained from: The
Canadian Standard
www.csa.ca
ELECTRICAL CONNECTIONS:
The cabinet is factory wired for either 110/120 volt or 208/240 volt, single phase operation. All 110/120 volt cabinets are equipped with a 8 foot cord and NEMA 5-20 plug as standard equipment. All 208/240 volt cabinets are equipped with an 8 foot cord and NEMA 6-15 plug. Refer to wiring diagram in the back of this manual.
The cord and plug supplied is a suitable durable cord with a molded three-prong plug, and is provided with a proper strain relief.
WARNING
All cabinets
are
equipped with a three-prong plug. It is imperative that this plug must be connected into a properly grounded three-prong receptacle. If the receptacle is not the proper grounding type, contact an electrician. Do not remove the grounding prong from this plug.
Verify that the power source matches the Serial Data Plate located on the lower back corner of the cabinet and the plug configuration before the connection is made. (Fig.4)
(Fig. 4)
OPERATION
CONTROLS
WARNING The Cabinet and its parts are hot. Be very careful when operating, cleaning, or servicing the cabinet.
THERMOMETER
PROOF/HOLD THERMOSTAT ON/OFF SWITCH SWITCH

(Fig. 5)
ON/OFF Switch:
The ON/OFF Switch provides power to the unit. When depressed to the bottom position the unit is OFF. When flipped to the top position the unit is ON. The indicator light in the switch should glow red when the unit in plugged in and has power.
Thermometer:
The Thermometer indicates the interior temperature of the cabinet.
Proof/Hold Switch:
Flip the switch upward for Proofing mode or flip the switch downward for Holding mode.
Thermostat:
The Thermostat turns power on to the heating elements. The thermostat setting is from 1 to 10. The greater the thermostat setting number, the higher the temperature. If "Proofing mode" is desired, it is recommended the thermostat be set at 1 through 4. If "Holding mode" is desired, it is recommended that the thermostat be set at 5 through 10. (Fig. 5)
PROOFING OPERATING INSTRUCTIONS
⚠ WARNING Always disconnect power cord prior to adding water to the water pan inside the cabinet. Do not over fill water pan with water.
- Fill Water Pan at the bottom of cabinet with a maximum of approx. 2 liters, or one-half full, of clean warm water. Never fill water pan more than one-half full. If proofing for a long period of time, check the water pan occasionally and refill if needed.
- Plug in power cord to appropriate power source.
- Switch the unit ON. The red light on the switch will light up, indicating you have power. The thermostat dial can be turned to the desired setting.
- Turn the Thermostat to the desired setting. It is recommended the thermostat be set at 1 through 4 while proofing.
- Preheat approximately 30 to 45 minutes to reach desired temperature and humidity.
WARNING The Cabinet and its parts are hot. Be very careful when operating, cleaning, or servicing the cabinet.
At the proper setting, your proofer door will have a light haze of moisture on it. If water beads up and runs down the door, the setting or amount of water in the water pan is too high. You may need to adjust according to atmospheric conditions.
- Place pans with prepared dough inside cabinet. It is recommended that dough is completely thawed and at room temperature before placing in the proofer.
- Close cabinet door and monitor until dough is ready.
Note: Proofing time will vary depending on the different dough products. Always monitor your products for desired results. The door should not be opened unnecessarily to conserve the heat and humidity inside the cabinet.
A Water Pan is located underneath the cabinet to collect excess condensation. Make sure to periodically check and empty this pan. (Refer to Fig. 2.)
DOUGH PREPARATION
If Dough is Frozen:
- Grease pan. Place frozen dough on pan and brush tops of dough with oil, cover dough lightly with a film wrap, and refrigerate until dough thaws and reaches 40°F
It is important during thawing that the tops of the dough product must not "crust" or dry out. This can be prevented by oiling the tops and lightly covering the dough with a film wrap. This film wrap must not be tucked in at the sides – it should merely lie on top of the greased dough. Note: Always remove this film wrap before proofing.
- Remove dough from refrigerator and allow the dough to reach room temperature.
Hint: You may want to place the dough on a greased room temperature pan. This helps shorten the proofing time. Placing cold pans in the proofer brings the temperature down inside the cabinet and lengthens the proofing time.

natural_image
Still life arrangement of bread and baked goods including bread rolls, potatoes, and a wicker basket (no text or symbols visible)PROOFING SHUTDOWN
WARNING The Cabinet and its parts are hot. Be very careful when operating, cleaning, or servicing the cabinet.
When the use of the proofing cycle is completed:
-
Turn the switch to the OFF position. The thermostat dial may be left at the desired setting.
-
Open the door slightly to let out the humidity and to prevent mold.
-
Allow cabinet to cool down completely.
To clean:
-
Unplug power cord.
-
Empty and clean both water pans.
-
Clean cabinet according to instructions in this manual.
HOLDING OPERATING INSTRUCTIONS
WARNING The Cabinet and its parts are hot. Be very careful when operating, cleaning, or servicing the cabinet.
Once the cabinet has been connected to the appropriate power source, the cabinet is ready for operation.
-
Switch the unit ON. The red light on the switch will light up, indicating you have power. The thermostat dial can be turned to the desired setting.
-
Switch Proof/Hold Switch downward to the Hold position.
-
Turn the Thermostat to desired setting between 5 and 10. See Fig. 5.
-
Wait approximately 25 minutes for the cabinet to preheat.
-
Load hot food pans with hot, cooked food into cabinet.
-
When removing items, start at the bottom and work up. This will keep food hotter and eliminate spillage onto lower items.
This cabinet is not intended to reheat food. Food must be cooked and at a safe serving temperature prior to being placed in the cabinet.
The operator should always monitor the food product to insure that it remains at a proper temperature.
HOLDING SHUTDOWN
⚠ WARNING The Cabinet and its parts are hot. Be very careful when operating, cleaning, or servicing the cabinet.
When the use of the holding cycle is completed:
-
Turn the switch to the OFF position. The thermostat dial may be left at the desired setting.
-
Keep the fan switch in the On position. This helps remove the excess humidity from the food product.
-
Allow cabinet to cool down completely.
To clean:
-
Unplug power cord.
-
Clean cabinet according to instructions in this manual.
CLEANING
WARNING
electrical power cleaning.
Always unplug supply before
⚠ WARNING The Cabinet and its parts are HOT. Be very careful when operating, cleaning, or servicing the cabinet.
DAILY CLEANING:
-
Unplug electrical power supply.
-
Allow warmer to cool before cleaning.
-
Clean the interior of the cabinet with a mild soap and water. Never use harsh chemicals or abrasive pads to clean the cabinet.
-
Rinse and dry with a soft dry cloth.
-
Clean the exterior of the cabinet with a clean damp cloth.
HEAT TINT:
Darkened areas, called “heat tint,” may appear on stainless steel exposed to excessive heat. Excessive heat causes the protective film to thicken. This is unsightly, but is not a sign of permanent damage.
LOCKOUT / TAGOUT PROCEDURE

▲WARNING Always perform the Lockout / Tagout Procedure before removing any sheet metal panels or attempting to service this equipment.
The Lockout / Tagout Procedure is used to protect personnel working on an electrical appliance. Before performing any type of maintenance or service on an electrically operated appliance, follow these steps:
- In electrical box, place unit's circuit breaker into OFF position.
- Place a lock or other device on electrical box cover to prevent someone from placing circuit breaker ON.
- Place a tag on electrical box cover to indicate that unit has been disconnected for service and power should not be restored until tag is removed by maintenance personnel.
- Disconnect unit power cord from electrical outlet.
- Place a tag on cord to indicate that unit has been disconnected for service and power should not be restored until tag is removed by maintenance personnel.
TROUBLESHOOTING
| SYMPTOMS POSSIBLE CAUSES REMEDY | ||
| Cabinet not operating | Cabinet not connected to power source. Connect cabinet to power source. | |
| No power. | Check circuit breaker | |
| Check GFCI | ||
| GFCI or Ground Fault Circuit Indicator tripped | Moisture problem. Dry moisture problem. | |
| Shorted element | Contact Authorized Service Provider. | |
| Pinched/damaged wire. | Contact Authorized Service Provider. | |
| Damaged power cord. | Contact Authorized Service Provider. | |
| Cabinet is connected to power source, switch is ON, circuit breaker is ON, but cabinet is not heating. | Defective: element, thermometer, thermostat, etc. | Contact Authorized Service Provider. |
| Proof/Hold Indicator Light not lit. Light faulty | Contact Authorized Service Provider. | |
| Cabinet does not heat properly | Door not shut properly or needs adjustment | Check door seal and Contact Authorized Service Provider. |
| Defective: element, thermometer, thermostat, thermostat requires adjustment | Contact Authorized Service Provider. | |
| Fan not operating | ON/OFF switch not ON Turn ON/OFF switch ON | |
| Defective fan. | Contact Authorized Service Provider. | |
| Excessive Humidity | Too much water in Water Pan | Adjust Water |
| Drain hole clogged for Drip Pan underneath Cabinet | Clean drainage hole and check Drip Pan | |
SERVICE & PARTS INFORMATION
To obtain Service and Parts information concerning this model, contact Vulcan-Hart Service Department at the address listed on the front cover of this manual, or refer to our website: www.vulcanequipment.com for a complete listing of Authorized Service and Parts depots.
Customer Service 1-800-814-2028
Technical Service 1-800-814-2028
Service Parts 1-800-814-2028
When calling for service, have the model number and serial number available.
serve a votre disposition.
natural_image
Stacked wooden tools and tools with a small bowl, no visible text or symbols1Batterymarch Park, Quincy, MA
Protection Association,
aupres de : La National Fire
natural_image
Illustration of a portable electronic device labeled (F19.3) inside a room with no visible text or symbols on the device itself.adeguats. (Fig. 3)
natural_image
Metal frame structure with metal rods and mounting brackets, no visible text or symbolsnatural_image
Exterior view of a stainless steel laboratory oven with internal rack-mounted dish (no visible text or labels)VP18 ML-138089
:37300M
SERIES V
DE TEMPERATURE
FERMENTATION ET DE MALNTIEN
ARMOIRE CHAUFANTE DE
D UTILISATION
MANUEL DINSTALLATION 8
VILDAH
- V SERIES FOOD HEATED HOLDING PROOFER CABINET
- IMPORTANT FOR YOUR SAFETY
- FOR YOUR SAFETY
- WARNING
- TABLE OF CONTENTS
- IMPORTANT FOR YOUR SAFETY 1
- GENERAL 3
- OPERATION 6
- CLEANING....10
- LOCKOUT / TAGOUT PROCEDURE 10
- TROUBLESHOOTING 11
- SERVICE & PARTS INFORMATION .... 11
- GENERAL
- INTRODUCTION
- INSTALLATION
- UNPACKING:
- CLEANING:
- LOCATION:
- The installation location must be level and allow adequate clearances for servicing and proper operation.
- ELECTRICAL REQUIREMENTS
- ELECTRICAL CODES & STANDARDS:
- In the United States of America:
- In Canada:
- ELECTRICAL CONNECTIONS:
- OPERATION
- CONTROLS
- ON/OFF Switch:
- Thermometer:
- Proof/Hold Switch:
- Thermostat:
- PROOFING OPERATING INSTRUCTIONS
- DOUGH PREPARATION
- If Dough is Frozen:
- PROOFING SHUTDOWN
- HOLDING OPERATING INSTRUCTIONS
- HOLDING SHUTDOWN
- CLEANING
- DAILY CLEANING:
- HEAT TINT:
- LOCKOUT / TAGOUT PROCEDURE
- SERVICE & PARTS INFORMATION
Brand : Vulcan
Model : VP18
Category : Armoire chauffante alimentaire