
LDX-514 - DVD Player / VCR LG - Free user manual and instructions
Find the device manual for free LDX-514 LG in PDF.


| Product Type | DVD Player / VCR Combo |
| Brand | LG |
| Model | LDX-514 |
| Dimensions (W x H x D) | 430 x 85 x 280 mm |
| Weight | Approx. 4 kg |
| Power Supply | AC 110-240 V, 50/60 Hz |
| Power Consumption | 20 W (typical) |
| Disc Playback | DVD, DVD±R/RW, CD, CD-R/RW, MP3, JPEG |
| VCR Playback/Recording | VHS (NTSC/PAL) with timer recording |
| Video Outputs | Composite (RCA), S-Video, RF (antenna) |
| Audio Outputs | Stereo RCA (L/R), Coaxial Digital |
| Inputs | Composite (RCA) for VCR recording |
| Remote Control | Infrared with full function buttons |
| Front Panel Controls | Play, Stop, Eject, Record, Timer, Menu |
| Display | Large VFD (Vacuum Fluorescent Display) |
| Safety Features | Child lock, auto power off, overheat protection |
| Maintenance | Clean disc lens with soft cloth; use VHS head cleaning tape periodically |
| Spare Parts | Remote control (batteries: AAA), power cord, user manual |
| Repairability | Modular design with accessible components; consult service manual |
Frequently Asked Questions - LDX-514 LG
User questions about LDX-514 LG
0 question about this device. Answer the ones you know or ask your own.
Ask a new question about this device
Download the instructions for your DVD Player / VCR in PDF format for free! Find your manual LDX-514 - LG and take your electronic device back in hand. On this page are published all the documents necessary for the use of your device. LDX-514 by LG.
USER MANUAL LDX-514 LG
Before connecting, operating or adjusting this product, please read this owner's manual carefully and completely.
For service/
support Call:
Toll Free Number
1-800-243-0000

CAUTION
RISK OF ELECTRIC SHOCK DO NOT OPEN

CAUTION: TO REDUCE THE RISK OF ELECTRIC SHOCK
DO NOT REMOVE COVER (OR BACK) NO USER-SERVICEABLE PARTS INSIDE REFER SERVICING TO QUALIFIED SERVICE PERSONNEL.

This lightning flash with arrowhead symbol within an equilateral triangle is intended to alert the user to the presence of uninsulated dangerous voltage within the product's enclosure that may be of sufficient magnitude to constitute a risk of electric shock to persons.

The exclamation point within an equilateral triangle is intended to alert the user to the presence of important operating and maintenance (servicing) instructions in the literature accompanying the product.
WARNING: TO PREVENT FIRE OR ELECTRIC SHOCK HAZARD, DO NOT EXPOSE THIS PRODUCT TO RAIN OR MOISTURE.
WARNING: Do not install this equipment in a confined space such as a bookcase or similar unit.
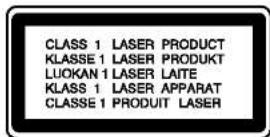
CAUTION:
This product employs a Laser System.
To ensure proper use of this product, please read this owner's manual carefully and retain it for future reference. Should the unit require maintenance, contact an authorized service center.
Performing controls, adjustments, or carrying out procedures other than those specified herein may result in hazardous radiation exposure.
To prevent direct exposure to laser beam, do not try to open the enclosure. Visible laser radiation when open. DO NOT STARE INTO BEAM.
CAUTION: The apparatus should not be exposed to water (dripping or splashing) and no objects filled with liquids, such as vases, should be placed on the apparatus.
CAUTION: VISIBLE AND INVISIBLE LASER RADIATION WHEN OPEN AND INTERLOCKS DEFEATED.
FCC WARNING: This equipment may generate or use radio frequency energy. Changes or modifications to this equipment may cause harmful interference unless the modifications are expressly approved in the instruction manual. The user could lose the authority to operate this equipment if an unauthorized change or modification is made.
REGULATORY INFORMATION: FCC Part 15
This equipment has been tested and found to comply with the limits for a Class B digital device, pursuant to Part 15 of the FCC Rules. These limits are designed to provide reasonable protection against harmful interference when the product is operated in a residential installation. This product generates, uses, and can radiate radio frequency energy and, if not installed and used in accordance with the instruction manual, may cause harmful interference to radio communications. However, there is no guarantee that interference will not occur in a particular installation. If this product does cause harmful interference to radio or television reception, which can be determined by turning the product off and on, the user is encouraged to try to correct the interference by one or more of the following measures:
• Reorient or relocate the receiving antenna.
- Increase the separation between the product and receiver.
- Connect the product into an outlet on a circuit different from that to which the receiver is connected.
- Consult the dealer or an experienced radio/TV technician for help.
FCC COMPLIANCE: The responsible party for this product's compliance is:
LG Electronics U.S.A., Inc., 1000 Sylvan Avenue, Englewood Cliffs, NJ.
Phone: 1-800-243-0000.
CAUTION concerning the Power Cord
Most appliances recommend they be placed upon a dedicated circuit;
That is, a single outlet circuit which powers only that appliance and has no additional outlets or branch circuits. Check the specification page of this owner's manual to be certain.
Do not overload wall outlets. Overloaded wall outlets, loose or damaged wall outlets, extension cords, frayed power cords, or damaged or cracked wire insulation are dangerous. Any of these conditions could result in electric shock or fire. Periodically examine the cord of your appliance, and if its appearance indicates damage or deterioration, unplug it, discontinue use of the appliance, and have the cord replaced with an exact replacement part by an authorized servicer.
Protect the power cord from physical or mechanical abuse, such as being twisted, kinked, pinched, closed in a door, or walked upon. Pay particular attention to plugs, wall outlets, and the point where the cord exits the appliance.
SERIAL NUMBER:
You can find the serial number on the back of the unit. This number is unique to this unit and not available to others. You should record requested information here and retain this guide as a permanent record of your purchase.
Model No. ____
Serial No. ____
IMPORTANT SAFETY INSTRUCTIONS
CAUTION: PLEASE READ AND OBSERVE ALL WARNINGS AND INSTRUCTIONS IN THIS OWNER'S MANUAL. AND THOSE MARKED ON THE PRODUCT. RETAIN THIS BOOKLET FOR FUTURE REFERENCE.
This product has been designed and manufactured to assure personal safety. Improper use can result in electric shock or fire hazard. The safeguards incorporated in this product will protect you if you observe the following procedures for installation, use, and servicing.
This product does not contain any parts that can be repaired by the user.
DO NOT REMOVE THE CABINET COVER, OR YOU MAY BE EXPOSED TO DANGEROUS VOLTAGE. REFER SERVICING TO QUALIFIED SERVICE PERSONNEL ONLY.
-
Read these instructions. - All these safety and operating instructions should be read before the product is operated.
-
Keep these instructions. - The safety, operating and use instructions should be retained for future reference.
-
Heed all warnings. - All warnings on the product and in the operating instructions should be adhered to.
-
Follow all instructions. - All operating and use instructions should be followed.
-
Do not use this product near water. – For example: near a bath tub, wash bowl, kitchen sink, laundry tub, in a wet basement; or near a swimming pool; and other areas located near water.
-
Clean only with dry cloth. – Unplug this product from the wall outlet before cleaning. Do not use liquid cleaners.
-
Do not block any ventilation openings. Install in accordance with the manufacturer's instructions. - Slots and openings in the cabinet are provided for ventilation and to ensure reliable operation of the product and to protect it from over-heating. The openings should never be blocked by placing the product on a bed, sofa, rug or other similar surface. This product should not be placed in a built-in installation such as a bookcase or rack unless proper ventilation is provided or the manufacturer's instructions have been adhered to.
-
Do not install near any heat sources such as radiators, heat registers, stoves, or other apparatus (including amplifiers) that produce heat.
-
Do not defeat the safety purpose of the polarized or grounding-type plug. A polarized plug has two blades with one wider than the other. A grounding type plug has two blades and a third grounding prong. The wide blade or the third prong are provided for your safety. If the provided plug does not fit into your outlet, consult an electrician for replacement of the obsolete outlet.
-
Protect the power cord from being walked on or pinched particularly at plugs, convenience receptacles, and the point where they exit from the product.
-
Only use attachments/accessories specified by the manufacturer.
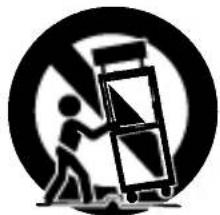
natural_image
Symbolic icon of a person pushing a cart with a diagonal arrow, enclosed in a circle (no text or symbols)-
Use only with the cart, stand, tripod, bracket, or table specified by the manufacturer, or sold with apparatus. When a cart is used, use caution when moving the cart/product combination to avoid injury from tip-over.
-
Unplug this product during lightning storms or when unused for long periods of time.
-
Refer all servicing to qualified service personnel. Servicing is required when the product has been damaged in any way, such as power-supply cord or plug is damaged, liquid has been spilled or objects have fallen into the product, the product has been exposed to rain or moisture, does not operate normally, or has been dropped.
Contents
Introduction ....5
Moisture Condensation ....5
Symbol Used in this Manual .....5
About the ⊙ Symbol Display .....5
Notes on Discs .5
Types of Playable Discs .....6
Region code 6
Notes on Copyrights .6
Notice for Progressive Scan Use .....6
Selecting the Viewing Source .....6
Disc-related terms .....7
Card useable on this unit .....8
Using Memory Card ....8
About the Remote Control ....8
Front Panel 9
Remote Control ....10
Rear Panel 11
Preparation .....11
Connecting an Antenna or Cable TV .....12
Basic TV Connections .....12-13
Optional TV Connections .....13
HDMI Connection .....14
Connection to an Amplifier .....15
Initial Settings - VCR .....16-17
General Operation 16
CLOCK 16
• Auto Clock Set ..... 16
- Manual Clock Set 16
PROGRAM 16
TUNING .....17
• Auto Channel Programming .....17
- To Add or Erase Channels .....17
SETUP 17
Initial Settings - DVD .....18-21
General Operation 18
LANGUAGE 18
- Menu Language .....18
• Disc Audio/Subtitle/Menu .....18
DISPLAY 19
• TV Aspect .....19
- Display Mode .....19
AUDIO 19
• Dolby Digital/DTS/MPEG .....19
• Sample Freq. (Frequency) .....19
• DRC (Dynamic Range Control) .....19
• Vocal .....19
LOCK (Parental Control) .....20
• Rating .....20
- Password (Security Code) .....20
- Area Code .20
OTHERS .21
- PBC ....21
• Auto Play .....21
• B.L.E. (Black Level Expansion) .....21
• DivX Registration Code .....21
Operation 22
VCR Tape Playback .....22-23
Basic Instructions .22
Auto Tracking .22
Manual Tracking .....22
Search 22
Still Picture and Frame-by-Frame
Playback 22
Slow Motion 23
CM SKIP (Commercial Skip) .....23
VHS Hi-Fi Stereo/MTS Broadcast .....23
VCR Tape Recording .....24
Timer Recording .....24-25
Instant Timer Recording .....26
Recording from External Components .....26
Copying from DVD to VCR .....27
On-Screen Display - VCR .....27
Additional VCR Information .....28
VCR Auto Play System .....28
S-VHS Quasi Playback (SQPB) .....28
Easy Information 28
Playing a DVD or Video CD .....29-31
Playback Setup .29
General Features .29-31
- Moving to another TITLE .....29
- Moving to another CHAPTER/TRACK ...29
- Slow motion .....29
- Still Picture and Frame-by-Frame
Playback 29
- Search 30
• Time Search ....30
- Marker Search ....30
- Repeat ....30
- Repeat A-B 30
- Zoom 30
• 3D Surround .....30
- Random 31
- Changing the Audio Channel .....31
- Last Scene Memory . . . . . . . . . . . . . . . . . . . . . . . . . . . . . . . . . . . . . . . . . . . . . . . . . 31
- Screen Saver ....31
- Changing Video Mode . . . . . . . . . . . . . . . . . . . . . . . . . . . . . . . . . . . . . . . . . . . . . . . . . . 31
Special DVD Features .....31
- Checking the contents of DVD discs:
Menus .31
- Title Menu ....31
- Disc Menu ....31
- Camera Angle ....31
- Changing the Audio Language .....31
- Subtitles ....31
On-Screen Display - DVD .....32
Maintenance and Service ....32
Playing an Audio CD or MP3/WMA Disc .33-34
Programmed Playback .35
Viewing a JPEG Files ....36
Playing a DivX Movie File .....37
Playing a DVD VR format Disc .....37
Controlling Your TV with the Supplied
Remote 38
Reference 39
Language Codes ....39
Area Codes 39
Troubleshooting .....40-41
Specifications 42
Introduction
To ensure proper use of this product, please read this owner's manual carefully and retain for future reference.
This manual provides information on the operation and maintenance of your DVD+VCR. Should the unit require service, contact an authorized service location.
Moisture Condensation
Never operate the DVD+VCR immediately after moving it from a cold location to a warm location. Leave it unplugged for two or three hours without operating it. If you use the DVD+VCR in such a situation, it may damage discs/tapes and internal parts.
Symbol Used in this Manual

Indicates hazards likely to cause harm to the unit itself or other material damage.
Note: Indicates special notes and operating features.
Tip: Indicates tips and hints for making the task easier.
A section whose title has one of the following symbols is applicable only to the disc represented by the symbol.
DVD DVD and finalized DVD±R/RW
VCD Video CDs
ACD Audio CDs
MP3 MP3 Discs
WMA WMA Discs
JPEG JPEG Discs
DivX DivX Discs
About the Symbol Display
“ ⊗ ” may appear on your TV display during operation and indicates that the function is not permitted by this unit or the disc.
Notes on Discs
Handling Discs
Do not touch the playback side of the disc. Hold the disc by the edges so that fingerprints do not get on the surface. Never stick paper or tape on the disc.
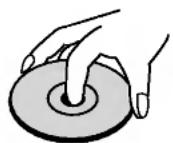

Storing Discs
After playing, store the disc in its case. Do not expose the disc to direct sunlight or sources of heat and never leave it in a parked car exposed to direct sunlight.
Cleaning Discs
Fingerprints and dust on the disc can cause poor picture quality and sound distortion. Before playing, clean the disc with a clean cloth. Wipe the disc from the center out.
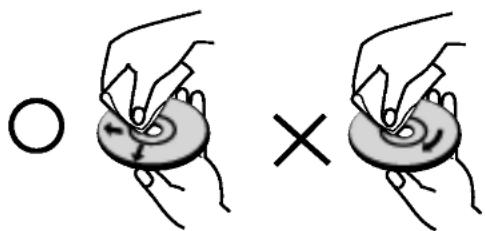
Do not use strong solvents such as alcohol, benzine, thinner, commercially available cleaners, or anti-static spray intended for older vinyl records.
Types of Playable Discs
| DVD |
| VIDEO ^TM |
DVD (8 cm / 12 cm disc)

Video CD (VCD) (8 cm / 12 cm disc)

Audio CD (8 cm / 12 cm disc)
In addition, this unit plays Memory Card, DVD-R, DVD+R, DVD-RW, DVD+RW, SVCD, and CD-R / CD-RW that contains audio titles, MP3, WMA, and/or JPEG, DivX files.
RW This indicates a product feature that is capable of playing DVD-RW discs recorded with Video Recording format.
Notes:
- Depending on the conditions of the recording equipment or the CD-R/RW (or DVD -R, DVD +R, DVD -RW, DVD +RW) disc itself, some CD-R/RW (or DVD -R, DVD +R, DVD -RW, DVD +RW) discs cannot be played on the unit.
- Do not attach any seal or label to either side (the labeled side or the recorded side) of a disc.
- Do not use irregularly shaped CDs (e.g., heart-shaped or octagonal) since they may result in malfunctions.
Notes on DVDs and Video CDs
Some playback operations of DVDs and Video CDs may be intentionally programmed by software manufacturers. This unit plays DVDs and Video CDs according to disc content designed by the software manufacturer, therefore some playback features may not be available or other functions may be added.
Region code
This DVD+VCR is designed and manufactured for playback of region "1" encoded DVD software. This unit can play only DVD discs labeled "1" or "ALL".


Notes on Regional Codes
- Most DVD discs have a globe with one or more numbers in it clearly visible on the cover. This number must match your DVD+VCR's regional code or the disc cannot play.
- If you try to play a DVD with a different region code from your player, the message "Check Regional Code" appears on the TV screen.
Notes on Copyrights:
It is forbidden by law to copy, broadcast, show, broadcast via cable, play in public, or rent copyrighted material without permission.
This product features the copy protection function developed by Macrovision. Copy protection signals are recorded on some discs. When recording and playing the pictures of these discs picture noise will appear. This product incorporates copyright protection technology that is protected by method claims of certain U.S. patents and other intellectual property rights owned by Macrovision Corporation and other rights owners. Use of this copyright protection technology must be authorized by Macrovision Corporation, and is intended for home and other limited viewing uses only unless otherwise authorized by Macrovision Corporation. Reverse engineering or disassembly is prohibited.
Notice for Progressive Scan Use
CONSUMERS SHOULD NOTE THAT NOT ALL HIGH DEFINITION TELEVISION SETS ARE FULLY COMPATIBLE WITH THIS PRODUCT AND MAY CAUSE ARTIFACTS TO BE DISPLAYED IN THE PICTURE. IN CASE OF 525 PROGRESSIVE SCAN PICTURE PROBLEMS, IT IS ECOMMENDED THAT THE USER SWITCH THE CONNECTION TO THE 'STANDARD DEFINITION' OUTPUT. IF THERE ARE QUESTIONS REGARDING OUR TV SET COMPATIBILITY WITH THIS MODEL 525p DVD+VCR, PLEASE CONTACT OUR CUSTOMER SERVICE CENTER.
Selecting the Viewing Source
You must select one of your output sources (DVD or VCR) to view on the TV screen.
- If you want to view DVD deck output source: Press DVD until DVD indicator in the display window lights and output source of DVD deck is viewed on the TV screen.
- If you want to view VCR deck output source: Press VCR until VCR indicator in the display window lights and output source of VCR deck is viewed on the TV screen.
Notes:
- If you insert a disc while the DVD+VCR is in the VCR mode, the DVD+VCR will switch to DVD mode automatically.
- If you insert a cassette tape without prevention tab while the DVD+VCR is in the DVD mode, the DVD+VCR will switch to VCR mode automatically.
Disc-related terms
DVD ±R / DVD ±RW
DVD -R and DVD +R are two different standards for recordable DVD drives and discs. This format allows information to be recorded onto the DVD disc only once. DVD +RW and DVD -RW are two standards for re-writable media, meaning the DVD content can be erased and re-recorded. Single-sided discs can hold 4.38 Gigabytes and double-sided discs hold twice as much. There are no double layer single sided recordable discs.
VCD (Video CD)
A VCD holds up to 74 minutes (650 MB disc) or 80 minutes (700 MB disc) of MPEG-1 full-motion video along with quality stereo sound.
MPEG
MPEG is an international standard for video and audio compression. MPEG-1 is used in encoding video for VCD and provides for multichannel surround sound coding such as PCM, Dolby Digital, DTS and MPEG audio.
MP3
MP3 is a popular compression format used for digital audio files that yields very high near-CD quality.
WMA
Windows media audio file. A type of coding / decoding developed by Microsoft Corp.
JPEG
Joint Pictures Expert Group. JPEG is a compressed file format that allows you to save images with no limit on the number of colors.
DivX
DivX is the name of a revolutionary new video codec which is based on the new MPEG-4 compression standard for video. You will be able to play DivX movies using this DVD player.
PBC: Playback Control (Video CD only)
Playback control is available for Video CD (VCD) version 2.0 disc formats. PBC allows you to interact with the system via menus, search functions, or other typical computer-like operations. Moreover, still pictures of high resolution can be played if they are included in the disc. Video CDs not equipped with PBC (Version 1.1) operate in the same way as audio CDs.
Title (DVD only)
A title is generally a distinct section of a DVD disc. For example the main feature could be title 1, a documentary describing how the film was made could be title 2, and cast interviews could be title 3. Each title is assigned a reference number enabling you to locate it easily.
Chapter (DVD only)
A chapter is a segment of a title such as a scene in a film or one interview in a series. Each chapter is assigned a chapter number, enabling you to locate the chapter you want. Depending on the disc, chapters may not be recorded.
Scene (VCD)
On a video CD with PBC ( playback control) functions, moving pictures and still pictures are divided into sections called "scenes". Each scene is displayed in the menu screen and assigned a scene number, enabling you to locate the scene you want. A scene is composed of one or several tracks.
Track
A distinct element of audiovisual information, such as the picture or sound track for a specific language (DVD), or a musical piece on a video or audio CD. Each track is assigned a track number, enabling you to locate the track you want. DVD discs allow one track of video (with multiple angles) and several tracks of audio.
Card useable on this unit
- Compact Flash Card (CF)
- Micro Drive (MD)
• Secure Digital Card (SD)
• Multi Media Card (MMC)
• SmartMedia Card (SMC)
• Memory Stick (MS)
• Memory Stick Pro (MS-Pro)
• Compatible with: FAT 12, FAT 16, or FAT 32
• Only use the memory cards recommended above.
Regarding Write Protect
For cards that have a write protect switch, if the switch is on it will not be possible to write, erase or format the card.
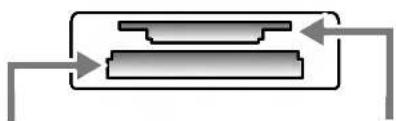
Inserting/Removing the Memory Card
natural_image
Pure diagram of a mechanical component with no text, numbers, or symbolsInsert CF, MD card
Insert SD, MMC, SMC, MS, or MS-Pro card
Inserting the card: Insert straight-in until it fits into place.
Removing the card: Withdraw the card carefully.
Notes:
- Keep the memory card out of reach of children. If swallowed, seek medical advice immediately.
- Some memory card may not work in this unit, depending on the formatting.
- Do not extract the memory card in operating.
Using Memory Card
- Insert a memory card.
- Press MEMORY on the Front panel in the DVD mode.
The Memory Card slot choice menu appears on the TV screen.
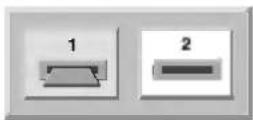
- Use ▲/▼ to select the desired Memory Card slot then press ENTER. The Photo or Music menu appears on the TV screen.
Note:
For details on each operation item, refer to relevant pages.
About the Remote Control
Operation Range
Point the remote control at the remote sensor and press the buttons.
Distance: About 23 ft (7 m) from the front of the remote sensor.
Angle: About 30^ in each direction of the front of the remote sensor.
Battery installation
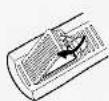
Detach the battery cover on the rear of the remote control, and insert two (R03/AAA) size batteries with ⊕ and ⊖ aligned correctly.

Do not mix old and new batteries and never mix different types of batteries such as standard, alkaline, etc.
Front Panel
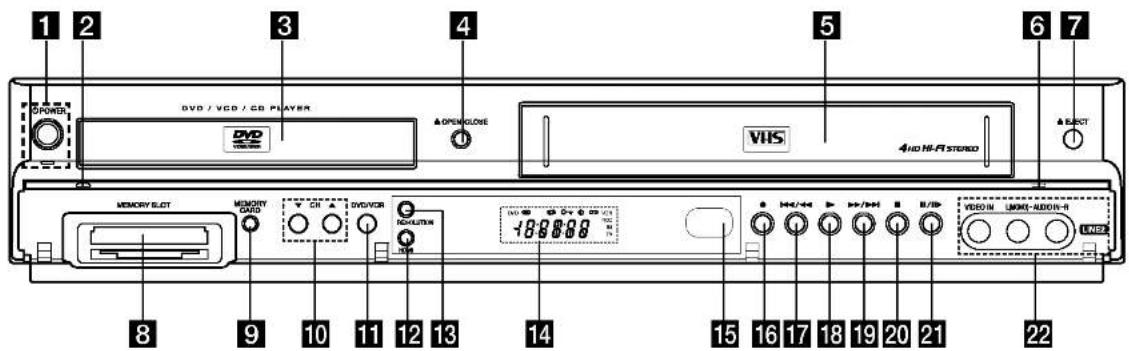
1 POWER button and indicator
Switches the DVD+VCR ON and OFF.
Lights green when the DVD+VCR is turned on.
2 DVD indicator
Indicates the active DVD deck.
3 Disc Tray (DVD deck)
Insert a disc here.
4 ▲ OPEN/CLOSE
Opens or closes the disc tray.
5 Cassette Compartment (VCR deck)
Insert a video cassette here.
6 VCR indicator
Indicates the active VCR deck.
7 ▲EJECT
Ejects the tape in the VCR deck.
8 MEMORY SLOT
Insert a memory card
(CF, MD, SMC, MMC, SD, MS, MS-Pro).
9 MEMORY CARD
Accesses the menu for memory card.
10 CH (▼/▲)
To scan up or down through memorized channels.
11 DVD/VCR (output select)
Select one of your output sources to view on the TV screen between DVD and VCR.
12 HDMI
Switches the HDMI mode to HDMI (active) and OFF (inactive).
13 RESOLUTION
You can change the resolution depending on your TV.
- HDMI mode : You can switch among the 480p, 720p or 1080i resolution.
- Component mode : You can switch among 480i, 480p, 720p or 1080i resolution.
14 Display Windows
DVD The DVD deck is selected.

A disc is in the DVD deck.
(Lights when a disc is in the DVD deck and Flashes when no disc.)

Indicates repeat mode.

Indicates when the DVD+VCR is locked.
DVD+VCR is in timer recording or a timer recording is programmed (VCR part only).
A cassette is in the VCR deck.
VCR The VCR deck is selected.
REC DVD+VCR is Recording.(VCR part only)
PM Indicates PM time. (AM is not displayed.)
TV Lights when TV mode is active.
18:00:00 Indicates total playing time, elapsed time, remaining time or current deck status (Playback, Pause, etc).
15 Remote Sensor
Point the DVD+VCR remote control here.
16 ● (REC) button
Starts recording.
Press repeatedly to set the recording time.
17
- DVD: Skip to beginning of current chapter or track, press twice in quick successions to go to previous chapter or track. Press and hold button for about two seconds to search backward.
- VCR: Rewinds the tape during the stop mode or for fast backward picture search.
18 Starts playback of a disc or tape.
19
DVD: Skip to next chapter or track. Press and hold for two seconds for a fast forward search.
VCR: Advances the tape during the STOP mode or for fast forward picture search.
20 ■ Stops playback of the disc or tape.
21 II/III▶ Pause playback or recording temporarily. Press repeatedly for frame-by-frame playback.
22 LINE2 (VIDEO/AUDIO (L/R) input)
Connect to the audio/video output of an external source (Audio system, TV/Monitor, Another VCR).
Remote Control
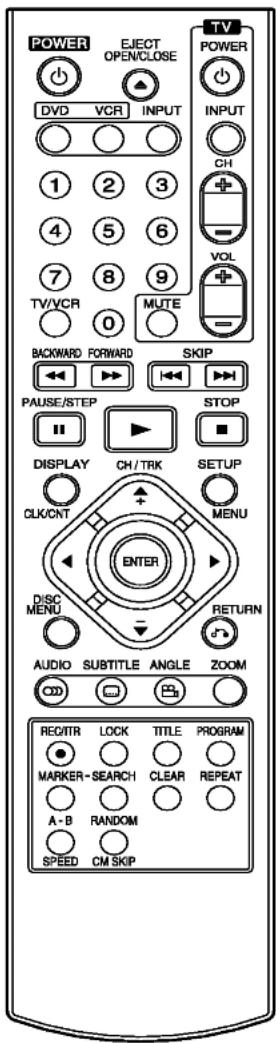
◀ ▶ ▲ ▼ Selects menu options.
CH/TRK(▲+/▼-) Selects VCR channels. Adjusts manually the tape's picture onscreen.
▶ (PLAY) Starts playback.
0-9 Selects numbered options in a menu.
A-B Repeats sequence between two points (A and B).
SPEED Selects recording speed.
ANGLE Selects a DVD camera angle, if available.
AUDIO Selects an audio language (DVD) or an audio channel (VCD).
BACKWARD / FORWARD (◀◀/▶▶)
DVD: Search backward or forward.
- VCR: Rewinds/Advances the tape during the STOP mode, for fast backward/forward picture search.
CLEAR Removes a mark on the Marker Search menu.
DISC MENU Accesses menu on a DVD disc.
DISPLAY Accesses On-Screen Display.
CLK/CNT Switches between the clock, tape counter and tape remaining modes on the display.
DVD Select the DVD+VCR function mode to DVD.
EJECT Ejects the tape in the VCR deck.
OPEN/CLOSE Opens and closes the disc tray.
ENTER Confirms menu selections. Displays functions on the TV screen.
INPUT Selects the VCR deck's source (Tuner, LINE 1, or LINE 2).
LOCK Locks/unlocks front panel buttons.
MARKER Marks any point during playback.
PAUSE/STEP (III) Pause playback or recording temporarily. Press repeatedly for frame-by-frame playback.
POWER Switches DVD+VCR ON and OFF.
PROGRAM Shows or hides Program menu.
RANDOM Plays tracks in random order.
CM SKIP Fast forwards picture search through 30 seconds of recording.
REC/ITR (●) Starts recording. Press repeatedly to set the recording time.
REPEAT Repeat chapter, track, title or all.
RETURN (💡) Removes the setup menu, displays the video CD with PBC.
SEARCH Displays Marker Search menu.
SETUP, MENU Accesses or removes DVD Setup menu and VCR menu.
SKIP (I◄◄ / ►►I) Go to next chapter or track. Returns to beginning of current chapter or track or go to previous chapter or track.
STOP (■) Stops playback or recording.
SUBTITLE Selects a subtitle language.
TITLE Displays the disc's Title menu, if available.
TV Control Buttons (See page 35).
TV/VCR To view channels selected by the VCR tuner or by the TV tuner.
VCR Select the DVD+VCR function mode to VCR.
ZOOM Enlarges DVD video image.
LOCK function
The Lock feature disables the front panel buttons to prevent children from tampering with the DVD+VCR. Simply press LOCK on the remote control to toggle this feature on and off.
Rear Panel

Caution
Do not touch the inner pins of the jacks on the rear panel. Electrostatic discharge may cause permanent damage to the unit.
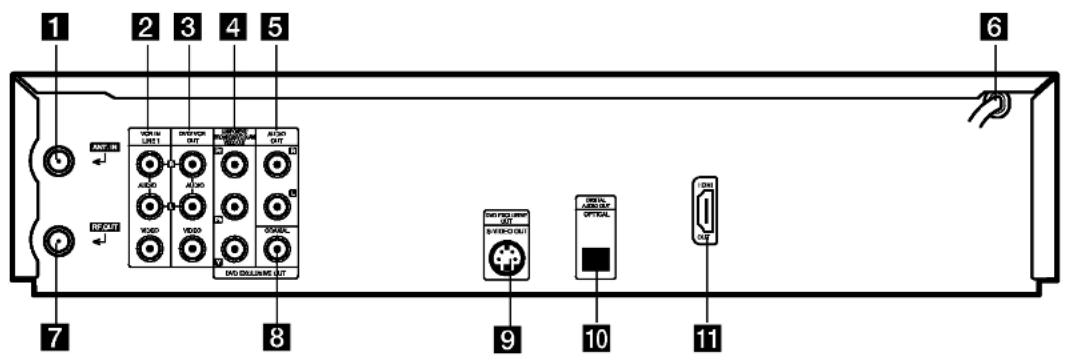
1 ANT.IN
Connect the VHF/UHF/CATV antenna to this terminal.
2 VCR IN LINE 1 (VIDEO/AUDIO (Left/Right))
Connect the audio/video output of an external source (Audio system, TV/Monitor, VCR, Camcorder).
3 DVD/VCR OUT (VIDEO/AUDIO (Left/Right))
Connect to a TV with video and audio inputs.
4 COMPONENT/PROGRESSIVE SCAN VIDEO OUT (Y Pb Pr) (DVD OUT)
Connect to a TV with Y Pb Pr inputs.
5 AUDIO OUT (Left/Right) (DVD OUT)
Connect to a TV or other equipment with audio inputs.
6 AC Power Cord
Plug into the power source.
7 RF.OUT
Connect to a TV with RF coaxial inputs.
8 COAXIAL (DIGITAL AUDIO OUT jack) (DVD OUT)
Connect to digital (coaxial) audio equipment.
9 S-VIDEO OUT (DVD OUT)
Connect to a S-Video Input on TV.
10 OPTICAL (DIGITAL AUDIO OUT jack) (DVD OUT)
Connect to digital (optical) audio equipment.
11 HDMI OUT
HDMI output providing a high quality interface for digital audio and video.
Preparation
Depending on your TV and other equipment there are various ways you can connect the player. Please refer to the manuals of your TV, VCR, stereo system or other devices as necessary for additional connection information.
Notes:
- The picture and sound of a nearby TV, VCR, or radio may be distorted during playback. Position the units away from each other or turn off the unit after removing the disc.
• Make sure the DVD+VCR is connected directly to the TV and tune the TV to the correct video input channel. - Do not connect the DVD+VCR's AUDIO OUT jack to the phono in jack (record deck) of your audio system. Do not connect the DVD+VCR via another VCR. The DVD image could be distorted by the copy protection system.
Connecting an Antenna or Cable TV
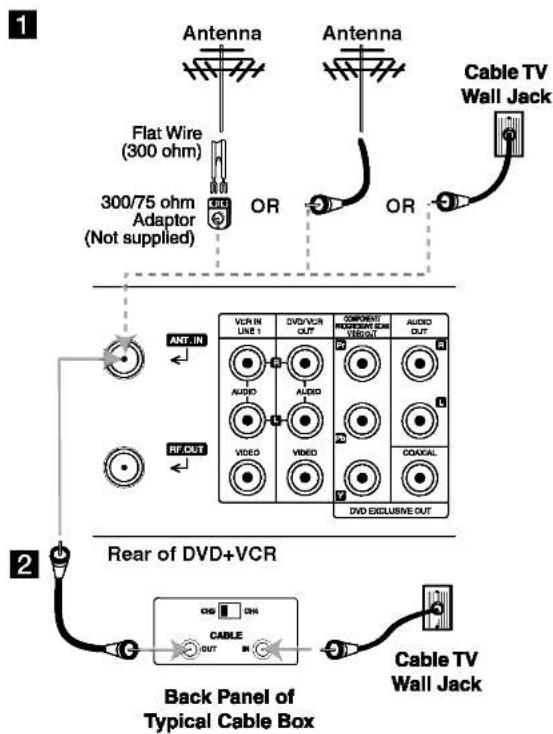
1 Antenna:
Disconnect the antenna from the rear of the TV and identify the antenna cable. If it is a round 75 ohm coaxial cable connect it directly to the jack marked ANT.IN on your DVD+VCR. If your antenna cable is flat connect it to a 300-ohm to 75-ohm antenna adaptor (not supplied) and slip the adaptor over the ANT.IN jack. Don't attempt to screw it into to the DVD+VCR.
2 Cable TV:
If your cable connection has no converter or descrambler, unscrew the cable from your TV and attach it to the ANT.IN jack on the DVD+VCR. If a converter is required connect a coaxial cable from the wall jack to the IN connector on the converter, and a coaxial cable from the OUT connector on the converter to the ANT.IN on your DVD+VCR. This cable hookup permits both TV and DVD+VCR operation.
To view or record a CATV channel
- Tune the TV to the DVD+VCR output channel (CH 3 or 4).
- Set the DVD+VCR channel selector to the cable output channel. (Example: CH3)
- Select a channel using the cable converter.
Notes:
- With this connection, you cannot record one program while viewing another.
• If you are using a cable box to tune channels, it is not necessary to do Auto Channel Set.
Basic TV Connections
Make one of the following connections, depending on the capabilities of your TV.
Rear of TV
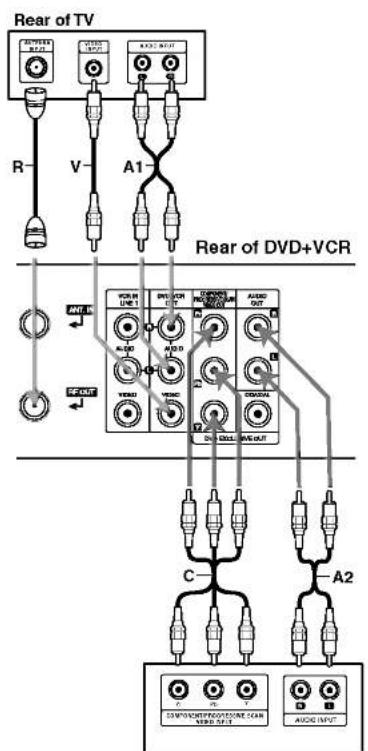
RF coaxial connection
Connect the RF.OUT jack on the DVD+VCR to the antenna in jack on the TV using the supplied 75-ohm Coaxial Cable (R).
How to set the DVD+VCR's RF output channel
- When the DVD+VCR is turned off, press and hold CH (▼/▲) on the front panel for more than five seconds. "RF03" or "RF04" appears in the display window.
- Press CH (▼/▲) to change the RF output channel (RF03 or RF04). Tune the TV to this channel.
- Turn off the DVD+VCR.
Audio/Video connection
- Connect the DVD/VCR VIDEO OUT jack on the DVD+VCR to the video in jack on the TV using the video cable supplied (V).
- Connect the Left and Right DVD/VCR AUDIO OUT jacks on the DVD+VCR to the audio left/right in jacks on the TV (A1) using the supplied audio cables.
Notes:
- If you use this connection, set the TV's source selector to VIDEO.
- For DVD/VCR VIDEO OUT jack connection, resolution must be set to 480i or 480p by pressing RESOLUTION on the front panel, however DVD/VCR VIDEO OUT is always at 480i standard resolution.
- HDMI mode must be set to OFF for DVD/VCR VIDEO OUT jack connection.
Optional TV Connections
These connections support only DVD playback. The tuner and VCR still output through the RF.OUT (R) or DVD/VCR OUT (A, V) jacks.
S-Video connection
Connect the S-VIDEO OUT jack on the DVD+VCR to the S-Video in jack on the TV using the optional S-Video cable (S).
Notes:
- For S-Video connection, resolution must be set to 480i or 480p by pressing RESOLUTION on the front panel, however S-VIDEO OUT is always at 480i standard resolution.
- HDMI mode must be set to OFF for S-Video connection.
Component Video / Progressive Scan connection
If your television is a high-definition or "digital ready" television, you may take advantage of the DVD+VCR's progressive scan output for the highest video resolution possible.
Connect the COMPONENT/PROGRESSIVE SCAN VIDEO OUT jacks on the DVD+VCR to the corresponding in jacks on the TV using an optional Y Pb Pr cable (C).
Notes:
- You can change the resolution (480i, 480p, 720p, 1080i) for the component/progressive scan video output by pressing RESOLUTION on the front panel.
- For 720p and 1080i resolution, only non-copy protected discs can be played back. If the disc is copy protected, it will be auto down-scaling to 480p resolution.
- HDMI mode must be set to OFF for Component video connections.
- Progressive scan does not work with the analog video connections (yellow VIDEO OUT jack and S-VIDEO OUT jack).
Audio connection
Connect the Left and Right AUDIO OUT jacks of the DVD+VCR to the audio left/right in jacks on the TV using the supplied audio cables (A2).
HDMI Connection
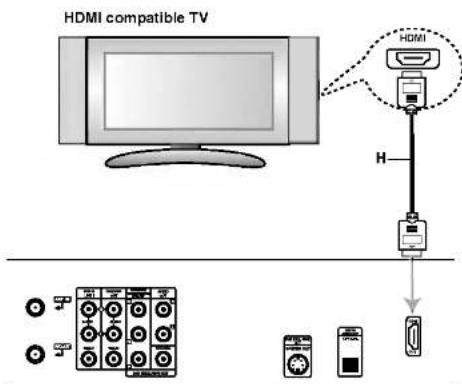
If you have a HDMI TV or monitor, you can connect it to this DVD+VCR using a HDMI cable.
-
Connect the HDMI OUT jack on the DVD+VCR to the HDMI jack on a HDMI compatible TV or monitor (H).
-
Set the TV's source to HDMI (refer to TV's Owner's manual).
-
In stop mode, select HDMI mode by pressing HDMI on the front panel.
“hdmi” will appear on the display window.
Notes :
- No sound will be output from HDMI cable if the [Dolby Digital] or [MPEG] option is not set to PCM.
- The arrow on the cable connector body should be face up for correct alignment with the connector on the DVD+VCR.
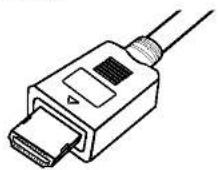
- When you use HDMI, the other connections (Yellow VIDEO OUT, S-Video and Component Video (Y Pb Pr)) does not work.
- If there is noise or lines on the screen, please check the HDMI cable.
Tip :
When you use HDMI connection, you can change the resolution (480p, 720p, 1080i) for the HDMI output by pressing RESOLUTION on the front panel. Software incompatibility between this unit and TV/monitor may result in getting only 2 options. 480i is not available. You can only change the resolution within your TV's and Monitor's resolution capabilities.
- For DVD/VCR VIDEO OUT connection, a message will appear if you select an incompatible resolution.
- For S-VIDEO OUT connection, black and white scramble signal will appear if you select an incompatible resolution.
Rear of DVD+VCR
About HDMI
HDMI (High Definition Multimedia Interface) supports both video and audio on a single digital connection for use with DVD players, Set-Top boxes, and other AV devices.
HDMI was developed to provide the technologies of HDCP (High Definition Contents Protection). HDCP is used to protect digital content transmitted and received.
HDMI has the capability to support standard, enhanced, or high-definition video plus standard to multi-channel surround-sound audio, HDMI features include uncompressed digital video, a bandwidth of up to 5 gigabytes per second, one connector (instead of several cables and connectors), and communication between the AV source and AV devices such as DTVs.
HDMI, the HDMI logo and High-Definition Multimedia Interface are trademarks or registered trademarks of HDMI licensing LLC.
Connection to an Amplifier
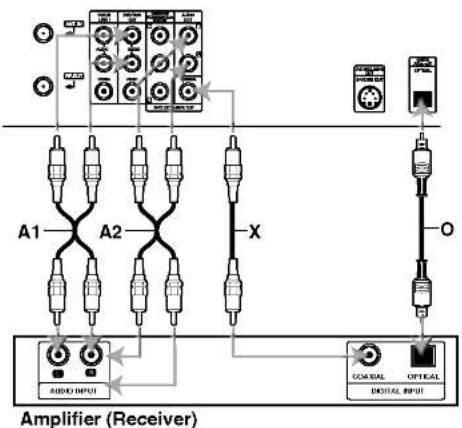
You can only listen to DVD playback using OPTICAL (O), COAXIAL (X) and AUDIO OUT (A2) connections. The tuner and VCR will still be heard through the RF.OUT (R) or DVD/VCR AUDIO OUT (A1) jack. (See page 12.)
Connecting to an amplifier equipped with two channel analog stereo or Dolby Pro Logic II/Pro Logic
Connect the Left and Right AUDIO OUT (or DVD/VCR AUDIO OUT) jacks on the DVD+VCR to the audio left and right in jacks on your amplifier, receiver, or stereo system using the audio cables (A1, A2) supplied.
Connecting to an amplifier equipped with two channel digital stereo (PCM) or to an Audio/Video receiver equipped with a multi-channel decoder (Dolby Digital™, MPEG 2, or DTS)
- Connect one of the DVD+VCR's DIGITAL AUDIO OUT jacks (OPTICAL O, COAXIAL X) to the corresponding in jack on your amplifier. Use an optional digital (OPTICAL O, COAXIAL X) audio cable.
- You will need to activate the DVD+VCR's digital output. (See "AUDIO" on page 19).
Digital Multi-channel sound
A digital multi-channel connection provides the best sound quality. For this you need a multi-channel Audio/Video receiver that supports one or more of the audio formats supported by your DVD+VCR (MPEG 2, Dolby Digital and DTS). Check the receiver manual and the logos on the front of the receiver.
Caution:
Due to the DTS Licensing agreement, the digital output will be in DTS digital out when DTS audio stream is selected.
Notes:
- If the audio format of the digital output does not match the capabilities of your receiver, the receiver will produce a strong, distorted sound or no sound at all.
- Six Channel Digital Surround Sound via digital connection can only be obtained if your receiver is equipped with a Digital Multi-channel decoder.
- To see the audio format of the current DVD in the on-screen display, press AUDIO.
Rear of DVD+VCR
flowchart
graph TD
    A["Amplifier (Receiver)"] --> B["AUDIO INPUT"]
    A --> C["X"]
    A --> D["OPTICAL DIGITAL INPUT"]
    A --> E["Switch X"]
    A --> F["Switch O"]
    A --> G["Switch P"]
    A --> H["Switch Q"]
    A --> I["Switch R"]
    A --> J["Switch S"]
    A --> K["Switch T"]
    A --> L["Switch U"]
    A --> M["Switch V"]
    A --> N["Switch W"]
    A --> O["Switch X"]
    A --> P["Switch Y"]
    A --> Q["Switch Z"]
Manufactured under license from Dolby Laboratories. "Dolby", "Pro Logic", and the double-D symbol are trademarks of Dolby Laboratories.
DTS and DTS Digital Out are trademarks of Digital Theater Systems, Inc.
Accessory Audio/Video (A/V) Connections to DVD+VCR
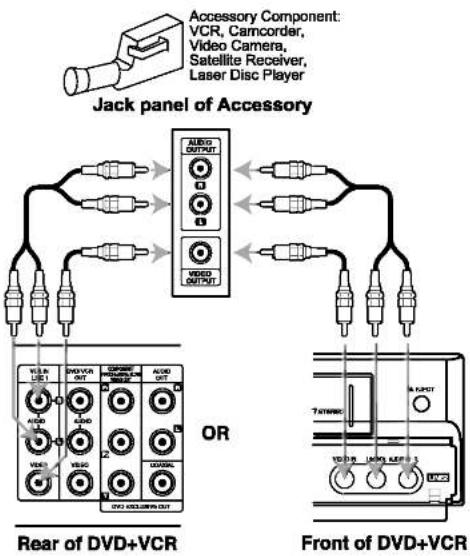
Connect the VCR IN LINE 1 or LINE 2 jacks on the DVD+VCR to the audio/video out jacks on your accessory component, using the optional audio/video cables. (Refer to page 26 for "Recording from External Components".)
Initial Settings - VCR
By using the VCR Setup menu, you can make various adjustments to items such as clock setting, and timer recordings.
Your DVD+VCR allows remote control adjustment of several features.
General Operation
- Press VCR on the remote control.
- Press MENU and the MAIN menu will appear.
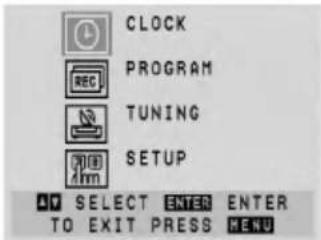
- Use ▲▼ to select the desired menu, then press ENTER.
- Use ▲/▼ to choose a desired option on the selected Menu. Then use ◀/▶ to choose a desired setting.
- Press MENU when finished.
Note:
Menus remain on-screen for 3 minutes.
CLOCK
The DVD+VCR gives you two ways to set the time and date: the Auto Clock Feature or Manually.
Auto Clock Set
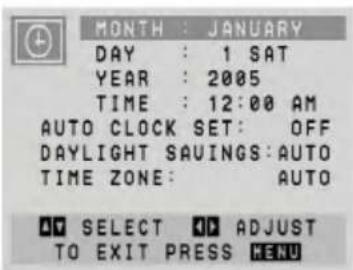
• AUTO CLOCK SET
The Auto Clock Set feature is set to ON at the factory. In the ON setting, the DVD+VCR looks for a channel carrying XDS (Extended Data Services) information. XDS updates the clock using the Coordinated Universal Time.
- Use ◀/▶ to choose ON or OFF.
• DAYLIGHT SAVINGS
You can turn Daylight Savings On or Off manually. If you choose "AUTO", the DVD+VCR sets the clock using the DST information broadcast in the signal (channel).
- Use ◀/▶ to choose AUTO, ON or OFF.
- TIME ZONE
You can set your local Time Zone manually. If you choose "AUTO", the DVD+VCR sets the clock using the first Coordinated Universal Time information it finds in a broadcast signal.
-Use ◀/▶ to choose the correct time zone (AUTO, EASTERN, CENTRAL, MOUNTAIN, PACIFIC, ALASKA or HAWAII).
Notes:
- The Auto Clock feature enables the DVD+VCR to set up the clock while the DVD+VCR is turned off.
- There are cases where the TV station does not send or sends wrong date and/or time information and the DVD+VCR sets the incorrect time. If this happens we recommend that you set the clock manually.
Manual Clock Set
Use ▲/▼/◄/► to enter the necessary information.
• MONTH : Choose the month.
• DAY : Choose the date.
The day of the week will display automatically.
• YEAR : Choose the year.
• TIME : Choose the time.
Press and hold ◀/▶ to advance clock continuously.
Notes:
- If setting the clock manually, "AUTO CLOCK SET" must set to "OFF". If it is set to "ON", an incorrect date and/or time will be entered again when the DVD+VCR is turned off.
- The clock uses the 12-hour system. Be sure to set AM and PM correctly (AM does not appear).
PROGRAM
The Timer Recording function allows you to have up to 8 programs scheduled to record within a period of one year. (See pages 24-25).
TUNING
This DVD+VCR is equipped with a frequency synthesized tuner capable of receiving up to 181 channels. These include VHF channels 2-13, UHF channels 14-69 and CATV channels 1-125.
Auto Channel Programming
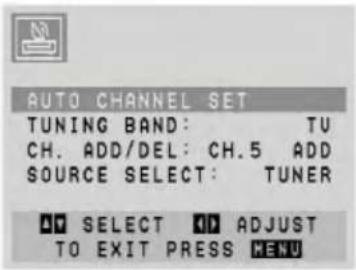
-
Choose the SOURCE SELECT option, then use ◀/▶ to select TUNER. Use ◀/▶ to switch among TUNER, LINE1, and LINE2.
-
Choose the AUTO CHANNEL SET option, then use ◀/▶ to find channels.
- The tuner will automatically cycle through all available channels (TV/CATV) in the area and place them in the tuner's memory. - After the AUTO CHANNEL SET is complete, the TUNING menu will hide and return to the TV screen automatically.
- Make sure the TUNING BAND is set appropriately (TV or CATV).
- TV: If you are using a standard antenna to receive channels. - CATV: If you are using basic cable to receive channels.
To Add or Erase Channels
This feature allows you to add or erase channels from memory manually.
-
Choose the CH. ADD/DEL option, then use ◀/▶ to select a channel to add or erase.
-
Use ENTER to add or erase the channel. Repeat steps 1 and 2 to add or erase other channels.
-
Press MENU to return to the TV screen.
SETUP
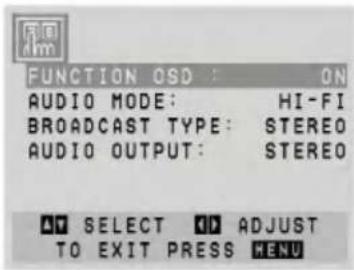
FUNCTION OSD
The on-screen display can be turned on or off.
AUDIO MODE
The DVD+VCR has two separate audio playback systems, the high quality VHS Hi-Fi system and standard NORMAL mono system. The same audio is generally recorded on both systems. The VHS Hi-Fi system plays on separate (left and right) channels, and the NORMAL system plays monaural sound. The normal track is always played so the cassette can be played on a DVD+VCR that does not have VHS Hi-Fi.
BROADCAST TYPE (STEREO/SAP/MONO)
Multichannel Television Sound (MTS) carries stereo and/or Second Audio Program (SAP) bilingual signals. Set this display to the desired position when both MTS stereo and SAP signals are received. When only one of the MTS signal is received, the DVD+VCR automatically selects the corresponding receiving mode (Stereo or SAP) regardless of the selected position. For normal operation, the display should be in the STEREO position. The DVD+VCR will then record a STEREO program when available, and record a mono program IF the program is NOT IN STEREO. For weak STEREO and/or SAP broadcasts, changing the display to mono may give clearer sound.
Used during playback [when AUDIO MODE (HI-FI/NORMAL) is in HI-FI position] for selecting the audio output signals from the AUDIO OUT terminals (L ch and R ch), and RF.OUT. This display setting should normally be left in the stereo position, so that when a stereo tape is played, the stereo sound will be heard through the left and right channels. If a mono tape is played and the audio output is set to stereo, the same mono sound will be heard from both left and right channels.
Initial Settings - DVD
By using the DVD Setup menu, you can make various adjustments to items such as picture and sound. You can also set a language for the subtitles and the Setup menu, among other things. For details on each Setup menu item, see pages 18 to 21.
To display and exit the Menu:
Press SETUP to display the menu. A second press of SETUP will take you back to initial screen.
To go to the next level:
Press ▶ on the remote control.
To go back to the previous level:
Press ◀ on the remote control.
General Operation
-
Press DVD on the remote control.
-
Press SETUP.
The Setup menu appears.
-
Use ▲ / ▼ to select the desired option then press ▶ to move to the second level. The screen shows the current setting for the selected item, as well as alternate setting(s).
-
Use ▲ / ▼ to select the second desired option then press ▶ to move to the third level.
-
Use ▲ / ▼ to select the desired setting then press ENTER to confirm your selection. Some items require additional steps.
-
Press SETUP or ▶ (PLAY) to exit the Setup menu.
LANGUAGE
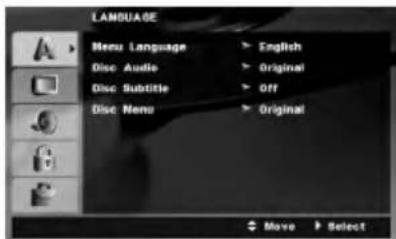
Menu Language
Select a language for the VCR and DVD's setup menu and information display.
Disc Audio/Subtitle/Menu DVD
Select the language you prefer for the audio track (disc audio), subtitles, and the disc menu.
Original: Refers to the original language in which the disc was recorded.
Other: To select another language, press number buttons then ENTER to enter the corresponding 4-digit number according to the language code list in the reference chapter (see p. 39). If you enter the wrong language code, press CLEAR.
Off (for Disc Subtitle) : Turn off Subtitle.
DISPLAY
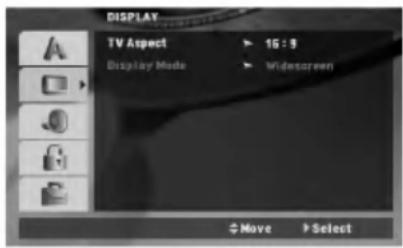
TV Aspect DVD
4:3 : Select when a standard 4:3 TV is connected.
16:9 : Select when a 16:9 wide TV is connected.
Display Mode DVD
Display Mode setting works only when the TV Aspect mode is set to "4:3".
Letterbox: Displays a wide picture with bands on the upper and lower portions of the screen.
Panscan: Automatically displays the wide picture on the entire screen and cuts off the portions that do not fit.
AUDIO
Each DVD disc has a variety of audio output options. Set this unit's AUDIO options according to the type of audio system you use.
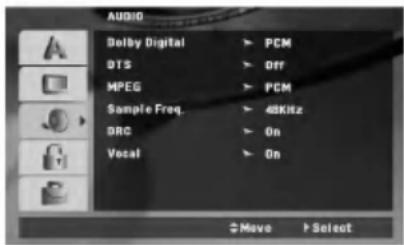
Dolby Digital/DTS/MPEG DVD
Bitstream: Select "Bitstream" if you connect the DVD+VCR's DIGITAL AUDIO OUT jack to an amplifier or other equipment with a Dolby Digital, DTS or MPEG decoder.
PCM (for Dolby Digital / MPEG): Select when connected to a two-channel digital stereo amplifier. DVDs encoded in Dolby Digital or MPEG will be automatically downmixed to two-channel PCM audio.
Off (for DTS): If you select "Off", the DTS signal is not output through the DIGITAL AUDIO OUT jack.
Sample Freq. (Frequency) DVD
If your receiver or amplifier is NOT capable of handling 96 kHz signals, select 48 kHz. When this choice is made, this unit automatically converts any 96 kHz signals to 48 kHz so your system can decode them. If your receiver or amplifier is capable of handling 96 kHz signals, select 96 kHz. When this choice is made, this unit passes each type of signal through without any further processing.
Check the documentation for your amplifier to verify its capabilities.
DRC (Dynamic Range Control) DVD
With the DVD format, you can hear a program's soundtrack in the most accurate and realistic presentation possible, thanks to digital audio technology. However, you may wish to compress the dynamic range of the audio output (the difference between the loudest sounds and the quietest ones). This allows you to listen to a movie at a lower volume without losing clarity of sound. Set DRC to On for this effect.
Vocal DVD
Set to On only when a multi-channel karaoke DVD is playing. The karaoke channels on the disc mix into normal stereo sound.
LOCK (Parental Control)
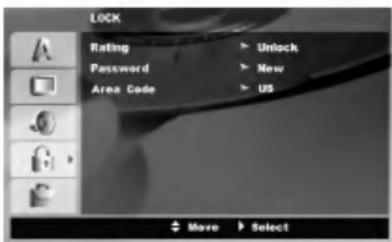
Rating DVD
Some movies contain scenes that may not be suitable for children to view. Many of these discs contain parental control information that applies to the complete disc or to certain scenes on the disc. Movies and scenes are rated from 1 to 8, depending on the area. DVD video discs may or may not respond to the parental control setting if the Area code of the disc is set wrongly. Some discs offer more suitable scenes as an alternative. Ratings are area dependent.
The parental control feature allows you to block access to scenes below the rating you input, thereby preventing your children from being able to view material you believe is unsuitable.
-
Select "Rating" on the LOCK menu then press ▶.
-
To access the Rating, Password and Area Code features, you must input the 4-digit security code you created.
If you have not yet entered a security code you are prompted to do so. Input a 4-digit code and press ENTER. Enter it again and press ENTER to verify. If you make a mistake before pressing ENTER, press CLEAR.
- Select a rating from 1 to 8 using the ▲ / ▼ buttons.
1-8: Rating one (1) has the most restrictions and rating eight (8) is the least restrictive.
Unlock : If you select unlock, parental control is not active and the disc plays in full.
Note:
If you set a rating for the player, all disc scenes with the same rating or lower are played. Higher rated scenes are not played unless an alternate scene is available on the disc. The alternative must have the same rating or a lower one. If no suitable alternative is found, playback stops. You must enter the 4-digit password or change the rating level in order to play the disc.
- Press ENTER to confirm your rating selection, then press SETUP to exit the menu.
- Press OPEN/CLOSE (▲) to activate parental control.
Password (Security Code)
You can enter or change password.
- Select "Password" on the LOCK menu then press ▶.
- Follow step 2 as shown left column (Rating). To change the password, select the "Change", press ENTER and input the new 4-digit code then press ENTER. Input it again to verify.
- Press SETUP to exit the menu.
If you forget your Security Code
If you forget your security code you can clear it using the following steps:
- Press SETUP to display the Setup menu.
- Input the 6-digit number "210499" and the security code is cleared.
- Enter a new code as described above.
Area Code DVD
Enter the Area Code whose standards were used to rate the DVD video disc, based on the list in the reference chapter (see p. 39).
- Select "Area Code" on the LOCK menu then press ▶.
- Follow step 2 as shown left (Rating).
- Select the first character using ▲ / ▼ buttons.
- Press ▶ and select the second character using ▲ / ▼ buttons.
- Press ENTER to confirm your area code selection.
OTHERS
The PBC, Auto Play, and B.L.E. settings can be changed.
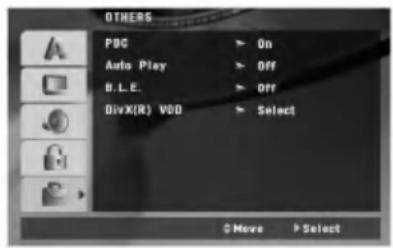
PBC VCD
Set Playback Control (PBC) to On or Off.
On: Video CDs with PBC are played according to the PBC.
Off: Video CDs with PBC are played the same way as Audio CDs.
Auto Play DVD
You can set up the DVD+VCR so a DVD disc automatically starts playing whenever the DVD is inserted.
If Auto Play mode is set to On, this DVD player will search for title that has the longest playback time and then play back the title automatically.
On: Auto Play function is active.
Off: Auto Play function is not active.
Note:
The Auto Play function may not work for some DVDs.
B.L.E. (Black Level Expansion)
To select the black level of playback pictures. Set your preference and monitor's ability.
On: Expanded grey scale. (0 IRE cut off)
Off: Standard grey scale. (7.5 IRE cut off)
DivX Registration Code DivX
We provide you the DivX® VOD (Video On Demand registration code that allows you to rent and purchase videos using the DivX® VOD service. For more information, visit www.divx.com/vod.
- Select "DivX(R) VOD" option then press ▶.
- Press ENTER while "Select" is selected and the registration code will appear.
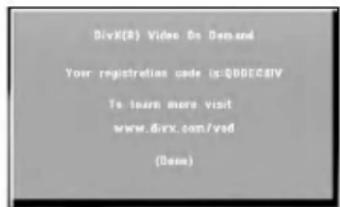
- Use the registration code to purchase or rent the videos from Divx® VOD service at www.divx.com/vod. Follow the instructions and download the video onto a disc for playback on this unit.
Note:
All the downloaded videos from DivX® VOD can only be played back on this unit.
Operation
This chapter describes how to operate the VCR and DVD.
VCR Tape Playback
Press the VCR button to select the device to be operated.
Basic Instructions
- Turn on the TV.
- Tune the TV to the DVD+VCR output channel (CH 3 or 4) or if a direct VIDEO/AUDIO connection is made between the DVD+VCR and the TV, set the TV's source selector to VIDEO.
- Insert a pre-recorded video cassette. The indicator lights and the DVD+VCR powers on automatically.
- If the Ⓐ (TIMER) indicator in the display window is lit press POWER once.
- If a tape without a safety tab is inserted the unit starts playback automatically. If not, press ▶ (PLAY).
- Press STOP (■) to stop playback. If the tape reaches the end before you press STOP (■) the DVD+VCR automatically stops, rewinds and ejects the tape.
Note:
It is not necessary to select the tape speed for playback because it is automatically selected by the DVD+VCR. Also, during playback the TV/VCR selector switches to VCR mode automatically.
Auto Tracking
Automatic tracking adjusts the picture to remove snow or streaks and beings when:
• A tape is played for the first time.
• The tape speed (SP, LP, SLP) changes.
- Streaks or snow appear due to scratches on the tape.
Manual Tracking
To manually adjust the tracking use the CH/TRK (▲/▼) buttons on the remote control or CH (▲/▼) on the front panel during playback.
Notes:
• Vertical jitter requires a very fine adjustment.
- Tracking is automatically reset to normal when the tape is ejected or the power cord is unplugged for more than 3 seconds.
Search
This function lets you visually search for a tape section in either direction: forward and backward. During the high-speed picture search modes, the audio is muted and horizontal lines (noise bars) appear. Also, a short time is needed to stabilize the tape speed when re-entering the PLAY mode so slight interference may be observed during this time.
To search:
-
Press BACKWARD (◀◀) or FORWARD (▶▶) during playback.
-
To return to playback, press ▶ (PLAY).
Note:
After 3 minutes in SEARCH mode the DVD+VCR returns to PLAY mode to protect the tape and video heads.
Still Picture and Frame-by-Frame Playback
- Press PAUSE/STEP (■) during playback.
A still picture appears on the TV screen and the audio is muted.
2 If the still picture vibrates vertically, stabilize it by using CH/TRK (▲/▼) on the remote control. - Press PAUSE/STEP (III) repeatedly to advance the video picture one frame at a time.
- To return to playback, press ▶ (PLAY).
Note:
After 5 minutes in STILL mode the DVD+VCR stops to protect the tape and video heads.
Slow Motion
During slow motion, audio is muted and horizontal lines (noise bars) may appear on the TV screen. This is normal.
- While in still mode, press FORWARD (▶▶). The tape is played at a speed 1/19 times slower than the normal speed.
- Use CH/TRK (▲/▼) on the Remote Control if necessary to adjust the tracking.
- To return to the normal speed, press ▶ (PLAY).
Note:
After 3 minutes in SLOW MOTION mode the DVD+VCR goes back to PLAY mode to protect the tape and video heads.
CM SKIP (Commercial Skip)
This feature is useful for skipping commercials or short program segments.
- Press CM SKIP in playback mode. The DVD+VCR performs a fast forward picture search through 30 seconds of recording.
- Press CM SKIP again to extend the search time by an addition 30 seconds. The maximum search time is 3 minutes.
- When the search is complete, the DVD+VCR goes into playback mode automatically.
VHS Hi-Fi Stereo/MTS Broadcast
This DVD+VCR is equipped with the VHS Hi-Fi audio sound system for recording and playback. The information below gives a brief description of Hi-Fi audio and how to record and play a tape in the Hi-Fi audio mode.
Hi-Fi Stereo Audio Sound
A stereo TV with AUDIO/VIDEO input jacks or a stereo audio system is required for true stereo play-back. To experience the full and rich stereo sound available with Hi-Fi recorded tapes, we recommend the connection of this unit to a home stereo audio system.
- Set the AUDIO MODE option to HI-FI on the VCR SETUP menu.
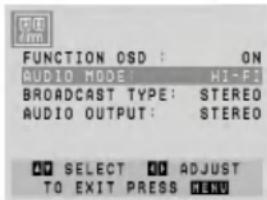
- Set the AUDIO OUTPUT option to STEREO so that the left channel sound (L) is heard from the left speaker and the right channel sound (R) is heard from the right speaker.
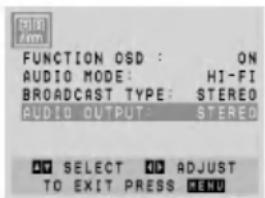
The other options are (LEFT) POSITION, which results in the left channel sound (L) being heard from both speakers or (RIGHT) POSITION, which results in the right channel sound (R) being heard from both speakers.
- Insert a cassette and press ▶ (PLAY).
MTS (Multi-Channel TV Sound)
This DVD+VCR can decode MTS stereo and bilingual (SAP) off-the-air broadcast sound signals. It also decodes stereo TV sound from local cable companies as long as they operate on assigned cable frequencies and use the EIA-recommended MTS stereo/bilingual TV sound system.
Multichannel TV Sound Indicator (MTS)
When you press ENTER one or both of the indicators appears on the TV Screen.
STEREO
The DVD+VCR can record in stereo onto the VHS Hi-Fi audio tracks when the BROADCAST TYPE option is in the STEREO position. The DVD+VCR can also record mono audio onto the mono audio track.
SAP
Some stations transmit a Second Audio Program, which is used for a second language or additional information.
STEREO/SAP
Use the BROADCAST TYPE option to select the desired recording mode (STEREO or SAP).
VCR Tape Recording
Basic Instructions
- Turn on the DVD+VCR and TV.
- Tune the TV to the DVD+VCR output channel (CH 3 or 4) or if a direct VIDEO/AUDIO connection is made between the DVD+VCR and the TV, set the TV's source selector to VIDEO.
- Insert a video cassette with the safety tab intact.
- Select the desired channel using CH/TRK (▲/▼).
- If you are recording from another source via audio/video input jacks (at the rear or front panel), select LINE1 or LINE2 using INPUT.
- Set the desired recording speed (SP or SLP) by pressing SPEED. This DVD+VCR is not designed to record in LP mode.
- Set the MTS mode (STEREO or SAP). Set the BROADCAST TYPE option to SAP if applicable.
- Press REC/ITR (●) and recording starts. The REC indicator appears in the display window. If a cassette with no safety tab is loaded, the cassette is ejected.
- Press STOP (■) to stop recording. If the tape reaches the end before STOP (■) is pressed, the DVD+VCR stops, rewinds and ejects the tape.
Tips:
- Use PAUSE/STEP (III) for best results when making changes while recording. For example, if you want to change channels while recording, first press PAUSE/STEP (III) to put the unit in pause mode, select the desired channel on the DVD+VCR, and then press PAUSE/STEP (III) again to resume recording.
- If you wish DVD playback during the VCR recording, press DVD to change DVD mode and perform the DVD playback.
To pause the recording
- Press PAUSE/STEP (III) to pause the tape during recording. The REC indicator flashes in the display window.
- When you want to continue recording, press PAUSE/STEP (Ⅱ) or press REC/ITR (●). After 5 minutes in PAUSE mode, the DVD+VCR stops automatically to protect the tape and the video heads.
To record one TV program while watching another
- Press TV/VCR to select the TV mode during recording. The TV indicator appears.
- Using the TV, select the channel to be viewed.
Timer Recording
For unattended recording, you must input the channels to be recorded and the starting and ending times.
Things to know before starting
If you try to set the program timer before setting the clock, "PLEASE SET THE CLOCK" appears for a moment and then CLOCK menu appears on the TV screen. Set the time and date before proceeding.
- Turn on the DVD+VCR and the TV.
- Be sure the TV is set to the DVD+VCR output channel (3 or 4).
- Make sure the TUNING BAND in the TUNING menu is set appropriately (TV or CATV).
- Press MENU and the MAIN menu appears.
- Use ▲/▼ to choose the PROGRAM menu and press ENTER.
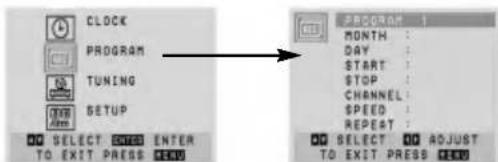
If eight programs are already entered, the FULLY PROGRAMMED message appears for a moment and then PROGRAM 1 appears on the TV screen.
- Use the ▲/▼ buttons to switch between the program options, and the ◀/▶ buttons to input the program information:
Input the month, day, start and stop times of the program you want to record.
Channel: Select a TV channel, LINE1 or LINE2. If you have CABLE TV and use a cable box (converter) you must set the channel to match the cable box output channel (usually CH 3 or 4). Change channels on the cable box instead of with the DVD+VCR. If you use a cable converter, you can program multiple recordings only on the converter box output channel. This is because the converter determines what channel you view through your DVD+VCR.
Speed: AUTO mode determines how much tape is left and switches the speed from SP to SLP if it is necessary to complete recording the program. If this occurs there could be some picture and sound distortion at the point where the speed changes.
Repeat: To record up to 8 programs on a certain day of every week select WEEKLY. To record up to 8 programs at the same time Monday through Friday select DAILY. Otherwise select ONCE.
- Press MENU and the program is memorized by the DVD+VCR.
- Additional programs may be entered by repeating steps 1-7.
- Ensure you insert a tape with the record safety tab intact before the first programmed time.
Notes:
- If you make a mistake or want to change a setting, use ▲ to select the option and correct it using ◀/▶.
- If the program preset time is past, the "PAST TIME PROGRAMMED" message appears on the TV screen. Return to the incorrect program and program it with the correct time.
- If you enter a past date, the timer recording will be performed on that date of the next year.
- If the power fails or the DVD+VCR is unplugged the clock and timer settings are kept in memory for only 3 seconds. Otherwise you must reset the clock and timer.
• If the tape indicator is blinking, no tape is loaded. - When you are playing DVD at programmed Recording time, the DVD+VCR automatically change to VCR mode and start recording.
- The DVD+VCR will automatically power off when Timer Recording ends.
Checking or Erasing the Timer Program
Programming can be checked whenever the DVD+VCR is turned on.
- Press MENU and the MAIN menu appears.
- Use ▲/▼ to choose the PROGRAM menu and press ENTER.
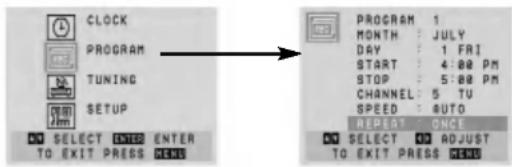
- Use ◀/▶ to select a program you want to check or erase. To erase the program, press CLEAR.
- Press MENU to return to the TV screen.
Program Priority
If the recording start and end times of preset programs overlap on the same day (see the example), the second program is not recorded until the first is finished.
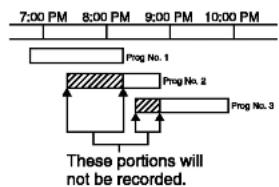
flowchart
graph TD
    A["7:00 PM"] --> B["Prog No. 1"]
    C["8:00 PM"] --> D["Prog No. 2"]
    E["9:00 PM"] --> F["Prog No. 3"]
    G["10:00 PM"] --> H["..."]
    I["These portions will not be recorded."] --> J["Prog No. 2"]
    K["Prog No. 3"] --> L["Prog No. 1"]
In this example, the first part of program numbers 2 and 3 are not recorded.
Instant Timer Recording
With this feature you can record for a preset length without using the program timer.
- Turn on DVD+VCR and the TV.
- Be sure the TV is tuned to the DVD+VCR output channel (CH 3 or 4). If a direct VIDEO/AUDIO connection is made between the DVD+VCR and the TV, set the TV's source selector to VIDEO.
- Insert a video cassette with the safety tab intact.
- Select the desired channel using CH/TRK (▲/▼) or the number buttons (0-9). The channel number appears on the TV screen. If you are recording from another source via audio/video input jacks (at the rear or front panel), select LINE1 (rear jacks) or LINE2 (front jacks) by using INPUT.
- Set the desired recording speed (SP or SLP) using SPEED. The tape speed appears on the TV screen.
- Press REC/ITR (●) twice. The menu appears on the TV screen, recording starts, and the Ⓞ (TIMER) indicator lights.
| INSTANT TIMER RECORD | |
| CHANNEL | 2 |
| SPEED | SP |
| START | NOW |
| LENGTH | 0H30M |
-
Press REC/ITR (●) repeatedly to select the recording time length. Each time you press this button the recording time increases 30 minutes (up to 9 hours). If you set the time to 0H00M, the DVD+VCR goes into the normal recording mode.
-
Stop the recording by pressing STOP (■) If you don't press stop, at the end of the recording, the DVD+VCR stops and shuts off.
Note:
During Instant Timer Recording, you cannot change the channel on the DVD+VCR.
Checking the Recording Time
Press REC/ITR (●) once to check the recording time. The recalled setting automatically returns to the TV screen after 6 seconds.
Extending the Recording Time
The recording time can be extended anytime by pressing REC/ITR (●). Subsequent presses result in advancing the recording time by 30-minute increments.
Note:
If you press PAUSE/STEP (III) during instant timer recording, the instant timer recording is cancelled.
Recording from External Components
You can record from an external component, such as a camcorder or VCR, connected to any of the DVD+VCR's external inputs.
- Make sure that the component you want to record from is connected properly to the DVD+VCR. See page 15.
-
Press INPUT repeatedly to select the external input to record from.
• LINE1 (L1): Audio/Video Input mounted on back panel.
• LINE2 (L2): Audio/Video Input mounted on front panel. -
Load a recordable tape.
-
Set a recording mode (SP or SLP) as necessary by pressing SPEED repeatedly.
-
Play the tape or disc in the external component. If you have a TV attached to your DVD+VCR, you can see the video palying.
-
Press REC/ITR (●) once to start recording. The REC indicator lights in the display window.
-
Press STOP (■) to stop recording.
Notes:
• Before recording, confirm the recording start position.
- If your source is copy-protected using CopyGuard, you will not be able to record it using this unit. See Copyright on page 6 for more details.
• To record for a fixed length of time, see Instant Timer Recording.
Copying from DVD to VCR
You can copy the contents of a DVD to a VHS tape.
-
Insert the disc you wish to copy into the DVD deck and close the disc tray.
-
Insert a blank VHS video tape into the VCR deck.
-
Find the place on the DVD from which you want to start dubbing using the PLAY, FF, REW and PAUSE functions.
For best results, pause playback at the point from which you want to record.
-
Press the REC/ITR (●). The DVD goes into PLAY mode and the VCR goes into RECORD mode. If the DVD disc menu appears, you may need to press ▶ (PLAY) manually to begin copying.
-
When the DVD is finished playing, press STOP (■) to end copying.
Notes:
- If the DVD you are attempting to copy is copy protected, you will not be able to copy the disc. It is not permitted to copy Macrovision encoded DVDs (or Discs). "Lock" is displayed in the display window.
- You must stop the copy process manually when the DVD movie ends, or the unit may replay and record over and over again.
- When you stop the DVD playback during copying, the recording on VCR is stopped automatically.
On-Screen Display - VCR
Some of these functions will be displayed every time the DVD+VCR is operated.
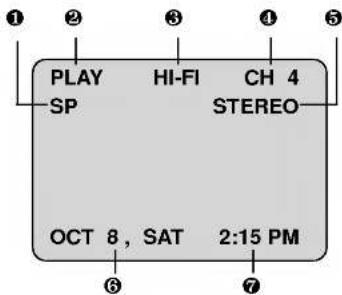
① TAPE SPEED DISPLAY
(MONO is not displayed)
② FUNCTION DISPLAY
⑥ DATE DISPLAY
③ HI-FI DISPLAY
⑦ CLOCK/ COUNT/ REMAIN DISPLAY
④ CHANNEL DISPLAY
⑤ STEREO/SAP DISPLAY
Each press of the ENTER changes the TV screen in the following sequence.
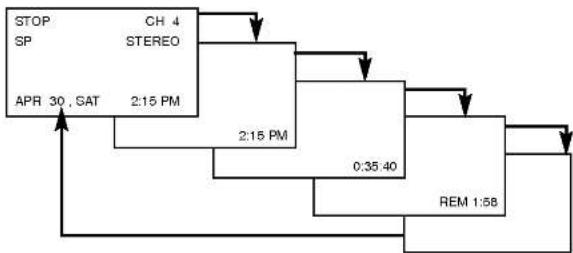
flowchart
graph TD
    A["STOP"] --> B["SP"]
    B --> C["CH 4 STEREO"]
    C --> D["2:15 PM"]
    D --> E["2:15 PM"]
    E --> F["0:35.40"]
    F --> G["REM 1:58"]
    G --> H["APR 30, SAT"]
    H --> A
Real-Time Counter
If a tape with contents recorded on it is inserted into the VCR, the real-time counter shows length of the tape running in hours, minutes, and seconds. Press CLK/CNT to select the real-time counter display. Every press of CLK/CNT changes the TV screen as illustrated below.

Counter Memory
This feature is useful if there is a section of tape you want to view immediately after recording or if you want to return to the same point several times.
- Begin recording or playing a tape.
- Press CLK/CNT until the real-time counter is displayed on the TV screen.
- At the point that you want to locate later, reset the real-time counter to "0:00:00" by pressing CLEAR.
- Continue to play or record.
- Press STOP (■) when recording or playback finishes.
- Press BACKWARD (◀◀). The tape automatically stops when the tape counter returns to about "0:00:00".
Tape Remaining
This function displays the amount of time remaining on the tape during recording or playback. Press CLK/CNT repeatedly until the REM indicator displays on the TV screen during recording or playback.
The remaining tape length may not be displayed correctly depending on the condition of the tape and the kind of the tape (T-140, T-160, or T-210 etc.).
Notes:
- The function displays can be seen displayed on the TV screen for 5 seconds.
- The clock (or tape counter, tape remaining) mode will be displayed until you press ENTER.
- The tape counter and the remaining tape length indicator appear only when a cassette is inserted. Also, the remaining tape length indicator appears after any tape operation.
Additional VCR Information
- During manual recording, timer recording, Instant Timer Recording, playback, or fast forward modes, the DVD+VCR automatically starts rewinding the tape at the end of the tape. The cassette stops at the beginning of the tape and is ejected.
- After you have finished using the DVD+VCR, rewind, eject, and remove the cassette. Place the cassette in its protective sleeve to protect it from dust. It is not necessary to rewind the cassette before removing it, but if you do, it is ready to play or record the next time you use it.
- Be sure the DVD+VCR channel selector is on the correct channel you wish to record. The channel that is being recorded can always be checked by setting the television on the DVD+VCR channel (CH 3 or 4) and pressing the TV/VCR to turn the DVD+VCR's TV indicator off.
- Do not attempt to hook up more than one television set to the DVD+VCR for either recording or playback.
VCR Auto Play System
This DVD+VCR features automatic playback.
When you load a tape with the safety tab removed the following occurs:
- The Output Source is changed to VCR mode automatically.
• The power turns on automatically and playback begins. - At the end of the tape, the DVD+VCR stops, then rewinds.
- The tape is ejected after rewinding and the turns itself off automatically.

flowchart
graph LR
    A["LOAD TAPE"] --> B["AUTO PLAY"]
    B --> C["AUTO REWIND"]
    C --> D["AUTO EJECT"]
    D --> E["AUTO POWER OFF"]
Note:
Auto power off does not function during regular DVD play mode. (DVD+VCR power stays on.)
S-VHS Quasi Playback (SQPB)
- This DVD+VCR can play back S-VHS recorded tapes, however, it cannot make recordings using S-VHS format tapes.
- SQPB is an abbreviation for S-VHS Quasi Playback.
Easy Information
If the Extended Data Service (XDS) signals are provided along with normal TV signal in your area or during playback of a tape recorded with Extended Data Service (XDS) signals, the station ID, program title, and program details are shown on the TV screen. When viewing a channel with Extended Data Service (XDS) signals, press ENTER and the station ID will appear on the TV screen. Press ENTER again and the program details will appear on the TV screen.
When viewing a tape recorded with Extended Data Service (XDS) signals, press ENTER twice and the program title and program details will appear on the TV screen.
Program Details
LENGTH: Indicates the run length of a program.
TIME REMAINING: Indicates the remaining time of a program.
RATING: Indicates the rating of the current program (N/A, G, PG, PG-13, R, NC-17, X and Not Rated). The rating N/A means that the motion picture ratings are not applicable to this program.
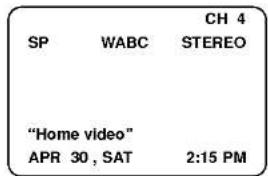
Easy Information Screen (Station ID)
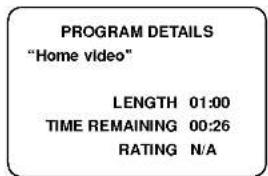
Easy Information Screen (Program details)
Playing a DVD or Video CD
Playback Setup
- Turn on the TV and select the video input source connected to the DVD+VCR.
- Turn on the audio system (if applicable) and select the input source connected to the DVD+VCR.
- Press OPEN/CLOSE (▲) to open the disc tray and load your chosen disc in the tray, with the playback side down.
- Press OPEN/CLOSE (▲) to close the tray. Playback starts automatically. If playback does not start, press ▶ (PLAY).
In some cases, the disc menu might appear instead.
- To stop the playback, press STOP (■).
The unit records the stopped point, depending on the disc. "■" appears on the screen briefly.
Press ▶ (PLAY) to resume playback (from the scene point). If you press STOP (■) again or unload the disc ("■" appears on the screen.), the unit will clear the stopped point.
Press OPEN/CLOSE (▲) to remove the disc. Press OPEN/CLOSE (▲) to close disc tray or press POWER (○), the disc tray closes automatically and unit turns off.
If a menu screen is displayed
The menu screen may be displayed first after loading a DVD or Video CD which offer a menu.
DVD
Use the ◀▶▲▼ buttons to select the title/chapter you want to view, then press ENTER to start. Press TITLE or DISC MENU to return to the menu screen.
VCD
Use the number buttons to select the track you want to view and press RETURN to return to the menu screen. Menu settings and operating procedures may differ. Follow the instructions on each menu screen. You also may set PBC to Off (See "PBC" on page 21).
Notes:
- If parental control is set and the disc is not within the rating settings you must input the password. (See "LOCK" on page 20).
- DVDs may have a region code. Your player will not play discs that have a region code different from your player. The region code for this player is 1 (one).
General Features
Notes:
Unless stated otherwise, all operations described use the remote control. Some features may also be available on the Setup menu.
Moving to another TITLE DVD DivX
When a disc has more than one title, you can move to another title. Press DISPLAY and select desired title by using number (0-9) or ◀ / ▶ then press ENTER to move to another title.
Moving to another CHAPTER/TRACK
DVD VCD
When a title on a disc has more than one chapter or a disc has more than one track, you can move to another chapter/track as follows:
- Press SKIP (▶▶▶ or ◀◀◀) briefly during playback to select the next chapter/track or to return to the beginning of the current chapter/track.
- Press SKIP (◀◀) twice in quick successions to step back to the previous chapter/track.
- To go directly to any chapter during DVD playback, press DISPLAY and press ▲ / ▼ to select the chapter/track icon. Input the chapter/track number (0-9) or use ◀ / ▶.
Note:
On a Video CD with PBC, you must set PBC to Off on the setup menu to use this function (See "PBC" on page 21).
Slow Motion DVD VCD DivX
- Press PAUSE/STEP (III) during playback. The DVD+VCR will now go into PAUSE mode.
- Use BACKWARD (◀◀) or FORWARD (▶▶) to select the required speed: DVD : 1/16, 1/8, 1/4 or 1/2 (Forward or Backward) With a DviX Disc or Video CD : 1/16, 1/8, 1/4 or 1/2 (Forward only)
- To exit Slow Motion mode, press ▶ (PLAY).
Still Picture and Frame-by-Frame Playback
DVD VCD
- Press PAUSE/STEP (Ⅲ) during playback. Advance the picture frame-by-frame by pressing PAUSE/STEP (Ⅱ) repeatedly.
- To exit still motion mode, press ▶ (PLAY).
Search DVD VCD DivX
- Press BACKWARD (◀◀) or FORWARD (▶▶) during playback.
- Press BACKWARD (◀◀) or FORWARD (▶▶) repeatedly to select the required speed. DVD disc; X2, X4, X16 or X100 With DivX Disc or Video CD; X2, X4, X8
- To exit SEARCH mode, press ▶ (PLAY).
Time Search DVD VCD DivX
To start playing at any chosen time on the disc:
- Press DISPLAY during playback. The time search box shows the elapsed playing time.
- Press ▲ / ▼ to select the time clock icon and “-;-;-” appears.
- Input the required start time in hours, minutes, and seconds from left to right. If you enter the wrong numbers, press CLEAR to remove the numbers you entered. Then input the correct numbers.
- Press ENTER to confirm. Playback starts from the selected time.
Marker Search DVD VCD
To enter a Marker
You can start playback from up to nine memorized points. To enter a marker, press MARKER at the desired point on the disc. The Marker icon appears on the TV screen briefly. Repeat to enter up to nine markers.
To Recall or Clear a Marked Scene
- During disc playback, press SEARCH. The marker search menu appears on the screen.
- Within 10 seconds, press ◀ / ▶ to select a marker number that you want to recall or clear.
- Press ENTER and playback starts from the marked scene. Or, Press CLEAR and the marker number is erased from the list.
- You can play any marker by inputting its number on the marker search menu.
Repeat
Press REPEAT during playback to select a desired repeat mode.
- CHAPTER: repeats the current chapter. (DVD only)
• TITLE: repeats the current title. (DVD only) - TRACK: repeats the current track. (VCD, DivX only)
- All : repeats all the tracks on a disc.(VCD, DivX only)
- Off: does not play repeatedly.
Notes:
- On a Video CD with PBC, you must set PBC to Off on the setup menu to use this function (See "PBC" on page 19).
- If you press SKIP (▶▶▶) once during Repeat Chapter (Track) playback, the repeat playback cancels.
Repeat A-B DVD VCD DivX
To repeat a sequence.
- Press A-B at your chosen starting point. "A*" appears briefly on the TV screen.
- Press A-B again at your chosen end point. "A B" appears briefly on the TV screen and the repeat sequence begins.
- Press A-B again to cancel.
Zoom DVD VCD DivX
Use zoom to enlarge the video image.
- Press ZOOM during playback or still playback to activate the Zoom function. The square frame appears briefly in the right bottom of the picture.
- Each press of the ZOOM button changes the TV screen in the sequence: 100% size → 400% size → 1600% size → screen fit mode → 100% size
Screen fit mode:
You can change the way the image appears on the screen when you're playing a DVD movie. Press ▲▼ to select between Normal, Enhanced, and Maximum. - Use the ◀▶▲▼ buttons to move through the zoomed picture.
- To resume normal playback, press ZOOM repeatedly or CLEAR button.
Notes:
• Zoom may not work on some DVDs.
• Screen fit mode is available for playing the DVD disc, VR disc.
3D Surround DVD VCD DivX
To produce a 3D surround effect that simulates multi-channel audio from two stereo speakers (instead of the five+ speakers normally required for multi-channel audio from a home theater system).
- Press DISPLAY during playback.
- Use ▲ or ▼ to select the sound option. The sound option will be highlighted.
- Use ◀ or ▶ to select "3D SUR". To turn off the 3D Surround effect, select "Normal".
Random VCD Karaoke DVD
- Press RANDOM during playback. The unit automatically begins random playback and RANDOM appears on the TV screen.
- Press RANDOM again to normal.
Tip:
By pressing SKIP (▶▶▶) during random playback, the unit selects another title (track) and resumes random playback.
Note:
On a Video CD with PBC, You must set PBC to Off on the setup menu to use the this function (See "PBC" on page 21).
Changing the Audio Channel VCD
Press AUDIO repeatedly during playback to hear a different audio channel (STEREO, LEFT, RIGHT).
Last Scene Memory DVD ACD VCD 1.1
This player memorizes last scene from the last disc that is viewed. The last scene remains in memory even if you remove the disc from the player or switch off the player. If you load a disc that has the scene memorized, the scene is automatically recalled.
Note:
This player does not memorize the scene of a disc if you switch off the player before commencing to play the disc.
Screen Saver
The screen saver appears when you leave the DVD+VCR in Stop mode for about five minutes.
Changing Video Mode DVD
- With certain discs, the playback picture may be flickering or Dot Crawl is shown on straight lines. That means Vertical interpolation or De-interlace is not perfectly matched with the disc. In this case, the picture quality may be improved by changing the video mode.
- To change the video mode, press and hold DISPLAY about 3 seconds during disc playback.
MODE1 : The source material of the DVD video (film material or video material) is determined from disc information.
MODE2 : Suitable for playing film based content or video based material recorded by the progressive scan method.
MODE3: Suitable for playing video based content with comparatively little motion.
Note:
The video mode setting only works when the Progressive Scan option is set to "On" in the Setup menu.
Special DVD Features
Checking the contents of DVD discs: Menus
DVDs may offer menus that allow you to access special features. To use the disc menu, press DISC MENU. Input the corresponding number or use the
◀▶ ▲▼ buttons to highlight your selection. Then press ENTER.
Title Menu DVD
- Press TITLE. If the current title has a menu, the menu appears on the screen. Otherwise, the disc menu may appear.
- The menu offers features such as camera angles, spoken language and subtitle options, and chapters for the title.
Disc Menu DVD
Press DISC MENU and the disc menu is displayed. Press DISC MENU again to exit.
Camera Angle DVD
If the disc contains scenes recorded at different camera angles, you can change to a different camera angle during playback. Press ANGLE repeatedly during playback to select a desired angle. Note that the number of the current angle appears on the display.
Tip :
The Camera Angle icon is displayed on the TV screen when alternate angles are available.
Changing the Audio Language DVD DivX
Press AUDIO repeatedly during playback to hear a different audio language or audio track. With DVD-RW discs recorded in VR mode that have both a main and a Bilingual audio channel, you can switch between Main (L), Bilingual (R), or a mix of both (Main + Bilingual) by pressing AUDIO.
Subtitles DVD DivX
Press SUBTITLE repeatedly during playback to see the different subtitle languages.
Note:
If there is no information or there is a code that can not read in the Divx file, "1" etc are displayed.
On-Screen Display - DVD
You can display the general playback status on the TV screen. Some items can be changed using the menu. To use the on-screen display:
- Press DISPLAY during playback.
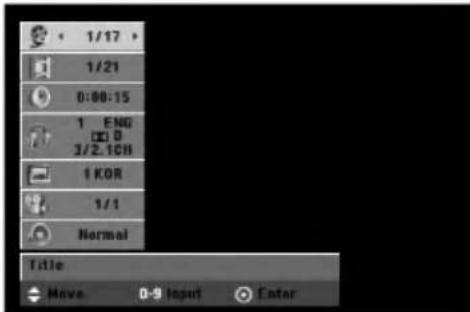
- You can select an item by pressing ▲ / ▼ and change or select the setting by pressing ◀ / ▶. The items displayed differ depending on the disc type or playing status.
For details about each item, see the pages in parentheses.
• [Title]: Current title (or track) number/total number of titles (or tracks) (page 29)
• [Chapter]: Current chapter number/total number of chapters (page 29)
• [Time]: Elapsed playing time (page 30)
• [Audio]: Selected audio language (DVD VIDEO only) or audio channel (page 31)
• [Subtitle]: Selected subtitle (page 31)
• [Angle]: Selected angle/total number of angles (page 31)
• [Sound]: Selected sound mode (page 31)
Notes:
- Some discs may not provide all of the features shown below.
- If no button is pressed for 10 seconds, the on-screen display disappears.
• If ⊗ is displayed, action prohibited or not available.
Maintenance and Service
Refer to the information in this chapter before contacting a service technician.
Handling the Unit
When shipping the unit
Please save the original shipping carton and packing materials. If you need to ship the unit, for maximum protection, re-pack the unit as it was originally packed at the factory.
Keeping the exterior surfaces clean
- Do not use volatile liquids such as insecticide spray near the unit.
- Do not leave rubber or plastic products in contact with the unit for a long period of time. since they leave marks on the surface.
Cleaning the unit
To clean the player, use a soft, dry cloth. If the surfaces are extremely dirty, use a soft cloth lightly moistened with a mild detergent solution.
Do not use strong solvents such as alcohol, benzine, or thinner, as these might damage the surface of the unit.
Maintaining the Unit
The DVD+VCR is a high-tech, precision device. If the optical pick-up lens and disc drive parts are dirty or worn, the picture quality could be diminished.
Depending on the operating environment, regular inspection and maintenance are recommended after every 1,000 hours of use.
For details, please contact your nearest authorized service center.
Playing an Audio CD or MP3/WMA Files
The DVD+VCR can play Audio CDs and MP3/WMA files on CD-ROM, CD-R/RW, DVD+R/RW, DVD-R/RW discs or Memory Card.
Audio CD
Once you insert an audio CD a menu appears on the TV screen. Press ▲ / ▼ to select a track then press ▶ (PLAY) or ENTER and playback starts.
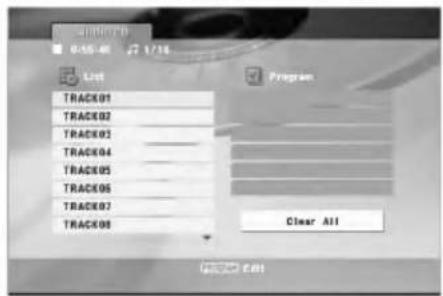
MP3 / WMA
- Press ▲ / ▼ to select a folder, and press ENTER to see the folder contents.
- Press ▲ / ▼ to select a track then press ▶ (PLAY) or ENTER. Playback starts.
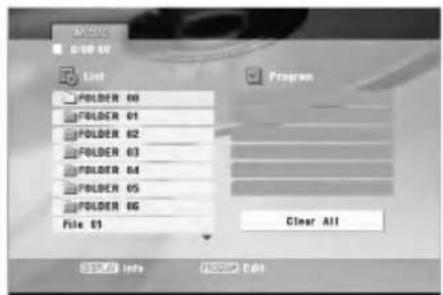
ID3 TAG
- When playing a file containing information such as track titles, you can see the information by pressing DISPLAY. [Title, Artist, Album, Year, Comment]
- If there is no information, "No ID3 TAG" appear on the menu screen.
Tips:
- If you are in a file list on the "MUSIC" menu and want to return to the Folder list, use the ▲ / ▼ to highlight ⓁL. and press ENTER.
- Press DISC MENU to move to the next page.
- On CDs, DVDs or Memory Card with mixed content (MP3/WMA files, JPEG files or DivX files), you can select among the Music menu, Movie menu and Photo menu by pressing TITLE repeatedly.
MP3 / WMA disc compatibility with this player is limited as follows:
- Sampling frequency: within 8 - 48 kHz (MP3), within 32 - 48kHz (WMA)
- Bit rate: within 8 - 320kbps (MP3), 32 - 192kbps (WMA)
- The player cannot read an MP3/WMA file that has a file extension other than ".mp3" / ".wma".
• CD-R physical format should be ISO 9660 - If you record MP3 / WMA files using software that cannot create a file system (eg. Direct-CD) it is impossible to playback MP3 / WMA files. We recommend that you use Easy-CD Creator, which creates an ISO 9660 file system.
- File names should have a maximum of 8 letters and must incorporate an .mp3 or .wma extension.
- They should not contain special letters such as / ? * : " < > | etc.
- The total number of contents on the disc should be less than 650.
This DVD+VCR requires discs and recordings to meet certain technical standards in order to achieve optimal playback quality. Pre-recorded DVDs are automatically set to these standards. There are many different types of recordable disc formats (including CD-R containing MP3 or WMA files) and these require certain pre-existing conditions (see above) to ensure compatible playback.
Customers should note that permission is required in order to download MP3 / WMA files and music from the Internet. Our company has no right to grant such permission. Permission should always be sought from the copyright owner.
Audio CD and MP3 / WMA Disc Features
Pause
- Press PAUSE/STEP (III) during playback.
- To return to playback, press ▶ (PLAY) or press PAUSE/STEP (Ⅲ) again.
Moving to another Track
- Press SKIP (▶▶▶ or ◀◀◀) briefly during playback to go to the next track or to return to the beginning of the current track.
- Press SKIP (I◄◄) twice in quick successions to go back to the previous track.
- In case of audio CD, to go directly to any track, enter the track number using the numbered buttons (0-9) during playback.
Repeat Track / All / Off
You can play a track/all on a disc.
- Press REPEAT when playing a disc. The repeat icon appears.
- Press REPEAT to select a desired repeat mode.
- TRACK: repeats the current track.
- ALL: repeats all the tracks on a disc.
- Off(No display): does not play repeatedly.
Note:
If you press SKIP (▶▶▶) once during Repeat Track playback, the repeat playback will be cancelled.
Search
- Press BACKWARD (◀◀) or FORWARD (▶▶) during playback.
- Press BACKWARD (◀◀) or FORWARD (▶▶) repeatedly to select the required speed: X2, X4 and X8 backward or forward.
- To exit SEARCH mode, press ▶ (PLAY).
Random
- Press RANDOM during playback. Random Playback begins immediately and "RANDOM" appears on the menu screen.
- To return to normal playback, press RANDOM repeatedly until "RANDOM" disappears from the menu screen.
Tip :
By pressing SKIP (▶▶ or ◀◀◀) during random playback, the unit selects another track and resumes random playback.
Repeat A-B ACD
- To repeat a sequence during disc playback press A-B at your chosen starting point. The Repeat icon and "A" appear on the menu screen.
- Press A-B again at your chosen end point. The Repeat icon and "A-B" appear on the menu screen, and the sequence begins to play repeatedly.
- To exit the sequence and return to normal play, press A-B again. The Repeat icon disappears from the menu screen.
3D Surround ACD
To produce a 3D Surround effect that simulates multi-channel audio from two stereo speakers (instead of the five + speakers normally required for multi-channel audio from a home theater system).
- Press AUDIO during playback. "3D SUR." appears on the menu screen.
- To return to normal playback, press AUDIO repeatedly until "3D SUR." disappears from the menu screen.
Programmed Playback
The program function enables you to store your favourite tracks from any disc in the player memory. A program can contain 30 tracks.
- Insert a disc.
Audio CD or MP3/WMA Discs.
AUDIO CD or MUSIC menu appears.
- Press PROGRAM.
The Ⓗ mark will appear to the right of the word "Program" on the right side of the menu screen.
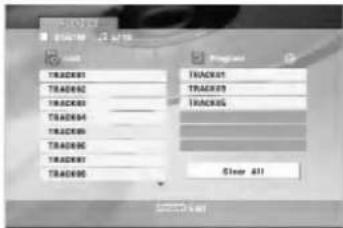
Audio CD Program Menu
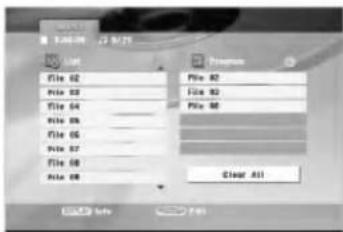
MP3/WMA Program Menu
Note:
Press PROGRAM again, the Ⓔ mark will disappear to exit the Program Edit mode.
Video CD: Press PROGRAM while playback is stopped. The program menu appears. Press PROGRAM again to exit the menu.
Note:
On a Video CD with PBC, you must set PBC to Off on the setup menu to use the this function (See "PBC" on page 21).
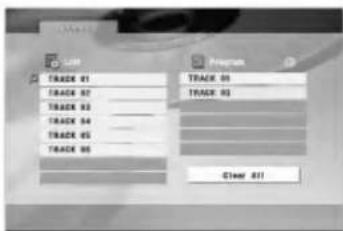
-
Select a track on the "List", then press ENTER to place the selected track on the "Program" list. Repeat to place additional tracks on the list.
-
Press ▶. Select the track you want to start playing on the "Program" list.
- Press ▶ (PLAY) or ENTER to start. Playback begins in the order in which you programmed the tracks. Playback stops after all of the tracks on the "Program" list have played once.
- To resume normal playback from programmed playback, select a track of AUDIO CD (or MUSIC) list and then press ▶ (PLAY).
Repeat Programmed Tracks
- Press REPEAT when playing a disc. The repeat icon appears.
-
Press REPEAT to select a desired repeat mode.
-
TRACK: repeats the current track
- ALL: repeats all the tracks on programmed list.
- Off (No display): does not play repeatedly.
Note:
If you press ▶▶▶ once during Repeat Track playback, the repeat playback will be cancelled.
Erasing a Track from "Program" List
- Use ▶ / ▲ / ▼ to select the track that you wish to erase from the Program list.
- Press CLEAR. Repeat to erase additional tracks on the list.
Erasing the Complete Program List
Use ▶ / ▲ / ▼ to select "Clear All" in the "Program" list, then press ENTER.
Note:
The programs are also cleared when the disc is removed.
Viewing a JPEG Files
This unit can play JPEG files on CD-R/RW, DVD+R/RW, DVD-R/RW discs or Memory Card.
- Insert a disc and close the tray. The PHOTO menu appears on the TV screen.
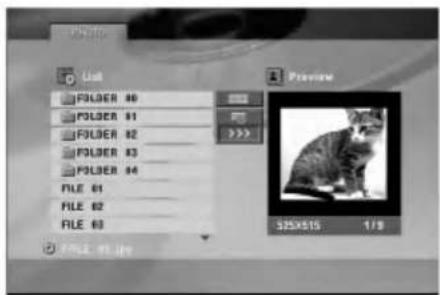
-
Press ▲ / ▼ to select a folder, and press ENTER. A list of files in the folder appears. If you are in a file list and want to return to the previous Folder list, use the ▲ / ▼ buttons on the remote to highlight 📄 and press ENTER.
-
If you want to view a particular file, press ▲/▼ to highlight a file and press ENTER or ▶ (PLAY). The selected image is displayed in full screen.
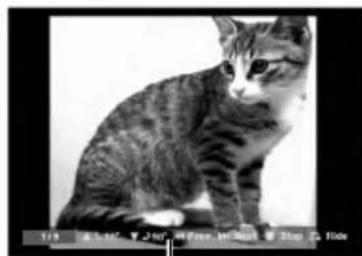
natural_image
Black and white photo of a tabby cat sitting on a bench (no visible text or symbols)Press RETURN to appear or disappear this menu.
- To stop viewing at any time, press STOP.
Tips:
- Press DISC MENU to move to the next page.
- There are three Slide Speed options : >>> (Fast), >> (Normal) and > (Slow) Use ▲▼◀▶ to highlight the Speed. Then, use ◀/▶ to select the option you want to use then press ENTER.
- On CDs, DVDs or Memory Card with mixed content (MP3/WMA files, JPEG files or DivX files), you can select among the Music menu, Movie menu and Photo menu by pressing TITLE repeatedly.
Slide Show JPEG
Use ▲▼◀▶ to highlight the 📄 (Slide Show) then press ENTER.
Still Picture JPEG
- Press PAUSE/STEP (II) during slide show. The player will now go into PAUSE mode.
- To return to the slide show, press ▶ (PLAY) or press PAUSE/STEP (II) a gain.
Moving to another File JPEG
Press SKIP (▶▶▶ or ◀◀◀) or cursor (◀ or ▶) once while viewing a picture to advance to the next or previous file.
Zoom JPEG
Use zoom to enlarge the photo image. (see page 30)
To rotate picture JPEG
Press ▲ / ▼ during showing a picture to rotate the picture clockwise or counter clockwise.
To listen to music while slide show simultaneously JPEG
You can display photo files while listening to MP3/WMA music files recorded on a disc. Select icon then press ENTER on the JPEG menu.
JPEG disc compatibility with this player is limited as follows:
- Depending upon the size and number of JPEG files, it could take a long time for the DVD+VCR to read the disc's contents. If you don't see an on-screen display after several minutes, some of the files may be too large — reduce the resolution of the JPEG files to less than 2M Pixels as 2760X2048 pixels and burn another disc.
- The total number of contents on the disc should be less than 650.
- Some discs may be incompatible due to a different recording format or the condition of disc.
- Ensure that all the selected files have the ".jpg" extensions when copying into the CD layout.
- If the files have ".jpe" or ".jpeg" extensions, please rename them as ".jpg" file.
- File names without ".jpg" extension will not be able to be read by this DVD+VCR. Even though the files are shown as JPEG image files in Windows Explorer.
Playing a DivX Movie File
The DVD+VCR can play Divx files on CD-R/RW or DVD±R/RW discs or Memory Card.
-
Use ▲ / ▼ to select a folder, and press ENTER. A list of files in the folder appears.
-
Use ▲ / ▼ to select a file then press ▶ (PLAY). Playback starts. You can use variable playback functions. Refer to pages 29-31.
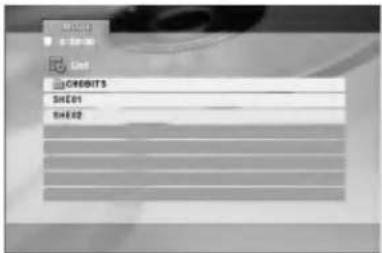
- Press STOP (■) to stop the playback. The Movie menu appears.
DivX disc compatibility with this recorder is limited as follows:
• Available resolution size of the DivX file is under 720x576 (W x H) pixel.
- The file name of the DivX subtitle is limited to characters.
- If there is impossible code to express in the DivX file, it may be displayed as “_” mark on the display.
- If the number of the screen frame is over 29.97 frames per second, this unit may not operate normally.
- If the video and audio structure of recorded file is not interleaved, returns to the menu screen.
- If the file is recorded with GMC, the unit supports only 1-point of the record level.
* GMC?
GMC is the acronym for Global Motion Compensation. It is an encoding tool specified in MPEG4 standard. Some MPEG4 encoders, like DivX or Xvid, have this option. There are different levels of GMC encoding, usually called 1-point, 2-point, or 3-point GMC.
\playable DivX file : ".avi", ".mpg", ".mpeg", ".divx' \
\\} \\\\\\\\\\\\\\\\\\\\\\\\\\\\\\\\\\\\\\\\\\\\\\\\\\\\\\ \DivX subtitle : “.smi”, “.srt”, “.sub”.\}\$
- Divx subtitle except those listed above is not displayed on the TV screen.
playable Codec format
"DIV3", "MP43", "DIVX", "XVID", "DX50", "DXSB"
playable Audio format
"AC3", "PCM", "MP2", "MP3", "WMA"
- Sampling frequency: within 8-48 kHz (MP3), within 32 - 48kHz (WMA).
- Bit rate: within 8-320kbps (MP3), 32-192kbps (WMA).
Playing a DVD VR format Disc
This unit will play DVD-R/RW discs recorded using the DVD-Video format that have been finalized using a DVD-recorder.
This unit will play DVD-RW discs recorded using the Video Recording (VR) format.
- Insert a disc and close the tray. The DVD-VR menu appears on the TV screen.
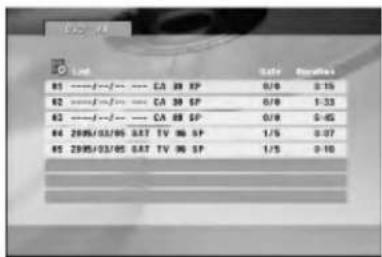
- Press ▲ / ▼ to select a track then press ▶ (PLAY) or ENTER and playback starts.
- Press DISC MENU to move to the list menu.
Notes:
- Unfinalized DVD-R/RW discs cannot be played in this player.
- Some DVD-VR disc are made with CPRM data by DVD RECORDER. Player does not support these kinds of discs and display the "CHECK DISC".
What is 'CPRM'?
CPRM is a copy protection system (with scramble system) only allowing the recording of 'copy once' broadcast programs. CPRM stands for Content Protection for Recordable Media.
This player is CPRM compatible, which means that you can record copy-once broadcast programs, but you cannot then make a copy of those recordings. CPRM recordings can only be made on DVD-RW discs formatted in VR mode, and CPRM recordings can only be played on players that are specifically compatible with CPRM.
Controlling Your TV with the Supplied Remote
You can control the sound level, input source, and power switch of your LG TV with the supplied remote.
| By pressing | You can |
| POWER | Turn the TV on or off. |
| INPUT | Switch the TV's input source. |
| CH +/- | Scans up or down through memorized channels. |
| VOL +/- | Adjust the volume of the TV. |
| MUTE | Turns on or off TV sound. |
Note:
Depending on the unit being connected, you may not be able to control your TV using some of the buttons.
Controlling other TVs with the remote
You can control the sound level, input source, and power switch of non-LG TVs as well. If your TV is listed in the table below, set the appropriate manufacturer code.
- While holding down TV POWER button, press the number buttons to select the manufacturer code for your TV (see the table below).
- Release TV POWER button.
Code numbers of controllable TVs
If more than one code number is listed, try entering them one at a time until you find the one that works with your TV.
| Manufacturer | Code Number | Manufacturer | Code Number |
| ADMIRAL | 16.33,37,44,45 | MONTGOMERY | 01,06,08,09 |
| AIWA | 70 | WARD | 23,24,32,33,34 |
| AKAI | 01 | NEC | 01,08 |
| AMARK | 09 | NOBLEX | 07 |
| AOC | 01 | PACKARD BELL | 43 |
| BELL & HOWELL | 33 | PANASONIC | 07,11,13,25,35,36 |
| BROKSONIC | 18,19 | PHILCO | 01,06,07,08,09, |
| CANDLE | 51 | 15,38,43,58 | |
| CCE | 07 | PHILIPS | 06,07,43,61,62,65 |
| CENTURION | 08 | PIONEER | 30 |
| CINERAL | 43 | PORTLAND | 09 |
| CITIZEN | 49,50,51,52,53,54,55 | PROSCAN | 03,37,44 |
| CORONADO | 09 | QUASAR | 11,13 |
| CROWN | 09 | RADIO SHACK | 16,17,23 |
| CURTIS MATHES | 01,03,08,33,35,37,44 | RCA | 01,03,37,44,69 |
| DAEWOO | 16,38,39,40,41,42,43 | REALISTIC | 16,17,23 |
| DAYTRON | 01,08 | SAMPO | 08 |
| EMERSON | 01,09,16,17,18,19 | SAMSUNG | 01,08,09,25,68 |
| FISHER | 28,29 | SANYO | 28,29 |
| FUNAI | 46,47 | SCOTT | 01,08 |
| GENERAL ELECTRIC | 03,10,11,13,37,44 | SEARS | 09,25,26,27,28,29 |
| GRADIENTE | 01,56,57,63,67 | SEMP | 64 |
| HITACHI | 09,14,15,43 | SHARP | 09,22,23,24,60,66 |
| JC PENNEY | 01,08,10,27,35 | SIGNATURE 2000 | 01,06,08,09,10, |
| JVC | 20,21,63,67 | 23,24,33,34 | |
| KIOTE | 43 | SONY | 12,62 |
| KMC | 09 | SOUNDESIGN | 51 |
| KTV | 01,08,09,31 | SYLVANIA | 01,04,05,06,07, |
| LG (GOLDSTAR) | 01,07,08,09,35,39,40 | 08,35,51 | |
| LODGENET | 33 | SYMPHONIC | 46,47 |
| LOGIK | 33 | TATUNG | 11 |
| LXI | 09,24,25,26,27,28,29 | TEKNIKA | 07,09,16,33,51 |
| MAGNAVOX | 01,02,04,05,06,07,08,09,20,34,35,43,51,61,62,65 | TELERENT | 09,33 |
| THOMSON | 69 | ||
| YORX | 08 | ||
| MAJESTIC | 33 | TOSHIBA | 01,25,26,27,64 |
| MARANTZ | 01,32 | WARDS | 01,06,08,09,10,33,34 |
| MEMOREX | 33 | XR1000 | 48 |
| MGA/MITSUBISHI | 01,08,32,34 | ZENITH | 01,02,33,59 |
Notes:
- Depending on your TV, some or all buttons may not function on the TV, even after entering the correct manufacturer code.
- If you enter a new code number, the code number previously entered will be erased.
- When you replace the batteries of the remote, the code number you have set may be reset to the default setting. Set the appropriate code number again.
Reference
Language Codes
Use this list to input your desired language for the following initial settings:
Disc Audio, Disc Subtitle, Disc Menu.
| Language | Code | Language | Code | Language | Code | Language | Code |
| Abkhazian | 6566 | Fiji | 7074 | Lingala | 7678 | Singhalese | 8373 |
| Afar | 6565 | Finnish | 7073 | Lithuanian | 7684 | Slovak | 8375 |
| Afrikaans | 6570 | French | 7082 | Macedonian | 7775 | Slovenian | 8376 |
| Albanian | 8381 | Frisian | 7089 | Malagasy | 7771 | Somali | 8379 |
| Ameharic | 6577 | Galician | 7176 | Malay | 7783 | Spanish | 6983 |
| Arabic | 6582 | Georgian | 7565 | Malayalam | 7776 | Sudanese | 8385 |
| Armenian | 7289 | German | 6869 | Maltese | 7784 | Swahili | 8387 |
| Assamese | 6583 | Greek | 6976 | Maori | 7773 | Swedish | 8386 |
| Aymara | 6588 | Greenlandic | 7576 | Marathi | 7782 | Tagalog | 8476 |
| Azerbaijani | 6590 | Guarani | 7178 | Moldavian | 7779 | Tajik | 8471 |
| Bashkir | 6665 | Gujarati | 7185 | Mongolian | 7778 | Tamil | 8465 |
| Basque | 6985 | Hausa | 7265 | Nauru | 7865 | Tatar | 8484 |
| Bengali; Bangla | 6678 | Hebrew | 7387 | Nepali | 7869 | Telugu | 8469 |
| Bhutani | 6890 | Hindi | 7273 | Norwegian | 7879 | Thai | 8472 |
| Bihari | 6672 | Hungarian | 7285 | Oriya | 7982 | Tibetan | 6679 |
| Breton | 6682 | Icelandic | 7383 | Panjabi | 8065 | Tigrinya | 8473 |
| Bulgarian | 6671 | Indonesian | 7378 | Pashto, Pushto | 8083 | Tonga | 8479 |
| Burmese | 7789 | Interlingua | 7365 | Persian | 7065 | Turkish | 8482 |
| Byelorussian | 6669 | Irish | 7165 | Polish | 8076 | Turkmen | 8475 |
| Cambodian | 7577 | Italian | 7384 | Portuguese | 8084 | Twi | 8487 |
| Catalan | 6765 | Japanese | 7465 | Quechua | 8185 | Ukrainian | 8575 |
| Chinese | 9072 | Javanese | 7487 | Rhaeto-Romance | 8277 | Urdu | 8582 |
| Corsican | 6779 | Kannada | 7578 | Rumanian | 8279 | Uzbek | 8590 |
| Croatian | 7282 | Kashmiri | 7583 | Russian | 8285 | Vietnamese | 8673 |
| Czech | 6783 | Kazakh | 7575 | Samoan | 8377 | Volapük | 8679 |
| Danish | 6865 | Kirghiz | 7589 | Sanskrit | 8365 | Welsh | 6789 |
| Dutch | 7876 | Korean | 7579 | Scots Gaelic | 7168 | Wolof | 8779 |
| English | 6978 | Kurdish | 7585 | Serbian | 8382 | Xhosa | 8872 |
| Esperanto | 6979 | Laothian | 7679 | Serbo-Croatian | 8372 | Yiddish | 7473 |
| Estonian | 6984 | Latin | 7665 | Shona | 8378 | Yoruba | 8979 |
| Faroese | 7079 | Latvian, Lettish | 7686 | Sindhi | 8368 | Zulu | 9085 |
Area Codes
Choose a area code from this list.
| Area | Code | Area | Code | Area | Code | Area | Code |
| Afghanistan | AF | Ethiopia | ET | Malaysia | MY | Saudi Arabia | SA |
| Argentina | AR | Fiji | FJ | Maldives | MV | Senegal | SN |
| Australia | AU | Finland | FI | Mexico | MX | Singapore | SG |
| Austria | AT | France | FR | Monaco | MC | Slovak Republic | SK |
| Belgium | BE | Germany | DE | Mongolia | MN | Slovenia | SI |
| Bhutan | BT | Great Britain | GB | Morocco | MA | South Africa | ZA |
| Bolivia | BO | Greece | GR | Nepal | NP | South Korea | KR |
| Brazil | BR | Greenland | GL | Netherlands | NL | Spain | ES |
| Cambodia | KH | Islands | HM | Netherlands Antilles | AN | Sri Lanka | LK |
| Canada | CA | Hong Kong | HK | New Zealand | NZ | Sweden | SE |
| Chile | CL | Hungary | HU | Nigeria | NG | Switzerland | CH |
| China | CN | India | IN | Norway | NO | Taiwan | TW |
| Colombia | CO | Indonesia | ID | Oman | OM | Thailand | TH |
| Congo | CG | Israel | IL | Pakistan | PK | Turkey | TR |
| Costa Rica | CR | Italy | IT | Panama | PA | Uganda | UG |
| Croatia | HR | Jamaica | JM | Paraguay | PY | Ukraine | UA |
| Czech Republic | CZ | Japan | JP | Philippines | PH | United States | US |
| Denmark | DK | Kenya | KE | Poland | PL | Uruguay | UY |
| Ecuador | EC | Kuwait | KW | Portugal | PT | Uzbekistan | UZ |
| Egypt | EG | Libya | LY | Romania | RO | Vietnam | VN |
| El Salvador | SV | Luxembourg | LU | Russian Federation | RU | Zimbabwe | ZW |
Troubleshooting
Check the following guide for the possible cause of a problem before contacting service.
| Symptom | Cause | Correction |
| No power. | The power cord is disconnected. | Plug the power cord into the wall outlet securely. |
| Abnormal or no picture | The TV is not set to receive DVD+VCR signal output. | Insert a disc or tape. (Check that the disc or tape indicator in the display window is lit.) |
| The video cable is not connected securely. | Select the appropriate video input mode on the TV so the picture from the DVD+VCR player appears on the TV screen. | |
| The HDMI mode is on. | Set HDMI on the front panel to OFF. | |
| Unit output setting and TV resolution capabilities mismatch. | Check TV capability.Check mode of connections (eg. S-Video, Components etc.).Check unit Resolution setting according to TV capability and mode of connection. | |
| Wrong cable connection. | Check the connection. | |
| Distorted or no sound. | The equipment connected with the audio cable is not set to receive DVD+VCR signal outpt. | Select the correct input mode of the audio receiver so you can listen to the sound from the DVD+VCR. |
| The audio cables are not connected securely. | Connect the audio cable into the jacks securely. | |
| The power of the equipment connected with the audio cable is turned off. | Turn on the equipment connected with the audio cable. | |
| The AUDIO options are set to the wrong position. | Set the AUDIO options to the correct position. | |
| In HDMI mode, audio selection is not set to PCM. | Change AUDIO setup to PCM mode. | |
| The playback picture is poor. | The disc is dirty. | Clean thd disc. |
| The TV channels are not tuned in properly. | Check tuning, carry out tuning again. | |
| Tape heads are dirty. | Clean video heads. | |
| Tape is a rental or was recorded on another VCR. | Use CH/TRK (+/-) for manual tracking adjustment while tape is playing. | |
| The DVD+VCR does not start playback. | No disc is inserted.No tape is inserted. | Insert a disc or tape. (Check that the disc or tape indicator in the display window is lit.) |
| An unplayable disc is inserted. | Insert a playable disc. (Check the disc type and Regional code.) | |
| The disc is placed upside down. | Place the disc with the playback side down. | |
| The disc is not placed within the guide. | Place the disc on the disc tray correctly inside the guide. | |
| The disc is dirty. | Clean the disc. | |
| The Rating level is set. | Cancel the Rating function or change the Rating level. | |
| Video tape cannot be inserted. | Is the cassette compartment empty? | Eject the tape in. |
| No Hi-Fi sound | Audio mode is not set properly. | Select STEREO by repeatedly pressing AUDIO on the remote control. |
| The remote control does not work properly. | There is an obstacle in the path of the remote control and this unit. | Remove the obstacle. |
| The batteries in the remote control are exhausted. | Replace the batteries with new ones. | |
| The remote control is not pointed at the remote sensor of the DVD+VCR. | Point the remote control at the remote sensor of the DVD+VCR. | |
| The remote control is too far from the DVD+VCR. | Operate the remote control within 23ft (7m). | |
| This remote control use the same buttons for VCR and DVD functions (ex.PLAY). | When using a VCR, first press the VCR button. When using a DVD, first press the DVD button. | |
| Camcorder image is not shown. | Camcorder is off. | Turn camcorder on and operate properly. |
| Camcorder image via AV input to DVD+VCR is not shown on TV screen. | DVD+VCR SOURCE SELECT is not set to LINE1 or LINE2. | Press INPUT to select LINE input channel (LINE1 or LINE2). |
| Timer recording is not possible. | Clock in DVD+VCR is not set to correct time. | Set clock to correct time. |
| Timer has been programmed incorrectly. | Reprogram Timer. | |
| indicator light does not appear after programming timer. | Reprogram Timer and turn DVD+VCR off to enable timer. |
Specifications
General
| Power requirements | 120V, 60 Hz |
| Power consumption | 23 W |
| Dimensions (approx.) | 16.9" X 3.1" X 10.2" (430 X 79 X 260 mm) (w x h x d) |
| Weight (approx.) | 8.8 lbs (4.0 kg) |
| Operating temperature | 5°C to 40°C (41°F to 104°F) |
| Operating humidity | 5 % to 90 % |
| Signal system | NTSC |
Inputs
| ANTENNA IN | 75 ohms (VHF/UHF/CATV) |
| VHS VIDEO IN(LINE1, 2) | 1 V (p-p) 75 ohms, sync negative, RCA jack x 2 |
| VHS AUDIO IN(LINE1, 2) | -6.0 dBm more than 47 ohms, RCA jack (L, R) x 2 |
Outputs
| VIDEO OUT | 1 V (p-p) 75 ohms, sync negative |
| S-VIDEO OUT | (Y) 1.0 V (p-p), 75 ohms, negative sync, Mini DIN 4-pin(C) 0.286 V (p-p) 75 ohms |
| COMPONENT VIDEO OUT(PROGRESSIVE SCAN) | (Y) 1.0 V (p-p), 75 ohms, negative sync, RCA jack x 1(Pb)/(Pr) 0.7 V (p-p), 75 ohms, RCA jack x 2 |
| Audio output (digital audio) | 0.5 V (p-p), 75 ohms, RCA jack x 1 |
| Audio output (optical audio) | 5 V (p-p), 75 ohms, Optical connector x 1 |
| Audio output (analog audio) | 2.0 Vrms (1 KHz, 0 dB), 600 ohms, RCA jack (L, R) x 1 |
| RF OUT | Channel 3 or 4 (Adjustable) |
VCR Specifications
| Head system | Four head helical scan azimuth system |
| Timer | 12-hour display type with AM, PM |
| Tape speed | SP: 33.35 mm/sec, LP: 16.67 mm/sec, SLP: 11.12 mm/sec |
| Tape width | 12.7 mm |
| Maximum recording time | SP: 2 HOURS (T-120), SLP: 6 HOURS (T-120)/8 HOURS (T-160) |
| Rewind time | About 3 minutes (T-120) |
| Channel coverage | VHF: 2-13, UHF: 14-69, CATV: 1-125 (4A, A-W, W+1 - W+84, A-5 - A-1) |
| Frequency range | 20 Hz to 20 kHz |
| Signal-to-noise ratio | More than 43 dB |
| Dynamic range | More than 88 dB |
| Channel separation | More than 60 dB |
DVD Specifications
| Laser system | Semiconductor laser, wavelength 650 nm |
| Frequency response | DVD (PCM 96 kHz): 8 Hz to 44 kHz,DVD (PCM 48 kHz): 8 Hz to 22 kHzCD: 8 Hz to 20 kHz |
| Signal-to-noise ratio | More than 100 dB (ANALOG OUT jacks only) |
| Harmonic distortion | Less than 0.008% |
| Dynamic range | More than 95 dB (DVD/CD) |
Accessories:
Video cable x 1, Audio cable (L/R) x 1, RF 75-ohm Coaxial Cable x 1, Remote control x 1, Batteries (R03/AAA) x 2
- Design and specifications are subject to change without prior notice.
LG DVD/VCR LIMITED WARRANTY - USA
The manufacturer will repair or replace your product, at the manufacturer's option, if it proves to be defective in material or workmanship under normal use, during the warranty period ("Warranty Period") listed below, effective from the date ("Date of Installation") of original consumer purchase of the product. This warranty is good only to the original purchaser of the product and effective only when used in the United States, excluding U.S. Territories.
WARRANTY PERIOD:
LABOR: 90 DAYS from the Date of Purchase.
PARTS: ONE YEAR from the Date of Purchase.
Replacement Units is warranted for the remaining period of the original warranty.
HOW SERVICE IS HANDLED:
This is an Exchange Product. Call 1-800-243-0000 for instructions on getting the defective unit replaced.
Please retain dated sales receipt and your box to return the unit for replacement.
During the first 90 days of the Warranty Period, shipping charges both ways will be paid by the manufacturer. During the remainder of the Warranty Period (91-365 days), you pay in-bound shipping charges and the manufacturer pays return shipping charges.
Visit our website at http://us.lgservice.com
THIS WARRANTY IS IN LIEU OF ANY OTHER WARRANTIES, EXPRESS OR IMPLIED, INCLUDING WITHOUT LIMITATION, ANY WARRANTY OF MERCHANTABILITY OR FITNESS FOR A PARTICULAR PURPOSE. TO THE EXTENT ANY IMPLIED WARRANTY IS REQUIRED BY LAW, IT IS LIMITED IN DURATION TO THE EXPRESS WARRANTY PERIOD ABOVE. LG WILL NOT BE LIABLE FOR ANY CONSEQUENTIAL, INDIRECT, OR INCIDENTAL DAMAGES OF ANY KIND, INCLUDING LOST REVENUES OR PROFITS, IN CONNECTION WITH THE PRODUCT. SOME STATES DO NOT ALLOW LIMITATION ON HOW LONG AN IMPLIED WARRANTY LASTS OR THE EXCLUSION OF INCIDENTAL OR CONSEQUENTIAL DAMAGES, SO THE ABOVE LIMITATIONS OR EXCLUSIONS MAY NOT APPLY TO YOU.
THIS LIMITED WARRANTY DOES NOT APPLY TO:
- Damages or operating problems that result from shipping, installation, adjustment of user controls, calibration, maintenance or failure to maintain, or separate system components; and
- Damages or operating problems that result from normal wear and tear, misuse, abuse, operation outside environmental specifications or contrary to the requirements or precautions in the Operating Guide, accident, lightning strikes or other natural causes, unauthorized modification or alteration, incorrect electrical current or voltage, signal reception or input, software not licensed directly by LG, software errors that do not disable functionality, operating and software protocols adopted after the date of manufacture or for outside the US, institutional or commercial use, or other causes not arising out of defect in material or workmanship.
The cost of repair or replacement under these excluded circumstances shall be borne by the consumer.
CUSTOMER INTER-ACTIVE CENTER NUMBERS:
For Where to buy, Product Assistance, or Customer Assistance
Call 1-800-243-0000 (24 hours a day, 365 days per year) and select appropriate options from the menu.
Or visit our website at http://us.lgservice.com
FOR WARRANTY SERVICE:
You must call 1-800-243-0000 (24 hours a day, 365 days per year) and select an appropriate option from the menu to confirm the product is defective and to obtain a Return Authorization (RA). If the defect has occurred during the first 90 days of the Warranty Period, you will be sent a return-shipping label. After you obtain an RA for return, please box your unit with a legible copy of the sales receipt and enough packing material to ensure undamaged delivery of your product. When you receive the label, place it on the box and call the 800# in the instructions for pick-up. When your unit is received, the manufacturer will replace your unit in accordance with this Limited Warranty.
ADVANCE SHIPMENT. If a replacement unit is available and you want second day delivery, our service representative will ask for your credit card number. A reserved deposit by credit card is required as surety for such advance shipment. Your credit card will not be charged if you return the defective unit in 10 business days. For advance shipment, the return label will come with the replacement unit sent to you. Please follow boxing and shipping instructions above.
- CAUTION
- CAUTION:
- REGULATORY INFORMATION: FCC Part 15
- CAUTION concerning the Power Cord
- Most appliances recommend they be placed upon a dedicated circuit;
- SERIAL NUMBER:
- IMPORTANT SAFETY INSTRUCTIONS
- Contents
- Introduction ....5
- Preparation .....11
- Operation 22
- Reference 39
- Introduction
- Moisture Condensation
- Symbol Used in this Manual
- About the Symbol Display
- Notes on Discs
- Handling Discs
- Storing Discs
- Cleaning Discs
- Types of Playable Discs
- Notes:
- Region code
- Notes on Regional Codes
- Notes on Copyrights:
- Notice for Progressive Scan Use
- Selecting the Viewing Source
- Disc-related terms
- DVD ±R / DVD ±RW
- VCD (Video CD)
- MPEG
- MP3
- WMA
- JPEG
- DivX
- PBC: Playback Control (Video CD only)
- Title (DVD only)
- Chapter (DVD only)
- Scene (VCD)
- Track
- Card useable on this unit
- Regarding Write Protect
- Inserting/Removing the Memory Card
- Using Memory Card
- Note:
- About the Remote Control
- Operation Range
- Battery installation
- LOCK function
- Rear Panel
- Preparation
- Connecting an Antenna or Cable TV
- Antenna:
- Cable TV:
- To view or record a CATV channel
- Basic TV Connections
- RF coaxial connection
- How to set the DVD+VCR's RF output channel
- Audio/Video connection
- Optional TV Connections
- S-Video connection
- Component Video / Progressive Scan connection
- Audio connection
- HDMI Connection
- Notes :
- Tip :
- About HDMI
- Connection to an Amplifier
- Connecting to an amplifier equipped with two channel analog stereo or Dolby Pro Logic II/Pro Logic
- Connecting to an amplifier equipped with two channel digital stereo (PCM) or to an Audio/Video receiver equipped with a multi-channel decoder (Dolby Digital™, MPEG 2, or DTS)
- Digital Multi-channel sound
- Accessory Audio/Video (A/V) Connections to DVD+VCR
- Initial Settings - VCR
- General Operation
- CLOCK
- Auto Clock Set
- • AUTO CLOCK SET
- • DAYLIGHT SAVINGS
- - TIME ZONE
- Manual Clock Set
- PROGRAM
- TUNING
- Auto Channel Programming
- SELECT # ADJUST
- To Add or Erase Channels
- SETUP
- FUNCTION OSD
- AUDIO MODE
- BROADCAST TYPE (STEREO/SAP/MONO)
- Initial Settings - DVD
- To display and exit the Menu:
- To go to the next level:
- To go back to the previous level:
- LANGUAGE
- Menu Language
- Disc Audio/Subtitle/Menu DVD
- DISPLAY
- TV Aspect DVD
- Display Mode DVD
- AUDIO
- Dolby Digital/DTS/MPEG DVD
- Sample Freq. (Frequency) DVD
- DRC (Dynamic Range Control) DVD
- Vocal DVD
- LOCK (Parental Control)
- Rating DVD
- Password (Security Code)
- Area Code DVD
- OTHERS
- PBC VCD
- Auto Play DVD
- B.L.E. (Black Level Expansion)
- DivX Registration Code DivX
- Operation
- VCR Tape Playback
- Basic Instructions
- Auto Tracking
- Manual Tracking
- Search
- To search:
- Still Picture and Frame-by-Frame Playback
- Slow Motion
- CM SKIP (Commercial Skip)
- VHS Hi-Fi Stereo/MTS Broadcast
- Hi-Fi Stereo Audio Sound
- MTS (Multi-Channel TV Sound)
- Multichannel TV Sound Indicator (MTS)
- STEREO
- SAP
- STEREO/SAP
- VCR Tape Recording
- Tips:
- To pause the recording
- To record one TV program while watching another
- Timer Recording
- Things to know before starting
- Checking or Erasing the Timer Program
- Program Priority
- Instant Timer Recording
- Checking the Recording Time
- Extending the Recording Time
- Recording from External Components
- Copying from DVD to VCR
- On-Screen Display - VCR
- Real-Time Counter
- Counter Memory
- Tape Remaining
- Additional VCR Information
- VCR Auto Play System
- S-VHS Quasi Playback (SQPB)
- Easy Information
- Program Details
- Playing a DVD or Video CD
- Playback Setup
- DVD
- VCD
- General Features
- Moving to another TITLE DVD DivX
- Moving to another CHAPTER/TRACK
- DVD VCD
- Slow Motion DVD VCD DivX
- Search DVD VCD DivX
- Time Search DVD VCD DivX
- Marker Search DVD VCD
- To enter a Marker
- To Recall or Clear a Marked Scene
- Repeat
- Repeat A-B DVD VCD DivX
- Zoom DVD VCD DivX
- 3D Surround DVD VCD DivX
- Random VCD Karaoke DVD
- Changing the Audio Channel VCD
- Last Scene Memory DVD ACD VCD 1.1
- Screen Saver
- Changing Video Mode DVD
- Special DVD Features
- Checking the contents of DVD discs: Menus
- Title Menu DVD
- Disc Menu DVD
- Camera Angle DVD
- Changing the Audio Language DVD DivX
- Subtitles DVD DivX
- On-Screen Display - DVD
- Maintenance and Service
- Handling the Unit
- When shipping the unit
- Keeping the exterior surfaces clean
- Cleaning the unit
- Maintaining the Unit
- Playing an Audio CD or MP3/WMA Files
- Audio CD
- MP3 / WMA
- ID3 TAG
- MP3 / WMA disc compatibility with this player is limited as follows:
- Audio CD and MP3 / WMA Disc Features
- Pause
- Moving to another Track
- Repeat Track / All / Off
- Random
- Repeat A-B ACD
- 3D Surround ACD
- Programmed Playback
- Repeat Programmed Tracks
- Erasing a Track from "Program" List
- Erasing the Complete Program List
- Viewing a JPEG Files
- Slide Show JPEG
- Still Picture JPEG
- Moving to another File JPEG
- Zoom JPEG
- To rotate picture JPEG
- To listen to music while slide show simultaneously JPEG
- JPEG disc compatibility with this player is limited as follows:
- Playing a DivX Movie File
- DivX disc compatibility with this recorder is limited as follows:
- Playing a DVD VR format Disc
- What is 'CPRM'?
- Controlling Your TV with the Supplied Remote
- Controlling other TVs with the remote
- Code numbers of controllable TVs
- Reference
- Language Codes
- Area Codes
- Troubleshooting
- Specifications
- Accessories:
- LG DVD/VCR LIMITED WARRANTY - USA
- WARRANTY PERIOD:
- HOW SERVICE IS HANDLED:
- THIS LIMITED WARRANTY DOES NOT APPLY TO:
- CUSTOMER INTER-ACTIVE CENTER NUMBERS:
- FOR WARRANTY SERVICE:
Brand : LG
Model : LDX-514
Category : DVD Player / VCR