HOLA - Video Conferencing System Alfatron - Free user manual and instructions
Find the device manual for free HOLA Alfatron in PDF.


| Product Type | Video Conferencing System |
| Brand | Alfatron |
| Model | HOLA |
| Dimensions (W x H x D) | 200 x 50 x 150 mm |
| Weight | 1.2 kg |
| Power Supply | 12V DC, 2A |
| Main Functions | Video conferencing, screen sharing, audio capture, camera tilt/pan |
| Connectivity | HDMI, USB 3.0, Bluetooth, Wi-Fi |
| Camera Resolution | 1080p Full HD |
| Microphone Range | Up to 5 meters |
| Speaker Output | 10W |
| Maintenance & Cleaning | Wipe with a soft, dry cloth. Do not use abrasive cleaners. |
| Safety Precautions | Keep away from water and extreme temperatures. Ensure proper ventilation. |
| Spare Parts & Repairability | Contact Alfatron support for spare parts. Repairs should be performed by qualified personnel. |
| General Information | Designed for small to medium meeting rooms. Compatible with major UC platforms. |
Frequently Asked Questions - HOLA Alfatron
User questions about HOLA Alfatron
0 question about this device. Answer the ones you know or ask your own.
Ask a new question about this device
Download the instructions for your Video Conferencing System in PDF format for free! Find your manual HOLA - Alfatron and take your electronic device back in hand. On this page are published all the documents necessary for the use of your device. HOLA by Alfatron.
USER MANUAL HOLA Alfatron
4K UHD ePTZ Video Conference camera
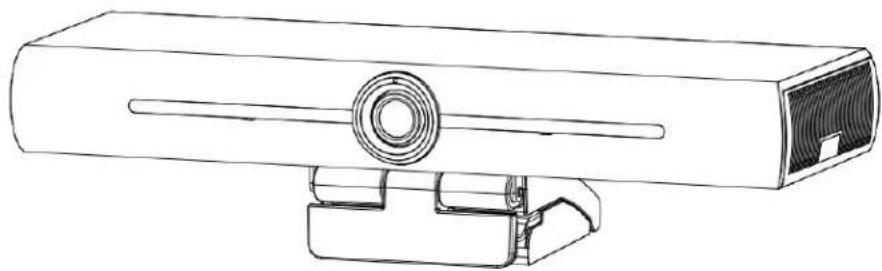
natural_image
Line drawing of a rectangular electronic device with a circular component and base mount (no text or symbols)1. FAST INSTALLATION....3
1.1 CAMERA INTERFACE 3
1.2 CAMERA OPERATION .... 3
2. PRODUCT OVERVIEW 4
2.1 PRODUCT INTRODUCTION .... 4
2.1.1 Dimensions 4
2.1.2 Accessories....4
2.2 MAIN FEATURES .... 5
2.3 TECHNICAL SPECIFICATIONS .... 5
2.4 INTERFACE INSTRUCTION 7
2.4.1 External Interface....7
3. APPLICATION INSTRUCTION .... 7
This manual introduces functions, installation and operations for the camera in details. Please read this manual thoroughly before installation and use.
1. How to Use
To prevent damage to this product or any product connected to it, this product can only be used within the specified range.
1). Do not expose the product to rain, liquid or moisture.
2). To prevent the risk of electric shock, do not open the casing. Installation and maintenance should only be carried out by qualified technicians.
3). Do not use the product beyond the specified temperature, humidity or power supply specifications.
4). Wipe it with a soft, dry cloth when cleaning the camera lens. Wipe it gently with a mild detergent if needed. Do not use strong or corrosive detergents to avoid scratching the lens and affecting the image.
2. Electrical Safety
Installation and use of this product must strictly comply with local electrical safety standards.
3. Handle with Care
Avoid damage to the product caused by heavy pressure, strong vibration or immersion during transportation, storage and installation.
4. Install with Caution
1). Do not rotate the camera head violently, otherwise, it may cause mechanical failure.
2). This product should be placed on a stable desktop or other horizontal surfaces. Do not install the product obliquely, otherwise, it may display an inclined image.
3). If the camera is installed on TV or computer, the base can be fixed by four double-sided adhesive trays.
4). The housing of this product is made of organic materials. Do not expose it to any liquid, gas or solids which may corrode the shell.
5). Ensure there are no obstacles within rotation range of the holder.
6). Do not power on before completion of the installation.
5. Do not Disassemble the Product Without Permission
This product contains no parts which can be maintained by users themselves. Any damage caused by dismantling the product by the user without permission is not covered by warranty.
6. Magnetic Interference
Electromagnetic fields at specific frequencies may affect the image. This product is Class A and may cause radio interference in the household application. Ensure the appropriate measure are in place.
FCC Statement
This equipment generates, uses and can radiate radio frequency energy and, if not installed and used in accordance with the instructions, may cause harmful interference to radio communications. It has been tested and found to comply with the limits for a Class B digital device, pursuant to part 15 of the FCC Rules. These limits are designed to provide reasonable protection against harmful interference in a commercial installation.
Operation of this equipment in a residential area is likely to cause interference, in which case the user at their own expense will be required to take whatever measures may be necessary to correct the interference
Any changes or modifications not expressly approved by the manufacture would void the user's authority to operate the equipment.

Do not dispose of this product with the normal household waste at the end of its life cycle. Return it to a collection point for the recycling of electrical and electronic devices. This is indicated by the symbol on the product, user manual or packaging. The materials are reusable according to their markings. By reusing, recycling or other forms of utilisation of old devices you make an important contribution to the protection of our environment. Please contact your local authorities for details about collection points.
1. Fast Installation
1.1 Camera Interface
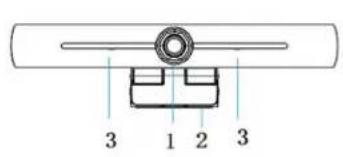
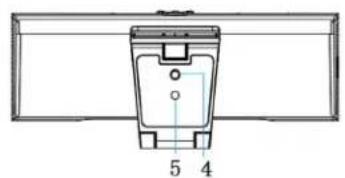
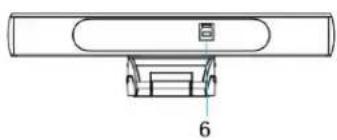
natural_image
Technical line drawing of a cylindrical device with a base and top component, labeled with number 6 (no text or symbols on the diagram itself)Figure 1.1 camera interface
- Camera lens
-
Bracket 4. Tripod fixing hole
-
Built-in MIC
-
USB 3.0 output interface
-
Positioning hole
1.2 Camera Operation
1) Product Installation: Affix the device on an LCD screen, on top of computer; directly on a desk or a tripod mounting.
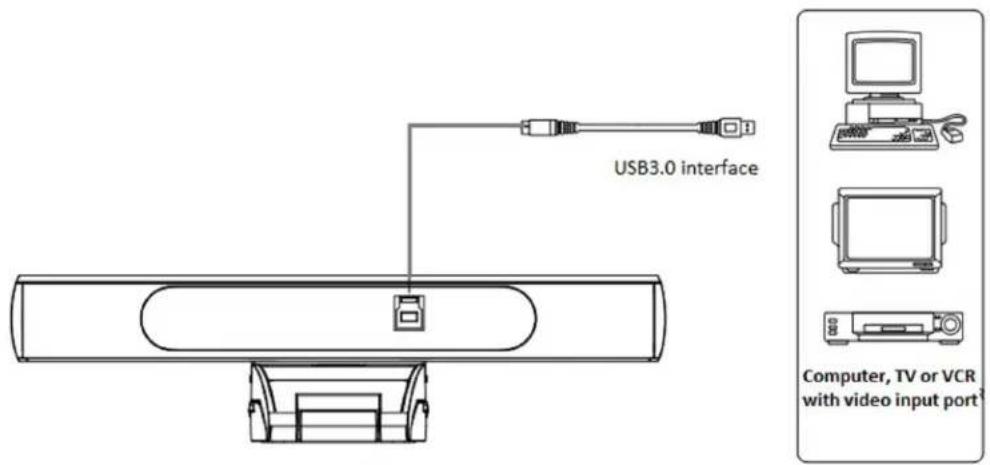
2) Connect the camera via USB cable to the computer, video conference terminal or other USB input device, log in the video conference software and select the camera as the video device to get image output.
2. Product Overview
2.1 Product Introduction
2.1.1 Dimensions
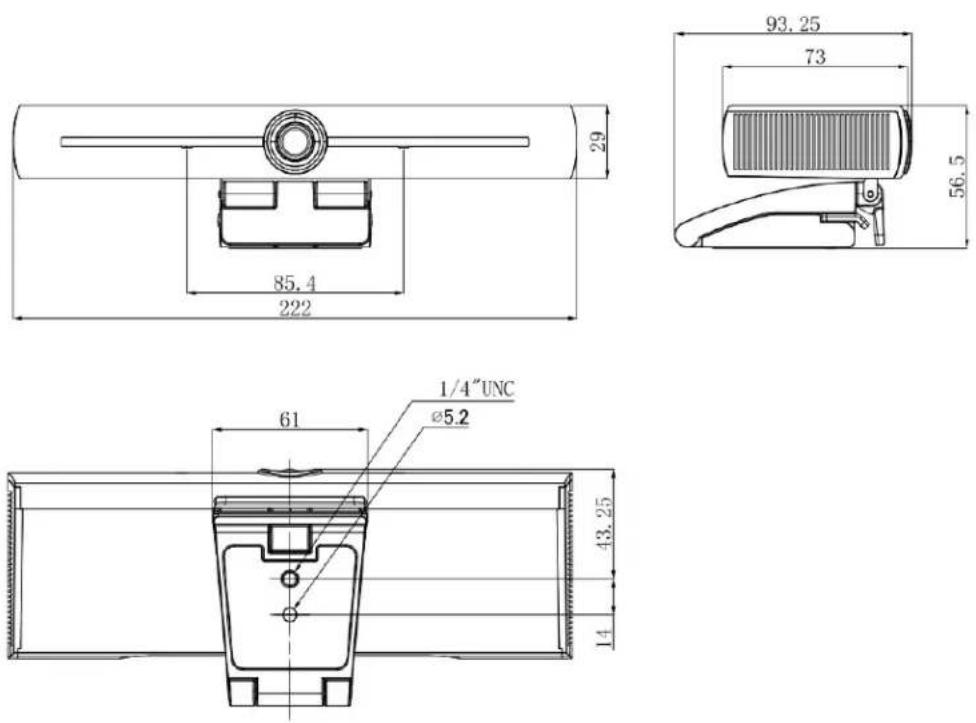
Figure 2.1 Camera Dimensions
2.1.2 Accessories
Check and confirm all accessories are provided as listed.
| User manual x 1 | |
| Wireless remote controller x 1 | |
| USB3.0 cable x 1 | |
| Warranty card x1 | |
2.2 Main Features
This product is a new 4K UHD ePTZ video conference camera. It is built with AI functions, which can automatically frame all people in the meeting and centre them in the scene. With flawless functionality and superior performance, adopting advanced ISP processing algorithms to provide vivid images with evenly clear brightness, strong colour layering, high resolution, and fantastic colour rendition. Easy and convenient to install and maintain, stable and reliable.
- 4K UHD: It employs 1/2.5 inch, 8 million pixels high-quality CMOS sensor; supports 4K UHD; provides 4K@30fps MJPG video resolution at most, and provides clear UHD video and vivid expressions and movements. At the same time, it is compatible with 1080p and 720p resolution.
● EPTZ: EPTZ and 4X digital Zoom - Built-in microphone: Includes 2 built-in microphones with all-round pickup. Unique noise suppression algorithm ensures your voice is perfectly clear. The effective microphone pickup distance is up to 5 meters.
- Dual-stream output: The USB3.0 port support mainstream and sub-stream output at the same time.
- Auto framing: With an excellent facial detection algorithm, the camera automatically adjusts the zoom according to the number of people in the meeting. It can frame all the meeting attendees and centre them within the scene.
● Wide view angle without distortion: 120^ super wide view angle lens for options - Low Noise and High SNR: Low Noise CMOS effectively ensures high SNR of video. Image is still clear even under low light condition.
- Multiple Installations: Standard equipped with mould clamp. Easy to install on any devices, such as LCD screen, PC, table and tripod.
● Easy to Use: No need to download driver; USB Plug and play. - Wide Applications: Personal video conferencing, enterprise video conferencing, unified collaboration, etc.
2.3 Technical Specifications
| Model Number | ALF-HOLA | ||
| Camera Parameter | |||
| Image Sensor | 1/2.5 Inch High Quality 4K CMOS Sensor | ||
| Effective Pixels | 8.28MP 16:9 | ||
| Video output port | 1* USB3.0, Type B, support audio output over USB3.0 | ||
| Audio input | 2 built-in MIC pickups | ||
| View Angle | 126°(D)/120°(H)/85°(V) | ||
| Video Format | Main stream: 3840×2160@30fps、1920×1080P@30fps/25fps、1280×720P@30fps/25fps, etc.Sub-stream:1280×720P@30fps/25fps、640×480P@30fps/25fps;320×172P@30fps/25fps, etc. | ||
| Min Illumination | 0.1Lux (F1.8, AGC ON) | ||
| Lens | f=2.72mm | ||
| Aperture | F2.5 | ||
| Digital zoom 4X | |||
| DNR | 2D & 3D DNR | ||
| Ultra-low illumination | On/off | ||
| White Balance | Auto / Manual/ One Push/ 3000K/ 3500K/ 4000K/ 4500K/ 5000K/ 5500K/ 6000K/6500K/ 7000K | ||
| Focus | Auto / Manual/ One push Focus (available on AM series) | ||
| Exposure | Auto / Manual | ||
| Auto framing | On/off/sensitivity | ||
| Backlight compensation | On/off | ||
| Dual-stream | On/off | ||
| SNR | >55dB | ||
| USB Feature | |||
| Operation Systems | Windows 7(1080p at the most), Windows 8.1, Windows 10; macOSTM 10.10 or higher, Linux (Require to support UVC.) | ||
| Video Compression format | YUY2, MJPG, H.264, H.265 | ||
| Audio over USB3.0 | Support | ||
| USB communication protocol | UVC, UAC | ||
| PTZ control | Support EPTZ | ||
| Hardware requirement | 2.4 GHz Intel@ Core 2 Duo processor or higher, 2GB RAM or more, USB 2.0/USB3.0 port (USB 3.0 is needed for 4K) | ||
| Other Parameters | |||
| Input Voltage | 5V | ||
| Input Current | 1A(Max.) | ||
| Power consumption | 5W(Max.) | ||
| Store Temperature | -10°C~+60°C | ||
| Store Humidity | 20%~90% | ||
| Working Temperature | -10°C~+50°C | ||
| Working Humidity | 20%~80% | ||
| Dimension (W*H*D) | 222mm×93.25mm×56.5mm | ||
| Weight | Around 0.53kg | ||
| Application | Indoor | ||
| Accessory | User Manual; Warranty card, remote controller, USB3.0 cable | ||
2.4 Interface Instruction
2.4.1 External Interface
The interface illustration is as Figure 2.4 below:
3. Application Instruction
3.1 Remote Controller
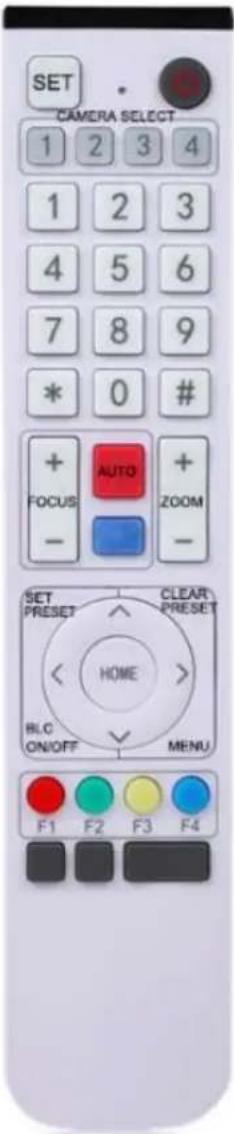
3.1.1 Keys Instruction
1. Standby Key
After a 3s long press, the camera will go into standby mode. Long press 3s again, and the camera will self-test and go back to HOME position. Note: If preset 0 is set, there is no operation within 12s, camera head will automatically point to the specified preset 0 position.
2. Camera Address Selection
Select the camera address
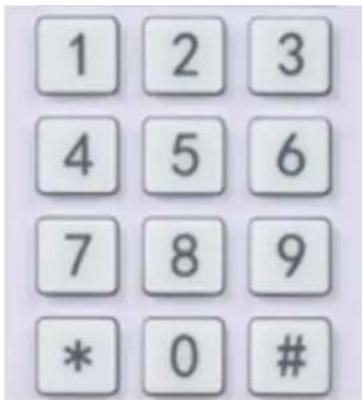
3. Number Key
Set or call 0-9 presets
4. \*, # Key
Key combination use
Long Press 5s "SET" + *" at the same time, the WR controller will light up, then release buttons. Power on the camera again, it will have successfully paired with WR controller.
Long Press 5s "SET" + "*" at the same time, the WR controller will light up, then release buttons.. Power on the camera again, it will cancel the pairing with WR controller.
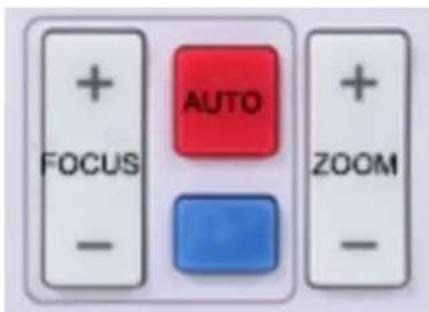
5. Focus Control Key
Auto Focus: Enter into auto focus mode.
Manual Focus: The camera focus mode is manual
Switch the camera focus mode to manual focus by pressing [focus +] or [focus -] to adjust.
6. Zoom Control Key
Zoom+: Lens near
Zoom—: Lens far
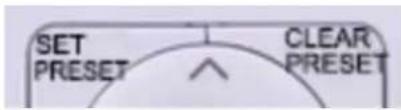
7. Set or Clear Preset key:
Set Preset: Set preset key + 0-9 number key
Clear Preset key: Clear preset key + 0-9 number key
8. Electronic Pan/Tilt Control Key
Press Key: Up
Press Key: Down
Press Key: Left
Press Key: Right
"HOME" Key: Return to the middle position or enter into the sub-menu
9. BLC Control Key
Back Light ON / OFF: Turn on or off the backlight
10. Menu Setting
Open or close the OSD menu
Enter/exit the OSD menu or return to the previous menu
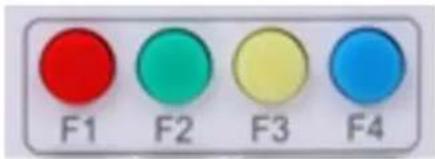
11. Address Setting
【*】+【#】+【F1】:Camera Address No.1
【*】+【#】+【F2】:Camera Address No. 2
【*】+【#】+【F3】:Camera Address No. 3
Power on the camera, press the "SET" and "*" keys together for 5 seconds, the indicator light will be on. Then release the button and power on the camera again when the light is flashing. The matching process will be done when the indicator light stops flashing. Then users can control the pan/tilt/zoom, set and call preset positions via the wireless remote controller.
Key Instruction:
- In this instruction, "press the key" means a click rather than a long-press, and a special note will be given if a long-press for more than one second is required.
- When a key-combination is required, do it in sequence. For example, "【*】+【#】+【F1】" means press"【*】" first and then press"【#】" and last press"【F1】".
1) Camera Selection
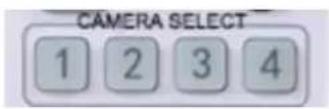
Select the camera address to control.
2) Pan/Tilt Control
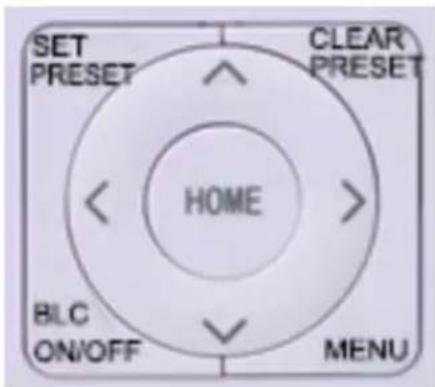
Up: press Down: press
Left: press Right: press
Back to middle position: press"【HOME】"
Press and hold the up/down/left/right key, the pan/tilt will keep running, from slow to fast, until it runs to the endpoint; the pan/tilt running stops as soon as the key is released.
3) Presets
4) Zoom Control
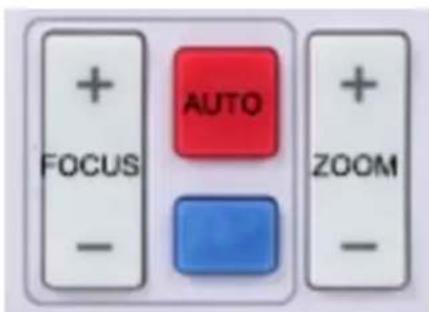
5) Focus Control
- Preset setting: to set a preset position, the users should press the "【SET PRESET】" key first and then press the number key 0-9 to set a relative preset,
Note: 10 preset positions in total are available via remote controller.
- Preset calling: Press a number key 0-9 directly to call a relative preset.
Note: Action in vain if a relative preset position does not exist.
- Preset clearing: to clear a preset position, the user can press the "【CLEAR PRESET】" key first and then press the number key 0-9 to clear the relative preset;
Note : press the“【#】” key three times continually to cancel all the presets.
ZOOM IN: press "ZOOM" key
ZOOM OUT: press "ZOOM key
Press and hold the key, the camera will keep zooming in or zooming out and stops as soon as the key is released.
Focus (near): Press "【focus+】" key (Valid only in manual focus mode)
Focus (far): Press "【focus-】" key (Valid only in manual focus mode)
Auto Focus: yes
Manual Focus: yes
Press and hold the key, the action of focus will keep
continue and stops as soon as the key is released.
6) Address Setting
【*】+【#】+【F1】:Camera Address No.1
【*】+【#】+【F2】:Camera Address No. 2
【*】+【#】+【F3】:Camera Address No. 3
- Language Setting: press 【←→】key to select Language
- Image Style Setting: press key to select the style
- Exposure Setting
Move the pointer to EXPOSURE in the Main Menu, click the【HOME】and enter the (EXPOSURE SET) as follows:
EXPOSURE
Mode
Auto
EV
OFF
BLC
OFF
Flicker
50Hz
G.Limit
3
Mode: Auto, Manual, Shutter priority, Iris priority and Brightness priority.
EV: On/Off (only available in auto mode)
Compensation Level: -7\~7 (only available in auto mode when EV is ON)
BLC: ON/OFF for options (only available in auto mode)
Dynamic range: adjustable items: 1 \~
8, close
Anti-Flicker: OFF/50Hz/60Hz for options (only available in Auto/Iris priority/Brightness priority modes)
Gain Limit: 0\~15(only available in Auto/ Iris priority /Brightness priority mode)
WDR: Off,1\~8
Shutter Priority:
1/25, 1/30, 1/50, 1/60, 1/90, 1/100, 1/120, 1/180, 1/250, 1/350, 1/500, 1/1000, 1/2000, 1/3000, 1/4000, 1/6000, 1/10000 (only available in Manual and Shutter priority mode)
Brightness: 0\~23 (only available in Brightness priority mode)
4. Colour Setting
Move the pointer to COLOR in the Main Menu, click the【HOME】and enter the (COLOR SET) as follows:
COLOR
WB Mode Auto
RG Tuning 0
BG Tuning 0
Saturation 100%
Hue 7
WB Mode: Auto, Manual, One Push, 3000K, 3500K, 4000K, 4500K, 5000K, 5500K, 6000K, 6500K, 7000K
RG Tuning: -10\~10 (only available in Manual mode)
BG Tuning: -10\~10 (only available in Manual mode)
Red Gain: 0\~255 (only available in Manual mode)
Blue Gain: 0\~255 (only available in Manual mode)
Saturation: 60%, 70%, 80%, 90%, 100%, 110%, 120%, 130%, 140%, 150%, 160%, 170%, 180%, 190%, 200%
Hue: 0\~14
AWB Sensitivity: high/middle/low (only available in Manual mode)
5. Image Setting
Move the pointer to IMAGE in the Menu, click the 【HOME】 and enter the (IMAGE) as follows,
IMAGE
Brightness 7
Contrast 7
Sharpness 4
Flip-H OFF
Flip-V OFF
B&W-Mode Color
Brightness: 0\~14
Contrast: 0\~14
Sharpness: 0\~15
Flip-H: On/Off
Flip-V: On/Off
B&W Mode: colour, black/white
Gamma: default, 0.45, 0.50, 0.55, 0.63
DCI: Dynamic Contrast: Off,1\~8
6. Focus Setting
Move the pointer to FOCUS in the Menu, click the 【HOME】 and enter the (FOCUS) as follows:
FOCUS
Focus Mode
Auto
AF-Zone
Center
AF-Sensitivity
Low
Focus Mode: Auto, manual, one-push
AF-Zone: Up, middle, down, overall
AF-Sensitivity: High, middle, low
7. Noise Reduction Setting
Move the pointer to NOISE REDUCTION in the Menu, click the 【HOME】 and enter the (NOISE REDUCTION) as follows,
NOISE REDUCTION
NR-2D 2
NR-3D
5
Dynamic Hot Pixel OFF
2D Noise Reduction: Auto, close, 1\~7
3D Noise Reduction: Close, 1\~8
Dynamic Hot Pixel: Close, 1\~5
8. Auto Framing Setting
Move the pointer to Auto Framing in the Menu, click 【←→】 keys to set ON/OFF.
Auto Framing
Auto Framing
Close
9. Dual Stream Setting
Move the pointer to Dual Stream in the Menu, click 【←→】 keys to set ON/OFF.
10. Version
Move the pointer to VERSION
VERSION
Cam Version
1.0.0
2019-7-31
Focus Version
1.0.6 2018-8-21
11. Restore Default
Move the pointer to RESTORE DEFAULT in the Main Menu, click 【HOME】and enter RESTORE DEFAULT as below:
RESTORE DEFAULT
Restore
Default?
NO
Restore default: Yes/No for options. (the video format and colour style won't be restored)
Note: If the address of former remote controller is not 1 but another one from 2,3,4, the corresponding camera address will restore to 1 when all parameters or system parameters are restored. User should change the remote controller address to be 1 (press No.1 according to the camera to get normal operation)
4. Maintenance and Troubleshooting
4.1 Maintenance
1) Please disconnect the camera if not in use for an extended period of time.
2) Use soft cloth or tissue to clean the camera cover.
3) Wipe with a soft, dry cloth when cleaning the camera lens. Wipe it gently with a mild detergent if needed. Do not use strong or corrosive detergents to avoid scratching the lens and affecting the image;
4.2 Troubleshooting
1) No video output
a. Check whether USB cable connected securely and the power indicator light is ON.
b. Does the camera do self-check after it has restarted.
c. Restart PC.
d. Check whether the camera is recognized by PC.
2) Intermittent image display
a. Check the USB cable quality and whether it is securely connected.
3) Image dithering when zoom-in or zoom-out
a. Check whether the camera installation position is solid.
b. Whether there is shaking machine or objects around the camera.
4) Remote controller is non-functional
a. Re-match the camera and the wireless remote controller.
b. Set the camera address to 1 (The camera address would be back to 1 after restoring default setting)
c. Check whether the battery is installed on the remote controller or low.
d. Check the camera working mode is the normal operating mode (see Table 2.2 and Table 2.3)
e. Exit the menu, the menu only displayed under MJPG/H.264/H.265 compression format.
Warranty
1.1 This limited warranty covers defects in materials and workmanship in this product.
1.2 Should warranty service be required, proof of purchase must be presented to the Company. The serial number on the product must be clearly visible and not have been tampered with in any way whatsoever.
1.3 This limited warranty does not cover any damage, deterioration or malfunction resulting from any alteration, modification, improper or unreasonable use or maintenance, misuse, abuse, accident, neglect, exposure to excess moisture, fire, improper packing and shipping (such claims must be presented to the carrier), lightning, power surges, or other acts of nature. This limited warranty does not cover any damage, deterioration or malfunction resulting from the installation or removal of this product from any installation, any unauthorized tampering with this product, any repairs attempted by anyone unauthorized by the Company to make such repairs, or any other cause which does not relate directly to a defect in materials and/or workmanship of this product. This limited warranty does not cover equipment enclosures, cables or accessories used in conjunction with this product.
This limited warranty does not cover the cost of normal maintenance. Failure of the product due to insufficient or improper maintenance is not covered.
1.4 The Company does not warrant that the product covered hereby, including, without limitation, the technology and/or integrated circuit(s) included in the product, will not become obsolete or that such items are or will remain compatible with any other product or technology with which the product may be used.
1.5 Only the original purchaser of this product is covered under this limited warranty. This limited warranty is not transferable to subsequent purchasers or owners of this product.
1.6 Unless otherwise specified, the goods are warranted in accordance with the manufacturer's product specific warranties against any defect attributable to faulty workmanship or materials, fair wear and tear being excluded.
1.7 This limited warranty only covers the cost of faulty goods and does not include the cost of labor and travel to return the goods to the Company's premises.
1.8 In the event of any improper maintenance, repair or service being carried out by any third persons during the warranty period without the Company's written authorization, the limited warranty shall be void.
1.9 A 7 (seven) year limited warranty is given on the aforesaid product where used correctly according to the Company's instructions, and only with the use of the Company's components.
1.10 The Company will, at its sole option, provide one of the following three remedies to whatever extent it shall deem necessary to satisfy a proper claim under this limited warranty:
1.10.1 Elect to repair or facilitate the repair of any defective parts within a reasonable period of time, free of any charge for the necessary parts and labor to complete the repair and restore this product to its proper operating condition.; or
1.10.2 Replace this product with a direct replacement or with a similar product deemed by the Company to perform substantially the same function as the original product; or
1.10.3 Issue a refund of the original purchase price less depreciation to be determined based on the age of the product at the time remedy is sought under this limited warranty.
1.11 The Company is not obligated to provide the Customer with a substitute unit during the limited warranty period or at any time thereafter.
1.12 If this product is returned to the Company this product must be insured during shipment, with the insurance and shipping charges prepaid by the Customer. If this product is returned uninsured, the Customer assumes all risks of loss or damage during shipment. The Company will not be responsible for any costs related to the removal or reinstallation of this product from or into any installation. The Company will not be responsible for any costs related to any setting up this product, any adjustment of user controls or any programming required for a specific installation of this product.
1.13 Please be aware that the Company's products and components have not been tested with competitor's products and therefore the Company cannot warrant products and/or components used in conjunction with competitor's products.
1.14 The appropriateness of the goods for the purpose intended is only warranted to the extent that the goods are used in accordance with the Company's installation, classification and usage instructions.
1.15 Any claim by the Customer which is based on any defect in the quality or condition of the goods or their failure to correspond with specification shall be notified in writing to the Company within 7 days of delivery or (where the defect or failure was not apparent on reasonable inspection by the Customer) within a reasonable time after discovery of the defect or failure, but, in any event, within 6 months of delivery.
1.16 If delivery is not refused, and the Customer does not notify the Company accordingly, the Customer may not reject the goods and the Company shall have no liability and the Customer shall pay the price as if the goods had been delivered in accordance with the Agreement.
1.17 THE MAXIMUM LIABILITY OF THE COMPANY UNDER THIS LIMITED WARRANTY SHALL NOT EXCEED THE ACTUAL PURCHASE PRICE PAID FOR THE PRODUCT.
- FAST INSTALLATION....3
- PRODUCT OVERVIEW 4
- APPLICATION INSTRUCTION .... 7
- How to Use
- Electrical Safety
- Handle with Care
- Install with Caution
- Do not Disassemble the Product Without Permission
- Magnetic Interference
- FCC Statement
- Fast Installation
- Camera Interface
- Camera Operation
- Product Overview
- Product Introduction
- Accessories
- Main Features
- Technical Specifications
- Interface Instruction
- External Interface
- Application Instruction
- Remote Controller
- Keys Instruction
- Standby Key
- Camera Address Selection
- Number Key
- \*, # Key
- Focus Control Key
- Zoom Control Key
- Set or Clear Preset key:
- Electronic Pan/Tilt Control Key
- BLC Control Key
- Menu Setting
- Address Setting
- Key Instruction:
- 1) Camera Selection
- 2) Pan/Tilt Control
- 3) Presets
- 4) Zoom Control
- 5) Focus Control
- 6) Address Setting
- EXPOSURE
- Shutter Priority:
- Colour Setting
- COLOR
- Image Setting
- Focus Setting
- Noise Reduction Setting
- NOISE REDUCTION
- Auto Framing Setting
- Dual Stream Setting
- Version
- Restore Default
- Maintenance and Troubleshooting
- Maintenance
- Troubleshooting
- 1) No video output
- 2) Intermittent image display
- 3) Image dithering when zoom-in or zoom-out
- 4) Remote controller is non-functional
- Warranty
Brand : Alfatron
Model : HOLA
Category : Video Conferencing System