
75114 - Compressor Craftsman - Free user manual and instructions
Find the device manual for free 75114 Craftsman in PDF.


| Product Type | 12V DC Inflator/Compressor |
| Model Number | 75114 |
| Brand | Craftsman |
| Power Source | 12 Volt DC (vehicle power outlet) |
| Max Current | 15A |
| Working Current at 32 PSI | 9.8A |
| Air Flow (SCFM @ 30 PSI) | 0.35 SCFM |
| Max Pressure (Preset Shut-off) | 100 PSI |
| Pressure Gauge | Digital, detachable; displays PSI, BAR, KG/CM², KPA |
| Preset Shut-off Feature | Adjustable from 30 to 100 PSI; default 30 PSI |
| Included Accessories | Quick-Connect Universal Valve Adaptor, Air Needle, Presta Valve Adaptor, Small Adaptor |
| Weight | Approximately 3.5 lbs |
| Safety Features | Thermal overload protection; requires 10 min cool-down after 10 min continuous use; fuse in 12V plug |
| Maintenance | Clean exterior with damp cloth; replace digital gauge batteries (2x #LR44) |
| Warranty | 1 Year Full Warranty from Craftsman |
| Customer Service | 1-800-874-5771 |
Frequently Asked Questions - 75114 Craftsman
User questions about 75114 Craftsman
0 question about this device. Answer the ones you know or ask your own.
Ask a new question about this device
Download the instructions for your Compressor in PDF format for free! Find your manual 75114 - Craftsman and take your electronic device back in hand. On this page are published all the documents necessary for the use of your device. 75114 by Craftsman.
USER MANUAL 75114 Craftsman
- Safety Guidelines
- Assembly
- Operation
- Maintenance
- Troubleshooting
CAUTION: Read the Safety Guidelines and All Instructions Carefully Before Operating.
Sears Brands Management Corporation, Hoffman Estates, IL 60179 U.S.A. Visit our Craftsman website: www.craftsman.com
TABLE OF CONTENTS
WARRANTY 1
REPLACEMENT PARTS 1
SAFETY GUIDELINES-DEFINITIONS 2
IMPORTANT SAFETY INSTRUCTIONS 2-6
GLOSSARY 6
ACCESSORIES....7
ASSEMBLY 7
OPERATION 8-9
USING PRESSURE GAUGE PRESET FEATURE.... 10
CHANGING DIGITAL GAUGE FORMAT....11
MAINTENANCE 12
TROUBLESHOOTING GUIDE....12
SPECIFICATIONS.... 12
WARRANTY
CRAFTSMAN ONE YEAR FULL WARRANTY
FOR ONE YEAR from the date of purchase, this product is warranted against any defects in material or workmanship. Defective product will be replaced free of charge.
For warranty coverage details to obtain free replacement, visit the web site: www.craftsman.com
This warranty does not cover the air needle, which is an expendable part that can wear out from normal use within the warranty period.
This warranty is void if this product is ever used while providing commercial services or if rented to another person.
This warranty gives you specific legal rights, and you may also have other rights which vary from state to state.
Sears Brands Management Corporation, Hoffman Estates, IL 60179
REPLACEMENT PARTS
If you need to replace any inflation accessories, call this number and ask for Customer Service: 1-800-874-5771
SAFETY GUIDELINES - DEFINITIONS
This manual contains information that is important for you to know and understand. This information relates to protecting YOUR SAFETY and PREVENTING EQUIPMENT PROBLEMS. To help you recognize this information, we use the symbols below. Please read the manual and pay attention to these sections.
| ⚠DANGER: Indicates an imminently hazardous situation which, if not avoided,will result indeath or serious injury. | ⚠CAUTION: Indicates a potentially hazardous situation which, if not avoided,may result inminor or moderate injury. |
| ⚠WARNING: Indicates a potentially hazardous situation which, if not avoided,could result indeath or serious injury. | CAUTION: Used without the safety alert symbol indicates a potentially hazardous situation which, if not avoided,may result inproperty damage. |
IMPORTANT SAFETY INSTRUCTIONS

SAVE THESE INSTRUCTIONS

IMPROPER OPERATION OR MAINTENANCE OF THIS PRODUCT COULD RESULT IN SERIOUS INJURY AND PROPERTY DAMAGE. READ AND UNDERSTAND ALL WARNINGS AND OPERATING INSTRUCTIONS BEFORE USING THIS EQUIPMENT.
WARNING: Some dust created by power sanding, sawing, grinding, drilling, and other construction activities contains chemicals known (to the State of California) to cause cancer, birth defects or other reproductive harm. Some examples of these chemicals are:
- lead from lead-based paints
• crystalline silica from bricks and cement and other masonry products
• arsenic and chromium from chemically-treated lumber
Your risk from these exposures varies, depending on how often you do this type of work. To reduce your exposure to these chemicals: work in a well ventilated area, and work with approved safety equipment, always wear MSHA/NIOSH approved, properly fitting face mask or respirator when using such tools.
When using air tools, basic safety precautions should always be followed to reduce the risk of personal injury.
- Use 12 Volt DC only. Make sure that your vehicle 12 Volt power outlet is free of any ash residue or debris. A dirty 12 Volt power outlet can cause the inflator and power cord to overheat. Overheating can cause damage to your inflator/vehicle and could cause bodily harm or injury. Disconnect power when not in use.
- This inflator is designed to inflate car tires, bike tires, ATV tires, sports equipment, air mattresses, beach toys and other inflatables. Do not use for any purpose other than inflating. If you do so, bodily harm or personal injury can occur.
- Caution, allow inflator to cool down 10 minutes after each 10 minutes of continuous operation.
• After using, turn off power. - The inflator is not a toy. Keep away from children at all times.
- Do not carry inflator by the air hose or power cord as damage may occur.
- Do not leave the inflator unattended while in operation.
- Do not over inflate. Please follow the manufacturer's instructions for the item you are inflating
- Keep the inflator away from flammable areas/liquids at all times.
- Do not operate the inflator in wet or damp areas.
- Operate the inflator only with the attachments that are included.
- USE SAFETY GLASSES. Also use face or dust mask if operation is dusty. It is recommended that your vehicle's 12 Volt battery be fully charged to get the best performance from your inflator. If your vehicle battery is weak, the inflator will not work at its maximum output level.
- For best results and more efficient power, it is recommended that you operate your inflator with your VEHICLE'S ENGINE RUNNING, making absolutely sure you are outside or in an open, well-ventilated area and NOT INSIDE A CONFINED AREA, SUCH AS A GARAGE as bodily injury or asphyxiation resulting in death could occur. ALWAYS ALLOW FOR PROPER VENTILATION. Most vehicle 12 Volt power outlets will operate with vehicle ignition off; however, some vehicles require that the ignition be turned on.
IMPORTANT SAFETY INSTRUCTIONS

Save these instructions

Improper operation or maintenance of this product could result in serious injury and property damage. Read and understand all warnings and operation instructions before using this equipment.
HAZARD

WARNING: Risk of explosion or fire

| What Could Happen | How To Prevent It |
| It is normal for electrical contacts within the motor to spark. | Always operate the inflator in a well ventilated area free of combustible materials, gasoline, or solvent vapors. |
| If electrical sparks from inflator come into contact with flammable vapors, they may ignite, causing fire or explosion. | Store flammable materials in a secure location away from inflator. |
| Restricting any of the inflator ventilation openings will cause serious overheating and could cause fire. | Never place objects against or on top of inflator. Operate inflator in an open area at least 12 inches away from any wall or obstruction that would restrict the flow of fresh air to the ventilation openings.Do not operate unit in any confined area. |
| Unattended operation of this product could result in personal injury or property damage. To reduce the risk of fire, do not allow the inflator to operate unattended. | Always remain in attendance with the product when it is operating. Always disconnect power by moving on/off switch to the off position and unplug the power cord. |
HAZARD
WARNING: Risk of Bursting

| What Could Happen | How To Prevent It |
| ATTACHMENTS & ACCESSORIES: Exceeding the pressure rating of air operated accessories, tires, inflatable balls, and other inflatables item can cause them to explode or fly apart, and could result in serious injury. | Follow the equipment manufacturer's recommendation and never exceed the maximum allowable pressure rating of attachments or inflatable items. |
| Unattended tires, inflatable balls, inflatable toys, and other inflatable items can over inflate very quickly sometimes in a matter of seconds and result in personal or property damage. | Always remain in attendance when inflating tires, inflatable balls, inflatable toys, and other inflatable items. Be prepared to stop inflator when item is fully inflated, sometimes in a matter of seconds. |
HAZARD
WARNING: Risk from Flying Objects

| What Could Happen | How To Prevent It |
| The inflator air stream can cause soft tissue damage to exposed skin and can propel dirt, chips, loose particles, and small objects at high speed, resulting in property damage or personal injury. | Always wear ANSI Z87.1 approved safety glasses with side shields when using the inflator.Never direct compressed air toward any part of the body or at other people or animals.Always turn the inflator off before attempting maintenance or attaching accessories. |
HAZARD
WARNING: Risk to Breathing

| What Could Happen | How To Prevent It |
| The compressed air directly from your inflator is not safe for breathing. The air stream may contain carbon monoxide, toxic vapors, or solid particles from the tank. Breathing these contaminants can cause serious injury or death. | Air obtained directly from the inflator should never be used to supply air for human consumption. In order to use air produced by this inflator for breathing, suitable filters and in-line safety equipment must be properly installed. In-line filters and safety equipment used in conjunction with the inflator must be capable of treating air to all applicable local and federal codes prior to human consumption. |
HAZARD
WARNING: Risk of Burns

| What Could Happen | How To Prevent It |
| Touching exposed metal such as the inflator head or outlet tubes, can result in serious burns. | Never touch any exposed metal parts on inflator during or immediately after operation. Inflator will remain hot for several minutes after operation. Do not reach around protective shrouds or attempt maintenance until unit has been allowed to cool. |
HAZARD

WARNING: Risk from Moving Parts

| What Could Happen | How To Prevent It |
| Moving parts such as the pulley, flywheel, and belt can cause serious injury if they come into contact with you, your clothing, loose hair, or jewelry. | Never operate the inflator with guards or covers which are damaged or removed. |
| Attempting to operate inflator with damaged or missing parts or attempting to repair inflator with protective shrouds removed can expose you to moving parts and can result in serious injury. | Any repairs required on this product should be preformed by authorized service center personnel. |
HAZARD
WARNING: Risk of Falling

| What Could Happen | How To Prevent It |
| An inflator can fall from a table or workbench causing damage to the inflator and could result in serious injury or death to the operator. | Always operate inflator in a stable secure position to prevent accidental movement of the unit. Never operate inflator on a roof or other elevated position. |
HAZARD
WARNING: Risk of Unsafe Operation

| What Could Happen | How To Prevent It |
| Unsafe operation of your inflator could lead to serious injury or death to you or others. | Review and understand all instructions and warnings in this manual.Become familiar with the operation and controls of the inflator.Keep operating area clear of all persons, pets and obstacles.Keep children away from the inflator at all times.Do not operate the product when fatigued or under the influence of alcohol or drugs. Stay alert at all times.Never defeat the safety features of this product.Equip area of operation with a fire extinguisher.Do not operate machine with missing, broken, or unauthorized parts. |
HAZARD
WARNING: Risk of Injury
- Do not direct air stream at body.
- Disconnect from supply circuitry before replacing fuse.
SAVE THESE INSTRUCTIONS
GLOSSARY
Become familiar with these terms before operating the unit.
CFM: Cubic feet per minute.
SCFM: Standard cubic feet per minute; a unit of measure of air delivery.
PSIG: Pounds per square inch gauge; a unit of measure of pressure.
Code Certification: Products that bear one or more of the following marks: UL, CUL, ETL, CETL, have been evaluated by OSHA certified independent safety laboratories and meet the applicable Underwriters Laboratories Standards for Safety.
ACCESSORIES
This unit is capable of powering the following Accessories that are included with your inflator:
Air Needle: Used to inflate sports balls.
Presta Valve Adaptor: Used to inflate high performance bike tires.
Small Adaptor: Attaches directly to the Quick-Connect Universal Valve Adaptor to inflate small inflatable items such as mattresses and beach balls.
ASSEMBLY
Contents of Carton
- 1 Inflator equipped with rubber air hose, built-in Quick-Connect Universal Valve Adaptor and digital pressure gauge
- 1 Air Needle
- 1 Small Adaptor
• 1 Presta Valve Adaptor
To Remove Inflator from Carton
- Grasp handle and lift the Inflator out of the carton.
- Remove all packaging from Inflator and discard.
OPERATION
Know your Inflator
READ THIS OWNER'S MANUAL AND SAFETY RULES BEFORE OPERATING YOUR UNIT. Compare the illustration with your unit to familiarize yourself with the location of various controls and adjustments. Save this manual for future reference.
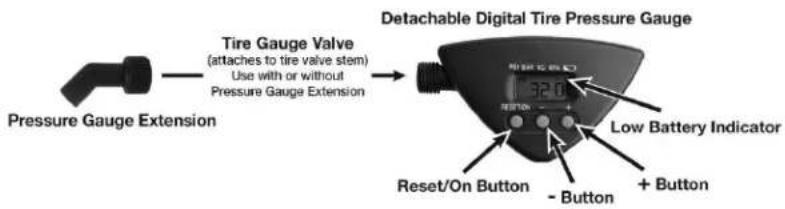
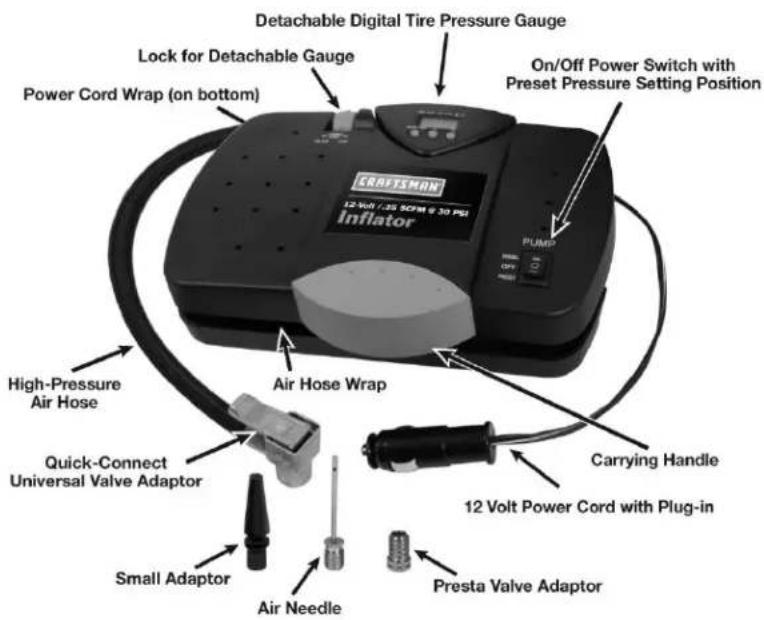
Description of Operation
On/Off Switch: Used to turn Inflator on and off.
Digital Pressure Gauge: Gives the pressure reading in PSI, BAR, KG/CM ^2 or KPA.
Small Adaptor: Attaches directly to the Quick-Connect Universal Valve Adaptor to inflate small inflatable mattresses and beach balls.
Presta Valve Adaptor: Used to inflate high performance bike tires.
Quick-Connect Universal Valve Adaptor:
Used with standard tire valves and with accessories included with Inflator.
Air Needle: Attaches directly to the Quick-Connect Universal Valve Adaptor to inflate sport balls.
WARNING: Risk of Bursting. Unattended tires, inflatable balls, inflatable toys, and other inflatable items can over-inflate very quickly, sometimes in a matter of seconds, and result in personal injury or property damage.
OPERATION
To inflate vehicle and bicycle tires
- Place Inflator evenly on flat surface.
- Connect the Quick-Connect Universal Valve Adaptor to tire air valve and push down the Valve Lock Lever to secure the connection.
- Connect the 12 Volt power cord into DC 12 Volt power outlet.
- Move the On/Off switch to On position and the Inflator will begin to operate. Monitor the PSI on the gauge to fill your item to desired pressure. Once you have reached the desired air pressure, move the On/Off switch to the Off position.
- Remove the air hose from your tire air valve by raising the Valve Lock Lever up.
- Remove the 12 Volt power cord from the DC 12 Volt power outlet.
- Allow unit to cool.
WARNING: Risk of Flying
Objects/Bursting Objects. Over inflating tire could cause the tire to burst or the Quick-Connect Universal Valve Adaptor to pop off the valve stem and become a projectile. Use a tire pressure gauge to ensure an accurate tire pressure reading, because the pressure gauge on the unit is for general reference only.
To inflate sports ball, air mattress, rubber raft, etc.
- Place Inflator evenly on flat surface.
- Select the appropriate inflation accessory and insert into the Quick-Connect Universal Valve Adaptor and push down the Valve Lock Lever to secure the connection.
- Connect the 12 Volt power cord into DC 12 Volt power outlet.
- Insert the inflation accessory into desired item you are inflating.
- Move the On/Off switch to On position and the Inflator will begin to operate. Inflate your desired item to the correct pressure and move the On/Off switch to the Off position.
- Remove inflation accessory from Quick-Connect Universal Valve Adaptor by raising the Valve Lock Lever up.
- Remove the 12 Volt power cord from the DC 12 Volt power outlet.
- Allow unit to cool.
WARNING: Risk of Bursting. Most sports balls with no initial air will fill in less than 10 seconds. Watch sports balls carefully while filling, do not overfill.
WARNING: Risk of Bursting. Too much air pressure causes a hazardous risk of bursting. Check the manufacturer's maximum pressure rating for objects being inflated. Carefully follow Instructions.
To operate Inflator using the Preset Gauge with Automatic Shut Off feature:
- Install the "Digital Tire Gauge" on the Inflator and turn the Digital Gauge Lock Nut to secure.
- Insert the 12 Volt power cord into DC 12 Volt power outlet.
- Connect the Quick-Connect Universal Valve Adaptor to tire air valve and push down the Valve Lock Lever to secure the connection.
- Press "Reset/On" button to turn the gauge on. The gauge will display the current tire pressure, + or -2 PSI.
- The gauge is pre-set at the factory to 30 PSI. This means the Inflator will automatically shut off when it reaches 30 PSI. Press the "+" or "-" to change the shut off pressure setting to the desired automatic shut off pressure (Maximum: 100 PSI). To return to the default setting of 30 PSI, hold down the "Reset/On" button for 3 seconds.
- For Automatic Shut Off, switch the "Pump" switch to 'Preset'. In the 'Preset' Mode the Inflator will automatically shut off when it reaches the preset pressure setting.
- Turn the Inflator "Pump" switch to the 'Off' position when finished. CAUTION: Do Not Over Inflate! NOTE: If low pressure is present (below 3 PSI), the gauge will turn off automatically after 15 seconds. The gauge will remain on if the pressure is above 3 PSI.
To operate Removable Digital Tire Pressure Gauge and check air pressure in vehicle tires:
- Turn the "Digital Gauge Lock Nut" to the unlock position and lift the Digital Tire Pressure Gauge upward at the arrow marking on the Inflator to remove from the Inflator.
- Press "Reset/On" button to turn the gauge on. Wait approximately 2 seconds for the gauge LCD display to read 0.0.
- Press the Digital Tire Pressure Gauge firmly onto the tire stem/valve to measure the tire pressure.
- Press the "Reset/On" button to reset the gauge before next use.
- The gauge will automatically shut off after 15 seconds. To use again, repeat steps 2 and 3.
CHANGING DIGITAL TIRE PRESSURE GAUGE FORMAT
The removable Digital Tire Pressure Gauge can be used to monitor air pressure when inflating tires, can shut off the Inflator automatically to the desired air pressure and can also be used as a separate tire gauge.
SOME VERY IMPORTANT INFORMATION ON THE OPERATION OF YOUR DIGITAL TIRE PRESSURE GAUGE
The Digital Tire Pressure Gauge is capable of reading air pressure in the following formats: PSI, BAR, KG/CM ^2 and KPA. The North American standard format is PSI and the gauge is preset at the factory in the PSI mode. To change the output mode from PSI to one of the other modes:
- Press "Reset/On" to switch on the gauge. Wait approximately 2 seconds for the gauge LCD display to read 0.0.
- Hold down "Reset/On" for 3 seconds until the display flashes.
- Press "Reset/On" repeatedly to select desired unit of measure: PSI, BAR, KG/CM² or KPA.
- After selecting the mode, the gauge will reset in the mode selected and will read the output mode in small letters at the top of the LCD Display. (PSI, BAR, KG/CM ^2 or KPA).
- When pumping there is approximately 1 to 2 PSI difference between the tire pressure and the display figure due to the air hose back pressure.
- The digital gauge display will be subject to fluctuation while pumping.
- The digital gauge will automatically shut off in 15 seconds when the pressure is under 3 PSI.
- When the batteries in the Digital Tire Pressure Gauge are getting low, the Low Battery Indicator will remain on in the upper right hand corner of the LCD Display when the gauge is functioning. To replace batteries, remove the small Phillips screw in the battery cover on the back of the gauge. The screw is located above the indents/markings in the battery cover. Replace with two (2) #LR44 watch style batteries.
- Replace all batteries of a set at the same time.
- Clean the battery contacts and also those of the device prior to battery installation.
- Ensure the batteries are installed correctly with regard to polarity (+ and -).
- Remove batteries from equipment which is not to be used for an extended period of time.
- Remove used batteries promptly.
Battery Contains Mercury. Do Not Put in Trash. Recycle or Manage as Hazardous Waste.
Do not mix alkaline, standard (Carbon-Zinc), or rechargeable (Nickel Cadmium) batteries
MAINTENANCE
Cleaning
- Turn the On/Off switch to Off and unplug the cord.
- Wipe exterior plastic and metal parts clean using damp cloth. Do not get moisture or water into interior moving parts.
- Any other servicing should be performed by a qualified service representative.
TROUBLESHOOTING
WARNING: Risk of Unsafe Operation. Voltage sources, moving parts, or compressed air sources are exposed when repairing the inflator. Personal injury can occur. Unplug the inflator before attempting the repairs.
| PROBLEM | CAUSE | CORRECTION |
| Motor will not run. | Blown Fuse | 1. Check fuse in end of 12 Volt plug. See diagram below.2. Check automobile fuse for 12 Volt receptacle. |
| Faulty motor | Contact 1-800-874-5771 |
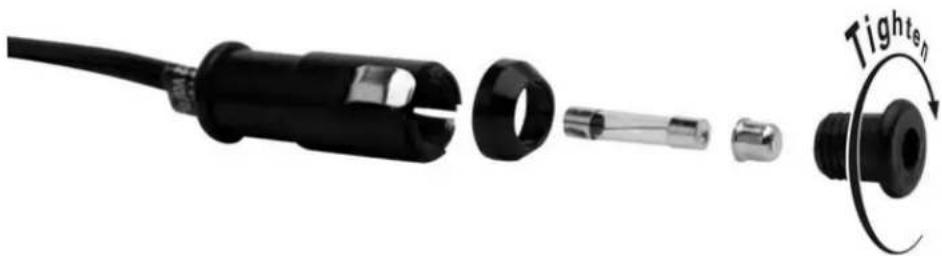
natural_image
Exploded view of a black cable connector with a tighter tip, showing internal components and a circular arrow labeled 'Tighten' (no text or symbols on the diagram itself)SPECIFICATIONS
Model No. 75114
Working amperage at 32 PSI: 9.8A
Max amperage: 15A
.35 SCFM @ 30 PSI
Get it fixed, at your home or our
Your Home
For troubleshooting, product manuals and expert advice:

managemylife
www.managemylife.com
For repair – in your home – of all major brand appliances, lawn and garden equipment, or heating and cooling systems, no matter who made it, no matter who sold it!
For the replacement parts, accessories and owner's manuals that you need to do-it-yourself.
For Sears professional installation of home appliances and items like garage door openers and water heaters.
1-800-4-MY-HOME®
Call anytime, day or night
(1-800-469-4663)
(U.S.A. and Canada)
www.sears.com
www.sears.ca
Our Home
For repair of carry-in items like vacuums, lawn equipment, and electronics, call anytime for the location of the nearest
Sears Parts & Repair Service Center
1-800-488-1222 (U.S.A.) 1-800-469-4663 (Canada)
www.sears.com
www.sears.ca
To purchase a protection agreement on a product serviced by Sears
1-800-827-6655 (U.S.A.)
1-800-361-6665 (Canada)
® Registered Trademark / ™ Trademark of KCD IP, LLC in the United States, or Sears Brands, LLC in other countries
- TABLE OF CONTENTS
- WARRANTY
- CRAFTSMAN ONE YEAR FULL WARRANTY
- For warranty coverage details to obtain free replacement, visit the web site: www.craftsman.com
- REPLACEMENT PARTS
- SAFETY GUIDELINES - DEFINITIONS
- IMPORTANT SAFETY INSTRUCTIONS
- SAVE THESE INSTRUCTIONS
- HAZARD
- WARNING: Risk of Bursting
- WARNING: Risk from Flying Objects
- WARNING: Risk to Breathing
- WARNING: Risk of Unsafe Operation
- WARNING: Risk of Injury
- GLOSSARY
- ACCESSORIES
- ASSEMBLY
- Contents of Carton
- To Remove Inflator from Carton
- OPERATION
- Know your Inflator
- Description of Operation
- To inflate vehicle and bicycle tires
- WARNING: Risk of Flying
- To inflate sports ball, air mattress, rubber raft, etc.
- WARNING: Risk of Bursting. Most sports balls with no initial air will fill in less than 10 seconds. Watch sports balls carefully while filling, do not overfill.
- To operate Inflator using the Preset Gauge with Automatic Shut Off feature:
- To operate Removable Digital Tire Pressure Gauge and check air pressure in vehicle tires:
- CHANGING DIGITAL TIRE PRESSURE GAUGE FORMAT
- SOME VERY IMPORTANT INFORMATION ON THE OPERATION OF YOUR DIGITAL TIRE PRESSURE GAUGE
- MAINTENANCE
- Cleaning
- TROUBLESHOOTING
- SPECIFICATIONS
- Get it fixed, at your home or our
- Our Home
Brand : Craftsman
Model : 75114
Category : Compressor