Watch GPS - Sports Watch Swami - Free user manual and instructions
Find the device manual for free Watch GPS Swami in PDF.


| Product Type | Golf GPS Watch |
| Brand | Swami |
| Model | Watch GPS |
| Display Size | 1 inch Transflective |
| Water Resistance | IPX7 |
| Battery Type | 300 mAh coin type rechargeable |
| Battery Life (Golf Mode) | 6.5 hours |
| Battery Life (Time Mode) | 40 days |
| GPS Chipset | SiRF Star III |
| Number of Preloaded Courses | 35,000+ worldwide |
| USB Interface | Supported |
| Accessories Included | USB Cable, Charging Station, User Manual |
| Main Functions | GPS course play, shot distance measurement, electronic scorecard, odometer, stopwatch, alarm, backlight, sunrise/sunset times, manual/auto date/time, 12/24h format, metric/imperial units, DST, language selection |
| Controls | Power/Backlight, OK/Menu, Up, Down |
| Charging Method | Place watch in charging clamp connected to computer USB or AC charger |
| Care Instructions | Ensure charging contacts align; avoid indoor or underwater GPS use; charge when low |
| Safety Precautions | GPS is managed by U.S. DOD; device for leisure only, not for industrial/special measurement; no liability for misuse |
| Warranty | 90 days from purchase; free software updates; replacement for defects |
| Spare Parts / Repairability | Not specified; contact support for replacement under warranty |
Frequently Asked Questions - Watch GPS Swami
User questions about Watch GPS Swami
0 question about this device. Answer the ones you know or ask your own.
Ask a new question about this device
Download the instructions for your Sports Watch in PDF format for free! Find your manual Watch GPS - Swami and take your electronic device back in hand. On this page are published all the documents necessary for the use of your device. Watch GPS by Swami.
USER MANUAL Watch GPS Swami
1. General Description of Hardware ....2
1.1 Basic Specifications ......2
1.2 Accessories List ...... 2
1.3 Screen Display Description ....3
2. Getting Started ....4
2.1 Power On/Off 4
3. Time Mode 4
4. Using Swami on the Course ....5
4.1 Getting Started 5-6
4.2 Play Mode ....7
4.3 Shot Distance 7
4.4 Electronic Score Card ....8
4.5 Odometer 9
4.6 End Round 9
5. Swami Settings ....10
5.1 Alarm 10
5.2 Backlight 11
5.3 Sound 11
5.4 Date/Time 12
5.5 Time Format ....13
5.6 Unit 13
5.7 Daylight Savings Time ....14
5.8 Language 14
5.9 Device Info 15
Caution 15
Using Conditions 15
Charging Swami 16
Warranty 17
Questions & Answers ....17
Registration Card 18
1. General Description of Hardware
1.1 Basic Specifications
| Number of courses stored +35,000 Worldwide |
| Receiving chip SiRF Star III |
| Battery 300 mAh coin type rechargeable |
| Battery Life Golf Mode – 6.5 hours / Time Mode – 40 days |
| USB interface Supported |
| Display size 1” Transflective |
| Water resistant Yes IPX7 |
1.2 Accessories List
- USB Cable - Charging Station - User Manual
1.3 Screen Display Description

Key Description:
• Power/Backlight: Press and hold (3 seconds) to turn the device on and off. Press once to turn on backlight.
- OK/Menu: Press to select menu options and acknowledge messages. Press to switch pages (Green View, Shot Distance, Scorecard, and Odometer) Press and hold to open Main Menu.
• Up: Press to scroll up through menus, holes, and settings.
• Down: Press to scroll down through menus, holes, and settings.
2. Getting Started
2.1 Power On/Off

-
Press and hold Power key for 3 seconds until the power screen appears.
-
The device will show the Start-Up logo first and into the Time Mode screen.
-
To turn off the device, press and hold the Power key.
3. Time Mode

A. Day of Week
B. Time of Day
C. Date
-
From Time Mode page
-
Press Up key to display Stopwatch
• To start Stopwatch, press OK/Menu key
• To pause Stopwatch, press OK/Menu key again.
- To reset the Stopwatch, press and hold Down key.
-
Press Up key again to change 3rd row to display Seconds ☒.
-
Press Up key again to change 3rd row to display Sunset time. Press Up key again to change 3rd row to display Sunrise time.
Note: Date/Time must be set to AUTO for Sunrise/Sunset Feature (See page 12). Satellite connection must be available.
4. Using Swami on the Course (directions on page 6)
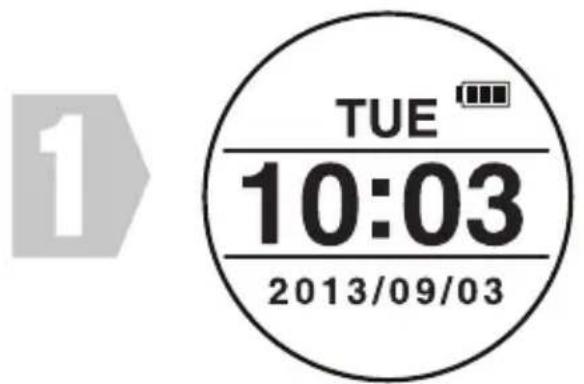
Time Mode Page

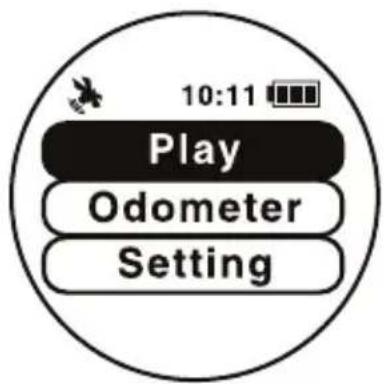
Main Menu Page

Searching for Signal Choose Course


4. Using Swami on the Course (Screen shots on page 5)
4.1 Getting Started
- From Time Mode page, press and hold OK/Menu key to access Main Menu page.
- Use Up or Down key to select Play Golf and press OK/Menu key.
- Device will begin to search for satellite signal, you can press OK/Menu key to cancel request. (Note: When Swami is used for the first time or has not been used for a while, it may take a few minutes to locate satellites. If it has not located them within 5 minutes, please turn watch completely off and try again).
- When device has found the satellite, it will begin auto searching the surrounding courses that the device supports. You can press OK/Menu key to cancel request.
- It will then list the nearest golf courses to choose from. Use Up or Down key to select the golf course, then press OK/Menu key to continue.
- Device will begin Play Mode and start at hole #1, user can press Up or Down key to switch the hole number. (see page 7 for Play Mode screen)
4.2 Play Mode

4.3 Shot Distance

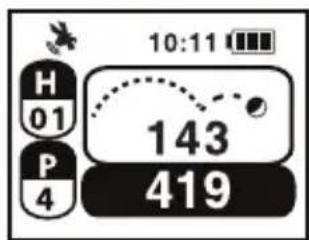
- From Green View page, press OK/Menu key to switch to Shot Distance page.
- Press & hold Down key to reset distance to 0.
- Press & hold Up key to start marking.
- Press & hold Down key to reset when finished.
- Press OK/Menu key twice to return to Play Mode screen.
4.4 Electronic Scorecard

- From Shot Distance screen, press OK/Menu key to switch to Scorecard screen.
- Use Up or Down key to see scorecard for each hole.
- To change the default Par press and hold Down key to access Edit mode. Use Up or Down key to change the par then press OK/Menu key.
- To change the Score press and hold Up key to access Edit mode. Use the Up or Down key to change score for the hole then press OK/Menu key.
- Press OK/Menu key to return to Play Mode screen.
4.5 Odometer


- From Time Mode or Play Mode, press and hold OK/Menu key to access Main Menu.
- Use Up or Down key to select Odometer and press OK/Menu key (Figure A).
- Press Up key to Enable Odometer (Figure B). (Note: Will beep three times when ready)
- Press Up key again to Disable Odometer.
- Press Down key to reset Odometer.
- To exit Odometer, press and hold OK/Menu key to return back to Main Menu.
- Press and hold OK/Menu key again will return back to Time Mode page.
4.6 End Round
- Press and hold OK/Menu key to return back to Main Menu will end the golf round.
- Press and hold OK/Menu key again to return back to Time Mode page.
5. Swami Settings
5.1 Alarm


- From Time Mode page, press and hold OK/Menu key to access Main Menu.
- Use Up or Down key to select Settings and press OK/Menu key.
- Use Up or Down key to select Alarm and press OK/Menu key (Figure A).
- Use Up or Down key to select Alarm 0/Alarm 1/Alarm 2 and press OK/Menu key (Figure B).
- Use Up or Down key to Enable/Disable and press OK/Menu key (Figure C).
- If Enabled, Use Up or Down key to set HH (00 \~ 23) and press OK/Menu key.
- Use Up or Down key to set MM (00 \~ 59) and press OK/Menu key (Figure D).
- Press and hold OK/Menu key to return back to Settings Menu.
5.2 Backlight


- From Time Mode page, press and hold OK/Menu key to access Main Menu.
- Use Up or Down key to select Settings and press OK/Menu key.
- Use Up or Down key to select Backlight and press OK/Menu key (Figure A).
- Use Up or Down key to select Off/5s/10s/30s and press OK/Menu key (Figure B).
- Press and hold OK/Menu key to return back to Settings Menu.
5.3 Buzzer - Turn button sound On/Off

- From Time Mode page, press and hold OK/Menu key to access Main Menu.
- Use Up or Down key to select Settings and press OK/Menu key.
- Use Up or Down key to select Buzzer and press OK/Menu key (Figure A).
- Use Up or Down key to select On/Off and press OK/Menu key.
- Press and hold [OK/Menu] key to return back to Settings Menu.
11 Swami Settings
5.4 Date/Time
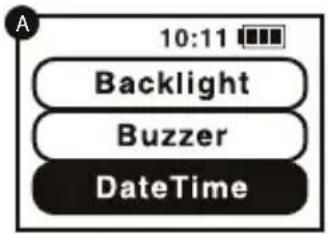
flowchart
graph TD
    A["Backlight"] --> B["Buzzer"]
    B --> C["DateTime"]


- From Time Mode page, press and hold OK/Menu key to access Main Menu.
- Use Up or Down key to select Settings and press OK/Menu key.
- Use Up or Down key to select DateTime and press OK/Menu key (Figure A).
-
Use Up or Down key to select Manual or Auto and press OK/Menu key.
-
If Manual is selected (Figure B):
• Use Up or Down key to select Year and press OK/Menu key.
• Use Up or Down key to select Month and press OK/Menu key.
• Use Up or Down key to select Day and press OK/Menu key.
• Use Up or Down key to select Hours and press OK/Menu key
• Use Up or Down key to select Seconds and press OK/Menu key
- Press and hold OK/Menu key to return back to Settings Menu.
5.5 Time Format
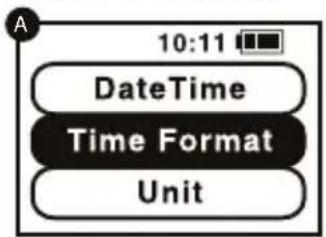
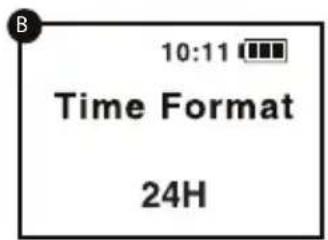
- From Time Mode page, press and hold OK/Menu key to access Main Menu.
- Use Up or Down key to select Settings and press OK/Menu key.
- Use Up or Down key to select Time Format and press OK/Menu key (Figure A).
- Use Up or Down key to set 12H/24H and press OK/Menu key (Figure B).
- Press and hold OK/Menu key to return back to Settings Menu.
5.6 Unit - Change unit of measurement between yards and meters

flowchart
graph TD
    A["10:11"] --> B["DateTime"]
    B --> C["Time Format"]
    C --> D["Unit"]
- From Time Mode page, press and hold OK/Menu key to access Main Menu.
- Use Up or Down key to select Settings and press OK/Menu key.
- Use Up or Down key to select Unit and press OK/Menu key (Figure A).
- Use Up or Down key to select Metric/Imperial and press OK/Menu key.
- Press and hold [OK/Menu] key to return back to Settings Menu.
5.7 Daylight Saving Time

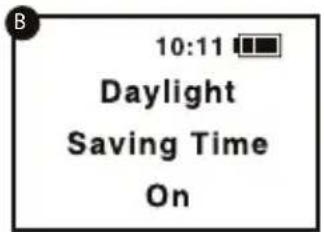
- From Time Mode page, press and hold OK/Menu key to access Main Menu.
- Use Up or Down key to select Settings and press OK/Menu key.
- Use Up or Down key to select DST and press OK/Menu key (Figure A).
- Use Up or Down key to select On/Off and press OK/Menu key (Figure B) On = current time minus 1 hour.
- Press and hold OK/Menu key to return back to Settings Menu.
5.8 Language

- From Time Mode page, press and hold OK/Menu key to access Main Menu.
- Use Up or Down key to select Settings and press OK/Menu key.
- Use Up or Down key to select desired Language and press OK/Menu key (Figure A).
- Press and hold OK/Menu key to return back to Settings Menu.
5.9 Device Info

- From Time Mode page, press and hold OK/Menu key to access Main Menu.
- Use Up or Down key to select Settings and press OK/Menu key.
- Use Up or Down key to select Device Info and press OK/Menu key.
CAUTION
Global Position System (GPS) was developed and is managed by United States Department of Defense (DOD) that is responsible for its normal operation and position precision control; the U.S. is entitled to affect function or position precision of the whole system without prior notification or announcement based on its political considerations or safety of national defense.
In order to use SWAMI Watch correctly and safely, you must be aware of some specific knowledge; please read the following attentions in the manual prior to operating the device:
- SWAMI Watch was only designed for the purpose of leisure and recreation and it isn't applicable for industrial or special measurement.
- SWAMI Watch is only an auxiliary device, so we will not take any legal liability of accidents due to mistaken operation or wrong judgment by using SWAMI Watch for measurement.
Using Conditions
As Swami Watch uses GPS, the GPS features are available only in the places that can receive satellite signals, excluding places indoor or in water.
Charging Swami Watch
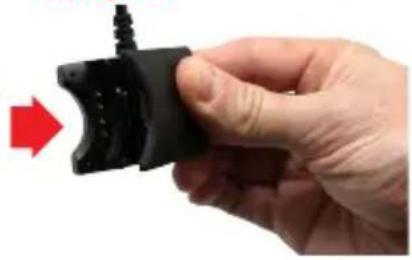
- Place Swami Watch inside clamp on Swami Watch Charger (Image A). Insert USB end into computer or AC Charger.
- Make sure that the charging ports on the back of the watch (Image B) are matched up with the prongs on the bottom of the charging clamp (Image C).
- Charger will clamp securely over Swami Watch when connected correctly (Image D).
- Charging Icon will appear in top right corner of screen to indicate a charge (Image E).
Charging Station

natural_image
Black cable with connector and connector, no visible text or symbolsImage B

natural_image
Close-up of a black smartwatch with a red annotation highlighting a specific sensor or button (no text or symbols visible)
Image C

natural_image
Close-up of a hand holding a black handheld device with a red rectangular overlay highlighting a small grid of pins (no text or symbols visible)Image A
natural_image
Hand holding a black plastic object with a red arrow pointing to it, no visible text or symbols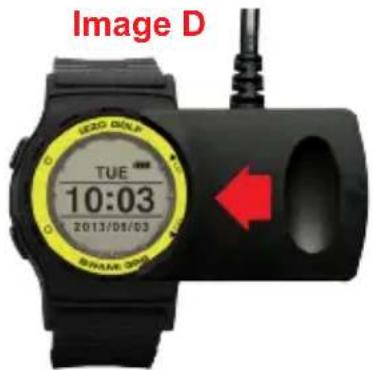
Image E

Warranty / Return Policy
SWAMI is warranted to be free from defects for up to 90 days from your purchase date. Software updates are free of charge. Izzo cannot refund your purchase. Izzo will replace any defective unit within the warranty period. Please call Swami Support at 800-777-7899 to request a Return Authorization. All defective product must be returned to:
Izzo Golf
1635 Commons Parkway
Macedon, NY 14502
Please include a note with your Name, Address, Phone # and the Return Authorization #. Your replacement SWAMI will be shipped once we receive and diagnose the returned unit.
QUESTIONS & ANSWERS
For U.S. customers, if you have any other questions or concerns, please call 1-800-777-7899 or go to www.IZZO.com.
For U.K. customers, If you have any other questions or concerns, please call 01342 836376 or email richard@skymaxsport.co.uk.
For EU customers, if you have any other questions or concerns, please call +44 (0)844 8717775 or email customerservice@secondchance.co.uk.

SWAMI
GOLF GPS WATCH
IZZO
GOLF
REGISTER YOUR SWAMI WATCH
FILL OUT THE INFORMATION BELOW OR GO TO WWW.IZZO.COM/SWAMIREGISTRATION
NAME: ____
ADDRESS:
EMAIL:
PHONE: ( ) ____
DATE PURCHASED: ____ / ____ / ____


SWAMI
GOLF GPS WATCH
IZZO
GOLF
MAIL TO: IZZO GOLF
1635 COMMONS PKWY
MACEDON, NY 14502-9191
[ PLEASE PLACE INSIDE ENVELOPE ]
- General Description of Hardware ....2
- Getting Started ....4
- Time Mode 4
- Using Swami on the Course ....5
- Swami Settings ....10
- General Description of Hardware
- Basic Specifications
- Accessories List
- Screen Display Description
- Key Description:
- Getting Started
- Power On/Off
- Time Mode
- Using Swami on the Course (directions on page 6)
- Using Swami on the Course (Screen shots on page 5)
- Getting Started
- Play Mode
- Shot Distance
- Electronic Scorecard
- Odometer
- End Round
- Swami Settings
- Alarm
- Backlight
- Buzzer - Turn button sound On/Off
- Swami Settings
- Date/Time
- Time Format
- Unit - Change unit of measurement between yards and meters
- Daylight Saving Time
- Language
- Device Info
- CAUTION
- Using Conditions
- Charging Swami Watch
- Warranty / Return Policy
- QUESTIONS & ANSWERS
- SWAMI
- GOLF GPS WATCH
- IZZO
- GOLF
- REGISTER YOUR SWAMI WATCH
- FILL OUT THE INFORMATION BELOW OR GO TO WWW.IZZO.COM/SWAMIREGISTRATION
Brand : Swami
Model : Watch GPS
Category : Sports Watch