
Salara M - Projection screen Draper - Free user manual and instructions
Find the device manual for free Salara M Draper in PDF.


| Product Type | Projection Screen |
| Brand | Draper |
| Model | Salara M |
| Screen Material Options | Matt White, High Contrast Grey, Glass Beaded |
| Operation Type | Manual pull-down with Standard or AutoReturn mechanism |
| Mounting | Wall or ceiling flush mount with included brackets |
| Case Material | Extruded aluminum |
| Viewing Surface Care (Matt White & High Contrast Grey) | Mild dishwashing liquid diluted with warm water, rinse and blot dry |
| Viewing Surface Care (Glass Beaded) | Soft brush or cloth only; no soap, water, solvents or abrasives |
| Safety Feature | Slow retraction to reduce risk of injury from falling screen |
| Installation Requirement | Level mounting, reinforced surface to support screen weight |
| Included Accessories | Mounting brackets (2), installation instructions |
| Patent Status | Patent Pending |
| Manufacturer | Draper Inc., Spiceland, Indiana, USA |
| Compliance | Tested at factory prior to shipment |
Frequently Asked Questions - Salara M Draper
User questions about Salara M Draper
0 question about this device. Answer the ones you know or ask your own.
Ask a new question about this device
Download the instructions for your Projection screen in PDF format for free! Find your manual Salara M - Draper and take your electronic device back in hand. On this page are published all the documents necessary for the use of your device. Salara M by Draper.
USER MANUAL Salara M Draper
Installation Instructions
Salara/Series M by Draper
Patent
Pending
Caution
① Read and understand these instructions; keep them for future reference. Follow instructions carefully.
② Care in both mounting and correct operation will mean long and satisfactory service from your Draper screen.
③ Locate the screen where the audience can best see it, and where other room fur nish ings permit.
④ Mount the screen so that the bottom of the picture, when screen is fully extended, will be above the heads of viewers.
⑤ When raising screen, pull down and, while holding, allow for slow retraction into the case to reduce risk of injury from falling screen.
⑥ Screen should be installed level (using a carpenter's level).
⑦ Nothing should be fastened to screen dowel or viewing surface.
NOTE: Screen has been thoroughly inspected and tested at factory and found to be operating prior to shipment.
Wall/Ceiling Flush Mounting
① Attach Mounting Brackets to wall or ceiling (see Fig. 1). The installer should furnish screws, toggle bolts, molly bolts, nylon or lead anchors as required by the mounting surface. Installer also needs to ensure the mounting surface is reinforced sufficiently to support the screen. Brackets must be level with each other.
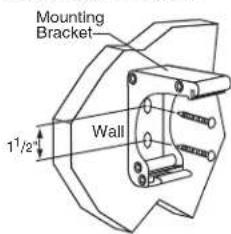
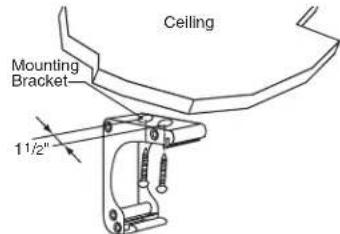
Figure 1
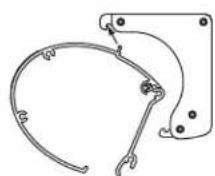
② Attach the screen by snapping the extrusions on the back of the case onto the brackets. With the lower edge of the screen case tilted away from the wall, engage the rib on top of the case with the slot on each bracket. Slide the screen case along the brackets to adjust the screen location from left to right if necessary (see Fig. 2). Once the case is in position, pivot the case back toward the brackets until the lower edge of the case "snaps" into place with the spring-loaded latch (see Fig. 3).
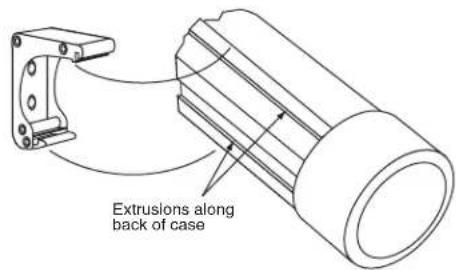
Figure 2
1
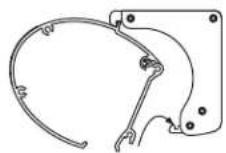
2
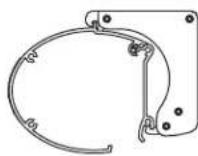
3
Figure 3
Operating Instructions—Standard
To lower picture surface, pull screen down. Hesitate—then allow screen to retract very slowly until it locks in place.
⚠ To raise picture surface, pull screen down and, while holding, allow for slow retraction into the case to reduce risk of injury from falling screen.
Operating Instructions—AutoReturn
To lower picture surface, pull screen down. Hesitate—then allow screen to retract very slowly until it locks in place.
To raise picture surface, pull screen down gently until it stops, then release.
Dimensions

Viewing Surface Care & Maintenance
Matt White & High Contrast Grey
Clean surface with a solution of mild dishwashing liquid diluted with warm water. Sponge the surface, rinse with clear water and blot dry. Do not use cleaning solvents or abrasives.
Glass Beaded
Clean with a very soft brush or cloth and care fully dust the surface. DO NOT USE SOAP, WATER, SOLVENTS OR ABRASIVES. These substances will damage a glass beaded viewing surface.
DRAPER®
411 S. Pearl St., Spiceland, IN 47385 USA ■ 765-987-7999
www.draperinc.com ■ fax 765-987-7142
Copyright ©2010 Draper Inc. Form SalaraM_Inst10 Printed in U.S.A.
If you encounter any diffi culty installing or ser vic ing your Salara, call your dealer or Draper, Inc., Spiceland, Indiana, (765) 987-7999; or fax (765) 987-7142.
Brand : Draper
Model : Salara M
Category : Projection screen