LED24VF60 - Television Viore - Free user manual and instructions
Find the device manual for free LED24VF60 Viore in PDF.


| Product Type | 24" LCD Television with LED Backlight |
| Model | LED24VF60 |
| Screen Size (Diagonal) | 24 inches (61.0 cm) |
| Native Resolution | 1920 x 1080 (Full HD) |
| Panel Brightness | 300 cd/m² |
| Contrast Ratio | 1000:1 |
| TV Tuner | Integrated ATSC (Digital) / NTSC (Analog) |
| Input Connectors | 2 x HDMI, 1 x VGA, 1 x Component (YPbPr), 1 x Composite (AV), 1 x RF, 1 x USB (Service Only) |
| Output Connectors | 1 x Digital Coaxial (Coax), 1 x Headphone |
| Audio Output | Built-in speakers (stereo) |
| Power Supply | DC 12V, 5A (External Adapter) |
| Power Consumption | 60W (Max) |
| Dimensions (Approx, without stand) | 21.7 x 12.6 x 1.7 inches (551 x 320 x 43 mm) |
| Weight (Approx, without stand) | 5.5 lbs (2.5 kg) |
| VESA Mount Compatible | Yes, 100 x 100 mm, M4 screws (max 10mm length) |
| Remote Control | Infrared, uses 2 x AAA batteries (not included) |
| Energy Efficiency | Energy Saving Eco TV |
| Safety Certifications | UL (UL STD. 60065), FCC Compliant |
| Maintenance | Clean with soft dry cloth; do not use solvents |
| Environmental Compliance | RoHS, WEEE (Recyclable) |
| Included Accessories | Remote control, power adapter, user manual |
| Wall Mount Type | VESA 100x100mm (bracket not included) |
Frequently Asked Questions - LED24VF60 Viore
User questions about LED24VF60 Viore
0 question about this device. Answer the ones you know or ask your own.
Ask a new question about this device
Download the instructions for your Television in PDF format for free! Find your manual LED24VF60 - Viore and take your electronic device back in hand. On this page are published all the documents necessary for the use of your device. LED24VF60 by Viore.
USER MANUAL LED24VF60 Viore
OPERATING INSTRUCTIONS
24" 1080p LCD Television with LED backlight
LED24VF60

natural_image
Front view of a black VIORE TV monitor with a blank screen (no visible text or symbols on the screen body)AIR (TV)/CABLE MODE SELECTION
The Air/CABLE menu option is set to the "CABLE" (Cable Television) mode at the factory. If you want to use an antenna for the built-in TV tuner, this menu option must be set to the "Air" mode. Please refer to page 19 of the owner's manual for the details of this menu.

Contents
| Caution | 2 |
| Safety Information | 3 |
| Unit and Accessories | 4 |
| Product Feature | 4 |
| Introduction | 5-8 |
| 1. Front View | 5 |
| 2. Rear View | 6 |
| 3. Remote Control | 7-8 |
| Connection | 9-11 |
| Basic Operation | 12-13 |
| OSD Menu | 14-20 |
| 1. Picture menu | 14 |
| 2. Audio menu | 15 |
| 3. Time menu | 16 |
| 4. Setup menu | 17 |
| 5. Lock menu | 18 |
| 6. Channel menu | 19-20 |
| Simple Troubleshooting | 21 |
| Technical Specifications | 22 |
Caution
The lightening flash with arrowhead symbol, within an equilateral triangle is intended to alert the user to the presence of un-insulated "dangerous voltage" within the products enclosure that may be of sufficient magnitude to constitute a risk of electric shock to the persons.

The exclamation point within an equilateral triangle is intend to alert the user to the presence of important operating and maintenance (servicing) instructions in the literature accompanying the appliance.

Correct disposal of this Product
(Waste Electrical & Electronic Equipment (WEEE)
Your product is designed and manufactured with high quality materials and components which can be recycled and reused.
This symbol means that electrical and electronic equipment, at their end-of-life should be disposed of separately from your household waste.
Please dispose of this equipment at your local community waste collection/recycling centre.
In the USA there are separate collection systems for used electrical and electronic products. Please help us to conserve the environment we live in!

This unit complies with America Safety directives.
3124140 CONFORMS TO UL STD. 60065

This unit complies with FCC directives.
Safety Information
To ensure reliable and safe operation of this equipment, please read carefully all the instructions in this user guide, especially the safety information below.
Electrical safety
- The TV set should only be connected to a mains supply which matches that stated on the label on the mains adaptor
-
To prevent overload, don't share the same mains supply socket with too many other items of equipment.
-Do not place any connecting wires where they may be stepped on or tripped over.
-Do not place heavy items on the leads, which may damage them.
-Hold the Mains plug, not the wires, when removing from a socket.
-During a thunderstorm or while leaving the TV for long periods, disconnect the aerial (if outdoor) and mains adaptor from the supply.
-Do not allow water or moisture to enter the TV or mains adaptor. Do NOT use in wet or moist areas such as Bathrooms, steamy kitchens or near swimming pools. -
Pull the plug out immediately, and seek professional help if:
-the mains plug or cable is damaged
-liquid is spilt onto the set, or if it is accidentally exposed to water or moisture
-anything accidentally penetrates the ventilation slots
-the set does not work normally.
-Do NOT remove the safety covers. There are no user serviceable parts inside.
You may invalidate the warranty. Qualified personnel only are permitted to service this apparatus.
-To avoid battery leakage, remove exhausted batteries from the remote control handset, or when not using for along period.
-Do NOT break open or throw exhausted batteries on a fire.
Physical safety
- Do NOT block ventilation slots in the back cover. You may place the TV in a cabinet, but ensure at least 5cm (2") clearance all around the unit.
- Do NOT tap or shake the TV screen, you may damage the internal circuitry. Take good care of the remote control, do not drop it or allow it to come into contact with liquids.
- To clean the TV use a soft dry cloth. Do NOT use solvents or petrol based fluids. For stubborn stains, you may use a damp soft cloth with diluted detergent.
Unit and Accessories
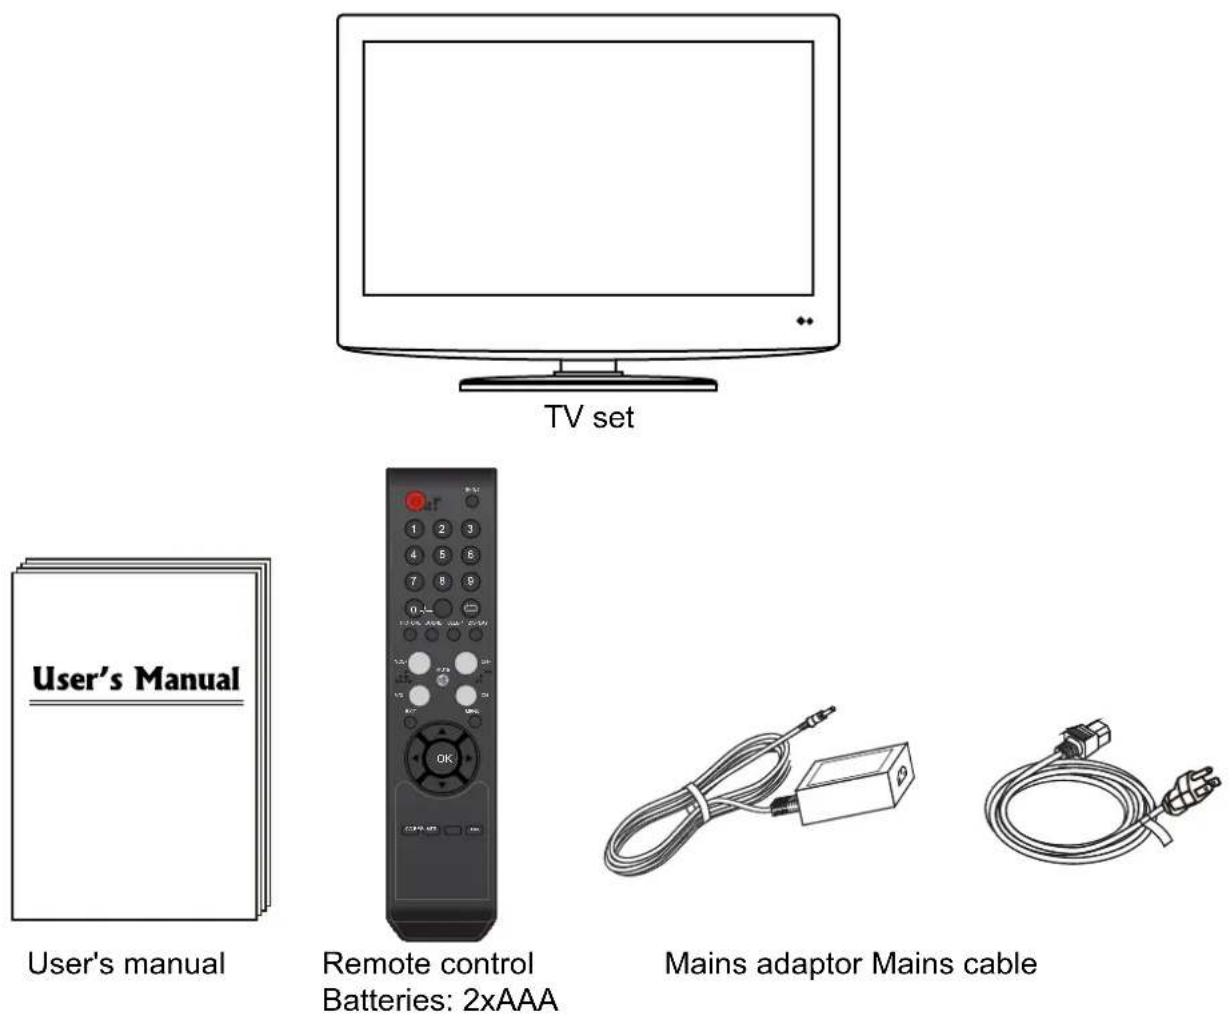
Product Feature
- 21.6" (measured diagonally) wide screen for a complete home theater experience
- Energy Saving Eco TV – more natural colors and better picture quality than conventional LCD TVs with less power consumption
• Made of 95% recyclable materials
• 1920 x 1080 native resolution for Full-HD (1080p) performance - Integrated ATSC TV tuner for HDTV broadcast reception
- Dual HDMI input for true digital connections
• VGA port for connection to PC
Introduction
1. Front View

- (IR) Infrared Receiver: Receives IR signals from the remote control. (Power on/Standby)LED Indicator: Press POWER to turn on and off.
Indicator on(Red)
Indicator on(Green)
Standby mode
Power on mode
The effective receiving range for the signal is 5-8 metres from the front of the remote control window, and 30^ to the left or right side and 20^ above or below the remote control window.
- The functions of the buttons:
INPUT: Press to display the input source menu.
MENU: Press to display the OSD menu, press again to exit the menu.
CH+/-: Press to scan through channels.
VOL+/-: Press to adjust the volume.
POWER: Turn on/standby the TV set.

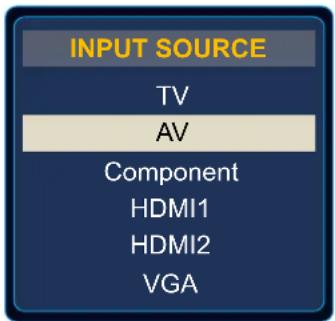
Press INPUT button on the TV set or remote control to display the input source menu, and use CH+/- button on the TV set or ∧ / ∨ button on remote control to select the input source, press OK button on the remote control to enter.
Note: Before you select the input source, make sure the connections are prepared.
- Rear View

- POWER: Connect to the mains adaptor.
- USB: For update the soft.
- HDMI1/2: Connect it to the HDMI of DVD or other equipment.
- VGA: For PC display. Connect it to the D-Sub 15 pins analog output connector of the PC.
- PC-IN: Connect it to the audio output terminal of PC.
- Coax: Digital coaxial output.
- Headphone: Connect it to your headphone or other audio equipment.
- YPbPr: Connect them to the YPbPr video output terminal of DVD.(used in component source)
- VIDEO: Connect it to video output terminal of DVD.
- R/L in: Connect them to the audio output terminal of DVD.(shared with YPbPr)
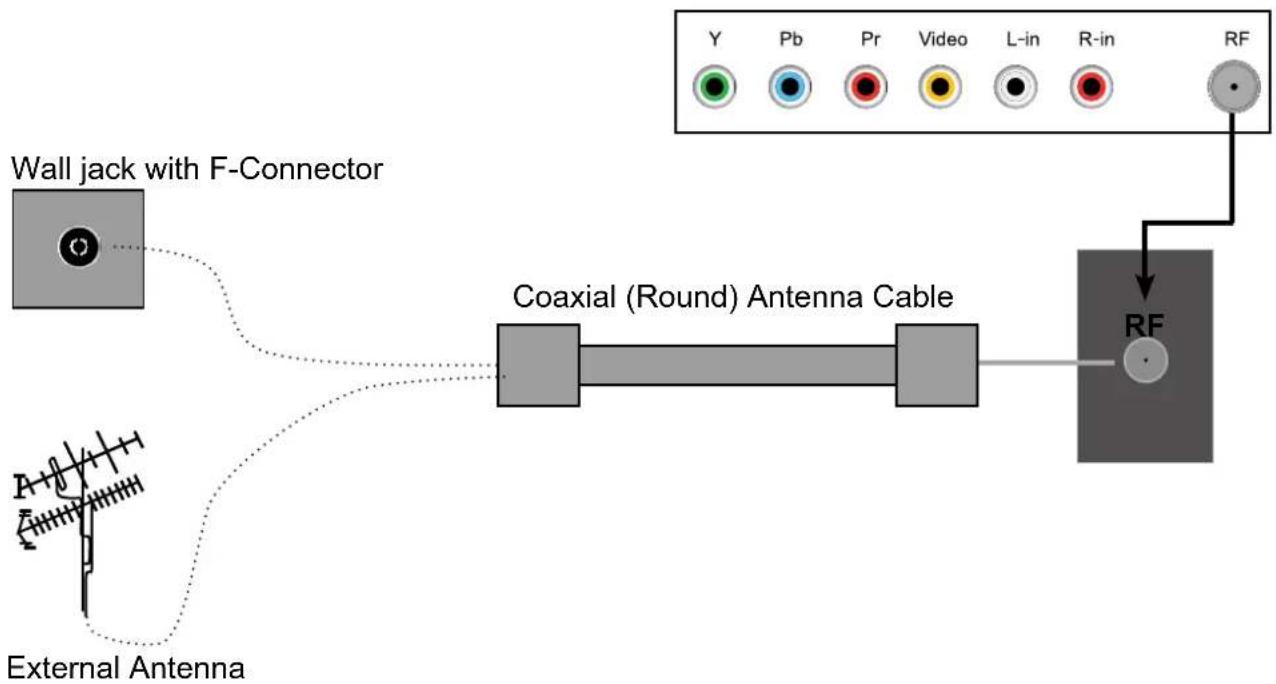
- RF: Connect antenna or cable 75 Ohm coaxial to receive TV signal.
Wall Mounting
The TV is provided with mounting holes for a VESA approved wall mounting bracket (NOT SUPPLIED). Remove the pozi screws holding the base to the base bracket and lift the base away (do not remove the base mounting bracket). Mount the VESA bracket using 4 x M4 x10 Iso metric threaded screws (not supplied). Do not use screws longer than 10 mm, damage will occur to the internal parts. Fit the wall bracket securely following the manufacturer's instructions.
3. Remote Control
The remote control is using Infra-Red(IR). Point it towards the front of the LCD TV. The remote control may not work correctly if it is operated out of range or out of angle.
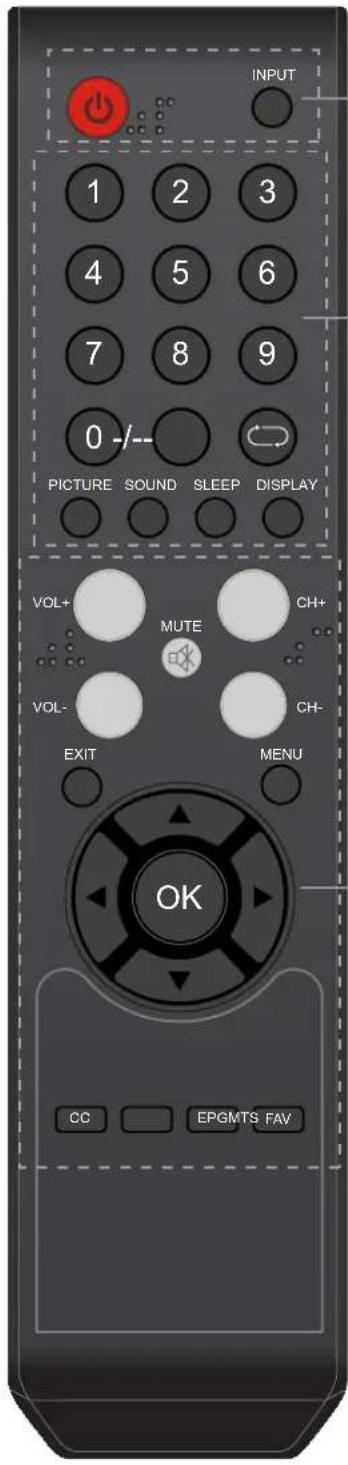
POWER(red button): Turn the TV on/standby.
INPUT: Press to display the input source menu.
Number Buttons: Choose channel directly.
Select channel 5, Press button "5";
Select channel 62, Press button "6", then press button "2" in 2 seconds;
Select channel 151, Press button "1", and press button "5" in 2 seconds, and press button "1" in 2 seconds;
Select channel 5-1, Press button "5", and press button "- / --" in 2 seconds, and press button "1" in 2 seconds;
(RETURN): Return to the previous channel viewed.
PICTURE: Press repeatedly to cycle through the available video picture modes.
SOUND: Press to cycle through the different sound settings.
SLEEP : Shutdown timer.
DISPLAY: Display the information of current mode.
VOL+/-: Press to adjust the volume.
CH+/-: Press to scan through channels.
MUTE: Press to mute the sound, press again or press VOL+ to unmute.
MENU: Press to display the OSD menu.
EXIT: Press to exit the OSD menu.
Thumbstick(< > ^) : Allows you to navigate the on-screen menus and adjust the system settings to your preference.
OK: CONFIRM button.
CC: Press to display the closed caption.
MTS: Press to select the audio channels.
EPG: Press to enter the EPG menu directly.
FAV: Press to add or remove favorite channel.
Installing Batteries
- Open the battery compartment cover on the back of the remote control.
-
Insert two 1.5V AAA size batteries observing the polarity markings inside the battery compartment. Don't mix different types or used batteries with new ones.
-
Close the cover.

Batteries shall not be exposed to excessive heat such as sunshine or fire.
- The remote control should be operated within 30 feet(7m) and 30^0 to the left and right of the IR receive at the front of the LCD TV.
- Used batteries should be disposed properly.

flowchart
graph TD
    A["Top Section"] --> B["Top Section with Component 1"]
    B --> C["Bottom Section with Component 2"]
    C --> D["Bottom Section with Component 3"]
    D --> E["Bottom Section with Component 4"]
Connection
Power Cord Connection

- Connect to the power supply correctly as shown with the mains cable and mains adaptor.
- When you connect the power, the TV set comes into standby mode and the LED indicator (Page 5) lights red.
- You could bring the TV out of standby mode by press the POWER button on TV set (page 5) or remote control(page 7), and the LED indicator lights green.
Antenna (RF) Connection
flowchart
graph LR
    A["External Antenna"] --> B["Coaxial (Round) Antenna Cable"]
    B --> C["RF"]
    D["Wall jack with F-Connector"] -.-> B
    E["Y"] --> F["Pb"]
    G["Pr"] --> H["Video"]
    I["L-in"] --> J["R-in"]
    K["RF"] --> L["RF"]
Press INPUT button on the remote control to display the input source menu, press ∧/∨ button to select TV, then press OK button to confirm, and you will receive the signal.
AV Input Connection
Note: All cables shown are not included with the TV.

- Connect the VIDEO and AUDIO output jacks on the DVD or VCR to the AV IN jacks on the TV set with a RCA cable.
- Match the jacks colors: Video=yellow, Audio left=White, Audio right=red.
- Turn on the DVD/VCR, and select "AV" in the input source menu.
YPbPr Connection
Note: All cables shown are not included with the TV.

- Connect the YPbPr output jacks on the DVD or VCR to the YPbPr input jacks on the TV set with a YPbPr cable. The picture quality is improved compared to a regular VCR to the video input.
- Match the jacks colors: Y=Green, Pb=Blue, Pr=red.
- Connect the audio output jacks on the DVD or VCR to the audio input jacks on the set with an audio cable.
- Turn on the DVD/VCR, and select "YPbPr" in the input source menu.
HDMI Connection
Note: All cables shown are not included with the TV.

- Connect the HDMI jack on the DVD to the HDMI jack on the TV set with a HDMI cable.
- Turn on the DVD, and select "HDMI1/2" in the input source menu.
- HDMI (High Definition Multimedia Interface) is the first all digital consumer electronics A/V interface that supports uncompressed standard. One jack supports both video and audio information.
PC Connection
Note: All cables shown are not included with the TV.

- If using a sound card, adjust the PC sound as required.
- Set the video resolution of your PC to 1024x768, 60Hz on its original monitor.
Make the connections between the TV monitor and your PC, switch on the monitor before booting the PC.
You can now set your preferred resolution from the choice supported.
See the table of supported resolutions on the right.
| Supported PC resolutions |
| 640 x 480, 60 Hz |
| 640 x 480, 72 Hz |
| 640 x 480, 75 Hz |
| 800 x 600, 75 Hz |
| 800 x 600, 60 Hz |
| 800 x 600, 72 Hz |
| 1024 x 768, 60 Hz |
| 1024 x 768, 70 Hz |
| 1024 x 768, 75 Hz |
| 1920 x 1080, 60Hz |

- Connect the RGB jack on the PC to the VGA jack on the TV set with a VGA cable.
- Connect the audio output jack on the PC to the PC IN jack on the TV set with a stereo audio cable.
- Turn on the PC, and select "VGA" in the input source menu.
Basic Operation
Power on/off
- Connect to the power with a mains cable and an adaptor (page9).
2.-To turn on the TV
Press POWER button on the TV or remote control.
-To turn off the TV
Press POWER button on the TV or remote control.
Input Source select
Press INPUT button on the TV set or remote control to display the input source menu, and use CH+/- button on the TV set or ∧/∨ button on remote control to select the input source, press OK button on the remote control to enter.
Note: Before you select the input source, make sure the connections are prepared.
Basic buttons on the remote control
POWER(red button): Turn the TV on/standby.
INPUT : Press to display the input source menu.
Number Buttons: Choose channel directly.
Select channel 5, Press button "5";
Select channel 62, Press button "6", then press button "2" in 2 seconds;
Select channel 151, Press button "1", and press button "5" in 2 seconds, and press button "1" in 2 seconds;
Select channel 5-1, Press button "5", and press button "- / --" in 2 seconds, and press button "1" in 2 seconds;
(RETURN): Return to the previous channel viewed.
PICTURE: Press repeatedly to cycle through the available video picture modes.
SOUND: Press to cycle through the different sound settings.
SLEEP: Shutdown timer.
DISPLAY: Display the information of current mode.
VOL+/-: Press to adjust the volume.
CH+/-: Press to scan through channels.
MUTE: Press to mute the sound, press again or press VOL+ to unmute.
MENU: Press to display the OSD menu.
EXIT: Press to exit the OSD menu.
Thumbstick(< > ^) : Allows you to navigate the on-screen menus and adjust the system settings to your preference.
OK: CONFIRM button.
Basic OSD Menu operation
Press MENU button to display the OSD menu as below:

Use < / > button to select the main menu, and press button to enter the submenu. In the submenu, use / button to select the function item, and you could:
adjust ("Contrast" item in Picture menu for example) with < / > button; select ("Picture Mode" item in Picture menu for example) with < / > button; enter the submenu ("Close Caption" item in Setup menu for example) with > button.
* (Press MENU button to return to the upper menu.)
* (Press EXIT button to exit the menu display.)
Note1: Only when you input the suitable signal, the relevant items can be activated Note2: Please operating the OSD menu according to hint on the bottom of the banner.
OSD Menu
1. Picture menu

Description
Picture mode: Select between Standard, Dynamic, Mild, Sports and User.
You may select the picture mode directly by pressing the PICTURE button on the remote control.
Contrast: Control the difference between the bright and dark regions of the screen picture.
Brightness: Adjust brightness of the picture.
Color: Adjust color of the picture.
Tint: Control the fresh tones to make them appear natural.
Sharpness: Set the amount of fine detail in the picture.
Color Temp.: Select between Normal, Cool and Warm.
2. Audio menu

Description
Sound Mode: Select your desired picture mode as follow: Flat, Music, Movie, Sports and User You may select the sound mode directly by pressing the SOUND button on the remote control.
Bass: Low frequencies intensity.
Treble: High frequencies intensity.
Balance: Left and right stereo audio channels balance.
Surround: Activate or deactivate the Surround function.
Audio Language: Select audio language.
3. Time menu
Description
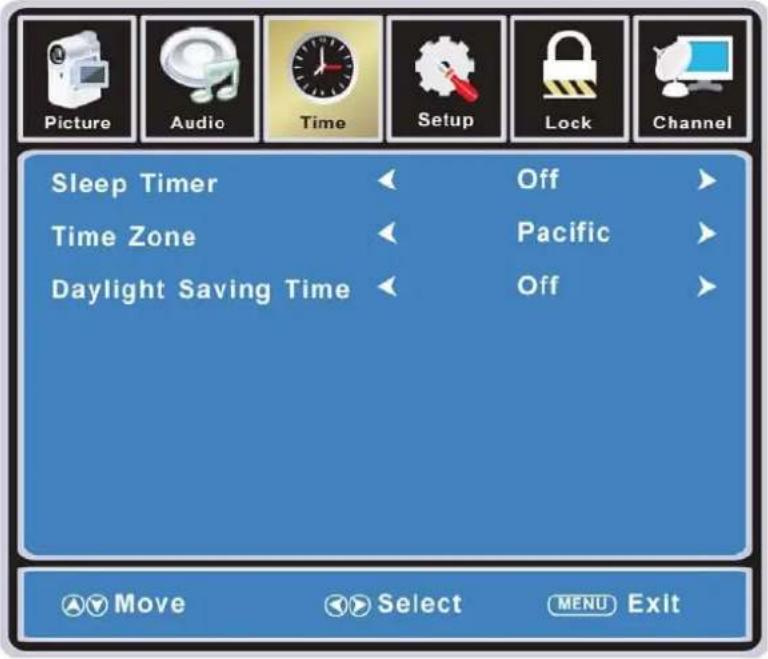
Sleep timer: You may set the automatic shutdown timer choosing from 5 to 240 minutes, or deactivate this function.
Time zone: Select between Pacific, Alaska, Hawaii, Eastern, Central and Mountain.
Daylight Saving Time: Select between On and Off.
4. Setup menu
Description
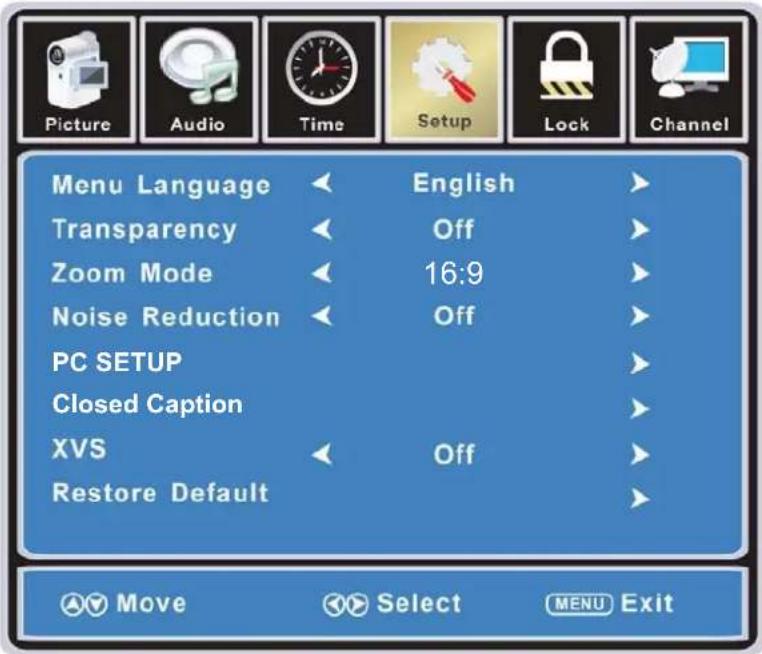
Menu Language: Select OSD menu language.
Transparency: Turn on or off the transparency menu function.
Zoom Mode: Select the zoom mode between 16:9, 16:9 zoom, 4:3, 4:3 zoom.
Noise reduction: Select the noise reduction mode between Strong, Off, Weak and Middle.
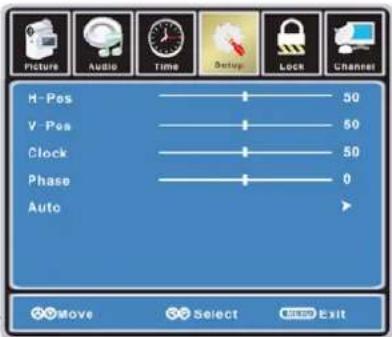
PC SETUP: If the video input signal comes from your PC, you may adjust the V-Position, H-Position, Frequency, Phase or even perform an Auto adjustment.
Closed Caption:
CC Mode: Allow you to select the CC Mode among: On, Off and CC on Mute.
Basic Selection: Allow you to select the basic selection among: CC1, CC2, CC3, CC4, Text1, Text2, Text3 and Text4.
Advanced Selection: Allow you to select the advanced selection among: Service1, Service2, Service3 Service4, Service 5 and Service 6.
Option: Use thumbstick buttons to operating in option menu as your desire.


XVS: Activate / deactivate the automatic dynamic brightness function.
Restore Default: Restore all settings in SETUP menu to factory settings.
5. Lock menu
You must enter the password to gain access to the Lock menu. The default password is 0000.
You may modify the following options:

flowchart
graph LR
    A["Enter Password"] --> B["Change Password"]
    B --> C["System Lock Off US Canada RRT Setting Reset RRT"]
    C --> D["Select Move MENU Exit"]
Description
Change password: Change the password, you must enter the new password twice to confirm it. Note: Do not forget the password.
Lock: Allow you to turn on or off the system lock. If deactivated, the functions described below don't work.
This option menu allows you to lock any TV channel or adjust the Movie rating filter.
US:
TV: Use ∧ / ∨ buttons to select the desired rating and press > button to block or unblock rating.


MPAA: The Movie rating (MPAA) is used for original movies rated by the Motion Picture Association of America (MPAA) as broadcasted on cable TV and not edited for television.
Use ∧ / ∨ button to select N/A, G, PG, PG-13, R, NC-17 or X.
| RATING | DESCRIPTION |
| G | General Audiences. Movie is appropriate for all ages. |
| PG | Parental Guidance Suggested. May contain material not suited for younger viewers. |
| PG-13 | Contains content that may not be appropriate for viewers under the age of 13. |
| R | Restricted. Contains adult content, no one under 17 admitted without parent. |
| NC-17 | No one 17 and under admitted. |
| X | Adults only. |
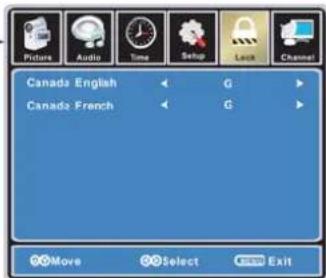
Canada:
Canada English: Select among: E, C, C8+, G, PG, 14+ and 18+. Canada French: Select among: E, G, 8ans+, 13ans+, 16ans+ and 18ans+.
Reset RRT: Allow you to reset the RRT setting.
6. Channel menu
Description
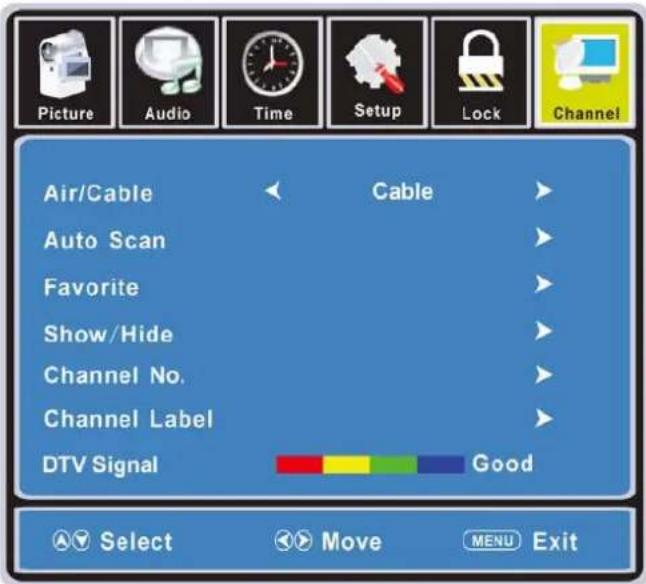
Air/Cable: Allow you to select antenna between Air and Cable.
If you select "Cable", the following items(Favorite, Show/Hide, Channel NO, Channel Label and DTV Signal) are unable to use.
Auto Scan: Enter the Auto Scan menu to start auto scan.
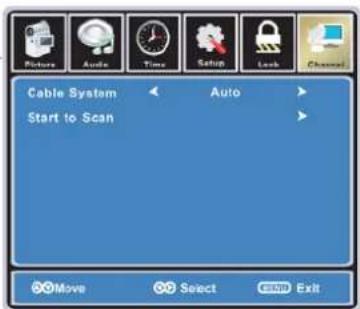
★ If you select "Cable" as input signal in Antenna item, allows you to select Cable System among: Auto, STD, IRC and HRC.
Use ∨ button to highlight the "Start to Scan", then press > button to search the channels automatically.
The receivable channels will be stored automatically.
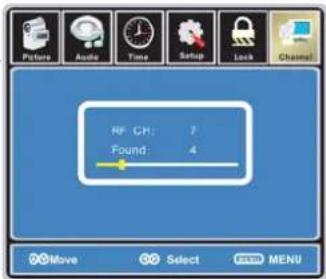
When searching channels, press MENU to stop.
★ If you select "Air" as input signal in Antenna item, you __ can press > button to search the channels automatically.
The receivable channels will be stored automatically.
When searching channels, press MENU to stop.
NOTE: It will take a while to auto scan in NTSC or ATSC mode, please wait patiently.
Favorite: Allow you to add these channels which you desired as the favorite channels.
Use ∧ / ∨ button to highlight the desired item, then press OK button to add or remove the highlighted channel as favorite.
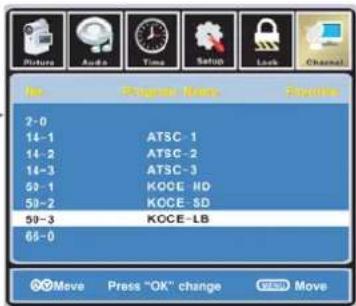
Show/Hide: Allow you to show or hide the channels.
Use ∧/∨ button to highlight the desired item, then press OK button to show or hide the highlighted channel.

Channel No.: Show and select the channel.
Channel Label: Allow you to setup a label for the channel.
Press < / > button to select the position of the table, and press / button to select the words.
DTV Signal: Show the quality of digital signal: good, Normal, Bad.
Simple Troubleshooting
If the display fails or performance dramatically deteriorates check the Display in accordance with the following instructions. Remember to check the peripherals to pinpiont the source of the failure.
If the display still fails to perform as expected, connect your helpline for assistance.
No power
- Check all connections to the TV.
- Press either the power button or the Standby button on the Remote control.
No picture or sound
- Ensure that the TV is plugged in and the power is on.
- Ensure that the aerial is connected.
- Try a different programme.
Poor picture quality
- Check the aerial connections.
- Check that the channel is tuned in properly.
- Adjust the picture settings: brightness, colour, sharpness, contrast, hue.
- Make sure that the TV is not located close to electrical appliances that may emit radio frequency interference.
No colour
- Adjust the colour setting.
- Check that the programme is broadcast in colour.
- Check that the cannel is tuned properly.
TV does not respond to remote control
- Check that there are no obstructions between the remote control and the unit.
- Check that the remote control is within range of the unit.
- Check that the batteries in the remote control and not weak or exhausted.
This LCD TV is for household use and registered as harmless on electromagnetic waves. Therefore, you can use it in every location as well as residential areas.
Technical Specifications
| LCD Panel | Panel Size | 24 inch (diagonal) |
| Brightness | 300 cd/m2 | |
| Contrast | 1000:1 | |
| Resolution | 1920x1080 | |
| Input Connector | Video | 1 |
| Audio(L/R) | 1 | |
| VGA | 1 | |
| PC Audio | 1 | |
| HDMI | 2 | |
| YPbPr | 1 | |
| RF | 1 | |
| Output Connector | Coax | 1 |
| Headphone | 1 | |
| Power Source | DC 12V 5A | |
| Power Consumption | 60W | |
* Product specifications and appearance are subject to change without notice.

- OPERATING INSTRUCTIONS
- 24" 1080p LCD Television with LED backlight
- AIR (TV)/CABLE MODE SELECTION
- Contents
- Caution
- Correct disposal of this Product
- Safety Information
- Electrical safety
- Physical safety
- Unit and Accessories
- Product Feature
- Introduction
- Front View
- Wall Mounting
- Remote Control
- Installing Batteries
- Connection
- AV Input Connection
- YPbPr Connection
- HDMI Connection
- PC Connection
- Basic Operation
- Power on/off
- Input Source select
- Basic buttons on the remote control
- Basic OSD Menu operation
- OSD Menu
- Picture menu
- Description
- Audio menu
- Time menu
- Setup menu
- Lock menu
- US:
- Canada:
- Channel menu
- Simple Troubleshooting
- No power
- No picture or sound
- Poor picture quality
- No colour
- TV does not respond to remote control
Brand : Viore
Model : LED24VF60
Category : Television