
244CEC2 - Battery charger BatteryMINDer - Free user manual and instructions
Find the device manual for free 244CEC2 BatteryMINDer in PDF.


| Product Type | Battery Charger, Maintainer, and Desulfator |
| Model | 244CEC2 |
| Compatible Battery Types | Lead-Acid (Wet, AGM, Sealed, Odyssey/PLT) and Lithium (LiFePO4, 8 cells) |
| Input Voltage | 90 - 140 Vac |
| Input Frequency | 47 - 63 Hz |
| Output Voltage | 24V DC |
| Output Current (Selectable) | 1A, 2A, or 4A |
| Dimensions (L x W x H) | Approx. 7.32 in x 4.88 in x 2.44 in (186 mm x 124 mm x 62 mm) |
| Weight | Approx. 2.86 lb (1.3 kg) |
| Waterproof Rating | IP65 |
| Operating Humidity Range | 0 to 95% RH |
| Temperature Compensation Range (Lead-Acid) | -4°F to 122°F (-20°C to 50°C) |
| Charging Stages | Soft-Start, Constant Current (Bulk), Constant Voltage (Absorption), Float (Maintenance) |
| Desulfation Function | Yes, for lead-acid batteries only |
| Battery Test | Automatic testing after absorption and every 12 hours in float mode |
| Safety Certifications | UL 1236, UL 1012, CSA C22.2 No. 107.2 |
| Included Accessories | 2 ft insulated battery clip cordset with 15A fuse, 2 ft ring terminal cordset, ATS-1 ambient temperature sensor |
| Warranty | 5-Year Limited Warranty (with 1-year unconditional money-back guarantee) |
| Country of Origin | USA (VDC Electronics, Inc.) |
Frequently Asked Questions - 244CEC2 BatteryMINDer
User questions about 244CEC2 BatteryMINDer
0 question about this device. Answer the ones you know or ask your own.
Ask a new question about this device
Download the instructions for your Battery charger in PDF format for free! Find your manual 244CEC2 - BatteryMINDer and take your electronic device back in hand. On this page are published all the documents necessary for the use of your device. 244CEC2 by BatteryMINDer.
USER MANUAL 244CEC2 BatteryMINDer
For ALL 12-Volt and 24-Volt
Sealed and Wet "Filler Caps"
Batteries
Including AGM,
PLT and Odyssey*
For 12V and 24V Lithium Batteries
* NOT for
nickel-cadmium (NiCad),
nickel-metal hydride (NiMH)
or aircraft batteries.


All Models Include:
•Auto-Temp Compensation Sensor (Installed)
- 2' Insulated Battery Clip Cord Set with Quick Connector and 15A replaceable fuse
- 2' Ring Terminal Cord Set with Quick Connector and 15A replaceable fuse
CONFORMS TO UL STD. 1236 AND UL STD. 1012 · CERTIFIED TO CSA STD. C22.2 NO. 107.2
READ AND SAVE THESE INSTRUCTIONS
BatteryMINDers.com
Table of Contents
Glossary of Terms....2
Required Safety Instructions....3 - 6
Preparing to Charge....5
Charger Location 5
DC Connection Precautions .... 5
Qualifying Your Battery 6
Specific Gravity - Capacity Table. 6
Testing a Filler Cap Lead-Acid Battery 7
Testing With a Hot/Cold Calibrated Hydrometer Tester .....7
Testing a Sealed, AGM or Lead Acid Battery ....8
Simplified Operating Instructions 9
Detailed Specifications 9
Common Features ....10
Common Features Details 10 - 12
Charging Stages....13
Unit Labels 14
LED Indication Table....15
LED Indicator Lights Details....15 - 16
Detailed Operating Instructions....17 - 18
Charging a Battery in a Tightly Confined Area. 18
OCV/Battery State of Charge Table 19
Maintaining Multiple Lead-Acid Batteries....19
Troubleshooting....20
Multi-Battery Configuration....21
Recommended Accessories (optional) 21
For Repair or Replacement / Registration....22
Guarantee/Warranty....23
Glossary of Terms
- Maintain a battery
BatteryMINDer ensures batteries are truly fully charged and will likely continue improving the condition of the battery to the fullest extent possible.
- Rested
A battery that has been as fully charged as possible and left disconnected from charger or any type load overnight.
- Specific Gravity
One of the key parameters of battery operation is the specific gravity of the electrolyte. Specific gravity is the ratio of the weight of a solution to the weight of an equal volume of water at a specified temperature. Specific gravity is used as an indicator of the state of charge of a cell or battery.
- Sulfation
Occurs when the battery sits discharged for a long period of time and large sulfate crystals build up in the plates. The large sulfate crystals increase the resistance of the plates and makes the battery harder to recharge and reduces the amount of power that can be drawn from the battery.
IMPORTANT SAFETY INSTRUCTIONS - SAVE THESE INSTRUCTIONS
This manual contains important safety and operating instructions for all BatteryMINDer battery chargers unless otherwise specified.
A. WARNING: RISK OF EXPLOSIVE GASES
WORKING IN VICINITY OF A LEAD-ACID BATTERY IS DANGEROUS. BATTERIES GENERATE EXPLOSIVE GASES DURING NORMAL BATTERY OPERATION. FOR THIS REASON, IT IS OF UTMOST IMPORTANCE THAT YOU FOLLOW THE INSTRUCTIONS ON (1) BATTERY CHARGER, (2) BATTERY AND (3) PRODUCT USING BATTERY EACH TIME YOU USE THE CHARGER.
-
To reduce risk of battery explosion, follow these instructions and those published by manufacturer of any equipment you intend to use in vicinity of battery. Review cautionary marking on these products and on engine.
-
To reduce risk of injury, charge only rechargeable batteries. Other types of batteries may burst causing personal injury and damage.
-
Do not expose charger to rain or snow.
-
Use of an attachment not recommended or sold by VDC Electronics may result in a risk of fire, electric shock, or injury to persons.
-
To reduce risk of damage to electric plug and cord, pull by plug rather than cord when disconnecting charger. Make sure cord is located so that it will not be stepped on, tripped over, or otherwise subjected to damage or stress.
-
An extension cord should not be used unless absolutely necessary. Use of improper extension cord could result in a risk of fire and electric shock. If an extension cord must be used, make sure:
a. That pins on plug of extension cord are the same number, size, and shape as those of plug on charger;
b. Not to operate charger with damaged cord or plug – replace the cord or plug immediately.
c. That extension cord is properly wired and in good electrical condition; and
d. That wire size is large enough for AC ampere rating of charger as specified in Recommended Minimum AWG Size Table.
| Recommended Minimum AWG size for Extension Cords For Battery Chargers | |||||
| AC input rating, amperes AWG size of cord | |||||
| Equal to or greater than | But less than | Length of cord, feet | |||
| 18 18 | 18 16 | ||||
| 0 2 25 50 | 100 150 | ||||
e. Do not operate charger if it has received a sharp blow, been dropped, or otherwise damaged in any way.
-
Do not disassemble charger; call VDC Electronics Tech Support Dept. 800.379.5579 x6 (ET) for advice when service or repair is required. Incorrect reassembly may result in a risk of electric shock or fire.
-
To reduce risk of electric shock, unplug charger from outlet before attempting any maintenance or cleaning.
B. PERSONAL PRECAUTIONS
-
Consider having someone close enough by to come to your aid when you work near a lead-acid or lithium rechargeable battery.
-
Have plenty of fresh water and soap nearby in case battery acid contacts skin, clothing, or eyes.
-
Wear complete eye protection and clothing protection. Avoid touching eyes while working near battery.
-
If battery acid contacts skin or clothing, wash immediately with soap and water. If acid enters eye, immediately flood eye with running cold water for at least 10 minutes and get medical attention immediately.
-
NEVER smoke or allow a spark or flame in vicinity of battery or engine.
-
Be extra cautious to reduce risk of dropping a metal tool onto battery. It might spark or short-circuit battery or other electrical part that may cause explosion.
-
Remove personal metal items such as rings, bracelets, necklaces, and watches when working with a battery. A battery can produce a short-circuit current high enough to weld a ring or the like to metal, causing a severe burn.
-
Use charger for charging a battery only. It is not intended to supply power to a low voltage electrical system other than in a starter-motor application. Do not use battery charger for charging dry-cell batteries that are commonly used with home appliances. These batteries may burst and cause injury to persons and damage to property.
-
NEVER charge a frozen battery or a battery at a temperature above 123^ F. Never charge a lithium battery below 32^ F.
Always follow battery manufacturer's strict instructions for proper care, charging and testing of battery. Questions relating to the subject should be referred directly to the battery manufacturer to be certain of current requirements that may have been added to or changed since publication of their instructions.
C. PREPARING TO CHARGE
-
If necessary to remove battery from vehicle to charge, always remove grounded terminal from battery first. Make sure all accessories in the vehicle are off, so as not to cause an arc.
-
Be sure area around battery is well ventilated while battery is being charged.
-
Clean battery terminals. Be careful to keep corrosion from coming in contact with eyes.
-
For lead acid battery add distilled water in each cell until battery acid reaches level specified by battery manufacturer. Do not overfill. For a battery without removable cell caps, such as valve regulated lead acid and lithium batteries, carefully follow manufacturer's recharging instructions.
-
Study all battery manufacturer's specific precautions while charging and recommended rates of charge.
-
Determine voltage of battery by referring to your owner's manual and make sure it matches output rating of battery charger.
D. CHARGER LOCATION - FOR INDOOR USE ONLY
-
Locate charger as far away from battery as DC cables permit.
-
Never place charger directly above battery being charged; gases from battery will corrode and damage charger.
-
Never allow battery acid to drip on charger when reading electrolyte specific gravity or filling battery.
-
Do not operate charger in a closed-in area or restrict ventilation in any way.
-
Do not set a battery on top of charger.
E. DC CONNECTION PRECAUTIONS
-
Connect and disconnect DC output clips only after removing AC cord from electric outlet. Never allow clips to touch each other.
-
Attach clips to battery and chassis as indicated in Section G.
F. FOLLOW THESE STEPS WHEN CONNECTING BATTERY IS INSTALLED IN VEHICLE. A SPARK NEAR BATTERY MAY CAUSE BATTERY EXPLOSION. TO REDUCE RISK OF A SPARK NEAR BATTERY:
-
Position AC and DC cords to reduce risk of damage by hood, door, or moving engine part.
-
Stay clear of fan blades, belts, pulleys, and other parts that can cause injury to persons.
-
Always connect unit to battery BEFORE plugging into AC POWER SOURCE.
-
Check polarity of battery posts. POSITIVE (POS, P, +) battery post usually has larger diameter than NEGATIVE (NEG, N,−) post.
-
Determine which post of battery is grounded (connected) to the chassis. If negative post is grounded to chassis (as in most vehicles), see (5). If positive post is grounded to the chassis, see (6).
-
Connect POSITIVE (RED) clip from battery charger to POSITIVE (POS, P, +) post of battery. Connect NEGATIVE (BLACK) clip to NEGATIVE (NEG, N, -) post of battery. Do not connect clip to carburetor, fuel lines, or sheet-metal body parts. Connect to a heavy gage metal part of the frame or engine block.
-
When disconnecting charger, disconnect AC cord, and then remove clips from battery terminals.
-
See operating instructions for length of charge information.
QUALIFYING YOUR BATTERY:
Preliminary Requirements
NOTE: The BatteryMINDer has no electrical output unless it is connected to a battery that is not completely dead (3-6V min). Testing the Battery-MINDer with a volt meter without the unit being connected across a good battery will result in a false reading. If you experience any problems, or are not sure of how to properly use or connect your BatteryMINDer, please call our toll-free technical support line 800-379-5579 or 631-423-8220 x6 (M - F, ET 9 - 5). Be certain to leave your phone number with the area code, time zone, and the best time to call.
| Specific Gravity | State of Charge Level |
| 1.270(4 Balls floating) | 100% |
| 1.250(3 Balls floating) | 75% |
| 1.190(2 Balls floating) | 50% |
| 1.150(1 Balls floating) | 25% |
| 1.120(0 Balls floating) | Discharged |
Testing a Filler Cap or Manifold-type Lead Acid Battery
- Carefully remove all caps from your battery.
- Check the water-liquid electrolyte level. If the level is low or has ever been below top of plates, severe lead plate sulfation has taken place. Significant recharge/reconditioning time is needed to restore these plates to a condition where the battery can be expected to function normally.
- Refill each cell with distilled water only to the liquid level indicator found in each cell. Before proceeding further you must be thoroughly familiar with the safety and operating instructions.
- Recharge the battery with the BatteryMINDer to ensure that it is slowly and completely charged before you determine its condition. Allow battery to "rest" (see GLOSSARY OF TERMS on page 2) overnight for a minimum of 12 hours before testing with a temperature compensated hydrometer and/or digital type voltmeter only.
Testing a lead acid battery with a Hot/Cold Calibrated Hydrometer Tester Read the tester instructions carefully for most accurate readings.
- When using the tester the first time or after a long period of non-use, fill the tester with the battery fluid and let it sit for 1/2 hour or longer. This will soak the balls in order to give you more accurate readings. Failure to do so will give you false readings indicating a battery that may not be in as good a condition as you may have thought.
- After inserting the tester in a cell, gently tap the tester several times against the inside wall of each cell to dislodge air bubbles that will cause more balls to float than should. Failure to do so will yield false readings that indicate a battery that is not fully desulfated or does not qualify for desulfation.
- If no balls float in any cell, the cell is shorted. This means your battery is beyond the point of being properly recharged or reconditioned/desulfated. Dispose of the battery.
- If each cell floats three (3) or more balls (or 1250 on gauge-type), your battery can be desulfated/reconditioned.
- Always rinse the tester with fresh water after every use. Failure to do so will cause false readings.
Testing a Sealed or AGM Lead Acid Battery
These batteries have no filler caps or manifold-type covers. Because you cannot gain access to the interior of your battery you cannot test it with a hydrometer. USE A DIGITAL VOLTMETER ONLY:
- Recharge the battery with the BatteryMINDer to ensure it is as completely charged as possible, before you determine its condition. Allow battery to "rest" overnight for a minimum of 12 hours before testing with a digital voltmeter only. Failure to test a "rested" battery will cause false readings. Be certain to read and understand all safety related instructions (pages 3 - 7) before proceeding further.
- Measure battery's voltage, without any load attached. If the voltage is less than 12.4 volts / 24.8 volts (Typically 50% of charge) the battery may be too heavily sulfated to be fully recoverable. If voltage is 12.4V / 24.8V or higher full recovery can be expected, given sufficient time (average 1-2 weeks for batteries that are heavily sulfated).
- Connect the BatteryMINDer to the battery. Charge battery to its maximum level. Allow battery to rest for a minimum of 8 hours before retesting. If improvement is seen, continue until battery voltage reaches full capacity level or no further increase is seen. Refer to OPEN CIRCUIT NO LOAD VOLTAGE table (page 19).
Note: Do not expect to completely dissolve sulfate in a day. Long established sulfate will require a longer period to be fully dissolved. Be patient and you will rewarded with a “sulfate-free” battery.
- Lithium batteries do not suffer sulphation, but they are sensitive to under-voltage or over-voltage; therefore, Lithium (LiFePO4) batteries are integrated with a BMS (Battery Management System) for cell balancing and under-voltage or over-voltage protection.
Note: Never attempt to charge a Lithium (LiFePO4) battery when its temperature is below 32^ F (0°C).
SIMPLIFIED OPERATING INSTRUCTIONS
Read and thoroughly understand ALL SAFETY Instructions, pages 3 - 7 including Preparing to Charge, DC Connection Precautions, Unit Location and Qualifying Your Battery BEFORE proceeding further.
-
Attach Battery Clips (9, supplied), to output cordset of charger (5).
-
Attach output to battery terminals:
$$ \begin{array}{l} \text { RED band } = \text { Positive } + \ \text { BLACK band } = \text { Negative }. \end{array} $$
-
Ambient Temperature Sensor, ATS-1 comes already installed on the Temperature Sensor input connector (5). Do not detach.
-
Plug AC power cord (7) into a 120 Vac electrical outlet. Always connect unit to battery before plugging into AC POWER SOURCE.
-
Observe POWER GREEN steady
-
Observe BATTERY CONNECTION GREEN/RED LED indicator (4E): If lit RED, reverse battery connector attachments on battery.
IF IN DOUBT REGARDING ANY OF THE ABOVE, REFER TO DETAILED OPERATING INSTRUCTIONS (page 17).
^1 See full instructions if not lit GREEN.
Note: Neither of our two models are designed to function at input voltages above 140 VAC except when combined with a step-down transformer (not supplied).
| Detailed Specifications | ||
| Input Voltage: 90 - 140 Vac | ||
| Input frequency: 47 - 63 Hz | ||
| Output voltage and current: | 12V 2/4/8A 24V 1/2 | /4A |
| Plastic enclosure material: UL-94V0 Noryl or PC or PC+ABS | ||
| Enclosure Dimension: Approx. 7.32 in. (186 mm)(L) x 4.88 in.(124 mm)(W) x 2.44 in. (62 mm)(H) | ||
| Weight: Approx. 2.86 lb. (1.3 Kg) | ||
| Lead Acid Only - Temp Compensation Range | -4°F/-20°C to 122°F/50°C | |
| Operating Humidity range: 0 to 95% RH | ||
| Waterproof: IP65 | ||
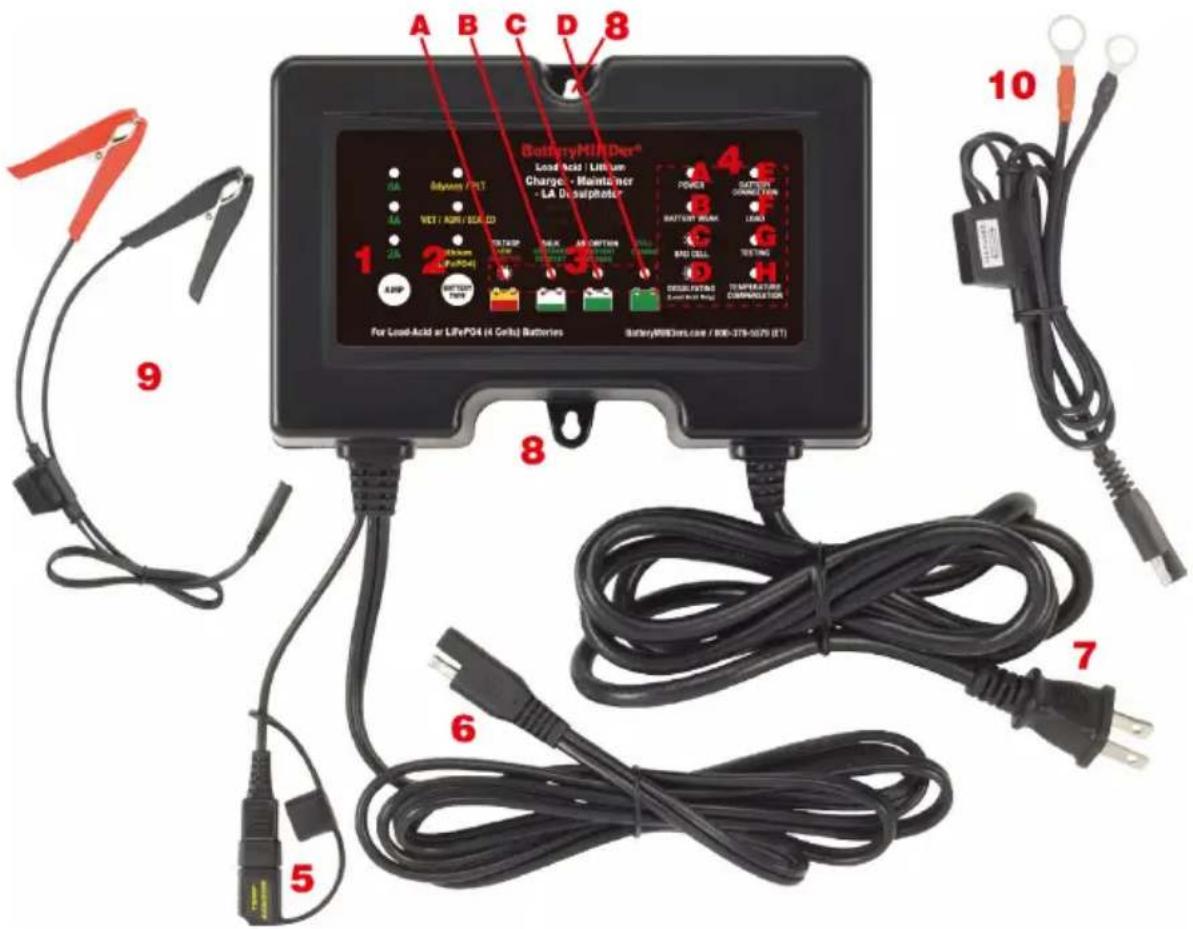
| Common Features (12V & 24V Models) | |
| 1 | AMPERAGE Selection button: 2A, 4A or 8A (12 Volt) or 1A, 2A or 4A (24 Volt) |
| 2 | BATTERY TYPE Selection button: WET/AGM/Sealed, Odyssey/PLT, Lithium |
| 3 | BATTERY STAGE Indicators:A: Stage 1: Battery Low (Soft-Start)B: Stage 2: Constant Current (Bulk)C: Stage 3: Constant Voltage (Absorption)D: Stage 4: Battery Fully Charged (Maintenance/Float) |
| 4 | LED Indicators: See Table on page 15 |
| 5 | Temperature Sensor input connector with ATS-1 Ambient Temperature Sensor installed (included) |
| 6 | Output cord with quick connect plug |
| 7 | Input power cordset |
| 8 | Mounting tabs |
| 9 | Battery Clip (15 Amp, insulated) BCAA cordset with quick connect plug |
| 10 | Ring Terminal cordset (15 Amp) with quick connect plug |
| Common Features Details (All Models) Con't. from Previous Table | ||
| Meaning Action | ||
| 1AMPERAGE | Maximum Current for your battery. | Select preferred amperage (8A for standard 12V / 4A for 24V car batteries). |
| 2BATTERY TYPE | Battery Type | Select type according to your battery's specifications. |
| 3ASOFT-START VOLTAGE: LOW, REJECTED | Start of charge AMBER STEADY ON = battery fully discharged. | Allow BatteryMINDer to try to restore battery. |
| RED FLASHING = Battery voltage is near zero volts. | Battery rejected | |
| 3BBULK STAGE | Battery is being Constant Current charged to about 80%. | Allow BatteryMINDer to charge battery. |
| 3CABSORPTION STAGE | Battery is being Constant Voltage charged to about 95%. | Allow BatteryMINDer to charge battery. |
| 3DMAINTENANCE/FLOAT MODE | Battery is being topped off to 100%. | Allow BatteryMINDer to maintain and desulfate lead acid battery indefinitely. |
| 4APower | GREEN STEADY = AC power connected.GREEN FLASHING = ECO mode (no battery connected, very low standby power mode). | None required. |
| 4BBATTERY WEAK | Battery voltage is low at start of charge OR voltage is low after testing stage. | Allow BatteryMINDer to attempt to restore lead acid battery if low at start of charge. Replace battery if voltage is low after testing stage. |
| 4C BAD CELL | RED FLASHING = one or more cells of the battery are dead. | Battery must be replaced. |
| 4D DESULFATING | FLASHING = battery is being desulfated (lead acid only). | None required. |
| 4E BATTERY CONNECTION | GREEN STEADY = battery connected properly. RED STEADY = battery connect improperly. | If needed, correct battery connection. |
| 4F LOAD | AMBER STEADY = some device is drawing current. BatteryMINDer is putting out max. current in maintenance mode (lead acid only). | Turn off external device if possible. |
| 4G TESTING | BLUE STEADY = test in progress, pause in charging. (Tests to see if battery holds charge.) | None possible. |
| 4H TEMPERATURE COMPENSATION | Meaning: BLUE STEADY = cold temperature compensation being applied (lead acid only). GREEN STEADY = hot temperature compensation being applied (lead acid only). BLUE FLASHING = temperature below 32°F/0°C (Lithium only) | None required. |
Charging Stages
- Maintenance Mode: the CEC2 BatteryMINDer is fully automatic and after the batteries are fully charged, unit will go into Maintenance Mode by itself. Soft-Start is used if a battery's voltage is under 10.5V/21.0V when charging begins. It uses a low constant current to slowly bring up voltage. This prepares a weak or neglected battery for the Constant Current stage.
- Constant Current (sometimes called Bulk) is the main charging stage. The charger puts out a constant current of 2/4/8A for 12V and 1/2/4A for 24V, its full power. Battery voltage rises until the battery reaches the optimal charging voltage.
- Constant Voltage (sometimes called Absorption) is the second charging stage. The charger regulates the current given to the battery to maintain constant voltage. As the battery nears a full charge, the current needed to maintain this voltage decreases. Once the current falls below a 0.10A change per hour, the stage is complete.
- Battery Test is administered by reading your battery voltage while putting the battery under a load for 10 minutes. A voltage of under 12.5V/25.0V indicates a weak battery, under 11.5V/23.0V indicates a shorted cell. The battery is tested at completion of the Constant Voltage (Absorption) stage, and every 12 hours while in Float.
- Float (sometimes called Maintenance) is the charger's long term stage. The charger can and should be left connected indefinitely. This will keep the battery fully charged ensuring no sulfate can form. The charger maintains float voltage using very little power as it actively monitors the battery and adjusts its output several times a second.
- Restart Charge for Lithium (LiFePO4 battery), if a Lithium battery is fully charged after absorption, the BatteryMINDer will continuously monitor the Lithium battery voltage, it will restart to Bulk charge when it sensed the battery has lost charge (less than 13.0V / 26.0V) by possible connection to the vehicle or other circuit loop or its self-discharge.
- Automatic Activation for Lithium (LiFePO4 battery), a deep discharged battery may not hold the sufficient voltage to power its own BMS (Battery Management System) system, the BatteryMINDer is designed with a special Lithium charging algorithm, it will automatically wake up the BMS when BMS protection has been triggered by under voltage.
If the Lithium battery is not able to wake up within the maximum 6 hours, the BatteryMINDer will stop charge and Power Green LED will flash to indicate the BatteryMINDer goes into ECO mode.
VDC 128CEC2 LABEL R2---P/N: 701-100629-01-R

BatteryMINDer 128CEC2: 12 Volt
VDC 244CEC2 LABEL R2---P/N 701-1004XX-01-R
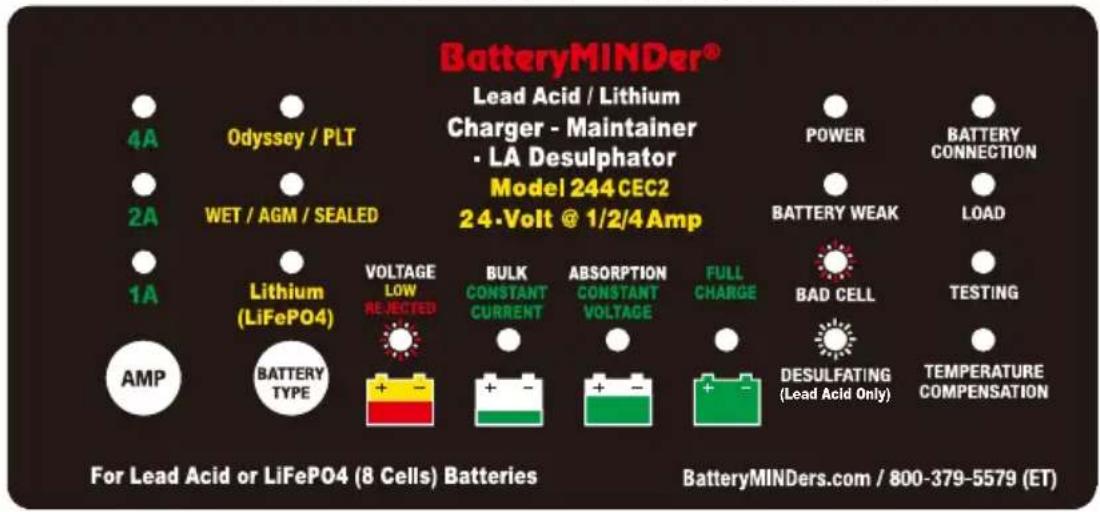
BatteryMINDer 244CEC2: 24 Volt
| LED INDICATION TABLE | |||
| POWER | GREEN | ||
| Green Steady | AC power connected | ||
| Green Flashing | ECO mode | ||
| BATTERY CONNECTION | GREEN | RED | |
| Green Steady | Battery connected correctly | ||
| Red Steady | Battery connected incorrectly | ||
| BATTERY WEAK | AMBER | ||
| Amber Steady | Battery requires soft-start charging or battery voltage is < 12.5V / 25.0V after analysis stage | ||
| LOAD | AMBER | ||
| Amber Steady | The output current is up to the maximum rating in Float mode | ||
| BAD CELL | RED | ||
| Red Flashing | Battery voltage is < 11.5V / 23.0V after analysis stage | ||
| TESTING | BLUE | ||
| Blue Steady | Analysis stage | ||
| DESULFATING (LEAD ACID ONLY) | BLUE | ||
| Blue Flashing | Desulfating pulses are in process | ||
| TEMPERATURE COMPENSATION | GREEN | BLUE | |
| Green Steady | Ambient temperature >27°C/80°F (lead acid only) | ||
| Blue Steady | Ambient temperature < 21°C/70°F (lead acid only) | ||
| Blue Flashing | Ambient temperature < 0°C/32°F (lithium only) | ||
| VOLTAGE LOW | AMBER | REJECTED | RED |
| Initial qualification of the battery's condition (at the beginning of Soft-Start stage) | |||
| Amber Steady | Voltage: 12 Volt: 3 - 10.5V / 24 Volt: 6 - 21V | ||
| Red Flashing | Voltage: 12 Volt: < 3V / 24 Volt: < 6V (Low Voltage) | ||
LED Indicator Light Details
• Power light is GREEN anytime the charger is plugged into AC Power.
- Battery Connection light is GREEN when the unit it is correctly connected to a battery. If the Battery Connection light is RED the polarity is reversed. The positive and negative terminals need to be switched or there is a short circuit.
- Battery Weak light is AMBER if the Soft-Start mode is used or the battery fails a Battery Test. The indicator will stay on until the battery passes a Battery Test.
A neglected lead acid battery can take over 2 weeks of desulfation to correct.
If after 2 weeks it still reads as a Weak Battery, there is likely internal physical damage.
- Load light is AMBER if the charger is in Float and outputting full amperage. This indicates a drain on the battery. If possible remove any loads.
- Bad Cell if the charger has not completed the Constant Current stage in 20 hours and battery voltage is under 11.5V/23.0V, or if the battery is under 11.5V/23.0 after a Battery Test.
The charger shuts off output to avoid any damage to your battery. Loads or banks of batteries may trigger this mode if they are too large for this charger. Remove any loads and charge batteries individually.
- Testing light flashes BLUE when the unit is performing a Battery Test (see Charging Stages).
- Desulfation light flashes BLUE any time the unit is desulfating. The BatteryMINDer desulfates any time it is outputting current. (Lead acid only)
- Temperature Compensation light is GREEN if the temperature is over 80°F/27°C, BLUE if the temperature is under 70°F/21°C. BatteryMINDer CEC models include an ambient temperature sensor which allows it to vary the output voltage as necessary to properly charge your 12V (-28mV/°C) or 24V (-56mV/°C) battery. Batteries charged at higher temperatures without compensation will overcharge and may out-gas. Batteries charged at lower temperatures without compensation will undercharge allowing sulfation to build, possibly leading to the battery freezing. By using temperature compensation, the BatteryMINDer ensures your battery will never over or under charge, even in extreme conditions. (Lead acid only)
In Lithium mode temperature compensation LED will flash BLUE if temperature is less than 32^ F ( 0^ C).
DETAILED OPERATING INSTRUCTIONS
Installed properly, your charger is set to provide your battery with what it needs to out-live and out-perform any similar battery used in the same application-conditions by a factor of two.
READ AND THOROUGHLY UNDERSTAND ALL IMPORTANT SAFETY INSTRUCTIONS, PAGES 3-6 INCLUDING PREPARING TO CHARGE, DC CONNECTION PRECAUTIONS, UNIT LOCATION AND QUALIFYING YOUR BATTERY BEFORE PROCEEDING FURTHER.
-
Attach output cord of charger to the battery clip(s) assembly (BCAA) or ring terminals (RTA-2415) (supplied).
-
Plug the unit's power cord into a standard – grounded 120 VAC electrical outlet. The power on LED indicator will light GREEN. Within 30 seconds, if it does not light GREEN check the outlet to be sure it is functioning. In addition, be sure if outlet is controlled by a switch, no one will accidentally shut off the power to the outlet. Check for correct polarity = no error RED LED indicator. If error indicator is lit, reverse the charger's output connections to the battery.
Charger will automatically start within 15 - 30 seconds. The Bulk LED Indicator will light GREEN. The charger will now begin charging by first checking the battery to determine its voltage and ability to accept a charge. Should the battery not have a normal fully discharged voltage (10.5V/21.0V minimum) the unit will begin charging in the "Soft-Start" mode to determine if the battery can be safely charged. If it cannot, the Soft-Start LED will light RED and charging will be stopped. Battery should be carefully checked under a load by a qualified person before further attempting to charge it.
Note: If the battery does not have a minimum no load OCV (Open Circuit Voltage) of 3/6 volts, the Soft-Start LED will light RED and charger will reject battery.
No further effort should be made to charge this battery with this charger or any charger. Discard this battery, unless it has just been subjected to a long period of continuous discharge under a load such as can occur with leaving lights on or cranking an engine excessively. Allow such a battery to “Rest” for several hours (overnight if possible) before determining if it is defective.
Be very suspicious of any 12V/24V battery that does not have at least 11V/22V (OCV) before it is recharged. It may well be seriously damaged and unsafe for any type of use or recharge. The unit's Battery Weak Indication LED will help you determine if battery is less than 11V/22V (AMBER).
- After battery has been fully charged, FULL CHARGE stage LED will light. Battery may not be able to be fully charged, may be too large or too deeply discharged to be fully charged in the normal time allowed by charger. If you are certain battery is not defective, having read and understood completely all of the above concerns and conditions, proceed to reboot the charger by unplugging from the wall (AC), disconnecting from the battery (DC) and waiting 30 seconds before reconnecting the battery and then the AC. This allows charger to begin charging battery again. If battery is not defective it should be able to be fully charged after being restarted. After sufficient time has elapsed the FULL CHARGE stage LED Indicator (COMMON FEATURES TABLE, page 10, item 3D) will illuminate confirming when / if battery is now fully charged.
Note: If attempting to charge more than one battery at a time, it is very likely the charger will need to be restarted as described in order to completely charge multiple batteries. We do not recommend charging more than one battery at a time. A better solution is to charge each battery separately using your BatteryMINDer and then connect them together, if desired for long term maintenance-float charging. We suggest reading MAINTAINING MULTIPLE BATTERIES (page 19), and the additional LED INDICATOR FUNCTIONS (page 15), not already covered above.
IMPORTANT! Charging a Battery in a Tightly Confined Area
Charging a battery in a tightly confined area should always be avoided as it can be dangerous, especially if battery is, has or was:
- Older than 2 years
- Marginal at last capacity test
- Not frequently checked for proper electrolyte level in each cell (filler cap, lead acid only)
- Ever needed considerable water added, especially in one or more cells vs. other cells needing far less (filler cap, lead acid only)
- Different Specific Gravity (SG) readings-levels (cell to cell) or has one or more cells reading less than 1.220 after being fully charged, left to "Rest" for a minimum of 8 hours (as we describe repeatedly in all our Instruction Manuals) (filler cap, lead acid only)
| OCV=Open Circuit No Load Voltage (lead acid only) | ||
| OCV - “Rested” Voltage | Full Capacity Percentage | |
| 12V 24V | ||
| 12.9 - 13.1 25.8 | 26.2 100% | |
| 12.6 - 12.9 25.2 | 25.8 | 75% |
| 12.4 - 12.6 24.8 | 25.2 | 50% |
| 12.2 - 12.4 24.4 | 24.8 | 25% |
| 12.0 - 12.2 24.0 | 24.4 | 0% |
| <11.0 = shorted | <22.0 = shorted | |
| Note: All OPTIMA brand starter/deep cycle batteries have a fully charged “resting” voltage of 13.1 (OCV). Increase above values accordingly. | ||
MAINTAINING MULTIPLE LEAD-ACID BATTERIES
BatteryMINDer Maintenance-Charger-Desulfators can be used to maintain 12-Volt or 24-Volt lead acid batteries, providing each battery is fully operational (no dead-dying cells), free of sulfate and meeting the minimum open circuit charge "rested" voltage of 12.7 Volts or 25.4 Volts, after being fully desulfated.
Never connect two or more batteries together unless they are fully charged. ALL batteries MUST be properly tested to ensure they are in good condition (no dead-dying cells or excessive sulfation) before maintaining them in multiples. Only healthy, fully desulfated lead acid batteries should ever be MAINTAINED in sets of 2 or more. Check each cell of ALL filler cap batteries using an accurate, temperature compensated hydrometer. Check sealed (no filler caps) batteries using an accurate, DIGITAL type voltmeter, ONLY. The minimum voltage must not be less than 2.1 volts / cell after fully charging battery and letting it “rest” for 12 hours minimum, before testing. If battery voltage is less than 2.1 volts / cell you must first desulfate it until you reach a “rested” voltage of 2.1 volts / cell.
Remember, you must desulfate each battery by itself (one at a time) before maintaining them for extended periods. Attempting to desulfate more than one battery at a time will yield very poor results, as the strongest (healthiest) and not the weakest (most sulfated) battery will receive the majority of the desulfation pulse energy.
ALWAYS test each battery individually to be certain it is healthy and free of sulfate before attempting to charge or maintain them, either as a single battery or in sets. NEVER connect multiple batteries together for maintenance charging purposes using less than #18 Gauge insulated wire or consider using BatteryMINDer Y-Connector Model 210AY with SmarTECHnology*.
See diagram on the page 21 for the most common multiple battery configuration.
*BatteryMINDer® has developed a simple, safe and inexpensive method of connecting multiple batteries we call SmarTECHnology®-Y (model 210 AY). Using our single SmarTECHnology®-Y connector, two batteries can be maintained simultaneously using just a single output charger designed to maintain batteries. Adding additional Y-connectors allows from four (4) to eight (8) batteries to be connected depending on the maintenance charger capability.
| TROUBLESHOOTING GUIDE | ||
| PROBLEM POSSIBLE CAUSE SOLUTION | ||
| Power ON Indicator does not light after being plugged into AC for 30 seconds. | AC outlet is dead. | Plug in a lamp or other appliance to check for voltage. If controlled by a wall switch, be sure switch is on and try to prevent accidental shut off while charger is working. |
| Battery Connection Indicator lights RED solid. | Output lead connections to battery may be reversed. | Switch (reverse) connections at battery. |
| VOLTAGE Indicator lights RED blinking. (Common Features table, page 12, item 3A). | Battery voltage <3/6 volts. | Battery may be damaged and should not be recharged. Allow battery to “recover” by letting it “rest” without a load. |
| Battery was just recently removed from a load (lights, electronic equipment) or not used for extended time without a charger-maintainer. | If battery is healthy and just deeply discharged it should recover its voltage (rise above 3/6 volts) sufficiently to allow charger to begin an attempt to fully recharge it. | |
| Battery has “rested” and still cannot be recovered – recharged. | Call VDC Tech Support, 800.379.5579 x6, M-F 9-5 ET (631-423-8220) | |
| Battery Weak Indicator lights AMBER solid. (Before battery has been completely charged). | Battery(s) may be weak, heavily sulfated, or too large to fully charge before unit times out. | |
| Battery may be so large it may require a second full recharge. | Reboot unit by unplugging from A.C. electrical outlet, disconnect from battery so there will be no electrical power going to the unit from either direction, wait 30 seconds, connect to battery first then plug into A.C. outlet. | |
| Battery can be weak due to sulfation, self discharge or was very deeply discharged. | Attempt a full recharge and recheck after completion. If still AMBER, follow next procedure (“After battery has been completely charged.”) | |
OPTIONAL ACCESSORIES

MULTI-BATTERY CONFIGURATION
(LEAD ACID ONLY)

BC2AY: Insulated Battery Clips paired with 210AY Y-Connector with SmarTECHnology®

natural_image
Coiled automotive electrical clamp with black, red, and white probes (no visible text or symbols)210AY n nector with TECHnology®
One BatteryMINDer Will Maintain Two Lead Acid Batteries Using a BCAA (included) + BC2AY* Accessory. For more than 2 batteries call tech support.
After carefully reading these instructions and the TROUBLE-SHOOTING GUIDE (page 20) sections, should you still have questions, please call our toll-free technical support department at 1-800-379-5579 x6 Mon-Fri 9am-5pm (631-423-8220). Allow up to 3 business days for a detailed response to your questions. Always identify the model number of the product and revision letter of this manual contained on this page below. Without this information we may not be able to assist you correctly.
FOR REPAIR OR REPLACEMENT
All returns must be authorized by VDC Electronics.
In the event that you believe your product may be defective, you MUST speak to a VDC Electronics technician at 1-800-379-5579 x6 (M-F, 9-5 ET) / 631-423-8220 before proceeding further. If you must return the unit, the technician will give you an RMA #. Please use Return Form found on batteryminders.com/ under Shipping & Returns when returning your product.
IMPORTANT NOTICE
BatteryMINDer® Five-Year Warranty Registration
BatteryMINDers.com/ under Registration
Please register your unit on-line within 10 days of purchase. Due to the ever-changing technology associated with this BatteryMINDer® unit, we may be unable to keep you informed of significant upgrades, changes, etc. without your registration. The information you provide upon registration will be used to keep a record of your purchase and will assist in providing support should you ever need to contact our Technical Service department: techsupport@vdcelectronics.com; 800-379-5579 x6 (M-F, 9-5 ET) / 631-423-8220.
BatteryMINDER Model purchased:
128CEC2 □
or
244CEC2

Serial Number
Place of purchase
Date of purchase
RMA#
NOTES
BatteryMINDer® Guarantee and Warranty Policy effective Jan. 2013.
ALL Returns and Replacements must be authorized by a VDC Electronics technician. Units must only be returned to VDC Electronics, Inc., NOT TO THE DEALER FROM WHOM IT WAS PURCHASED.
For ALL Replacements, Returns or Repairs covered by Guarantee or Warranty:
Please call 800-379-5579 x6, M - F, 9 AM - 5 PM (ET) / 631-423-8220 to speak to a technician. Have your unit available when you call. We will ask you for:
Your contact information Product serial number Proof of purchase
One-Year 100% Unconditional Money Back Guarantee:
Your BatteryMINDer product is guaranteed within the first year to perform as claimed or VDC Electronics, Inc. will refund your full purchase price including all taxes, shipping or handling cost applicable to the purchase. Customer will return product to VDC Electronics at their expense.
The Technician will provide you with an RMA number and shipping information. You will be required to fill out a form to complete your return which can be found on BatteryMINDers.com, see Shipping/Returns. Clearly write your RMA number on the outside of the package you are returning. We suggest using a carrier that provides tracking information. VDC Electronics is not responsible for returned packages lost in transit. If the unit is to be replaced, it is shipped by ground with free shipping. Expedited shipping is available at extra cost.
Five-Year Limited Warranty:
Your BatteryMINDER product is warranted for FIVE years from date of purchase at retail against defective material or workmanship. We make no warranty other than this limited warranty and expressly exclude any implied warranty including any warranty for consequential damages. This limited warranty is not transferable.
- If the technician determines defective unit should be repaired, customer will return product at their expense. Once we receive the unit it will be repaired and shipped back to customer, all at no charge. Expedited shipping is available at extra cost.
- If the technician determines unit does not warrant repair but needs replacement, customer will be required to pay a \$9.95 shipping fee for the replacement unit. This fee may be subject to change without notice. There is no cost for the replacement unit itself. Expedited shipping is available at extra cost.
VDC Electronics, Inc. 155 W. Carver St., Ste. 2 Huntington, NY 11743 www.BatteryMINDers.com techsupport@vdcelectronics.com
BatteryMINDer®

- All Models Include:
- READ AND SAVE THESE INSTRUCTIONS
- BatteryMINDers.com
- Table of Contents
- Glossary of Terms
- - Maintain a battery
- - Rested
- - Specific Gravity
- - Sulfation
- IMPORTANT SAFETY INSTRUCTIONS - SAVE THESE INSTRUCTIONS
- WARNING: RISK OF EXPLOSIVE GASES
- PERSONAL PRECAUTIONS
- PREPARING TO CHARGE
- CHARGER LOCATION - FOR INDOOR USE ONLY
- DC CONNECTION PRECAUTIONS
- FOLLOW THESE STEPS WHEN CONNECTING BATTERY IS INSTALLED IN VEHICLE. A SPARK NEAR BATTERY MAY CAUSE BATTERY EXPLOSION. TO REDUCE RISK OF A SPARK NEAR BATTERY:
- QUALIFYING YOUR BATTERY:
- Preliminary Requirements
- Testing a Filler Cap or Manifold-type Lead Acid Battery
- Testing a lead acid battery with a Hot/Cold Calibrated Hydrometer Tester Read the tester instructions carefully for most accurate readings.
- Testing a Sealed or AGM Lead Acid Battery
- SIMPLIFIED OPERATING INSTRUCTIONS
- Charging Stages
- BatteryMINDer 128CEC2: 12 Volt
- LED Indicator Light Details
- DETAILED OPERATING INSTRUCTIONS
- READ AND THOROUGHLY UNDERSTAND ALL IMPORTANT SAFETY INSTRUCTIONS, PAGES 3-6 INCLUDING PREPARING TO CHARGE, DC CONNECTION PRECAUTIONS, UNIT LOCATION AND QUALIFYING YOUR BATTERY BEFORE PROCEEDING FURTHER.
- IMPORTANT! Charging a Battery in a Tightly Confined Area
- MAINTAINING MULTIPLE LEAD-ACID BATTERIES
- OPTIONAL ACCESSORIES
- FOR REPAIR OR REPLACEMENT
- IMPORTANT NOTICE
- BatteryMINDer® Five-Year Warranty Registration
- BatteryMINDers.com/ under Registration
- BatteryMINDER Model purchased:
- BatteryMINDer® Guarantee and Warranty Policy effective Jan. 2013.
- For ALL Replacements, Returns or Repairs covered by Guarantee or Warranty:
- One-Year 100% Unconditional Money Back Guarantee:
- Five-Year Limited Warranty:
- BatteryMINDer®
Brand : BatteryMINDer
Model : 244CEC2
Category : Battery charger