
FPSTJE317R013 - Juicer OSTER - Free user manual and instructions
Find the device manual for free FPSTJE317R013 OSTER in PDF.


| Product Type | Centrifugal Juicer |
| Brand | Oster |
| Model | FPSTJE317R013 |
| Power Consumption | 800 W |
| Voltage | 120 V |
| Frequency | 60 Hz |
| Dimensions (L x W x H) | 12.5 x 8.5 x 15.5 inches |
| Weight | 3.5 lbs |
| Cord Length | 3 feet |
| Pulp Container Capacity | 1.5 liters |
| Juice Pitcher Capacity | 1 liter |
| Feeding Tube Diameter | 2.5 inches |
| Speed Settings | 2 speeds (Low/High) |
| Stainless Steel Micro-Mesh Filter | Yes |
| BPA-Free Materials | Yes |
| Dishwasher Safe Parts | Yes (except motor base) |
| Anti-Drip Spout | Yes |
| Safety Locking Arm | Yes |
| Non-Slip Feet | Yes |
| Warranty | 1 Year Limited |
Frequently Asked Questions - FPSTJE317R013 OSTER
User questions about FPSTJE317R013 OSTER
0 question about this device. Answer the ones you know or ask your own.
Ask a new question about this device
Download the instructions for your Juicer in PDF format for free! Find your manual FPSTJE317R013 - OSTER and take your electronic device back in hand. On this page are published all the documents necessary for the use of your device. FPSTJE317R013 by OSTER.
USER MANUAL FPSTJE317R013 OSTER
natural_image
Illustration of a pair of Oester brand juice cooktops, one with a white handle and the other with a clear lid (no text or symbols)MODELO MODEL
PLEASE READ ALL INSTRUCTIONS BEFORE USING THIS APPLIANCE
MANUAL DE INSTRUÇÕES
CENTRÍFUGA
LEIA TODAS AS INSTRUÇÕES ANTES DE USAR ESTE APARELHO
PRECAUCIONES IMPORTANTES
natural_image
Line drawing of a mechanical device with a downward arrow indicating compression or disassembly (no text or symbols)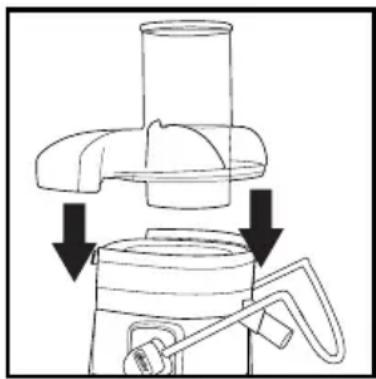
natural_image
Diagram of a mechanical device with a cylindrical component and a base, showing downward force arrows (no text or symbols)natural_image
Line drawing of a juice<|im_start|> Greenland filter with a handle and lid, showing no text or symbols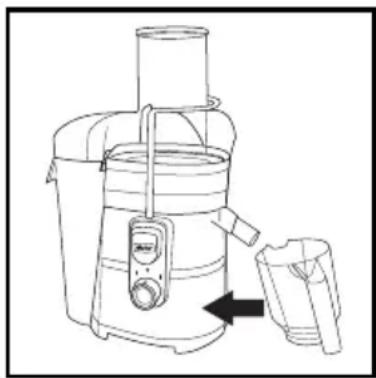
natural_image
Line drawing of a juice maker with a lid and handle, showing internal components without any text or symbols.USANDO SU ARTEFACTO
natural_image
Line drawing of a juice maker with two arrows indicating directional flow (no text or symbols)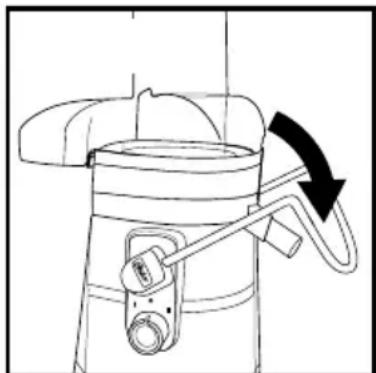
natural_image
Line drawing of a mechanical device with a curved arrow indicating rotation (no text or symbols)When using electrical appliances, basic safety precautions should always be followed including the following:
- READ ALL INSTRUCTIONS, PRODUCT LABELS AND WARNINGS BEFORE USING THE APPLIANCE.
- To protect against risk of electrical shock, DO NOT put power cord or motor base in water or any other liquid.
- Close supervision is necessary when any appliance is used by or near children.
- Unplug from outlet when not in use, before putting on or taking off parts, and before cleaning.
- Avoid contact moving parts. DO NOT touch the small cutting blades located at the base of the stainless steel filter.
- DO NOT operate any appliance with a damaged cord or plug or after the appliance malfunctions, or is dropped or damaged in any manner. Return appliance to the nearest authorized service center for examination, repair or electrical or mechanical adjustment.
- The use of attachments not recommended or sold by the manufacturer may cause fire, electric shock or injury.
- DO NOT use outdoors.
- DO NOT let cord hang over edge of table or counter.
- DO NOT let cord touch hot surfaces, including the stove.
- DO NOT operate this appliance continuously for more than 5 minutes.
- Always make sure juicer lid/cover is securely locked in place before motor is turned on. DO NOT unfasten stainless steel locking arm while juicer is in operation.
- Be sure to turn switch to off position "O" after each use of your juicer. Make sure the motor stops completely before disassembling.
- DO NOT PUT YOUR FINGERS OR OTHER OBJECTS INTO THE JUICER OPENING WHILE IT IS IN OPERATION. IF FOOD BECOMES LODGED IN THE OPENING, USE FOOD PUSHER OR ANOTHER PIECE OF FRUIT OR VEGETABLE TO PUSH IT DOWN. WHEN THIS METHOD IS NOT POSSIBLE TURN THE MOTOR OFF AND DISASSEMBLE JUICER TO REMOVE THE REMAINING FOOD.
- DO NOT use the appliance if the rotating sieve/filter is damaged.
- DO NOT push produce into the feed chute with your finger. Always use the food pusher provided.
- DO NOT touch the small cutting blades in the base of the stainless steel filter basket.
-
Always make sure the juice extractor is properly and completely assembled before operating. The unit will not turn on unless properly assembled.
-
Always use the juice extractor on a dry, level surface.
- Always turn the juice extractor off first before unplugging it from the outlet.
- DO NOT place this appliance on or near a hot gas or electric burner or where it could touch a heated oven.
- This appliance is not intended for use by persons (including children) with reduced physical, sensory or mental capabilities, or lack of experience and knowledge, unless they have been given supervision or instruction concerning use of the appliance by a person responsible for their safety. Children should be supervised to ensure that they do not play with the appliance.
- Close supervision is necessary when any appliance is used by or near children, or incapacitated individuals.
- The instructions shall state that appliances are not intended to be operated by means of an external timer or separate remote-control system
- This appliance is intended to be used in household and similar applications such as: staff kitchen areas in shops, offices and other working environments, farm houses, by clients in hotels, motels and other residential type environments, bed and breakfast type environments.
THIS UNIT IS FOR HOUSEHOLD USE ONLY.
SAVE THESE INSTRUCTIONS
SPECIAL CORD SET INSTRUCTIONS
- A short power supply cord is provided to reduce the hazards resulting from becoming entangled in or tripping over a longer cord.
- An extension cord may be purchased and used if care is exercised in its use.
- If an extension cord is used the marked electrical rating of the extension cord must be the same as the product. The extended cord must be arranged so that it will not drape over the counter top or tabletop where it can be pulled on by children or tripped over accidentally.
DESCRIPTION OF THE APPLIANCE
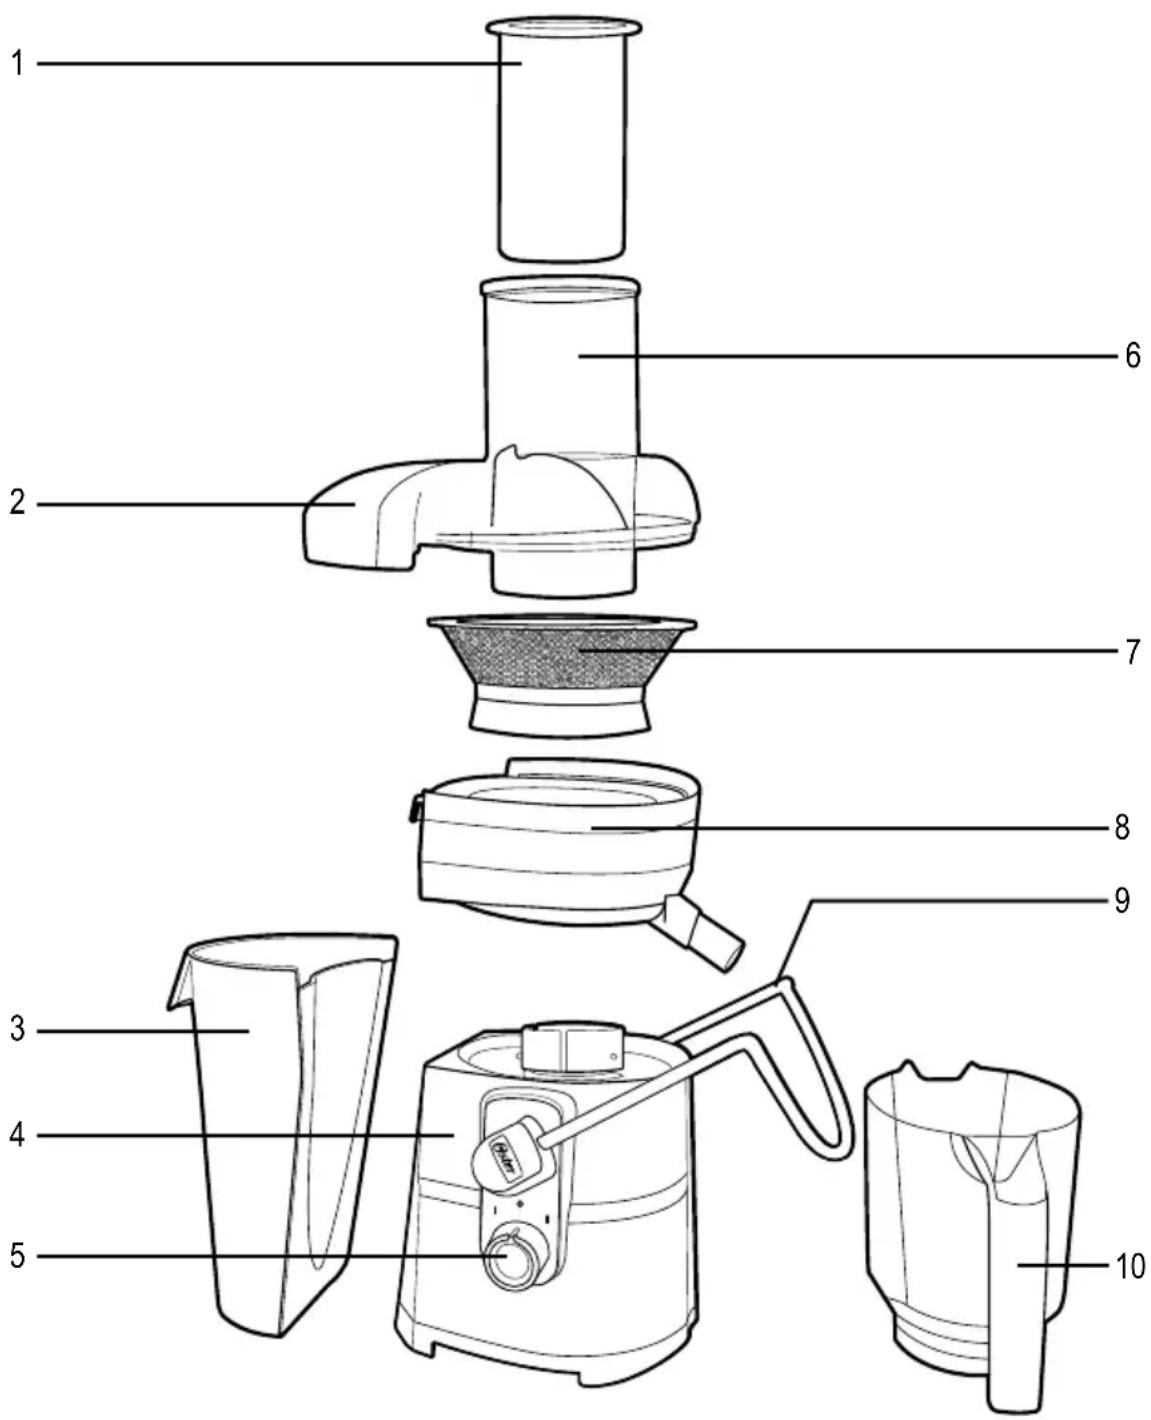
- Food Pusher
- Juice Extractor Lid/Cover
- Large Pulp Collector Container
- Motor Base Housing
- Control Knob
-
Food Chute
-
Stainless Steel Filter
- Filter Basket
- Stainless Steel Locking Arm
- 1.25 liter Jar with Froth Separator
BEFORE USING YOUR APPLIANCE
Follow the assembling instructions listed below before using your Oster® Juice Extractor:
- Before you start assembling your juice extractor, make sure it is unplugged and it is placed on a dry and level surface.
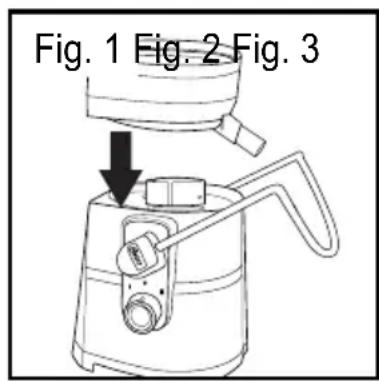
- Place filter basket on top of the motor base (Figure 1).
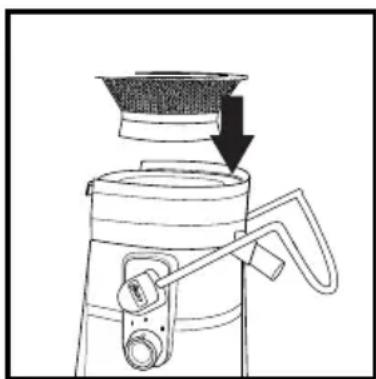
- Place the stainless steel filter on top of the filter basket pushing down and turning it until it fits into the grooves of the motor shaft (Figure 2).
- Place juicer cover/lid on top of the filter basket (Figure 3).
natural_image
Line drawing of a mechanical device with a downward arrow indicating compression or disassembly (no text or symbols)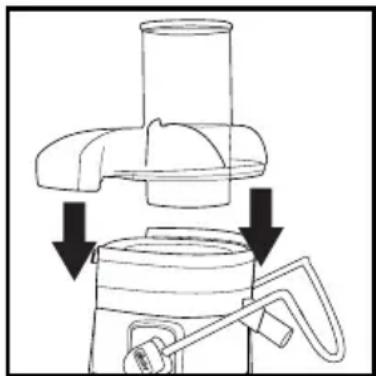
natural_image
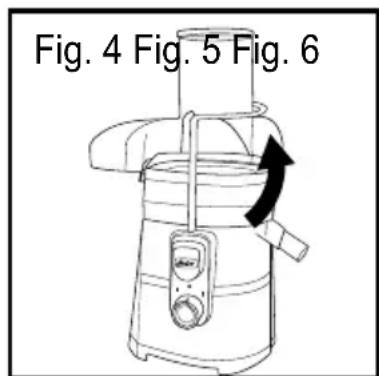
Diagram of a mechanical device with a cylindrical component and a base, showing downward force arrows (no text or symbols)- Raise the stainless steel locking arm and place it on the grooves on the sides of the lid. Your juice extractor is equipped with a safety feature that will ensure the unit will not operate unless the lid is properly locked. (Figure 4).
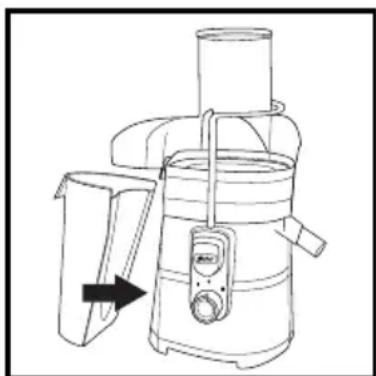
- Place the pulp container into position by tilting it slightly (Figure 5). IMPORTANT: Make sure Pulp Container edge is underneath basket.
- Place the 1.25 liter jar under the spout located on the right hand side of the juicer by tilting it slightly. Other jars or glasses can be used as well (Figure 6).
natural_image
Line drawing of a portable juice maker with a lid and handle, showing no text or symbols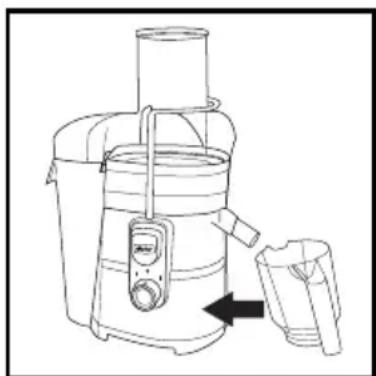
natural_image
Line drawing of a juice<|im_start|> Greenland Jamaica blender with a side panel and lid (no text or symbols)USING YOUR APPLIANCE
- Prepare your fruits and vegetables by washing them thoroughly and peeling off those that need the skin removed.
NOTE: Your juice extractor is equipped with an extra-wide food chute that is designed to allow whole fruits and vegetables. Fruits and vegetables larger than the food chute will need to be cut into smaller pieces to ensure they will fit in the chute.
-
Make sure your juice extractor is properly assembled. Please follow the instructions from the section "Before Using Your Appliance."
-
Ensure the juice extractor and its accessories are clean by following the cleaning and maintenance section of this manual.
-
Place the jar or any other container/glass you may wish to use to collect the juice under the spout and make sure the pulp collector is in place prior to begin juicing. Do not allow the pulp collector container to overfill as this may cause the unit to stall.
-
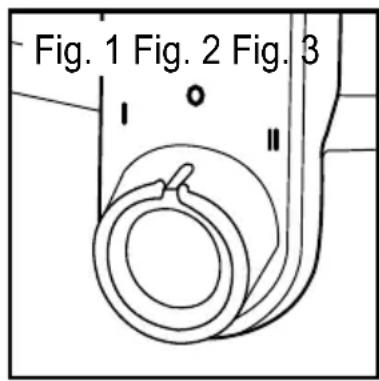
Plug the power cord into an electrical outlet and select your desired speed. Use "I" for soft foods or "II" for tougher foods.
-
Once the juicer is on, place the fruits and vegetables on the food chute and use the food pusher slowly to drive them down. In order to extract the maximum amount of juice, it is important to push the food pusher slowly.
-
The juice extractor will separate the juice and the pulp in the jar and pulp collector while you are juicing.
NOTE: Both the pulp container as well as the jar can be emptied during juicing by turning the juice extractor off "O". Make sure to place both containers back in place before you resume juicing.
NEVER USE HAND OR FINGERS TO PUSH FOOD DOWN THE FOOD CHUTE OR TO CLEAR THE FOOD CHUTE. ALWAYS USE THE FOOD PUSHER PROVIDED.
AFTER USING YOUR APPLIANCE
Before cleaning and storing your juice extractor, follow the instructions below to disassemble the unit:
- Turn juice extractor off "O" and unplug it from the electrical outlet (Figure 1).
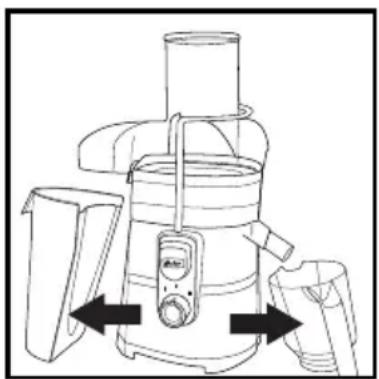
- Remove the jar and the pulp collector container by tilting it slightly (Figure 2).
- Unlock the stainless steel locking arm and move it to the right and down to release the cover/lid (Figure 3).
natural_image
Line drawing of a juice maker with two black arrows indicating directional flow (no text or symbols)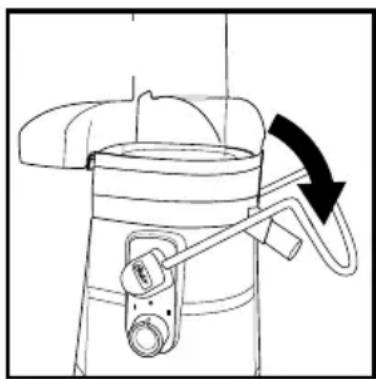
natural_image
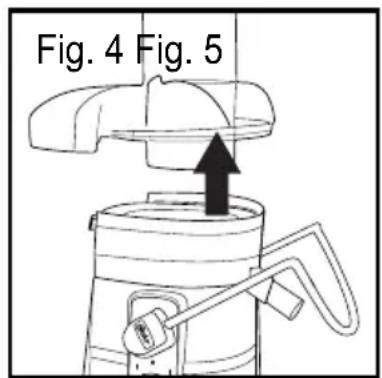
Line drawing of a mechanical device with an arrow indicating rotation (no text or symbols)- Lift the lid up and remove it from the juice extractor (Figure 4).
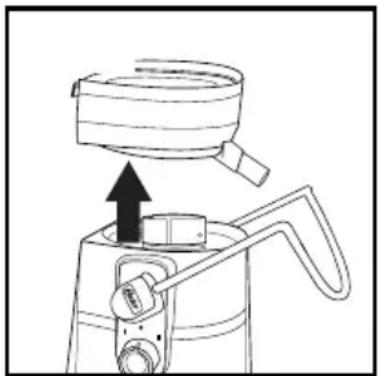
- In order to remove the filter basket and the filter, hold the filter basket with two hands and then lift it straight up (Figure 5).
natural_image
Line drawing of a mechanical device with an upward arrow indicating motion or force (no text or symbols)WARNING: THE STAINLESS STEEL FILTER BASKET CONTAINS SMALL SHARP BLADES TO CUT AND PROCESS FRUITS AND VEGETABLES. DO NOT TOUCH BLADES WHEN HANDLING THE FILTER BASKET.
CARE AND CLEANING
- After disassembling all removable parts of the juice extractor, wash them by hand with warm soapy water or in the dishwasher (top shelf only). If the pulp dries out in the pulp collector container, the filter or the filter basket, let it soak in water for approximately 10 minutes before washing it.
- Wipe the motor base with a damp cloth.
- It is very important to keep the filter very clean, free of residues blocking the holes in order to ensure optimal performance. Wash it thoroughly with warm soapy water. If the holes in the mesh remain blocked, soak the filter in hot water with a water solution with 10% lemon juice.
NOTE: DO NOT IMMERSE THE MOTOR BASE IN WATER OR ANY OTHER LIQUID.
MAINTENANCE
Some plastic parts might stain when in contact with some fruits and vegetables for too long. In order to avoid this from happening, all parts should be washed immediately after each use.
TROUBLESHOOTING
Your Oster® appliance has been carefully designed to give you many years of trouble free service. In the unlikely event that your new appliance does not operate satisfactorily, please review the following potential problems and try the steps recommended BEFORE you call or take it to an Authorized Oster® Service Center.
| PROBLEM SOLUTION | |
| Juice Extractor will not work after switching on “I” or “II”. | Stainless steel locking arm may not be locked properly in its position.Turn off and unplug unit and ensure all parts are assembled properly.Turn off and unplug unit and check if there are any residues blocking the unit. |
| Motor makes loud noise and unit starts vibrating. | Turn off and unplug unit and ensure all parts are assembled properly.Juicing overripe fruits may produce too much pulp and clog the filter. Turn off and unplug unit and clean the filter thoroughly. |
| Motor appears to stall when juicing. | If pulp starts building up under the lid, slow down the juicing process. Turn off and unplug unit and clean the filter basket, the stainless steel filter and the lid. |
| Too much pulp build up on. • Follow the instructions to disassemble the unit included in the “After Using Your Juice Extractor” section. Clean up pulp from the filter. | |
| Pulp too wet and reduced juice extraction. | Try a slower juicing action. Remove stainless steel mesh filter and thoroughly clean mesh with a nylon brush. Rinse the filter basket with hot water. If the fine mesh holes are blocked, soak the basket in a solution of hot water with 10% lemon juice to unblock the holes or wash in the dishwasher. This will remove excess fiber build up (from fruit or vegetables), which could be reducing the flow of juice. |
| Juice leaks between the rim of the Juicer and Cover the Filter. | Try a slower juicing action by pushing the Food Pusher down slower. |
TIPS AND SUGGESTIONS
- Do not place any fruits or vegetables until you turn the unit on. Allow unit to run for at least 10 seconds before you start juicing.
- Do not allow the pulp container to overfill as this may prevent correct operation or damage the unit.
- Ensure to remove large pits from fruits such as peach, mango, etc as they can damage the unit.
- You can use a plastic bag inside the pulp collector container to avoid having to clean it.
- Do not use bananas or avocados as they do not contain juice and will clog the unit. You can use a blender to add them to the juice.
- You can use the pulp of the juices you prepare in a variety of ways. The pulp from fruits and vegetables contains high amounts of fiber and cellulose, which are essential for a healthy and well balanced diet. You can use the pulp to thicken soups, bulk up rissoles and thicken casseroles or to enhance your desserts. Make sure to use the pulp the same day you juice to avoid loss vitamins.
RECIPES
FRUIT POTPOURRI
Ingredients:
4 medium apricots
2 cups cubed melon
1 large apple
1 orange
Preparation:
Process the fruits in the Oster® Juice Extractor, mix well and add a few ice cubes. Serve immediately.
PINK CLOUD
Ingredients:
1 cup strawberries
1 cored orange
1 cup cubed pear
1 small carrot
Preparation:
Process the fruits in the Oster® Juice Extractor, mix thoroughly. Serve immediately. Add a few ice cubes.
MIRACLE EXTRACT
Ingredients:
1 cup pineapple cubes
1 apple cubes
2 small carrots
1 cored orange
2 celery stalks
1 lime with peal
Preparation:
Process the fruits with the Oster® Juice Extractor, mix well. Add a few ice cubes. Serve immediately.
ENERGY COCKTAIL
Ingredients:
2 cups carrot
12 cup cucumber
12 spinach leaves
1 lime with peel
1 cup celery
1 apple
2 tablespoons honey
1 tomato
Preparation:
Process ingredients in the Oster® Juice Extractor, except the honey. Mix honey and juice well. Serve immediately, adding a few ice cubes as desired.
TOMATO COCKTAIL
Ingredients:
8 tomatoes
4 celery stalks
1 lime, peeled
1 carrot
12 teaspoon salt
1 tablespoon Worcestershire sauce
Procedure:
Wash vegetables thoroughly. Process the tomatoes, celery, lime and cucumbers. Mix the juices, add condiments, and stir well. Serve over ice in tall glasses. Garnish with a celery leaf. Yields 4 servings.
TEMPTATION
Ingredients:
6 apricots
2 cups melon
12 cup orange juice
Preparation:
Process the fruits with the Oster® Juice Extractor. Mix well the resulting extract. Add 6 ice-cubes. Serve immediately in medium glasses garnished with strawberries or a maraschino cherry and an orange slice.
SURPRISE PINEAPPLE CAKE
Ingredients:
^3/_4 cup pineapple extract
10 tablespoons butter
1 tablespoon powdered sugar
2 egg yolks
1 cup sweet condensed milk
54 lady-finger biscuits
Caramel:
14 cup water
1 cup sugar
Decoration:
1 can sliced pineapple
6-10 maraschino- cherries
Preparation:
Use the Oster® Juice Extractor to obtain the pineapple extract. With an Oster® mixer, beat the butter until creamy. Slowly add the sugar, yolks and sweetened condensed milk. Continue beating until fluffy, and then add the pineapple extract. Grease a spring mold lightly with butter, and build the cake by covering bottom and slides of the pan with the lady-finger biscuits slightly moistened with the canned pineapple's syrup.
Then add a layer of cream. Followed by a layer of biscuits, and so on until finishing with a layer of cream. Cool cake in refrigerator for three hours and unmold. Make caramel by boiling sugar and water. Decorate the cake with pineapple slices, maraschino cherries and caramel threads. Using a spring mold will yield the best results.
PRECAUÇÕES IMPORTANTES
natural_image
Line drawing of a mechanical device with a downward arrow indicating compression or disassembly (no text or symbols)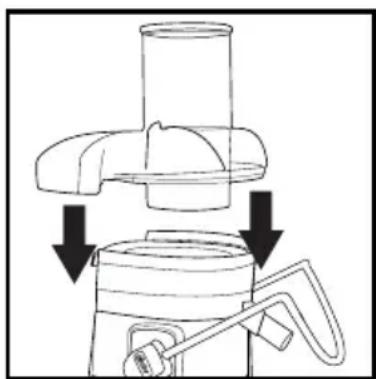
natural_image
Diagram of a mechanical device with arrows indicating assembly or motion (no text or symbols)natural_image
Line drawing of a portable juice maker with a lid and control panel (no text or symbols)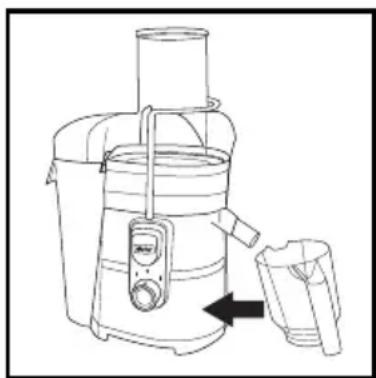
natural_image
Line drawing of a juice<|im_start|> Greenland Jamaica blender with a side arm and lid (no text or symbols)UTILIZANDO SEU APARELHO
natural_image
Line drawing of a juicer with open lid and side arm, showing internal components and directional arrows (no text or symbols)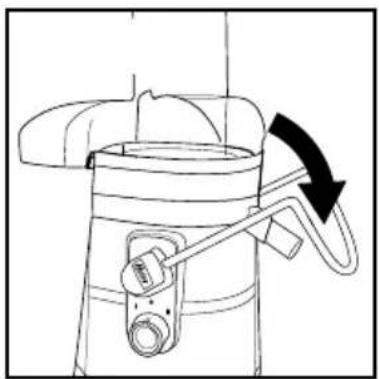
natural_image
Line drawing of a mechanical device with a handle and arrow indicating rotation (no text or symbols)natural_image
Line drawing of a portable device with a lid and handle, showing mechanical components and an upward arrow (no text or symbols)ADVERTÊNCIA: O FILTRO DE AÇO INOXIDÁVEL CONTEM AS LÂMINAS AFIADAS PEQUENAS PARA CORTAR E PROCESSAR FRUTAS E LEGUMES. NÃO TOCAR NAS LÂMINAS QUANDO ESTE FILTRO ESTIVER SENDO MANIPULADO.
LIMPEZA
PROBLEMAS E SOLUÇÕES
XXX where X is any number between 0 and 9 or any letter between A and Z.
© 2015 Sunbeam Products, Inc. All rights reserved. Distributed by Sunbeam Latin America, LLC, 5200 Blue Lagoon Drive, Suite 860, Miami, FL 33126. One year limited warranty – please see insert for details.
- PRECAUCIONES IMPORTANTES
- USANDO SU ARTEFACTO
- SAVE THESE INSTRUCTIONS
- SPECIAL CORD SET INSTRUCTIONS
- DESCRIPTION OF THE APPLIANCE
- BEFORE USING YOUR APPLIANCE
- USING YOUR APPLIANCE
- AFTER USING YOUR APPLIANCE
- CARE AND CLEANING
- MAINTENANCE
- TROUBLESHOOTING
- TIPS AND SUGGESTIONS
- RECIPES
- FRUIT POTPOURRI
- Ingredients:
- Preparation:
- PINK CLOUD
- MIRACLE EXTRACT
- ENERGY COCKTAIL
- TOMATO COCKTAIL
- Procedure:
- TEMPTATION
- SURPRISE PINEAPPLE CAKE
- Caramel:
- Decoration:
- PRECAUÇÕES IMPORTANTES
- UTILIZANDO SEU APARELHO
- LIMPEZA
- PROBLEMAS E SOLUÇÕES
Brand : OSTER
Model : FPSTJE317R013
Category : Juicer