
WD0656BR - Vacuum Cleaner RIDGID - Free user manual and instructions
Find the device manual for free WD0656BR RIDGID in PDF.


| Product Type | Wet/Dry Vacuum |
| Brand | RIDGID |
| Model | WD0656BR |
| Tank Capacity | 6.5 gallons |
| Motor Power (Peak HP) | 6.5 HP |
| Voltage | 120V |
| Amperage | 12 A |
| Power Cord Length | 10 ft |
| Hose Length | 7 ft |
| Hose Diameter | 1.25 in |
| Filtration System | Reusable foam filter and cloth filter bag |
| Blower Function | Yes, with blower port |
| Included Accessories | Crevice tool, utility nozzle, car nozzle |
| Weight | 15.5 lbs |
| Dimensions (L x W x H) | 18.5 x 18.5 x 20.3 in |
| Material | Polypropylene tank |
| Warranty | Lifetime limited warranty on vacuum, 2-year on parts |
| Certifications | UL listed |
| Dust Class | L class |
Frequently Asked Questions - WD0656BR RIDGID
User questions about WD0656BR RIDGID
0 question about this device. Answer the ones you know or ask your own.
Ask a new question about this device
Download the instructions for your Vacuum Cleaner in PDF format for free! Find your manual WD0656BR - RIDGID and take your electronic device back in hand. On this page are published all the documents necessary for the use of your device. WD0656BR by RIDGID.
USER MANUAL WD0656BR RIDGID
natural_image
Line drawing of a vacuum cleaner with lid, valve, and mounting feet (no text or symbols)FOR QUESTIONS OR INFORMATION CONTACT US AT 1-800-4-RIDGID (1-800-474-3443) from the US and Canada 01-800-701-9811 from Mexico www.ridgidvacs.com
WARNING:
To reduce the risk of injury, the user must read and understand the owner's manual before using this product.
Thank you for buying a RIDGID product.
SAVE THIS MANUAL FOR FUTURE REFERENCE
Part No. SP6737 Printed in Mexico
Table of Contents
Section Page
Important Safety Instructions....2
Introduction 4
Unpacking and Checking Carton Contents 4
Caster/Caster Foot Assembly ..... 5
Filter Removal & Installation ..... 5
Wet/Dry Vac Assembly 6
To Store Your Accessories....7
Operation....7
Vacuuming Dry Materials ..... 8
Section Page
Vacuuming Liquids 9
Emptying the Drum 9
Moving the Wet/Dry Vac. 9
Blowing Feature 9
Maintenance 10
Filter 10
Storage 11
Casters 11
Repair Parts....12
Warranty 14
IMPORTANT SAFETY INSTRUCTIONS
Safety is a combination of using common sense, staying alert, and knowing how your wet/dry vacuum cleaner ("Vac") works.
Safety Signal Words
⚠️ DANGER: Indicates a hazardous situation which, if not avoided, will result in death or serious injury.
⚠ WARNING: Indicates a hazardous situation which, if not avoided, could result in death or serious injury.
CAUTION: Indicates a hazardous situation which, if not avoided, could result in minor or moderate injury.
When using your Vac, always follow basic safety precautions including the following:
▲ WARNING
- To reduce the risk of fire, electric shock, or injury:
- Read and understand this manual and all labels on the Vac before operating.
- Use only as described in this manual.
- Do not leave Vac running while unattended - you may fail to notice important signs indicating abnormal operation such as loss of suction, debris/liquid exiting exhaust, or abnormal motor noises. Immediately stop using Vac if you notice these signs.
- Sparks inside the motor can ignite flammable vapors or dust. To reduce the risk of fire or explosion, do not use near combustible liquids, gases, or dusts, such as gasoline or other fuels, lighter
fluid, cleaners, oil-based paints, natural gas, coal dust, magnesium dust, grain dust, aluminum dust, or gun powder.
- Do not vacuum anything that is burning or smoking, such as cigarettes, matches, or hot ashes.
- Do not vacuum drywall dust, cold fireplace ash, or other fine dusts with standard filter. These may pass through the filter and be exhausted back into the air. Use a fine dust filter instead.
• To reduce the risk of inhaling toxic vapors, do not vacuum or use near toxic or hazardous materials.
• To reduce the risk of electric shock, do not expose to rain or allow liquid to enter motor compartment. Store indoors.
- Do not allow to be used as a toy. Close attention is necessary when used by or near children.
- Do not use with a torn filter or without filter installed except when vacuuming liquids as described in this manual. Dry debris ingested by the impeller may damage the motor or be exhausted into the air.
- Do not leave Vac when plugged in. Unplug from outlet when not in use and before servicing.
- Turn off Vac before unplugging.
• To reduce the risk of injury from accidental starting, unplug power cord before changing or cleaning filter.
- Do not unplug by pulling on cord. To unplug, grasp the plug, not the cord.
- Do not use with damaged cord, plug or other parts. If your Vac is not working as it should, has missing parts, has been dropped, damaged, left outdoors, or dropped into water, call customer service.
- Do not pull or carry by cord, use cord as handle, close a door on cord, or pull cord around sharp edges or corners. Do not run Vac over cord. Keep cord away from heated surfaces.
- Do not handle plug, switch, or the Vac with wet hands.
- Use only extension cords that are rated for outdoor use. Extension cords in poor condition or too small in wire size can pose fire and shock hazards. To reduce the risk of these hazards, be sure the cord is in good condition and that liquid does not contact the connection. Do not use an extension cord with conductors smaller than 16 gauge (AWG) in size. To reduce power loss, use a 14 gauge extension cord if 25 to 50 ft. long and 12 gauge for 50 ft. or longer.
- This Vac is double-insulated, eliminating the need for a separate grounding system. Use only identical replacement parts. Read the instructions for Servicing Double-Insulated Wet/Dry Vacs.
- Do not put any object into ventilation openings. Do not vacuum with any ventilation openings blocked; keep free of dust, lint, hair or anything that may reduce air flow.
- Keep hair, loose clothing, fingers, and all parts of body away from openings and moving parts.
-
To reduce the risk of falls, use extra care when cleaning on stairs.
• To reduce the risk of back injury or falls, do not lift a Vac that is heavy with liquid or debris. Partially empty by scooping debris or draining liquid.
• To reduce the risk of personal injury or damage to Vac, use only Ridgid recommended accessories. -
When using as a blower:
- Direct air discharge only at work area.
- Do not direct air at bystanders.
- Keep children away when blowing.
- Do not use blower for any job except blowing dirt and debris.
- Do not use as a sprayer.
- Wear safety eyewear.
• To reduce the risk of eye injury, wear safety eyewear. The operation of any utility Vac or blower can result in foreign objects being blown into the eyes, which can result in severe eye damage.
CAUTION:
• To reduce the risk of hearing damage, wear ear protectors when using for extended time or in a noisy area.
- For dusty operations, wear dust mask.
- Static shocks are common when the relative humidity of the air is low. Vacuuming fine debris with your Vac can deposit static charge on the hose or Vac. To reduce the frequency of static shocks in your home or when using this Vac, add moisture to the air with a humidifier.
Observe the following warnings that appear on the motor housing of your Vac:

DOUBLE INSULATED GROUNDING NOT REQUIRED. WHEN SERVICING USE ONLY IDENTICAL REPLACEMENT PARTS.
WARNING: For your own safety, read and understand owner's manual. Do not run unattended. Do not pick up hot ashes, coals, toxic, flammable or other hazardous materials. Do not use around explosive liquids or vapors.
⚠ WARNING: To reduce the risk of electric shock - do not expose to rain - store indoors.
SAVE THIS MANUAL
Introduction
This Wet/Dry Vac is intended for household use. It may be used for vacuuming wet or dry media and may be used as a blower.
Read this owner's manual to familiarize yourself with the product features and to understand the specific usage of your new Vac.
Unpacking and Checking Carton Contents —
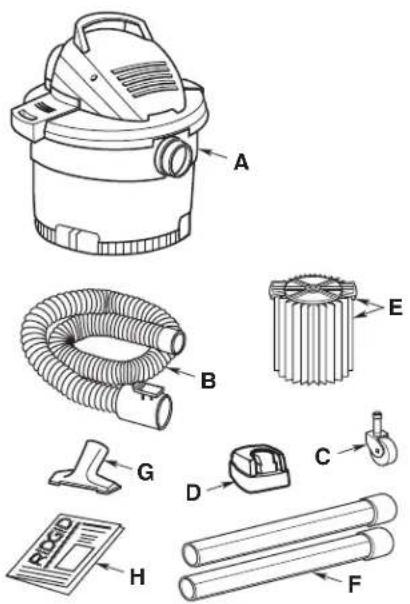
Remove entire contents of carton. Check each item against the Carton Contents List. Contact 1-800-4-RIDGID from the US and Canada, 01-800-701-9811 from Mexico, or E-mail us at info@ridgidvacs.com if any parts are damaged or missing.
Carton Contents List
Key Description Qty
A Wet/Dry Vac ....1
B Tug-A-Long Hose....1
C Caster 4
D Caster Foot w/Storage....4
E* Qwik Lock™ Filter....1
F Extension Wands ......2
G Utility Nozzle ....1
H Owner's Manual....1
* The filter comes preassembled to the power head.
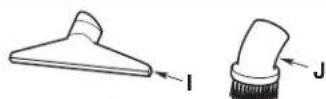
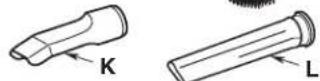
Select Models May Also Include:
I* Wet Nozzle ....1
J* Dusting Brush ....1
K* Car Nozzle ....1
L* Crevce Tool 1
Caster/Caster Foot Assembly
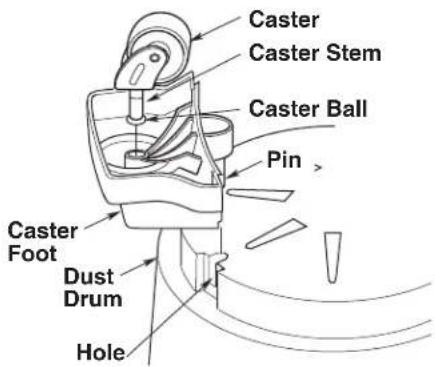
- Turn the dust drum upside down on the floor.
- Insert the caster feet into the bottom of drum, as shown (4 places).
- Push on the caster foot until the foot is flush with bottom of the dust drum.
- Insert the caster stem into the socket of the caster foot, as shown (4 places).
- Push on the caster until the ball on the caster stem is inserted all the way into the socket. You will hear the ball snap into the socket and the caster will swivel easily when positioning is correct.
- Turn the drum upright.
Filter Removal and Installation
Removal and Installation of the Qwik Lock™ Filter
Filter Removal:
- Hold the filter tabs of the Qwik Lock™ filter in each hand.
- With one thumb on the Qwik Lock™ stud, which protrudes through the integrated filter plate, lift up on the filter tabs while pushing down on the stud.
- This action will cause the filter to release from the filter cage. Slide filter off cage.
Filter Installation:
- Carefully slide the Qwik Lock™ filter over the filter cage and press down on the outside edge of the filter until the rubber gasket on the bottom of the filter seats securely around the base of the filter cage and against the lid.
- Align the small center hole in the top of the filter over the Qwik Lock™ stud on the filter cage. Press firmly on top of the filter near the stud to allow the filter to snap over the ball on the end of the stud. The filter is now attached.
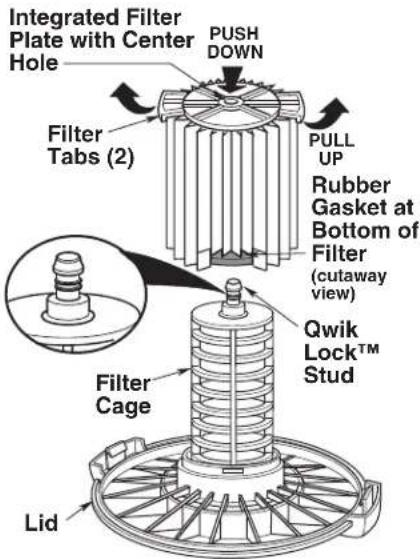
NOTE: Failure to properly seat the bottom gasket could result in debris bypassing the filter.
Wet/Dry Vac Assembly
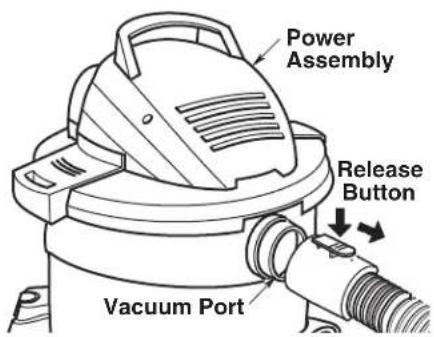
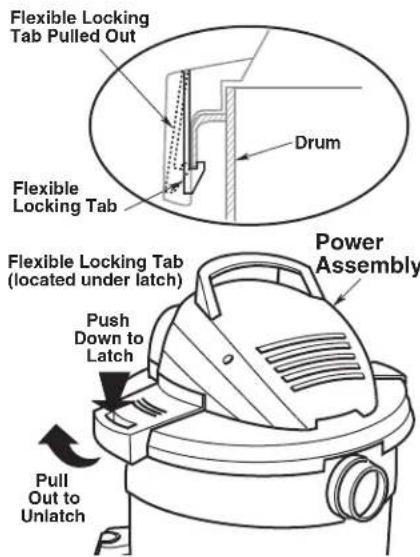
- Line up front of powerhead assembly with Vacuum port located on the front of the drum, as shown.
NOTE: Powerhead assembly must be aligned with drum for proper attachment.
- Place powerhead assembly on top of drum.
- Be sure powerhead assembly completely covers the top of the drum so leakage does not occur.
- Push down on top of handles to cause flexible locking tabs to hook onto the drum lip.
- Make sure that the locking tabs are snapped into place as shown, to prevent the lid from coming off.
- To remove the powerhead assembly, reverse above directions.
Insert Hose
Insert the larger end of the hose into the vacuum port.
Place the utility nozzle securely on the opposite end of the hose and the Vac is ready for use.
To Store Your Accessories
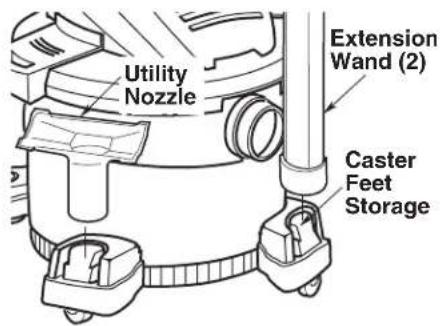
- Slide extension wands and accessories onto posts of the caster feet for storage.
- To remove wands and accessories, lightly rotate and pull upward.
Operation
WARNING: To reduce the risk of fire, explosion, or damage to Vac:
- Do not leave Vac running while unattended - you may fail to notice important signs indicating abnormal operation such as loss of suction, debris/liquid exiting exhaust, or abnormal motor noises. Immediately stop using Vac if you notice these signs.
- Do not leave Vac plugged-in when not in use.
- Do not continue running when float has cut off suction.
- Do not operate Vac in areas with flammable gases, vapors, or explosive dust in the air. Sparks inside the motor can ignite airborne flammables. Flammable gases and vapors include: lighter fluid, solvent-type cleaners, oil-based paints, gasoline, alcohol, or aerosol sprays. Flammable dusts include: coal, magnesium, aluminum, grain, or gun powder.
- Do not vacuum up explosive dusts, flammable liquids, or hot ashes.
- Do not use Vac as a sprayer.
WARNING: To reduce the risk of electric shock or injury:
- Do not expose to rain or allow liquid to enter the motor compartment. Store indoors.
- Do not handle plug, switch, or Vac with wet hands.
- Do not service Vac while it is plugged-in. If your Vac is not working as it should, has missing parts, has been dropped, damaged, left outdoors, or dropped into water, return it to an independent service center or call customer service.
- When using an extension cord, use only outdoor-rated cords that are in good condition. Do not allow the connection to come into contact with liquid.
- Do not vacuum toxic materials to reduce the risk of inhaling the vapors or dust.
Operation (continued)
To reduce the risk of electric shock, this Vac has a polarized plug (one blade is wider than the other, except for 230 volt models). This plug will fit in a polarized outlet only one way. If the plug does not fit fully in the outlet, reverse the plug. If it still does not fit, contact a qualified electrician to install the proper outlet. Do not change the plug in any way.
After you plug the power cord into the outlet, turn the unit on by pushing the switch from position "O" to position "I". The symbols used on the switch actuator are international "On & Off" symbols:
$$ \bigcirc = \text { OFF } \quad | = \text { ON } $$
Familiarize yourself with the accessories included with the Vac. Each accessory may be used in various ways for vacuuming and blowing debris. Here is a list of the accessories and their uses.
Extension Wands - These wands can be connected together and provide additional length.
Hose - Provides transfer of vacuum or blowing capability to work site. Provides the means of attaching extension wands and nozzles.
Utility Nozzle - General purpose nozzle for most vacuuming applications.
Car Nozzle (On Select Models Only) - Dry pickup nozzle for car interiors and most upholstery cleaning.
Crevice Tool (On Select Models Only) - Use to pick up debris in hard to reach locations.
Dusting Brush (On Select Models Only) - Used for detailed cleaning in small spaces.
Wet Nozzle (On Select Models Only) - Used for wet pickup on smooth surfaces to pick up liquid and dry the surface in one stroke.
Vacuuming Dry Materials
- The filter must always be in correct position at all times to avoid leaks and possible damage to Vac.
- When using your Vac to pick up fine dust, it will be necessary for you to empty the drum and clean the filter at more frequent intervals to maintain peak Vac performance.
NOTE: A dry filter is necessary to pick up dry material. If you use your Vac to pick up material when the filter is wet, the filter will clog quickly and be very difficult to clean.
- If your filter is wet but you need to use the Vac to pick up dry material, you must first allow the filter to dry.
Vacuuming Liquids
- When picking up small amounts of liquid the filter may be left in place.
- When picking up large amounts of liquid it is recommended that the filter be removed. If the filter is not removed, it will become saturated and misting may appear in the exhaust.
- When the liquid in the drum reaches a predetermined level, the float mechanism will rise automatically to cut off air-flow. You will know that the float has risen because suction stops and the motor noise will become higher in pitch, due to increased motor speed. When this happens, turn off the Vac, unplug the power cord, and empty the drum.
- After using the Vac to pick up liquids, the filter must be dried to avoid possible mildew and damage to the filter.
Operation (continued)
Emptying the Drum
- Remove the lid. Pull the flexible latches outward on each side of the lid to release from the drum.
- While holding the latches out, lift the top assembly up and away from the drum.
- Lay top assembly upside down on a clean area while emptying drum or changing filter.
- Dump the drum contents into the proper waste disposal container.
Moving the Wet/Dry Vac
Should it become necessary to pick the Vac up to move it, DO NOT pick the Vac up by the lid handles unless dust drum is empty. To avoid dropping the Vac, due to latches releasing or possible part breakage, pick the Vac up by the dust drum.
Blowing Feature
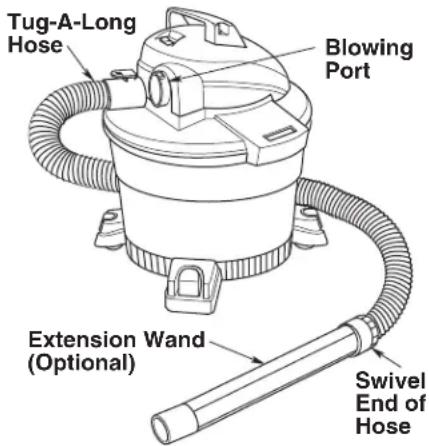
Your Wet/Dry Vac features "Full Blowing". It can blow sawdust and other debris. Follow the steps below to use your Vac as a blower.
⚠ WARNING: Always wear safety eyewear complying with ANSI Z87.1 (or in Canada, CSA Z94.3) before using as a blower.
⚠ WARNING: To reduce the risk of injury to bystanders, keep them clear of blowing debris.
⚠️ CAUTION: Wear a dust mask if blowing creates dust which might be inhaled.
CAUTION: To reduce the risk of hearing damage, wear ear protectors when using the Vac/blower for extended time or in a noisy area.
- Locate blowing port of your Wet/Dry Vac.
- Insert the larger end of hose into the blowing port of the Vac.
- (Optional) Attach extension wand to swivel end of hose.
- Turn Vac on and you are ready to use your Vac as a blower.
Maintenance
Filter
⚠ WARNING: To reduce the risk of injury from accidental starting, unplug power cord before changing or cleaning filter.
NOTE: The filter is made of high quality paper designed to stop small particles of dust. The filter can be used for dry pick up or small amounts of liquid. Handle the filter carefully when removing or installing it. Creases in the filter pleats may occur from installation but will not affect the performance of the filter.
Filter Cleaning
Your filter should be cleaned often to maintain peak Vac performance.
Allow the filter to dry before storing or picking up dry debris.
IMPORTANT: After cleaning, check the filter for tears or small holes. Do not use a filter with holes or tears in it. Even a small hole can allow dust to come out of your Vac. Replace it immediately.
Filter Removal
Refer to section "Filter Removal and Installation" of this manual.
IMPORTANT: To avoid damage to the blower wheel and motor, always reinstall the filter before using the Vac for dry material pick-up.
Cleaning A Dry Filter
- Some removal of dry debris can be accomplished without removing the filter from the Vac. Slap your hand on top of the lid while the Vac is turned off.
- For best cleaning results due to accumulated dust, clean the filter in an open area. Cleaning SHOULD be done outdoors and not in the living quarters.
- After filter removal from Vac, remove the dry debris by gently tapping filter against the inside wall of your dust drum. The debris will loosen and fall.
- For thorough cleaning of dry filter with fine dust (no debris), run water through it as described under "Cleaning A Wet Filter"
Cleaning A Wet Filter
After filter is removed, run water through the filter from a hose or spigot. Take care that water pressure from the hose is not strong enough to damage filter.
Maintenance (continued)
Cleaning and Disinfecting the Wet/Dry Vac
To keep your Wet/Dry Vac looking its best, clean the outside with a cloth dampened with warm water and mild soap.
To clean the drum:
- Dump debris out.
- Wash drum thoroughly with warm water and mild soap.
- Wipe out with dry cloth.
Before prolonged storage or as needed (i.e.; waste water pick up) the drum should be disinfected.
To disinfect the drum:
- Pour 1 gallon of water and 1 teaspoon chlorine bleach into the drum.
- Let solution stand for 20 minutes, carefully swishing every few minutes, making sure to wet all inside surfaces of the drum.
- Empty drum after 20 minutes. Rinse with water until bleach smell is gone. Allow drum to dry completely before sealing the motor on the drum.
Storage
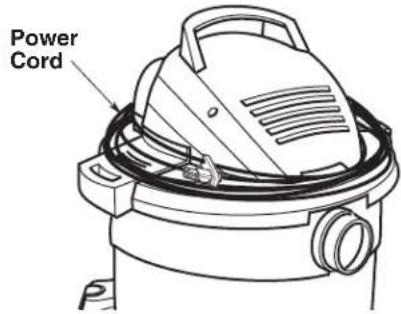
Before storing your Vac, the dust drum should be emptied and cleaned. The cord should be wrapped around the unit. Accessories should be kept in the same area as the Vac so they can be readily available. The Vac should be stored indoors.
If the power cord is damaged, it must be replaced by the manufacturer or their service agent or by similarly qualified personnel to reduce the risk of accident.
Casters
If your casters are noisy, you may put a drop of oil on the roller shaft to make them quieter.
Repair Parts
6 or 9 U.S. Gallon Wet/Dry Vac
Model Number WD06700/WD0671EX0 or
WD09700/WD0970M0/WD0970EX0
RIDGID parts are available on-line at www.ridgidparts.com
Always order by Part Number - Not by Key Number
WARNING
SERVICING OF DOUBLE-INSULATED WET/DRY VAC
In a double-insulated Wet/Dry Vac, two systems of insulation are provided instead of grounding. No grounding means is provided on a double-insulated appliance, nor should a means for grounding be added. Servicing a double-insulated Wet/Dry Vac requires extreme care and knowledge of the system, and should be done only by qualified service personnel. Replacement parts for a double-insulated Wet/Dry Vac must be identical to the parts they replace. Your double-insulated Wet/Dry Vac is marked with the words "DOUBLE INSULATED" and the symbol (square within a square) may also be marked on the appliance.
To reduce the risk of injury from electrical shock, unplug power cord before servicing the electrical parts of the Wet/Dry Vac.
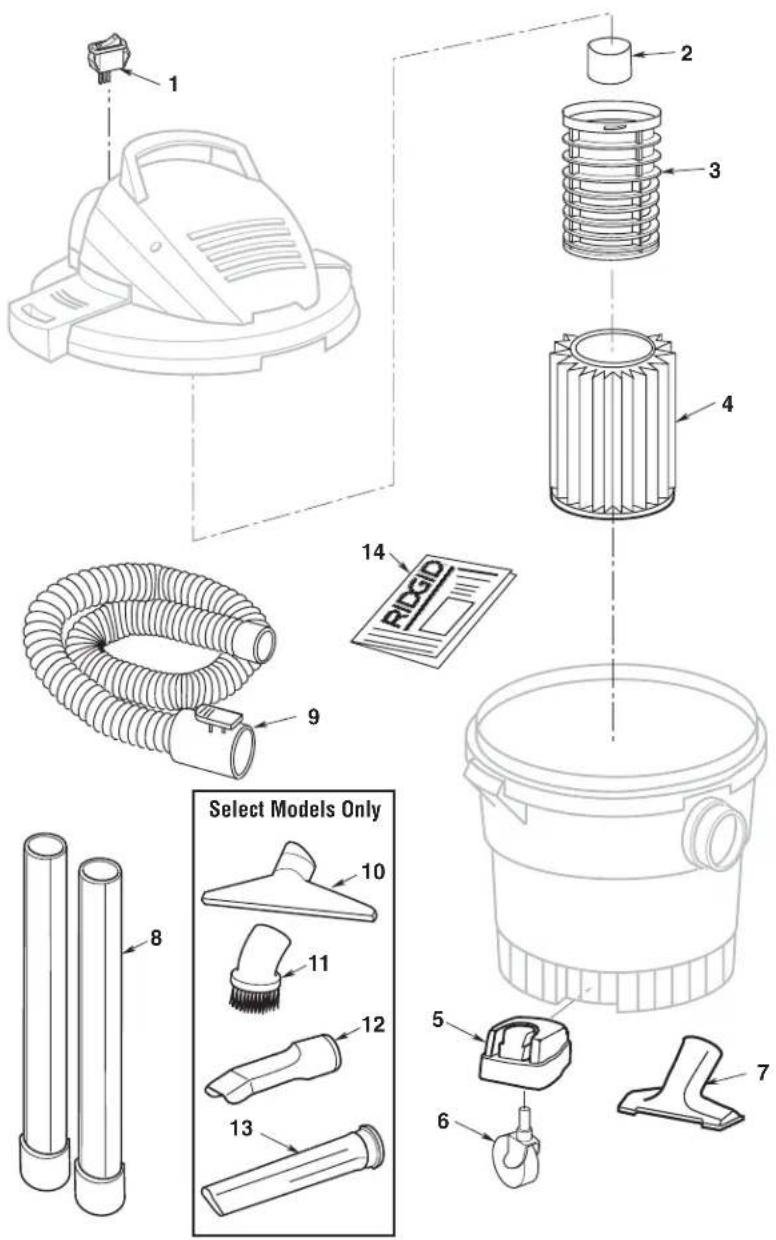
| Key WD0670 Series WD0970 Series No. Part Number Part Number Description | ||
| 1 832086 832086 Rocker Switch | ||
| 2 509488 509488 Float | ||
| 3 823201-3 823201-3 Filter Cage | ||
| 4 VF4000 VF4000 Qwik LockTM Filter | † | |
| 5 832084 832084 Caster Foot w/Storage | ||
| 6 331605 331605 Caster | ||
| 7 VT1709 VT1709 Utility Nozzle | † | |
| 8 VT1708 VT1708 Extension Wand | † | |
| 9 VT1720 VT1720 Hose | † | |
| 10 VT1710 VT1710 Wet Nozzle | † (Select Models Only) | |
| 11 VT1701 VT1701 Dusting Brush (Select Models Only) | † | |
| 12 VT1781 VT1781 Car Nozzle (Select Models Only) | † | |
| 13 VT1702 VT1702 Crevice Tool (Select Models Only) | † | |
| 14 SP6737 SP6737 Owner's Manual |
† These replacement parts are available where you purchased your Vac.
Repair Parts (continued)
6 or 9 U.S. Gallon Wet/Dry Vac
Model Number WD06700/WD0671EX0 or
WD09700/WD0970M0/WD0970EX0
RIDGID parts are available on-line at www.ridgidparts.com


What is covered
RIDGID® tools are warranted to be free of defects in workmanship and material.
How long coverage lasts
This warranty lasts for the lifetime of the RIDGID ^® tool. Warranty coverage ends when the product becomes unusable for reasons other than defects in workmanship or material.
How can you get service
To obtain the benefit of this warranty, deliver via prepaid transportation the complete product to RIDGE TOOL COMPANY, Elyria, Ohio, or any authorized RIDGID® INDEPENDENT SERVICE CENTER. Pipe wrenches and other hand tools should be returned to the place of purchase.
What we will do to correct problems
Warranted products will be repaired or replaced, at RIDGE TOOL's option, and returned at no charge; or, if after three attempts to repair or replace during the warranty period the product is still defective, you can elect to receive a full refund of your purchase price.
What is not covered
Failures due to misuse, abuse or normal wear and tear are not covered by this warranty. RIDGE TOOL shall not be responsible for any incidental or consequential damages.
How local law relates to the warranty
Some states do not allow the exclusion or limitation of incidental or consequential damages, so the above limitation or exclusion may not apply to you. This warranty gives you specific rights, and you may also have other rights, which vary, from state to state, province to province, or country to country.
No other express warranty applies
This FULL LIFETIME WARRANTY is the sole and exclusive warranty for RIDGID ^3 products. No employee, agent, dealer, or other person is authorized to alter this warranty or make any other warranty on behalf of the RIDGE TOOL COMPANY.
Stock No. WD0670/WD0671EX or WD0970/WD0970M/WD0970EX Model No. WD06700/WD0671EX0 or WD09700/WD0970M0/WD0970EX0
Serial Number
Model and serial numbers may be found next to the blowing port. You should record both model and serial numbers in a safe place for future use.
FOR QUESTIONS OR INFORMATION CONTACT US AT
1-800-4-RIDGID (1-800-474-3443) from the US and Canada
01-800-701-9811 from Mexico
www.ridgidvacs.com
Please have your Model Number and Serial Number on hand when calling.

EMERSON™
Professional Tools
Emerson Tool Company
A Division Of
Emerson Electric Co.
© 2010 Emerson
Part No. SP6737 Form No. SP6737-1 Printed in Mexico 07/10
RIDG ^
MANUAL DEL USUARIO
natural_image
Line drawing of a vacuum cleaner with lid, valve, and mounting feet (no text or symbols)natural_image
Illustration of four different types of hair clips labeled I, J, K, and L (no text or symbols beyond labels)Emerson Tool Company
Una División de
Emerson Electric Co.
© 2010 Emerson
- Table of Contents
- Section Page
- IMPORTANT SAFETY INSTRUCTIONS
- Safety Signal Words
- ▲ WARNING
- CAUTION:
- SAVE THIS MANUAL
- Introduction
- Unpacking and Checking Carton Contents —
- Carton Contents List
- Key Description Qty
- Select Models May Also Include:
- Caster/Caster Foot Assembly
- Filter Removal and Installation
- Removal and Installation of the Qwik Lock™ Filter
- Filter Removal:
- Filter Installation:
- Wet/Dry Vac Assembly
- Insert Hose
- To Store Your Accessories
- Operation
- WARNING: To reduce the risk of fire, explosion, or damage to Vac:
- WARNING: To reduce the risk of electric shock or injury:
- Operation (continued)
- Vacuuming Dry Materials
- Vacuuming Liquids
- Emptying the Drum
- Moving the Wet/Dry Vac
- Blowing Feature
- Maintenance
- Filter
- Filter Cleaning
- Filter Removal
- Cleaning A Dry Filter
- Cleaning A Wet Filter
- Maintenance (continued)
- Cleaning and Disinfecting the Wet/Dry Vac
- Storage
- Casters
- Repair Parts
- WARNING
- SERVICING OF DOUBLE-INSULATED WET/DRY VAC
- Repair Parts (continued)
- RIDG ^
Brand : RIDGID
Model : WD0656BR
Category : Vacuum Cleaner