Excalibur RS-272 - Remote control OMEGA - Free user manual and instructions
Find the device manual for free Excalibur RS-272 OMEGA in PDF.


| Type | Remote control for car alarm and remote start system |
| Brand | Omega |
| Model | Excalibur RS-272 |
| Battery Type | CR2032 (1) for part #124 & 1111; CR2016 (2) for part #123 & 118 |
| Battery Replacement | Remove screw, pry case open, replace battery |
| Range | Up to 1 mile (line of sight, typical) |
| Main Functions | Lock & Arm, Unlock & Disarm, Silent Arm/Disarm, Trunk/Hatch Release, Panic, Remote Start/Stop, Pit Stop Mode, XL Pit Stop Mode, Low Battery & Low/High Temp Auto-Start, Valet Mode |
| Security Features | Alarm system with violated zone diagnostics, status LED, sensor disable, anti-carjacking, secure code override |
| Programming | Up to 4 remotes; ignition ON, press valet 5x, press lock on each remote |
| Valet/Programming Button | Located on antenna/receiver module |
| Status LED | Indicates system mode and violated zones |
| Manual Transmission Reservation | Required for manual vehicles; procedure ensures neutral and safety |
| Compatibility | Works with Omega Excalibur RS-X70 series (firmware v1.6) |
| Accessories | Linkr smartphone control, 2-way controllers, data sensors, siren |
| Regulatory | FCC Part 15 compliant |
| Dimensions | Approx. 2.5 x 1.5 x 0.6 inches (typical remote) |
| Weight | Approx. 0.5 oz (with battery) |
| Color | Black with gray buttons (typical) |
| Warranty | Register at CarAlarm.com for warranty details |
Frequently Asked Questions - Excalibur RS-272 OMEGA
User questions about Excalibur RS-272 OMEGA
0 question about this device. Answer the ones you know or ask your own.
Ask a new question about this device
Download the instructions for your Remote control in PDF format for free! Find your manual Excalibur RS-272 - OMEGA and take your electronic device back in hand. On this page are published all the documents necessary for the use of your device. Excalibur RS-272 by OMEGA.
USER MANUAL Excalibur RS-272 OMEGA
REPLACING YOUR REMOTE BATTERY
| STEPS | REMOTE PART# | BATTERY (QTY) |
| 1) Find the part # on the back of the remote to identify the battery.2) Remove the screw from the back of the remote.3) Gently pry the case in halves apart to access & replace the battery. | 124 & 1111 | CR2032 (1) |
| 123 & 118 | CR2016 (2) |
SECURITY*, KEYLESS ENTRY, & CONVENIENCE FUNCTIONS
| FUNCTION | 1+1 BUTTON | 1 BUTTON | NOTE |
| Lock & Arm* |  | For 1 Sec. | Security enabled systems will flash the status LED. Repeat to Unlock/Disarm* |
| Unlock & Disarm* |  | For 1 Sec. | Repeat to Lock/Arm* |
| Silent Arm/Disarm* |  | - | System will toggle Arm/Disarm each time |
| Disable Sensor* |  | - | Sensors are disabled until you Lock/Arm again. |
| Trunk/Hatch Release |  | - | By default, the system will also disarm/unlock |
| Panic |  | - | Doors will Lock or Unlock before panic. |
*Security related functions only available on some models. Consult your installer to upgrade.
Register today at www.CarAlarm.com
to activate/learn about your warranty & download a complete operation guide.
Serial Number
819296104100
version 1.60
EXCALIBUR REMOTE START & SECURITY PERFECTED
1+1 Button / 1 Way Remote Start Systems
| FUNCTION | BUTTON(S) | NOTE |
| Engine Start/Stop |  | Activation is programmable (contact installer). Take Over: Turn ignition key 'ON' (not start), press brake pedal |
| Run Time Extender |  | The system will restart the internal run timer. |
| FUNCTION | VALET BUTTON | NOTE |
| Pit Stop Mode | Press 2x after Engine Running For More Than 10 Seconds | This will leave the engine running for the programmed run time so you can take your keys with you to run errands. |
| XL Pit Stop Mode | Press 6x After Engine Running For More Than 10 Seconds | This will leave the engine running for 12 hours so you can safely leave the engine running for extended periods. Ideal for commercial vehicles using strobes, refrigerators boxes, etc. |
| Low Battery & Low/ Hi Temp Auto-Start | Ignition Key ON, OFF, Press 2x | Auto-start will activate a max of once per 2 hours. See your installer or the full manual for threshold settings. |
| Valet Mode | Unlock, Hold For 3 Sec. | This disables remote start and the security system. The status LED will turn on. Repeat this process or press valet button once to exit valet mode. TIP: You can also enter valet mode by holding the valet button for 3 seconds! |
MANUAL TRANSMISSION RESERVATION MODE
This must be performed before you can remote start a manual transmission vehicle to ensure the car is in neutral & maximum safety. Consult your installer for more information.
1) With the engine running (more than 10 seconds), hold the brake pedal & place the transmission in neutral.
2) Apply the parking brake and release the brake pedal.
3) Send the remote start command via your remote. The status LED will begin flashing.
4) Take the ignition key out of the switch (the engine should stay running).
5) Exit the vehicle and lock your doors. The engine will turn off.
WINDOW-MOUNT ANTENNA/RECEIVER
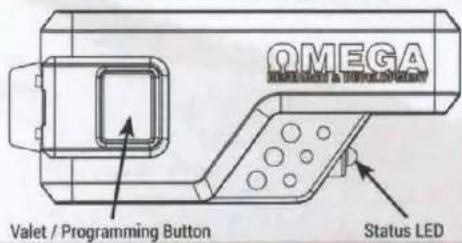
EXCALIBUR REMOTE START & SECURITY PERFECTED
PROGRAMMING REMOTES
PROGRAMMING REMOTES TO THE SYSTEM (UP TO 4)
BEFORE YOU BEGIN: Have all remotes for the system at hand.
1) Turn the ignition key "ON" (do not start).
2) Press the valet button 5 times within 5 seconds of step 1.
- The horn will briefly sound
3) Press & release the "lock" button on each transmitter one after the other.
- 1-button models, press the "start" button.
- The siren/horn will chirp once for each transmitter.
- NOTE: When the first remote is learned all previous remotes are erased.
- NOTE: All other button functions will automatically be assigned.
4) Turn the ignition key "OFF".
- NOTE: The system will exit at any time after 10 seconds of no activity.
SCAN TO WATCH
HOW-TO VIDEO


1+1 Button / 1 Way Remote Start Systems
| CHIRPS/FLASHES | VIOLATED ZONE |
| LED ON | System in Valet mode |
| 1 | Hood opened |
| 2 | Brake pedal pressed |
| 3 | Bad tach signal or engine over-rev. |
| 4 | BLACK/WHITE wire lost ground |
| 5 | 3D motion detected while cranking |
| 6 | Received engine stop command |
| 7 | Alarm was triggered |
| 8 | Run time expired |
| 9 | Low vehicle battery voltage detected |
If the system fails to remote start or remote start stops unexpectedly, it will give a long horn/siren chirp followed by a series of short horn/siren chirps & light flashes. The short chirps/light flashes indicate the cause of the failure.
TIP: If remote start won't activate, the system may be in valet mode (Status LED ON). Press the valet button once to exit.
EXCALIBUR REMOTE START & SECURITY PERFECTED
1+1 Button / 1 Way Remote Start Systems
Visit www.CarAlarm.com today
To Download your complete operation guide and learn more about:
Additional Features
- Anti-Carjacking Mode
- Secure Code Override
- Turbo Timer Support & Operation
- Customizing System Options
- Passive Security Functions
- Emergency Override
System Upgrades
-Linkr Smartphone Control
-2-Way Controllers w/ Extended Range
- Upgrading To Full Security With Sensors & Siren
Problems? Questions? Contact Customer Service:
800-554-4053 (toll free) | +1-770-942-9876 (outside USA)


Scan to register & download the full operation guide at CarAlarm.com!

Your System Model:
(Installer, write system model above)
This device complies with FCC Rules part 15. Operation is subject to the following two conditions: 1) This device may not cause harmful interference &, 2) This device must accept any interference that may be received, including interference that may cause undesired operation. The manufacturer is not responsible for any radio or TV interference caused by unauthorized modifications to this equipment. Such modifications could void the user's authority to operate the equipment.
EXCALIBUR REMOTE START & SECURITY PERFECTED
RS-X70 QUICK REFERENCE
PROGRAMMING GUIDE (FOR FIRMWARE v1.6)
visit www.OmegaWeblink.com to get the latest firmware visit www.OmegaDealer.com to download a complete guide

Scan To Download the full installation guide from OmegaDealer.com! (login required)
Perform Vehicle Learn (US patent #10.151.269)
Whole Learn is the ultimate time server and remote start configuration tool. It configues meat
instal-critical features to match vehicle requirements.
IT'S FASTER THAN PROGRAMMING EVEN ONE FEATURE MANUALLY OR ON YOUR PC
Vehicle Learn Will:
* Automatically configure IGNITION, ACCESSORY, AND START circuits to match the vehicle.
*Let you quickly choose crank delay (NOTE: wait-to-start via data is always honored)
• Sample crank time for crank averaging (tachless modes only).
• Acto-dated engine running method. Code-by-ech wine (all who bech beer), or bechbox mules
• Auto-diesel data port producers
• Let you quickly enable manual transmission reservation mode.
Before You Begin:
• Moka st. 2018 (2019)
- Connect any accessories modules to the data ports.
Make sure any interface module bypass kit is in "DATA MODE" and programmed to the vehicle.
*Get the parking brake if it is connected to the BLACKWHITE wire for manual transmission
Vehicle Learn Procedure:
-
Turn the ignition key ON (do not start)
-
Press the valet button 3 times in less than 5 seconds.
- The system with claim & loss: kappa to inactivate crank delay (Default, 1.0% of case) = 1.5 secondal
- OPTIONAL Press valet to change crack delay
- China confirmation: 1=1.5 sec, 2=15 sec, 3=20 sec, 4=30 sec
-
Start the engine with the key and let the engine reach a normal die (about 700 mm).
-
AUTOMATIC TRANSMISSION: Turn the ignition OFF.
- The system with chip & heat the lights equal the P of I/O/ACC/START circuits detected (Dec. 4)
TIP, if you receive fewer unipositions than checks you connected, check connections and try again.
MANUAL TRANSMISSION: Release the parking brake (this completes ignition sequence loam.)
- The system and clean & flow: the inputs equal the P of iG6/AGC/START private detected (lab. 4)
TIP. If you receive fewer chipsticks than checks you connected, check connections and try again.
Set the parking brake again to enter Manual Trans. Reservation Mode option selection (installer feature #11).
- The system and clip & flash the lights to various current sliding pins (at: 2 - OFF).
Release & sat the parking brake to scroll through selling options.
- Chip confl motion: 1 chip - ON - Shutdown w/ lack, 2 chips - OFF.
3 chips - ON - Shutdown w/ clear close. 4 chips - ON - Shutdown 10 sec. after clear close.
Before turning the key OFF, perform the selected MT reservation sequence (see operation guide)
- When successful, the LED will once every 2 seconds (ALARM MODELS will flash twice every 2 seconds
-
PUSH-BUTTON-START VEHICLES: Exit the vehicle & take the OEM foot/key 20 ft. away to allow remote start
-
Activate remote start within 60 seconds of Step 5. Wall until the engine is running and the LED flashes slowly.
- The system will then delete data protocols and the best available engine detection method (difierism, tech, etc.).
If the brake pedal is proper before the LED flashes slowly, settings are reset and you must repeat vehicle items.
- TO SAVE SETTINGS & COMPLETE VEHICLE LEARN. Press the BRAKE pedal (the engine oil stop).
This device VEHICLE LEARN (to double again, then on installed status #2 in bank 10).
TO CANCEL/START OVER: Press & release the valid button once.
Programming Features Manually
-
Turn the ignition key "ON", then "OFF".
-
Press the vialt button equal to the desired burk (press 2c for Burk 2, w/c.)
- This must be done within 5 seconds or step 1.
- The slenfrom will chip & the status light will flash indicating the selected bank [see bank header].
- NOTE: You cannot move from banks to bank. You must start over to change banks.
- NOTE: When accessing BANK 10 (installer), you will best a long chip after 5 presses (user
leaf,rest). Continue presses 6-10 without delay. You will hear a 2nd long chip after 10 presses
Press the valet button equal to the desired fastener's number
- The phantom will chip equal to the selected feature.
- Finish presses before hearing any clips. EXAMPLE: press the valve 5x, then you'll hear 5 charges.
- Press the transmitter button (or brake pedal) to select the desired setting;
- 1-BUTTON MODELE: Change the feature by pressing the transmitter button OR brake pedal the same
equal to the desired selling. Complex all presses before hearing any chips.
- The sirenthem will chip equal to the selected setting.
-
Repeat steps 3 & 4 at this time IF you wish to change additional features
-
Turn the ignition key "ON" then "OFF" to add programming
NOTE: The system will exit automatically at any time after 10 seconds of no activity.
Scan To Download the full installation guide from OmegaDealer.com! (login required)
BANK 2 - Low Temp Auto Start: ignition on, off, press valve 2 times (3 chips / 3 LED flashes)
| # Feature Value 1x Value 2x Value 3x | ||||||
| 1. Time Target: Am-Sett Weighted D Ceg 1 | 15 Ceg 1 | 0 | ||||
BANK 3 - High Term Auto Start: loading up off, press down 3 lines (4 channels (4 LED backway))
| # | Cantara Color 1x Color 2x Color 3x Color 4x | |||||
| 1 | High Temp Auto Start Temperature (50°C) 120°C | 75.50m |
BANK 5 - User Features: Inception an, off press vault 5 times (pro-chassis LED flash)
| # Feature | Loss Breakdown (Broke 16) | Discount Breakdown (Broke 24) | Profit Breakdown (Broke 36) | Short Breakdown (Broke 40) | Lock & Short (Broke 56) | Short - Short (Broke 69) |
| 1. Service Start/Start New | 1 sec | Home | 10 sec | 50 sec | 60 sec | |
| 2. Faking Light Delay/Slow | Unknown, ON, RF, Off | Unknown, ON, RF, Push | Unknown, On, RF, Off | Unknown, Push RF, Push | ||
| 3. Control Status Copy/Replace | Low | Med Low | 1000 pcs | High | ||
| 4. BRC/WI/Write Spread/Reset From | Take 2W | Pulse MID | Push Hi | Stoody Semi | Human Panel | |
| 5. go short/short, Unlock | Off | Up On Work | up 2000 Work | Lock + Unknown | ||
| 6. Door Opin/Byless for Real PS | Only | Off | ||||
| 7. John's Train Passive | Dry | Off | ||||
| 8. RF Activation (Rusual) | Black 1 | Black 2 | Blade 3 | Blade 4 | Shrt + Short | Shrt + Short |
| 9. Left/Right Arrow | Off | Black 3 Back | Black 4 Back | |||
| 10. Automatic Resetting | Off | On/Down Look | On/Down Look | Enshamed | ||
| 11. Condominant Chain | Short - Long | Short Only | Short Grey | On/ Beyond | Off | |
| 12. Ann Compounding | green | Green | green Up/ Down | Off | ||
| 13. Outside Code | See condition guide for programming, network, cloud, DIF400, LT 12 | |||||
| 14. Longer Overview | On | Off | ||||
| 15. Alarm Trigger Detection | 30 sec | 40 sec | 30 sec | 125 sec | ||
| 16. Airing Grey | 3 sec | 15 sec | 30 sec | 40 sec | ||
| 17. Close Four-Point Lending/Mark | On | Off | ||||
BANK 10 - Installer Features: Ignition on, off, press water 10 times (2nd Long chirpfast LED flash)
| 1. R# Addition (WHITEBLUE AVE) | 1 Paloo | 2 Jalvole | 3 Paloo | 4 Paloo | ||
| 2. V#e De Louer | L###ed | Dakaba | ||||
| 3. Eng # Poudras | Puy#o#ing | V##aja | Tet W#y | E###ndu | C#n#s C#y | |
| 4. Cr#r ##day (Cost Window) | 1 L### | G#### | 27 ### | S#### | ||
| 5. Cr#r ##p# (C#S# K#e) | C###### | Shel | J##### | A######## | Shes# | Light Tash |
| 6. Cr#r ##P ## ## ## ## | Iggnon | Shen# | 8 ### Defect P#### | 10 ### Defect P#### | P####### Ex## Off | Horn |
| 7. Cr#r ##e (Leach#er Creek Only) | In N### | 1 ### | 15 ### | 25 ### | 1 ### | Average |
| 8. Over Lock/Lock Outside | 6 ### | 1 ### | Cus#t B#### | Tont C#eers | ||
| 9. Brands Sh# Lock Control | 37 | Lack of Sheet | Ml#ch B#### Set | Lack of L#### | Lack of R# RO Off | |
| 10. Trats Sn#e | 38 | 1 ### | 1 ### | 1 ### | ||
| 11. Manual Trns, Resc#ation | On, Bright Off on Lock | On, Bright Off on Lock | On, Bright Off On D##d ##k (##art) | On, Bright Off On D##d ##k (##) | ||
| 12. Onle Pr Infr#tion | Green DB Stock, DB | Green Daz Bars, Daz | Green DB Stock, Daz | Green Dab Stock, DB | ||
| 13. After Functions | On | Off | D#UKock Only | Senior G###nd | ||
| 14. Pre-#p # 1 #ex or C##ent | On | Off | ||||
| 15. Lece Pr Instrant | On | Off | ||||
| 16. Stor#mth m | Allam Only | A##ingly C##p | A##m#d C##m# | A####### | ||
| 17. Low T#s C##k Balance | 9 ### | 200 ### | 300 ### | 400 ### | ||
| 18. OSH Arm E#m#m or Ch. #s | AmD###### | AmO#K 6 | Ch 4 D###### | Ch 4D-4S | Ch#Lunch D###### | Ch#Lunch CHS Plus |
| 19. BRZOW Way | Run | Ljphon | Truck Re##an | Pulch A## Baa | ||
| 20. Live C##nt To#de | On | 36 |
FEATURE SETTING KEY: Default Setting Installer Feature 12 (Alarm Functions) must be ON * Data share returned from external interface unit or DATA register as existing results
TIP: You can program features via your computer with Omega Weblink. Visit www.OmegaWeblink.com to learn more.
Features Reset
-
Enter Bank 10 feature programming (installer features - DO NOT SELECT ANY FEATURES)
-
Press LOCK + UNLOCK for DRAKE x 51
-
button3 button models: Cross tan START button 5 times
- You will hear a long screen chip to indicate reset & exit programming.

Tach Wire Signal Learn
When utilizing the batch are circuit for engine selection, the vehicle's batch signal must be learned. Each signal is learned during Vehicle Loan and usually does not have to be learned. Using either method below will automatically change installer Feature #3 to 'Tech-Now'. It is valid batch signal is not detected, the system will not switch to 'Tech-Now mode. METHOD 1:
-
Turn the ignition key "ON"
-
Press the broke pedal 5 times within 5 seconds of step 1
- The stronghorn will chip 5 times.
- Start the engine.
- The dialc LED will turn on when it has learned the back signal. If not, check both wire & try sign. 4. Pass the violet button to resemble the back signal if needed. If this engine has a high clock startup, allow the idle in
- Sisral, around 130 HPW before resampling.
- The state light will rush on 5. Turn the irrigation day 18:55
- Turn the
METHOD 2: 1. Start the series with the inversion how
- Start the engine with the ignition may
-
Press A hold the brake model
-
Frake & hold the brake panel.
-
Dress & release the valve bulb
-
Press & release the valve buttons
The slot LED will run on which it has never hit technical. If not, check tool is 2 to apply
- Turn the ignition key "OFF" or release the brake pedal to exit.
Programming Transmitters
Standard Programming: Use this method to program additional or replacement transmitters.
BEFORE YOU BEGIN: Have all transmitters which are to operate the system at hand.
-
Turn the ignition key "ON" (do not start).
-
Press the vialt button 5 times within 5 seconds of step 1
- The best will briefly sound
- Press & release the "lock" button on each transmitter one also the other
- 1-tubon models, press the 'elari' button.
- The stewhorn wild chip prices for such tranemiles.
- NOTE: When the first new transmitter is known all previous transmitters are erased.
- NOTE: All other button functions will automatically be assigned
- Turn the ignition key "OFF".
NOTE: The system will exit automatically at any time after 10 seconds of no activity.
Alarm Diagnostics
Alarm Quick Test Mode. Use this mode to bed all zones of the alarm system and quickly adjust any sensors.
-
Press & hold the valve button
-
Press the Lock button on the remote within 2 seconds of step (before the system enters valid mode).
- The LED will begin to flash rapidly.
- Release the valet button.
- The shortborn will chip indicating all claim zone violations. See the table below.
NOTE: Chips will repeat every 2 seconds while the trigger remains violated.
- NOTE: If multiple zones are triggered the chips will cycle thru the zones every 2 seconds then repeat.
-
- Press Lock or Unlock on the controller or power cycle the system to exit.
- NOTE: There is no suit timer to this feature. chips will continue until the zone is clear or the mode is called.
Zona Violation Below: Tu division where biomes understand the line along with the remote and the status LED switch
Zone Valuation RACER: To trigger alarm trigger, a small packet is lost with the reverse KNC the alarms flash to inflects which zurnets were triggered lost. Turn the ignition key "ON" in case alarm trigger memory.
| LED Flashes/Chirps | Alarm Quick Test | Zone Violation Recall |
| 1 | Sensor Full Trigger | - |
| 2 | Hood | Hood |
| 3 | Door | Door |
| 4 | Sensor Warning | Sensor Full Trigger |



Remote Start Diagnostics
If remote start fails to activate, the system will chirp, flash the lights, and flash the status LED to indicate the
cause. If remote start, snails down prematurely after successfully starting, you can recall the violation by putting the system in valet mode (hold the vault button for 3+ seconds). Before the status LED sums on (system in vault mode), the LED will both to indicate any viabird zones.
| LED Flashes | Violated Zone |
| 1 | Head |
| 2 | Drake |
| 3 | Rack lach signal or engine over-no. |
| 4 | BLACKWHITE vitr test ground |
| 5 | 3D arcsec deflected vehicle motion while crossing |
| 6 | Received engine stop command (remote, telematics, etc.) |
| 7 | Airway status/good |
| 8 | Runtime speed |
| 9 | Low vehicle battery voltage detected |
Copyright 2019 Omega Research & Development Technologies, Inc.
QM RS-370 20190605
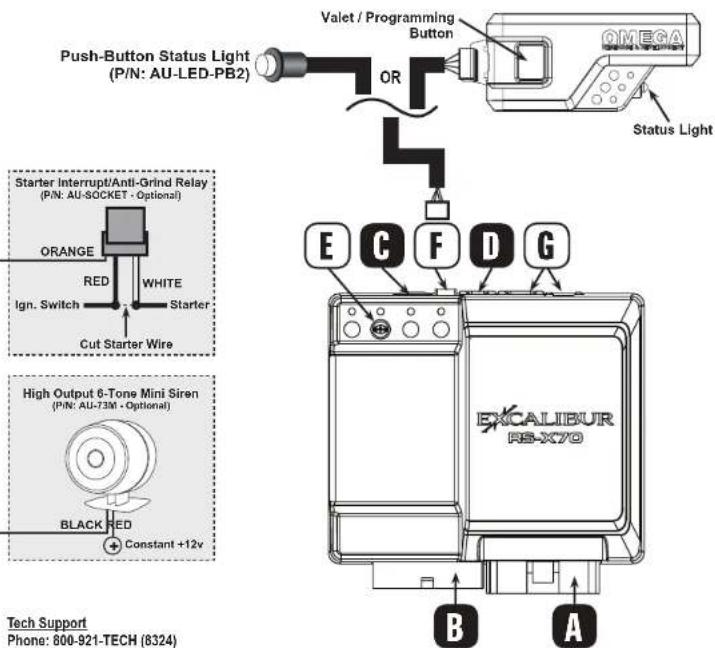
RS-X70 Wire Diagram
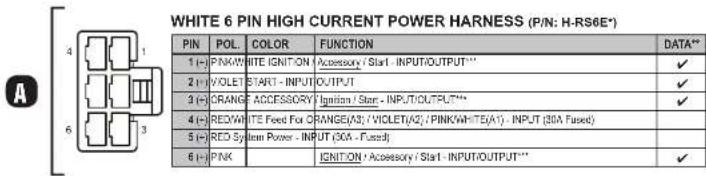
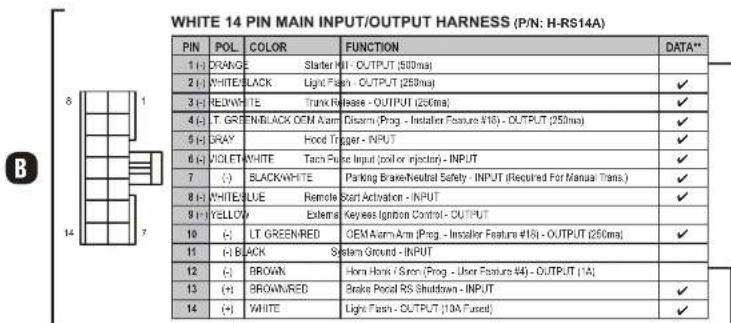


Optional 'OL-HRN-RS' T-harnesses available.
Optional low current (LC) harness available - P/N H-RS6BLC (ask about HC>LC exchange program)
^23 √ = The function is supported via the data ports. Confirm vehicle support in interface module install guide.
Function auto-detected during VEHICLE LEARN procedure - SEE OTHER SIDE OF THIS SHEET
Default function is capitalized and underlined
TEMPERATURE SENSOR - DO NOT COVER
(For high/low temp auto start and for automatic low temp crank extender)
F ANTENNA / STATUS LIGHT / VALET PORT - Supports any compatible plug-in antennas or push-button status light (P/N: AU-LED-PB2)
GREEN & BLACK DATA PORTS - For Telematics / Data Sensor (Shock, Tilt, etc) / Vehicle Interface Module. (DBI & IDatalink protocols supported on both ports - see "Vehicle Learn" or Installer feature #12)
Tech Support
Phone: 800-921-TECH (8324)
Web: OmegaDealer.com
FB dealer group: Facebook.com/groups/omegadealer
Corporate Site / Product Info: CarAlarm.com
Linkr
MOBILE
CONTROL.
TRACK.
ALERT.

natural_image
Front view of a black Audi A sports car (no visible text or symbols)
natural_image
Side view of a black and green utility vehicle with multiple wheels and suspension panels (no visible text or symbols)
natural_image
Illustration of a simple house with brown roof and green roof, no text or symbols presentAll Service Plans Include Full Functionality with GPS!
Control Multiple Devices
From One App
Controla Varios Dispositivos
Auto-track From Every
1 to 30 Days

ANDROID APP OR
Google play

Available on the
App Store
Download the FREE app!

Choose Custom Images &
Names For Each Device
Supports 6 Languages:
Apoya 6 Idiomas:
English
Español
Francais
Romana
Српки
Malay
Apple, the Apple logo, iPhone, and iPod
Touch are trademarks of Apple Inc., registered in the U.S. and other countries. App Store is a service mark of Apple Inc.
Google Play is a trademark of Google Inc.
POP-LINKR-84TDP3D-CARD
ΩMEGA
800-554-4053/770-942-9876
info@caralarm.com
www.caralarm.com
facebook.com/omegard
LAERSX70
WARNING: THIS REMOTE
START IS ALSO AN ALARM!
ALARM EQUIPPED
Every Excalibur Remote Start Includes a Full Security Suite That Can Be Easily Enhanced
- Add any siren you like.
Siren, horn honk & parking light outputs
Take advantage of the full suite of INCLUDED security features! Every remote start can be a "combo"!
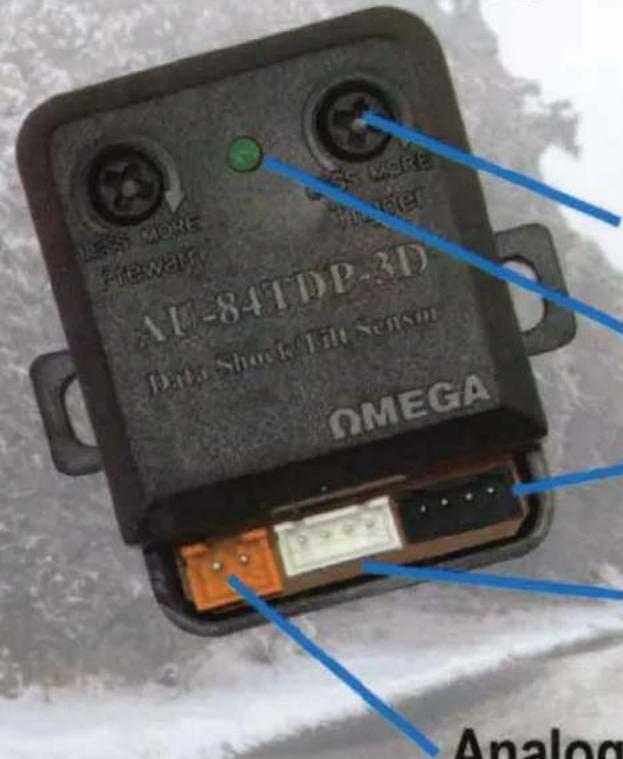
Add the AU-84TDP-3D to gain shock & tilt functions!
Sensor Adjustments
Trigger Indicator
Connect To The Starter's Data Port
Pass-Through Data Port For Other Accessories
Analog Door Trigger Inputs For RS models
(If door status is not available from the interface module)
The AU-84TDP-3D data shock & 3D tilt sensor works with any 70 series remote start.
- ADD FULL SECURITY IN A FEW MINUTES
- 3D MOTION SENSOR FOR MANUAL TRANSMISSION SAFETY
- TILT DETECTION FOR WHEEL PROTECTION & ANTI-TOW
phone-800.554.4053|web-caralarm.com

- Register today at www.CarAlarm.com
- EXCALIBUR REMOTE START & SECURITY PERFECTED
- 1+1 Button / 1 Way Remote Start Systems
- MANUAL TRANSMISSION RESERVATION MODE
- PROGRAMMING REMOTES
- PROGRAMMING REMOTES TO THE SYSTEM (UP TO 4)
- Visit www.CarAlarm.com today
- Additional Features
- System Upgrades
- Problems? Questions? Contact Customer Service:
- RS-X70 QUICK REFERENCE
- PROGRAMMING GUIDE (FOR FIRMWARE v1.6)
- Perform Vehicle Learn (US patent #10.151.269)
- Programming Features Manually
- Features Reset
- Tach Wire Signal Learn
- Programming Transmitters
- Alarm Diagnostics
- Remote Start Diagnostics
- RS-X70 Wire Diagram
- Linkr
- MOBILE
- CONTROL.
- TRACK.
- ALERT.
- All Service Plans Include Full Functionality with GPS!
- WARNING: THIS REMOTE
- START IS ALSO AN ALARM!
- ALARM EQUIPPED
Brand : OMEGA
Model : Excalibur RS-272
Category : Remote control