
DSH-922 - Dash cam Dashmate - Free user manual and instructions
Find the device manual for free DSH-922 Dashmate in PDF.


| Product Type | Dash Cam |
| Brand | Dashmate |
| Model | DSH-922 |
| Video Resolution | Full HD 1080p (1920x1080) |
| Lens Angle | 170° wide angle |
| Display | 2.7 inch LCD screen |
| GPS | Built-in GPS module |
| G-Sensor | Built-in 3-axis gravity sensor |
| Night Vision | Infrared LED and WDR technology |
| Loop Recording | Supported with automatic overwrite |
| Parking Mode | Motion detection and time-lapse |
| Storage | MicroSD card up to 64GB (Class 10 required) |
| Power Supply | 12-24V DC car adapter |
| Battery | Built-in rechargeable battery (200 mAh) |
| Dimensions (WxHxD) | 6.5 x 4.5 x 3.0 cm |
| Weight | 55 g |
| Mounting | Suction cup mount included |
| Connectivity | Micro USB for power; Mini HDMI for output |
| Date & Time Stamp | Yes, with GPS sync |
| Language Support | Multiple languages (English, French, etc.) |
| Cleaning Instructions | Clean with a soft dry cloth; avoid harsh chemicals |
| Safety Note | Do not install where it obstructs driver's view |
| Spare Parts Availability | Contact Dashmate support for replacement mounts or cables |
Frequently Asked Questions - DSH-922 Dashmate
User questions about DSH-922 Dashmate
0 question about this device. Answer the ones you know or ask your own.
Ask a new question about this device
Download the instructions for your Dash cam in PDF format for free! Find your manual DSH-922 - Dashmate and take your electronic device back in hand. On this page are published all the documents necessary for the use of your device. DSH-922 by Dashmate.
USER MANUAL DSH-922 Dashmate
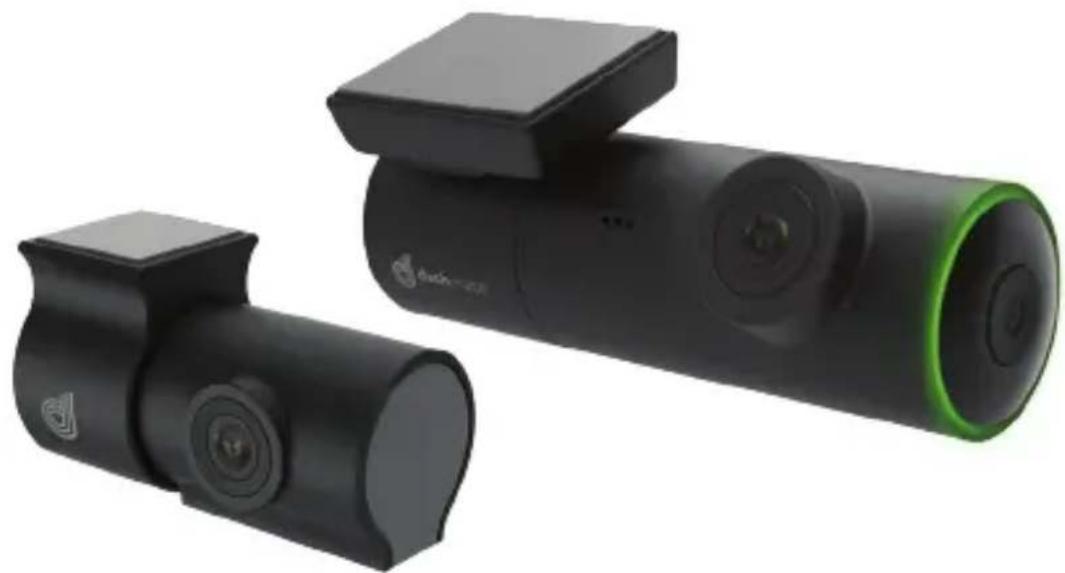
Full HD Dual Channel Discreet Dash Camera with inbuilt GPS & WIFI
natural_image
Three black electronic devices with green-lit tops, one emitting a camera lens (no visible text or symbols)DSH-922
USER MANUAL
1080p
FULLHD

natural_image
Color palette bar with grayscale shades and a central crosshair symbol (no text or labels)


CONTENTS
1.0 CAUTION....2
2.0 BATTERY WARNING ....2
3.0 SD CARD WARNING .... 3
4.0 INTRODUCTION....3
5.0 PRODUCT OVERVIEW....4
6.0 INSTALLATION INSTRUCTIONS....5
6.1 DSH-922 installation ....5
6.2 Rear Camera installation ....6
7.0 SOUND ALERTS....7
7.1 Real-Time Audio Road Alerts*....7
7.2 Speed Camera Alert 8
7.3 Blackspot Alert 8
7.4 School Zone Alert 8
7.5 Railway Crossing Alert 8
8.0 KEY FUNCTIONS....8
9.0 DOWNLOAD AND INSTALLING THE DSH-922 APP......9
10.0 DSH-922 APP OPERATION ....10
10.1 App Video Playback....10
10.2 Downloading videos from the App....11
10.3 Sharing videos on Social Media.... 12
10.4 DSH-922 App Settings 12
11.0 WARRANTY TERMS & CONDITIONS ....14
12.0 NOTES 15
1.0 CAUTION
- Ensure you are using your Dash Camera within your countries' road laws. Please make sure you are familiar with your local road legislation before use.
- Please set time and date before you use this device to record.
- The notifications given by the Dash Camera are suggestions only, please drive to the actual conditions.
- The system is to be used only for non-commercial use, within the limits permitted by the relevant laws
- Avoid using the Dash Camera in the vicinity of any devices that emit radio interference (eg. Microwave Ovens).
- It is considered normal operation for the Dash Camera to get warm during use.
2.0 BATTERY WARNING
• Always charge the Dash Camera using the provided charger. Improper charging of the Dash Camera may result in failure of the internal battery.
- Never dismantle the Dash Camera or expose the internal battery.
- Do not dispose of the Dash Camera in fire.
- Dispose of the Dash Camera observing local regulations being mindful of the internal battery.
- Do not attempt to replace or expose the internal battery.
3.0 SD CARD WARNING
This Dash Camera can only be used with Micro SD Cards, Class 10 or above with 32GB - 128 GB storage capacity. Not Included.
NOTES ON INSTALLATION
- It is advised that the Dash Camera is installed near the rear view mirror, at the top centre of the windshield for optimal operation.
- Make sure that the lens is within the range of the windscreen wiper to ensure a clear view when it rains.
- Do not touch the lens with your fingers. Finger prints left on the lens will result in unclear videos or photos. If photos or videos are blurred, please clean the lens gently with a microfibre cloth.
- Only use the included charging cable to power the Dash Camera.
4.0 INTRODUCTION
Thank you for purchasing a Dashmate Dash Camera. We are certain that our product will give you trouble free operation while providing you with a safety feature that enhances your driving experience. Our products, like most after-market safety enhanced devices, are designed to assist and aid the driver, not to replace the manual function of the person operating the vehicle. Please read through these instructions before attempting to install this product.
For the latest manual and product updates, please visit our website at www.dashmate.com.au

natural_image
Color palette bar with grayscale gradient and a central crosshair symbol (no text or labels)5.0 PRODUCT OVERVIEW
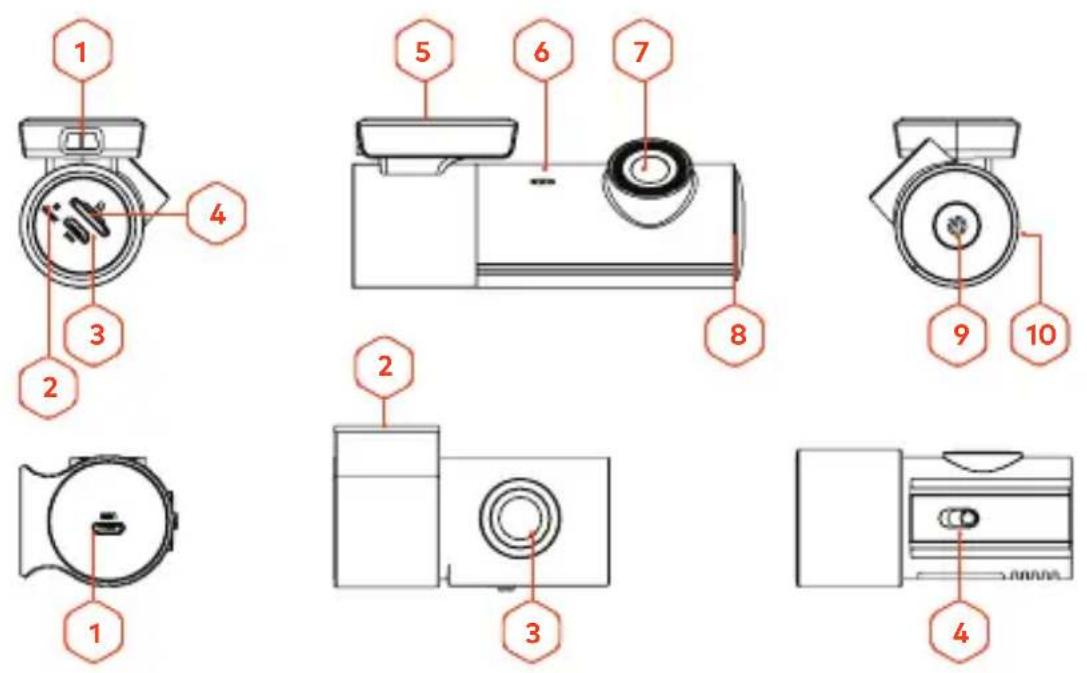
FRONT CAMERA
- Mini USB connector (for power)
- Reset button
- Micro USB Connector (Connect to rear cam)
- SD card Slot
- Adhesive Sticker
- Speaker Hole
-
Camera Lens
-
Recording indicator LED
- Power button/WIFI ON and OFF/Lock file
- Microphone
REAR CAMERA
- Micro USB Connector (Connect to Front Cam)
- Adhesive Sticker
- Camera Lens
- Mirror Image Switch
4

6.0 INSTALLATION INSTRUCTIONS
6.1 DSH-922 INSTALLATION
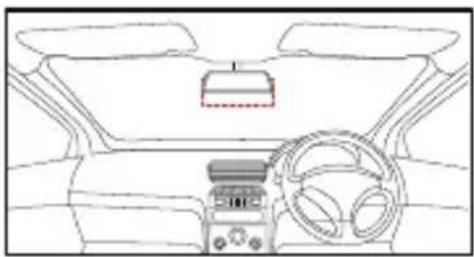
- OPTIONAL: Select the electrostatic film from the box and install it on the front windshield in the recommended position as shown below.
Please wipe the glass before installation and push out the bubbles between the static film and the glass before installation.
natural_image
Top-down line drawing of a car dashboard and steering wheel (no text or symbols)-
Remove the protective film off the DSH-922 and position the DVR in the middle of the electrostatic film (optional). Press down on the base of the bracket by hand for 30 seconds to ensure that the sticker adhesive is attached to the electrostatic film, adjust the camera by rotating the barrel until it is capturing the entire road.
-
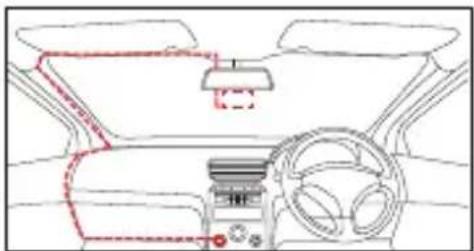
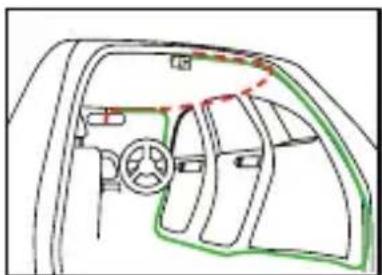
Run the DSH-922 cable along the top of the front windshield through the A pillar and around and under the
storage compartment of the passenger seat to the car's 12/24v adapter port. Connect the 12/24v adapter to the car power.
natural_image
Interior view of a car dashboard and steering wheel (no text or symbols visible)- See image below for cable management.

natural_image
Diagram of a vehicle with hoses and a checkmark indicating approval (no text or symbols present)
natural_image
Pure electrical circuit lines without any symbols5
NOTE:
- Electrostatic film helps for easy removal of dash camera from the windshield. Included in package contents.
6.2 REAR CAMERA INSTALLATION
- OPTIONAL: Select the
electrostatic film from the box and install it on the rear windshield in the recommended position as shown below. Please wipe the glass before installation and push out the bubbles between the static film and the glass before installation.

natural_image
Front view line drawing of a car cab with no text or symbols-
Remove the protective film off the rear camera base bracket and select either the top or the bottom of the rear window to position the rear camera. Press down on the base of the bracket by hand for 30 seconds to ensure that the sticker adhesive has attached to the electrostatic film.
-
Connect the rear camera to the DSH-922 using the cable provided. Either run the cable through the roof lining or under the carpet underlay as shown below. The rear camera can rotate 360^ degrees depending on the position and type of installation method.
Method 1: Thread the rear camera cable along the top of
the roof lining and connect it to the DSH-922 Dash Cam.
Method 2: Lift up the car carpet and run the rear camera cable along the underlay of the carpet and connect it to the DSH-922 Dash Cam.
natural_image
Diagram of a car interior showing dashboard, steering wheel, and dashboard frame (no text or labels)- Adjust the camera by rotating the barrel until it is capturing the entire road.
NOTE:
- While live viewing on the app, the rear camera will show the true rear view image where the license plates of vehicles behind your vehicle is inverted. But actual recorded images are horizontally flipped to capture the license plate correctly.
- If the image from the rear camera is upside down, please adjust the "Mirror Image" switch on the rear camera. (Refer to fig on page 4)
7.0 SOUND ALERTS
The DSH-922 will provide an sound alert to keep you updated with the status of your dash camera. Audio notifications will come through the in-built speaker of the DSH-922, see below.
• Recording Started/Stopped
- Turning On/Off WIFI
• Emergency Recording
Started/Stopped
- Rear camera is not Connected, Please check the connection
- Please insert SD card
• Factory Reset Started/Completed
7.1 REAL-TIME AUDIO ROAD ALERTS\*
Your Dash Camera comes with the added feature of providing real time road safety alerts. An audio warning will alert you of your actual live speed, speed limit (if applicable) and distance to the alert (eg. Speed Camera).
* Here Maps does not support School Zone & Accident Blackspot Alerts for New Zealand.
All Alert types are listed below.
7.2 SPEED CAMERA ALERT
Fixed Speed camera alerts you on the speed limit with your current speed and the distance count down.
7.3 BLACKSPOT ALERT
Blackspot alerts you before you enter a high accident zone.
7.4 SCHOOL ZONE ALERT
The School Zone alerts will appear 24/7 and cannot be setup to appear only during specific School Zone times.
7.5 RAILWAY CROSSING ALERT
Railway Crossing alert gives you a warning before a railway crossing.
NOTE:
- Sound Alerts can be disabled or sound can be lowered through DSH-922 App Volume Settings. In most cases alerts are generic. Please refer to the App section.
8.0 KEY FUNCTIONS
By pressing the Power button multiple times you can access several quick key functions.
| OPERATION FUNCTION | |
| Press and Hold for 2 seconds | On/Off Device |
| Press Once On/Off Wifi | |
| Quick Press x2 Lock File | |
| Quick Press x5 Reset To Default Setting | |
9.0 DOWNLOAD AND INSTALLING THE DSH-922 APP
The DSH-922 needs to be used in combination with DSH-922 APP to function correctly.
All major settings on the DSH-922 are edited through the DSH-922 App. The system requirements for your smart phone are noted below.
iPhone: iPhone 5 or later using iOS 8.0 and above.
Samsung Galaxy: S3 and later using Android 4.2.2 and above.
For you to correctly connect your smart device to your DSH-922 you will need to have the DSH-922 App from the App store. You will also need to connect your smart phone to the DSH-922's WiFi signal using your smartphones WiFi settings.
For Android devices, please search DSH-922 in Play Store for installation.
For iOS devices, please search DSH-922 in App Store for installation.
For a step by step guide on connecting to your Dash Cam please follow the steps below.
- On your smart device download the DSH-922 App from the Google Play store if you are using an Android device, or the iOS App store if you are using an iPhone.
- Power up the DSH-922 and allow 2 minutes for the WiFi connection to start.
- Once the App is downloaded and installed on your phone and the Dash Cam is powered up, open your phones WiFi settings and connect to the wireless connection named DSH922.


- When prompted enter the password 12345678
WIFI Name: DSH-922
Password: 12345678
- Once the connection has been made, open the DSH-922 App. You will now be able to access the live recording screen for the front and rear cameras, the stored videos, and the Dash Cams settings.
To use the DSH-922 App your smart device will need to be connected to the Dash Cams wireless connection. For instructions on connecting please see the section of the manual named WiFi Connection.
10.1 APP VIDEO PLAYBACK
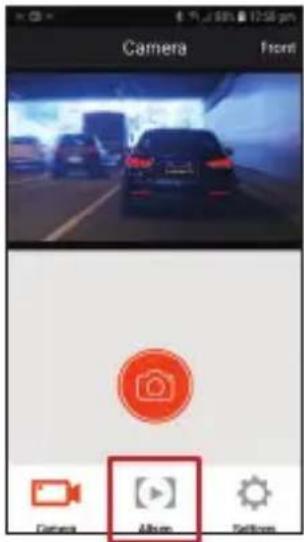
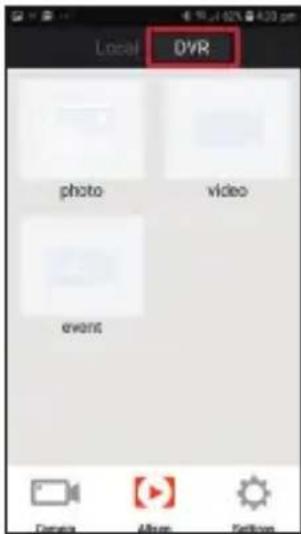
For Video Playback, please follow the instructions below.
- Open the DSH-922 APP.
-
Press the Album Button.
-
Click on the Video Folder and select the video you want to view.

10.2 DOWNLOADING VIDEOS FROM THE APP
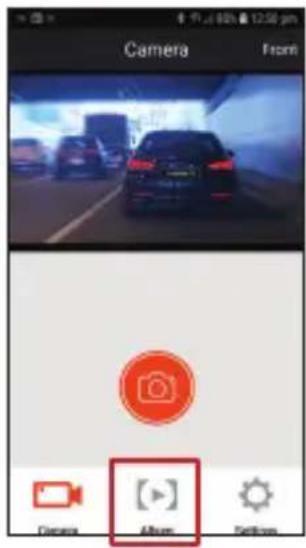
For downloading videos, please follow the instructions below.
- Open the DSH-922 APP.
- Press the Album Button.
- Select the video/videos and press the download button.
The download will start and will save to your phone which can also be accessed through the DSH-922 app in Folder name Local.


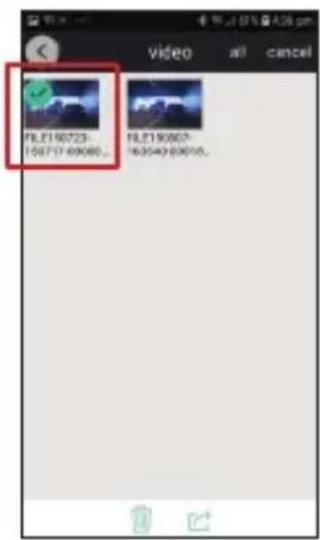
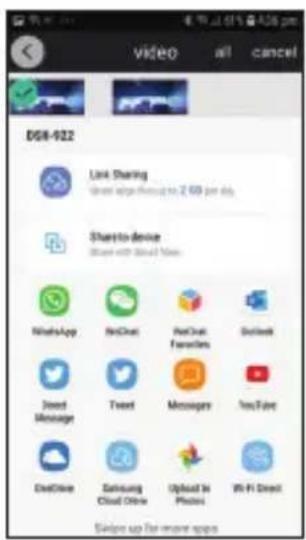
10.3 SHARING VIDEOS ON SOCIAL MEDIA
To share videos on Social Media, please follow the instructions below.
- Open the DSH-922 APP.
- Press the Album Button.
- Open the Local folder on the DSH-922 App, all downloaded files can be accessed via the local folder.
- Select the files you want to share, and then press the share button below.
- Select the Social media application you wish to share on.

10.4 DSH-922 APP SETTINGS
| MENU SETTING | DESCRIPTION | |
| Microphone On, | Off Turns Microphone | on/off |
| Speed Camera Alerts | On, Off Turns Speed | Camera Alerts on/off |
DSH-922 APP SETTINGS CONT'
| MENU SETTING | DESCRIPTION | |
| Loop Recording | 1 & 3 Minutes Loop | recording allows you to set the duration that the camera will record before creating a new clip |
| Volume Low, Mid | High Controls the | sound level of inbuilt speaker |
| G-Sensor Off, High, Mid, Low | The G-Sensor monitors your vehicle against impact. The DVR will automatically lock the recording in the event of a collision. Turn off or adjust the sensitivity of the built in G-Sensor. | |
| Adjust Time Day, Month, Year Adjusts the time on timestamp. | ||
| Format SD Card | Formats the SD card. | Deletes all recorded data off the SD Card. |
| WIFI Settings N/A Change the DVR's WIFI Name and password from default. | ||
| Factory Settings | N/A To Restore factory settings. | |
| Help N/A FAQ | ||
| About DVR N/A | Firmware version | |


11.0 WARRANTY TERMS & CONDITIONS
Our goods come with guarantees that cannot be excluded under the Australian & New Zealand Consumer Law. You are entitled to a replacement or refund for a major failure and for compensation for any other reasonably foreseeable loss or damage. You are also entitled to have the goods repaired or replaced if the goods fail to be of acceptable quality and the failure does not amount to a major failure.
This warranty is provided in addition to your rights under the Australian & New Zealand Consumer Law.
Directed Electronics warrants that this product is free from defects in material and workmanship for a period of 12 months from the date of purchase or for the period stated on the packaging. This warranty is only valid where you have used the product in accordance with any recommendations or instructions provided by Directed Electronics.
This warranty excludes defects resulting from alterations of the product, accident, misuse, abuse or neglect
In order to claim the warranty, you must return the product to the retailer from which it was purchased or if that retailer is part of a National network, a store within that chain, along with satisfactory proof of purchase. The retailer will then return the goods to Directed Electronics. Directed Electronics will repair, replace or refurbish the product at its discretion. The retailer will contact you when the product is ready for collection. All costs involved in claiming this warranty, including the cost of the retailer sending the product to Directed Electronics, will be borne by you.
Email: service@dashmate.com.au

natural_image
Color palette bar with grayscale shades and a central crosshair symbol (no text or labels)12.0 NOTES


natural_image
Pure color calibration grid with no text, numbers, or symbols
dashmate*
V1.1
TECHNOLOGY DRIVEN™


CE


All Images, Information and Content are Copyright © 2021 Directed Electronics Australia Pty Ltd. All Rights Reserved.
www.dashmate.com.au | www.dashmate.co.nz
DIRECTED.
AUSTRALIA & ME
www.directed.com.au
www.directed.co.nz



- Full HD Dual Channel Discreet Dash Camera with inbuilt GPS & WIFI
- CONTENTS
- CAUTION
- BATTERY WARNING
- SD CARD WARNING
- NOTES ON INSTALLATION
- INTRODUCTION
- FRONT CAMERA
- REAR CAMERA
- INSTALLATION INSTRUCTIONS
- DSH-922 INSTALLATION
- NOTE:
- REAR CAMERA INSTALLATION
- SOUND ALERTS
- REAL-TIME AUDIO ROAD ALERTS\*
- SPEED CAMERA ALERT
- BLACKSPOT ALERT
- SCHOOL ZONE ALERT
- RAILWAY CROSSING ALERT
- KEY FUNCTIONS
- DOWNLOAD AND INSTALLING THE DSH-922 APP
- APP VIDEO PLAYBACK
- DOWNLOADING VIDEOS FROM THE APP
- SHARING VIDEOS ON SOCIAL MEDIA
- WARRANTY TERMS & CONDITIONS
- TECHNOLOGY DRIVEN™
Brand : Dashmate
Model : DSH-922
Category : Dash cam