
DSH-890 - Dash cam Dashmate - Free user manual and instructions
Find the device manual for free DSH-890 Dashmate in PDF.


| Product Type | Dash Cam |
| Brand | Dashmate |
| Model | DSH-890 |
| Screen Size | 1.5" LCD |
| Lens Angle | 150° wide angle |
| Video Resolution | Full HD 1080p (1920x1080) |
| GPS Logger | Built-in (records speed and path) |
| WiFi Connectivity | Built-in (up to 10m range, 2.4GHz) |
| Memory Card Support | Micro SD up to 32GB, Class 6 or higher |
| Power Supply | 12V car adapter (included) |
| Audio Recording | Built-in microphone (can be muted) |
| Loop Recording | 3 / 5 / 10 minutes or off |
| WDR (Wide Dynamic Range) | On / Off |
| Motion Detection | Yes (records only when movement detected) |
| Parking Monitor | Yes (records on impact when parked) |
| Lane Departure Warning System | Yes (activates above 60 km/h) |
| G-Sensor | Adjustable sensitivity (low/middle/high) |
| Date Stamp | On / Off (stamps time and date on footage) |
| Car Plate Stamp | Yes (can input license plate number) |
| Mount Type | Magnetic mount with adhesive |
| Minimum Illumination | 1 Lux |
| Included Accessories | Camera, power adapter, USB cable, mount |
Frequently Asked Questions - DSH-890 Dashmate
User questions about DSH-890 Dashmate
0 question about this device. Answer the ones you know or ask your own.
Ask a new question about this device
Download the instructions for your Dash cam in PDF format for free! Find your manual DSH-890 - Dashmate and take your electronic device back in hand. On this page are published all the documents necessary for the use of your device. DSH-890 by Dashmate.
USER MANUAL DSH-890 Dashmate
natural_image
Black dashmate smart device with a digital display and top handle (no visible text or symbols on the device body)Full HD Dash Camera
with 1.5" LCD Screen, GPS & WiFi
1080p
Resolution

WiFi

GPS
Logger

1.5" LCD Screen
DSH-890 | USER MANUAL
CONTENTS
CAUTION 6
BATTERY WARNING....7
NOTES ON INSTALLATION 7
PRODUCT INFORMATION....7
1. INTRODUCTION 8
1.1 FEATURES....8
1.2 PACKAGE CONTENTS 8
1.3 PRODUCT OVERVIEW 9
2. GETTING STARTED 10
2.1 INSERTING A MICRO SD CARD....10
2.2 REMOVING A MICRO SD CARD....10
2.3 INSTALLING THE DASH CAM....11
2.4 CONNECTING TO POWER....11
3. POWERING THE DASH CAM ON/OFF....12
3.1 AUTO POWER ON/OFF 12
3.2 MANUAL POWER OFF....12
3.3 MANUALLY POWER ON 12
3.4 RESET THE DASH CAM 12
4. PLAYING BACK VIDEO ON A PC....12
-
GPS RECORDING 13
-
WIFI SMART PHONE CONNECTIVITY....13

7. INITIAL SETTINGS....14
7.1 FORMATTING THE INSERTED MICRO SD CARD....14
7.2 SETTING THE TIME AND DATE....15
7.3 USING THE DASH CAM 15
7.4 LOCKED RECORDING....16
8. VIDEO MODE....17
8.1 VIDEO MENU....17
8.1.1 RESOLUTION....17
8.1.2 LOOP RECORDING....18
8.1.3 WDR....18
8.1.4 EXPOSURE 19
8.1.5 MOTION DETECTION....19
8.1.6 RECORD AUDIO....20
8.1.7 PARKING MONITOR....20
8.1.8 LDWS 21
8.1.9 DATE STAMP....21
8.2.0 G SENSOR....22
9. STILL MODE 22
9.1 PHOTO MENU 23
9.1.1 CAPTURE MODE 23
9.1.2 RESOLUTION....23
9.1.3 SEQUENCE 24
9.1.4 WHITE BALANCE 24

9.1.5 EXPOSURE 25
9.1.6 ANTI SHAKING 25
9.1.7 DATE STAMP 26
10. SETTINGS MENU.... 26
10.1 WIFI 27
10.2 TIME/DATE....28
10.3 BEEP SOUND 28
10.4 LANGUAGE 29
10.5 SCREEN SAVER 29
10.6 CAR PLATE 30
10.7 FORMAT....31
10.8 DEFAULT SETTINGS....31
11. PLAYBACK SCREEN.... 32
11.1 PLAYBACK SOFTWARE 32
11.2 PLAYBACK....33
12. SPECIFICATIONS....34
- VIDEO MENU 35
- STILL MENU 36
- SETTINGS MENU.... 37
- PLAYBACK MENU 37
- ABOUT THIS GUIDE.... 38
- WARRANTY TERMS & CONDITIONS...... 39

CAUTION
- Ensure you are using your Dash Cam within your countries' road laws. Please make sure you are familiar with your local road legislation before use.
- Avoid leaving your Dash Cam in direct sunlight for extended periods of time in an unventilated space.
- Please set time and date before you use this device to record.
- The notifications given by the Dash Cam are suggestions only, please drive to the actual conditions.
- The results of GPS positioning are only for reference. The Dash Cam will lose GPS positioning abilities when signal is blocked (e.g. driving through tunnels, enclosed car parks).
- GPS positioning accuracy may vary depending on weather and surroundings such as dense cities, tunnels, or forests. GPS satellite signals cannot pass through most solid materials. Tinted windows may also affect the GPS signal.
- The values displayed in this system, such as speed, position, and the distance warning, may be affected by the surrounding environment.
- The system is to be used only for non-commercial use, within the limits permitted by the relevant laws.
- WiFi Signal is designed to be used in close proximity. The longest range of the WiFi signal is 10m.
- WiFi Operation Channels List: Ch1\~Ch11.
- Avoid using the Dash Cam in the vicinity of any devices that emit radio interference (e.g.. Microwave Ovens).
- Please note that other devices using 2.4GHz band may interfere with the WiFi signal of the Dash Cam, and result in the connection speed of both devices slowing down.
- It is considered normal operation for the Dash Cam to get warm during use.
BATTERY WARNING
- Always power the Dash Cam using the provided cable and 12v adapter. Improper charging of the Dash Cam and may result in failure of the internal battery.
- Never dismantle the Dash Cam or expose the internal battery.
- Do not dispose of the Dash Cam in fire.
- Dispose of the Dash Cam observing local regulations being mindful of the internal battery.
- Do not attempt to replace or expose the internal battery.
NOTES ON INSTALLATION
- It is advised that the Dash Cam is installed near the rear view mirror, at the top centre of the windshield for optimal operation.
- Make sure that the lens is within the range of the windscreen wiper to ensure a clear view when it rains.
- Do not touch the lens with your fingers. Finger prints left on the lens will result in unclear videos or photos. If photos or videos are blurred, please clean the lens gently with a microfibre cloth.
- Do not install the device on a tinted window. Doing so may damage the tint film and restrict the Car Dash Cam's GPS signal.
- Make sure that the installation position does not hinder or block the field of view or GPS signal.
- Only use the included cable to power the DSH-890.
PRODUCT INFORMATION
For latest manual and product updates please visit our website at
www.dashmate.com.au or www.dashmate.co.nz

1. INTRODUCTION
Thank you for purchasing a Dashmate Dash Cam. We are certain that our product will give you trouble free operation while providing you with safety features that enhances your driving experience. Our products, like most after-market safety enhanced devices, are designed to assist and aid the driver, not to replace the manual function of the person operating the vehicle. Please read through these instructions before attempting to install this product. For the latest manual and product updates, please visit our website at www.dashmate.com.au or www.dashmate.co.nz
1.1 FEATURES
• Full High Definition Recording
• 1.5" Colour Screen
- 150^ Field of View
• Built In GPS Logger Records Your Speed and Path
• Built in WiFi Smart Phone Connectivity
1.2 PACKAGE CONTENTS
CAMERA POWER ADAPTOR USB CABLE


1.3 PRODUCT OVERVIEW
| A Reset Button |
| B Microphone |
| C Micro SD Card Slot |
| D Magnetic Mount |
| E Wide Angle Lens |
| F Protective Glass |
| G 1.5" LCD Screen |
| H Status Light |
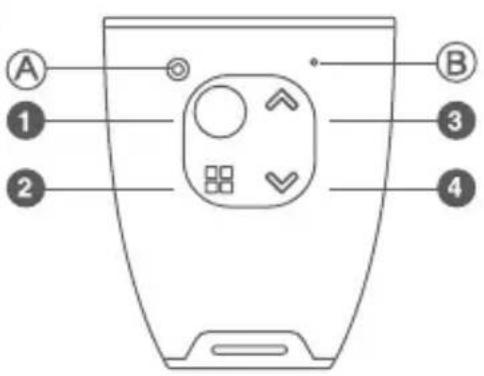

| 1 OK Button |
| 2 Menu Button |
| 3 Up Button |
| 4 Down Button |

natural_image
Simple line drawing of a square device with concentric rings and labeled points E and F (no text or symbols beyond labels)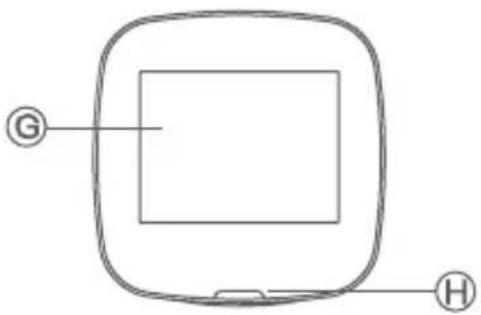

2. GETTING STARTED
2.1 INSERTING A MICRO SD CARD
With the Dash Cam powered off disconnect the Dash Cam from the magnetic mount.
With the screen facing toward you insert the Micro SD card in the slot in the top of the camera making sure the copper contacts of the Micro SD Card are facing toward you. Press the Micro SD Card down with your thumb nail until a click is heard.
2.2 REMOVING A MICRO SD CARD
Ensure that the Dash Cam is powered off, then remove the Dash Cam from the magnetic mount.
With your thumb nail press down the Micro SD Card until a click is heard and release. The Micro SD Card should eject from the Dash Cam.
NOTE:
- Do not remove or insert the memory card while the Dash Cam is turned on as this may damage the memory card or corrupt the memory cards stored data.
- Please use a Class 6 or higher rated micro SD card with a maximum capacity of 32GB.
- Please format the Micro SD card before the initial use.
- When removing the memory card, be careful as the card may eject quickly.
- For optimum use, it is recommended that you format the Micro SD card every 2 weeks.

2.3 INSTALLING THE DASH CAM
- Remove the protective stickers from the Dash Cams lens and screen
- Clean your desired mounting position on your vehicles windscreen making sure it is dry and free from dust.
- Connect the Dash Cam to the magnetic mount.
- Remove the 3M label from the adhesive on the magnetic mount and press the adhesive onto your desired position of your windscreen using the Dash Cam as a guide to where the camera will be facing.
- Once the mount is in position, remove the Dash Cam from the magnetic mount and firmly press the mount onto the windscreen for 30 seconds securing it in position.
- With the mount now installed re attach the Dash Cam to the mount
2.4 CONNECTING TO POWER
Only use the included charger to power and charge the Dash Cam.
-
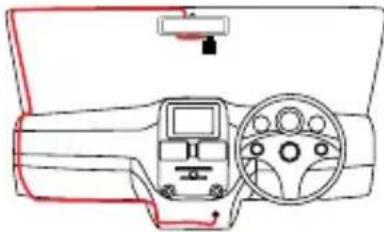
Once the Dash Cam is securely installed on your vehicle's windscreen, plug the 12v charger into your vehicle's cigarette lighter.
-
Run the cable along your vehicle's console and windscreen and plug the USB Micro plug into the Dash Cam Mount.
natural_image
Line drawing of a car dashboard and steering wheel (no text or symbols)NOTE:
- It is recommended that the Dash Cam is installed behind your vehicle's rear view mirror.
- Make sure that the camera view or GPS module is not obstructed by any window tint or any other objects.
- When Installing, to make sure that the Dash Cam is positioned correctly it is recommended that you power up the Dash Cam and use the viewfinder screen to ensure the Dash Cam is positioned correctly.

3. POWERING THE DASH CAM ON/OFF
3.1 AUTO POWER ON/OFF
When the Dash Cam is correctly installed to your vehicles 12V power supply, the Dash Cam will automatically power up and start recording.
3.2 MANUAL POWER OFF
To manually power off the camera make sure the Dash Cam isn't recording and hold the (OK) Button for 5 seconds until the camera powers down.
3.3 MANUALLY POWER ON
To manually power up the Dash Cam after it has been powered off, hold the ○ (OK) Button for 5 seconds until the camera powers up.
3.4 RESET THE DASH CAM
To reset the Dash Cam, hold the button marked Reset on the underside of the camera.
To playback video files on you PC it is recommended to connect the SD card (not included) directly to your PC using either a USB micro SD card reader (not included) or if your PC has a SD card slot, a Micro SD/SD Card converter (not included).
Once the SD card is connected it should appear as a removable storage device. It is recommended that you transfer video files that you want to playback to a le on your computer before attempting to playback. This will reduce any delay in playback.
To view the GPS data played back alongside your videos, the included GPS software will be required and will show the speed and positioning of your vehicle at the time of recording. For more information on the GPS software, please see the section named Playback Software.

5. GPS RECORDING
GPS recording will record your speed and location when driving. When the Dash Cam is started it may take up to two minutes for the GPS module to position itself, in this time your position and speed will not be recorded. It is recommended that the windscreen mount is positioned so that the GPS module sits below the roof of the car and any windscreen tint so that the GPS signal is not blocked. GPS signal will also be weaker in tunnels, built up city areas, and heavily wooded areas.
6. WIFI SMART PHONE CONNECTIVITY
The on board WiFi is used to wirelessly connect your smart phone to your Dash Cam to review and download your footage while you are on the go.
To set up your Wireless connection between you Dash Cam and your iOS or Android smart device please follow the instructions below.
- It is required that you download the Dashmate DSH-890 app from the Google Play or iOS app store on your device before you attempt to connect your device.
- Once downloaded either activate the WiFi following the instructions in the WiFi section of this Manual, or hold the ♥ button while in the Video screen while the Dash Cam is not recording.
- The Dash Cam screen will then display the WiFi name and password.
- On your iOS or Android smart device go into the WiFi settings and connect to the Dash Cams WiFi connection which is displayed on the Dash Cams screen.
- When prompted by your smart device enter the password that is displayed on the Dash Cams screen.
- The connection should now be secured.
- Once you have established your wireless connection start the DSH-890 app on your smart device.

- You will now be able to access your recorded files from your Dash Cam on your smart device.
NOTE:
- When transferring videos to your smart device larger files will take longer to transfer.
- Please make sure that your smart phone operating system is up to date before attempting to connect your smart device.
7. INITIAL SETTINGS
Before using the Dash Cam we recommend Formatting the inserted SD card and setting the correct time and date
7.1 FORMATTING THE INSERTED MICRO SD CARD
Formatting the Micro SD Card will delete all information on the inserted Micro SD Card and prepare it for recording with the Dash Cam. To format your inserted Micro SD Card please follow the instructions below.
- Press the (OK) button to stop your Dash Cam from recording.
- Press the ☐ (Menu) button to enter the Video menu.
- Press the 88 (Menu) button again to enter the Settings menu.
- Use the ∧ and ♥ buttons to navigate the Settings menu and highlight the Format setting and press ○ (OK) to select.
- Select SD Card and press the ○(OK) button.
- Select OK and press the ○ (OK) button.
NOTE:
- Menus cannot be accessed while the Dash Cam is recording. Please stop the recording to access the menu.
- Formatting your Micro SD will delete all files from the card, Once these files have been deleted you will not be able to recover them.

7.2 SETTING THE TIME AND DATE
Setting the correct time and date ensures that the date is correct when you date stamp your footage.
To set the correct time and date, please follow the steps below.
-
Press the ○ (OK) button to stop your Dash Cam from recording.
-
Press the ⚪ (Menu) button to enter the Video menu.
-
Press the ☐ (Menu) button again to enter the Settings menu.
-
Use the ∧ and ♥ buttons to navigate the Settings menu and highlight the Date/Time setting and press ○ (OK) to select.
-
Use the ↑ and ↓ buttons to edit the selected field and the (OK) button to confirm and proceed to the next field. The last field lets you edit what format that the date is presented in, once confirmed pressing ○ (OK) a final time will save the time and date and exit to the settings menu.
NOTE:
- Menus cannot be accessed while the Dash Cam is recording. Pleas stop the recording to access the menu.
- Once the time and date is set it can be stamped onto your footage using the Date Stamp setting. Please see section Date Stamp for more details.
7.3 USING THE DASH CAM
When the Dash Cam is connected to your vehicle's 12v power supply, the Dash Cam will automatically power up and begin recording when you start your vehicle. During the start up the buttons will be unresponsive and the camera will take a moment to begin recording. The Dash Cam will automatically stop recording and shut down when your vehicle is powered off.

NOTE:
- Because of how some vehicles are wired, the recording may continue when the engine is switched off. If this happens, please manually turn off the Dash Cam or remove the car adapter from the cigarette lighter when not in use.
- The recording loop length can be configured to save a video file every 3 or 5 minutes of recording. For information on how to adjust this setting please refer to the Loop Recording section of this manual.
- The device saves the recorded footage and photos on to the inserted Micro SD Card. If the memory card capacity is full, the oldest file in the memory card will be overwritten.
Locked Recording saves the current video file and protects it from being overwritten. To manually start a locked recording press the 88 (Menu) button while recording.
NOTE:
- If the G Sensor (Gravity Sensing) function is enabled and a collision is detected, the device will automatically trigger an emergency recording and protect the current video file. Please refer to the section titled G Sensor for more information.
- Any emergency recording file will be created as a new file which will be protected to avoid being overwritten by normal loop recording. If the inserted Micro SD Card fills up with Emergency Recording files, the message "SD Card Full" will appear on the screen. When this happens the oldest emergency file will be automatically deleted when a new emergency recording file is created.
8. VIDEO MODE
When the Dash Cam is powered up the video screen will start by default. In this screen recording will automatically start and can be stopped by pressing the Ⓧ (OK) Button. To access the Video Menu, ensure that the Dash Cam is not recording then press the ⏻ (Menu) button.
8.1 VIDEO MENU
8.1.1 RESOLUTION
The Resolution setting allows you to select your required recording resolution. Higher resolution files will have more detail and take up more space on your Micro SD Card. Lower Resolution recordings will have less detail and take up less space.
To set your recording resolution, please follow the steps below.
- Press the Ⓐ (OK) button to stop your Dash Cam from recording.
- Press the ☐ (Menu) button to enter the Video menu.
- Use the 🔊 and ♥ buttons to navigate the Video menu and highlight the Resolution setting and press ○ (OK) to select.
- Select your required resolution and press the ○ (OK) button to confirm.
NOTE:
- Menus cannot be accessed while the Dash Cam is recording. Please stop the recording to access the menu.
- Higher resolution recordings will fill up the inserted Micro SD Card faster.

Loop Recording Sets the amount of time that the Dash Cam will record for before creating a new video.
To set your loop recording length, please follow the steps below.
- Press the
○ (OK) button to stop your Dash Cam from recording.
- Press the
88 (Menu) button to enter the Video menu.
- Usethe
and ♥ buttons to navigate the Video menu and highlight the Loop ng setting and press (OK) to select.
- Select your required loop recording length and press the ○ (OK) button to confirm.
NOTE:
- Menus cannot be accessed while the Dash Cam is recording. Please stop the recording to access the menu.
- It is suggested that the 3 minute option to prevent the inserted Micro SD card from filling up quickly.
- Selecting the OFF option will create the longest possible clip, in most cases depending on the set resolution and other factors this will be limited to 10MB.
- If your Micro SD Card is filling up quickly, lower the G Sensor sensitivity and reduce the Loop Recording length.
8.1.3 WDR
WDR allows you to activate the wide dynamic range of the recording.
To activate this setting please follow the instructions below.
- Press the
○ (OK) button to stop your Dash Cam from recording.
- Press the
Menu) button to enter the Video menu.
- Usethe
and ♥ buttons to navigate the Video menu and highlight the WDR and press ○ (OK) to select.
- Select On or Off and press the
○ (OK) button to confirm.
NOTE:
- Menus cannot be accessed while the Dash Cam is recording. Please stop the recording to access the menu.

8.1.4 EXPOSURE
Exposure is used to manually control the light sensitivity of the Dash Cam. To edit the Exposure setting please follow the steps below.
-
Press the ○ (OK) button to stop your Dash Cam from recording.
-
Press the ☐ (Menu) button to enter the Video menu.
-
Use the ▲ and ♥ buttons to navigate the Video menu and highlight the Exposure setting and press ○ (OK) to select.
-
Select your required exposure setting and press the ○ (OK) button to confirm.
NOTE:
- Menus cannot be accessed while the Dash Cam is recording. Please stop the recording to access the menu.
8.1.5 MOTION DETECTION
Motion Detection stops the Dash Cam from recording when no movement is detected in front of the camera, and starts the recording again when activity resumes.
To edit the Motion Detection settings please follow the instructions below.
-
Press the ○ (OK) button to stop your Dash Cam from recording.
-
Press the ☐(Menu) button to enter the Video menu.
-
Use the 🔊 and ♥ buttons to navigate the Video menu and highlight the Motion Detection setting and press ⭕ (OK) to select.
-
Select On or Off and press the ○ (OK) button to confirm.
NOTE:
- Menus cannot be accessed while the Dash Cam is recording. Please stop the recording to access the menu.
- When Motion Detection is activated, the Dash Cam will only record when movement is detected in font of the camera.

8.1.6 RECORD AUDIO
Record Audio allows you to set whether the Dash Cam records audio or if the microphone is muted.
To edit the Record Audio settings please follow the instructions below.
- Press the
○ (OK) button to stop your Dash Cam from recording.
- Press the
88 (Menu) button to enter the Video menu.
- Usethe
and ♥ buttons to navigate the Video menu and highlight the Record etting and press ○ (OK) to select.
- Select On or Off and press the
○ (OK) button to confirm.
NOTE:
- Menus cannot be accessed while the Dash Cam is recording. Please stop the recording to access the menu.
8.1.7 PARKING MONITOR
The Parking Monitor setting allows you to activate Park Mode which detects when there is an impact to your parked vehicle. When an impact is detected the Dash Cam will power up and begin recording a clip.
To edit the Parking Monitor settings please follow the instructions below.
- Press the
○ (OK) button to stop your Dash Cam from recording.
- Press the
Menu) button to enter the Video menu.
- Usethe
and ♥ buttons to navigate the Video menu and highlight the Parking setting and press ○ (OK) to select.
- Select On or Off and press the
○ (OK) button to confirm.
NOTE:
- Menus cannot be accessed while the Dash Cam is recording. Please stop the recording to access the menu.
- Parking Monitor will only begin recording after an impact to your parked vehicle is detected.

8.1.8 LDWS
The LDWS setting controls the Lane Departure Warning System feature, this feature will warn you if your vehicle is leaving it's lane when your vehicle is traveling over 60kph. To activate LDWS please follow the instructions on the next page.
- Press the
○ (OK) button to stop your Dash Cam from recording.
- Press the
88 (Menu) button to enter the Video menu.
- Usethe
and ♥ buttons to navigate the Video menu and highlight the LDWS and press ○ (OK) to select.
- Select On or Off and press the
○ (OK) button to confirm.
NOTE:
- Menus cannot be accessed while the Dash Cam is recording. Please stop the recording to access the menu.
- LDWS relies on the camera being correctly positioned, to ensure correct operation make sure that the on screen horizon line aligns with the horizon and the diagonal lane lines align with the lanes when driving naturally.
- If you are experiencing false triggers, ensure that the guidelines are aligning with the horizon and lanes correctly.
- Because LDWS uses visual cues to determine if you are leaving you lane, this can be effected by tram lines, skid marks, and any other similar intersecting road markings.
8.1.9 DATE STAMP
The Date Stamp stamps the time and date of recording on your footage giving you a chronological record of your travels. To activate Date Stamp please follow the instructions below.
- Press the
○ (OK) button to stop your Dash Cam from recording.
- Press the
Menu) button to enter the Video menu.
- Usethe
and ♥ buttons to navigate the Video menu and highlight the Date setting and press ○ (OK) to select.
- Select On or Off and press the
○ (OK) button to confirm.
NOTE:
- Menus cannot be accessed while the Dash Cam is recording. Please stop the recording to access the menu.

8.2.0 G SENSOR
The G Sensor detects when there is an impact to your vehicle while you are driving and saves the video as an emergency recording away from the normal loop recording files.
To edit the G Sensor settings please follow the instructions below.
- Press the
○ (OK) button to stop your Dash Cam from recording.
- Press the
88 (Menu) button to enter the Video menu.
- Usethe
and ♥ buttons to navigate the Video menu and highlight the G Sensor and press ○ (OK) to select.
- Select your required G Sensor setting and press the ○ (OK) button to confirm.
NOTE:
- Menus cannot be accessed while the Dash Cam is recording. Please stop the recording to access the menu.
- Your G Sensor setting will depend on the Vehicle the Dash Cam is installed in, smaller vehicles will require a lower sensitivity, larger vehicles will require a higher sensitivity. To avoid false triggers please set an appropriate sensitivity for your vehicle.
- If your Micro SD Card is filling up quickly, lower the G Sensor sensitivity and reduce the Loop Recording length.
9. STILL MODE
Still Mode is used to capture photos with your Dash Cam
To access the Still mode hold the ☐ (Menu) button for 2 seconds while in video mode.
In this mode the (OK) button is used to capture a snapshot and the (Menu) button is used to open the Still Menu.

9.1 PHOTO MENU
9.1.1 CAPTURE MODE
The Capture Mode setting is used to set a timer on your photos.
To edit your photo timer please follow the instructions below.
- Press the ○ (OK) button to stop your Dash Cam from recording.
- Hold the ☐ (Menu) button for 2 seconds to enter Still Mode.
3.Pressthe ☐(Menu) button to enter the Still menu. -
Use the ⚠ and ♥ buttons to navigate the Still menu and highlight the Capture Mode setting and press ○ (OK) to select.
-
Select your required timer duration and press the Ⓒ (OK) button to confirm.
NOTE:
- Menus cannot be accessed while the Dash Cam is recording. Please stop the recording to access the menu.
- Capture Mode can only be accessed from the Still Menu
9.1.2 RESOLUTION
Resolution allow you to set the image quality of your photos.
To set your Resolution please follow the instructions below.
- Press the ○ (OK) button to stop your Dash Cam from recording.
- Hold the 88 (Menu) button for 2 seconds to enter Still Mode.
- Press the ☐(Menu) button to enter the Still menu.
-
Use the ∧ and ♥ buttons to navigate the Still menu and highlight the Resolution setting and press ○ (OK) to select.
-
Select your required resolution and press the ○ (OK) button to confirm.
NOTE:
- Menus cannot be accessed while the Dash Cam is recording. Please stop the recording to access the menu.
- Resolution can only be accessed from the Still Menu

9.1.3 SEQUENCE
The Sequence setting allows you to set the Dash Cam to capture a sequence of 3 photos every time the photo function is triggered.
To activate the Sequence function please follow the instructions below.
- Press the

(OK) button to stop your Dash Cam from recording.
- Hold the

(Menu) button for 2 seconds to enter Still Mode.
- Press the

(Menu) button to enter the Still menu.
- Use the

♥ buttons to navigate the Still menu and highlight the Sequence less ○ (OK) to select.
- Select Off or On and press the ○ (OK) button to confirm.
NOTE:
- Menus cannot be accessed while the Dash Cam is recording. Please stop the recording to access the menu.
- Sequence can only be accessed from the Still Menu
9.1.4 WHITE BALANCE
White Balance controls the light and colour of your images with pre-set options.
To set your White Balance setting please follow the instructions below.
- Press the

(OK) button to stop your Dash Cam from recording.
- Hold the

(Menu) button for 2 seconds to enter Still Mode.
- Press the

(Menu) button to enter the Still menu.
- Usethe

√ buttons to navigate the Still menu and highlight the White g and press ○ (OK) to select.
- Select your required white balance setting and press the Ⓒ (OK) button to confirm.
NOTE:

24
- Menus cannot be accessed while the Dash Cam is recording. Please stop the recording to access the menu.
- White Balance can only be accessed from the Still Menu
9.1.5 EXPOSURE
Exposure is used to manually control the light sensitivity of the Dash Cam.
To set your Exposure setting please follow the instructions below.
- Press the ○ (OK) button to stop your Dash Cam from recording.
- Hold the 88 (Menu) button for 2 seconds to enter Still Mode.
- Press the ☐(Menu) button to enter the Still menu.
- Use the ∧ and ♥ buttons to navigate the Still menu and highlight the Exposure setting and press ○ (OK) to select.
- Select your required Exposure setting and press the ○ (OK) button to confirm.
NOTE:
- Menus cannot be accessed while the Dash Cam is recording. Please stop the recording to access the menu.
- Exposure can only be accessed from the Still Menu
9.1.6 ANTI SHAKING
Anti Shaking assists and corrects any blurring caused by hand held photography.
To activate the Anti Shaking function please follow the instructions below.
- Press the ○ (OK) button to stop your Dash Cam from recording.
- Hold the 88 (Menu) button for 2 seconds to enter Still Mode.
- Press the ☐(Menu) button to enter the Still menu.
- Use the ∧ and ∨ buttons to navigate the Still menu and highlight the Anti Shaking setting and press ○ (OK) to select.
- Select Off or On and press the ○ (OK) button to confirm.
NOTE:
- Menus cannot be accessed while the Dash Cam is recording. Please stop the recording to access the menu.
- Anti-Shanking Mode can only be accessed from the Still Menu

9.1.7 DATE STAMP
The Date Stamp stamps the time and date of recording on your photos giving you a chronological record of your travels.
To activate Date Stamp please follow the instructions below.
- Press the ○ (OK) button to stop your Dash Cam from recording.
- Hold the ☐ (Menu) button for 2 seconds to enter Still Mode.
- Press the ☐ (Menu) button to enter the Still menu.
- Use the ∧ and ♥ buttons to navigate the Still menu and highlight the Date Stamp setting and press ○ (OK) to select.
- Select Off or On and press the ○ (OK) button to confirm.
NOTE:
- Menus cannot be accessed while the Dash Cam is recording. Please stop the recording to access the menu.
- Date Stamp can only be accessed from the Still Menu
10 SETTINGS MENU
The Settings menu is used to edit the camera operational settings.
The Settings menu can be accessed from either the Video or Photo Mode by pressing the ☐ (Menu) button to access the menu, then pressing the ☐ (Menu) button again which will open the Settings menu.
While in this menu the ∧ and buttons can be used to highlight a setting and the Ⓗ(OK) button is used to select.
10.1 WIFI
WiFi is used to connect your Smart Device wirelessly to your DSH-890. To access full wireless functionality from your smart device you will need to download the DSH-890 app from either the Apple App store, or the Google Play store before connecting to the Dash Cams WiFi signal.
To activate WiFi follow the instructions below.
- Press the ○ (OK) button to stop your Dash Cam from recording.
- Press the 88 (Menu) button to enter the Video menu.
- Press the ☐ (Menu) button again to enter the Settings menu.
- Use the ∧ and ♥ buttons to navigate the Settings menu and highlight the WiFi setting and press ○ (OK) to select.
-
Select On and press the ○ (OK) button to confirm.
-
Once On is selected the screen will display the WiFi signals name and password which can now be connected to from your smart devices WiFi settings.
-
Once connected You will be able to access the Dash Cam via your smart phone using the DSH-890 app.
NOTE:
- Menus cannot be accessed while the Dash Cam is recording. Please stop the recording to access the menu.
- When connected to the DSH-890s WiFi connection your smart phone will not have access to the internet unless you have a data assist function activated on your smart device.
- Transferring large files wirelessly to your smart device may take time.

10.2 TIME/DATE
Setting the correct time and date ensures that the date is correct when you date stamp your footage.
To set the correct time and date, please follow the steps below.
-
Press the ○ (OK) button to stop your Dash Cam from recording.
-
Press the ☐ (Menu) button to enter the Video menu.
-
Press the ☐ (Menu) button again to enter the Settings menu.
-
Use the ∧ and ♥ buttons to navigate the Settings menu and highlight the Date/Time setting and press ○ (OK) to select.
-
Use the ∧ and ♥ buttons to edit the selected field and the Ⓑ(OK) button to confirm and proceed to the next field. The last field lets you edit what format that the date is presented in, once confirmed pressing Ⓞ(OK) a final time will save the time and date and exit to the settings menu.
NOTE:
- Menus cannot be accessed while the Dash Cam is recording. Please stop the recording to access the menu.
- Once the time and date is set it can be stamped onto your footage using the Date Stamp setting. Please see section Date Stamp for more details
10.3 BEEP SOUND
The Beep Sound setting is used to mute the key beeps that are emitted when a button is pressed.
To mute the key beeps, please follow the steps below.
-
Press the ○ (OK) button to stop your Dash Cam from recording.
-
Press the ☐ (Menu) button to enter the Video menu.

-
Press the ☐ (Menu) button again to enter the Settings menu.
-
Usethe ▲ and buttons to navigate the settings menu and highlight the Beep Sound setting and press ○ (OK) to select.
-
Select Off or On and press the ○ (OK) button to confirm.
NOTE:
- Menus cannot be accessed while the Dash Cam is recording. Please stop the recording to access the menu.
10.4 LANGUAGE
The Language setting is used to set your preferred language.
To change the Dash Cams language, please follow the steps below.
-
Press the ○ (OK) button to stop your Dash Cam from recording.
-
Press the 88 (Menu) button to enter the Video menu.
-
Press the ☐ (Menu) button again to enter the Settings menu.
-
Use the ∧ and ∨ buttons to navigate the Settings menu and highlight the Language setting and press ○ (OK) to select.
-
Select your preferred language and press the ○ (OK) button to confirm.
NOTE:
- Menus cannot be accessed while the Dash Cam is recording. Please stop the recording to access the menu.
10.5 SCREEN SAVER
The Screen Saver setting is used to dim the screen after a set duration of time while the Dash Cam is recording.
To set the screen saver, please follow the steps below.
- Press the ○ (OK) button to stop your Dash Cam from recording.

-
Press the ☐ (Menu) button to enter the Video menu.
-
Press the ☐ (Menu) button again to enter the Settings menu.
-
Usethe ∧ and ♥ buttons to navigate the Settings menu and highlight the Screen Saver setting and press ○ (OK) to select.
-
Select your screen saver timer and press the ○ (OK) button to confirm.
NOTE:
- Menus cannot be accessed while the Dash Cam is recording. Please stop the recording to access the menu.
- When the screen saver is active and the screen goes black, that Dash Camera will continue recording.
10.6 CAR PLATE
Car Plate allows you to save your cars licence plate so that it can be stamped onto your footage.
To save your licence plate, please follow the steps below.
- Press the ○ (OK) button to stop your Dash Cam from recording.
- Press the 88 (Menu) button to enter the Video menu.
- Press the ☐ (Menu) button again to enter the Settings menu.
- Use the ▲ and ♥ buttons to navigate the Settings menu and highlight the Car Plate setting and press ○ (OK) to select.
- Usethe and buttons to edit the selected field and use the (Menu) button to confirm and proceed to the next field.
- Once finished press the OK) button to save and exit.
NOTE:
- Menus cannot be accessed while the Dash Cam is recording. Please stop the recording to access the menu.

10.7 FORMAT
Formatting the Micro SD Card will delete all information on the inserted Micro SD Card and prepare it for recording with the Dash Cam.
To format your inserted Micro SD Card please follow the instructions below.
- Press the ○ (OK) button to stop your Dash Cam from recording.
- Press the ☐ (Menu) button to enter the Video menu.
- Press the ☐ (Menu) button again to enter the Settings menu.
- Use the ∧ and ♥ buttons to navigate the Settings menu and highlight the Format setting and press ○ (OK) to select.
- Select SD Card and press the ○ (OK) button.
- Select OK and press the ○ (OK) button.
NOTE:
- Menus cannot be accessed while the Dash Cam is recording. Please stop the recording to access the menu.
- Formatting your Micro SD will delete all files from the card, Once these files have been deleted you will not be able to recover them.
10.8 DEFAULT SETTINGS
Default Settings restores the cameras settings back to their default state.
To restore your Dash Cams settings please follow the settings below
- Press the ○ (OK) button to stop your Dash Cam from recording.
- Press the 88(Menu) button to enter the Video menu.
- Press the ☐ (Menu) button again to enter the Settings menu.
- Use the ∧ and ♥ buttons to navigate the Settings menu and highlight the Default Settings setting and press ○ (OK) to select.

NOTE:
- Menus cannot be accessed while the Dash Cam is recording. Pleas stop the recording to access the menu.
11. PLAYBACK SCREEN
This screen is used to playback photos and videos. To access the Playback screen ensure that the camera is not recording and hold the ☐ (Menu) button for 2 seconds. This will send the camera to the Still mode. While in the Still mode hold the ☐ (Menu) button for another 2 seconds which will bring you to the Playback Screen. In this screen the 📂 and buttons are used to cycle through the recorded videos and photos and the ⏻ (OK) button is used to play and pause videos. In the Playback Screen photos and videos can also be locked and deleted via the Playback Menu. This menu can be accessed by pressing the ☐ (Menu) in the Playback Screen.
11.1 PLAYBACK SOFTWARE
Your videos can be viewed in most playback programmes like Windows Media Player and QuickTime. However, to playback your footage alongside the recorded GPS tracking and speed details please use the included software. It is recommended when playing back the video alongside the GPS tracking that you transfer the video files from the Micro SD card to your computer and play the files locally from your computer's hard drive.

11.2 PLAYBACK
To playback your files using the GPS tracking software, please follow the instructions below.
- Install the included software following the on screen instructions.
- Once installed, remove the Micro SD card from the Dash Cam and connect the card to your computer using your preferred method.
-
Transfer the required files from the inserted SD Card (Removable storage device) to a location on your computer's hard drive.
-
Open the installed software.
-
In the software, click File in the top left corner and then click Open from the drop down menu.
- In the window that appears, locate the videos that you have saved to your computer's hard drive, and double click the video you would like to play back.
- Your video will now start to Play back.
NOTE:
- GPS tracking may not appear instantly. If the GPS tracking does not appear ensure that you are playing the video files locally from your computer's hard drive, and that the GPS module was connected at the time that the video was recorded.
• GPS tracking is only available while your computer is connected to the internet. - If you have lost your software CD or can not ready a CD on your computer, please download a copy of the playback software from www.dashmate.com.au

12. SPECIFICATIONS
| SCREEN 1.5" LCD | |
| LENS 150° | |
| MINIMUM LIGHT 1 LUX | |
| VIDEO RESOLUTION FULL HD 1080P | |
| GPS BUILT IN | |
| WiFi BUILT IN | |
| MEMORY TYPE MICRO SD CARD | |
| CAPACITY SUPPORTED UP TO 32GB/CLASS 4 & ABOVE | |
| MICROPHONE/SPEAKER BUILT IN |
- VIDEO MENU
| VIDEO | RESOLUTION | 1080FHD 1920 x 1080 | WVGA 848 x 480 |
| 720P 1280 x 720 VGA 6 | 40 x 480 | ||
| LOOP RECORDING | OFF 5 MINUTES | ||
| 3 MINUTES 10 MINUTES | |||
| WDR OFF ON | |||
| CAPACITY +2.0 -1/3 | |||
| EXPOSURE | +5/3 -2/3 | ||
| +4/3 -1.0 | |||
| +1.0 -4/3 | |||
| +2/3 -5/3 | |||
| +1/3 -2.0 | |||
| 0.0 | |||
| MOTION DETECTION OFF ON | |||
| RECORD AUDIO OFF ON | |||
| PARKING MONITOR | OFF ON | ||
| LDWS | OFF ON | ||
| DATE STAMP | OFF ON | ||
| G SENSOR | OFF HIGH | ||
| MIDDLE | LOW | ||

- STILL MENU
| STILL | CAPTURE MODE | SINGLE 5S TIMER | |
| 2S TIMER 10S TIMER | |||
| RESOLUTION | 12M 4032 x 3024 3M 20 | 48 x 1536 | |
| 10M 3648 x 2736 2MHD | 1920 x 1080 | ||
| 8M 3264 x 2248 VGA 640 | 480 | ||
| 5M 2592 x 1944 1.3M 1280 | 960 | ||
| SEQUENCE OFF ON | |||
| QUALITY FINE | NORMAL ECONOMY | ||
| SHARPNESS STRONG | NORMAL SOFT | ||
| WHITE BALANCE | AUTO TUNGSTEN | ||
| DAYLIGHT | FLUORESCENT | ||
| CLOUDY | |||
| COLOUR | COLOUR BLACK & WHITE SEPIA | ||
| ISO | AUTO 200 | ||
| 100 | 400 | ||
| EXPOSURE | +5/3 | -2/3 | |
| +4/3 | -1.0 | ||
| +1.0 | -4/3 | ||
| +2/3 | -5/3 | ||
| +1/3 | -2.0 | ||
| 0.0 | |||
| ANTI SHAKING | OFF ON | ||
| QUICK REVIEW | OFF 2 SECONDS 5 SECONDS | ||
| DATE STAMP | OFF DATE DATE/TIME | ||
15. SETTINGS MENU
| SETTINGS | WIFI OFF ON | ||
| DATE / TIME *SET TIME | AND DATE* | ||
| BEEP SOUND OFF ON | |||
| LANGUAGE *SET LANGUAGE* | |||
| FREQUENCY 50Hz 60Hz | |||
| SCREEN SAVER | OFF 1 MINUTE | ||
| 3 MINUTES 5 MINUTES | |||
| CAR PLATE *SET REGO | PLATE NUMBER* | ||
| FORMAT OK CANCEL | |||
| DEFAULT SETTING | OK CANCEL | ||
| VERSION | *DISPLAY FIRMWARE VERSION* | ||
16. PLAYBACK MENU
| PLAYBACK | DELETE | DELETE CURRENT | DELETE ALL |
| PROTECT | LOCK CURRENT | UNLOCK CURRENT | |
| LOCK ALL | UNLOCK ALL | ||
| SLIDE SHOW | 2 SECONDS 5 SECONDS 8 SECONDS | ||
17. ABOUT THIS GUIDE
The content in this document is for information purpose and is subject to change without prior notice. We make every effort to ensure that this User Guide is accurate and complete. However, no liability is assumed for any errors and omissions that may have occurred. The manufacturer reserves the right to change the technical specifications without prior notice.
18. WARRANTY TERMS & CONDITIONS
Our goods come with guarantees that cannot be excluded under the Australian & New Zealand Consumer Law. You are entitled to a replacement or refund for a major failure and for compensation for any other reasonably foreseeable loss or damage. You are also entitled to have the goods repaired or replaced if the goods fail to be of acceptable quality and the failure does not amount to a major failure.
This warranty is provided in addition to your rights under the Australian & New Zealand Consumer Law.
Directed Electronics warrants that this product is free from defects in material and workmanship for a period of 12 months from the date of purchase or for the period stated on the packaging. This warranty is only valid where you have used the product in accordance with any recommendations or instructions provided by Directed Electronics.
This warranty excludes defects resulting from alterations of the product, accident, misuse, abuse or neglect.
In order to claim the warranty, you must return the product to the retailer from which it was purchased or if that retailer is part of a National network, a store within that chain, along with satisfactory proof of purchase. The retailer will then return the goods to Directed Electronics. Directed Electronics will repair, replace or refurbish the product at its discretion.
The retailer will contact you when the product is ready for collection. All costs involved in claiming this warranty, including the cost of the retailer sending the product to Directed Electronics, will be borne by you.
Directed Electronics Address: 44 Translink Drive, Keilor Park Victoria Australia 3042
Ph: +61 03 8331 4800
Email: service@dashmate.com.au
TECHNOLOGY DRIVEN™

dashmate
TECHNOLOGY DRIVEN™
www.dashmate.com.au
www.dashmate.co.nz
CE


DIRECTED. AUSTRALIA & NZ
www.directed.com.au
www.directed.co.nz


- Full HD Dash Camera
- CONTENTS
- INTRODUCTION 8
- GETTING STARTED 10
- POWERING THE DASH CAM ON/OFF....12
- PLAYING BACK VIDEO ON A PC....12
- INITIAL SETTINGS....14
- VIDEO MODE....17
- STILL MODE 22
- SETTINGS MENU.... 26
- PLAYBACK SCREEN.... 32
- SPECIFICATIONS....34
- CAUTION
- BATTERY WARNING
- NOTES ON INSTALLATION
- PRODUCT INFORMATION
- INTRODUCTION
- FEATURES
- PACKAGE CONTENTS
- PRODUCT OVERVIEW
- GETTING STARTED
- INSERTING A MICRO SD CARD
- REMOVING A MICRO SD CARD
- NOTE:
- INSTALLING THE DASH CAM
- CONNECTING TO POWER
- POWERING THE DASH CAM ON/OFF
- AUTO POWER ON/OFF
- MANUAL POWER OFF
- MANUALLY POWER ON
- RESET THE DASH CAM
- GPS RECORDING
- WIFI SMART PHONE CONNECTIVITY
- INITIAL SETTINGS
- FORMATTING THE INSERTED MICRO SD CARD
- SETTING THE TIME AND DATE
- USING THE DASH CAM
- VIDEO MODE
- VIDEO MENU
- RESOLUTION
- WDR
- EXPOSURE
- MOTION DETECTION
- RECORD AUDIO
- PARKING MONITOR
- LDWS
- DATE STAMP
- G SENSOR
- STILL MODE
- PHOTO MENU
- CAPTURE MODE
- RESOLUTION
- SEQUENCE
- WHITE BALANCE
- EXPOSURE
- ANTI SHAKING
- DATE STAMP
- SETTINGS MENU
- WIFI
- TIME/DATE
- BEEP SOUND
- LANGUAGE
- SCREEN SAVER
- CAR PLATE
- FORMAT
- DEFAULT SETTINGS
- PLAYBACK SCREEN
- PLAYBACK SOFTWARE
- PLAYBACK
- SPECIFICATIONS
- SETTINGS MENU
- PLAYBACK MENU
- ABOUT THIS GUIDE
- WARRANTY TERMS & CONDITIONS
- TECHNOLOGY DRIVEN™
Brand : Dashmate
Model : DSH-890
Category : Dash cam