
DuraFon Roam-BU - Headphones ENGENIUS - Free user manual and instructions
Find the device manual for free DuraFon Roam-BU ENGENIUS in PDF.


| Product Type | Long-Range SIP Cordless System Base Station (BU) |
| Dimensions (L x W x H) | 100 mm x 60 mm x 23.4 mm |
| Weight | 103 g (without accessories) |
| Power Supply | PoE (Power over Ethernet) or DC input (12V) |
| CPU | Qualcomm IPQ4019, ARM A7 Quad Core 717 MHz |
| Memory | 1 GB DDR3 RAM |
| Storage | 4 GB eMMC |
| Interfaces | 2 x 10/100/1000 RJ45 (1 PoE), 1 x Micro SD slot, 1 x DC jack, 1 x Reset button |
| Frequency | 900 MHz (902-928 MHz) DSS with frequency hopping |
| Range | Up to 12 floors in-building, 250,000 sq ft facility, 3,000 acres open land |
| Max Base Stations | Up to 8 base stations per system |
| Max Handsets | Up to 90 handsets per system |
| Voice Codecs | G.711a, G.711u, G.729A |
| SIP Protocol | RFC3261, supports RFC2833, SIP INFO, hold, transfer |
| Operating Temperature | 0°C to 40°C (32°F to 104°F) |
| Storage Temperature | -40°C to 80°C (-40°F to 176°F) |
| Operating Humidity | 0% to 90% (non-condensing) |
| Regulatory Compliance | FCC Part 15 Class B |
| Management | Web GUI via EnGenius Cloud (local or remote) |
| Firmware Upgrade | Via web interface (local file or scheduled) |
| Optional Accessories | External antenna kits, lightning protection, antenna splitter |
Frequently Asked Questions - DuraFon Roam-BU ENGENIUS
User questions about DuraFon Roam-BU ENGENIUS
0 question about this device. Answer the ones you know or ask your own.
Ask a new question about this device
Download the instructions for your Headphones in PDF format for free! Find your manual DuraFon Roam-BU - ENGENIUS and take your electronic device back in hand. On this page are published all the documents necessary for the use of your device. DuraFon Roam-BU by ENGENIUS.
USER MANUAL DuraFon Roam-BU ENGENIUS
Long-Range SIP Cordless System Controller

natural_image
White wireless router device with two ports and a label reading 'Double Rent 82C' (no other text or symbols visible)EnGenius Customer Service http://www.engeniustech.com/
Table of Contents
Regulatory Information 4
Federal Communications Commission (FCC) EMC Statement 4
IC Interference Statement 4
Equipment Checklist 5
DuraFon Roam BSC Illustration 6
System Architecture 7
System Features(including DuraFon Roam BU and DuraFon Roam HC) 7
Getting Started 10
Signing up 10
Logging On 11
Registering Devices to Organization 12
Adding BSC from Inventory.... 13
Connect to DuraFon Roam 14
Changing default credential 15
System Settings 17
IP Addressing 17
Time 17
SIP Server 18
SIP Accounts 20
Base Station....23
Handset 25
Base Station Settings 33
FXO Settings 33
FXO Number Settings 33
Broadcast 34
Dashboard 35
Overview 37
Controller 38
Call 39
RSSI 40
Topology 42
Statistics 43
Summary 43
Base Station 43
Calls....45
Log 46
Events 46
System 47
Tools 48
Firmware 48
Upgrade BSC 48
Upgrade Base 51
Upgrade Handset 53
Schedule Upgrade 55
Backup & Restore 56
Reset & Reboot 56
Phonebook 58
Email Notification 62
Technical Specifications 64
Index 65
Regulatory Information
Federal Communications Commission (FCC) EMC Statement
This device complies with Part 15 of FCC rules. Operation is subject to the following two conditions:
(1) This device may not cause harmful interference.
(2) This device must accept any interference received, including interference that may cause undesired operations.
WARNING!
Any changes or modifications not expressly approved by the party responsible for compliance could void the user's authority to operate this equipment.
This equipment has been tested and found to comply with the limits for a Class B digital device, pursuant to part 15 of the FCC Rules. These limits are designed to provide reasonable protection against harmful interference when the equipment is operated in a commercial environment. This equipment generates, uses, and can radiate radio frequency energy and, if not installed and used in accordance with the instruction manual, may cause harmful interference to radio communications.
Operation of this equipment in a residential area is likely to cause harmful interference in which case the user will be required to correct the interference at his own expense.
IC Interference Statement
The following information applies if you use the product within Canada area. Industry Canada ICES Statement CAN ICES 003 (Issue 7)
Equipment Checklist
In a DuraFon Roam BSC package, please find the following components:
a. DuraFon Roam BSC x 1
b. Screw pack x 1
c. Quick Guide
。
DuraFon Roam BSC Illustration
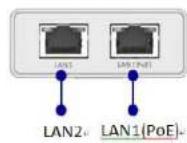


\~5\~
\~6\~
System Architecture

flowchart
graph TD
    A["Cloud"] --> B["Internet"]
    B --> C["IP-PBX"]
    C --> D["Switch"]
    D --> E["Controller"]
    E --> F["Base-1"]
    E --> G["Base-2"]
    E --> H["Base-3"]
    E --> I["Base-8"]
    F --> J["PSTN"]
    G --> K["Base up to 8"]
    H --> K
    I --> K
    K --> L["Handset-1"]
    K --> M["Handset-2"]
    K --> N["Handset-3"]
    K --> O["Handset-4"]
    K --> P["Handset-5"]
    K --> Q["Handset-89"]
    K --> R["Handset-90"]
    L --> S["Wireless Signal"]
    M --> T["Wireless Signal"]
    N --> U["Wireless Signal"]
    O --> V["Wireless Signal"]
    P --> W["Wireless Signal"]
    Q --> X["Wireless Signal"]
    R --> Y["Wireless Signal"]
    S --> Z["Handset up to 90"]
System Features(including DuraFon Roam BU and DuraFon Roam HC)
SIP
• Voice codec: G.711a, G.711u, G.729A
• SIP protocol: RFC3261
• DTMF: RFC2833, SIP INFO Hold: RFC3264
• Transfer: RFC3515, RFC3891, RFC3892
• Support Outbound Proxy
• DNS SRV Support
Long-Range
• 12 Floors In-Building Penetration
• 250,000 sq. ft. of Facility Coverage
• 3,000 Acres of Property, Open Land Coverage
Durable
- Tested to withstand 6-Foot Drops, Over 50 Times onto Concrete Floors
Handset Features
• Cordless telephone
• 2-Way Radio
- User Handset Naming
- Keypad Lock
- Speakerphone
- Caller ID
- Call Waiting
- Vibrate Mode
- Line Select
- Call Logs – Dialed & Received
- Redial
- Speed Dial
- Call Hold
- Call Transfer
• Wireless PBX Function Sharing
• Wireless Phone Book Sharing
- Silent Ring
- Mute
- Wired Headset
- Blue Tooth
• 900 MHz, DSS, Frequency Hopping
- Selectable Handset Grouping (7 groups)
- User Programmable PBX Functions
• Phone Book Supports 50 Entries
• Intercom (Handset-to-Handset), no group chatter
• PTT Broadcast (One-to-Many)
System
• 900MHz(902\~928MHz)
- Multi-Cell Architecture
• Roaming & Handover
- Multi-Base up to 8
• 1 LAN and 1 PSTN Ports per Base Unit
- Multi-Handset up to 90
- Removable Base Antenna
• Flexible Port Dedication: Single, Group or All
• Standard SIP Protocol Connection
- Remote Configuration via EnGenius Cloud
• Any Analog Line Connection: Landline, ATA, Cellular, VoIP or Satellite
• Supports Ring Groups & Hunt Groups
• Type I/II Caller ID (FSK and DTMF)
• Visual Message Waiting Indication (VMWI) for PSTN
- Conference Calling
- Modifiable Flash and DTMF Tone Timing
- Secure, Digital Spread Spectrum w/Frequency Hopping Technology
• EnGenius Cloud Remote Access
Battery & Charger
• Li-Ion Technology
• 6-Hours of Talk Time
• 50-Hours of Stand-By Time
• Desktop Charger Supports Handset & Spare Battery Charging Slots
• 4-Hour Recharge Time
• Battery Hot-Swap While Call is On-Hold
Optional Equipment
- External Base Antenna Kits: Optional indoor or outdoor antenna with 20 meter low loss LMR-400 cable
- Lighting Protection Kit
- Antenna Splitter
DuraFon Roam Value
• No Monthly Bill (like cellular)
• No Per Minute charges (like cellular)
• No Contracts (like cellular)
• No Annual FCC License Fees (like 2-way radios)
• No Extensive Infrastructure Installation (like wireless networking, Wi-Fi phones)
- No QoS Concerns
• No Wireless Network Interference
Manufacturer's Part Numbers
• DuraFon Roam BSC (Controller)
• DuraFon Roam HC (Handset)
• DuraFon Roam BU (Base Station)
Getting Started
Install and connect DuraFon Roam BSC and BU to a PoE switch inside your company's network which is able to access to internet.
Re: Connecting the line port of BU to PSTN network as a backup.

Signing up
Before you start to manage EnGenius DuraFon Roam BSC, you must first sign up for the service.
Registering EnGenius Cloud is similar to other web-based platforms and can be done either with a social media account (e.g. Google or Facebook) or by creating an account from scratch. You will need to provide your email address, company name, physical address, and phone number. Furthermore, you must determine the country in which your account will be hosted. That is, all relative device information, user configurations, and client statistics will be kept in the corresponding region of servers (Oregon for US and Frankfurt for other countries). This enables EnGenius Cloud to protect customer data and comply with requirements like GDPR for customers within the European Union.
Logging On
Once your account has been created, you can login to EnGenius Cloud in the following steps:
- Open a web browser to https://cloud.engenius.ai/. This will bring up the main login page.

- Enter your EnGenius Cloud email address and password, click the SIGN IN button.
- For EnGenius Partner who has account on EnGenius Partner Portal already, you can simply click on "E Partner" button, and EnGenius Partner Portal will pop up login page for you to use Single-Sign-On capability of Partner Portal to log on to EnGenius Cloud
- For Google and Facebook users, you can also click on "Google" or "Facebook" button to use your account on Google and Facebook to log on to EnGenius Cloud
- EnGenius Cloud will create a new default Organization and Network for every new account based on the email address as unique user identification. (Note: If someone is invited to an Organization or Network, this account won't have default Organization and Network.) If you have multiple accounts created on EnGenius Cloud, EnGenius Cloud will merge your accounts based on the "email address" of the account. For example, if you have created a new account on EnGenius Cloud using the same email address as your google account, then you're able to login to this email account either through Google account authentication
with Google account password or through EnGenius Cloud Login with the password while you created the EnGenius Cloud account.
Registering Devices to Organization
Register a DuraFon Roam BSC to EnGenius Cloud inventory by using the serial number located on the device.
Firstly, navigate to Inventory & License, click "Register Device".
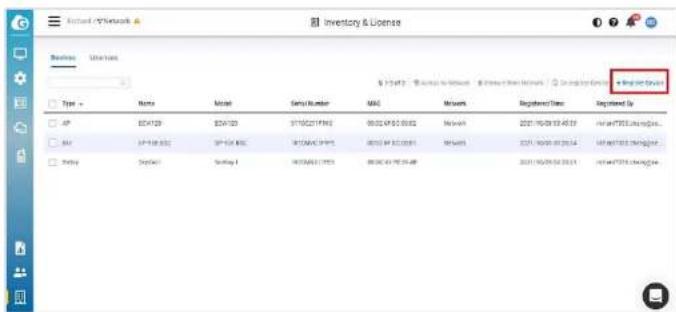
Registering devices with a serial number is easy. Just enter the serial numbers of your DuraFon Roam BSC, one per line, click the "Register" button.

Adding BSC from Inventory
➤ Navigate to DuraFon Roam

Click "Add from Inventory"

Select BSC then click Apply

Connect to DuraFon Roam
Navigate to DuraFon Roam
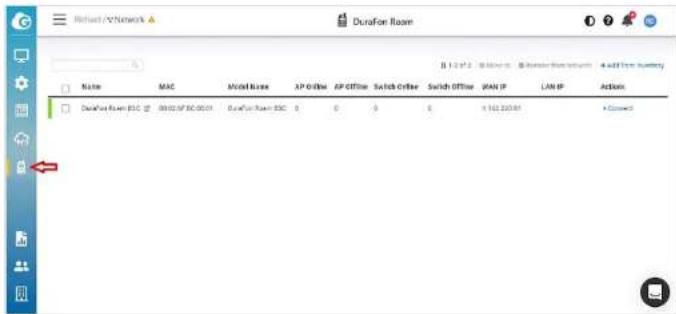
Click "Connect" to entering GUI of BSC

Now the DuraFon Roam is ready for networks configuration, device management and event/log analysis.

flowchart
graph TD
    A["BASE STATION CONTROLLER"] --> B["BASE STATIONS"]
    B --> C["HANDSETS"]
    C --> D["2"]
    C --> E["3"]
    style A fill:#f9f,stroke:#333
    style B fill:#ccf,stroke:#333
    style C fill:#cfc,stroke:#333
    style D fill:#fcc,stroke:#333
    style E fill:#cff,stroke:#333
Changing default credential
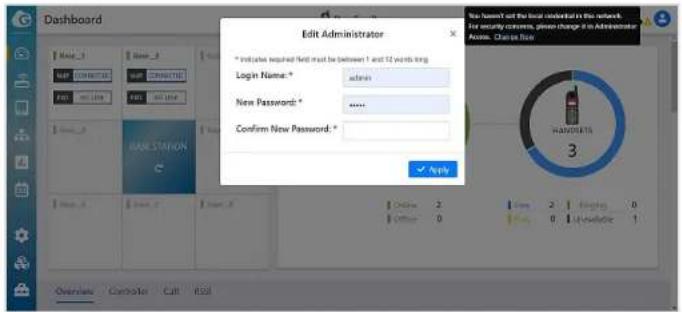
When first time enter the GUI of DuraFon Roam, you will find a triangle icon on the right top corner.

flowchart
graph TD
    A["Base Station Controller"] --> B["BASE STATIONS 2"]
    B --> C["Handsets 3"]
    C --> D["Free 2"]
    C --> E["Empty 0"]
    C --> F["Unusable 1"]
    style A fill:#f9f,stroke:#333
    style B fill:#ccf,stroke:#333
    style C fill:#cfc,stroke:#333
    style D fill:#fcc,stroke:#333
    style E fill:#cff,stroke:#333
    style F fill:#ffc,stroke:#333
When you move the cursor to the icon, it will show you a message to remind you to change default credential. Click "Change Now" to change Login Name and Password. Re: The default Login Name and Password is "admin".
System Settings
Before start using the DuraFon Roam, please make sure the related network settings are well setup.
IP Addressing
➢ Navigate to System Settings > IP Addressing

By default is DHCP, the BSC is assigned an IP address dynamically by the DHCP server. If somehow it can't be assigned the IP address from the DHCP server, it will roll back to default static IP 192.168.1.156 for the base unit automatically. You can set static IP 192.168.1.x to your PC/NB, so that they would be able to access web of this BSC.
| IP Address | IP assigned by DHCP serverOr using 192.168.1.156 |
| Username / Password | admin / admin |
➢ After finishing all settings, click Apply to take effect.
Time
➢ Navigate to System Settings > Time
➢ Check the default of Time Setting in "Auto" and NTP server Time server with "pool.ntp.org".
Select the Time Zone you located in, e.g. California is "UTC-08:00 Pacific Time", New York is "UTC-05:00 Eastern Time".
Re-1: If it's in daylight saving time, you should enable the "Daylight Saving". Re-2: The Time Zone will be back to default("UTC-05:00 Eastern Time") when BSC's firmware is upgraded.
➢ After finishing all settings, click Apply to take effect.

SIP Server
➢ Navigate to System Settings > SIP Server

You must check with SIP service provider to get the correct "VoIP Server"、"VoIP Server Port"、"Stun Server"、"Stun Server Port"、"SIP Outbound Proxy" and "SIP Outbound Proxy Port" before setting the SIP Server.
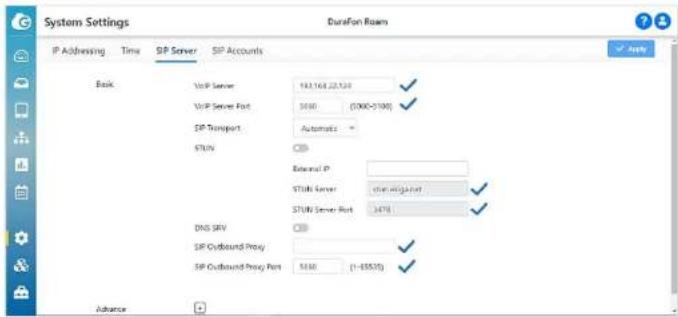
➢ Click + to set up advanced SIP settings(If necessary).
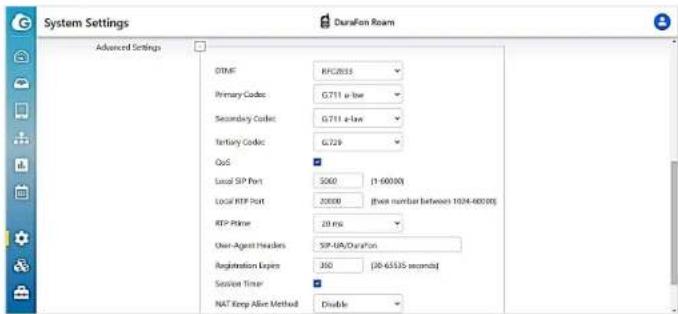
| Re: | |
| Basic | |
| SIP Transport Default: | Automatic. According to the requirement of SIP server, you can select UDP or TCP or TLS. |
| STUN When the BSC is located behind a NAT, you can set STUN server to discover its public IP. | |
| DNS SRV The BSC is used | a hosted device connected to ITSP,DNS SRV record type may be required in some service providers.When DNS SRV is activated, DNS is assigned to 8.8.8.8 (google DNS) |
| Advance | |
| DTMF Default: RFC2833 | |
| Primary CodecSecondary Codec | G.711 u-law or G.711 a-law is suggested. If you select G.729 Codec, the SIP call will not support 3-way conference. |
| QoS When activate this QoS, it will add the QoS parameters in message(following 802.1p, priority 6) | |
| Allow SDP NAT Rewrite In some cases, i.e. connected with NAT or VPN, to enable this option to have the IP address in UDP message bodies rewritten and routed correctly. | |
| RTP Ptime RTP packetization time is required to synchronize when using a P2P call. | |
| User-Agent Header For security in some SIP servers, they may authorize the specific user-agent string. | |
| Registration Expire Expire time of SIP registration | |
| Session Timer Enable/Disable SIP Session Timer | |
➢ After finishing all settings, click Apply to take effect.
SIP Accounts
➢ Navigate to System Settings > SIP Accounts
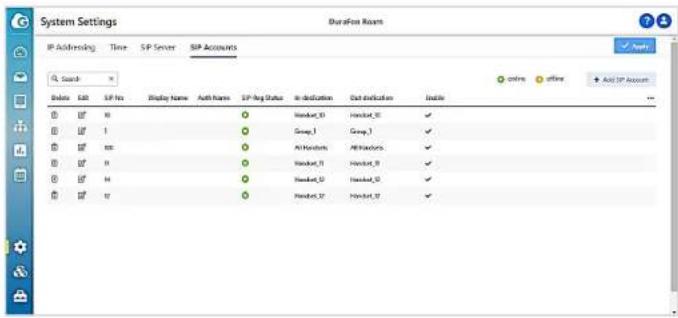
➢ Click Add SIP Account to increase new account
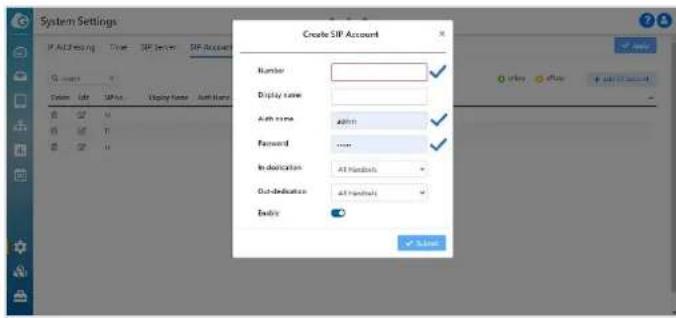
Click to edit the SIP account
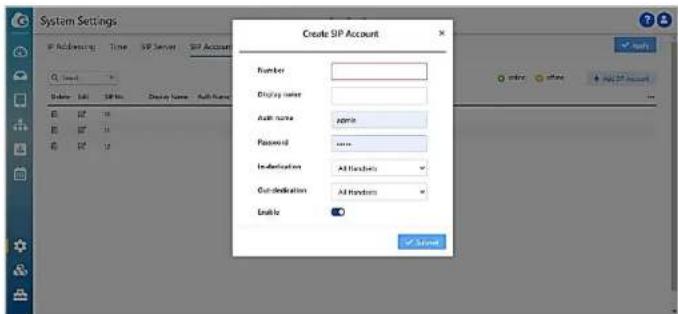
Re: You must check with SIP service provider to get the correct SIP "Number"、"Auth name" and "Password" before creating the new SIP account.
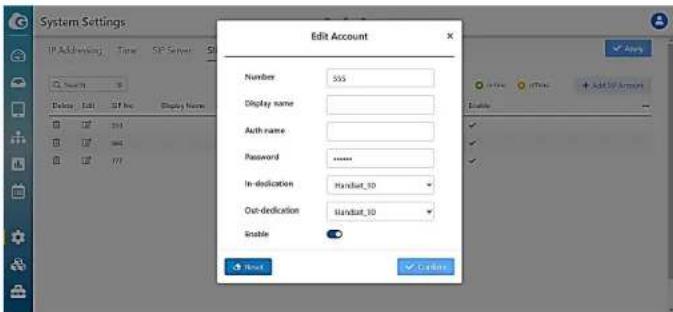
➢ After finishing all settings, click Apply to take effect.
Base Station
When finishing the System Settings, adding/editing Base Station will be next.
Navigate to Base Station
If your PC/NB displaying "No EnGenius Base Station discovered in same network!", It means the base station list is empty, please make sure the base is well connected to intranet, and can be discovered by BSC.
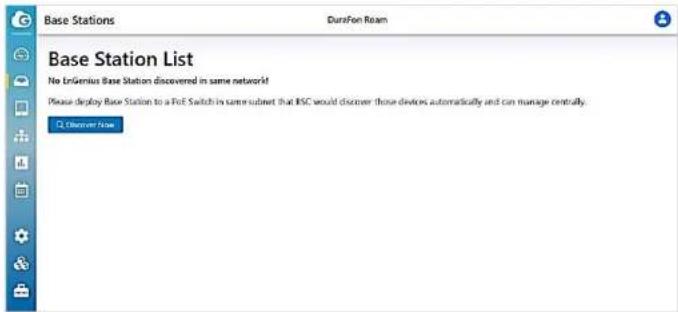
Once the base station connected to intranet, click the "Discover Now" to find new base station(Or simply wait for a few seconds, GUI will update automatically).

➢ Click "Manager", the base station will be registered to BSC with "Managed" Mode.
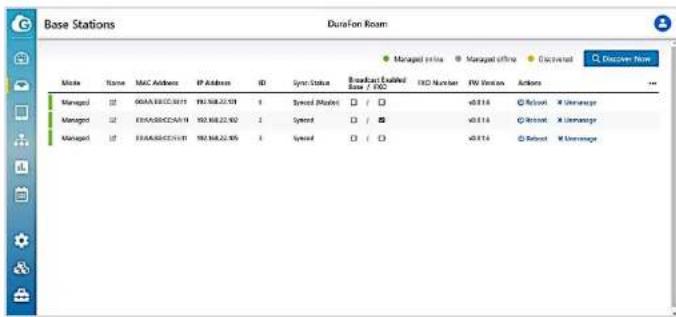
➢ Click to change the Name of base stations.
Handset
After adding/editing the Base Station, you can then add/edit Handset.
Navigate to Handset
If your PC/NB displaying "No EnGenius handset registered", it means the handset list is empty, please register handset(s) first.

Click "Add Handset" to register new handset(s)

Assign Handset ID and Handset Group, click "Next". At the same time, press MENU (softkey) on handset >> 6. Registration > 1. Register

▶ Handset is registering to base
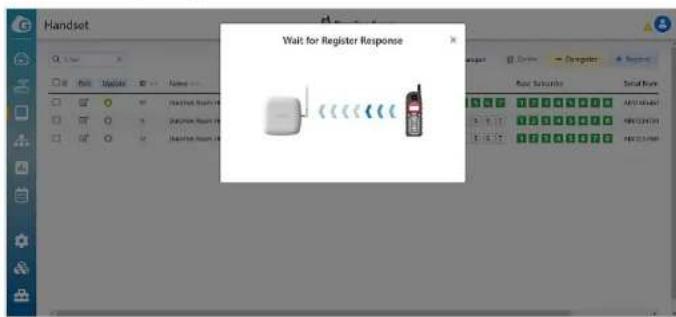
When handset registered completely, click "Done" to finish process.
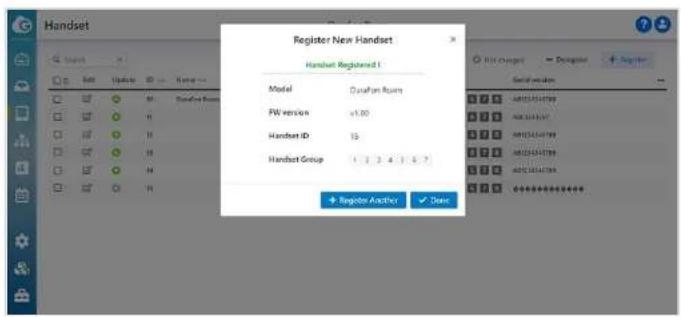
Re : In case registration failed, please check your registration process and do it again.

➢ Click "Deregister" to remove a handset
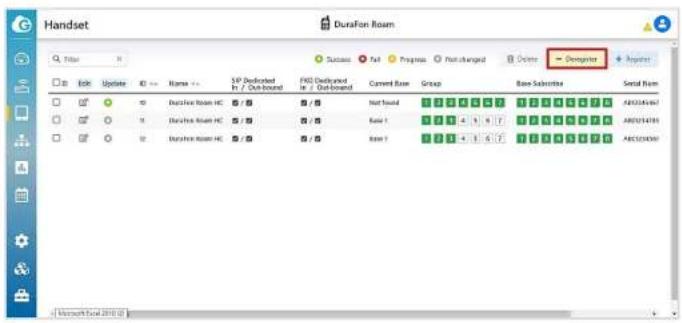
Select handset ID, click "De-register". At the same time, press MENU (softkey) on handset > 6. Registration > 2. Deregister

Select Handset ID, click "Deregister". At the same time, press MENU (softkey) on handset > 6. Registration > 2. Deregister
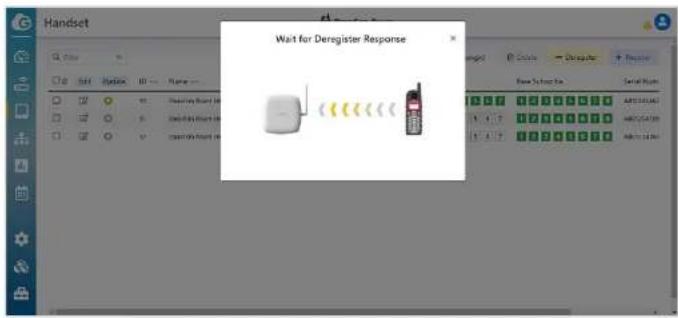
➢ Handset deregistered. Click "Done" to finish process. Or click "Deregister Another" to go ahead for another deregistration.

Click ☑ to edit the handset, including handset's name, group and subscribed base. Click Apply to take effect.

After editing "Name", "Group" and "Base subscribe", click "Apply" to take effect.

Delete handset
In case a handset is not working for some reason, you can't deregister it. You can click to select the handset you want to remove, and then click "Delete" to remove it from the system. The handset ID will be removed and become available for use again.
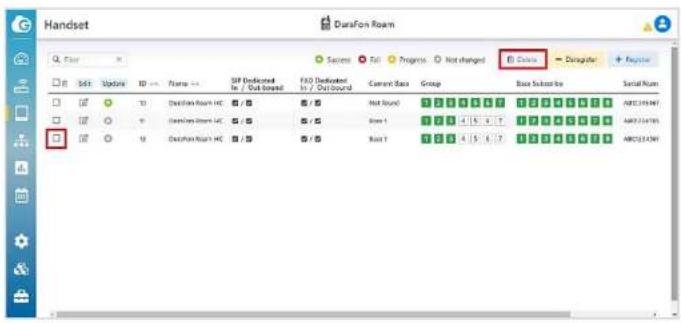

Select handset 12, and click "Delete". There is a warning message.
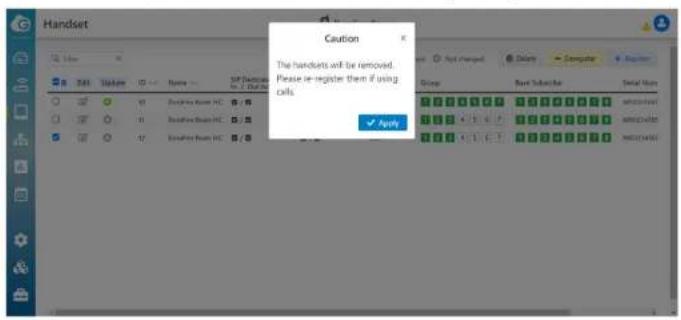
➢ Click "Apply" to remove handset 12
Base Station Settings
FXO Settings
DuraFon Roam base station implement a FXO port for emergency backup, please setup the related parameters before using it.

FXO Number Settings
You can assign the PSTN inbound call received by dedicated handset/group handset/all handsets. Also the outbound call called via dedicated handset/group handset/all handsets.
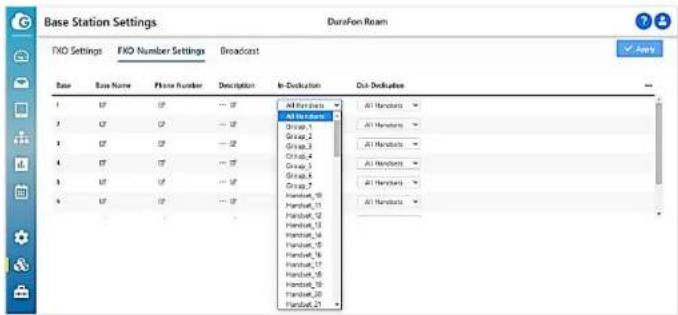
Broadcast
DuraFon Roam handset is not only able to make peer to peer broadcast, but also broadcast via base station.

When enabling broadcast over base, you can assign individual base (or multiple bases) for broadcasting. After enabled, broadcasts will always utilize enabled base(s) for broadcast.

Broadcast via base stations can be enabled also via the FXO port of the base, allowing non-DuraFon Roam users to broadcast to DuraFon Roam handsets by calling the base's FXO port.

▶ Broadcast Time out option : 30/60/90/120 seconds.
Dashboard
Dashboard of DuraFon Roam provides you an overall picture of whole system operating status, the details including overall usage、BSC status、Call status and RSSI status.

flowchart
graph TD
    A["BASE STATION CONTROLLER"] --> B["BASE STATIONS 6"]
    B --> C["HANDSETS 4"]
    style A fill:#f9f,stroke:#333
    style C fill:#bbf,stroke:#333
In the nine square grids, it shows the status of SIP/PSTN of each base.
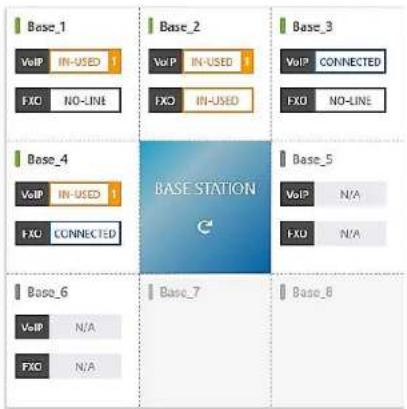
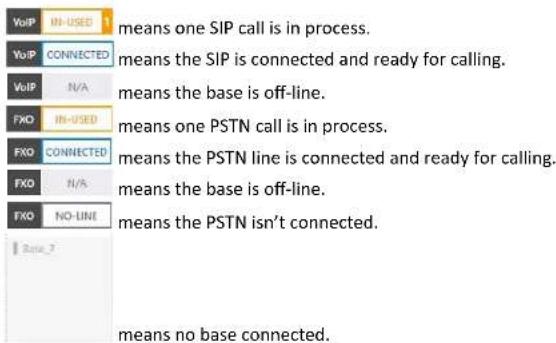
In the middle of nine square grids, the GUI will be re-freshed if clicking it.

Overview
Click "Overview", you can check "Call number" and "Call time" with all bases, or dedicated base. Also you can check at three periods: Last Hour, Last Day and Last Week.

line
| Time | Call Time (minutes) | Call Number | |------|---------------------|-------------| | 0 | 0 | 0 | | 1 | 0 | 0 | | 2 | 0 | 0 | | 3 | 0 | 0 | | 4 | 0 | 0 | | 5 | 0 | 0 | | 6 | 0 | 0 | | 7 | 0 | 0 | | 8 | 0 | 0 | | 9 | 0 | 0 | | 10 | 0 | 0 | | 11 | 0 | 0 | | 12 | 0 | 0 | | 13 | 0 | 0 | | 14 | 0 | 0 | | 15 | 0 | 0 | | 16 | 0 | 0 | | 17 | 0 | 0 | | 18 | 0 | 0 | | 19 | 0 | 0 | | 20 | 0 | 0 | | 21 | 0 | 0 | | 22 | 0 | 0 | | 23 | 0 | 0 | | 24 | 0 | 0 | | 25 | 0 | 0 | | 26 | 0 | 0 | | 27 | 0 | 0 | | 28 | 0 | 0 | | 29 | 0 | 0 | | 30 | 0 | 0 | | 31 | 0 | 0 | | 32 | 0 | 0 | | 33 | 0 | 0 | | 34 | 0 | 0 | | 35 | 0 | 0 | | 36 | 0 | 0 | | 37 | 0 | 0 | | 38 | 0 | 0 | | 39 | 0 | 0 | | 40 | 0 | 0 | | 41 | 0 | 0 | | 42 | 0 | 0 | | 43 | 0 | 0 | | 44 | 0 | 0 | | 45 | 0 | 0 | | 46 | 0 | 0 | | 47 | 0 | 0 | | 48 | 0 | 0 | | 49 | 0 | 0 | | 50 | 0 | 0 | | Note: The actual values for all times and call numbers are not provided in the code. The data is presented in a table format with three columns: 'Call Time' and 'Call Number'. The 'Number' column contains the corresponding count of calls at each time point. There is no additional data series in this case. The 'Handset' column contains the corresponding call counts for each time point. The 'Top CALL TIMES(Handset)' and 'Top CALL NUMBERS(Handset)' columns contain the corresponding numbers for each time point. There is no additional data series in this case.When scrolling down, you can check the following six charts :
1) "TOP CALL TIMES(Handset)"
2) "TOP CALL NUMBERS(Handset)"

bar
| Category | Top CALL TIMES(Handset) (Minutes) | Top CALL TIMES(Handset) (Number) | Top CALL NUMBERS(Handset) (Number) | Top CALL NUMBERS(FXO) (Minutes) | Top CALL NUMBERS(FXO) (Number) | |---|---|---|---|---|---| | Duration Room HC_12 | 300 | 45 | 70 | 10 | 1 | | Duration Room HC_19 | 280 | 40 | 65 | 10 | 1 | | Duration Room HC_26 | 250 | 35 | 60 | 10 | 1 | | Duration Room HC_33 | 200 | 30 | 55 | 10 | 1 | | Duration Room HC_40 | 150 | 25 | 50 | 10 | 1 | | Duration Room HC_47 | 100 | 20 | 45 | 10 | 1 | | Duration Room HC_54 | 50 | 15 | 40 | 10 | 1 | | Duration Room HC_61 | 25 | 10 | 35 | 10 | 1 | | Duration Room HC_68 | 10 | 5 | 30 | 10 | 1 | | Duration Room HC_75 | 5 | 2 | 25 | 10 | 1 | | Duration Room HC_82 | 2 | 1 | 20 | 10 | 1 | | Duration Room HC_89 | 1 | 0.5 | 15 | 10 | 1 | | Duration Room HC_96 | 0.5 | 0.25 | 10 | 10 | 1 | | Duration Room HC_103 | 0.25 | 0.125 | 5 | 10 | 1 | | Duration Room HC_110 | 0.125 | 0.0625 | 2.5 | 10 | 1 | | Duration Room HC_117 | 0.0625 | 0.025 | 1.25 | 10 | 1 | | Duration Room HC_124 | 0.03125 | 0.0125 | 0.625 | 10 | 1 | | Duration Room HC_131 | 0.018875 | 0.00625 | 0.3625 | 10 | 1 | | Duration Room HC_138 | 0.0144375 | 0.003125 | 0.23625 | 10 | 1 | | Duration Room HC_145 | 0.01221875 | 0.0020625 | 0.16875 | 10 | 1 | | Duration Room HC_152 | 0.010159375 | 0.00153125 | 0.124375 | 10 | 1 | | Duration Room HC_159 | 0.0089846875 | 0.001265625 | 0.1026875 | 10 | 1 | | Duration Room HC_166 | 0.00844234375 | 0.0011282875 | 0.08134375 | 10 | 1 | | Duration Room HC_173 | 0.007729172875 | 0.00106414375 | 0.0706296875 | 10 | 1 | | Duration Room HC_180 | 0.0071669396375 | 0.0009479776875 | 0.060814846375 | 10 | 1 | | Duration Room HC_187 | 0.00668486984375 | 0.000879888984375 | 0.05199792341875 | 10 | 1 | | Duration Room HC_194 | 0.0063424849726875 | 0.00083999999973875 | 0.043984966998375 | 10 | 1 | | Duration Room HC_201 | 0.006076747466337875 | 0.000824999999668875 | 0.0419824849996337875 | 10 | 1 | | Duration Room HC_208 | 0.0058333737336693975 | 0.0008224999996534375 | 0.03999644899998689375 | 10 | 1 | | Duration Room HC_215 | 0.00562668686684669375 | 0.00082224999963746875 | 0.038993774999993446875 | 10 | 1 | | Duration Room HC_222 | 0.00542334343343336875 | 0.000822224999623336875 | 0.0389923874999922346875 | 10 | 1 | | Duration Room HC_229-236-...+ : - : - : - : - : - : - : - : - : - : - : - : - : - : - : - : - : - : - : - : - : - : - : - : - : - : - : - : - : - : - : - : - : - : - : - : - : - : - : - : - : - : - : - : - : - : - : - : - : - : - : - The chart displays the time intervals for each category on the x-axis and the corresponding values on the y-axis (in minutes). The data is presented in a single column format with two columns: "Top CALL TIMES" and "Top CALL NUMBERS".3) "TOP CALL TIMES(FXO)"
4) "TOP CALL NUMBERS(FXO)"

bar
| Route | Top Call Times(FXO) | Top Call Numbers(FXO) | Top Use(Base) | CALL DISTRIBUTION(SIF vs FXO) | | :--- | :--- | :--- | :--- | :--- | | Buxton-RoxnHL_1L | 107 | 1 | 80 | 50 | | Buxton-RoxnHL_1H | 437 | 1 | 70 | 60 | | Buxton-RoxnHL_2H | 0 | 1 | 60 | 50 |5) "TOP Use(Base)"
6) "CALL DISTRIBUTION(SIP vs FXO)"

bar
| Category | DualFan Room HC_31 | DualFan Room HC_32 | DualFan Room HC_33 | DualFan Room HC_34 | DualFan Room HC_35 | DualFan Room HC_36 | DualFan Room HC_37 | DualFan Room HC_38 | DualFan Room HC_39 | DualFan Room HC_40 | Total | |---|---|---|---|---|---|---|---|---|---|---|---| | Number | 170 | 170 | 170 | 170 | 170 | 170 | 170 | 170 | 170 | 170 | 170 | | SFO | 50 | 50 | 50 | 50 | 50 | 50 | 50 | 50 | 50 | 50 | 50 | | SFO + FXO | 100 | 100 | 100 | 100 | 100 | 100 | 100 | 100 | 100 | 100 | 100 |Controller
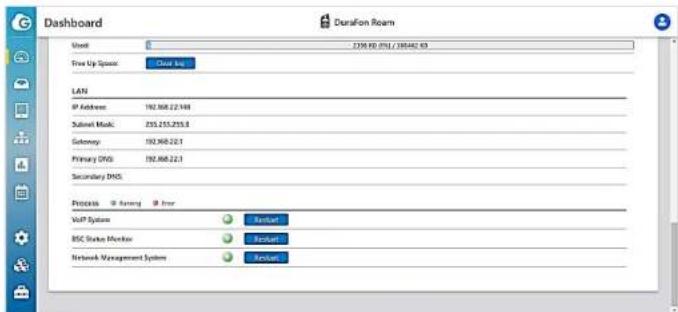
➢ Click "Controller", you can check the following system status:
1) Device : including Device Name、Series Number、MAC、Current Local Time、Uptime and Firmware Version.
2) Memory : including Total Available、Free、Cached and Buffered.

3) CPU loading
4) eMMC : including Used and Free Up Space.
5) LAN : Including IP Address、Subnet Mask、Gateway、Primary DNS and Secondary DNS.
6) Process : VoIP System · BSC Status Monitor and Network Management System.
7) If Process indicator signals "Error", simply click Restart
Call
➢ Click "Call", you can check the current call status in both base station and handset.
For example, checking below call status of base 3, handset 11 is making a call to handset 12. And handset 12 is receiving a call from handset 11.

At the same moment, checking below call status of handset, handset 11 is making the outgoing call to handset 12, and handset 12 is receiving the incoming call from handset 11.

RSSI
Click "RSSI", you can check the receiving radio signal strength of handset and base. This info shows you the connection performance of handset and base.
For example, the bar of deep blue means the handset receiving signal strength which received from base. And the bar of light blue means the base signal strength which received from handset.
Two type of RSSI : Bar chart & columnar

bar
| Handset | Base | Handset's strength | | :--- | :--- | :--- | | Sealant HC_11 | 833 | "Handset" means the signal strength which handset received (next from base). | | Sealant HC_12 | 833 | "Base" means the signal strength which base received (next from base). |
Topology
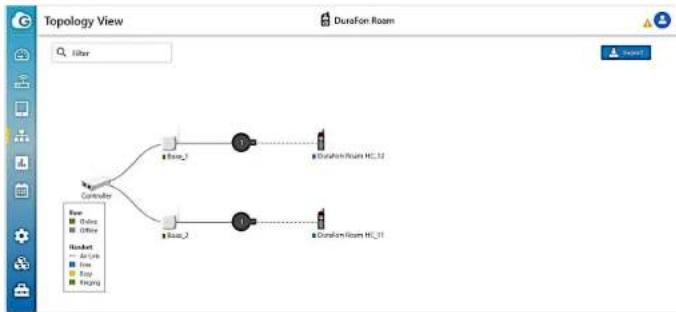
➢ Navigate to "Topology", you can overall view the current connection between base(s) and handset(s).

flowchart
graph TD
    A["Control"] --> B["Zone_1"]
    A --> C["Zone_2"]
    B --> D["DuralRoom HC_11"]
    B --> E["DuralRoom HC_12"]
    C --> D
    C --> E
When handset(s) is moving around, the handset will automatically hand-over from one to the other base, the topology will update the connection accordingly.
flowchart
graph TD
    A["Controller"] --> B["Dura_1"]
    A --> C["Dura_2"]
    B --> D["DuraFon Room HC_32"]
    C --> E["DuraFon Room HC_33"]
    style A fill:#f9f,stroke:#333
    style B fill:#ccf,stroke:#333
    style C fill:#cfc,stroke:#333
    style D fill:#fcc,stroke:#333
    style E fill:#cff,stroke:#333
Statistics
Summary
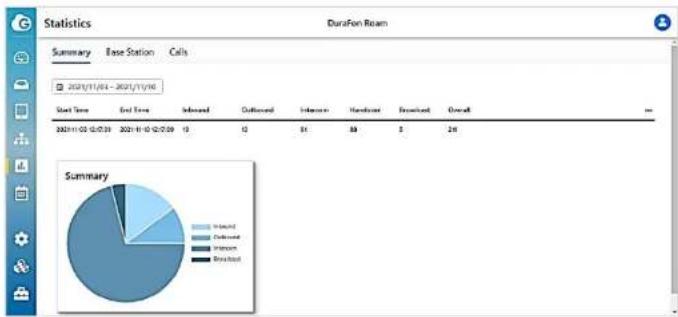
Navigate to Statistic, click "Summary", you can view the various calls during a time period, including Incoming Calls、Outgoing Calls、Intercom、Handover and Broadcast.
pie
DuraFon Roam | Category | Value | |---|---| | Headcount | 84 | | Headcount | 88 | | Breakout | 5 | | Breakout | 24 |Select time period.

pie
Statistics DuraFon Room Summary Base Station Calls | Category | Value | |---|---| | Main | 81 | | Sub | 88 | | Total | 25 |Base Station
➢ Navigate to Statistic, click "Base Station", you can view the following info :
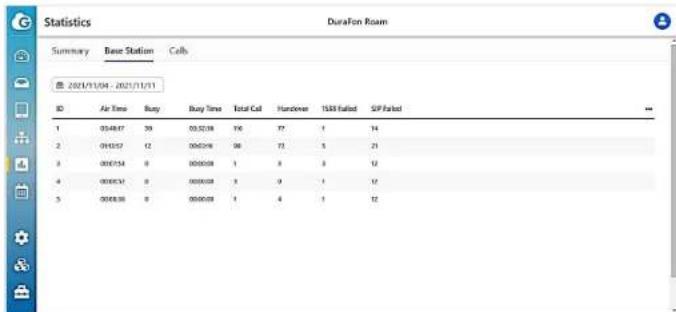
Re: "Air Time" is the accumulated time when handset link to base. "Busy" is the frequency of base full loading. "Busy Time" is the accumulated time when base full loading.
"The "1588 Failed" means the base failed in synchronization via networking. It will be recovered automatically, as long as the network works normally.
The "SIP Failed" means the bases inquire with BSC about the registration info of handsets, but somehow BSC doesn't respond. It will be recovered automatically, as long as the connection is normal between BSC BU.
Select time period.
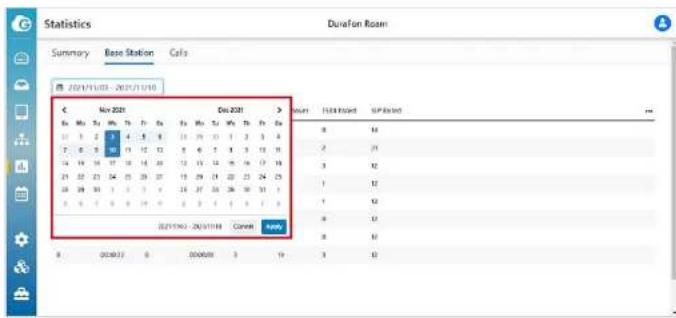
Calls
➢ Navigate to Statistics, click "Calls" to view call statistics over a time period.
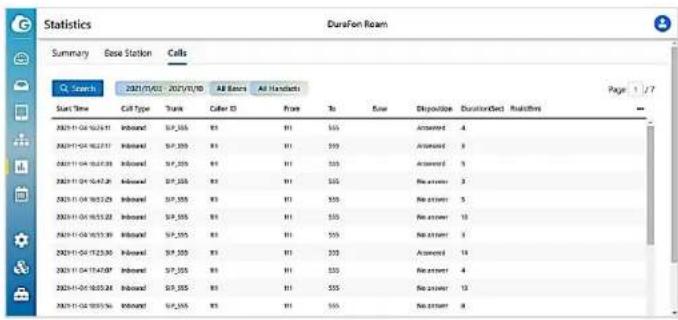
Select time period.
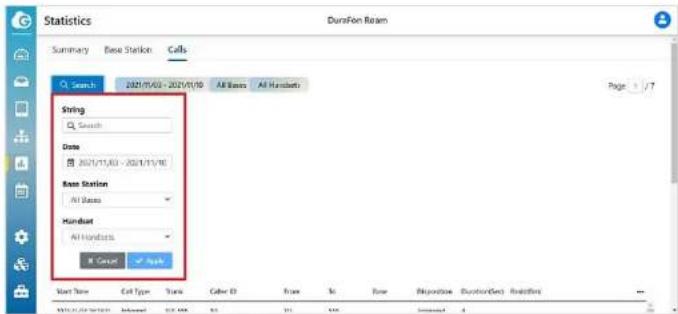
Log
Navigate to Log, there are "Event" and "System" for manager reviewing.
Events

- Select time period of Event log.

System
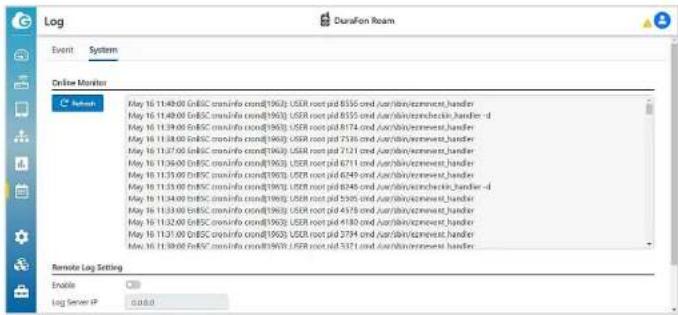
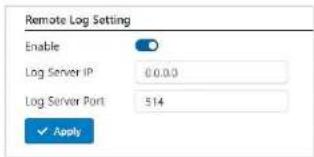
Re: You can enable the "Remote Log Setting", when system log has something abnormal, you can remotely check the log.
Tools
Firmware
- Navigate to Tools > Firmware, you can check the current firmware version and upgrade new firmware.
Download F/W When you want to upgrade firmware for Base Station Controller (BSC) - Base and Handset, please download the new firmware to your NB/PC first.

Upgrade BSC
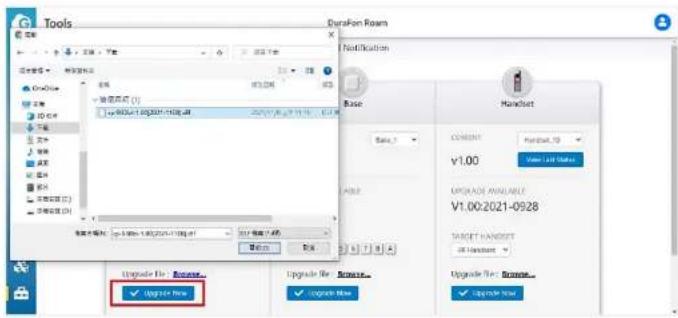
Click "Browse..." to load the firmware (ie. the current version is v0.0.1.19), once the new firmware loaded, the new firmware version will show on screen(new firmware is v1.0.0.5), click "Upgrade Now" if you want to upgrade immediately.
It will take 90 seconds to upgrade firmware.
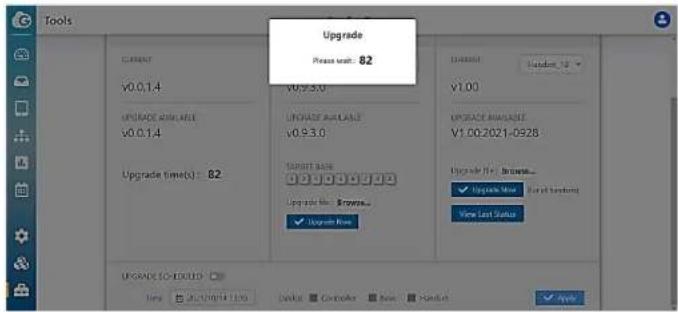
When firmware upgrade completely, you have to login BSC again. The default User ID & Password is admin/admin.

PS: You can change the user ID and password by entering the "Administrator Access" as following.

Now the firmware is new version.

Upgrade Base
You can check the firmware version of Base by clicking drop-down menu.
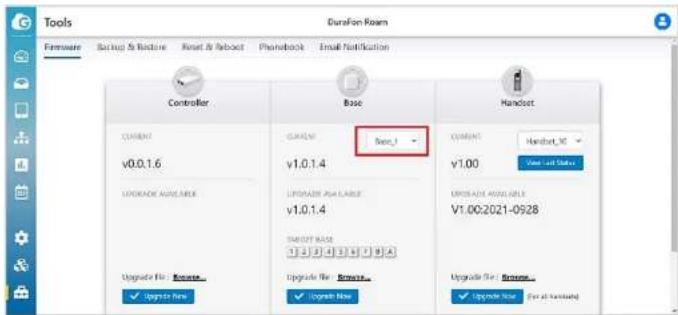
Choose the Base which needs to upgrade new firmware.
Re : The number 1 \~ 8 means the Base ID. The A means for all bases.
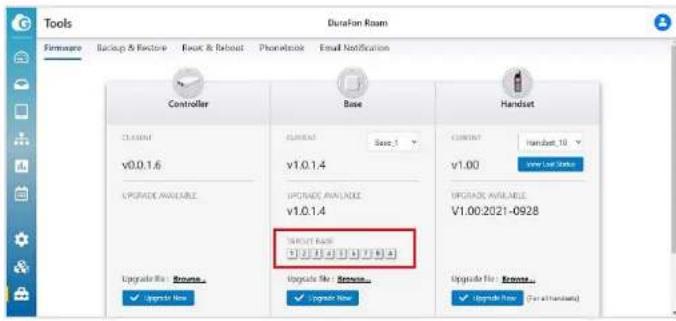
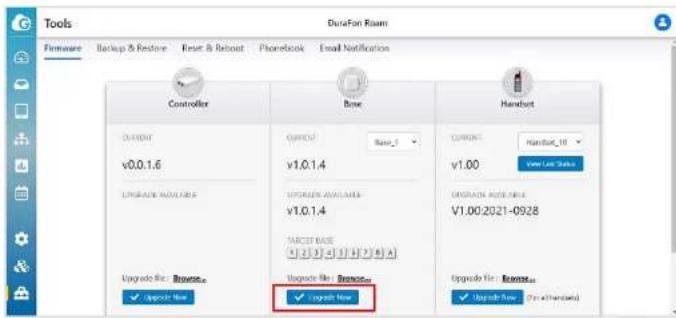
➢ Click "Browse..." to load the firmware (ie. the new firmware version is v1.0.1.4), click "Upgrade Now" if you want to upgrade immediately.
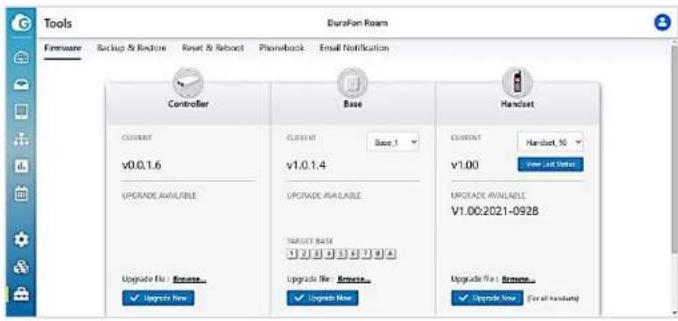
When firmware upgrade completely, you will see the new firmware version(v1.0.1.4) showed on screen.
Upgrade Handset
Same as Base, you can check the firmware version of Base by clicking drop-down menu.
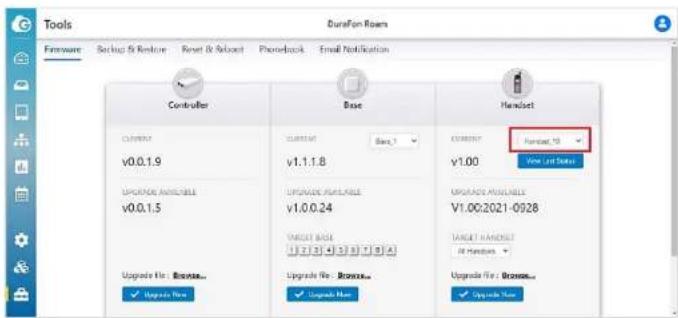
Click "Browse..." to load the firmware (ie. the new firmware version is v1.0.0.5), click "Upgrade Now" if you want to upgrade immediately.

Click "TARGET HANDSET" to select the handset(s) for firmware upgrade. There are "All Handsets"、"Group_1\~Group_7" and individual handset as an option.
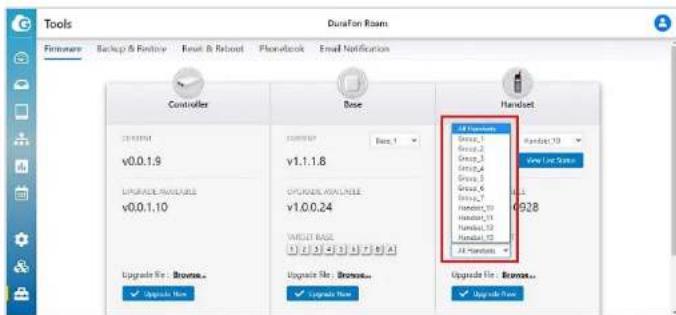
PS : In case the all bases installed closely (the interval between bases less than 6 feet), in order to avoid the interference between bases, please keep the Base_1 "Managed" only ("Un-manage" the rest bases) before start upgrading the firmware of handset(s).
When firmware upgrade completely, you will see the new firmware version(v0.0.1.9) showed on screen.

PS : You can check the status of last upgrade by click "View Last Status".

Schedule Upgrade
In case you don't want to upgrade immediately, you can setup a proper time by setting "Time", and click the device(Controller、Base or Handset).
After setting up, click "Apply" to take effect.

Backup & Restore
Navigate to Tools > Backup & Restore.
You can back-up the Configuration & Log of BSC to NB/PC or Micro-SD card. Also can restore the Configuration & Log of BSC from NB/PC or Micro-SD card.

Reset & Reboot
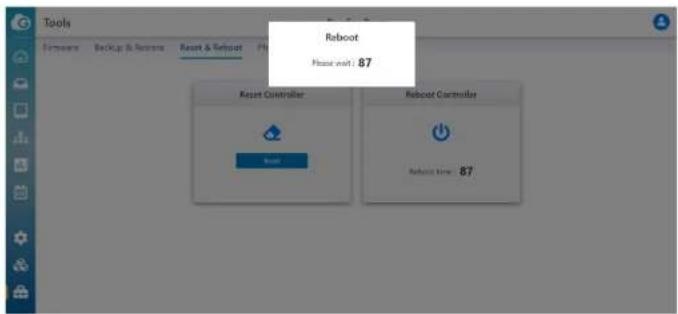
Navigate to Tools > Reset & Reboot.
When system running abnormally, you can reset the system, or reboot it.
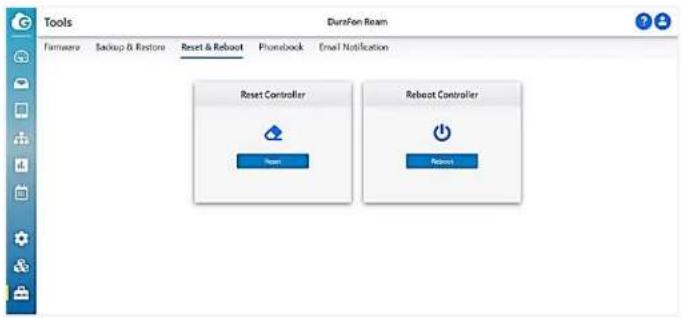
➢ Click "Reset", followed by clicking "Apply" to reset BSC
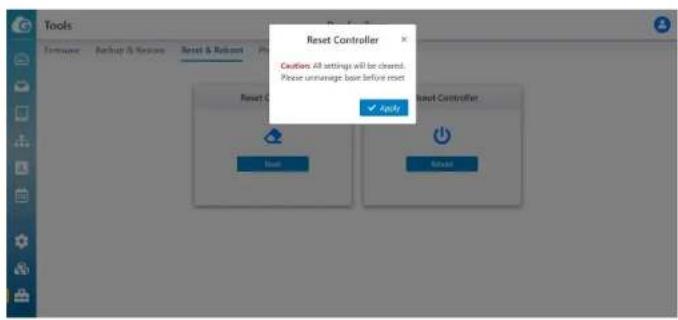
➢ Click "Reboot", BSC will take 90 seconds to restart.
Phonebook
➢ Navigate to Tools > Phonebook, you can do the following:
1) Create a phonebook list
2) Edit a phonebook list
3) Delete a phonebook list
4) Push phonebook list to all handsets.
5) Export a phonebook to PC/NB.
6) Import a phonebook from PC/NB.
➢ Create a phonebook list by clicking "Add Contact".

➢ Enter Name and Phone Number, click "Apply" to take effect.

Edit a phonebook list by clicking " "

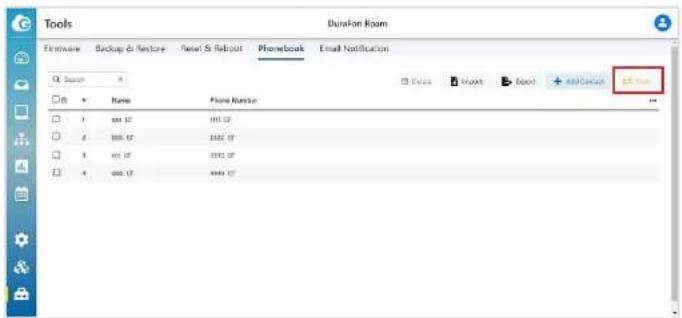
➢ Push phonebook to all handsets by clicking "Push".

Delete a phonebook list, select the entry you want to delete, and then click the "Delete
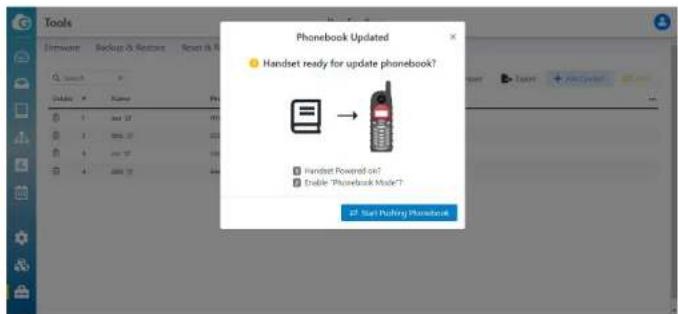
➢ Click "Start Pushing Phonebook" to send phonebook list to all handsets.
Save phonebook list to NB/PC by clicking "Export"
Email Notification
Navigate to Tools > Email Notification, you can setup a weekly email notification to send the Event & Call Log list to a designated address.
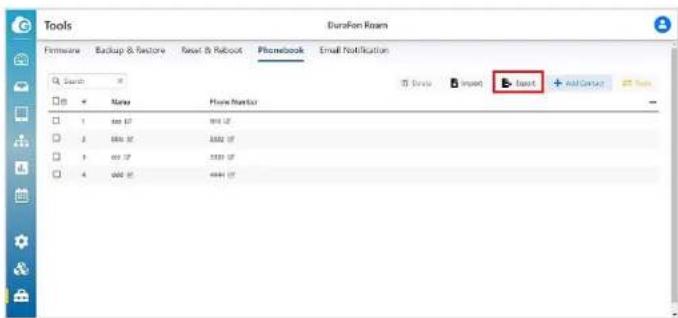
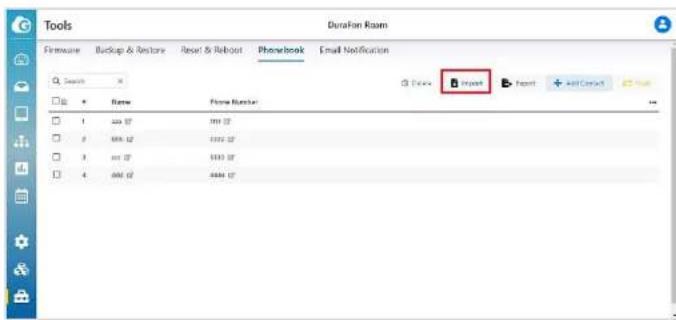
Re: the default file name is "phonebook.csv".

Below is an example when you receive the notification.
Retrieve and open phonebook file from NB/PC by clicking "Import".
Task tracked last week (2021-09-29 11:36:58 - 2021-10-06 11:36:58)
| Start Time | Cell Type | Trunk | Caller ID | From | To | Base | Disposition | Duration | Rsd |
| 2021-10-04 01:30:33 | In | rep_04 | 222 | 222 | Gcp08 | 5 | ANSERVED | 10 | -62 |
| 2021-10-04 02:05:15 | In | rep_04 | 222 | 222 | Gcp08 | 5 | ANSERVED | 302 | |
| 2021-10-04 06:10:14 | In | rep_04 | 222 | 222 | Gcp08 | 5 | ANSERVED | 4 | -106 |
| 2021-10-04 07:23:13 | In | rep_04 | 222 | 222 | Gcp08 | 4 | ANSERVED | 19 | -62 |
| 2021-10-05 10:43:08 | Intercom | 10 | Hs10 | Hs11 | 5 | ANSERVED | 5 | 64.101 |
Technical Specifications
Hardware Specification
CPU:
Model: Qualcomm IPQ4019
Architecture: 32-bit
Clock Rate: ARM A7 Quad Core 717MHz
Hardware Encryption Acceleration: Yes
Memory:
System Memory: 1GB DDR3
Storage:
eMMC: 4GB (MLC)
Interfaces and LEDs
2 x 10/100/1000 Mbps RJ45 ports (1 x PoE)
1 x Micro SD Slot
1 x DC-Input Jack
1 x Reset Button
1 x Power LED (Orange)
2 x LAN LED (Green)
Mechanical & Environment
Dimension
100mm(L) × 60mm(W) × 23.4mm(H)
Weight (Without accessories)
103g
Operating:
Temperature: 0°C\~40°C (32°F\~104°F)
Humidity: 0% \~ 90% typical
Storage:
Temperature: -40°C\~80°C (-40°F\~176°F)
Humidity: 0% \~ 90% typical
Compliance Regulatory
FCC Subpart15 B
Index
2-Way Radio, 7
900MHz, 7
Add from Inventory, 13
Antenna, 7
B
Base Station, 10
Base, 7, 23, 33, 38, 43, 51, 53, 55
Blue Tooth, 7
Broadcast, 7, 34, 43
BSC, 1, 5, 6, 7, 10, 12, 13, 15, 17, 19, 24, 35, 39, 48, 49, 56, 57
Call Hold, 7
Call Logs, 7
Call Transfer, 7
Call Waiting, 7
Caller I, 7
Caller ID, 7
Codec, 20
Conference, 7
Controller, 1, 7, 38, 55
Dashboard, 35
Desktop Charger, 7
DHCP, 17
DNS, 7, 19, 39
DTMF, 7, 20
Durable, 7
DuraFon Roam BU, 7
DuraFon Roam HC, 7
E
Equipment Checklist, 5
Email Notification, 62
EnGenius Cloud, 7, 10, 11, 12
Event Log, 46
FCC, 4, 7
Firmware, 38, 48
Frequency Hopping, 7
FXO Number Settings, 33
FXO Settings, 33
G.711a, 7
G.711u, 7
G.729A, 7
H
Handset Features, 7
Handover, 7, 43
Handset, 7, 25, 26, 28, 29, 37, 48, 53, 55
Headset, 7
IC, 4
Intercom, 7, 43
Inventory & License, 12
IP Addressing, 17
Keypad Lock, 7
LAN, 7, 39
Li-Ion, 7
Line Select, 7
LMR-400, 7
Long-Range, 1, 7
Multi-Base, 7
Multi-Cell, 7
Multi-Handset, 7
Mute, 7
NAT, 19, 20
PBX Functions, 7
Phonebook, 58, 60
Proxy, 7
PSTN, 7, 10, 33
Redial, 7
Register, 10, 12, 25, 27
Regulatory Information, 4
Reset & Reboot, 56
RFC2833, 7, 20
RFC3261, 7
RFC3264, 7
RFC3515, 7
RFC3891, 7
RFC3892, 7
Roaming, 7
RSSI, 35, 40
RTP, 20
SDP, 20
Selectable Handset Grouping, 7
SIP, 1, 7, 18, 19, 20, 21, 38
SIP Server, 18, 20
Speakerphone, 7
Speed Dial, 7
SRV, 7, 19
Stand-By Time, 7
Statistic, 43
STUN, 19
System Settings, 17, 18, 20
Talk Time, 7
Time, 7, 17, 20, 38, 55
Tools, 48, 56, 58, 62
Topology, 42
User Handset Naming, 7
Vibrate Mode, 7

- Long-Range SIP Cordless System Controller
- Table of Contents
- Regulatory Information
- Federal Communications Commission (FCC) EMC Statement
- WARNING!
- Any changes or modifications not expressly approved by the party responsible for compliance could void the user's authority to operate this equipment.
- IC Interference Statement
- Equipment Checklist
- DuraFon Roam BSC Illustration
- System Features(including DuraFon Roam BU and DuraFon Roam HC)
- SIP
- Long-Range
- Durable
- Handset Features
- System
- Battery & Charger
- Optional Equipment
- DuraFon Roam Value
- Manufacturer's Part Numbers
- Getting Started
- Signing up
- Logging On
- Registering Devices to Organization
- Adding BSC from Inventory
- Connect to DuraFon Roam
- Changing default credential
- System Settings
- IP Addressing
- Time
- SIP Server
- SIP Accounts
- Base Station
- Handset
- / Second
- Base Station Settings
- FXO Settings
- FXO Number Settings
- Broadcast
- Dashboard
- Overview
- Controller
- Call
- RSSI
- Topology
- Statistics
- Summary
- Calls
- Log
- Tools
- Firmware
- Upgrade BSC
- Upgrade Base
- Upgrade Handset
- Schedule Upgrade
- Backup & Restore
- Reset & Reboot
- Phonebook
- Email Notification
- Technical Specifications
- Hardware Specification
- CPU:
- Memory:
- Storage:
- Interfaces and LEDs
- Mechanical & Environment
- Dimension
- Weight (Without accessories)
- 103g
- Operating:
- Compliance Regulatory
- Index
Brand : ENGENIUS
Model : DuraFon Roam-BU
Category : Headphones