FD1501 - Lawn mower LawnMaster - Free user manual and instructions
Find the device manual for free FD1501 LawnMaster in PDF.


| Product Type | Electric Corded Lawn Mower |
| Model | FD1501 |
| Motor Power | 1200 W |
| Cutting Width | 15 inches (38 cm) |
| Cutting Height | 1.5 - 3.5 inches (38 - 89 mm), 6 positions |
| Grass Collection Capacity | 35 L fabric bag |
| Weight | 28 lbs (12.7 kg) |
| Overall Dimensions | 30 x 18 x 12 inches (76 x 46 x 30 cm) |
| Power Source | 120 V AC, 60 Hz |
| Power Cord Length | 50 ft (15 m) |
| Deck Material | Steel |
| Wheel Size | Front: 7 inches, Rear: 8 inches |
| Safety Features | Blade brake clutch, safety switch under handle |
| Maintenance | Sharpen blade annually; clean deck after each use |
| Spare Parts | Blade, grass bag, wheels available online |
| Repairability | Modular design; user-replaceable blade and belt |
| Warranty | 2-year limited warranty |
| Manufacturer | LawnMaster |
Frequently Asked Questions - FD1501 LawnMaster
User questions about FD1501 LawnMaster
0 question about this device. Answer the ones you know or ask your own.
Ask a new question about this device
Download the instructions for your Lawn mower in PDF format for free! Find your manual FD1501 - LawnMaster and take your electronic device back in hand. On this page are published all the documents necessary for the use of your device. FD1501 by LawnMaster.
USER MANUAL FD1501 LawnMaster
Note: This chipper is designed for dry material only. Never place green material or bamboo into chipper.
Read all safety rules and instructions carefully before operating this tool.
Distributed By Cleva North America 601 Regent Park Court Greenville, SC 29607 (866)-384-8432

PRODUCT SPECIFICATIONS
CHIPPER FD1501
| Nominal Current | 15 A |
| Nominal Voltage | 120 V~60Hz |
| Speed | 3800 rpm |
| Maximum Cutting Diameter | 1-1/2 in. max |
| Volume Of Collection Bag | 15.85 gal |
| Weight | 29.75lbs |
Helpful Tip!
The max. branch thickness that can be chipped is dependent on the type of wood and the quality of the goods being cut, but never thicker than 1-1/2" in diameter.
For hard wood (e.g. oak/beech branches), the max. branch thickness that can be chipped is less than for soft wood (e.g. pine/spruce wood). For dry or knotted wood, the cutting thickness may also be less. This chipper is not intended for bamboo.
IMPORTANT SAFETY INSTRUCTIONS

IMPORTANT
READ AND UNDERSTAND ALL INSTRUCTIONS. Failure to follow all instructions listed below may result in electric shock, fire, and/or serious personal injury.

WARNING
TO AVOID MISTAKES THAT COULD CAUSE SERIOUS INJURY, DO NOT PLUG IN THE CHIPPER UNTIL THE FOLLOWING STEPS HAVE BEEN READ THOROUGHLY.
- Avoid Dangerous Environment – Don't use appliances in damp or wet locations.
- Don't Use In Rain.
- Keep Children Away – All visitors should be kept at a distance from work area.
- Dress Properly – Do not wear loose clothing or jewelry. They can be caught in moving parts. Use of rubber gloves and substantial footwear is recommended when working outdoors. Wear protective hair covering to contain long hair.
- Use Safety Glasses – Always use face or dust mask if operation is dusty.
- Use Right Appliance – Do not use appliance for any job except that for which it is intended.
- Ground Fault Circuit Interrupter (GFCI) protection should be provided on the circuit(s) or outlet(s) to be used for the gardening appliance. Receptacles are available having built-in GFCI protection and may be used for this measure of safety.
- Warning – To reduce the risk of electric shock, use only with an extension cord intended for outdoor use, such as an extension cord of cord type SW-A, SOW-A, STW-A, STOW-A, SJW-A, SJOW-A, SJTW-A. or SJTOW-A.
- Extension Cord – Make sure your extension cord is in good condition. When using an extension cord, be sure to use one heavy enough to carry the current your product will draw. An undersized extension cord will cause a drop in line voltage resulting in loss of power and overheating. If in doubt, use the next heavier gage. The smaller the gage number, the heavier the cord. To reduce the risk of disconnection of appliance cord from the extension cord during operating:
i) Make a knot; or
ii) Use one of the plug-receptacle retaining straps or connectors described in this manual. - Avoid Unintentional Starting – Don't carry plugged-in appliance with finger on switch. Be sure switch is off when plugging in.
- Don't Abuse Cord – Never carry appliance by cord or yank it to disconnect from receptacle. Keep cord from heat, oil, and sharp edges.
- Don't Force Appliance – It will do the job better and with less likelihood of a risk of injury at the rate for which it was designed.
-
Don't Overreach – Keep proper footing and balance at all times.
-
Stay Alert – Watch what you are doing. Use common sense. Do not operate appliance when you are tired.
- Disconnect Appliance – Disconnect the appliance from the power supply when not in use, before servicing, when changing accessories such as blades, and the like.
- Store Idle Appliances Indoors – When not in use, appliances should be stored indoors in dry, and high or locked-up place – out of reach of children.
- Maintain Appliance With Care – Keep cutting edge sharp and clean for best performance and to reduce the risk of injury. Follow instructions for lubricating and changing accessories. Inspect appliance cord periodically, and if damaged, have it repaired by an authorized service facility. Inspect extension cords periodically and replace if damaged. Keep handles dry, clean, and free from oil and grease.
- Check Damaged Parts – Before further use of the appliance, a guard or other part that is damaged should be carefully checked to determine that it will operate properly and perform its intended function. Check for alignment of moving parts, binding of moving parts, breakage of parts, mounting, and any other condition that may affect its operation. A guard or other part that is damaged should be properly repaired or replaced by an authorized service center unless indicated elsewhere in this manual.
- When servicing use only identical replacement parts.
- To reduce the risk of electric shock, this appliance has a polarized plug (one blade is wider than the other) and will require the use of a polarized extension cord. The appliance plug will fit into a polarized extension cord only one way. If the plug does not fit fully into the extension cord, reverse the plug. If the plug still does not fit, obtain a correct polarized extension cord. A polarized extension cord will require the use of a polarized wall outlet. This plug will fit into the polarized wall outlet only one way. If the plug does not fit fully into the wall outlet, reverse the plug. If the plug still does not fit, contact a qualified electrician to install the proper wall outlet. Do not change the equipment plug, extension cord receptacle, or extension cord plug in any way.

ALWAYS WEAR EYE PROTECTION.
A yard chipper can throw foreign objects into your eyes which could cause permanent eye damage.
ALWAYS wear safety goggles (not glasses). Ordinary eyeglasses have only impact-resistant lenses—they are NOT safety goggles.
SPECIFIC SAFETY RULES FOR YARD CHIPPERS
- Be thoroughly familiar with the operation of the chipper before initial use.
- NEVER put your hands into the hopper. Always use the push stick supplied with your chipper to push items into the hopper.
- DO NOT try to force objects that exceed the recommended diameter and capacity of the chipper: 1-1/2" (38 mm).
- AVOID ACCIDENTAL START-UPS. Be sure switch is OFF when plugging in.
- DO NOT FORCE THE CHIPPER. It will do the job better and with less likelihood of injury at the rate for which it was designed.
- Before putting objects into the hopper, remove any stones, debris, or objects that could damage the blades.
- During operation, ensure that there are no other persons or animals within a radius of 50 feet. Stop using the machine while people, especially children, or pets, are nearby.
- NEVER reach under the chipper until it has completely stopped. The blade may continue to rotate for a time after being switched OFF.
- MAKE all adjustments with the power OFF and the chipper disconnected from the power source.
- ALWAYS use accessories provided or recommended by the manufacturer. Do not use substitutes.
- KEEP guards in place and in working order. Keep blades sharp. Keep hands and feet away from cutting areas.

WARNING
NEVER PLACE HANDS NEAR DISCHARGE CHUTE. FAILURE COULD RESULT IN SERIOUS INJURY.

WARNING
NEVER REACH INTO THE HOPPER UNTIL THE CHIPPER HAS COME TO A COMPLETE STOP AND IS UNPLUGGED. THE CHIPPER WILL CONTINUE TO ROTATE FOR A FEW SECONDS AFTER IT IS SWITCHED OFF
Some of the following symbols may be used on this product. Please study them and learn their meaning.
Proper interpretation of these symbols will allow you to operate the product better and safer.
| SYMBOL | NAME | DESIGNATION/EXPLANATION |
| V | Volts Voltage | |
| A Amperes | Current | |
| Hz Hertz | Frequency (cycles per second) | |
| W Watts | Power | |
| min Minutes | Time | |
| Alternating Current Type of current | ||
| --- | Direct Current | Type or a characteristic of current |
| n_0 | No Load Speed | Rational speed, at no load |
| Class II Construction | Double-insulated construction | |
| /min | Per Minute per minute | Revolutions, strokes, surface speed, orbits etc., |
 | Wet Conditions Alert | Do not expose to rain or use in damp locations |
| Read The Operator's Manual To reduce the risk of injury user must read and understand operator's manual before using this product. | ||
 | Eye Protection | Wear eye protection when operating this equipment. |
 | Ricochet | Thrown objects can ricochet and result in personal injury or property damage. |
 | Sharp Blade | Danger – Keep hands and feet away from blade. |
 | Cutting Capacity | Cutting capacity: 1-1/2" (38 mm) |
 | Standers Away Keep all | bystanders at least 50 ft. away. |
The following signal words and meanings are intended to explain the levels of risk associated with this product.
| SYMBOL | SIGNAL | MEANING |
 | Indicates an imminently hazardous situation, which, if voided, will result in death or serious injury. | |
 | Indicates a potentially hazardous situation, which, if not WARNING avoided, could result in death or serious injury. | |
 | Indicates a potentially hazardous situation, which, if not led, may result in minor or moderate injury. | |
| CAUTION (Without Safety Alert Symbol) Indicates a situation that may result in property damage. | ||
SERVICE
Servicing requires extreme care and knowledge and should be performed only by a qualified service technician. For service we suggest you return the product to your nearest AUTHORIZED SERVICE CENTER for repair. When servicing, use only identical replacement parts.

WARNING
To avoid serious personal injury, do not attempt to use this product until you have read this Owner's Manual thoroughly and understand it completely. If you do not understand the warnings and instructions in this Owner's Manual, do not use this product. Call the Toll-free Helpline (1-866-384-8432) for assistance.

WARNING

The operation of any power tool can result in foreign objects being thrown into your eyes, which can result in severe eye damage. Before beginning power tool operation, always wear safety goggles or safety glasses with side shields and, when needed, a full face shield. We recommend Wide Vision Safety Mask for use over eyeglasses or standard safety glasses with side shields. Always use eye protection which is marked to comply with ANSI Z87.1.
SAVE THESE INSTRUCTIONS
DOUBLE INSULATED (See Figure 1) ☐

WARNING
TO AVOID ELECTRIC SHOCK HAZARDS, FIRE HAZARDS, OR DAMAGE TO THE TOOL, USE PROPER CIRCUIT PROTECTION. YOUR CHIPPER IS WIRED AT THE FACTORY FOR 120-V OPERATION. CONNECT TO 120-V, 15-Amp CIRCUIT AND USE A 15-Amp CIRCUIT BREAKER. TO AVOID SHOCK OR FIRE WHEN THE POWER CORD IS WORN, CUT, OR DAMAGED IN ANYWAY, REPLACE IT IMMEDIATELY
This yard chipper has a plug that looks like the one shown in Fig. 1. The yard chipper is double insulated to provide a dual thickness of insulation between you and the tool's electrical system. All exposed metal parts are insulated.

WARNING
DOUBLE INSULATION DOES NOT TAKE THE PLACE OF NORMAL SAFETY PRECAUTION WHEN OPERATING THIS TOOL.

WARNING
TO AVOID ELECTRIC SHOCK:
-
Use only identical replacement parts when serving a tool with double insulation. Servicing should be performed by a qualified technician.
-
Do not use in wet or damp or expose to rain.

CAUTION
IN ALL CASES, MAKE CERTAIN THE RECEPTACLE IN QUESTION IS PROPERLY GROUNDED. IF YOU ARE NOT SURE, HAVE A CERTIFIED ELECTRICIAN CHECK THE RECEPTACLE.


WARNING
THIS LAWN TOOL IS FOR OUTDOOR USE ONLY. DO NOT EXPOSE TO RAIN OR USE IN DAMP LOCATIONS.
GUIDELINES FOR USING EXTENSION CORDS
Make sure your extension cord is in good condition. When using an extension cord, be sure to use one of heavy enough gauge to carry the current your product will draw. An undersized cord will cause a drop in line voltage resulting in loss of power and overheating. The table below shows the correct size to be used according to cord length and nameplate ampere rating. If in doubt, use the next heavier gauge. The smaller the gauge number, the heavier the cord.
MINIMUM GAUGE FOR EXTENSION CORDS (AWG)
(WHEN USING 120 V ONLY)
Amp Rating Total Length of Cord in Feet (meters)
| More Than Not | More Than 25' (7.6 m) | 50' (15 m) | 100' (30.4 m) | 150' (45.7 m) | ||
| 0 | 6 | 18 | 16 | 16 | 14 | |
| 6 | 10 | 18 | 16 | 14 | 12 | |
| 10 | 12 | 16 | 16 | 14 | 12 | |
| 12 | 16 | 14 | 12 | Not Recommended | ||
Be sure your extension cord is properly wired and in good condition. Always replace a damaged extension cord or have it repaired by a qualified person before using it. Keep your extension cords away from sharp objects, excessive heat and damp or wet areas. Use a separate electrical circuit for your tools. This circuit must not be less than 12-gauge cord and should be protected with a 15-amp time delayed fuse. Before connecting the motor to the power line, make sure the switch is in the OFF position and the electric current is rated the same as the current stamped on the motor nameplate. Running at a lower voltage will damage the motor.

WARNING
THIS TOOL MUST BE GROUNDED WHILE IN USE TO PROTECT THE OPERATOR FROM ELECTRICAL SHOCK.
SAVE THESE INSTRUCTIONS
Read this operator's manual and safety rules before operating your yard chipper. Compare the illustration in Figure 2 to your yard chipper in order to familiarize yourself with the location of various controls and adjustments. Save this manual for future reference.

UNPACKING
- Carefully remove the product and any accessories from the box. Make sure that all items listed in the packing list are included.
- Inspect the product carefully to make sure no breakage or damage occurred during shipping.
- Do not discard the packing material until you have carefully inspected and satisfactorily operated the product.
- If any parts are damaged or missing, please call (866)-384-8432 for assistance.
PACKING LIST (See Figure 3)


WARNING
If any parts are damaged or missing, do not operate this product until the parts are replaced. Failure to heed this warning could result in serious personal injury.

WARNING
Do not connect to power supply until assembly is complete. Failure to comply could result in accidental starting and possible serious personal injury.

WARNING
Do not attempt to modify this product or create accessories not recommended for use with this product. Any such alteration or modification is misuse, and could result in a hazardous condition leading to possible serious personal injury.
Assembling this YARD Chipper need the follows tools:
- 6mm Hex Key (included)
- wrench
- Phillips screwdriver
ATTACHING LEGS TO CHIPPER (See Figures 4 & 5)
The legs are attached to the bottom of the chipper.
- Place the legs (1) into the holes (4) on the housing.
- Push firmly into place.
• Using a screwdriver tighten the two supplied screws (3) to the small holes (2) in the housing and the legs. - Slide the axle through the two holes found at the curves of legs.
- Slide a transport wheel over the axle, support ribs directed in.
- Place washer over axle, push straight end of the cotter pin hole in axle and press into hole until it is secured.
- Repeat transport wheel installation on other side.
- Align and push hub cap into place on both sides.
NOTE: Do not over tighten the screws.

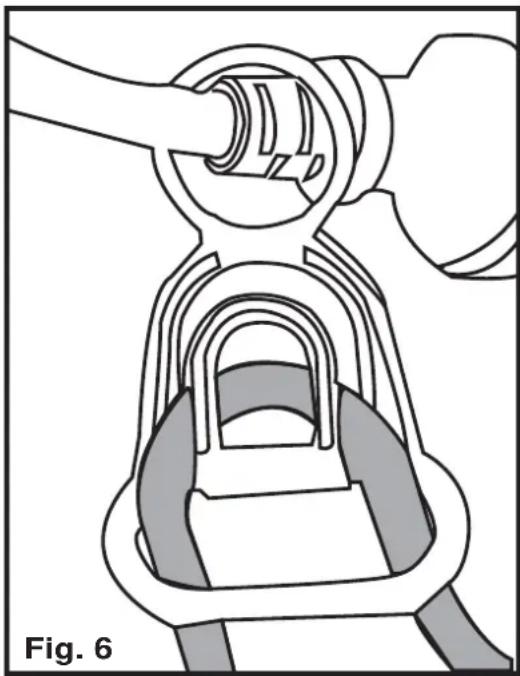
CONNECTING TO POWER SUPPLY (See Figure 6)
This product is designed with a cord lock that prevents the extension cord from being pulled loose during use.
- Form a loop with the end of the extension cord.
- Insert loop portion of extension cord through half moon shaped opening on the retainer and place over the rectangular tab on cord lock.
- Slowly pull loop against tab until all slack is removed.
- Plug product into extension cord.
NOTE: Make a loop at the end of the extension cable and hang the loop onto the strain relief on the mains cable.
natural_image
Technical line drawing of a mechanical clamp or bracket assembly (no text or symbols)STARTING AND STOPPING THE CHIPPER (See Figure 7)
ON/OFF SWITCH:
The ON/OFF switch (1) A circuit breaker/reset button (2) is located beside the switch.
- Plug the chipper into a properly grounded 2-prong outlet.
- Turn the switch (1) to the ON position. If the chipper does not start, turn the switch to the OFF position and press the reset button (2), then turn the switch to the ON position.
- Turn the switch (1) to the OFF position to turn off the chipper. Allow at least 5 seconds for the blade to stop rotating.

USING YOUR CHIPPER (See Figure 8)
The chipper is designed to work on yard waste, debris, sticks and twigs up to 1-1/2" (38 mm) in diameter. Chipper material will accumulate directly in chipper collection bag.

CAUTION
Do not attempt to chip material that exceeds the capacity of the chipper.
- Turn ON chipper.
- Place sticks/yard debris into narrow hopper opening. NEVER place your hands inside hopper.
- Use push paddle (1) only to help feed yard material into hopper.
- ALWAYS turn chipper OFF and allow it to come to a complete stop.
NOTE: This chipper is designed for dry material only. Never place green material or bamboo into chipper.

WARNING
DO NOT TRY TO CHIP ANY MATERIAL THAT EXCEEDS THE CAPACITY OF THIS TOOL.
DOING SO MAY CAUSE THE MOTOR TO JAM AND OVERHEAT. NEVER PUT YOUR HANDS IN THE HOPPER OR NEAR THE BLADE WHEN THE TOOL IS RUNNING.

natural_image
Technical line drawing of a mechanical device with labeled component 1, no readable text or symbols present
WARNING
ALWAYS ALLOW 5 SECONDS OR MORE FOR THE BLADE TO A SPACE BETWEEN STOP AND ROTATING AFTER TURNING OFF THE CHIPPER.
MOTOR OVERLOAD PROTECTION (See Figure 9)
This yard chipper has a reset overload feature.
The reset button will restart the motor after it shuts off due to overloading or low voltage.
If the motor stops during operation:
- Turn the ON/OFF (1) switch to the OFF position.
- Wait about five minutes for the motor to cool.
- Push in on the reset button (2).
- Turn the switch (1) to the ON position.

WARNING
TO PREVENT AN ACCIDENTAL START-UP IF THE RESET BUTTON IS PUSHED, THE ON/OFF SWITCH SHOULD BE IN THE OFF POSITION AND THE PLUG SHOULD BE REMOVED FROM THE POWER SOURCE WHILE COOL DOWN TAKES PLACE.

BLADE MAINTENANCE (See Figure 10)

WARNING
ALWAYS TURN OFF THE TOOL AND UNPLUG THE POWER CORD FROM THE OUTLET BEFORE PERFORMING ANY MAINTAINANCE TO THE CHIPPER.
NOTE: ALWAYS handle blade with care as it is sharp.
The chipper has a two sided reversible blade that is attached to a rotating support plate.
When one side of the blade becomes dull, it can be turned over in order to use the other side.
Replace or properly sharpen any dull blade.
HOW TO REPLACE CHIPPER BLADE
- Turn off chipper and remove power plug from outlet;
- Turn the upper housing's lock knob counterclockwise until the housing cover can be opened;
- Lift up the housing cover to expose the 2 side reversible blade (1);
- Using a screwdriver or wooden dowel, align the upper screw hole of the gear box with the hole on rotating blade support (2) and slide through to secure blade support (2) from rotating.
- Use the supplied 6mm Hex Key found on the power cord to loosen and remove the screw (3) that holds blade to rotating blade support;
- Take out the old blade. Either reinsert the blade with the sharp edge in position as the cutting surface or insert a replacement blade.
- Replace and tighten blade screw to secure the new blade to the rotating blade support.
- Position the removable upper hopper panel onto the lower hopper base section of unit and lock into place using the hopper locking knob (4). Return hex key to power cord location for future use.
NOTE: Only for dry branch chipping, not designed for leaves, vines, or bamboo.

GENERAL MAINTENANCE
- Keep the chipper clean and in good repair for maximum performance and machine longevity.
- Before each use, inspect the switch and cord for damage.
- Check for damaged, missing, or worn parts. Check for loose screws, moving parts that are jammed or any other conditions that may affect the operation.
- If abnormal vibration or noise occurs, turn OFF the tool immediately and correct the problem before further use.
- Do not use the chipper until it is properly repaired or replaced.
CLEANING

WARNING
TO AVOID INJURY, ELECTRIC SHOCK, OR DAMAGE TO THE CHIPPER, NEVER ALLOW A LIQUID TO FLOW INSIDE THE TOOL.
- Wipe the outside of the chipper with a dry soft cloth.
- Remove the hopper from the housing body before washing the inside of the hopper.
- Do not hose down or wash the tool with water.

WARNING
TO AVOID DAMAGE OR ELECTRIC SHOCK, DO NOT USE STRONG SOLVENTS OR DETERGENTS ON THE PLASTIC HOUSING OR PLASTIC COMPONENTS. CERTAIN HOUSEHOLD CLEANERS MAY CAUSE DAMAGE AND MAY ALSO CAUSE A SHOCK HAZARD.

WARNING (PROPOSITION 65)
Some dust created by power sanding, sawing, grinding, drilling and other construction activities contains chemicals known to the state of California to cause cancer, birth defects or other reproductive harm.
Some examples of these chemicals are:
- Lead from lead-based paints,
- Crystalline silica from bricks and cement and other masonry products, and
- Arsenic and chromium from chemically-treated lumber.
Your risk from these exposures varies, depending on how often you do this type of work. To reduce your exposure to these chemical: work in a well ventilated area, and work with approved safety equipment, such as those dust masks that are specially designed to filter out microscopic particles.
We take pride in producing a high quality, durable product. This Lawnmaster® product carries a limited two (2) year warranty against defects in workmanship and materials from date of purchase under normal household use. Warranty does not apply to defects due to direct or indirect abuse, negligence, misuse, accidents, repairs or alterations and lack of maintenance. Please keep your receipt/packing list as proof of purchase. This warranty gives you specific legal rights, and you may have other rights, which vary from state to state. For product service call Customer Service at (866) 384-8432.
Items not covered by warranty :
- Any part that has become inoperative due to misuse, commercial use, abuse, neglect, accident, improper maintenance, or alteration;
- The unit, if it has not been operated and/or maintained in accordance with the owner's manual;
- Normal wear, except as noted below;
- Routine maintenance items such as lubricants, blade sharpening;
- Normal deterioration of the exterior finish due to use or exposure.
Transportation Charges : Transportation charges for the movement of any power equipment unit or attachment are the responsibility of the purchaser. It is the purchaser's responsibility to pay transportation charges for any part submitted for replacement under this warranty unless such return is requested in writing by LawnMaster.
SAVE YOUR RECEIPTS. THIS WARRANTY IS VOID WITHOUT THEM.

| FD1501 MANUAL PARTS LIST | |||
| ITEM NO. | PART NO. DESCRIPTION | QTY | |
| 1 | GS01RS.X0.02 | Hopper | 1 |
| 2 | GS01RS.10.02 | Plastic Husk | 2 |
| 3 | GS01RS.11.00.W2.C3 | Plastic Flap | 1 |
| 4 | GS01RS.10.03.C4.Y1 | Top Cover | 1 |
| 5 | GS06RS.X0.01 | Insert-board | 1 |
| 6 | GC10SS.X0.22 | Wheel assembly | 1 |
| 6.1 | GC10SS.00.02.X1.01 | Right Wheel | 1 |
| 6.2 | GC10SS.00.03.X1.01 | Left Wheel | 1 |
| 7 | TJGS02.X0.01 | Motor & Transmission Assembly | 1 |
| 8 | GS01RS.X0.10 | Turbo Collar | 1 |
| 9 | GS06RS.X0.02 | Left and right bracket assembly | 1 |
| 9.1 | GS06RS.50.03 | Axle | 1 |
| 10 | FG8201.01.01.C3 | Push Stick | 1 |
| 11 | FG9201.05.01 | Hex Key | 1 |
| 12 | TODXD1.X0.17 | Power Cable | 1 |
| 13 | TOQTGX.X0.01 | Impacted Plate | 1 |
| 14 | GS01RS.X0.11 | Lower Motor Housing | 1 |
| 15 | GS06RS.X0.03 | Switch | 1 |
| 16 | GS01RS.X0.12 | Lock assembly | 1 |
| 17 | TODQ56.X0.01 | Interlock Switch assembly | 1 |
| 17.1 | TODQ56.X0.02 | Rubber Cap assembly | 1 |
| 17.2 | TODQ56.12.11 | Interlock Switch | 1 |
| 18 | GS01RS.X0.13 | Power Switch Assembly | 1 |
| 18.1 | WODQ10.07.16 | Electromagnetism Switch | 1 |
| 19 | GS01RS.20.01 | Middle Motor Housing | 1 |
| 20 | GS01RS.X0.03 | Material Feeder Plate | 1 |
| 21 | GS01RS.X0.08 | Blade Assembly | 1 |
| 21.1 | GS01RS.00.02 | Blade (CB1001) | 1 |
| 22 | FG5301.01.01 | Collection Bag | 1 |
| 23 | BOD1ZZ.03.02.X1.01 | Hardware bag | 1 |
| 23.1 | BOA2ZZ.39.05 | Screw ST3.9*16 | 2 |
| 23.2 | BOD1ZZ.03.02.01 | Cotter Pin | 2 |
| 23.3 | BOC1YX.14.BC | washer | 2 |
* Parts highlighted in gray are available for after sales purchase.
NOTES
CONTENIDOS
natural_image
Technical line drawing of a mechanical clamp or bracket assembly (no text or symbols)natural_image
Technical line drawing of a mechanical device with labeled component '1' and 'Fig. 8' (no readable text or symbols beyond label)
ADVERTENCIA
ESPERE SIEMPRE 5 SEGUNDOS O MÁS A QUE LA HOJA SE PARE, DESPUÉS DE APAGAR LA TRITURADORA.
- PRODUCT SPECIFICATIONS
- Helpful Tip!
- IMPORTANT SAFETY INSTRUCTIONS
- IMPORTANT
- WARNING
- ALWAYS WEAR EYE PROTECTION.
- SPECIFIC SAFETY RULES FOR YARD CHIPPERS
- SERVICE
- SAVE THESE INSTRUCTIONS
- CAUTION
- GUIDELINES FOR USING EXTENSION CORDS
- MINIMUM GAUGE FOR EXTENSION CORDS (AWG)
- (WHEN USING 120 V ONLY)
- UNPACKING
- ATTACHING LEGS TO CHIPPER (See Figures 4 & 5)
- CONNECTING TO POWER SUPPLY (See Figure 6)
- STARTING AND STOPPING THE CHIPPER (See Figure 7)
- USING YOUR CHIPPER (See Figure 8)
- HOW TO REPLACE CHIPPER BLADE
- GENERAL MAINTENANCE
- WARNING (PROPOSITION 65)
- NOTES
- CONTENIDOS
- ADVERTENCIA
Brand : LawnMaster
Model : FD1501
Category : Lawn mower