
CMXGRAM1130049 - Lawn mower Craftsman - Free user manual and instructions
Find the device manual for free CMXGRAM1130049 Craftsman in PDF.


| Product Type | Lawn Mower |
| Brand | Craftsman |
| Model | CMXGRAM1130049 |
| Engine Type | 4-stroke gasoline |
| Cutting Width | 21 inches |
| Deck Material | Steel |
| Height Adjustment | 6-position lever |
| Grass Bag Capacity | 2.5 bushels |
| Wheel Size | Front 8", Rear 10" |
| Start Type | Recoil start |
| Drive Type | Self-propelled, rear-wheel drive |
| Fuel Type | Unleaded gasoline |
| Oil Type | SAE 30 (or SAE 10W-30) |
| Cutting Modes | Mulch, bag, side discharge |
| Handle | Foldable for storage |
| Weight | Approximately 80 lbs |
| Noise Level | ≤ 96 dB (manufacturer rated) |
| Warranty | 2-year limited warranty |
| Maintenance | Regular oil change, blade sharpening |
| Safety | Operator presence control, blade brake |
| Parts & Repairs | Spark plug, air filter, blade, belt available |
Frequently Asked Questions - CMXGRAM1130049 Craftsman
User questions about CMXGRAM1130049 Craftsman
0 question about this device. Answer the ones you know or ask your own.
Ask a new question about this device
Download the instructions for your Lawn mower in PDF format for free! Find your manual CMXGRAM1130049 - Craftsman and take your electronic device back in hand. On this page are published all the documents necessary for the use of your device. CMXGRAM1130049 by Craftsman.
USER MANUAL CMXGRAM1130049 Craftsman
Battery-Powered Lithium-Ion Tractor
Record Product Information
Before setting up and operating your new equipment, please locate the model plate on the equipment and record the information in the provided area to the right. You can locate the model plate by lifting up the seat and looking under the seat pan. This information will be necessary, should you seek technical support via our web site or with your local authorized service dealer.
MODEL NUMBER

SERIAL NUMBER

natural_image
Row of identical empty rectangular boxes with no text or symbolsTable of Contents
Safe Operations Practices .... 2
Assembly....7
Operation....9
Service and Maintenance....12
Parts/Warranty......See Separate Supplement
WARNING
Read and follow all safety rules and instructions in this manual before attempting to operate this machine.
Failure to comply with these instructions may result in personal injury.
WARNING
California Proposition 65
Cancer and Reproductive Harm – www.P65Warnings.ca.gov.
NOTE: This Operator's Manual covers several models. Features may vary by model. Not all features in this manual are applicable to all models and the model depicted may differ from yours.
SAFE OPERATION PRACTICES
WARNING
This symbol points out important safety instructions which, if not followed, could endanger the personal safety and/or property of yourself and others. Read and follow all instructions in this manual before attempting to operate this tractor. Failure to comply with these instructions may result in personal injury. When you see this symbol, HEED ITS WARNING!
DANGER
This tractor was built to be operated according to the safe operation practices in this manual. As with any type of power equipment, carelessness or error on the part of the operator can result in serious injury. This tractor is capable of amputating fingers, hands, toes and feet and throwing debris. Failure to observe the following safety instructions could result in serious injury or death.
Lithium-Ion Battery System
Servicing requires extreme care and knowledge of the system and must be performed only by a qualified service technician. For repair or service take the tractor to your nearest authorized service dealer. Always use original equipment manufacturer's (OEM) replacement parts when servicing.
General Information
- Read, understand, and follow all instructions on the tractor and in the manual(s) before attempting to assemble and operate. Keep this manual in a safe place for future and regular reference and for ordering replacement parts.
- Be familiar with all controls and their proper operation. Know how to stop the tractor and disengage them quickly.
- Never allow children under 14 years of age to operate this tractor. Children 14 and over should read and understand the instructions and safe operation practices in this manual and on the tractor and should be trained and supervised by an adult.
- Never allow adults to operate this tractor without proper instruction.
- If situations occur which are not covered in this manual, use care and good judgment. Contact your customer service representative for assistance.
- According to the U.S. Consumer Products Safety Commission (CPSC) and the U.S. Environmental Protection Agency (EPA), this product has an estimated useful life of seven (7) years, under ordinary use conditions. At the end of its useful life, have the product inspected annually to ensure all mechanical, electrical and safety systems are operating properly, safely, and are not worn excessively. Failure to do so may result in accident, injury, or death.
Preparation Before Operating
- Thoroughly inspect the area where the tractor is to be used. Remove all stones, sticks, wire, bones, toys, and other foreign objects which could be picked up and thrown by the blade(s). Thrown objects can cause serious personal injury.
- To help avoid blade contact or a thrown object injury, keep bystanders, helpers, children and pets at least 75 feet (23 meters) from the tractor while it is in operation. Keep bystanders, children and pets inside during operation. Stop tractor if anyone enters the area.
- Be aware of the tractor discharge direction and do not point it at anyone.
- Always wear safety glasses or safety goggles during operation and while performing an adjustment or repair to protect your eyes. Thrown objects which ricochet can cause serious injury to the eyes.
- Wear sturdy, rough-soled work shoes and close-fitting slacks and shirts. Loose fitting clothes, jewelry and long hair can be caught in movable parts. Never operate this tractor in bare feet or sandals.
- Do not charge or operate the tractor in the rain or wet conditions.
- Use only accessories and attachments approved for this tractor by the tractor manufacturer. Read, understand and follow all instructions provided with the approved accessory or attachment.
Operating
- Data indicates that operators, age 65 years and above, are involved in a large percentage of riding tractor-related injuries. These operators should evaluate their ability to operate the riding tractor safely enough to protect themselves and others from serious injury.
- Set the parking brake before attempting to start the tractor.
- Plan your mowing pattern to avoid discharge of material toward roads, sidewalks, bystanders and the like. Also, avoid discharging material against a wall or obstruction which may cause discharged material to ricochet back toward the operator.
- In case of a system fault or a complete loss of battery power, the tractor on a hill can freewheel. Depress the brake pedal to maintain control and stop the tractor. Restart the tractor. If the system fault problem persists, contact your authorized service dealer.
- Do not put hands or feet near rotating parts or under the cutting deck. Contact with the blade(s) can amputate hands and feet.
- Watch for holes, ruts, bumps, rocks, or other hidden objects. Uneven terrain could overturn the tractor. Tall grass can hide obstacles.
- Check overhead clearances carefully before driving under low hanging tree branches, wires, door openings etc., where the operator may be struck or pulled from the tractor, which could result in serious injury.
- Never leave a running tractor unattended. Always turn off blade(s), set the parking brake, press Start/Stop button, turn key to OFF position and remove key before dismounting.
- Turn off blade(s), set parking brake, press Start/Stop button and wait until the blade(s) come to a complete stop before removing grass catcher, emptying grass, unclogging chute, removing any grass or debris, or making any adjustments.
- Your tractor is designed to cut normal residential grass of a height no more than 10" (25.4 cm). Do not attempt to mow through unusually tall, dry grass (e.g., pasture) or piles of dry leaves. Dry grass or leaves may contact hot surfaces and/or build up on the tractor deck presenting a potential fire hazard.
- Turn off blade(s) before traveling in reverse. Back up slowly. Always look down and behind before and while backing to avoid a back-over accident.
- Never carry passengers.
- Stay at least 10 feet (3 meters) from drop-offs, ditches, embankments or the edge of water. The tractor could suddenly turn over if a wheel is over the edge of a cliff, ditch, or if an edge caves in.
SAFE OPERATION PRACTICES
- A missing or damaged chute deflector, mulch plug or entire grass catcher can cause blade contact or thrown object injuries.
- Do not operate the tractor without the chute deflector, mulch plug or entire grass catcher in its proper place.
- Use extra care with grass catchers or other attachments. These can change the stability of the tractor. Always follow the attachment manufacturer's instructions.
- Stop the blade(s) when crossing gravel drives, walks, or roads and while not cutting grass.
- Watch for traffic when operating near or crossing roadways. This tractor is not intended for use on any public roadway.
- Mow only in daylight or good artificial light.
- Do not operate the tractor while under the influence of alcohol or drugs.
- Slow down before turning. Operate the tractor smoothly. Avoid erratic operation and excessive speed.
- Motors may become hot and can cause serious burn injuries. Do not touch. Allow the tractor to cool for five minutes before attempting any service.
- Do not turn off tractor and freewheel downhill. Over-speeding may cause the operator to lose control of the tractor resulting in serious injury or death.
Children
- Tragic accidents can occur if the operator is not alert to the presence of children. Children are often attracted to the tractor and the mowing activity. They do not understand the dangers. Never assume that children will remain where you last saw them.
- Keep bystanders, children and pets inside during operation under the watchful care of a responsible adult other than the operator. Stop the tractor if anyone enters the area.
- Never carry children, even with the blade(s) shut off. They may fall off and be seriously injured or interfere with safe tractor operation. Children who have been given rides in the past could suddenly appear in the mowing area for another ride and be run over or backed over by the tractor.
- Be alert and turn tractor off if a child or bystander enters the area.
- To avoid back-over accidents, always look behind and down for small children.
- Use extreme care when approaching blind corners, doorways, shrubs, trees or other objects that may block your vision of a child who may run into the path of the tractor.
- Never allow children under 14 years of age to operate this tractor. Children 14 and over should read and understand the instructions and safe operation practices in this manual and on the tractor and should be trained and supervised by an adult.
- Do not allow any child to joy ride on the tractor. The tractor is not a toy or a go-cart. Warn your children that the tractor can be dangerous and they must stay away from it at all times.
- Keep children away from a hot or running tractor. They can suffer burns from hot motors.
- Remove key when tractor is unattended to prevent unauthorized operation. Make certain the key is inaccessible to small children.
Slope Operation
-
Slopes are a major factor related to loss of control and tip-over accidents which can result in severe injury or death. All slopes require extra caution. If you cannot back up the slope or if you feel uneasy on it, do not mow or drive on it.
-
For your safety, measure any slope before using the tractor on the sloped area. Use a slope measuring device in addition to the slope gauge included as part of this manual to measure slopes before operating this tractor on a sloped or hilly area. Smart phone applications can be also utilized to measure slopes. If the slope is greater than 12 degrees as shown on the slope gauge or a slope measuring device, do not operate this tractor on that area or serious injury could result.
- Do not mow on slopes greater than 12 degrees (21%).
- Do not mow across slopes, only mow up or down slopes that are less than 12 degrees (21%). Use low speeds and avoid sudden turns.
- Do not mow on wet grass. Reduced traction could cause sliding or a loss of control.
- Do not operate tractor under any conditions where traction, steering or stability is in question. Tires could slide even if the wheels are stopped.
- Avoid starting and stopping on slopes. Avoid making sudden changes in speed or direction. Make turns slowly and gradually.
- Use extra care while operating tractor with grass catcher or other attachment(s). They can affect the stability of the tractor. Do not use grass catcher on slopes greater than 10 degrees (17%).
- Do not try to stabilize the tractor by putting your foot on the ground.
- Keep all movement on the slopes slow and gradual. Do not make sudden changes in speed or direction. Rapid acceleration could cause the front of the tractor to lift and rapidly tip over backwards, which could cause serious injury or death.
- Do not turn off tractor and freewheel downhill. Over-speeding may cause the operator to lose control of the tractor resulting in serious injury or death.
Hauling
- Use properly secured full width ramps for loading and unloading a tractor for transport.
- Use extra care when loading or unloading the tractor into a trailer or truck. This tractor should not be driven up or down ramp(s), because the tractor could tip over, causing serious personal injury. The tractor must be pushed manually on ramp(s) to load or unload properly.
- Raise the deck to the highest position for loading clearance.
- Do not tow this tractor, damage to the drive motors can occur.
Towing with your tractor
- Do not tow a load that exceeds 250 lbs (113kg) rolling weight and never exceed 50 lbs (22kg) tongue weight.
- Do not attach towed equipment except at the hitch point of the tractor.
- Never allow children or others in or on towed equipment.
- Do not tow on slopes greater than 5 degrees (9%). On slopes, the weight of towed equipment may cause loss of traction and loss of control and/or the ability to stop.
- Always use extra caution when towing with a tractor capable of making tight turns (e.g. tight-turn tractor). Make wide turns to avoid jack-knifing.
- Travel slowly and allow extra distance to stop.
Service
- Keep tractor in good working order. Do not use the tractor until worn or damaged parts are replaced.
- Tractor blade(s) are sharp. Wrap the blade or wear gloves, and use extra caution when servicing them.
- Remove key and store the tractor indoors when not in use. Allow the tractor to cool at least five minutes before charging or storing.
- Before cleaning, repairing, or inspecting, make certain the blade(s) and all moving parts have stopped. Turn off tractor and remove the key.
SAFE OPERATION PRACTICES
- Check to make sure the blades come to complete stop in not more than (5) five seconds after disengaging the blade disengagement control per the interval in the Maintenance Schedule. Measure the stopping time with a stop watch. If the blades do not stop completely in less than five seconds, your tractor should be serviced professionally by an authorized dealer.
- Check the safety interlock system per the interval in the Maintenance Schedule for proper function, as described later in this manual. If the safety interlock system does not function properly, have your tractor serviced immediately by an authorized dealer.
- Never tamper with the safety interlock system or other safety devices. Check their proper operation regularly.
- Check the blade(s) mounting bolt torque in accordance to the Maintenance Schedule in this manual. Also, visually inspect blade(s) for damage (e.g., excessive wear, bent, cracked). Replace the blade(s) with the original equipment manufacturer's (O.E.M.) blade(s) only.
- Use of service parts which do not meet the original equipment specifications may lead to improper performance and compromise safety.
- Keep all nuts, bolts and screws tight to be sure the equipment is in safe working condition. Review the Maintenance Schedule chart in this manual for service interval information.
- After striking a foreign object, stop the tractor, push the Start/Stop button, turn the key to the OFF position and remove. Thoroughly inspect the tractor for any damage. Repair the damage before operating.
- To reduce fire hazard, keep the motor(s) free of grass, leaves and debris build-up. Follow the post operation tractor care instructions in the Service and Maintenance section.
- Check brake operation frequently as it is subjected to wear during normal operation. Adjust and service as required.
- Never attempt to make adjustments or repairs to the tractor without removing the key.
- Maintain or replace safety and instruction labels, as necessary.
General Electric Safety
- Do not expose the tractor to rain or wet conditions.
- Do not service the tractor or handle electrical components with wet hands.
- Do not operate the tractor in the rain, in wet conditions or on wet surfaces.
- To reduce the risk of electric shock, avoid body contact with grounded conductors, such as metal pipes or wire fences.
- Do not operate the tractor in explosive atmospheres, such as in the presence of flammable liquids, gases or dust.
- For protection against risk of injury or electric shock, do not replace blown fuses. Your tractor should be serviced professionally by an authorized dealer.
- Never douse or hose the tractor with water. Avoid getting any liquid in the motors and electrical connections. Clean the tractor after each use. Refer to cleaning and storage. Do not use solvents or strong detergents.
Battery Charger Safety
WARNING
Only use an OEM battery charger (part# 725-07253A) to charge the batteries in this tractor. DO NOT attempt to charge any other batteries with the battery charger specific to this tractor. Other types of batteries may burst, causing fire, personal injury or property damage.
- Recharge only with the charger specified by the manufacturer. A charger that is suitable for one type of battery may create a risk of fire when used with another battery.
- Do not use the charger in the rain, wet locations or in the presence of flammable liquids or gasses.
-
A nameplate on the charger indicates the voltage used. Never connect the charger to an AC voltage that differs from this voltage.
-
An extension cord should not be used unless absolutely necessary. Use of an improper extension cord could result in a risk of fire, electric shock or electrocution.
- Do not use multiple extension cords.
- Make sure the extension cord is heavy enough to carry the current drawn by the charger. An undersized extension cord will cause a drop in line voltage, resulting in a loss of power and overheating. If in doubt, use the next heavier gauge cord. The smaller the gauge number, the heavier the cord.
| MINIMUM WIRE SIZE FOR EXTENSION CORDS FOR 120 VOLT APPLIANCES USING 0-6 AMPS | ||||
| Cord Length (ft.) | 25 | 50 | 100 | 150 |
| Wire Size (AWG) 16 16 | 6 14 | |||
- Make sure the cords are in good condition. Inspect the battery charger power cord and extension cord periodically. Look closely for deterioration, cuts or cracks in the insulation. If either cord is damaged in any manner while plugged in, disconnect the cord from both the outlet and the charger. Do not use a damaged cord. Damaged cords should be repaired or replaced.
- Do not abuse cords. Never pull or carry the charger by a cord. Keep cords away from heat, oil, water, sharp edges, and moving objects. Always grasp the plug when disconnecting a cord.
-
Never modify a plug, cord or outlet in any way.
-
Ground Fault Circuit Interrupter (GFCI) protection should be provided on the circuit(s) or outlet(s) to be used with this charger. For an extra measure of safety, use receptacles (outlets) with built-in GFCI protection.
-
Do not place the battery charger where cords might be stepped on, tripped over or subjected to damage.
- Keep the battery charger and cords in a cool and dry area.
- Keep the battery charger and cords away from all liquids.
- Do not allow small metal items or material such as steel wool, aluminum foil or other foreign particles into the charger port.
- Do not probe the charger with conductive material. There is a risk of electric shock.
- Do not cover the battery charger. The battery charger may overheat.
- Do not allow the battery or battery charger to overheat. If they are warm, allow them to cool down. Only charge batteries in temperatures between 32^ and 104^ F ( 0^ and 40^ C).
Battery Safety
- Do not expose the battery to fire or to temperatures over 140^ F ( 60^ C). Doing so could cause an explosion.
- Handle battery with care. Do not short the battery with conductive materials, such as rings, bracelets, keys, etc. Shorting the battery may cause personal injury, damage to the battery or a fire.
- Do not attempt to charge a cracked or damaged battery.
- Do not use or charge a wet battery or a battery that shows any evidence of corrosion.
- Do not use a damaged or modified battery. Doing so could result in a fire, explosion or personal injury.
- Do not dispose of the battery in a fire. The cell may explode. Contact your local authorized service dealer for proper battery recycling.
- Exercise care in handling batteries in order not to short the battery with conductive materials such as rings, bracelets, and keys. The battery or conductor may be hot and cause burns.
SAFE OPERATION PRACTICES

WARNING
- The battery may present a risk of fire or chemical burn if misused. Do not disassemble, overheat or incinerate the battery.
- Leakage from the battery may occur under extreme usage, charging or temperature conditions or if the battery is damaged, crushed or punctured. This leakage indicates a failure of the battery and the the battery should be properly disposed of by an authorized service dealer.
If the battery leakage gets on your skin or eyes, follow these steps:
- Immediately wash the skin and flush the eyes with cool water for at least 20 minutes and seek immediate medical attention.
- Contents of open battery cells may cause respiratory irritation. Provide fresh air. If symptoms persist, seek medical attention.
- Ventilate the room and vacate the area if smoke and gases are present. Gas and smoke in a confined area will present a potential health risk.
If the leakage gets on your clothing or shoes, remove, isolate and wash the contaminated clothing thoroughly.
SAFETY SYMBOLS
This page depicts and describes safety symbols that may appear on this product. Read, understand, and follow all instructions on the tractor before attempting to assemble and operate.
SymbolDescription
| READ THE OPERATOR'S MANUAL(S)Read, understand, and follow all instructions in the manual(s) before attempting to assemble and operate. | |
| WARNING — THROWN OBJECTSThis tractor may pick up and throw objects which can cause serious personal injury. Stay clear. Keep bystanders, helpers, children and pets at least 75 feet from the tractor while it is in operation. | |
| WARNING — BYSTANDERSKeep bystanders, helpers, children and pets at least 75 feet from the tractor while it is in operation. | |
| DANGER — ROTATING BLADE(S)Never carry passengers. Never carry children, even with the blade(s) OFF. | |
| WARNING — ROTATING BLADE(S)Do not put hands or feet near rotating parts or under the cutting deck. Contact with the blade(s) can amputate hands and feet. Be sure blade(s) and power are off before placing hands or feet near blade(s). |
SymbolDescription
 | WARNING — ROTATING BLADE(S)Do not put hands or feet near rotating parts or under the cutting deck. Contact with the blade(s) can amputate hands and feet. Be sure blade(s) and power are off before placing hands or feet near blade(s). Always remove the key when not in use. |
 | |
 | WARNING — SLOPE OPERATIONGo up and down slopes, not across. Use extra caution on slopes. Do not mow or drive on slopes greater than 12°/21%. If tractor stops going uphill, stop blade(s) and back down slowly. |
 | |
 | DANGER — SLOPE OPERATIONDo not operate this tractor where it could tip or slip. Avoid sudden turns. Use low speed. |
 | |
 | DANGER — ROTATING BLADE(S)Always look down and behind before and while backing to avoid a back-over accident. To avoid a back-over accident, keep children away from the tractor while it is in operation. Mowing in reverse is not recommended. |
 | WARNING — THROWN OBJECTSThis tractor may pick up and throw objects which can cause serious personal injury. |
 | DANGER — GUARDS, SHIELDS, SWITCHES, ETC.Keep safety devices (Guards, Shields, Switches, Etc.) in place and working. |
 | WARNING — ELECTRIC SHOCKDo not charge tractor in rain or wet locations. Do not operate tractor in rain. |
 | |
 | WARNING — ELECTRIC SHOCKDo not charge tractor in rain or wet locations. Do not operate tractor in rain. |
 | |
 | DANGER — SERVICEMany components on this tractor should only be serviced by an authorized service dealer. Read this Operator's Manual before attempting to service this tractor. |
 | |
 | WARNING — STORE TRACTOR INDOORSStore tractor indoors at all times when not in use. |
 |

WARNING
Your Responsibility—Restrict the use of this tractor to persons who read, understand and follow the warnings and instructions in this manual and on the tractor.
SAVE THESE INSTRUCTIONS!
SLOPE GAUGE
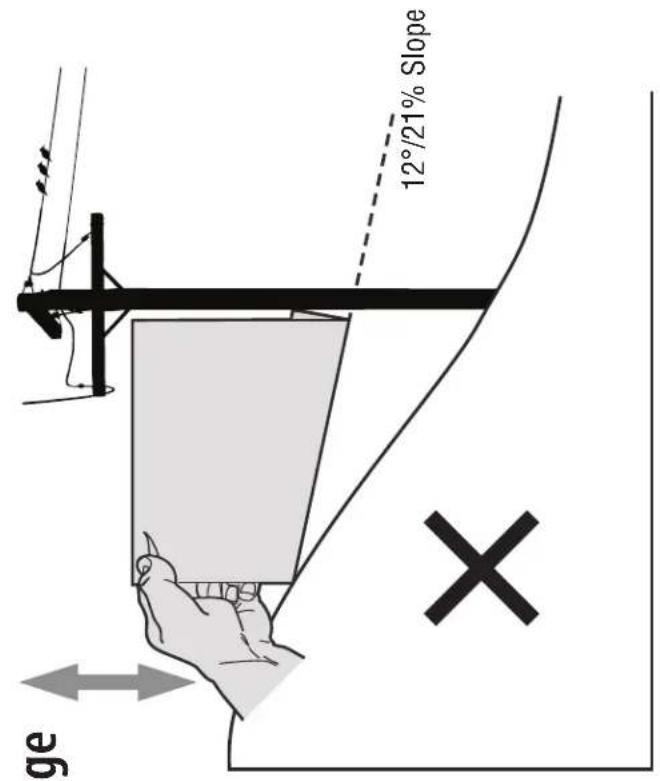
Figure 2Figure 1
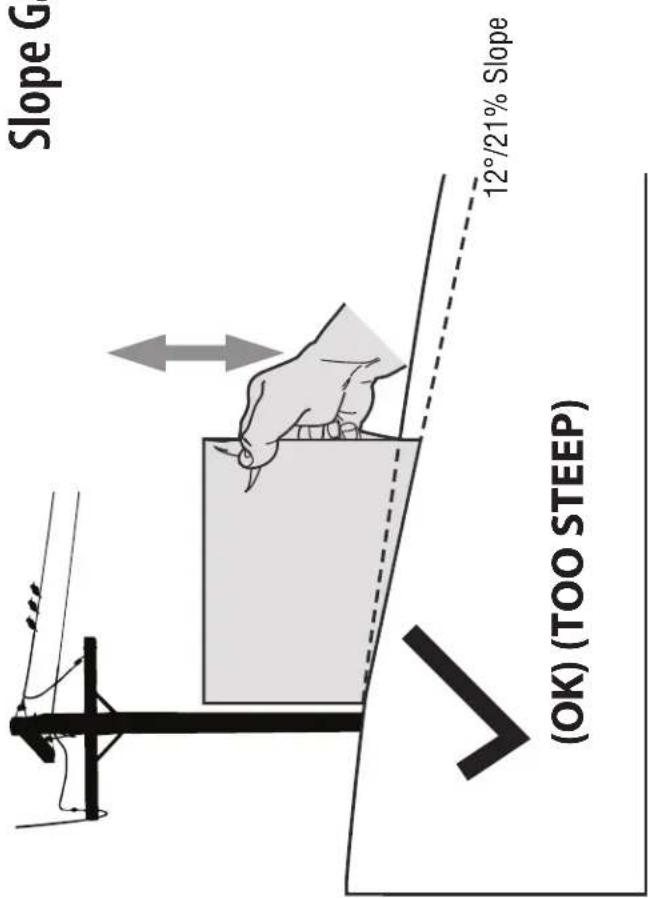
USE THIS SLOPE GAUGE TO DETERMINE IF A SLOPE IS TOO STEEP FOR SAFE OPERATION!
To check the slope, proceed as follows: 1. Remove this page and fold along the dashed line.
-
Locate a vertical object on or behind the slope (e.g. a pole, building, fence, tree, etc.)
-
Align either side of the slope gauge with the object (See Figure 1 and Figure 2).
-
Adjust gauge up or down until the left corner touches the slope (See Figure 1 and Figure 2).
-
If there is a gap below the gauge, the slope is too steep for safe operation (See Figure 2 above).
WARNING! Slopes are a major factor related to tip-over and roll-over accidents which can result in severe injury or death. Do not operate machine on slopes in excess of 12 degrees/21 percent. All slopes require extra caution. If you cannot back up the slope or if you feel uneasy on it, do not mow or drive on it. Always mow up and down slopes, never across the face of slopes.
ASSEMBLY
Note: All references in this manual to the left or right side and front or back of the tractor are from the operating position only. Exceptions, if any, will be specified.
Note: Some components may come already assembled. If they are already assembled, skip ahead to the next step.
Preparation
Before beginning installation, remove all the contents from the crate and all the hardware from the pack to make sure everything is present. Hardware is listed below.
Contents of Crate
- Tractor
• Steering Pedestal Cap
• Discharge Chute Assembly - Hardware Bag
• Product Registration Card - Operator's Manual
- Mulch Plug
- Battery Charger
• Steering wheel/ Shaft Assembly - Seat Assembly
- Front Bumper
- Battery Charger Manual
- Hardware Pack: Seat Mounting Bracket (w/ two shoulder bolts & lock nuts installed)
Recommended Tools for Assembly
- 1/4" or 3/8" drive ratchet
- 3/8" wrench and/or socket
- 7/16" wrench and/or socket
- 1/2" wrench and/or socket
- 9/16" wrench and/or socket
• Phillips screw driver
Manually Moving the Tractor

CAUTION
Never tow your tractor. Towing the tractor with the rear wheels on the ground may cause severe damage to the drive motors.
The tractor can be moved as long as the parking brake is not set. The tractor can be pushed slowly.
Installing the Steering Wheel Assembly
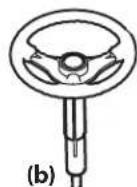
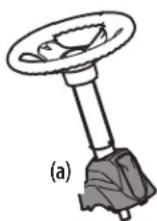
- Slide the pedestal cap (a) onto the steering shaft (b) so that when the steering shaft (b) is installed on the tractor, the pedestal cap (a) will be upright as shown in Figure 1.
- Remove the shoulder bolt (c) and lock nut (d) from the steering shaft and retain for later steps. See Figure 2.
- Position the steering wheel assembly over the lower steering shaft on the tractor. Align the steering wheel so that its largest opening faces forward when the tractor wheels are straight.
- Lower the steering wheel assembly (a) onto the lower steering shaft (b) and secure with the shoulder bolt (c) and lock nut (d) previously removed. See Figure 2.

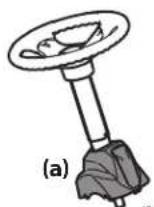
(b)
Figure 1
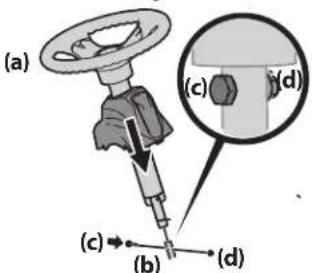
- Tighten the shoulder bolt and lock nut using a 9/16" wrench or socket and 7/16" wrench or socket.
- Remove the pedestal cap mount screw (factory installed) located on the tractor's steering console. Retain the screw for later instructions. See Figure 3.
- Connect the headlight wire terminals (a). Slide the pedestal cap (b) down onto the tractor and slightly rotate to the right to clip into place. Secure the pedestal cap (b) with the screw (c) previously removed. See Figure 3.
Installing Operator's Seat
- Remove the shoulder bolts (a) and lock nuts (b) from the seat mounting bracket (c) included in your hardware pack. See Figure 4.
- Remove the two self-tapping bolts (a) factory installed on the tractor. See Figure 5.
- Align the seat bracket (a) in place over the holes from where the self-tapping bolts (b) were removed, as shown in Figure 6.
- Using a 1/4" drive ratchet with a 3/8" socket, secure the seat bracket (a) with the self-tapping bolts (b) removed in step 2. See Figure 6.
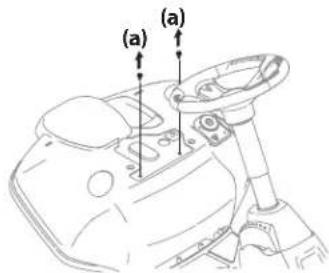
Figure 5
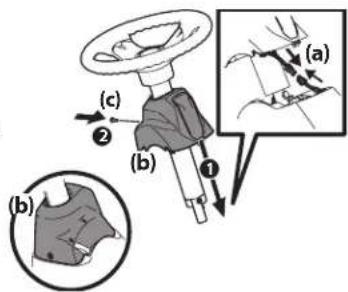
Figure 3
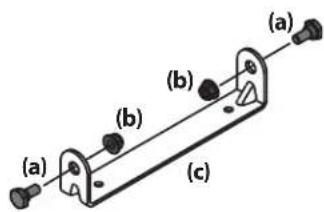
Figure 4
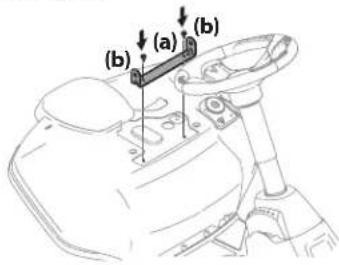
Figure 6

CAUTION
Do not use any type of power tool (e.g. impact gun or electric drill with nut driver attached) when tightening the self-tapping bolts to attach the seat bracket.
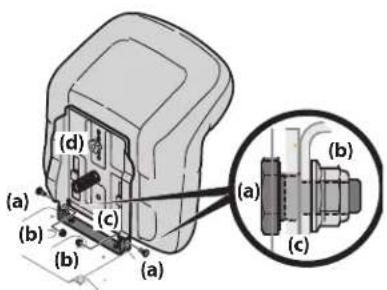
- Position the seat assembly over the seat mounting bracket, aligning the holes provided. See Figure 7.
- Install the two shoulder bolts (a) and lock nuts (b) removed from the seat mounting bracket (c) in Step 1. See Figure 7.
Note: Make sure that the bolt's shoulder is completely recessed into the seat bracket when securing the lock nut.
- To adjust the position of the seat, loosen the adjustment knob (d) on the bottom of the seat. Slide the seat forward or backward as desired. Securely retighten the adjustment knob. Refer to D in Figure 7.
Never operate this tractor without either the mulch plug or deck chute installed.
Installing the Deck Chute
-
Remove the wing knobs (a) installed on the mowing deck and retain for later installation. See Figure 8.
-
Install the deck chute (b) into the discharge opening on the deck. The rear of the chute should be under the tab (f) on the rear deck bracket (g). The studs (c) on the deck surface will fit through the holes on the upper portion of the deck chute. The small tab (d) on the deck lip area will fit through the square cutout on the lower portion of the deck chute. See Figure 8.
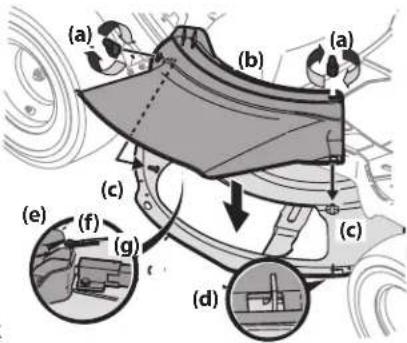
Important: Make certain that the upper-rear portion of deck chute (b) is depressing the safety switch (e) located on the deck surface and under the tab (f) on the rear deck bracket (g). The blade(s) will not start without the deck chute (b) properly in place.
- Secure the deck chute (b) by tightening the wing knobs (a) removed in step 1.
Installing the Mulch Plug (If equipped)
-
Remove the wing knobs (a) installed on the mowing deck and retain for later installation. See Figure 9.
-
Install the mulch plug (b) into the discharge opening on the deck. The rear of the mulch plug (b) should be under the tab (f) on the rear deck bracket (g). The studs (c) on the deck surface will fit through the holes on the upper portion of the mulch plug (b). The small tab (d) on the deck lip area will fit through the square cutout on the lower portion of the mulch plug (b). See Figure 9.
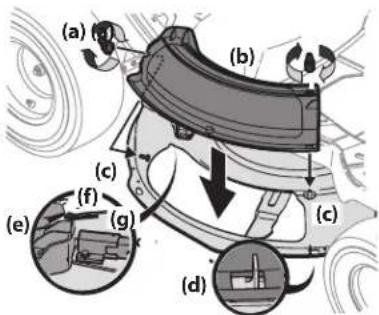
Important: Make certain that the upper-rear portion of mulch plug (b) is depressing the safety switch (e)
located on the deck surface and under the tab (f) on the rear deck bracket (g). The blade(s) will not start without the mulch plug (b) properly in place.
- Secure the mulch plug (b) by tightening the wing knobs (a) removed in step 1.
Installing the Bumper (If equipped)
- Remove the two screws (a) from the front and center of the front axle. See Figure 10.
- Position the bumper (b) over the mounting holes and secure using the screws (a) removed in Step 1. See Figure 10.
Checking Tire Pressure
See the tire sidewall for the proper inflation pressure. Proper inflation pressure should be maintained at all times.
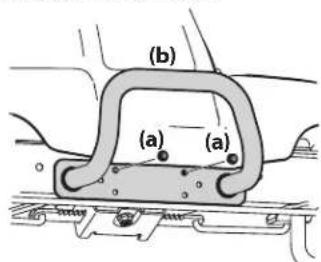
Figure 10
Note: The tires on your tractor may be over-inflated for shipping purposes. If necessary, reduce the tire pressure before operating the tractor.
Charging the Battery

WARNING
- California Proposition 65: Cancer and reproductive harm – www.P65Warnings.ca.gov.
- The battery contains corrosive fluid and toxic material — HANDLE WITH CARE. Keep away from children. Do not puncture, disassemble, mutilate, or incinerate. Explosive gases could be vented during charging or discharging. Charge in a well ventilated area, away from sources of ignition.
- Recharge only with the charger provided with this tractor. A charger that is not suitable for this machine may damage the batteries or create the risk of fire.
- Do not charge or operate the tractor in the rain or in wet conditions.
Refer to the manual packed with your battery charger for further information and instructions on charging the battery. The charging port is located on the rear body panel of the tractor.
To charge the battery:
- Lift the charge port cover (a). See Figure 11.
-
Insert the charging cord (b) into the charging port (c).
-
Plug charger power cord (b) into wall receptacle (outlet). See Figure 11.
Note: It will take approximately 4 hours to fully charge the battery.
Note: The Vehicle Control Module (VCM) LED's will blink continuously when charging and the LCD display will display percentage of charge. The battery is completely charged when all green lights are illuminated and the LCD displays 100%.
Note: When the charging cord is plugged into the tractor and not yet plugged into
the wall, the LED's will illuminate continuously until the cord is plugged into the wall.
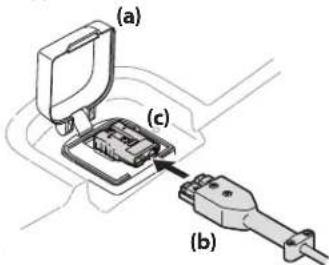
Figure 11
If at any time your charger displays a fault while charging your battery, follow these procedures:
- Turn the key off.
- Unplug the charging cord from the tractor.
- Unplug the charger power cord from the power source.
- Plug the charger power cord back into the power source.
- Plug the charging cord back into the tractor.
- It the fault persists contact qualified service personnel.
Note: Rechargeable batteries degrade with time and use. The battery may eventually need to be replaced. To have the battery replaced, contact your authorized Service Dealer.
Note: Using old or faulty battery could cause a system fault that results in loss of power.
Battery Charging Tips
• The battery should be fully charged before the initial use.
- The battery should be fully charged after each use. Storing the battery in a discharged state could reduce performance.
- The battery will turn off automatically after a complete charge.
- It will take approximately 4 hours to fully charge the battery. Leaving the battery connected to the charger for more than 4 hours will not damage the battery.
- The battery does not develop a memory and does not need to be fully discharged before recharging.
• Always disconnect battery charger (or extension cord, if used) from the electrical receptacle (outlet) first, then disconnect the charging cord from the charging port.
- Never charge a frozen battery.
- It is recommended that the tractor be charged once every month during off-season storage.
OPERATION
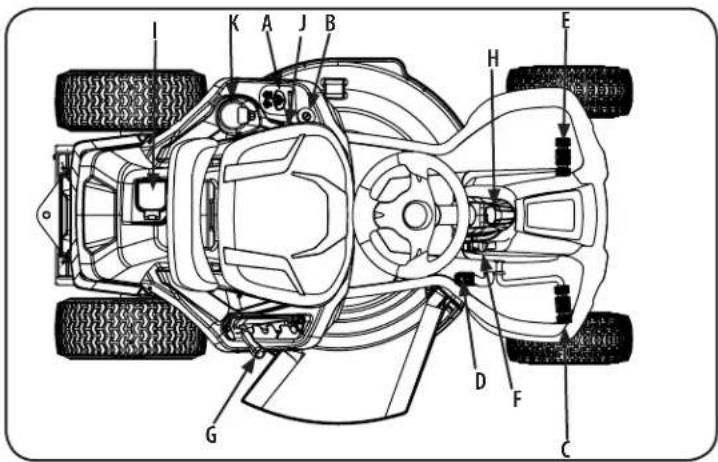
Figure 12
Note: References to LEFT, RIGHT, FRONT, and REAR indicate that position on the tractor when facing forward while seated in the operator's seat.
Vehicle Control Module (VCM) (A)

WARNING
Never leave a running machine unattended. Always disengage PTO, set parking brake, stop tractor and remove the key to prevent unintended starting.
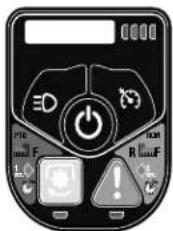
The vehicle control module (VCM) is located on the left fender of the tractor.
The VCM is the location of several control buttons for your tractor. The VCM includes the START/STOP button, PTO (blades ON/OFF) button, Reverse Caution Mode (RCM) button, Headlight button, Cruise Control button, LCD Screen and the Battery Level Indicator.

CAUTION
Prior to operating the tractor, refer to both Safety Interlock Switches and Starting The Tractor in the Operation section of this manual for detailed instructions regarding the VCM and operating the tractor in REVERSE CAUTION MODE.
Start/Stop Button

Located on the VCM, the start/stop button is used to start and stop the tractor.
PTO (Blades ON/OFF) Button

Located on the VCM, the PTO button is used to operate the blades. To engage the cutting deck (blades ON), press and hold the PTO button for one second. The green indicator light below the PTO button is ON and the LCD Screen displays "CUT DECK
ON" for two (2) seconds then returns to the hour meter. Pressing the PTO button again will disengage the cutting deck (Blades OFF). The green indicator light below the PTO button is OFF.
Reverse Caution Mode (RCM) Button

Located on the VCM, the RCM button allows the tractor to be operated in reverse with the blade(s) engaged (ON). To activate the RCM, press and hold the RCM button down for three seconds. When activated, the red indicator light is
illuminated. To de-activate the RCM, press the RCM button again. When the RCM is not activated, the red indicator light is not illuminated. Refer to the Operation section of this manual for more information on operating the tractor in the reverse caution mode.
Note: Mowing in reverse is not recommended.

WARNING
Use extreme caution while operating the tractor in the REVERSE CAUTION MODE. Always look down and behind before and while backing. Do not operate the tractor when children or others are around. Stop the tractor immediately if someone enters the area.
Headlight Button
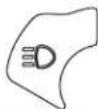
Located on the VCM, the headlight button is used to turn the headlights on or off.
Cruise Control Button
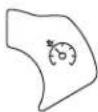
Located on the VCM, pressing the cruise control button while the tractor is in motion allows the tractor to remain at a constant ground speed without applying pressure to the forward drive pedal, the LCD Screen displays "CRUISE ON" when the cruise control is activated. The cruise control can be disengaged by pressing either the cruise control button, the brake pedal or the forward drive pedal.
Note: Cruise control will not engage at the tractor's fastest ground speed. If the operator should attempt to do so, the tractor will automatically decelerate to the fastest optimal mowing ground speed.
Note: Cruise control will not engage in reverse.
LCD Screen & Battery Level Indicator
HOURS XXXX.X
0000
Located on the VCM, the LCD display & battery level indicator are used to provide instructions, warnings and information about your tractor systems and the battery level of your tractor.
Key Switch (B)
natural_image
Simple line drawing of a camera with lens and circular base (no text or symbols)Style B1 (If Equipped)
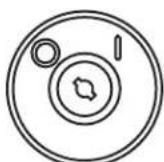
Style B2 (If Equipped)
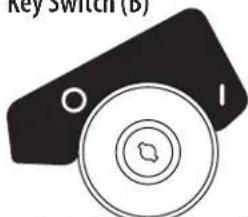
The key switch is located on the left fender and powers the VCM when the key is in the ON (I) position. The tractor cannot be started unless the key is in the ON (I) position and the START/STOP button is depressed. Turning the key to the OFF (O) position turns the tractor off.
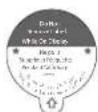
Note: Before your tractor can be started, the safety label covering the key switch must be removed. This label is in place to prevent unintended starting when the tractor is on display. Peel off the label to access the key switch.
Forward Drive Pedal (C)
The forward drive pedal is located on the right side of the steering column, along the running board. Press the forward drive pedal forward to allow the tractor to travel forward. Ground speed is also controlled with the forward drive pedal. The further forward the pedal is depressed, the faster the tractor will travel. The pedal will return to its original/neutral position when it is not pressed.
Reverse Drive Pedal (D)
The reverse drive pedal is located on the right side of the steering column along the running board. Ground speed is also controlled with the reverse drive pedal. The further rearward the pedal is pressed, the faster the tractor will travel. The pedal will return to its original/neutral position when it is released.
Brake Pedal (E)
The brake pedal is located on the left side of the steering column, along the running board. The brake pedal can be used for stopping the tractor or setting the parking brake.
OPERATION
Note: The brake pedal must be fully depressed to start the tractor. Refer to Safety Interlock Switches for more information.
Park Brake Lever (F)
The Park Brake Lever is located on the right side of the steering column and is used to engage the parking brake. Refer to Engaging the Parking Brake section of this manual for detailed instructions regarding setting the parking brake. Refer to Releasing the Parking brake section of this manual for instructions regarding releasing the parking brake.
Deck Lift Lever (G)
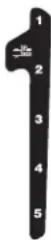
Located on your tractor's right fender, the deck lift lever is used to change the height of the cutting deck (5 positions). To use the deck lift lever, move the lever to the left, then place in the notch best suited for your application. The lowest position is "1" and the highest position is "5".
Position "1" is approximately a 1" cutting height, Position "5" is approximately a 4" cutting height and the change in height is approximately 3/4" between each position.
Headlight (H)
The headlights will turn ON whenever the key is ON and the headlight button is pressed. To turn the headlights OFF, press the headlight button again.
Charging Port (I)
The charging port is located on the rear of the tractor. To access the charging port, lift up on the charging port cover.
USB Charging Ports (J) (If Equipped)

If equipped, a pair of USB power sources are located on the left console. The two USB ports are both rated 2.1 A. The ports can be used to charge your phone or power up other USB devices.

WARNING
Do not have any devices plugged into your USB charging ports when starting the tractor. Doing so may cause damage to your device.
Cup Holder (K)
The cup holder is located to the left of the operator's seat.
Operation
Safety Interlock System
This tractor is equipped with a safety interlock system for the protection of the operator. If the interlock system should ever malfunction, do not operate the tractor. Contact an authorized service dealer.
- The safety interlock system prevents the operator from turning the tractor ON unless the operator is in the seat with the parking brake engaged or brake pedal fully depressed and the drive pedal in the NEUTRAL position.
- The tractor will not operate with the charger cord plugged into the charging port and/or the charging port cover open or removed.
- The tractor will automatically shut off the blade(s) and drive motors if the operator leaves the seat.
Note: To restart the tractor, follow the proper starting procedures as instructed in Starting the Tractor section on this page.

WARNING
Do not operate the tractor if the safety interlock system is malfunctioning. This system was designed for your safety and protection.
Engaging the Parking Brake
- Fully depress the brake pedal and hold it down with your foot.
- Move the parking brake lever back into the parking brake position.
- Release the brake pedal to allow the parking brake to engage.
Releasing the Parking Brake
- Depress the brake pedal.
- Move the parking brake lever forward out of the parking brake position.
- Release the brake pedal.
Setting the Cutting Height
Select the height position of the cutting deck by placing the deck lift lever in any of the five (5) different cutting height notches on the right side of the fender.

WARNING
Keep hands and feet away from the discharge opening of the cutting deck.
Refer to Leveling the Deck in the Service & Maintenance section of this manual for more detailed instructions regarding deck adjustment.
Starting the Tractor
- Unplug the charging cord (if necessary). If the cord is still plugged in, a reminder will display on the VCM when the key switch is turned on.
UNPLUG CORD
- Sit in the operator's seat. Insert the key into the key switch
Note: A reminder will display on the VCM if the operator is not in the seat when the key switch is turned on.
SIT IN SEAT
- Fully depress the brake pedal or set the parking brake.
Note: If the brake is not engaged a reminder will display on the VCM when the key switch is turned on.
PRESS BRAKE
-
Turn the key clockwise to the ON (I) position.
-
Press the start/stop button down until you hear two beeps.
Note: The VCM and drive motors are now activated and the tractor is ready to be operated.
Stopping the Tractor

WARNING
If you strike a foreign object, stop the tractor, turn the key to OFF and remove. Thoroughly inspect the machine for any damage. Repair the damage before restarting and operating.
- If the blade is engaged (blades ON), press the PTO button to disengage the blades (blades OFF) and engage the parking brake.
- Press the start/stop button (you will hear one beep) or turn the key counterclockwise to the OFF (0) position.
- Remove the key to prevent unauthorized use by children or others.
Driving the Tractor

WARNING
- Avoid sudden starts, excessive speed and sudden stops.
- Do not leave the seat of the tractor without first pressing the PTO button to turn off the blade(s), and engaging the parking brake. If leaving the tractor unattended, turn the key to the OFF position and remove.
-
Always look down and behind before and while backing up to avoid a back-over accident.
-
Disengage the parking brake
OPERATION
- To travel FORWARD, slowly depress the forward drive pedal until the desired speed is reached.
- To travel in REVERSE, slowly depress the reverse drive pedal until the desired speed is reached.
- The tractor is brought to a stop by releasing the forward or reverse drive pedal and depressing the brake pedal.

WARNING
Before leaving the operator's position for any reason, disengage the blade(s), engage the parking brake, turn the key switch to OFF position and remove the key.
Reverse Caution Mode (RCM)
The REVERSE CAUTION MODE button allows the tractor to be operated in reverse with the blade(s) (PTO) engaged.
Note: Mowing in reverse is not recommended.

WARNING
Use extreme caution while operating the tractor in the REVERSE CAUTION MODE. Always look down and behind before and while backing. Do not operate the tractor when children or others are around. Stop the tractor immediately if someone enters the area.
To use the REVERSE CAUTION MODE:
Note: The operator MUST be seated in the seat.
- Start the tractor as previously instructed.
- Press and hold the RCM button down for three seconds until the red indicator light illuminates. The red indicator will remain on as long as the REVERSE CAUTION MODE is on.
- Once activated (indicator light ON), the tractor can be driven in reverse with the cutting blade(s) (PTO) engaged.
- Always look down and behind before and while backing to make sure no children or others are around. After resuming forward motion, press the RCM button to return to normal mowing operation.
The REVERSE CAUTION MODE will remain activate until:
a. The RCM button is pressed again to turn off the mode (red indicator light turns off).
b. The operator leaves the seat.
c. The START/STOP button is pressed.
Operating the PTO
To operate the PTO (Blades ON/OFF) proceed as follows:
Press the PTO button for one second. When activated the green indicator light under the PTO button is ON (Blades ON). Press the PTO button again for one second, green indicator light is OFF (Blades OFF).
Mulching (If equipped)
Mulching is a process of recirculating grass clippings repeatedly beneath the cutting deck. The ultra-fine clippings are then forced back into the lawn where they act as a natural fertilizer. Refer to the Assembly section of this manual for instructions on how to install the mulch kit (if equipped).
Mowing

WARNING
- To help avoid blade contact or a thrown object injury, keep bystanders, helpers, children and pets at least 75 feet (23 meters) from the tractor while it is in operation. Stop tractor if anyone enters the area.
- Plan your mowing pattern to avoid discharge of materials toward roads, sidewalks, bystanders and the like. Also, avoid discharging material against a wall or obstruction which may cause discharged material to ricochet back toward the operator.
The following information will be helpful when using the cutting deck with your tractor:
- Do not mow or drive at high ground speed, especially if a mulch kit or grass collector is installed.
- For best results it is recommended that the first two laps be cut clockwise with the discharge facing towards the center of your lawn. After the first two laps, reverse the direction to discharge to the outside for the balance of cutting. This will give a better appearance to the lawn.
- Do not cut the grass too short. Short grass invites weed growth and yellows quickly in dry weather.
- Under heavier conditions it may be necessary to go back over the cut area a second time to get a clean cut.
- Do NOT attempt to mow heavy brush and weeds and grass taller than 10" (25.4 cm). Your tractor is designed to mow lawns, NOT clear brush.
Routine Service Reminders
During operation, a pair of service reminders will appear at regular intervals to help you properly maintain your tractor:
| SHARPEN BLADES | Sharpen Blade Reminder: Occurs every 10 hours of PTO run time. When this message is displayed, the blade should be checked and sharpened or replaced if worn. For instructions, see Sharpening or Replacing the blades in the Service and Maintenance section of this manual. |
| CHECK TIRE PRESSURE | Check Tire Pressure Reminder: Occurs every 5 hours. When this message is displayed check and adjust the tire pressure per the proper tire pressure listed on the tire sidewall. See Checking Tire Pressure in the Assembly section of this manual. |
SERVICE AND MAINTENANCE

WARNING
Before inspecting, cleaning or servicing the tractor, power off the tractor and remove the key.
Follow the maintenance schedule given below. This chart describes service guidelines only. Use the Service Log column to keep track of completed maintenance tasks. Contact an authorized service dealer to schedule a service.
| Prior to Use | After First Five Hours | Every Five Hours | Every 10 Hours | Every 25 Hours | Every 50 Hours | Every 100 Hours | Prior to Storing | |
| Clean Top and Underside of Deck | √ | √ | ||||||
| Check/Clean Around fuses, Wiring and Wiring Harnesses | √ | √ | ||||||
| Check/Clean Around Transmission and Axle | √ | √ | ||||||
| Clean Tractor | √ | |||||||
| Lube Front Axles and Rims | √ | √ | ||||||
| Lube Pedal Pivot Points, Parking Brake and Lift Linkage | √ | √ | ||||||
| Check Tire Pressure/Inflate to Sidewall Specification | √ | √ | ||||||
| Check Deck Level/Pitch/Adjust as needed | √ | √ | ||||||
| Check Blade(s)/Sharpen or Replace as Needed | √ | √ √ | ||||||
| Charge Battery | √ | √ | ||||||
| Check Safety Interlock System | √ | |||||||
| Check Mower Blade Stop Time | √ | |||||||
| Check Blade Mount Bolt Torque (Tighten to 450-600 in-lbs(51.9–67.8 N-m)) | √ | √ √ | ||||||
| Check That All Hardware is in Place and Secure | √ | √ |
IMPORTANT: Bring the battery charger when arriving at your authorized service dealer for any scheduled service.

DANGER
- The electrical components on this tractor are not serviceable. Please contact an authorized service dealer for any service needs.
- Have your tractor serviced by qualified service personnel using only identical replacement parts. This will ensure that the safety of the tractor is maintained.
Post-Operation Tractor Care
After each operation of the tractor, the following procedures should be implemented to extend the life of your tractor and ensure safe operating conditions.

DANGER
Failure to follow these recommendations may result in serious injury to yourself or others and may cause damage to the tractor.
Cleaning the Underside of the Deck

WARNING
To prevent serious injury, do not use water to clean the tractor, battery or battery charger. Do not use strong detergents. Household cleaners that contain aromatic oils such as pine and lemon, and solvents such as kerosene, can damage plastic.
The underside of tractor deck should be cleaned after each use as grass clippings, leaves, dirt and other debris will accumulate. This accumulation of grass clippings, etc., is undesirable as it will promote rust and corrosion.
- Remove any buildup of grass and leaves on or around the deck motor and underside of the tractor (DO NOT USE WATER). Wipe the tractor clean with a dry cloth.
Important: Do not use a pressure washer or garden hose to clean your tractor. These may cause damage to electric components or the electric motor. The use of water will result in shortened life and reduce serviceability.
SERVICE AND MAINTENANCE
Cleaning the Tractor
WARNING
If the tractor has been recently run, metal surfaces will be hot and can cause burns to the skin. Let the tractor cool for at least five minutes. Exercise caution to avoid burns.
Your tractor should be cleaned after each use and under certain conditions, i.e. dry conditions and/or mulching situations, additional cleaning may be necessary.
One of the best ways to keep your tractor running efficiently and to reduce fire risk is to regularly remove debris buildup from the tractor. Follow the recommendations below and contact your authorized dealer with any questions.
- Allow the machine to cool in an open area before cleaning.
- Do not use water on any part of the tractor. Doing so can cause damage to the tractor's electrical components and motor. The use of compressed air and/or leaf blower or a brush, damp sponge or rag will help keep the tractor clean.
- Clean around fuses and wiring harnesses.
- Clean the top of the tractor deck. See Figure 13.
- Clean around and near the transmission and axle. See Figure 14.
- Debris can accumulate anywhere on the tractor, especially on horizontal surfaces. Additional cleaning may be necessary when mowing in dry conditions or when mulching.
- Excess lubrication can become collection sites for debris. Immediate repair and cleaning up excess lubrication can help reduce fire hazards.
- In addition to cleaning the tractor before operating and storing, do not attempt to mow unusually tall grass (10" or higher), dry grass (e.g., pasture) or piles of dry leaves. Dry grass or leaves may build up on the tractor deck presenting a potential fire hazard.
Lubrication
DANGER
Bearing failures and overheating can result in fire. Always follow the instructions in this manual regarding lubrication locations and intervals. Contact your authorized dealer with any questions about the lubrication locations and intervals or any unusual noises coming from any areas a bearing may be located.
WARNING
Before lubricating, repairing, or inspecting, always disengage the PTO, set the parking brake, turn key to OFF position and remove to prevent unintended starting.
Front Axles:
Each end of the tractor's front pivot bar may be equipped with a grease fitting. Lubricate with No. 2 multi-purpose grease applied with a grease gun after every 25 hours of operation.
Rear Wheels:
The rear wheels should be removed from the axles once a season. Lubricate the axles and the rims well with an all-purpose grease before re-installing them.
Pivot Points & Linkage:
Lubricate all the pivot points on the drive system, parking brake and lift linkage at least once a season with light oil.
Note: It is not necessary to grease the steering pinion/sector gear interface. Doing so will allow dirt to accumulate and can affect steering performance.
Adjustments
WARNING
Before making adjustments, always disengage the PTO, set the parking brake, turn key to OFF position and remove to prevent unintended starting. Protect your hands by using heavy gloves when handling the blades.
Note: Check the tractor's tire pressure before performing any deck leveling adjustments. Refer to Checking Tire Pressure in the Assembly section for information regarding tire pressure.
Adjusting the Deck
Leveling the Deck (Front-To-Rear)
It is possible to adjust the pitch of the cutting deck. The front of the deck should be between 0" (level) and 1/4" (6.4 mm) lower than the rear of the deck. Adjust if necessary as follows:
- With the tractor parked on a firm, level surface, place the deck lift lever in the middle position and rotate the blade so that it is aligned with the front and rear of the tractor.
-
Measure the distance from the front of the blade tip to the ground and the rear of the blade tip to the ground. The end of the blade facing the front of the deck should be between 0" (level) and 1/4" (6.4 mm) less than the end of the blade facing the back of the deck. Determine the approximate distance necessary for proper adjustment and proceed, if necessary, to the next step.
-
Locate the flange lock nut (a) on the front end of the PTO lift rod (b). See Figure 15.
a. Tighten the flange lock nut (a) to raise the front of the deck.
b. Loosen the flange lock nut (a) to lower the front of the deck.
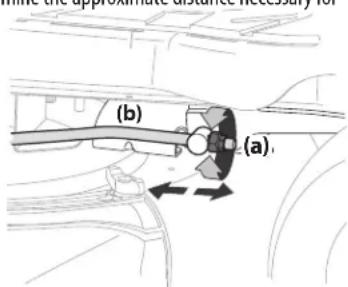
Figure 15
Parking Brake Adjustment
If the tractor does not come to a complete stop when the brake pedal is completely depressed, or if the tractor's rear wheels can roll with the parking brake applied, the brake is in need of adjustment. See your authorized service dealer to have the brake adjusted.
Neutral Adjustment
If the tractor creeps forward or rearward when neither the forward nor reverse pedal is depressed, contact your local authorized dealer to have the neutral setting properly adjusted.
Seat Adjustment
Refer to the Assembly section of this manual for seat adjustment instructions.
SERVICE AND MAINTENANCE
Service
Deck Removal
To remove the cutting deck, proceed as follows:
- Power off the tractor, remove the key from the key switch, and engage the parking brake.
- Lower the deck by moving the deck lift lever into the lowest (#1) position on the right fender.
- Remove the bow-tie cotter pin (a) and flat washer (b) from the deck lift assembly, and retain for reinstallation later. See Figure 16.
- Disconnect the deck motor(s) from the adapters on the underside of the tractor. Rotate the collar on the larger connector (a) counterclockwise and carefully pull apart. Repeat the procedure with the smaller connector (b).
Note: Your mower may have one of two different deck motor connector setups. If your mower has horizontally positioned connectors, see Figure 17. If your mower has vertically positioned connectors, see Figure 18.
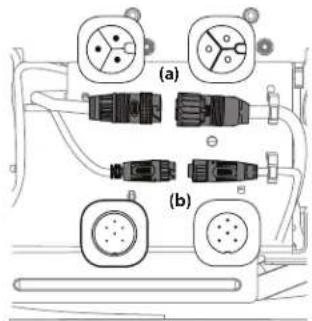
Figure 17
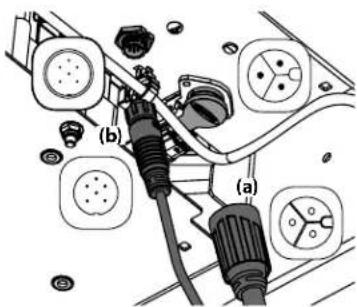
Figure 18
Note: Always disconnect the larger connector first.
- Remove the remaining bow-tie cotter pins (a) securing the deck to the tractor, as shown in Figure 19.
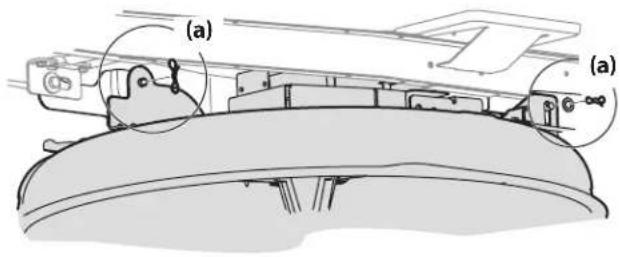
Figure 19
- Unplug the wire connector (a) from the safety switch (b) at the rear of the chute opening. See Figure 20.
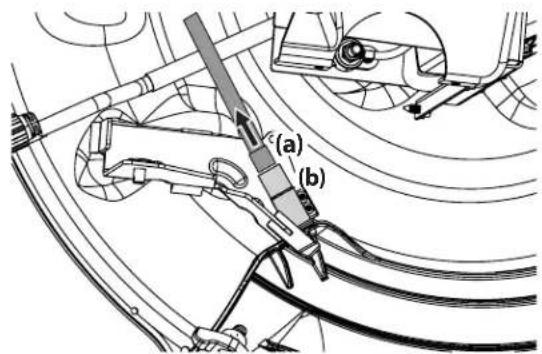
Figure 20
- Move the deck lift lever into the highest (#5) position on the right fender to raise the deck lift arms up and out of the way.
- Gently slide the cutting deck (from the left side) out from underneath the tractor.
Cutting Deck Installation
- Raise the deck lift lever into the highest (#5) position on the right fender to move the deck lift arms out of the way.
- Gently slide the cutting deck (from the left side) back under the tractor.
- Plug the wire connector (a) into the safety switch (b) at the rear of the chute opening. See Figure 20.
Note: Be sure to securely reconnect the wire connector to the safety switch in Figure 20, you tractor will not start or operate without the safety switch properly connected.
- Lower the deck lift lever to the lowest (#1) position.
- Secure the deck to the deck lift arms using two bow-tie cotter pins. See Figure 19.
Note: The bow-tie cotter pins (a) should be installed from the top down.
- Reconnect the deck motors on the underside of the tractor. Always connect the larger connector first and then the smaller connector. See Figure 17.
Note: When reconnecting the deck motors, you must be sure that the connections are secure.
Blade
WARNING
- Power off the tractor and remove the key before removing the cutting blade(s) for sharpening or replacement. Protect your hands by using heavy gloves when grasping the blade.
- Periodically inspect the blade and/or deck motor casting for cracks or damage, especially after you've struck a foreign object. Do not operate the tractor until damaged components are replaced.
CAUTION
If the cutting edge of the blade has previously been sharpened, or if any metal separation is present, replace the blade with a new one.
SERVICE AND MAINTENANCE
Sharpening or Replacing the Blade
Note: It may be easier to change the blade by first removing the deck from beneath the tractor, (refer to Cutting Deck Removal earlier in this section) then gently flip the deck over to expose its underside. It is possible to change the blade, however, with the deck still attached to the tractor. If attempting to change the blade with the deck still installed on the tractor, first move the deck lift lever to its highest (#5) position.
-
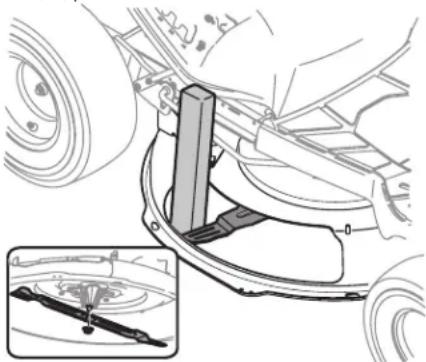
Remove the mulch plug, deck chute or bagging chute, if equipped, exposing the deck chute opening.
-
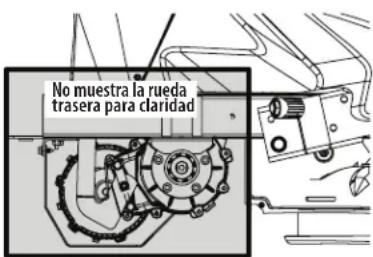
Using a block of wood or 2 x 4, insert it into the deck opening and rotate the blade around until it wedges the wood between the deck opening and the cutting blade, as shown in Figure 21.
-
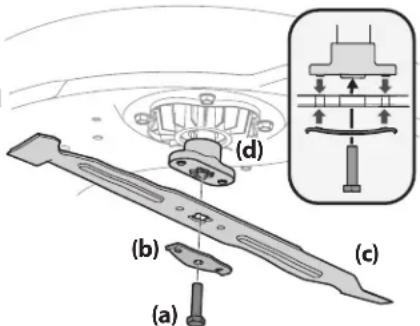
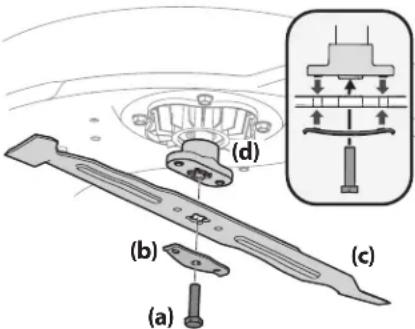
Remove the hex screw (a) and the blade bell support (b) which holds the blade (c) and the blade adapter (d) to the deck motor. See Figure 22.
-
Remove blade (c) and adapter (d) from the deck motor spindle See Figure 22.
-
To properly sharpen the cutting blade, remove equal amounts of metal from both ends of the blade along the cutting edges, parallel to the trailing edge, at a 25^ - to 30^ angle. Always grind each cutting blade edge equally to maintain proper blade balance. See Figure 23.
-
Test the blade's balance using a blade balancer. Grind metal from the heavy side until it balances evenly.
natural_image
Mechanical assembly diagram showing a bracket and wheel assembly with an inset close-up of a component detail (no text or symbols)Figure 21
natural_image
Diagram showing two shoe foot profiles with a magnified inset highlighting the interior detail (no text or symbols)Figure 23
WARNING
A poorly balanced blade will cause excessive vibration, may damage the tractor and/or result in personal injury.
Note: When replacing the blade, be sure to install the blade with the side of the blade marked "Bottom" (or with a part number stamped in it) facing the ground when the tractor is in the operating position.
- Reinstall blade when properly sharpened. Torque to 450-600 in-lbs (50.9-67.8 N-m).
Off-Season Storage
Storing the Tractor
- Allow the machine to cool in an open area before storing.
- Do not park the tractor near any flammable materials (wood, cloth or chemicals) or any open flames or other potential source of ignition (furnace, water heater or any other type of heater).
- Remove all combustible materials from the tractor before storing. Empty cargo boxes, grass catchers or containers.
Removing The Tractor From Storage
- Fully charge the battery and inflate the tires to the recommended pressures.
- Drive the tractor without a load to make certain all the tractor systems are functioning properly.
Battery Storage
- The battery should be stored with a full charge. A discharged battery can freeze faster than a charged battery in cold temperatures.
- The battery charger should remain connected to the charging port on the tractor when not in use.
- If keeping the charger connected during off-season storage is not possible, the battery should be fully charged once every month.
Note: It will take approximately 4 hours to fully charge the battery. Leaving the battery connected to the charger for more than 4 hours will not damage the battery.
- Battery should not be kept in a discharged state. Permanent damage to the battery can occur.
- Fully recharge the battery before returning to service.
Battery Disposal
Disposing of Damaged or Worn-Out Battery
WARNING
- The following toxic and corrosive material is used in this battery: LITHIUM-ION, a toxic material.
- Do not use broken or cracked batteries, even if there is no leakage. Replace damaged or worn-out batteries with new batteries. DO NOT ATTEMPT TO REPAIR BATTERIES! Repair attempts may result in severe personal injury, due to explosion or electrical shock.
To avoid personal injury and damage to the environment:
- Do not attempt to remove or destroy any of the battery components. Do not open or mutilate the battery. If a leak develops, released electrolytes are corrosive and toxic. Do not get the solution in your eyes or on your skin, and do not swallow it.
- Do not dispose of the battery in the regular household trash.
- Do not dispose of the battery in a fire. The cell may explode.
- Do not dispose of the battery where it will become part of any waste landfill or municipal solid waste stream.
- Contact your local authorized service dealer for proper battery recycling.
SERVICE AND MAINTENANCE
Troubleshooting
| Problem Cause Remedy | ||
| Excessive Vibration | 1. Blade loose or unbalanced2. Cutting blade damaged, unbalanced or bent. | 1. Tighten cutting blade and deck spindle2. Replace the blade |
| Uneven Cut 1. Deck not properly leveled | 2. Cutting blade dull or damaged3. Uneven tire pressure | 1. Perform front-to-rear deck adjustment2. Sharpen or replace cutting blade3. Check and correct tire pressure in all four tires |
| Tractor will not mulch grass 1. Wet grass | 2. Excessively high grass3. Dull blade | 1. Do not mulch when grass is wet2. Mow once at a high cutting height, then mow again at desired height or make a narrower cutting swath3. Sharpen or replace blade |
| Tractor stopped or will not start | 1. Electrical system fault | 1. Shut off and restart tractor. If problem persists, contact an authorized service dealer |
| The blades do not rotate /blades stopped 1. | Overload2. Low battery | 1. Allow deck motor(s) to cool/raise deck height2. Return home, plug into charger |
| The blade(s) stopped when traveling in reverse | 1. Blade(s) stopped | 1. Restart blade(s) (PTO). Make sure Reverse Caution Mode is activated. |
| Reduced Speed 1. Low battery | 2. Overload | 1. Charge battery as instructed in the battery charger manual2. Raise deck |
LCD Screen Messages
| Message Description | |
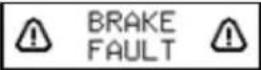 | Brake Switch Fault: The deck and drive shut off. Power off and restart tractor. If problem persists contact qualified service personnel. |
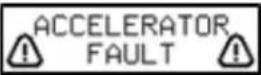 | Accelerator Pedal Sensor Fault: The deck and drive shut off. Power off and restart tractor. If problem persists contact qualified service personnel. |
 | Seat Switch Fault: The deck and drive shut off. Power off tractor, sit in seat and restart tractor. If problem persists contact qualified service personnel. |
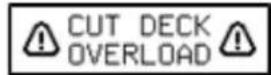 | Cutting Deck Overload: The deck and drive shut off. Power off the tractor, clean under the deck as instructed in the Post-Operation Tractor Care section and restart the tractor. Raise the deck and/or cut at a slower pace. If problem persists contact qualified service personnel. |
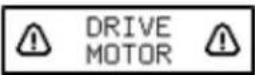 | Drive Motor Over Current Fault: The deck and drive shut off. Power off, let the tractor cool and restart tractor. If problem persists contact qualified service personnel. |
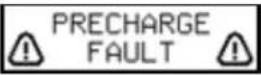 | Drive Motor Control Fault: The deck and drive shut off. Power off and restart tractor. If problem persists contact qualified service personnel. |
| Message Description | |
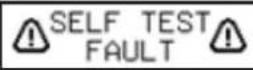 | Self Test Fault: The deck and drive shut off. Power off and restart tractor. If problem persists contact qualified service personnel. |
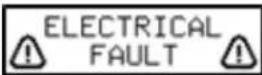 | Electrical Faults: The deck and drive shut off. Power off and restart tractor. If problem persists contact qualified service personnel. |
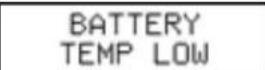 | Battery Temperature Low: Move the tractor to a warm location and allow the battery to warm. If problem persists contact qualified service personnel. |
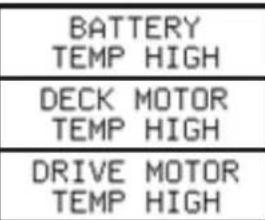 | High Temperature Faults: Power off, let the tractor cool and restart tractor. If problem persists contact qualified service personnel. |
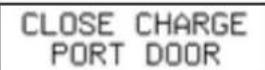 | Charge Port Door is Open: The tractor will come to a stop and shut off. Close the charge port door and restart tractor. If problem persists contact qualified service personnel. |
 | Low Battery Warning: The battery is low and should be charged as soon as possible. |
MANUAL DEL OPERADOR
natural_image
Row of identical empty rectangular boxes with no text or symbolsÍndice
natural_image
Diagram of a mechanical device with a cylindrical component and a base component, labeled (b), showing no text or symbols.(a)
(b)
Figura 1
Figura 4
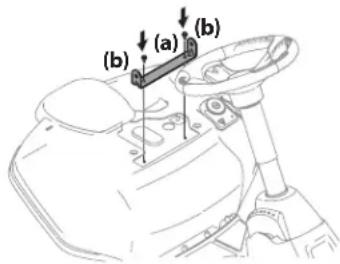
Figura 6
¡PRECAUCIÓN!
Figura 10
Figura 11
MONTAJE
Figura 12

PRECAUCIÓN
natural_image
Simple line drawing of a camera with lens and screen (no text or symbols)natural_image
Technical line drawing of a mechanical assembly with no visible text or symbolsFigura 13
natural_image
Mechanical assembly diagram showing a lever mechanism and a close-up of a tool inside a vehicle (no text or symbols visible)Figura 21
natural_image
Diagram showing two shoe foot profiles with a magnified inset highlighting the interior detail (no text or symbols)Figura 23

ADVERTENCIA
- Battery-Powered Lithium-Ion Tractor
- Record Product Information
- MODEL NUMBER
- SERIAL NUMBER
- Table of Contents
- WARNING
- SAFE OPERATION PRACTICES
- DANGER
- Lithium-Ion Battery System
- General Information
- Preparation Before Operating
- Operating
- Children
- Slope Operation
- Hauling
- Towing with your tractor
- Service
- General Electric Safety
- Battery Charger Safety
- Battery Safety
- SAFETY SYMBOLS
- SLOPE GAUGE
- ASSEMBLY
- Preparation
- Contents of Crate
- Recommended Tools for Assembly
- Manually Moving the Tractor
- CAUTION
- Installing the Steering Wheel Assembly
- Installing Operator's Seat
- Installing the Deck Chute
- Installing the Mulch Plug (If equipped)
- Installing the Bumper (If equipped)
- Checking Tire Pressure
- Charging the Battery
- Battery Charging Tips
- OPERATION
- Start/Stop Button
- PTO (Blades ON/OFF) Button
- Reverse Caution Mode (RCM) Button
- Headlight Button
- Cruise Control Button
- Key Switch (B)
- Forward Drive Pedal (C)
- Reverse Drive Pedal (D)
- Brake Pedal (E)
- Park Brake Lever (F)
- Deck Lift Lever (G)
- Headlight (H)
- Charging Port (I)
- USB Charging Ports (J) (If Equipped)
- Cup Holder (K)
- Safety Interlock System
- Engaging the Parking Brake
- Releasing the Parking Brake
- Setting the Cutting Height
- Starting the Tractor
- Stopping the Tractor
- Driving the Tractor
- Reverse Caution Mode (RCM)
- Operating the PTO
- Mulching (If equipped)
- Mowing
- Routine Service Reminders
- SERVICE AND MAINTENANCE
- Post-Operation Tractor Care
- Cleaning the Underside of the Deck
- Cleaning the Tractor
- Lubrication
- Front Axles:
- Rear Wheels:
- Pivot Points & Linkage:
- Adjustments
- Adjusting the Deck
- Leveling the Deck (Front-To-Rear)
- Parking Brake Adjustment
- Neutral Adjustment
- Seat Adjustment
- Deck Removal
- Cutting Deck Installation
- Blade
- Sharpening or Replacing the Blade
- A poorly balanced blade will cause excessive vibration, may damage the tractor and/or result in personal injury.
- Off-Season Storage
- Storing the Tractor
- Removing The Tractor From Storage
- Battery Storage
- Battery Disposal
- Disposing of Damaged or Worn-Out Battery
- MANUAL DEL OPERADOR
- Índice
- ¡PRECAUCIÓN!
- MONTAJE
- PRECAUCIÓN
- ADVERTENCIA
Brand : Craftsman
Model : CMXGRAM1130049
Category : Lawn mower