83523 - Microwaves KENMORE - Free user manual and instructions
Find the device manual for free 83523 KENMORE in PDF.


| Product Type | Over-the-Range Microwave Hood Combination |
| Brand | Kenmore |
| Model | 83523 |
| Capacity | 1.6 cu. ft. |
| Power Output | 1000 Watts |
| Power Levels | 10 Levels (including High, Medium, Low, Warm) |
| Control Type | Touch Control Panel with Digital Display |
| Display | Digital Clock and Cooking Information |
| Cooking Functions | Time Cook, Auto Cook, Auto Defrost, Two-Stage Cooking, Clock Delay Start, Timer Delay Start |
| One-Touch Cooking | Popcorn, Beverage, Potato, Melt Butter, Frozen Vegetable, Dinner Plate |
| Defrost | Auto Defrost (by weight) and Defrost by Time (Power Level 3) |
| Warm Function | Keeps food warm up to 30 minutes |
| Vent Fan | 2-speed (High/Low/Off) with Auto Fan Protection |
| Cooktop Light | On/Off, 30W bulb |
| Turntable | Glass tray with roller guide |
| Grease Filters | Reusable metal filters, washable |
| Control Lockout | Yes, to prevent accidental use |
| Mute Function | Yes, to silence beeps |
| Display On/Off | Yes, can turn off display |
| Installation | Over electric or gas ranges up to 30 inches wide |
| Electrical Requirements | 120V, 15A, grounded outlet |
| Dimensions (Approx.) | 30" W x 17" D x 17" H |
| Weight (Approx.) | 60 lbs |
| Color | Stainless steel or white (verify model) |
| Warranty | 1 year limited, 90 days for commercial use |
Frequently Asked Questions - 83523 KENMORE
User questions about 83523 KENMORE
0 question about this device. Answer the ones you know or ask your own.
Ask a new question about this device
Download the instructions for your Microwaves in PDF format for free! Find your manual 83523 - KENMORE and take your electronic device back in hand. On this page are published all the documents necessary for the use of your device. 83523 by KENMORE.
USER MANUAL 83523 KENMORE
Microwave Hood Combination
1.6 Cu. Ft., 1000 Watts
Transform SR Holding Management LLC,
Hoffman Estates, IL 60179 U.S.A.
www.kenmore.com
www.sears.com

Customer Assistance
For the most prompt assistance to order available replacement parts for this appliance, call 1-800-488-1222.
KENMORE LIMITED WARRANTY
FOR ONE YEAR from the date of sale this appliance is warranted against defects in material or workmanship when it is correctly installed, operated and maintained according to all supplied instructions.
WITH PROOF OF SALE a defective appliance will receive free repair. If the appliance cannot be repaired it will be replaced free of charge.
For warranty coverage details to obtain free repair or replacement, visit the web page: www.kenmore.com/warranty
This warranty applies for only 90 DAYS from the date of sale if this appliance is ever used for other than private household purposes.
This warranty covers ONLY defects in material and workmanship, and will NOT pay for:
- Expendable items that can wear out from normal use, including but not limited to filters, belts, bags or screw-in base light bulbs.
- A service technician to clean or maintain this appliance, or to instruct the user in correct appliance installation, operation and maintenance.
- Service calls to correct appliance installation not performed by Sears authorized service agents, or to repair problems with house fuses, circuit breakers, house wiring, and plumbing or gas supply systems resulting from such installation.
- Damage to or failure of this appliance resulting from installation not performed by Sears authorized service agents, including installation that was not in accord with electrical, gas or plumbing codes.
- Damage to or failure of this appliance, including discoloration or surface rust, if it is not correctly operated and maintained according to all supplied instructions.
- Damage to or failure of this appliance, including discoloration or surface rust, resulting from accident, alteration, abuse, misuse or use for other than its intended purpose.
- Damage to or failure of this appliance, including discoloration or surface rust, caused by the use of detergents, cleaners, chemicals or utensils other than those recommended in all instructions supplied with the product.
- Damage to or failure of parts or systems resulting from unauthorized modifications made to this appliance.
- Service to an appliance if the model and serial plate is missing, altered, or cannot easily be determined to have the appropriate certification logo.
Disclaimer of implied warranties; limitation of remedies
Customer's sole and exclusive remedy under this limited warranty shall be product repair or replacement as provided herein. Implied warranties, including warranties of merchantability or fitness for a particular purpose, are limited to one year or the shortest period allowed by law. Seller shall not be liable for incidental or consequential damages. Some states do not allow the exclusion or limitation of incidental or consequential damages, or limitation on the duration of implied warranties of merchantability or fitness, so these exclusions or limitations may not apply to you.
This warranty applies only while this appliance is used in the United States.
This warranty gives you specific legal rights, and you may also have other rights which vary from state to state.
Transform SR Brands Management LLC, Hoffman Estates, IL 60179
Introduction
Congratulations on your purchase of an over-the-range microwave oven. For best results, we suggest reading this guide carefully. You will find instructions on the proper operation and maintenance of your microwave.
Table of Contents
Introduction 1
Precautions to Avoid Possible Exposure to Excessive Microwave Energy 1
Important Safety Instructions 2\~4
Installation Recommendations / Automatic Fan Protection Feature 5
Microwaving Tips 6
Safe and Unsafe Materials 7
Touch Control Panel 8\~9
Oven Features at a Glance 10
Basic Operation 11\~15
Special Features 16\~22
Care and Cleaning 23\~25
Common Questions and Answers 26
Before You Call 27\~28
PRECAUTIONS TO AVOID POSSIBLE EXPOSURE TO EXCESSIVE MICROWAVE ENERGY
A. Do not attempt to operate this oven with the door open since open-door operation can result in harmful exposure to microwave energy. It is important not to defeat or tamper with the safety interlocks.
B. Do not place any object between the oven front face and the door or allow soil or cleaner residue to accumulate on sealing surfaces.
C. Do not operate the oven if it is damaged. It is particularly important that the oven door close properly and that there is no damage to the: (1) door (bent), (2) hinges and latches (broken or loosened), (3) door seals and sealing surfaces.
D. The oven should not be adjusted or repaired by anyone except properly qualified service personnel.
Important Safety Instructions
When using electrical appliances, basic safety precautions should be followed, including the following:
WARNING - To reduce the risk of burns, electric shock, fire, injury to persons or exposure to excessive microwave energy:
- Read all instructions before using the appliance.
- Read and follow the specific "PRECAUTIONS TO AVOID POSSIBLE EXPOSURE TO EXCESSIVE MICROWAVE ENERGY" found on page 1.
- This appliance must be grounded. Connect only to properly grounded outlet. See "GROUNDING INSTRUCTIONS" on page 5.
- Install or locate this appliance in accordance with the provided installation instructions. Do not mount over a sink
-
This microwave oven is UL listed for installation over electric and gas ranges.
This over-the-range oven was designed for use over ranges no wider than 30 inches. -
For best operation, plug this appliance into its own electrical outlet, to prevent flickering of lights, blowing of fuse or tripping of circuit breaker.
-
Some products such as whole eggs and sealed containers - for example, closed jars - are able to explode and should not be heated in this oven. In rare instances, poached eggs have been known to explode. Cover poached eggs and allow standing time of one minute before cutting into them.
-
Foods with unbroken outer "skin" such as potatoes, sausages, tomatoes, apples, chicken livers and other giblets, and egg yolks (see previous caution) should be pierced to allow steam to escape during cooking. "Boilable" cooking pouches and tightly closed plastic bags should be slit, pierced or vented.
-
Do not heat, store or use flammable materials in or near the oven. Fumes can create a fire hazard or explosion.
-
Use this appliance only for its intended use as described in this manual. Do not use corrosive chemicals or vapors in this appliance. This type of oven is specifically designed to heat, cook or defrost food. It is not designed for industrial, laboratory or commercial use. it is intended for home use only.
-
As with any appliance, close supervision is necessary when used by children.
-
Do not operate this appliance if it has a damaged cord or plug, if it is not working properly or if it has been damaged or dropped.
-
This appliance should be serviced only by qualified service personnel. Contact nearest authorized service facility for examination, repair or adjustment.
-
Do not cover or block any openings on the appliance.
-
Do not use or store this appliance outdoors. Do not use this product near water - for example, near a kitchen sink, in a wet basement or near a swimming pool, or similar locations.
-
Do not immerse cord or plug in water.
-
Keep cord away from heated surfaces.
-
Do not let cord hang over edge of table or counter.
-
When cleaning surfaces of door and oven that come together on closing the door, use only mild, non-abrasive soaps or detergents applied with a sponge or soft cloth.
-
To reduce the risk of fire in the oven cavity: a. Do not overcook food. Carefully attend appliance when paper, plastic or other combustible materials are placed inside the oven to facilitate cooking. Avoid using
recycled paper products. Do not use newspaper or other printed paper in the oven. Such products sometimes contain impurities which could ignite.
b. Remove wire twist-ties from paper or plastic bags before placing them in oven.
c. If materials inside the oven ignite, keep oven door closed, turn oven off and disconnect the power cord or shut off power at the fuse or circuit breaker panel.
d. Do not use the oven for storage. Do not leave paper products, cooking utensils or food in the oven when not in use.
e. Do not pop popcorn except in a microwave approved popcorn popper or in a commercial package recommended especially for microwave ovens.
f. Do not overcook potatoes. They may dehydrate and catch fire.
g. Do not use for drying clothes, linens, newspaper or similar non-food type items.
- Do not operate the oven when empty or with an empty utensil to avoid damage to the oven and danger of fire.
- Do not lean on the oven door. The door is designed to close tightly and seal properly for safe operation. Leaning on the door may warp or break the hinges.
- To avoid exposure to dangerous high voltage, DO NOT REMOVE THE SPLATTER SHIELD inside the oven cavity.
- Liquids, such as water, coffee, or tea are able to be overheated beyond the boiling point without appearing to be boiling due to surface tension of the liquid. Visible bubbling or boiling when the container is removed from the microwave oven is not always present. THIS COULD RESULT IN VERY HOT LIQUIDS SUDDENLY BOILING OVER WHEN A SPOON OR OTHER UTENSIL IS INSERTED INTO THE LIQUID. To reduce the risk of injury to persons:
1 Do not overheat the liquid.
2 Stir the liquid both before and halfway through heating it
3 Do not use straight-sided containers with narrow necks.
4 After heating, allow the container to stand in the microwave oven for a short time before removing the container.
5 Use extreme care when inserting a spoon or other utensil into the container.
-
Read and follow specific microwave oven preparation instructions on food packages or containers (especially baby food). Above all, this is a cooking appliance designed to prepare food.
-
Use only cooking utensils and accessories made for use in the microwave and specifically described in this manual.
- Microwave oven manufacturers do not recommend deep fat frying or frying in a microwave oven. Hot oil can damage oven parts and utensils and even result in skin burns.
- Plastic wrap: Use only those types designed for microwave oven use and avoid forming an air-tight seal. Fold back a small corner or cut a small slit to allow steam to escape.
- Stay near the appliance while it is in use and check cooking progress frequently. Leaving the appliance unattended may reslut in overcooked food and possibly a fire in your oven.
- Foods cooked in liquids (such as pasta) may tend to boil over more rapidly than foods containing less moisture. Should this occur, refer to the Care and Cleaning section for instructions on how to clean the inside of the oven.
- Do not use a thermometer in food you are microwaving unless the thermometer is designed or recommended for use in the microwave oven.
- Plastic cookware designed for microwave cooking is very useful, but should be used carefully. Even microwave-safe plastic may not be as tolerant of overcooking conditions as are glass or ceramic materials and may soften or char if subjected to short periods of overcooking. In longer exposures to overcooking, the food and cookware could ignite.
For these reasons: 1) Use microwave-safe plastics only and use them in strict compliance with the cookware manufacturer's recommendations. 2) Do not subject empty cookware to microwaving. 3) Do not permit children to use plastic cookware without complete supervision.
- Do not store anythig directly on top of the microwave oven surface when the oven is in operation.
- TV dinners may be microwaved in foil trays less than 3/4" deep; remove top foil cover and return tray to box. When using metal in microwave oven, keep metal at least 1 inch away from the sides of the oven.
- Do not defrost frozen beverages in narrow necked bottles.
- Cookware may become hot because of heat transferred from the heated food. Potholders may be needed to handle the cookware.
- Do not try to melt paraffin wax in the oven. Paraffin wax will not melt in a microwave oven because it allows microwaves to pass through it.
- Never use sharp-edged utensils in or near the oven.
- Hot foods and steam can cause burns. Be careful when opening containers of hot food, including popcorn bags, cooking pouches and boxes. To prevent possible injury, direct steam away from hands and face.
- Clean the vent hood often. Do not allow grease to build up on the hood or the filter.
- Use care when cleaning the vent hood filter. Corrosive cleaning agents, such as lye-based oven cleaners, may damage the filter.
- When flaming foods are under the hood, turn the fan on.
SAVE THESE INSTRUCTIONS
Installation Recommendations
Remove all packing materials both outside and inside the oven before using the oven. The oven requires free movement of air for proper operation. Do NOT block air vents located by the top air grill and underneath the oven.
Grounding Instructions
This appliance must be grounded. In the event of an electrical short circuit, grounding reduces the risk of electric shock by providing an escape wire for the electric current. This appliance is equipped with a cord having a grounding wire with a grounding plug. The plug must be plugged into a 120v, 15amp. outlet that is properly installed and grounded.
Consult a qualified electrician or service technician if the grounding instructions are not completely understood or if doubt exists as to whether the appliance is properly grounded.
WARNING - Improper use of the grounding plug can result in a risk of electric shock.
Where standard two-prong wall receptacle is encountered, it is your personal responsibility and obligation to have it replaced with a properly grounded three-prong wall receptacle.
Do not under any circumstance cut or remove the third (ground) prong from the power cord. Do not use an adapter plug with this appliance. See pages 1 and 2 of the Installation Manual for acceptable extension cord specifications.
Interference Note
Microwave ovens generate radio frequency energy during operation and if not installed properly may cause interference to radio and television reception. You can determine if this unit is causing interference by turning it on and off while the interference is occurring. If interference occurs, it may be corrected by one or more of the following measures:
- clean door and seal surfaces of the oven;
• reorient the television or radio receiving antenna; - the oven with respect to the television or radio receiver, and/or
- Plug the oven into a different outlet so that it and the television or radio receiver are on different circuits.
If the interference persists, you may want to consult an experienced radio/television technician for additional information.
Automatic Fan Protection feature
The cooking range installed under the microwave oven may, under some heavy usage conditions, cause temperatures high enough to overheat some internal parts of the microwave oven.
To prevent overheating from taking place, the exhaust fan is designed to automatically turn on at a low speed if excessive temperatures occur. Should this happen, the fan cannot be manually turned off, but it will automatically turn off when the internal parts have cooled. The fan may stay on for up to an hour after the range and microwave oven controls have been turned off.
Microwaving Tips
- Make sure all cookware used in your microwave oven is suitable for microwaving. Most glass cooking dishes, measuring cups, custard cups, pottery or china dinnerware, which does not have metallic trim or glaze with metallic sheen, can be used.
- If you are not sure if a dish is microwave-safe, use this test: Place in the oven the dish you are testing and a glass measuring cup filled with one cup of water. Set the measuring cup either in or next to the dish.
Microwave 1 minute at high. If the dish heats, it should not be used for microwaving. If the dish remains cool and only the water in the cup heats, then the dish is microwave-safe.
- Paper towels, waxed paper and plastic wrap can be used to cover dishes in order to retain moisture and prevent spattering. Be sure to vent plastic wrap so steam can escape.
Safe and Unsafe Materials
Materials you can use in microwave oven
Utensils Remarks
| Aluminum foil Shielding only. Small smooth pieces can be used to cover thin parts of meat or poultry to prevent overcooking. Arcing can occur if foil is too close to oven walls. The foil should be at least 1 inch (2.5cm) away from oven walls. | |
| Browning dish Follow manufacturer's instructions. The bottom of browning dish must be at least 3/16 inch (5 mm) above the turntable. Incorrect usage may cause the turntable to break. | |
| Dinnerware Microwave-safe only. Follow manufacturer's instructions. Do not use cracked or chipped dishes. | |
| Glass jars Always remove lid. Use only to heat food until just warm. Most glass jars are not heat resistant and may break. | |
| Glassware Heat-resistant oven glassware only. Make sure there is no metallic trim. Do not use cracked or chipped dishes. | |
| Oven cooking bags | Follow manufacturer's instructions. Do not close with metal tie. Make slits to allow steam to escape. |
| Paper plates and cups | Use for short-term cooking/warming only. Do not leave oven unattended while cooking. |
| Paper towels Use to cover food for reheating and absorbing fat. Use with supervision for a short-term cooking only. | |
| Parchment paper | Use as a cover to prevent splattering or a wrap for steaming. |
| Plastic Microwave-safe only. Follow the manufacturer's instructions. Should be labeled "Microwave Safe". Some plastic containers soften as the food inside gets hot. "Boiling bags" and tightly closed plastic bags should be slit, pierced or vented as directed by instructions on package. | |
| Plastic wrap Microwave-safe only. Use to cover food during cooking to retain moisture. Do not allow plastic wrap to touch food. | |
| Thermometers Microwave-safe only (meat and candy thermometers). | |
| Wax paper Use as a cover to prevent splattering and retain moisture. | |
Materials to be avoided in microwave oven
Utensils Remarks
| Aluminum tray May cause arcing. Transfer food into microwave-safe dish. | |
| Food carton with metal handle | May cause arcing. Transfer food into microwave-safe dish. |
| Metal or metal-trimmed utensils | Metal shields the food from microwave energy. Metal trim may cause arcing. |
| Metal twist ties May cause arcing and could cause a fire in the oven. | |
| Paper May cause a fire in the oven. | |
| Plastic foam | Plastic foam may melt or contaminate the liquid inside when exposed to high temperature. |
| Wood Wood will dry out when used in the microwave oven and may split or crack or begin to smoke. | |
Touch Control Panel
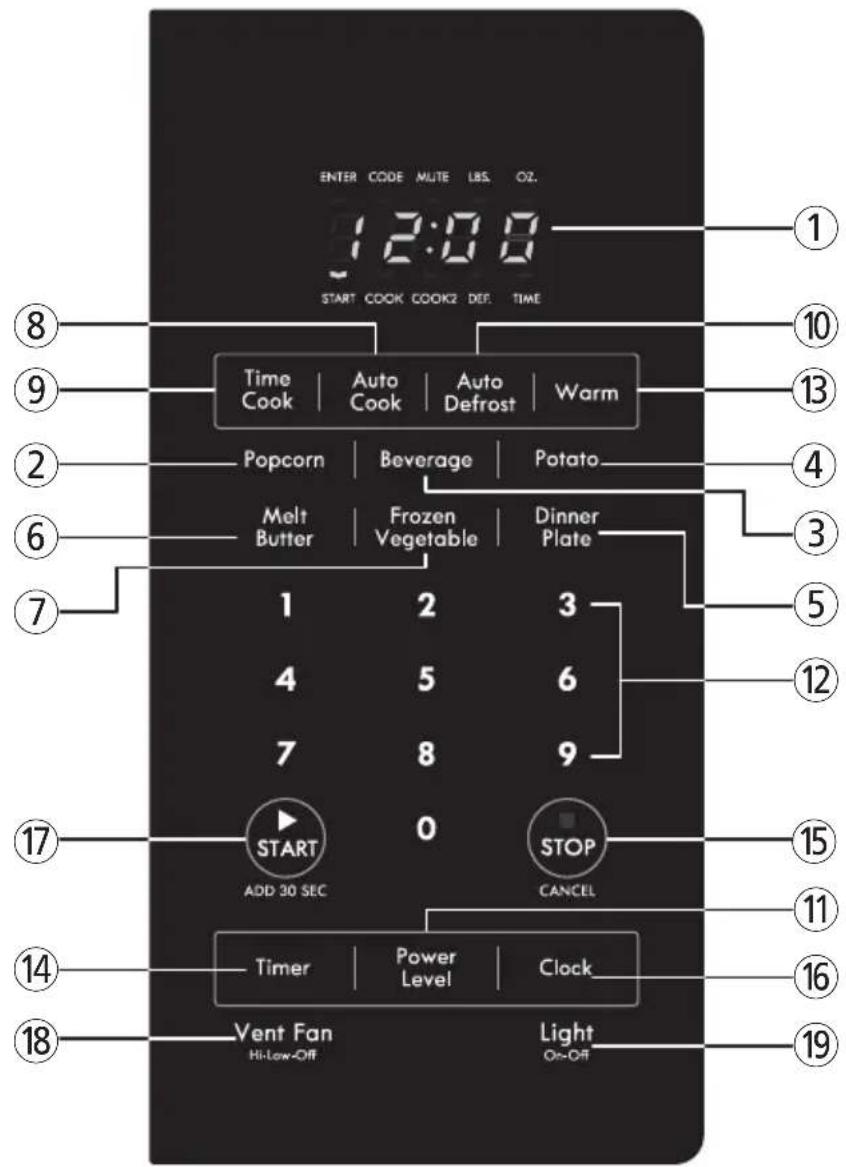
The Touch Control Panel allows you to set the oven controls with the touch of a finger. It's designed to be easy to use and understand.
- DISPLAY - Displays time of day, time during cooking functions, power level being used, cooking mode and instructions.
- POPCORN - Touch this pad to cook prepackaged microwave popcorn. (Page 16)
- BEVERAGE - Touch this pad to reheat a beverage. (Page 16)
- POTATO - Touch this pad to cook 1-4 potatoes. (Page 17)
- DINNER PLATE - Touch this pad to reheat a dinner plate full of chilled leftovers. (Page 17)
- MELT BUTTER - Touch this pad to melt butter. (Page 17)
- FROZEN VEGETABLE - Touch this pad to cook frozen vegetables. (Page 17)
- AUTO COOK - Will automatically compute the microwave power and cook time. Refer to Auto Cook Guide. (Page 19)
- TIME COOK - Microwave for a selected amount of time.
- Power Level 10 (High) is automatic but lower heat levels may be programmed. (Page 11)
- AUTO DEFROST - Touch this pad and enter food weight, then START. The oven automatically sets power levels and defrosting time. (Page 13)
- POWER LEVEL - Touch this pad if you want to change from automatic Power Level 10 (High) for cooking. (Page 12)
- NUMBER PADS - Touch these pads to enter cooking time, defrosting time, time of day or food weights for Auto Defrost.
- WARM - Touch this pad and safely keep food warm for up to 30 minutes. (Page 18)
- TIMER - This feature uses no microwave energy. It functions as a kitchen timer, as a holding period after defrost or as a delay timer before time cooking. (Page 12)
- STOP/CANCEL - When touched once, it pauses the oven operation. When touched twice, it shuts off the oven and erases all settings (except time of day).
- CLOCK - Touch this pad to enter time of day or check time of day while microwaving. (Page 11)
- START/ADD 30 SEC - After all selections are made, touch this pad to start the oven or timer.
- Also touch this pad for an "instant on" cooking period of 30 seconds, or to add 30 seconds of time while cooking is in progress. (Page 12)
- VENT FAN - Touch this pad to turn the fan on high, low or off. (Page 22)
- LIGHT - Touch this pad to turn on or off the light. (Page 22)
• Each time a pad is touched, a BEEP will sound.
- When STOP/CANCEL Pad is touched during oven operation, the oven will stop, however, all programmed information is retained. To clear all information, touch the STOP/CANCEL Pad again.
Note: Styling and features may differ slightly depending on model.
Oven Features at a Glance
-
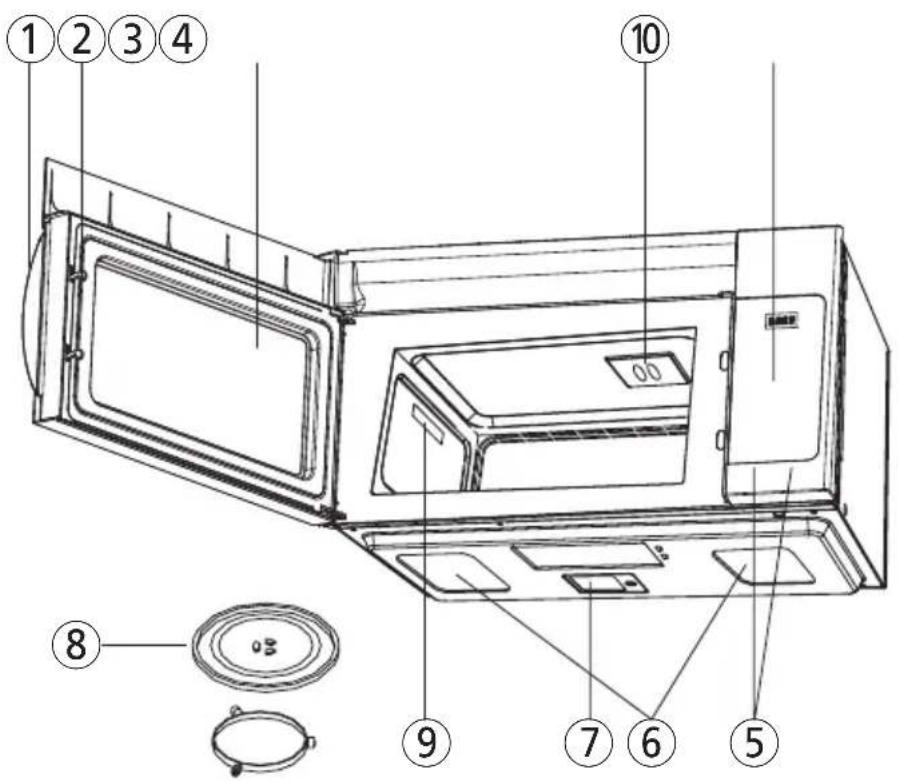
DOOR HANDLE - Pull to open door. Door must be securely latched for oven to operate.
-
DOOR LATCHES
-
WINDOW with METAL SHIELD - Screen allows cooking to be viewed while keeping microwaves confined in oven.
-
TOUCH CONTROL PANEL and DIGITAL DISPLAY - For detailed information on each feature, see Touch Control Panel section, Page 8.
-
HOOD CONTROLS
Vent Fan - Press High, Low or Off Light - Press On or Off
-
GREASE FILTERS
-
COOKTOP LIGHT - Provides illumination to surface of range cooktop below microwave oven.
-
TURNTABLE - Composed of glass tray and roller guide. The roller guide is placed first in the bottom of the microwave and supports the glass tray. Both parts must be in place when using the microwave oven.
-
DATA PLATE- Located on the inside wall of the microwave oven.
-
STIRRER COVER - The stirrer mechanism circulates the microwaves within the oven cavity.
Basic Operation
Time-of-Day Clock
- Touch the CLOCK Pad.
- Set the time of day by touching the appropriate numbers.
-
Touch the CLOCK Pad.
-
After plugging in the oven or after a power outage, "88:88" will be displayed. Touch the STOP/CANCEL Pad and set the clock following the directions above.
• The time-of-day clock is a 12 hour clock. - If set, the time of day will always be displayed when no other cooking function is being used.
- The time of day returns to the current time when the oven turns off.
Time Cook
- Touch the TIME COOK Pad.
- Touch the appropriate number pads to set the cooking time.
For example, for 5 minutes touch numbers 5, 0, 0. The selected time will be displayed.
-
Touch the START Pad.
-
The oven will start cooking and time countdown will begin.
- The oven will stop automatically when the time is done and beep three times.
- When the cook time ends, "End" appears in the display.
- To pause countdown open door or press Stop pad. To resume countdown, close door and press Start pad. To cancel cooking cycle once countdown begins press Stop pad twice.
- Start with the shortest recommended time and add more time as needed.
- Check the food as it cooks.
- The oven door can be opened any time during operation. Cooking will automatically stop and maintain the time setting until the door is closed and the START Pad is touched again.
- If the START Pad is touched and the oven does not operate, check the area between the door and door seal for obstructions. The oven will not start until the door is completely closed.
Power Level
Full power (level 10) is automatic. If you wish to use a different power level, touch the POWER LEVEL Pad before touching START Pad. Enter the power level desired by touching the POWER LEVEL Pad repeatedly. The selected power level will be displayed. (See Power Level Cooking Guide on next page.)
Power Level Cooking Guide
Your microwave oven offers various cooking power levels for optimum cooking results.
High (power level 10) or full power is the fastest way to cook and supplies microwave energy 100% of the time.
The other power levels supply microwave energy for a certain percentage of time. For example, power level 7 supplies microwave energy throughout 70% of the set cooking time. Most of your cooking will be done on High (Power Level 10). A lower setting will cook more evenly, requiring less attention given to stirring or rotating the food. Some foods may have better flavor, texture or appearance if one of the lower settings is used. You may wish to use a lower power level when cooking foods that have a tendency to boil over, such as scalloped potatoes. The times required to fully cook food will tend to lengthen as a result of using lower power levels.
| Power Level Best | Uses |
| High 10 Fish, bacon, vegetables, boiling liquids. | |
| Medium 7 Gentle | cooking of meat and Poultry, baking casseroles and reheating. |
| Medium 5 Slow cooking and tenderizing for stews and less tender cuts of meat. | |
| Low 3 Defrosting, simmering, delicate sauces. | |
| Warm 1 Keeping | food warm without overcooking, softening butter. |
Add 30 sec.
The START/ADD 30 SEC Pad provides a convenient way to heat foods at full power with one touch of a pad or to add extra time to the cooking cycle while it is in progress.
The microwave starts automatically after the pad is touched.
Each time the pad is touched the oven will add 30 seconds to the time up to 99 minutes 99
seconds. ADD 30 SEC cannot be used with ONE TOUCH COOKING FUNCTIONS, AUTO
COOK, AUTO DEFROST, TIMER or WARM.
Timer
- Touch the TIMER Pad.
-
Touch the appropriate number pads to set the time amount. The set time will appear in the display.
-
Touch the START Pad. The time amount counts down in the display.
When countdown completes End appears in the display and oven beeps until Stop pad is pressed.
- The timer can be programmed up to 99 minutes and 99 seconds.
- Beeps signal the end of the timing operation.
- To stop the timer once it has started, touch the STOP/CANCEL Pad. Display will return to the time of day.
- The timer cannot be set while cooking.
Auto Defrost
Use the defrost setting for defrosting meats, poultry and fish from 0.1 pounds to 6.0 pounds.
-
• Touch the AUTO DEFROST Pad once for meat. "dF-1" will be displayed.
-
Touch the AUTO DEFROST Pad twice for poultry. "dF-2" will be displayed.
-
Touch the AUTO DEFROST Pad three times for fish. "dF-3" will be displayed.
-
Touch number pads to enter the weight. The defrosting time and power levels are automatically calculated.*
-
Touch the START Pad
Defrost time appears in the display and counts down. To pause countdown open door or press Stop pad. To resume countdown, close door and press Start pad. To cancel cooking cycle once countdown begins press Stop pad twice.
* Enter the weight in pounds and tenths of a pound. See Conversion Chart below.
- During defrosting, the oven will beep a series of short beeps to signal that the food needs to be turned or rearranged.
Oven will continue operation if food is not turned or rearranged. Three beeps signal the end of defrosting. "End" appears in the display.
Conversion Chart
| Weight in ounces Weight in tenths-of-pound | |
| 1 to 2-oz. 0.1 | |
| 3 to 4-oz. 0.2 | |
| 5-oz. 0.3 | |
| 6 to 7-oz. 0.4 | |
| 8-oz. 0.5 | |
| 9 to 10-oz. 0.6 | |
| 11 to 12-oz. 0.7 | |
| 13-oz. 0.8 | |
| 14 to 15-oz. 0.9 | |
Defrost by Time
- Touch the TIME COOK Pad.
- Touch the appropriate number pads to set the defrosting time.
- Touch the POWER LEVEL Pad.
- Touch the POWER LEVEL Pad repeatedly to select power level 3.
- Touch the START Pad. Defrost time counts down in the display.
Note: See page 14 for additional defrosting tips for both Auto and Time Defrost.
To pause countdown open door or press Stop pad. To resume countdown, close door and press Start pad. To cancel cooking cycle once countdown begins press Stop pad twice.
Defrost by Time Guide (Power Level 3)
| Items and Weight Time | Defrosting Time | Standing | Procedures and Techniques |
| Beef | |||
| Ground Beef/1 lb. 10- | 12 min. 5 min. | Break apart and remove thawed portions with fork. | |
| Ground Beef/2 lbs. 18 | -20 min. 8-1 | 2 min. | Break apart and remove thawed portions with fork. |
| Beef Roast, boneless/3 lbs. | 26-28 min. | 7-10 min. | Turn over part way. Shield ends or thinner areas with foil. |
| Steaks/1" thick 7-8 min. | 5-7 min. | Separate and rearrange once. | |
| Pork | |||
| Pork Roast, boneless/3 lbs. | 20-22 min. | 10-15 min. | Turn over part way. shield ends or thinner areas with foil. |
| Pork Chops/1 lb 7-8 m | in. 5-7 min. | Separate and rearrange once. | |
| Ground Pork/1 lb. 10- | 12 min. 5-7 | min. | Break apart and remove thawed portions with fork. |
| Spareribs/1 1/2 1lbs. | 15-16 min. | 5-7 min. | Turn meat over and rearrange, separate once. |
| Poultry | |||
| Whole Chicken/3 lbs. | 20-22 min. | 10-15 min. | Turn chicken over. shield wing tips, leg ends and breast areas with foil. Breast side down. |
| Chicken Breasts boneless/1 lb. | 7-8 min. | 5-7 min. | Separate and rearrange once. |
| Chicken Thighs/2 lbs. | 18-23 min. | 8-13 min. | Separate and rearrange once. |
| Fish | |||
| Fish Fillets/1 lb. | 10-11 min. | 5-7 min. | Separate and rearrange once. Shield as needed. |
General Defrosting Tips
- Do not defrost covered meat. Covering might allow cooking to take place. Always remove outer wrap and tray. Place food on a microwave-safe rack in a dish.
- Begin defrosting whole poultry breast-side-down. Begin defrosting roasts fat-side-down.
- The shape of the package alters the defrosting time. Shallow rectangular shapes defrost more quickly than a deep block.
- Auto Defrost is programmed for specific weights. Defrost results will be affected if you enter an incorrect weight.
- Auto Defrost is programmed for frozen food at 0^ F. If food is stored at a higher temperature, expect shorter defrost times.
- After 1/3 of the defrost time has elapsed, check the food. You may wish to turn over, break apart, rearrange or remove thawed portions of the food.
-
During Auto Defrost, the oven will prompt you to turn the food over. At this point, open oven door and check the food. Follow the techniques listed below for optimum defrost results. Then, close oven door, touch the START Pad to complete defrosting.
-
Turn Over: Roast, ribs, whole poultry, turkey breasts, hot dogs, sausages, steaks, or chops.
- Rearrange: Break apart or separate steaks, chops, hamburger patties, ground meat, chicken or seafood pieces, chunks of meat such as stew beef.
- Shield: Use small strips of aluminum foil to protect thin areas or edges of unevenly shaped foods such as chicken wings. To prevent arching, do not allow foil to come within 1-inch of oven walls or door.
-
Remove: To prevent cooking, thawed portions should be removed from the oven at this point. This may shorten defrost time for foods weighing less than 3-lbs.
-
After defrosting, allow food to stand 5 to 10 minutes if there are any icy areas. If large solid roasts, such as sirloin tip or rump roasts, are not completely thawed after standing, return roast to oven and program Auto Defrost for 1 lb.
Two Stage Cooking
This feature lets you program two sequential operations such as defrosting and cooking or cooking using two different power levels. It automatically changes power settings and cooking time.
- Touch the TIME COOK Pad.
- Touch the appropriate number pads to enter the cooking time. The selected time will be displayed.
- Touch the POWER LEVEL Pad. Power level 10 displays.
-
Touch the POWER LEVEL Pad repeatedly to select a power level less than 10. Otherwise proceed to next step.
-
Touch the TIME COOK Pad again.
-
Touch the appropriate number pads to enter the cooking time for the second stage of cooking. The selected time will be displayed.
-
Touch the POWER LEVEL Pad. Power level 10 displays.
-
Touch the POWER LEVEL Pad repeatedly to select a power level less than 10. Otherwise proceed to next step.
-
Touch the START Pad. The first cook time counts down in the display, immediately followed by the second cook time count down.
To pause a countdown open door or press Stop pad. To resume countdown, close door and press Start pad. To cancel cooking cycle once countdown begins press Stop pad twice.
Special Features
One Touch Cook
The Popcorn, Beverage, Baked Potato, Melt Butter, Frozen Vegetable and Dinner Plate are One Touch Cooking functions.
One touch cooking allows you to cook or reheat many of your favorite foods by pressing just one pad. To increase quantity, press the chosen pad until the number in the display is same as desired quantity to cook.
Popcorn
- Center package correct side down on oven turntable. Close door.
- Touch the POPCORN Pad
• once for 3.5 oz. package.
- twice for 3.0 oz. package.
• three times for 1.75 oz. package.
- Once the correct package size displays, stop touching the pad. Touch the START Pad.
Cooking time appears in the display and counts down.
To pause countdown open door or press Stop pad. To resume countdown, close door and press Start pad. To cancel cooking cycle once countdown begins press Stop pad twice.
- The POPCORN Pad has been automatically set for the correct cook time for a 3.5, 3.0, 1.75 oz. bag of popcorn.
- Listen as the popcorn pops and stop the microwave when the popping slows down to 3 seconds apart even if the automatically set time has not elapsed.
- Do not try to repop unpopped kernels or reuse a bag.
- Pop only one package at a time.
CAUTION: If prepackaged popcorn is a different weight than those specified above, do not use the POPCORN Pad. Inadequate popping or a fire may occur. Follow manufacturer's instructions.
Beverage
- Center the mug on oven turntable and close door.
-
Touch the BEVERAGE Pad:
-
Once for 1 cup (8 oz.)/mug. The display will show "1CUP".
- Twice for 2 cups (16 oz.)/mugs. The display will show "2CUP".
-
Three times for 3 cups (24 oz.)/mugs. The display will show "3CUP".
-
Once the correct cup number displays, stop touching the pad. Touch the START Pad.
Cooking time appears in the display and counts down.
To pause countdown open door or press Stop pad. To resume countdown, close door and press Start pad. To cancel cooking cycle once countdown begins press Stop pad twice.
Potato
- Center one or evenly space more than one potato on oven turntable. Close door.
- Touch the POTATO Pad:
• once for 1 medium potato (7 oz.)
• twice for 2 medium potatoes (14 oz.)
• three times for 3 medium potatoes (21 oz.)
- four times for 4 medium potatoes (28 oz.)
- The display will show "1 EA" "2 EA", "3 EA" or "4 EA"
- Once the correct number displays, stop touching the pad. Touch the START Pad
Cooking time appears in the display and counts down.
To pause countdown open door or press Stop pad. To resume countdown, close door and press Start pad. To cancel cooking cycle once countdown begins press Stop pad twice.
Melt Butter
- Center the butter on oven turntable and close door.
- Touch the MELT BUTTER Pad. The display will show "4" (for 4 ounces).
- Touch the START Pad. Cooking time appears in the display and counts down.
To pause countdown open door or press Stop pad. To resume countdown, close door and press Start pad. To cancel cooking cycle once countdown begins press Stop pad twice.
Frozen Vegetable
- Center the food on oven turntable and close door.
-
Touch the FROZEN VEGETABLE Pad.
-
Once for 8 oz. frozen vegetable. The display will show "8"
- Twice for 10 oz. frozen vegetable. The display will show "10".
- Three times for 16 oz. frozen vegetable. The display will show "16".
-
Four times for 20 oz. frozen vegetable. The display will show "20".
-
Once the correct number displays, stop touching the pad. Touch the START Pad
Cooking time appears in the display and counts down.
To pause countdown open door or press Stop pad. To resume countdown, close door and press Start pad. To cancel cooking cycle once countdown begins press Stop pad twice.
Dinner Plate
- Center the plate on oven turntable and close door.
- Touch the DINNER PLATE Pad The display will show "12" (for 12 ounces).
- Touch the START Pad Cooking time appears in the display and counts down.
To pause countdown open door or press Stop pad. To resume countdown, close door and press Start pad. To cancel cooking cycle once countdown begins press Stop pad twice.
- Place meat and dense vegetables to the outside of the plate.
- Place delicate foods in the center of the plate.
- Cover the plate with wax paper to hold steam around most foods except rare meats or vegetables with crisp exteriors.
CAUTION: Only use a microwave safe plate in a microwave oven.
Warm
- Center the food on oven turntable and close door.
- Touch the WARM Pad. The display will show "HEAt". "HEAt" will remain in the display for the length warming cycle (30 minutes).
- Touch the START Pad.
At the end of 30 minutes the Warm cycle will automatically shut off.
- The microwave oven will safely keep cooked foods warm for up to 30 minutes.
- Opening the door or touching the STOP/CANCEL Pad cancels the WARM setting.
- Foods that were covered during cooking should be covered during warming.
- Complete meals on a dinner plate should be covered.
Auto Cook
- Center food on turntable and close door.
- Touch the AUTO COOK pad until the code for the desired food category is displayed.*
- Touch the number pad indicated on the Cooking Guide for the cooking weight desired.*
- Touch the START Pad. Cooking time appears in display and counts down.
To pause countdown open door or press Stop pad. To resume countdown, close door and press Start pad. To cancel cooking cycle once countdown begins press Stop pad twice.
* See the following chart or the Cooking Guide Label on the front of the oven cavity.
- Auto Cook has preset times and power levels for four food categories: Soup, Fresh Vegetables, Muffins and Fish Fillets.
- The display counts down the cooking time.
Auto Cook Guide
| FOOD | TOUCH AUTO COOK PAD | NUMBER PAD Q | QUANTITY DISPLAY | |
| Soup Once 1 | 234 | 8 oz.16 oz.24 oz.32 oz. | AC-1 | |
| Fresh Vegetables | Twice 1 | 234 | 4 oz.8 oz.12 oz.16 oz. | AC-2 |
| Muffins Three Times 1 | 234 | 2 ea.4 ea.6 ea.8 ea. | AC-3 | |
| Fish Fillets Four Times 1 | 234 | 4 oz.8 oz.12 oz.16 oz. | AC-4 |
Cooking Tips and Techniques
- For best results, cover container with plastic wrap and turn back one edge of the wrap to form a 1/2-inch slot where steam can escape.
• After cooking fresh vegetables, allow 3-5 minutes of stand time before serving. This will allow the food to finish cooking without overcooking. - When preparing fresh vegetables, add 1/2 cup of water per 1/2 pound of fresh vegetables.
Clock Delay Start
The Clock Delay Start feature allows you to program your oven to begin cooking at a preset time of day. You can program two sequential operations using two different power levels.
WARNING: Food poisoning hazard. Do not let food sit for more than one hour before or after cooking. Doing so can result in food poisoning or sickness.
- Place food on oven turntable and close door.
- Touch the TIME COOK Pad.
- Touch the appropriate number pads to select the first cooking time.
- Touch the POWER LEVEL Pad. Power level 10 displays.
- Touch the POWER LEVEL Pad repeatedly to select a power level less than 10. Otherwise proceed to next step.
- Touch the TIME COOK Pad for second cooking time if desired. If not, skip to step 9.
- Touch the appropriate number pads to select the second cooking time.
- Touch the POWER LEVEL Pad. Power level 10 displays.
-
Touch the POWER LEVEL Pad repeatedly to select a power level less than 10. Otherwise proceed to next step.
-
Touch the CLOCK Pad.
-
Touch the appropriate number pads to set the time of day you want the oven to start.
-
Touch the START Pad. The set start time will show in the display until the oven starts. When oven starts, the cooking time displays and counts down.
To pause countdown open door or press Stop pad. To resume countdown, close door and press Start pad. To cancel cooking cycle once countdown begins press Stop pad twice.
- Do not use foods containing baking powder or yeast when using Clock Delay Start. They will not rise properly.
Tips on setting Auto Start:
- Before setting, check that the correct time of day is displayed.
- If you hear the fan start when you touch the START Pad, you have not set the oven properly. Touch the STOP/CANCEL Pad and start over.
Timer Delay Start
The Timer Delay Start feature allows you to program your oven to begin cooking after a specific amount of time. You can program two sequential operations using two different power levels.
WARNING: Food poisoning hazard. Do not let food sit for more than one hour before or after cooking. Doing so can result in food poisoning or sickness.
- Touch the TIMER Pad.
- Touch the appropriate number pads to set the amount of delay start time.
- Touch the TIME COOK Pad.
- Touch the appropriate number pads to select the first cooking time.
- Touch the POWER LEVEL Pad. Power level 10 displays.
- Touch the POWER LEVEL Pad repeatedly to select a power level less than 10. Otherwise proceed to next step.
- Touch the TIME COOK Pad for second cooking time if desired. If not, skip to step 11.
- Touch the appropriate number pads to select the second cooking time.
- Touch the POWER LEVEL Pad. Power level 10 displays.
- Touch the POWER LEVEL Pad repeatedly to select a power level less than 10. Otherwise proceed to next step.
- Touch the START Pad. The set amount of delay time appears in the display and counts down. When oven starts, the cooking time displays and counts down.
To pause countdown open door or press Stop pad. To resume countdown, close door and press Start pad. To cancel cooking cycle once countdown begins press Stop pad twice.
Control Lockout
The oven operation can be locked to prevent the microwave from accidentally being turned on. All oven functions can be locked.
To Set:
Touch and hold the STOP/CANCEL Pad for three seconds. The display shows "Loc" and the oven beeps.
To Cancel:
Touch and hold the STOP/CANCEL Pad for three seconds. "Loc" disappears from the display and the oven beeps.
Mute
Audible signals are available to guide you when setting and using your oven.
To Set:
Touch and hold the TIMER Pad for three seconds. The MUTE indicator lights.
To Cancel:
Touch and hold the TIMER Pad for three seconds. A beep sounds and the MUTE indicator will be turned off.
Display On/Off
To turn Display off:
Touch and hold the CLOCK Pad for three seconds.
The display will turn off and a beep sounds.
To operate the oven, press any key.
Then clock will be shown and the operation of all function key will be same as in the normal mode.
But if there is no operation within 10 seconds in clear mode, all the contents of display will disappear.
To turn Display on:
Touch and hold the CLOCK Pad for three seconds.
When the display is on and a beep sounds.
The oven is again available for normal use.
Using the Vent Fan
You can control the 2-speed fan by touching the VENT FAN Pad
-
Touch the VENT FAN Pad once for HIGH speed. The Display will show "Hi".
-
Touch the VENT FAN Pad twice for LOW speed. The Display will show "Lo".
-
Touch the VENT FAN Pad three times for turning vent fan off. The Display will show "OFF".
Using the Cooktop Light
You can control the light by touching the LIGHT Pad.
-
Touch the LIGHT Pad once to turn the cooktop light on. The display will show "On".
-
Touch the LIGHT Pad twice to turn the light off. The display will show "OFF".
Note: If there is no user input for 10 hours, cooktop light and vent fan will turn off automatically to save energy.
Care and Cleaning
Microwave Oven Interior
The oven interior should be cleaned after each use with a damp cloth to keep it free from grease and soil buildup. Stubborn soils can be removed with a plastic scrub pad. When cleaning interior surfaces and surfaces of door and oven that come together when the door is closed, use only mild, non-abrasive soaps or detergents applied with a sponge or soft cloth.
Odors can be eliminated from the inside of the oven by boiling a solution of one cup of water and several tablespoons of lemon juice in the oven for 5-7 minutes. This also helps loosen any dried soil in the oven. Wipe off excess moisture after use.
Note:
- Do not spray or pour liquid cleansers directly onto a surface. Spray or pour cleanser onto a cloth or sponge and then clean.
- Do not use abrasive cleaners, oven cleaners, abrasive cleaning pads or steel wool, as they can scratch or dull oven surfaces.
- Do not remove or insert knife around the stirrer cover(located on ceiling of oven cavity) to clean, it may damage the cover or affect the cooking performance of your oven.
Oven Bottom
Wash oven bottom with hot sudsy water, rinse and dry. Do not use excessive amounts of water when cleaning the oven, especially around the turntable. Do not allow water or cleaning agents to seep into turntable gears located underneath.
Glass Tray/Turntable
Allow to cool before removing and cleaning. Wash in soapy water or dishwasher.
Roller Guide
Clean frequently to prevent excessive noise. Wash in soapy water or dishwasher.
Oven Exterior
Wipe the outside of your oven with a soapy cloth, rinse and dry. Do not use abrasive cleaners. They may scratch the surface.
Light Compartment
Clean off the grease and dust on the light compartment cover on the bottom side of the microwave oven often with warm water and detergent.
Control Panel
Wipe with a damp cloth. Dry. Do not spray cleaners directly on panel. Spray cleaners on cloth and then wipe.
The Exhaust Feature
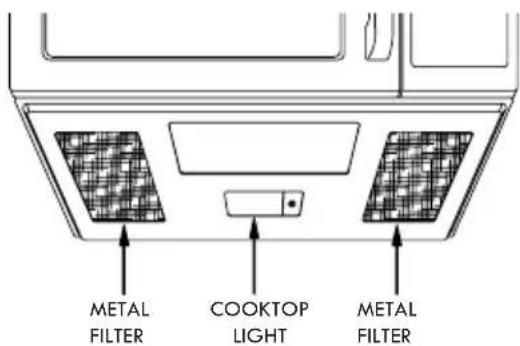
The exhaust hood feature on your microwave oven is equipped with two metal filters which collect grease. When the fan is operating, air is drawn up through the filters and is then discharged through the venting to the outside or through the charcoal filters if not vented to the outside.
Reusable Grease Filters
The reusable grease filters should be cleaned at least once a month. Never operate the microwave without the filters in place. In situations where flaming might occur on surfaces below the hood, filters will stop the entry of flames into the unit.
To Remove Grease Filter
To remove grease filter, grasp the "finger hold" on the filter and slide to the rear. Then pull filter downward and to the left. The filter will drop out.
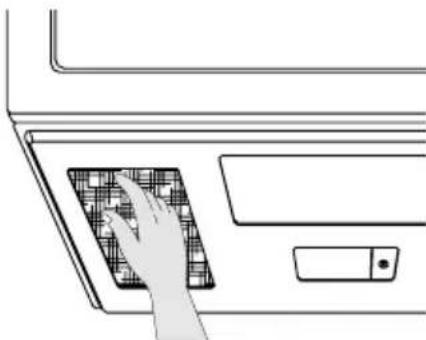
natural_image
Line drawing of a hand pressing a grid-patterned object on a computer screen (no text or symbols)To clean Grease Filter
To clean grease filters, soak and then agitate filter in solution of hot water and detergent. Do not use ammonia or ammonia products because they will darken the metal. Light brushing can be used to remove embedded dirt. Rinse, shake and remove moisture before replacing.
To Replace Grease Filter
To replace grease filter, slide the filter in the frame slot on the right of the opening. Pull filter upward and to the left to lock into place.
Light Bulb Replacement
Cooktop Light
To replace the combination cooktop light/ night light:
- Disconnect power at main fuse or circuit breaker or pull plug.
- Remove screw on right side of light compartment cover and lower cover until it stops. (See Figures 1 and 2.)
- Gently unscrew the bulb(s). Be sure bulb(s) to be replaced are cool before removing.
- Replace with a 30 watt appliance light bulb. High intensity 30-watt bulb(s) which are available in supermarkets and hardware stores, may also be used for replacements.
- Raise light compartment cover and replace screw.
- Connect electrical power to microwave oven.
Oven Light
To replace oven light:
- Disconnect power at main fuse or circuit breaker or pull plug.
- Remove the top grill by taking out the 2 screws that hold it in place. (See Figures 3.)
- Remove a screw (1) for lamp cover.(See Figure 4.)
- Pull out the Lamp cover. (See Figure 4.)
- Replace the light bulb with a 30-watt bulb.
- Replace light housing to original position
- Replace lamp cover and secure it with the screw (1).
- Replace top grill and secure with screws.
- Connect electrical power.
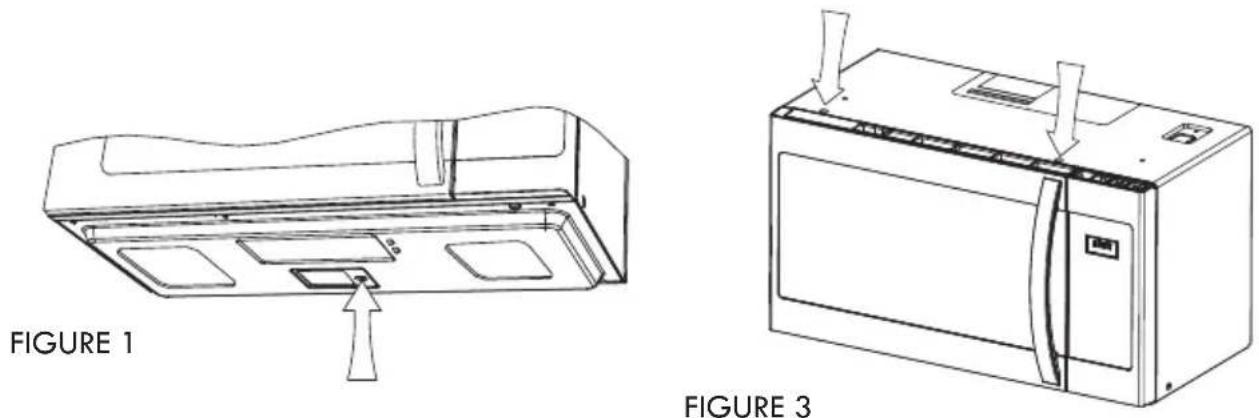
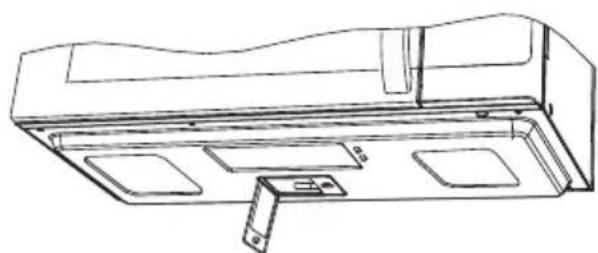
natural_image
Line drawing of a cabinet or enclosure with internal compartments and mounting brackets (no text or symbols)FIGURE 2
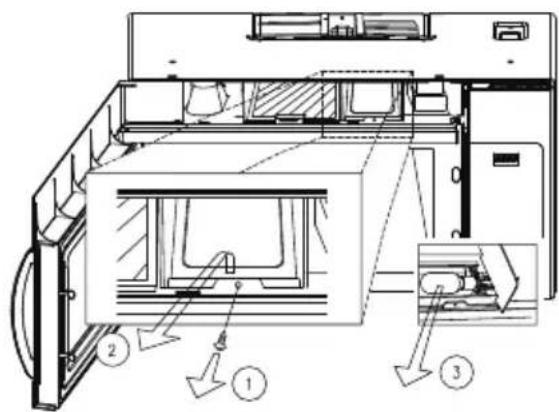
FIGURE 4
Common Questions and Answers
Q. Can I open the door when the oven is operating?
A. The door can be opened anytime during the cooking operation. The oven will automatically stop cooking and the time setting will maintain until the door is closed and the START Pad is touched.
Q. What causes the oven interior light and display to dim when using a Variable Power Level?
A. This is normal and indicates the oven is operating and cycling properly.
Q. Why does steam and/or vapor escape around the door and moisture droplets form on the inside of the oven door?
A. This in normal occurrence - as food cooks, steam is given off.
Q. What do the various beeps mean?
A. Short beep = any pad is touched.
Three short beeps = incorrect entry.
One long beep = oven plugged in.
Three long beeps = end of cooking (microwave will turn off).
Series of three short beeps = check food to see if turning or rearranging is needed.
Q. Can the oven be used with the glass tray or roller guide removed?
A. No. Both the glass tray and roller guide must always be used in the oven when cooking.
All these things are normal with your microwave oven.
- Steam or vapor escaping from around the door.
• Light reflection around the door or outer case.
- Dimming oven light and change in blower sound may occur while operating at power levels other than high.
- Dull thumping sound while oven is operating.
Charcoal Filter Kit
There is a recirculating charcoal filter kit included for models that are not vented to the outside. See installation guide for details.
Before You Call
Check the following to be sure a service call is necessary:
If nothing on the oven operates:
- check for a blown circuit fuse or a tripped main circuit breaker.
- check if oven is properly connected to electric circuit in house.
- check that controls are set properly.
- check that the cooking time is set.
If the oven interior light does not work:
- The light bulb may be loose or defective. See page 25 or call a qualified servicer.
If oven will not cook:
- check that control panel was programmed correctly.
- check that door is firmly closed.
- check that START Pad was touched.
- Clock Delay Start or Timer Delay Start may have been set.
• the Control Lockout may have been set - check the area between the door and seal for obstructions.
If oven takes longer than normal to cook or cooks too rapidly:
- be sure the Power Level is programmed properly.
- check instructions on food density, etc.
- verify that voltage to the microwave oven is not low.
If the time-of-day clock does not always keep correct time:
- check that the power cord is fully inserted into the outlet receptacle.
- check that the oven is properly grounded.
- try plugging the oven into an outlet on a separate electrical circuit.
If oven floor or glass tray are hot:
- this is normal. The floor is absorbing heat from the food.
If the interior of oven collects moisture:
- this is normal. Food gives off moisture when cooking and the steam collects on the door and the oven surface. Wipe off excess moisture from oven after each use.
If food cooks unevenly:
• refer to your recipe for proper cooking procedures.
- be sure food is evenly shaped.
- be sure food is completely defrosted before cooking.
- check placement of aluminum strips used to prevent overcooking.
If food is undercooked:
- check recipe to be sure all directions (amount, time, and power levels) were correctly followed.
- check household voltage.
- try plugging the oven into an outlet on a separate electrical circuit.
- be sure food was completely defrosted before cooking.
If food is overcooked:
- check recipe to be sure all directions (amount, time, and power levels) were correctly followed.
- the initial temperature of food may have been higher than normal.
If arcing (sparks) occur:
- be sure microwave-safe dishes were used.
- be sure wire twist ties were not used.
- be sure oven was not operated when empty.
If the display shows a time counting down but the oven is not cooking:
- check that door is firmly closed.
Insert the following warrantor information on a separate line at the bottom of this warranty statement:
Transform SR Brands Management LLC, Hoffman Estates, IL 60179
Introducción
natural_image
Line drawing of a hand placing a grid-patterned object on a door panel (no text or symbols)natural_image
Technical line drawing of a device with labeled component 'FIGURA 1' and an arrow pointing to a small component (no text or symbols beyond label)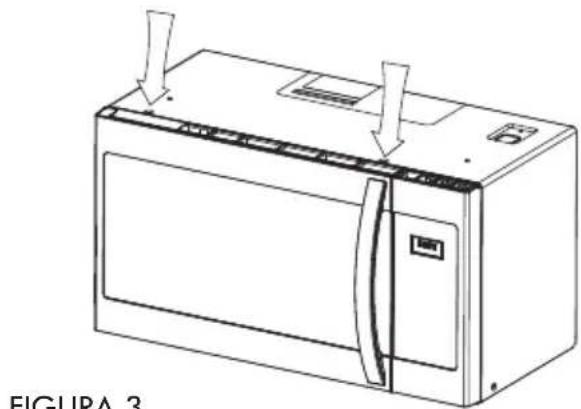
natural_image
Line drawing of a microwave oven with ventilation slots and lid (no text or symbols)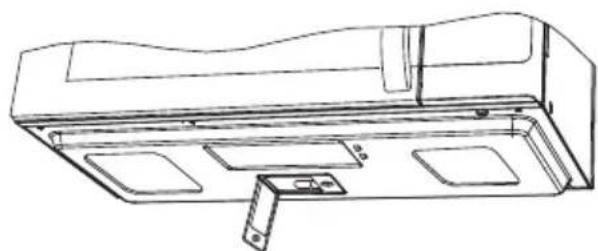
natural_image
Technical line drawing of a mechanical or electrical component with no visible text or symbols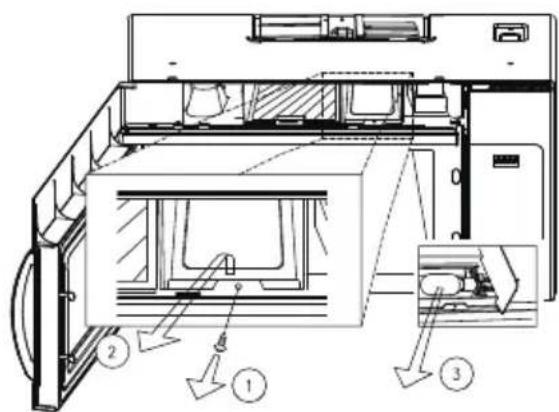
FIGURA 2
FIGURA 4
Customer Care Hotline
To schedule in-home repair service or order replacement parts
- Microwave Hood Combination
- Customer Assistance
- KENMORE LIMITED WARRANTY
- This warranty covers ONLY defects in material and workmanship, and will NOT pay for:
- Disclaimer of implied warranties; limitation of remedies
- Introduction
- Table of Contents
- PRECAUTIONS TO AVOID POSSIBLE EXPOSURE TO EXCESSIVE MICROWAVE ENERGY
- Important Safety Instructions
- WARNING - To reduce the risk of burns, electric shock, fire, injury to persons or exposure to excessive microwave energy:
- SAVE THESE INSTRUCTIONS
- Installation Recommendations
- Grounding Instructions
- Interference Note
- Automatic Fan Protection feature
- Microwaving Tips
- Safe and Unsafe Materials
- Materials you can use in microwave oven
- Materials to be avoided in microwave oven
- Touch Control Panel
- Oven Features at a Glance
- Basic Operation
- Time-of-Day Clock
- Time Cook
- Power Level
- Power Level Cooking Guide
- Add 30 sec.
- Timer
- Auto Defrost
- Conversion Chart
- Defrost by Time
- General Defrosting Tips
- Two Stage Cooking
- Special Features
- One Touch Cook
- Popcorn
- Beverage
- Potato
- Melt Butter
- Frozen Vegetable
- Dinner Plate
- Warm
- Auto Cook
- Cooking Tips and Techniques
- Clock Delay Start
- Tips on setting Auto Start:
- Timer Delay Start
- Control Lockout
- To Set:
- To Cancel:
- Mute
- Display On/Off
- To turn Display off:
- To turn Display on:
- Using the Vent Fan
- Using the Cooktop Light
- Care and Cleaning
- Microwave Oven Interior
- Oven Bottom
- Glass Tray/Turntable
- Roller Guide
- Oven Exterior
- Light Compartment
- Control Panel
- The Exhaust Feature
- Reusable Grease Filters
- To Remove Grease Filter
- To clean Grease Filter
- To Replace Grease Filter
- Light Bulb Replacement
- Cooktop Light
- To replace the combination cooktop light/ night light:
- Oven Light
- To replace oven light:
- Common Questions and Answers
- All these things are normal with your microwave oven.
- Charcoal Filter Kit
- Before You Call
- Check the following to be sure a service call is necessary:
- If nothing on the oven operates:
- If the oven interior light does not work:
- If oven will not cook:
- If oven takes longer than normal to cook or cooks too rapidly:
- If the time-of-day clock does not always keep correct time:
- If oven floor or glass tray are hot:
- If the interior of oven collects moisture:
- If food cooks unevenly:
- If food is undercooked:
- If food is overcooked:
- If arcing (sparks) occur:
- If the display shows a time counting down but the oven is not cooking:
- Introducción
- Customer Care Hotline
Brand : KENMORE
Model : 83523
Category : Microwaves