
MID-790IPS - Graphic tablet Laser - Free user manual and instructions
Find the device manual for free MID-790IPS Laser in PDF.


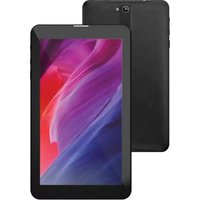
| Product Type | Graphic Tablet |
| Brand | Laser |
| Model | MID-790IPS |
| Operating System | Android 8 |
| Display | 7.0 inch Capacitive multi-touch IPS TFT |
| Resolution | 1024 x 600 |
| Processor | Quad Core |
| RAM | 1 GB |
| Internal Storage | 16 GB |
| Expandable Storage | microSD up to 32 GB |
| Battery | Rechargeable Li-ion Polymer 2000 mAh |
| Front Camera | 0.3 MP |
| Connectivity | Wi-Fi 802.11 b/g/n, Micro USB 2.0, 3.5 mm Audio Jack |
| Sensors | G-sensor 3D |
| Dimensions | 188 x 108 x 10 mm |
| Weight | Approximately 260 g |
| Power Input | Micro USB (5V) |
| Cleaning | Use a water-dampened soft cloth |
| Safety | No user serviceable parts; do not disassemble |
| Included Accessories | Tablet, Micro USB cable, User Guide |
Frequently Asked Questions - MID-790IPS Laser
User questions about MID-790IPS Laser
0 question about this device. Answer the ones you know or ask your own.
Ask a new question about this device
Download the instructions for your Graphic tablet in PDF format for free! Find your manual MID-790IPS - Laser and take your electronic device back in hand. On this page are published all the documents necessary for the use of your device. MID-790IPS by Laser.
USER MANUAL MID-790IPS Laser


TABLE OF CONTENTS
MID-790IPS: APPEARANCE AND BUTTONS 4
MID-1090IPS: APPEARANCE AND BUTTONS 5
ACCESSORIES 6
TURNING ON AND OFF 6
BATTERY CHARGING 6
RUN TIME 6
5 POINT TOUCH-SCREEN 6
SLEEP MODE 6
LOCK / UNLOCK 7
HOME SCREEN ICONS 7
VIEW ALL APPS 8
APP ICONS 8
WIDGETS 10
NOTIFICATION MENU BAR 10
SHORTCUT MENU BAR 10
SETTINGS - WI-FI 11
CONNECTING TO A PC / MAC VIA USB 12
WHY CREATE A GOOGLE™ ACCOUNT 12
PLAY STORE APP 12
SPECIFICATIONS 12
FAQ 13
IMPORTANT SAFETY INSTRUCTIONS AND PRECAUTIONS
- Read all instructions carefully before use.
- Retain this manual for future reference.
- Use this product only in the manner described.
- Only use a water-dampened soft-cloth to clean the surface of this product.
- The following will damage this product: water or moisture ingress, exposure to prolonged extreme heat or cold; excessive humidity, dust or sandy.
- It is recommended to thoroughly charge the device for the first time. Subsequent charges can be as needed. During charging, or extended use, the product may become warm.
- There are no user serviceable parts in this product.
- Un-authorized attempts to dismantle or repair this product will void product warranty and may result in dangerous electric shock.
- Remove data cable by pulling it from the plug, not from the cord.
MID-790IPS: APPEARANCE AND BUTTONS
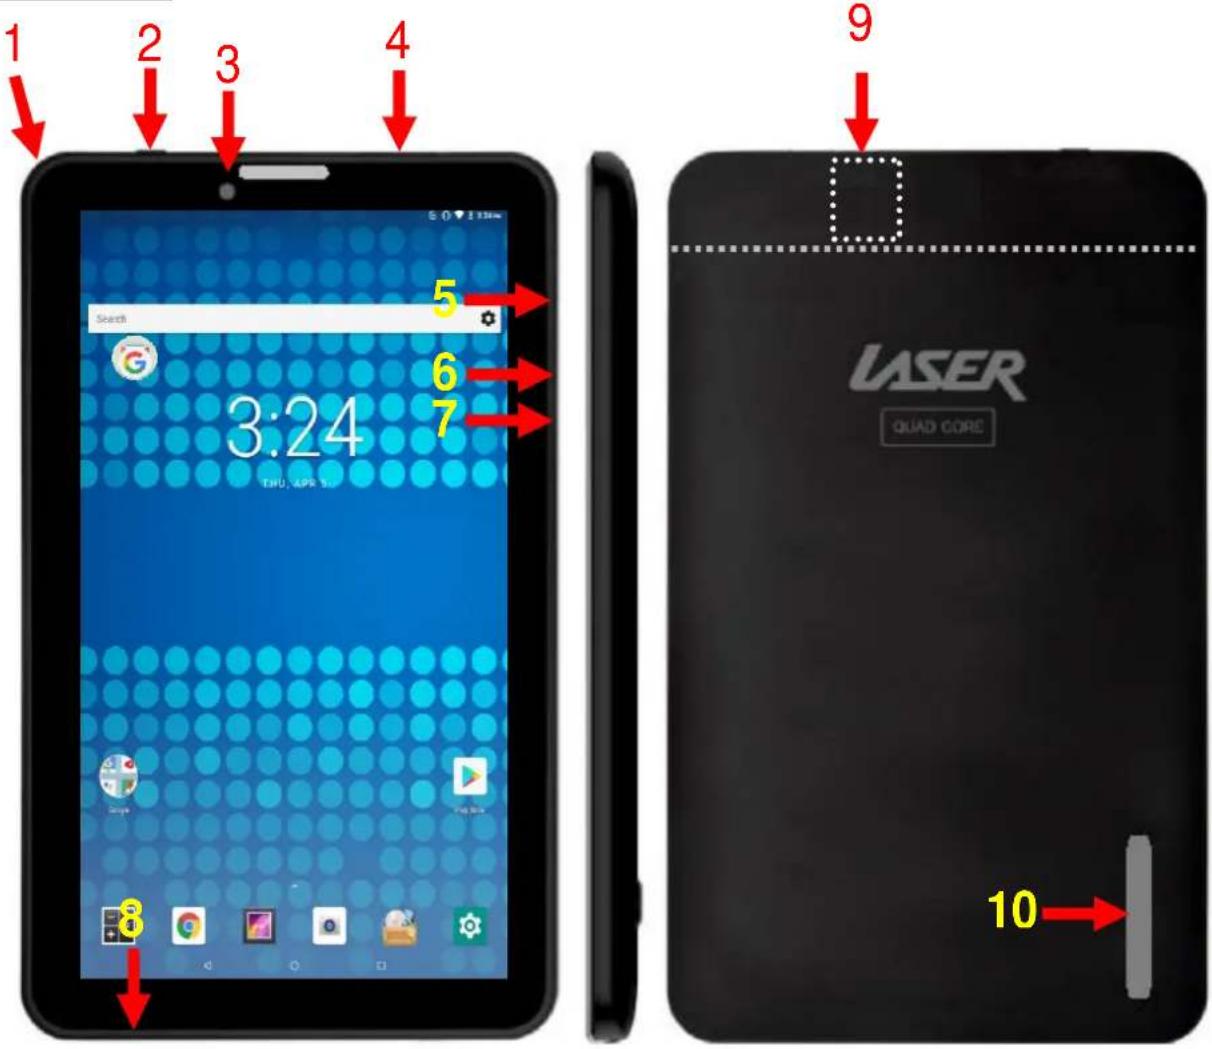
| Number | Description |
| 1 SD | Card Release Panel Access Point |
| 2 Micro USB interface (Data Transfer, Charging, USB Storage flash drive). | |
| 3 Front mount camera | |
| 4 Stereo Earphone Socket (3.5mm Jack) | |
| 5 Volume Up / Volume Down | |
| 6 On / OFF button (*Press and hold to turn ON and OFF) | |
| 7 Reset button | |
| 8 Microphone | |
| 9 (Internal) Micro SD Card slot (Supports cards up to 32GB) | |
| 10 Internal speakers | |
MID-1090IPS: APPEARANCE AND BUTTONS

| Number | Description |
| 1 Front mount camera | |
| 2 Internal speakers | |
| 3 Micro USB interface (Data Transfer, Charging, USB Storage flash drive). | |
| 4 Rear mounted camera | |
| 5 Internal Micro SD card slot. (Supports cards up to 32GB) | |
| 6 Stereo Earphone Socket (3.5mm Jack) | |
| 7 SD Card Release Panel Access Point | |
| 8 On / OFF button (*Press and hold to turn ON and OFF) | |
| 9 Volume Up / Volume Down | |
| 10 Reset button | |
ACCESSORIES
1 x MID Tablet, 1 x Micro USB/DATA cable, 1 x User Guide
TURNING ON AND OFF
To turn ON, PRESS and HOLD the POWER button until the screen turns ON.
To turn OFF, PRESS and HOLD the POWER button until the power screen appears. Then select Power Off.
Note: At any time you can press the POWER BUTTON to enter Snooze mode or to wake from Snooze mode.
BATTERY CHARGING
Connect your tablet to any USB charging socket (Wall adapter or PC), using the supplied USB/DATA cable.

OR

You will be alerted when the battery charge falls below 15%. If the battery is completely depleted your tablet will automatically turn off.
Note: If the battery has been completely exhausted, it may take a few minutes to switch on once charging has begun. Your tablet can be used during charging however this may increase the time needed to fully charge the battery.
RUN TIME
Run time of portable devices including your tablet can be extended by reducing the screen brightness, turning off Bluetooth function, turning off the Location function, turning off Wi-Fi when not in use, turning off Apps that are not required and manually turning the screen off using the power button when not in use.
5 POINT TOUCH-SCREEN
Your tablet has 5 different touch screen behaviours.
1- TAP Tap once to select or start a function, option or application
2- TAP and HOLD Tap and hold to select or start a function
3- DRAG and DROP Tap then drag an item and drop it to a location
4- DOUBLE TAP Double Tap an item twice to select or start a function
5- SLIDE/SWIPE Tap then slide an item up, down, left or right
SLEEP MODE
During prolonged inactive use where no buttons have been pressed, the screen will turn off automatically to conserve power. Press the POWER button to wake your tablet.
Note: This can be adjusted in Display option under Settings.
LOCK / UNLOCK
When your tablet is in sleep mode, press the POWER button to show the unlock screen. TAP and HOLD the LOCKED padlock icon, drag it up to unlock, then release.
Note: Some of the following images may be different from the actual product supplied.
HOME SCREEN ICONS
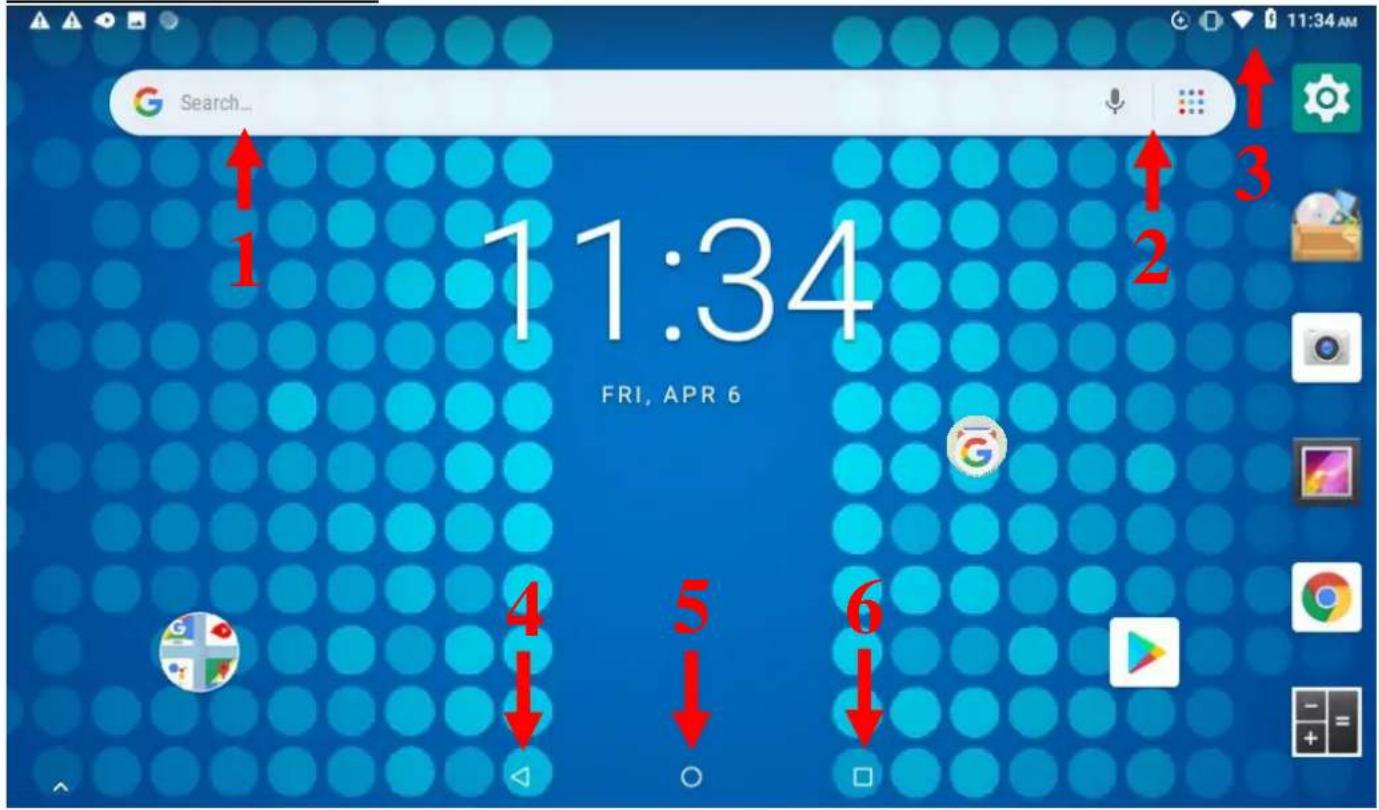
| Number | Icon Function | |
| 1 | 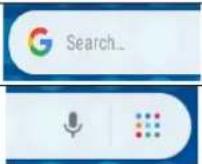 | Search web browser |
| 2 | Search web browser - Voice command | |
| 3 |  | “Swipe Down” Shortcut and Notification Menu |
| 4 | [DTTA] | Previous screen button |
| 5 |  | Home screen button |
| 6 |  | Shortcut to Settings / Sound options |
VIEW ALL APPS
Screen swipe up, using the swipe arrow to view all the installed apps on your tablet

natural_image
Two small icons on a blue dotted background, one with a framed picture and the other with a camera icon, both with a red arrow pointing to the top (no text or symbols)APPS ICONS
Note: Some of the following images may be different from the actual product supplied.
| Icon Function | |
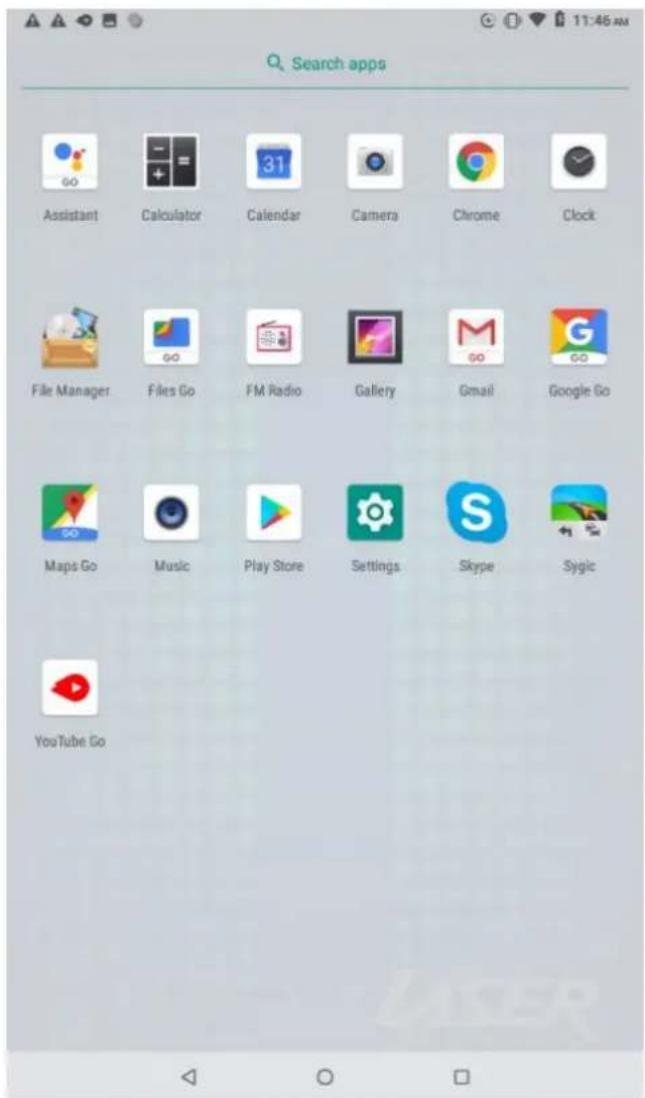
 Assistant Assistant | Google Assistant: Virtual personal assistant Note: A GoogleTM account is required |
 Calculator Calculator | Calculator |
 Calendar Calendar | Calendar: Create and manage daily, weekly and monthly events, set alarm clocks. Note: A GoogleTM account is required |
 Camera Camera | Camera: Take and view pictures and video |
 Chrome Chrome | Web Browser: Open Chrome web browser |
 Clock Clock | Clock: Access alarm clock settings and time display |
 File Manager File Manager | File Manager: Access all pictures, video, music, sound clips and other files saved on the device and SD card |
 Files Go Files Go | File cleanup program to help maximize memory space |
 FM Radio FM Radio | FM Radio |
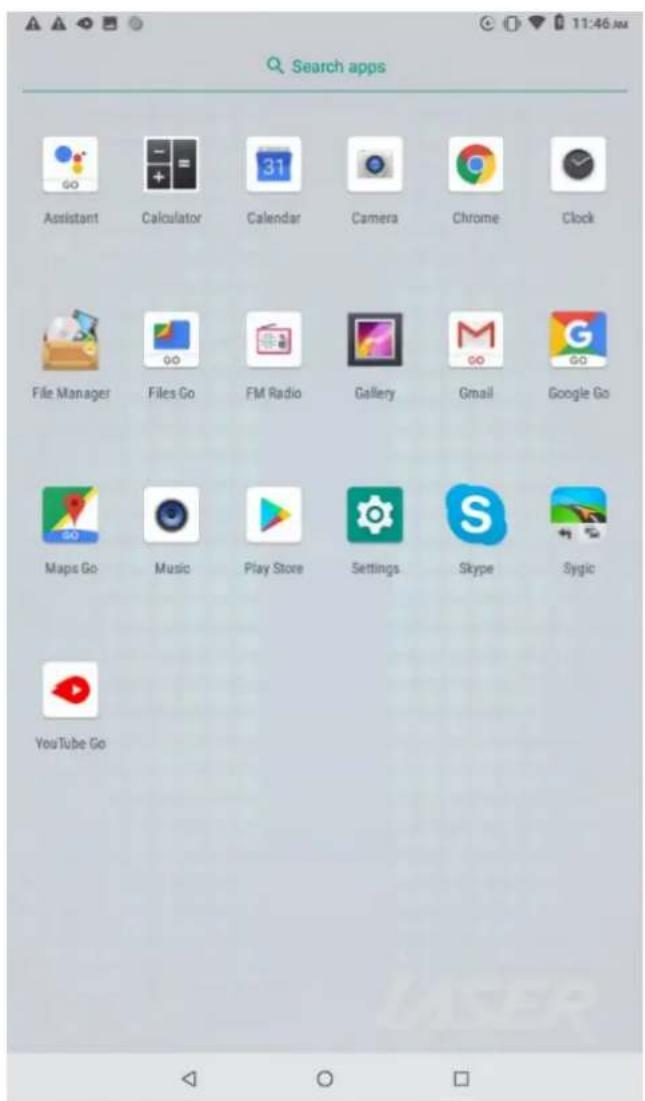
| Gallery | Access all pictures, video, music, sound clips and other files saved on the device and SD card |
| Mgmail | E-mail: e-mail access |
| GooGoogle Go | Google Go: Programming App |
| Maps Go | Maps Go: Light data use version of Google Maps |
| Music | Music: Music player |
| Play Store | Google App Store |
| Settings | Settings: View settings menu |
| Skype | Skype: Internet Video call software |
| Sygic | Sygic: Navigation software |
| YouTube Go | Youtube: Light data use version of Youtube |
WIDGETS


Users can add or remove Widget program icons (shortcuts) from the desktop as well as move them to different desktop screens.
To add a Widget, press and hold the desired widget, drag and drop it to the desired position on the desktop.
To delete an icon, press and hold the icon and flick it off screen to delete.
NOTIFICATION MENU BAR
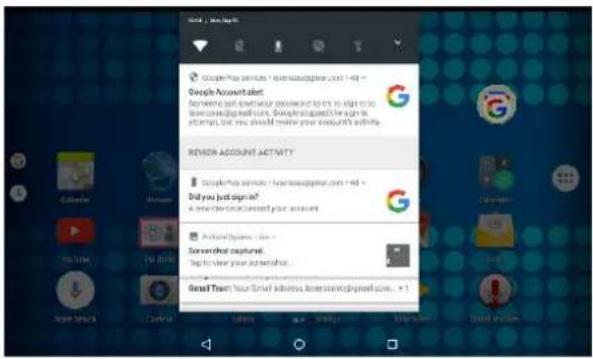
Swipe down over the Notification Menu Bar (top RIGHT of the screen) to bring up any notifications you may have.

SHORTCUT MENU BAR
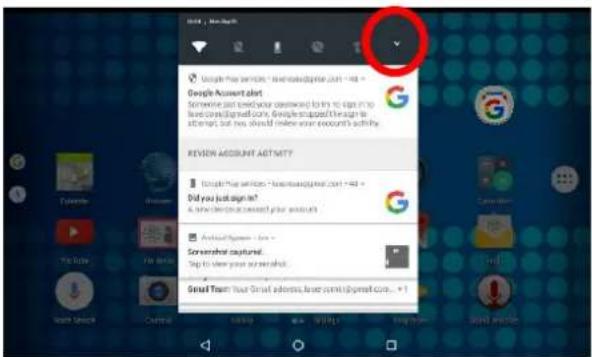
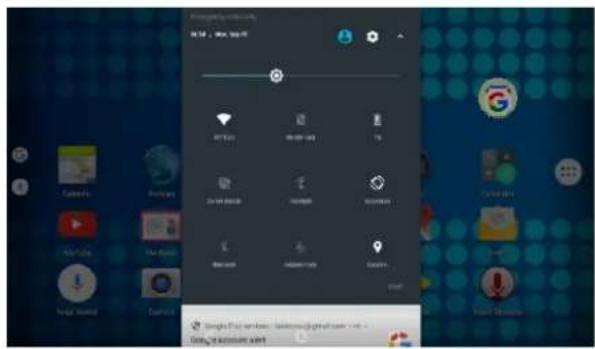
Press the drop down arrow from the NOTIFICATIONS MENU bar to display your shortcuts menu such as: Battery charge, Settings, WiFi, Location, Audio Profiles, screen rotation.
SETTINGS
Wi-Fi
When WiFi is turned on it will automatically scan for all available WiFi networks
Note: a WiFi connection is required if connecting to the internet (for email, Play Store App or web browsing)

Tap the desired NETWORK name. If this NETWORK connects successfully, "Connected" will appear. If the NETWORK is encrypted, enter the password then tap "Connect".
Your Tablet will indicate when the NETWORK connection is ready for use when the WiFi icon appears on the top right notification bar.
CONNECTING TO A PC / MAC VIA USB
Connect the USB cable to your Tablet and PC/MAC, making sure you are using the correct MICRO USB cable supplied.
WHY CREATE A GOOGLE™ ACCOUNT
Creating a Google™ account allows you to talk, chat, share, schedule, store, organize, collaborate, discover, and create online. A Google™ account also provides user level access to Gmail, Google+ and YouTube which are all backed up online and accessible online via the cloud.
PLAY STORE APP
Open the PLAY STORE APP and set up your account. If you have an existing account select EXISTING, otherwise choose NEW to create a new account and follow the set-up steps.

SPECIFICATIONS
| Operation System: MID-790IPS AndroidTM 8, MID-1090IPS AndroidTM 8 | |
| Size | MID-790IPS: 188 x 108 x 10mm, Aprox 260g |
| MID-1090IPS: 243 x 171 x 10mm, Aprox 500g | |
| CPU processor type: Quad Memory: 16GB | Core |
| RAM: | 1GB |
| TF card: | 128M-32G |
| Display screen: | MID-790IPS: 7.0" Capacitive multi-touch IPS TFT |
| MID-1090IPS: 10.1" Capacitive multi-touch IPS TFT | |
| Resolution: | MID-790IPS: 1024 x 600 MID-1090IPS: 1280 x 800 |
| Battery and capacity: | MID-790IPS: Rechargeable Li-ion Poly 2000Mah |
| MID-1090IPS: Rechargeable Li-ion Poly 5000Mah | |
| Camera Resolution: | 0.3MP (Front mount), 2.0MP (Rear Mount * MID-1090IPS only) |
| Screen auto orientation: | G-sensor 3D |
| Voice Recording | Built-in microphone |
| Supported file types: | Video format: avi, mov, mp4, 3gp, flvAudio format: mp3, flac, aac, wav, m4a(To play other formats, you will need to download the App that supports the format you intend to play) |
Google, Android, Google Play, YouTube and other marks are trademarks of Google LLC. The Android robot is reproduced or modified from work created and shared by Google and used accordingly to terms described in the Creative Commons 3.0 Attribution License.
FAQ
| I can't turn my tablet ON? | 1. Ensure your tablet is charged2. Connect the power adaptor, and then check again after sufficient charge time3. Reset the device using the reset button |
| I can't hear anything through my headset, or the sound quality is very bad | 1. Ensure speakers are not obstructed eg. Lying flat on a table1. Please ensure volume is turned up2. Check the music file on another device to make sure it is not damaged.3. Try using another pair of headphones |
| I can't copy files or play music | 1. Please check the connection to your computer2. Ensure there is enough spare memory3. Check the USB cable is not damaged by testing with another device4. Check the USB connection is inserted correctly |
| My tablet displays a network or service error message | 1. Check the strength of the WiFi signal2. Check that the WiFi service is available and operating correctly3. When using apps like Facebook and Play Store App (with a lot of content) for the first time, extra time will be required to load all the content. |
| My touch screen is slow and not working correctly | 1. Make sure the protective film has been removed from the screen2. Ensure that your fingers are dry and clean.3. Restart your tablet4. Ensure the touch screen is not scratched or otherwise damaged |
| My tablet is frozen or a severe error has occurred | 1. Try closing Apps or resetting2. Restore or reset the tablet to factory default settings via the settings menu.3. Reset the device using the reset button |
| My tablet becomes hot when in use or while charging | 1. Some applications can consume more power than others causing the tablet to become warm while in use or if used for extended amounts of time. This is normal and won't affect the life or performance of your tablet. |
| An error occurs when I open my music files | 1. Remove some files to make more storage space2. Make sure the music files aren't protected by digital rights management (DRM). If the files have DRM protection, make sure that you have the license or key.3. Make sure that file type is compatible. |
| The available memory on my tablet is less than 8GB. Why is that so? | Some of this space is required to pre-load Apps and other Software. Space is also required for the OS (Operating System). |
| My MID tablets internal memory is almost full; can I install or move the Apps to external SD card? | Latest AndroidTM OS will only allow apps to be installed on internal memory. To free up the internal space: 1) Uninstall some un-used apps. 2) Move photos, music or video files to SD card. |
| My tablet screen has cracked; will it be covered by warranty? | No, physical damage is not covered by warranty. |
| I can't find the Micro SD card socket | Please remove the top housing section by accessing the SD Card Release Panel Access Point. Please refer to the product diagram at the start of this manual. |
For further product information and instructions please visit our product web page at www.laserco.com.au or email www.laserco.com.au/supports/email.php.
Please note: As continuous improvements are made to this product, slight operational differences may occur. For the most up-to-date user manual, please visit our web site.
Warranty Against Defects
Laser Corporation Pty Ltd (“Laser”) warrants your new product to be free from defects in materials and workmanship for 12 months, from the date of purchase, provided that the product is used in accordance with accompanying recommendations or instructions where provided. The benefit of this warranty is in addition to your rights under the Australian Consumer Law and to other rights and remedies of the consumer under a law in relation to the goods or services to which the warranty relates.
Through a network of retailers and resellers, Laser will provide you with your choice of a repair, exchange (where possible) or refund (within Dead on Arrival period) for this product if it becomes defective within the warranty period.
This warranty will no longer apply where the defect is a result of alteration, accident, misuse, abuse, normal wear and tear, neglect or improper storage.
Please retain your receipt as proof of purchase.
How to make a product warranty claim:
Step 1: Find your receipt which proves the date of purchase. Where the date of purchase cannot be verified, your place of purchase or Laser will make an assessment based on the date of manufacture, the condition of the Laser product and the type of defect.
Step 2a): Contact your place of purchase. They will assess the nature of the fault and repair, replace or refund the product as per their store refund or warranty policy.
Step 2b): If your place of purchase cannot be contacted, then you can contact Laser Customer Service with details of your defective Laser Product Phone (02) 9870 3388; or Email: service@laserco.com.au or online www.laserco.com.au/warranty (click on “Consumers (End Users)”). Our business address is: Unit 1/6-8 Byfield Street, North Ryde, NSW 2113
Step 3: Laser will issue you with a Return Authorisation (RA) number within 48 hours. When requested, send us the defective product and a copy of your receipt. Laser will cover the cost of the return delivery.
Step 4: Wait for us to contact you. Once we have received your defective Laser product for inspection, we will inform you of our assessment of your claim within 7 days. When we contact you, we will firstly let you know whether you have a valid claim under this Warranty, and if so, we will inform you whether your defective Laser product will be replaced or repaired, together with the number of days you can expect to wait to receive your replaced or repaired Laser product.
Step 5: For further details on warranty cover and returns, please check Terms and Conditions for Warranty Returns section at www.laserco.com.au/warranty (Consumers Section).
Our goods come with guarantees that cannot be excluded under the Australian Consumer Law. You are entitled to a replacement or refund for a major failure and compensation for any other reasonably foreseeable loss or damage. You are also entitled to have the goods repaired or replaced if the goods fail to be of acceptable quality and the failure does not amount to a major failure.

NAVIG[8]R
PRECISION
gaming accessories
CONNECT
naum8
GPS ESSENTIALS
iRange!



- TABLE OF CONTENTS
- IMPORTANT SAFETY INSTRUCTIONS AND PRECAUTIONS
- ACCESSORIES
- TURNING ON AND OFF
- BATTERY CHARGING
- RUN TIME
- POINT TOUCH-SCREEN
- SLEEP MODE
- LOCK / UNLOCK
- VIEW ALL APPS
- APPS ICONS
- WIDGETS
- NOTIFICATION MENU BAR
- SHORTCUT MENU BAR
- SETTINGS
- Wi-Fi
- CONNECTING TO A PC / MAC VIA USB
- WHY CREATE A GOOGLE™ ACCOUNT
- PLAY STORE APP
- Warranty Against Defects
Brand : Laser
Model : MID-790IPS
Category : Graphic tablet