
130288 - HDD/SSD Enclosure MANHATTAN - Free user manual and instructions
Find the device manual for free 130288 MANHATTAN in PDF.


| Product Type | External Drive Enclosure for 3.5-inch SATA HDD/SSD |
| Interface | USB 2.0 (Hi-Speed) to SATA |
| Supported Drives | 3.5-inch SATA hard drives or SSDs up to 2 TB |
| Data Transfer Rate | Up to 480 Mbps (USB 2.0) |
| Dimensions (Enclosure) | 20 × 13 × 3.2 cm (8.7 × 5.1 × 1.4 in) |
| Weight (without drive) | 490 g (17.3 oz) |
| Power Supply | Input: 100–240 V AC, 50/60 Hz, 0.8 A; Output: 12 V DC, 2 A |
| Power Adapter Cable Length | 1.5 m (5 ft) |
| USB Cable Length | 80 cm (31.5 in) |
| Material | ABS plastic with metal construction |
| LED Indicators | Power/Activity LED |
| Special Features | One-touch backup button, plug and play, quick install, included stand |
| Compatible Operating Systems | Windows XP/Vista/7, Mac |
| Certifications | CE, FCC (Class B) |
| Warranty | Lifetime Warranty |
| Package Contents | Drive enclosure, USB cable, power adapter, stand, screws, screwdriver, quick install guide |
| Care and Cleaning | Wipe with a dry, soft cloth. Keep away from moisture and extreme temperatures. |
| Safety Precautions | Use only the supplied power adapter. Do not disassemble; no user-serviceable parts inside. |
| Repairability / Spare Parts | No spare parts available; product is non-repairable. Covered by lifetime warranty. |
Frequently Asked Questions - 130288 MANHATTAN
User questions about 130288 MANHATTAN
0 question about this device. Answer the ones you know or ask your own.
Ask a new question about this device
Download the instructions for your HDD/SSD Enclosure in PDF format for free! Find your manual 130288 - MANHATTAN and take your electronic device back in hand. On this page are published all the documents necessary for the use of your device. 130288 by MANHATTAN.
USER MANUAL 130288 MANHATTAN
manhattan-products.com
MAN-130288-UM-0712-01
INTRODUCTION
Thank you for purchasing this MANHATTAN® Drive Enclosure, Model 130288.
Install an idle or new hard disk drive into a MANHATTAN Drive Enclosure to expand storage capacities for desktop and notebook computers. With support for large-capacity 3.5-inch SATA drives up to 2 TB and Hi-Speed USB data transfer rates of up to 480 MBps, this MANHATTAN Drive Enclosure helps optimize high-performance personal computer storage applications.
By following the instructions in this user manual — or the simpler setup procedure in the printed quick install guide included with the product — you'll soon be enjoying these additional features:
- Integrated one-touch backup button
• Lightweight, compact design ideal for portable storage
• Sturdy case protects drive and facilitates cooling - Plug and Play installation – Windows and Mac compatible
- Lifetime Warranty (For a complete list of country-specific warranties, go to manhattan-products.com/warranty.)
Package Contents
- Drive Enclosure
- USB cable, power adapter, stand, installation hardware, screwdriver and quick install guide
System Requirements
• Available USB type-A port
• Windows XP/Vista/7 or Mac support
HARDWARE AND DRIVER INSTALLATION

- Remove the 4 screws on the bottom of the enclosure (A) and lift off the top (B).
- Connect the hard drive to the SATA data and power connectors on the enclosure, then secure it to the enclosure using the included screws (C).
- Re-assemble the enclosure (D) using the 4 screws in Step 1.

- Using the included USB cable, connect the enclosure (E) to a USB port on the computer.
- Press the Power button (F). Confirm the Power LED (G) lights.
Your system will automatically detect the new hardware and complete the setup, confirmed when "USB Mass Storage Device" displays in the Device Manager folder.

SOFTWARE INSTALLATION
These steps are for the installation of the convenient one-touch backup software. NOTE: This software doesn't support Mac operating systems. Some images may look different on your computer, as your software version may be slightly different than the one represented here.
- Load the included software CD. The PC Clone EX setup wizard's Welcome screen will display automatically. Click "Install" to continue.

- When the License and Warranty Agreement displays, click "Agree" to continue.

- Enter the desired pathway for the installation or click "Browse" to find a current folder. Click "Install" to continue.

- The final Setup screen will display a progress status bar. When finished, the wizard will display an "Install complete!" message. Click "OK" to exit the wizard.
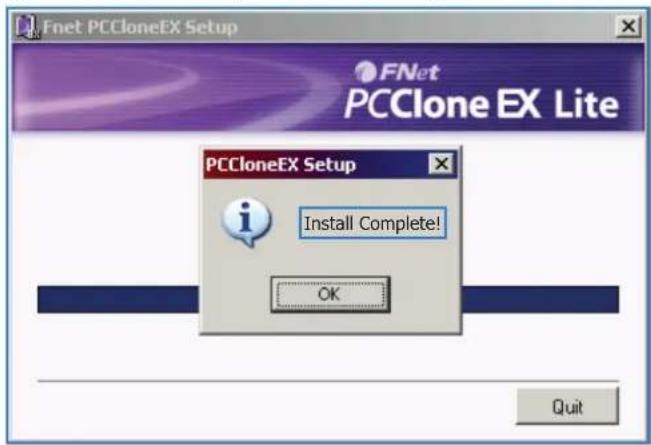
- The PC Clone EX icon will appear in the system tray. To open the program, you can double-click the icon or right-click to display the menu option for selection.

CREATING PARTITIONS
NOTE: If the hard drive you have placed in the enclosure (the drive that you are copying data to) has already been partitioned, you can proceed to the next section.
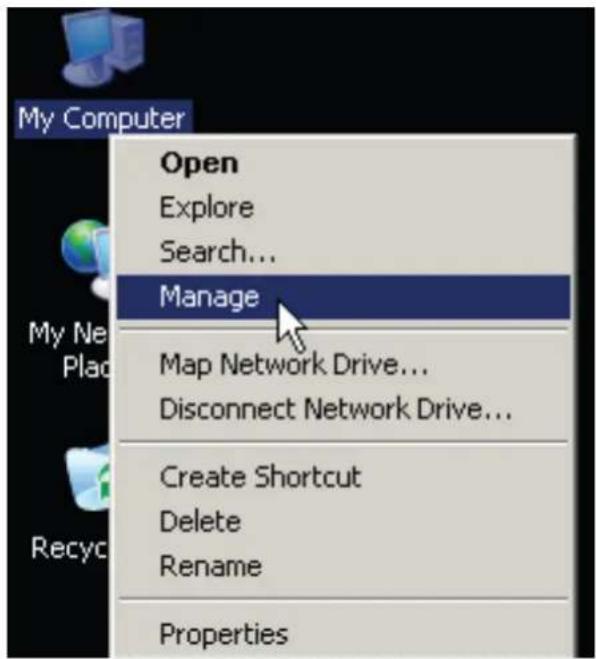
- With the adapter plugged into a USB port on your computer and powered on (see Hardware Installation above), right-click My Computer on your desktop and go to Manage. (Or go to Start / Control Panel / Administrative Tools / Computer Management.)
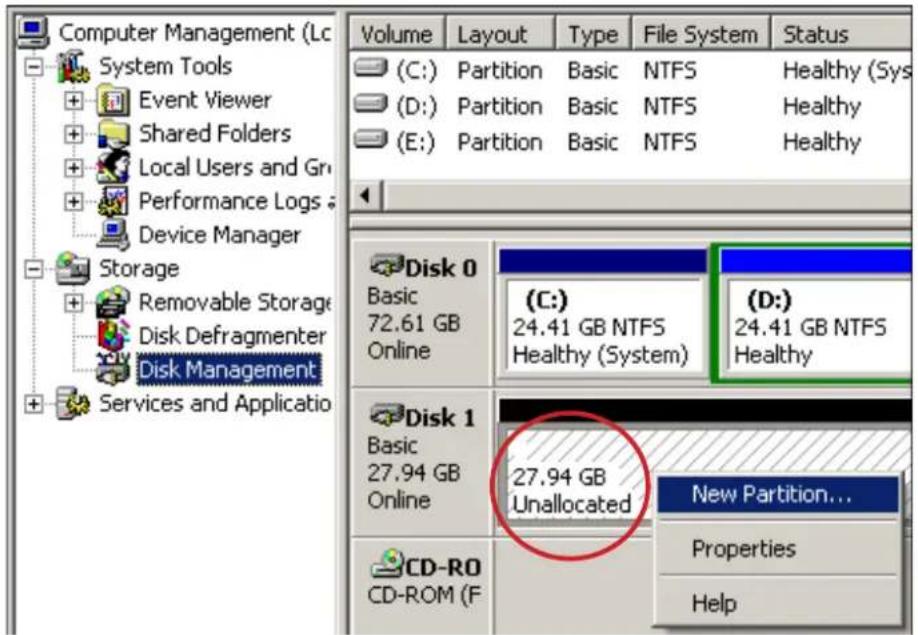
- In the left-hand file directory, click/select "Disk Management" so its screen displays on the right. Right-click on the disk identified as "Unallocated," then click/select "New Partition..." from the pop-up menu. NOTE: To confirm that the drive you've placed in the enclosure is indeed the unallocated disk, disconnect the USB cable and see if the corresponding "Unallocated" text disappears.
- With the Format Partition screen displayed, select your preferred settings, then click "Next" to continue.
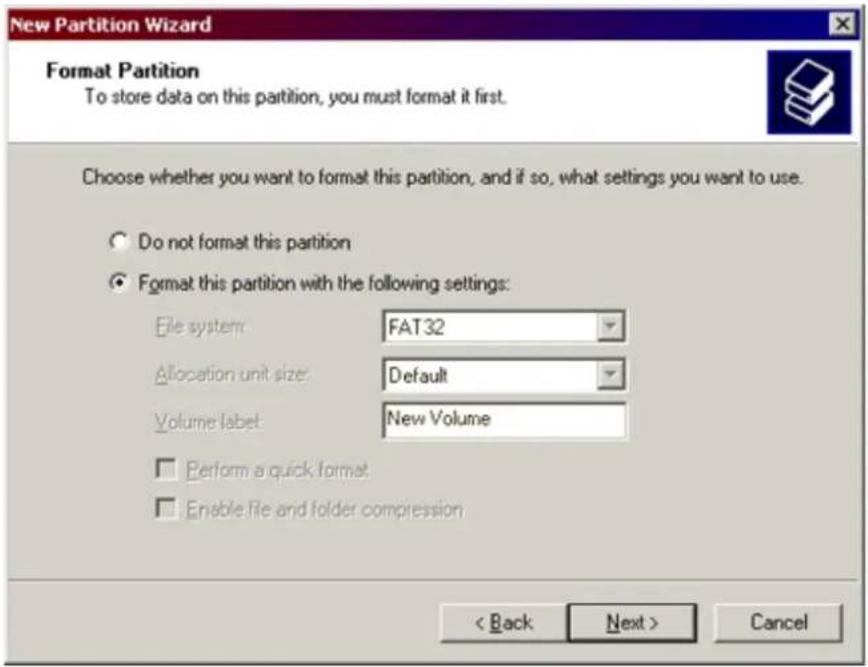
OPTION: An alternative pathway for accessing the formatting options is through Start on your desktop, then All Programs / PCCloneEX / FNet FAT32 Format. The formatting details and instructions will appear on the screens that display.

FAT32 FORMAT UTILITY
With the increases in drive capacities, the FAT32 Format Utility in older operating systems is unable to support data transfers in excess of 32 GB. The solution is to use the FNet formatting utility on the enclosed CD, which can quickly format a disk for as much as 4 TB (4,000 GB). Note that all data already on the disk will be deleted.
- Connect the HDD to the drive enclosure and turn on the computer.
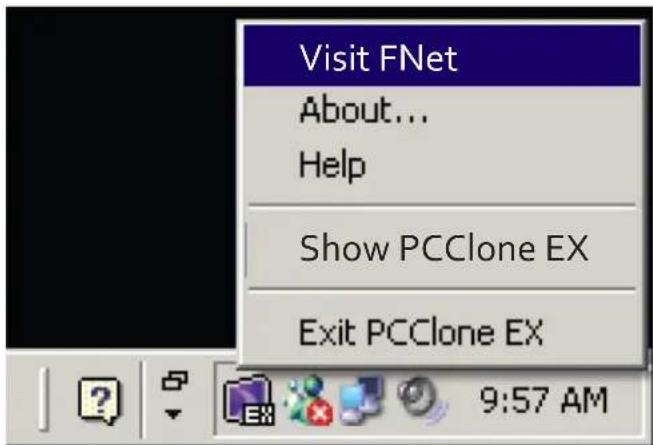
- Open PC Clone EX and select Visit FNet.
- Confirm that the fields for USB Device and Drive to Format display your preferences and click Start.

- Select "Quick Format" and click Start. Remember, all data previously loaded on the receiving HDD will be deleted.
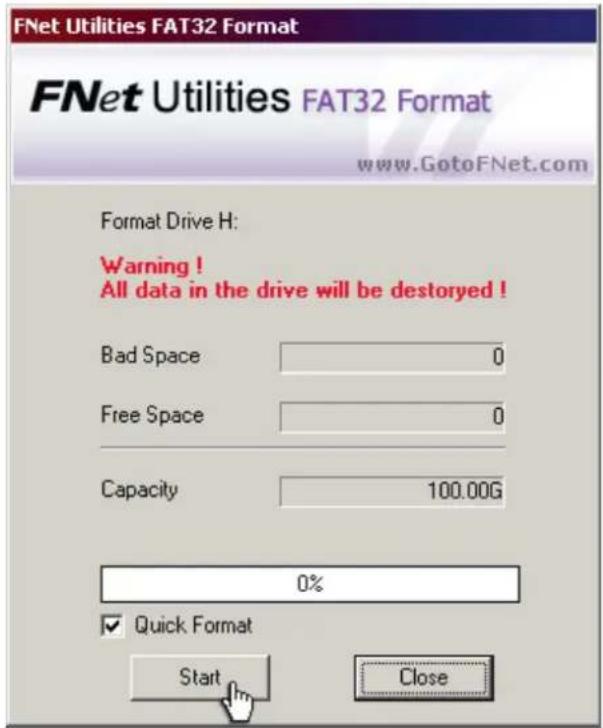
- A Status screen will display the progress of the formatting.

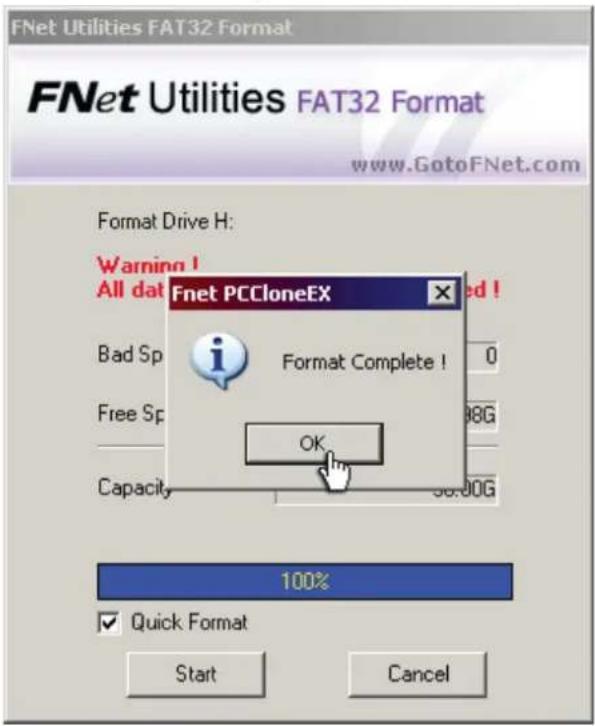
- When the Format Complete message displays, click OK. The selected disk has been formatted with the FAT32 file system.
To use any of the features available with this function, be sure the enclosure is plugged into a USB port on your computer and powered on, and that a backup drive has been properly loaded in the enclosure. NOTE: Before backing up files for the first time using this device, it's recommended that the function parameters be set on the File Backup Settings screen in the PC Clone EX program.
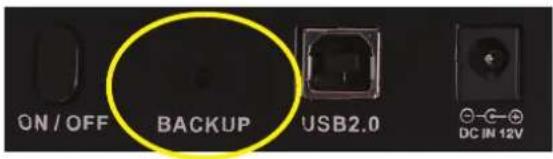
- With the PC Clone EX program open and the disk connected to the enclosure (see Hardware Installation above), press the Backup button on the enclosure.
- A Files Backup Confirm screen will display. Click Backup to continue.

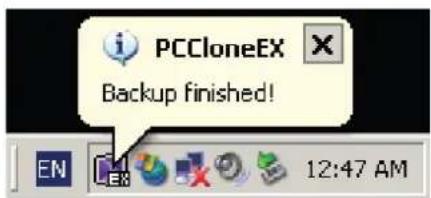
- While the backup procedure is in progress, the PC Clone EX icon will flash in the system tray and a status uplate will display every 10 seconds until the backup is complete.

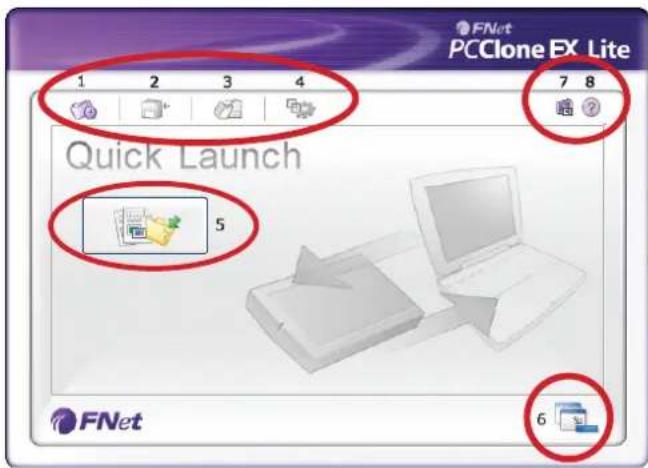
Quick Launch
The Quick Launch screen displays automatically when the PC Clone EX program is opened. From here, you can directly execute the File Backup function by clicking on the boxed icon (5 in the image below) or select one of the other menu options:
1 Quick Launch
3 File Manager
5 Quick File Backup 7 About
2 File Backup
4 Setup
6 Minimize
8 Help
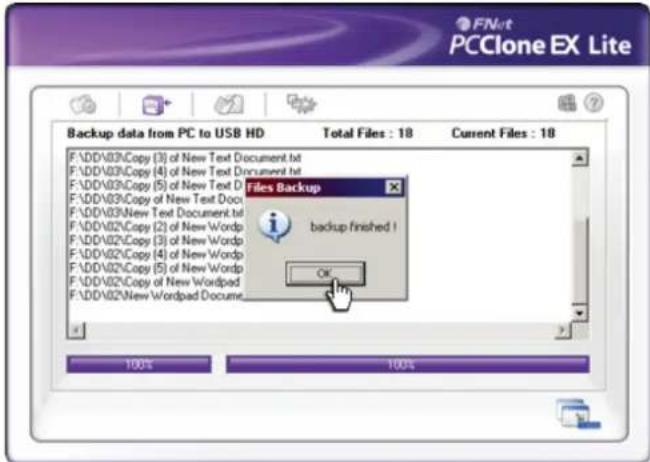
Quick File Backup
-
As mentioned above, you can click on the Quick File Backup icon (5) when you first open the program and are presented with the Quick Launch screen. NOTE: If using the backup function for the first time, you may want to first go to Setup to establish your preferred function parameters. Setup is where a hot key can be created for even quicker use of the backup function.
-
With your files selected for backup, click OK when prompted.

- When the file backup begins, a status bar displays to indicate the progress of the procedure. When the "Backup finished!" prompt displays, click "OK."
File Manager
Managing files in PC Clone EX is just like managing files in Windows Explorer. Just drag files between the fixed device and the drive ined to the enclosure.

Setup
You can select your preferences on this screen before you begin backing up files. Options include creating a hotkey: a single command used to initiate the backup function.
Hotkeys
Click Edit and enter any combination of keys (using Control and/or Shift and/or Alt keys plus any number, letter or function key) in the text field to the left.

Files Backup Type
Select "Add files to existing backup" to back up additional files; select "Discard and replace existing backup" to completely re-copy selected files.
Other
You can select "Quick file backup double confirm" so that a confirmation box will display whenever you use a hot key to initiate a backup. (This is enabled by default.) The other on-screen Setup options are self-explanatory.
File Backup
If you're navigating back from another menu screen and want to proceed with a file backup, click on the File Backup icon. This screen lets you do a backup or restore.
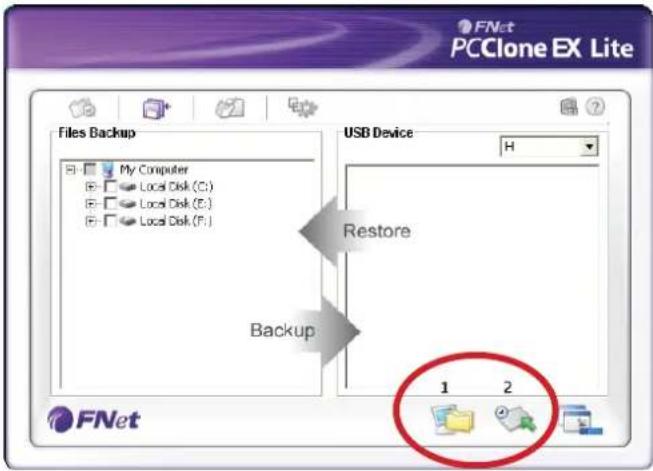
Backing Up Files
-
In the left-hand (Files Backup) window, select the folders/drives to be copied from the source device. Click the File Backup icon (1) to continue.
-
With your files selected for backup, click OK when prompted.

- When the file backup begins, a status bar displays to indicate the progress of the procedure. When the "Backup finished!" prompt displays, click "OK."

- Confirm that the selected items now appear in the right-hand (USB Device) window.
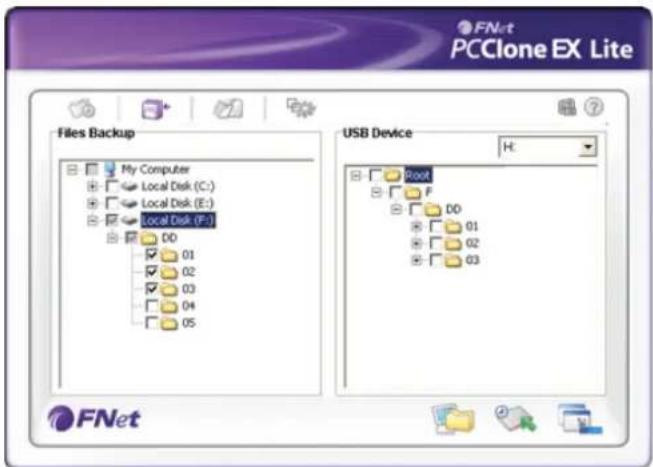
IMPORTANT: A root directory (FNet) folder will display in the USB Device window. This is where all the backed-up files are stored, so be careful not to delete it unintentionally.

Restoring Files
- In the event you need to copy files from the backup drive to the original source device (to replace lost or damaged originals, for example), select the items in the right-hand (USB Device) window and click the Restore icon (2).

- When the "Are you going to restore?" prompt displays, click OK.

- When the "Restore Finished!" message displays, click OK. The selected items will appear in the left-hand (File Backup) window.

Deleting Files
- Select a file (or files) you want to delete in the USB Device window.
- Right-click your mouse to display the "Delete select files" option. Select this option, and all highlighted files will be removed.

OPTION: To remove all files that have been backed up, you can simply select the root directory (FNet) folder, then right-click for the delete option.
SPECIFICATIONS
Standards and Certifications
- USB 2.0 to SATA interface
• CE
• FCC
General
- JM-20329 chipset
- SATA 7P + 15P internal data and power connections
- DC single-post power input (power adapter included)
- Power adapter: input, 100 – 240 V, 50 – 60 Hz, 0.8 A; output, 12 V / 2 A; cable, 1.5 m (5 ft.)
- USB Type-B external connection
- Working temperature: 0 - 45ircC
• ABS/metal construction
• Power/activity LED indicator - 20 × 13 × 3.2 cm . (8.7 × 5.1 × 1.4 in.)
• 490 g (17.3 oz.) without hard drive
Power Supply
- Input: 100 – 240 V AC; 50/60 Hz maximum 0.8 A
- Output: 12 V / 2 A
- Cable: 1.5 m (59 in.)
Physical
- 9.8 × 7 × 1.8 cm (3.8 x 2.75 x 0.7 in.)
• Cables: USB, 80 cm (31.5 in.); 4-pin power, 10 cm (4 in.)
• Weight: 270 g (9.5 oz.)
System Requirements
• Available USB type-A port
- Windows XP/Vista/7 and Mac support
Package Contents
- Drive Enclosure
- USB cable, power adapter, stand, installation hardware, screwdriver multilanguage quick install guide
WASTE ELECTRICAL & ELECTRONIC EQUIPMENT
Disposal of Electric and Electronic Equipment
(applicable in the European Union and other European countries with separate collection systems)
ENGLISH
This symbol on the product or its packaging indicates that this product shall not be treated as household waste. Instead, it should be taken to an applicable collection point for the recycling of electrical and electronic equipment. By ensuring this product is disposed of correctly, you will help prevent potential negative consequences to the environment and human health, which could otherwise be caused by inappropriate waste handling of this product. If your equipment contains easily removable batteries or accumulators, dispose of these separately according to your local requirements. The recycling of materials will help to conserve natural resources. For more detailed information about recycling of this product, contact your local city office, your household waste disposal service or the shop where you purchased this product. In countries outside of the EU: If you wish to discard this product, contact your local authorities and ask for the correct manner of disposal.
DEUTSCH
ENGLISH: For warranty information, go to manhattan-products.com/warranty.
This equipment has been tested and found to comply with the limits for a Class B digital device, pursuant to Part 15 of Federal Communications Commission (FCC) Rules. These limits are designed to provide reasonable protection against harmful interference in a residential installation. This equipment generates, uses and can radiate radio frequency energy, and if not installed and used in accordance with the instructions may cause harmful interference to radio communications. However, there is no guarantee that interference will not occur in a particular installation. If this equipment does cause harmful interference to radio or television reception, which can be determined by turning the equipment off and on, the user is encouraged to try to correct the interference by one or more of the following measures:
- Reorient or relocate the receiving antenna.
- Increase the separation between the equipment and the receiver.
- Connect the equipment to an outlet on a circuit different from the receiver.
- Consult the dealer or an experienced radio/TV technician for help.
CE / R&TTE
ENGLISH
This device complies with the requirements of R&TTE Directive 1999/5/EC.
DEUTSCH
Copyright © MANHATTAN
- INTRODUCTION
- Package Contents
- System Requirements
- HARDWARE AND DRIVER INSTALLATION
- SOFTWARE INSTALLATION
- CREATING PARTITIONS
- FAT32 FORMAT UTILITY
- Quick Launch
- Quick File Backup
- File Manager
- Setup
- Hotkeys
- Files Backup Type
- Other
- File Backup
- Backing Up Files
- Restoring Files
- Deleting Files
- SPECIFICATIONS
- Standards and Certifications
- General
- Power Supply
- Physical
- WASTE ELECTRICAL & ELECTRONIC EQUIPMENT
- ENGLISH
- DEUTSCH
- CE / R&TTE
Brand : MANHATTAN
Model : 130288
Category : HDD/SSD Enclosure