
X3-08 - Gps Nextar - Free user manual and instructions
Find the device manual for free X3-08 Nextar in PDF.


| Product Type | GPS Navigator |
| Brand | Nextar |
| Model | X3-08 |
| Screen Size | 3.5 inches TFT |
| Dimensions (L x W x D) | 100 mm x 76 mm x 22 mm |
| Weight | Approx. 0.16 kg |
| Power Source | DC 5V via included DC adaptor or internal rechargeable lithium-ion battery |
| Battery Life | Approx. 2 hours (fully charged) |
| Power Consumption | < 8W |
| Audio Formats Supported | MP3, WMA |
| Photo Formats Supported | JPEG |
| SD Card Slot | Accepts SD cards up to 4 GB (for mapping data, music, photos) |
| Frequency Response | 20 Hz - 20 kHz |
| Signal-to-Noise Ratio | ≥ 65 dB |
| Navigation Features | Touch screen, voice prompts, maps of U.S. and Canada, points of interest |
| Mounting Options | Suction cup (windshield) or adhesive dashboard mount disk |
| Safety Compliance | FCC Part 15, UL tested for fire/shock hazards |
| Temperature Range for Use | 32°F - 100°F (battery charging) |
| Storage Temperature Range | -5°F - 120°F |
| Included Accessories | DC adaptor, suction-cup mount, cradle, stylus, dashboard mount disk, mapping SD card, pouch, manuals, warranty card |
| Cleaning | Use soft cloth; avoid harsh chemicals like alcohol or benzene |
Frequently Asked Questions - X3-08 Nextar
User questions about X3-08 Nextar
0 question about this device. Answer the ones you know or ask your own.
Ask a new question about this device
Download the instructions for your Gps in PDF format for free! Find your manual X3-08 - Nextar and take your electronic device back in hand. On this page are published all the documents necessary for the use of your device. X3-08 by Nextar.
USER MANUAL X3-08 Nextar
Congratulations on purchasing your Nextar GPS Navigator. Your mobile navigation system assures that your days of getting lost are over! Finding an address or any of millions of different points of interest such as the nearest gas station or restaurant is a snap anywhere across the U.S and Canada. Just enter information using the touch screen and let the voice prompt and detailed map guide you to your destination.
Important Safety Information
Read and keep these instructions
Failure to heed the following warnings could result in an accident or collision resulting in serious injury or death
- When installing the unit in a vehicle, place the unit so that it does not obstruct the driver's view of the road or interfere with vehicle operating controls.
- This GPS unit is designed to provide you with route suggestions. It does not reflect road closures or road conditions, traffic congestion, weather conditions, or other factors that may affect safety or timing while driving.
- Always operate the vehicle in a safe manner. Do not become distracted by the unit while driving. The directions provided by the navigation unit are not guaranteed to be accurate in every situation. Before following suggestions from the unit, use your best judgment regarding the safety and legality of any action you take with your vehicle.
- Use this GPS unit only as a navigational aid. Do not attempt to use the unit for any purpose requiring precise measurement of direction, distance, location, or topography. This product should not be used to determine ground proximity for aircraft navigation.
- Do not access the GPS functions while driving. Pull over in a safe and legal manner before changing settings, entering destinations, or to access any other operational functions.
- Never store your GPS in temperatures less than -5°F or greater than 120°F.
- This unit contains a non-user-replaceable lithium-ion battery. Do not dispose of your GPS by fire or with hazardous or flammable materials. Contact your local waste disposal department for information regarding proper disposal of lithium-ion batteries.
- When in a car, do not mount your GPS on or near an air bag. If the air bag is deployed, you may be seriously injured.
Important Safety Information
• Only use a power cord provided by NEXTAR. Use of products provided by other suppliers may void the warranty. - Caution: To reduce the risk of electric shock, do not remove cover or back. No user serviceable parts inside. Refer servicing to qualified service personnel. - Do not use harsh chemicals (such as alcohol, benzene, thinners, etc.) or detergents to clean your GPS. This could damage the unit or cause a fire. - Do not drop, strike, or shake your GPS severely. It may harm the internal electronics of the unit. - Warning: To reduce the risk of fire, electric shock or damage, do not expose this product to rain or moisture. Do not use your GPS in high explosive areas as the unit may generate sparks. - Do not damage the power cord by bending, twisting, pulling, or heating. Do not use the plug if it is loose as it may cause a fire or electric shock. Do not place any heavy items on the power cord. Do not allow the power cord to be crimped as it may cause electric shock or fire. - Do not handle the GPS with wet hands while it is being charged. It may cause an electric shock or seriously damage your GPS. - Spilled beverages are a common problem in moving vehicles. Do not locate liquid containers, or items that can accumulate condensation such as cold beverages, in a position where liquid can spill or drip on the GPS device. - Only use attachments / accessories specified by the manufacturer. • Unplug the unit from the DC car adaptor when not in use. - Refer all servicing to qualified service personnel. Servicing is required when the apparatus has been damaged in any way, such as power-supply cord or plug is damaged, liquid has been spilled or objects have fallen into the apparatus, the apparatus has been exposed to rain or moisture, does not operate normally, or has been dropped. - Caution: Dashboard temperatures can reach 180°F in a closed vehicle! To prevent the GPS from being damaged by excess heat, always remove your GPS unit from the dash area when the car is parked.
Important: Some states have restrictions on locating your GPS unit on the windshield. Included with your Nextar unit is an adhesive backed Dashboard Mount Disk that can be used if attaching the mounting bracket to the windshield is inconvenient or not allowed.
See Page 10 for details.
FCC & UL Compliance
FCC COMPLIANCE:
This device complies with part 15 of the FCC Rules. Operation is subject to the following two conditions:
• This device may not cause harmful interference. • This device must accept any interference received, including interference that may cause undesired operation.
This equipment has been tested and found to comply with the limits for a Class B digital device, pursuant to Part 15 of the FCC Rules. These limits are designed to provide reasonable protection against harmful interference in a residential installation. This equipment generates, uses, and can radiate radio frequency energy and, if not installed and used in accordance with the instructions, may cause harmful interference to radio or television reception, which can be determined by turning the equipment off and on. The user is encouraged to try to correct the interference by one or more of the following measures:
• Reorient or relocate the receiving antenna. • Increase the separation between the equipment and the receiver. • Connect the equipment into an outlet on a circuit different from that to which the receiver is connected. • Consult the dealer or an experienced radio/TV technician for help.
This Class B digital apparatus complies with Canadian ICES-003.
CAUTION:
Underwriters Laboratories Inc. ("UL") has not tested the performance or reliability of the Global Positioning System ("GPS") hardware, operating software, or other aspects of this product. UL has only tested for fire, shock, or casualty hazards as outlined in UL's Standard(s) for Safety.
UL Certification does not cover the performance or reliability of the GPS hardware and GPS operating software.
UL MAKES NO REPRESENTATIONS, WARRANTIES, OR CERTIFICATIONS WHATSOEVER REGARDING THE PERFORMANCE OR RELIABILITY OF ANY GPS-RELATED FUNCTIONS OF THIS PRODUCT.
Table of Contents
Introduction
Important Safety Information....1
FCC & UL Compliance....3
Getting Familiar With Your Hardware
Main Unit....5
Accessories....6
Power Adaptor....7
System Connections 8
Using the Mounting Bracket 9
Using Your Navigator
General Setup....10
Playing Music....15
Photo Viewer....17
Service & Support
Troubleshooting 20
Specifications 22
Copyright....23
Main Unit


- POWER Button
Press and hold for 2 seconds to enter or exit the standby mode.
- Card Slot
Insert the SD card into the slot.
Used for Mapping Data Card or user's music and photo SD card.
- Earphone Jack
Used to connect earphones for private listening. When the earphones are connected to this jack, the speaker will be turned off automatically.
- DC 5V Input Jack
Used to connect to the supplied adaptor.
- LCD Screen
Tap the screen with a finger to select commands or use the included stylus pen.
- USB Port
Used to connect to the USB device.

- RESET Button
Press to reset the system.
- Speaker
Accessories
The Following Items Are Included With Your GPS Unit
 | Instruction ManualQuick-Start GuideWarranty Card |
 | DC Adaptor |
 | Suction-Cup Mounting Bracket |
 | Mounting Cradle |
 | Stylus Pen |
 | Dashboard Mount Disk |
 | Mapping Data SD Card |
 | Pouch |
NOTE: The SD card may be shipped installed in the GPS Unit.
Power Adaptor
Using the Power Adaptor
The GPS unit is supplied with a DC adaptor for charging the internal battery and for powering the unit while in a vehicle.
Connect the DC adaptor power plug to the unit's power jack and plug the other end into the vehicle's 5V accessory/cigarette socket, as shown below.

Attention
- Set up your destination and other settings before moving out into traffic. Do not access the controls of the GPS unit while driving.
- Mount the unit so that it does not obstruct your view of the road.
- When connected with the adaptor, the LCD screen will be brighter than when it is not charging.
About Rechargeable Battery
Your portable GPS device comes with a built-in rechargeable lithium-ion battery. A fully charged battery delivers about 2 hours of use. It is recommended to use the DC adaptor while in the vehicle.
Working conditions and precautions for the rechargeable battery
- The battery should only be used and charged when temperatures are between 32°F and 100°F.
- Maintain well-ventilated conditions around the product to avoid overheating. Do not put the product on a blanket, clothing, or anything that may block ventilation to the product.
- When the battery is weak, an indication symbol will appear on the LCD screen and the unit will power off automatically after a few minutes.
System Connections
Inserting SD Card
The unit is designed with an SD Card slot which allows you to insert an SD card into the unit as shown below:

To remove the card, gently press the card in with your fingernail. The card unlocks and protrudes slightly. You can now remove the card. To re-insert the card, press the card in the slot until it clicks. The card should not protrude from the slot when it is installed correctly.
Important: If you remove the SD Mapping Data Card to use the Music or Photo functions, treat the Mapping Card very carefully to avoid damage or loss of data.
Allowable SD Card Capacity: 32MB ~ 4GB.
Connecting to Earphones
You may connect earphones to the right side of the unit for private listening.

When earphones are connected, the speaker will automatically turn off.
- Note: Overly loud volume could damage your hearing. Turn down the volume before you connect the earphones, and then raise the volume to a comfortable level.
- Important: Most state and local laws prohibit the driver from wearing earphones while operating a vehicle on public roads.
Using The Mounting Bracket
When using the unit in vehicle, you can use the supplied mount accessories (mount bracket, mount cradle and dashboard mount disk) to mount the unit in the vehicle.
Take the following steps to operate:
![graph TD A["Device Mount"] --> B["Camera Module"] B --> C["Front Display"] style A fill:#f9f,stroke:#333 style B fill:#ccf,stroke:#333 style C fill:#cfc,stroke:#333](/content/2026/05/953072/images/2d1709aff52ab6b0ce222aef81dd103db902e1cc26a27dda3513ad9667039ea9.jpg)
- Following the arrow, slide the mount cradle onto the mount bracket.
- See Fig. 2. Fix the unit on the mount cradle.
- See Fig. 3. Lift the suction cup lever and then press the suction cup to the windshield. Following arrow (1), press down the suction cup lever. Then rotate the knob to adjust the unit to the proper position.
To mount to the dashboard, use the included adhesive disk. Choose a clean, dry spot on your dashboard, peel off the protection liner from the back of the disk, and then attach the disk to your dashboard.
Note: Keep the suction cup and the interior of the windshield clean to ensure good adhesion.
Warning:
When you mount the device in your vehicle, please make sure that it has a clear line of sight to the sky. The device must not be mounted in places that will impair the driver's view of the road. Please take extra precaution to ensure the airbags are not obstructed by the device.
General Setup
System Main Menu

In the system main menu, there are four items for selecting. Touch the corresponding item to enter.

Tap Music to enter the Music Player.


Setup Menu
In the main menu, tap Setup to enter the Setup menu, the screen will display as below:

Setup


In the Setup menu, tap ✗ to return to the main menu.
General Setup
Language

Tap Language in the Setup menu to enter the Language setting menu for language selection, as shown below:
Language


English

Cancel
Done
Tap the , buttons to select language.
Then tap Done to confirm or tap to cancel.
Date & Time

Tap Date & Time in the Setup menu to enter the Date & Time setting menu for changing to the current time zone, date and time, as shown below:
Date & Time

Time Zone

(GMT-08:00)
Pacific Time (US _Canada)

Date


Time


Cancel
Done
Tap the ▶ buttons to select the proper Time Zone.
Tap the ▲▼ buttons of Date group to change the corresponding date.
Tap the ▲▼ buttons of Time group to change the corresponding time.
Then tap Done to confirm or tap to cancel.
General Setup
Brightness
Tap Brightness in the Setup menu to enter Brightness setting menu for backlight adjustment, as shown below:

Tap , to darken or increase the brightness of the display.
Energy Saver:
You can set the energy saver ON or OFF to determine how the backlight will behave when the screen has not been touched for 5 minutes.
OFF: The screen will always be in normal brightness.
ON: When running on battery, dim the screen if it is inactive for 5 minutes. You can tap the screen to light it up again. This helps to maintain a longer battery life.
Note: Default is set to OFF
After setting, tap Done to confirm or tap to cancel.
General Setup
Volume

Tap Volume in the Setup menu to enter the Volume settings menu for volume adjustment, as shown below:

Tap the 🪲 to decrease the volume.
Tap the 🪟 to increase the volume.
Then tap Done to confirm or tap to cancel.
Align Screen

Tap in the Setup menu to align the screen, as shown below.

Tap the center of the cross with your finger. When the cross moves to another position, tap and hold the center of the new target. Repeat each time to complete the calibration process. When tapping the screen on the final step, the new settings will be stored and you are returned to the Display menu.
General Setup
Power

Tap Power in the Setup menu to enter the Power menu, as shown below:
Power

Battery Status: 0%

The Power menu displays the unit's battery status. The values are between 0% and 100%, where 0% means the battery power has run out completely, and 100% represents a full battery power. When the battery is being charged, the Battery Status will indicate "Charging".
Playing Music
The unit is designed with an SD card slot and supports MP3 and WMA format music files. To use the music player, you will need to have an SD card with your MP3 music files preloaded.
Please note that you cannot use the navigation function of the device at the same time you are using the music player. Remove the SD Mapping Data Card that comes with the device from the SD card slot on the side of the unit. Then insert your SD card with your MP3 or WMA music files.
Note: Please take special care of the Mapping Data Card if you remove it to use the Music Player as the navigation function will not work without it.
Warning: For your own safety, do not use the earphones when driving.
To Load Your Music
- First load your MP3 or WMA formatted music onto your personal SD card. Music files can be imported to your SD card on a PC, using a variety of programs such as Windows Media Player. This process must be performed independent of the navigation unit.
- Insert your SD card into the side of the GPS unit.
Do not attempt to use the unit to read and burn music files from an external source.
Playing Music

Tap Music in the system main menu to enter the Music Player, as shown below:

Playing Music
Tap

button to enter the music play list menu, as shown below:

When you open the play list, the system will look for audio files on its SD memory card and create a play list automatically.
If the play list consists of more than one screen, tap the up arrow for the previous page and the down arrow for the next page.
Tap the toggle buttons to determine whether the player will repeat the songs in the play list or not.
Tap the Random toggle buttons to determine whether or not to play the songs in the list randomly.
Tap Done to start the playback and return to Music Player, as shown below.

Tap the toggle button to pause or resume the playback. Tap to go back to the previous song; tap to skip to the next song. Tap to decrease or increase the volume of the speaker. Tap the progress bar to select the desired playback starting point. Tap in the top right corner to exit.
Photo Viewer
The unit is designed with an SD card slot and supports JPEG format files playback. To use the Photo Viewer, you will need to have an SD card with your JPEG picture files preloaded. Please note that you cannot use the navigation function of the device at the same time you are using the Photo Viewer. Remove the SD Mapping Data Card that comes with the device from the SD card slot on the side of the unit. Then insert your SD card with your JPEG picture files.
Note: Please take special care of the Mapping Data Card if you remove it to use the Photo Viewer as the navigation function will not work without it.
If the unit lags when reading JPEG files, try using lower resolution files. We suggest 640 x 480 pixel resolution files.

Tap Photos in the system main menu to enter the Photo Viewer, as shown below:

In the menu, tap the folder icon to enter the folder menu, as shown below:

Photo Viewer
Viewing Photos
In the folder menu, double tap the memory card icon, and the photos stored in the memory card will be listed on the screen.

In the photo list, double tap a photo to display it on the LCD screen. You can also tap a photo to select it and then tap Open to display it.
Tap Back to return to the previous menu.
Tap Setting to enter the Setting menu for setting the Slide Show.
When playing photos, the Photo Viewer has the following playback features:
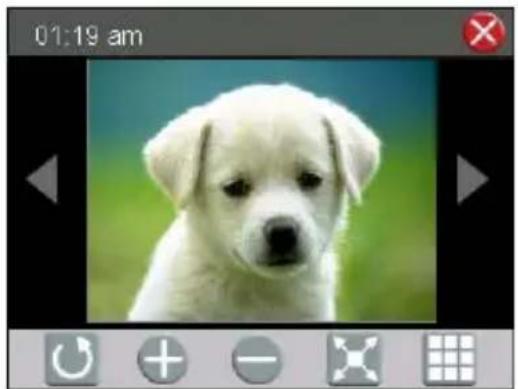
Tap ◀ to go back to the previous photo; tap ▶ to switch to the next photo.
Tap to rotate the photo.
Tap + or - to zoom in or out of the photo.
Tap ☒ to play the photo in full-screen mode; double tap the screen again to return to Photo Viewer.
Tap 📄 to return to the photo list.
Photo Viewer
Using the slide show
Tap Setting in the photo list screen to enter the Setting menu for setting the Slide Show.

You can set the slide show on or off to determine whether or not to play photos in slide show mode. When the slide show is on, you can set the interval between two photos during slide show.
After setting, tap OK to confirm or tap to cancel.
Next, tap a photo in the photo list to open it.

When you tap 📄, the slide show will start. To stop the slide show, double tap the screen.
Troubleshooting
Before contacting customer service, review the steps below to solve simple problems.
If you still suspect something wrong with this unit, immediately turn the power off, disconnect the power connector from the unit, and contact Nextar Customer Service. Never try to repair the unit yourself.
| Problem Possible Cause Possible Solution | ||
| Unit will not Power Up | Power adaptor is not connected properly | Check power adaptor connectionNote: Some automobile accessory power jacks provide no power when the ignition is off. |
| Weak battery Charge battery | ||
| Unit will not activate after pressing and holding the stand by button when connected to the adaptor for charging | The unit had not been used for a long time and built-in battery was overly discharged | Press Reset button to turn the unit on. |
| No Sound Volume | may be turned down or muted | Check volume and mute condition |
| Screen is difficult to see | Brightness may be turned down | Adjust brightness of the LCD screen |
Troubleshooting
| Problem Possible Cause Possible Solution | ||
| cannot receive satellite signals or does not orient | Unit may be inside a tunnel, inside a building, or tall buildings may obstruct the satellite signal | Check for obstructions Navigator |
| Mapping SD card may be removed for music or photo functions | Re-install Mapping SD Card | |
| Satellite signal strength is unstable. Comes and goes. | Rechargeable battery is weak | Plug in power adaptor and charge Battery |
| Unit is moving side to side too much | Secure unit | |
| Signal is obstructed by buildings or other materials | Check and correct obstruction | |
| System software fails to function after entering a command | Turn the unit off and on again to reset using slide switch on rear. |
Other possibilities
Static or other external interference may cause the unit to function abnormally. In order to recover normal status, please unplug the power supply cord and then plug it into the outlet again to reset the unit. If the problems still exist, please cut off the power supply and consult your service center or a qualified technician.
Specifications
| TFT screen size 3.5 inches | |
| Frequency Response 20Hz~20kHz | |
| Audio Signal-to-noise Rate ≥65dB | |
| Audio distortion or noise ≤-20dB (1kHz) | |
| Channel Separation ≥70dB (1kHz) | |
| Dynamic Range ≥80dB (1kHz) | |
| Power | DC |
| Power Consumption < 8W | |
| Dimensions | 100mmX76mmX22mm |
| Weight About 0.16kg |
(L W D)
Design and specifications are subject to change without notice.
Copyright
No part of this manual may be copied, republished, reproduced, transmitted or distributed in any way without prior written consent of Nextar, Inc. Any unauthorized distribution of this manual is expressly forbidden.
Nextar ® , is a trademark of Nextar (Hong Kong) Limited.
Nextar may find it necessary to modify, amend or otherwise change or update this manual. We reserve the right to do this at any time, without any prior notice. All specifications and features are subject to change without notice.
Note: All screen shots shown are simulated and may not represent the actual screen on production unit sold to consumers.
For instruction books, information on this product, its operation and accessories, visit us on the web at:
www.nextar.com
Or write to us at:
Nextar, Inc.
1661 Fairplex Drive
La Verne, CA 91750
USA
All products distributed by Nextar Inc. unless otherwise indicated Made in China
© 2009 Nextar (Hong Kong) Limited. Nextar is a trademark and service mark of Nextar (Hong Kong) Limited. All other brand names, trademarks and service marks are property of their owners.

We are seriously concerned about environmental protection, and we hope that you share our concern as well. For more information regarding our recycling program, please visit us at http://www.nextar.com/green or call us at 1-888-849-0846
X31109EH02



- IMPORTANT SAFETY INFORMATION
- READ AND KEEP THESE INSTRUCTIONS
- FAILURE TO HEED THE FOLLOWING WARNINGS COULD RESULT IN AN ACCIDENT OR COLLISION RESULTING IN SERIOUS INJURY OR DEATH
- FCC & UL COMPLIANCE
- FCC COMPLIANCE
- CAUTION
- TABLE OF CONTENTS
- INTRODUCTION
- GETTING FAMILIAR WITH YOUR HARDWARE
- USING YOUR NAVIGATOR
- SERVICE & SUPPORT
- MAIN UNIT
- ACCESSORIES
- THE FOLLOWING ITEMS ARE INCLUDED WITH YOUR GPS UNIT
- POWER ADAPTOR
- USING THE POWER ADAPTOR
- ATTENTION
- ABOUT RECHARGEABLE BATTERY
- WORKING CONDITIONS AND PRECAUTIONS FOR THE RECHARGEABLE BATTERY
- SYSTEM CONNECTIONS
- INSERTING SD CARD
- CONNECTING TO EARPHONES
- USING THE MOUNTING BRACKET
- WARNING
- GENERAL SETUP
- SYSTEM MAIN MENU
- SETUP MENU
- SETUP
- LANGUAGE
- ENGLISH
- CANCEL
- DONE
- DATE & TIME
- BRIGHTNESS
- ENERGY SAVER
- VOLUME
- ALIGN SCREEN
- POWER
- PLAYING MUSIC
- TO LOAD YOUR MUSIC
- TAP
- PHOTO VIEWER
- VIEWING PHOTOS
- USING THE SLIDE SHOW
- TROUBLESHOOTING
- OTHER POSSIBILITIES
- SPECIFICATIONS
- COPYRIGHT
Brand : Nextar
Model : X3-08
Category : Gps