
ITB396B - Soundbar iLive - Free user manual and instructions
Find the device manual for free ITB396B iLive in PDF.


| Product Type | 37" Soundbar with Bluetooth Wireless and Subwoofer |
| Model | ITB396B |
| Brand | iLive |
| Bluetooth | Yes, wireless range up to 60 ft |
| Audio Channels | 2.0 stereo with built-in subwoofer |
| Audio Inputs | Optical digital audio input, Line In (3.5mm), Aux In (RCA stereo) |
| Remote Control | Full-function remote with CR2025 battery (included) |
| Power Supply | AC/DC power adapter (included) |
| Dimensions (Width) | 37 inches |
| Wall-Mountable | Yes, hardware included |
| Equalizer Modes | Music, Movie, Dialog |
| Audio Controls | Volume, Bass, Treble (on remote and unit) |
| Status Indicators | Red (off), Amber (Optical), White (Aux), Green (Line In), Flashing Blue (Bluetooth pairing), Solid Blue (Bluetooth connected) |
| Included Accessories | Remote control, optical audio cable, AC/DC power adapter, wall-mount hardware |
| Cleaning | Use a dry cloth only |
| Repairability | No user-serviceable parts; refer servicing to qualified personnel |
| Safety Certifications | FCC Class B, Double Insulation |
Frequently Asked Questions - ITB396B iLive
User questions about ITB396B iLive
0 question about this device. Answer the ones you know or ask your own.
Ask a new question about this device
Download the instructions for your Soundbar in PDF format for free! Find your manual ITB396B - iLive and take your electronic device back in hand. On this page are published all the documents necessary for the use of your device. ITB396B by iLive.
USER MANUAL ITB396B iLive
natural_image
Black rectangular electronic device with rounded body and small buttons, isolated on white background (no text or symbols)37" HD Soundbar with Bluetooth Wireless and Subwoofer
User's Guide for Model ITB396B v1522-01
For the most up-to-date version of this User's Guide, go to www.iLiveElectronics.com
Safety Instructions & Warnings

WARNING: To reduce the risk of electric shock, do not remove cover (or back). No user-serviceable parts inside. Refer servicing to qualified service personnel.

the exclamation point within an equilateral triangle is intended to alert the user to the presence of important operating and maintenance (servicing) instructions in the literature accompanying the appliance.

The lightning flash with arrowhead symbol, within an equilateral triangle, is intended to alert the user to the presence of uninsulated "dangerous voltage" within the product's enclosure that may be of sufficient magnitude to constitute a risk of electric shock to persons.

This symbol indicates that this product incorporates double insulation between hazardous mains voltage and user accessible parts.
WARNING: DO NOT INGEST BATTERY, CHEMICAL BURN HAZARD.
Important Safety Instructions
- Read these instructions.
- Keep these Instructions.
- Need to warnings.
- Follow all instructions.
- Dif. can use this approach to treat cancer. (see references in article)
- Clean only with a dry chill.
with the manufacturer's instructions.
- Do not install near any heat sources such as radiators, heat
registers, stores, or other apparatus (including amplifiers) that produce heat.
- Do not defeat the safety purpose of the polarized or grounding type plug. A polarized plug has two blades with one wider than the other. A grounding type plug has two blades and a third grounding plug. The wide blade or the third prong are provided for your safety. When the provided plug does not fit into your outlet, consult an electrician for replacement of the obsolete outlet.
- Protect the power cord from being walked on or pinched particularly at plugs, convenience receptacles, and the point where they exit from the apparatus.
- Only use attachments/accessories specified by the manufacturer.
- Unplug this apparatus during lightning storms or when unused for long periods of time.
- Refer all servicing to qualified service personnel, servicing is required when the apparatus has been damaged in any way, such as power supply cord or plug is damaged, liquid has been spilled or objects have fallen into the apparatus; the apparatus has been exposed to rain or moisture, does not operate normally, or has been dropped.
- Use only with a cart, stand, tripod, bracket, or table specified by the manufacturer, or sold with the apparatus. When a cart is used use caution when moving the cart/apparatus combination to avoid injury from tip-over.

FCCWarnings
Warning: Changes or modifications to this unit not expressly approved by the party responsible for compliance could void the user's authority to operate the equipment.
NOTE: This equipment has been tested and found to comply with the limits for a Class B digital device, pursuant to Part 15 of the FCC Rules. These limits are designed to provide reasonable protection against harmful interference in a residential installation. This equipment generates, users, and can radiate radio frequency energy and, if not installed and used in accordance with the instructions, any cause harmful interference to reduce communications. However, there is no guarantee that interference can be avoided or in a particular installation. This equipment may cause harmful interference to radio or television reception, which can be determined by using the equipment off and on, the user is encouraged to try to correct the interference by one or more of the following measures.
• Reorient or relocate the receiving antenna.
- Increase the separation between the equipment and receiver. - Connect the equipment into an outlet on a circuit different from that, in which the receiver is connected.
- Consult the dealer or an experimaxial radio-TV technician for help.
Safety Instructions & Warnings
Additional Warnings and Precautions
- CAUTION: TO PREVENT ELECTRIC SHOCK, MATCH WIDE BLADE OF PLUG TO WIDE SLOT, FULLY INSERT.
Avir. AFIN DE PRÉVENIR LES CHOCS ÉLÉCTRIQUES FAITES CORRESPONDRE LA PICHE BLANCHE DE LA PRISE À LA FENTE LARGE, INSÉREZ TOTALEMENT.
- Mains plug is used as disconnect device and it should remain readily operable during intended use. In order to disconnect the apparatus from the mains completely, the mains plug should be disconnected from the mains socket outlet completely.
- Cation and marking information is located at the rear of
- WARNING: To reduce the risk of fire or electric shock, do not expose this apparatus to rain, moisture, dripping, or splashing.
- Objects filled with liquids, such as vases, shall not be placed on the apparatus.
- CAUTION: Use of controls or adjustments or performance of procedures other than those specified may result in hazardous radiation exposure.
- WARNING: Do not place this unit directly or in furniture surfaces with any type of soft, porous, or sensitive finish. As with any rubber compound made with oils, the feet could cause marks or staining where the feet reside. We recommend using a protective barrier such as a cloth or a piece of glass between the unit and the surface in reduce the risk of damage and/or staining.
- WARNING: Use of this unit near fluorescent lighting may cause interference regarding use of the remote. If the unit is displaying erratic behavior move away from any fluorescent lighting, as it may be the cause.
- Battery shall not be exposed to excessive heat such as
- Keep new and used batteries away from children. If the battery compartment does not close securely, stop using the producer and keep it away from children.
• Do not max old and new batteries
Completely replace all old batteries with new ones.
- Batteries should be recycled or dispensed of as per state and local guidelines.
• WARNING: This product may contain chemicals known
to the State of California to cause birth defects, or other reproductive harm (California Prop 62). Wash hands after handling.
- This product meets and complies with all Federal regulations.
Table of Contents Setup
Setup 5
Features & Specifications
Power
Remote Battery
Includes
Orientation 6
Rear View
Speaker Inputs Detail
Speaker Controls (Right Side)
Function/Source Indicator Lights
Remote 8
Bluetooth Wireless 9
Pairing a Bluetooth Device for the First Time
Playing Audio Wirelessly
Audio Inputs 10
Stereo RCA Inputs (Aux In)
Optical input
Line In
Company Information 12
Contact Information
Warranty
International Support
Features & Specifications
- 37" length
• Supports Bluetooth
- Wireless range: 60 ft.
• 2 channel stereo sound
Digital volume control
Full-function targets
- Full name of the name
• Optical digital audio input
• Line In (3.5mm audio input)
• Aux In (RCA stereo audio inputs)
Includes
• Remote control with 1 CR2025 button cell battery
• Optical audio cable
- AC/DC power adapter
• Wall-mount hardware and instructions
Power
natural_image
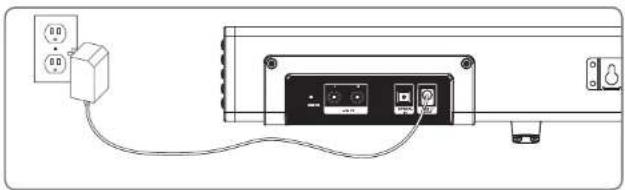
Pure electrical circuit lines without any symbolsPlug the small end of the power cord into the DC input on the back of the speaker, and the large plug into a standard wall outlet.
Remote Battery

Orientation


Speaker Controls (Right Side)
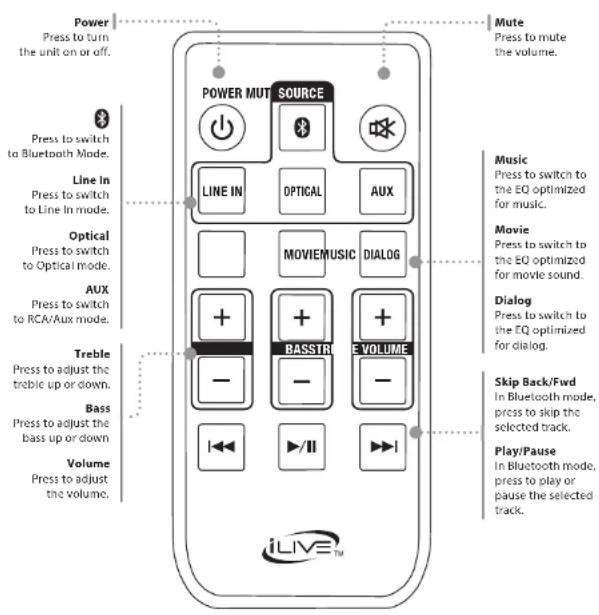
Power Press to power the unit on or off.
Source Press to switch between Optical, Line In, AUX, and Bluetooth modes
Volume +/- Press to adjust the volume up or down.
Pair Press and hold to begin pairing to a Bluetooth device.

Function/Source Indicator Lights
| STATUS INDICATOR | |
| Power Off Red Light | |
| Optical Mode Amber Light | |
| Aux In Mode White Light | |
| Line In Mode Green Light | |
| Bluetooth Pairing Flashing Blue Light | |
| Bluetooth Connected Blue Light |
Remote
Bluetooth Wireless
Pairing a Bluetooth Device for the First Time
- Power on the unit by pressing the Power button.
- Press the 📄 button on the remote to switch to Bluetooth Mode, indicated by a slowly flashing blue light. You can also press the Source button on the side of the unit.
- Press and hold the Pair button on the side of the unit. The pairing indicator will flash blue quickly. When pairing, remain within 3 feet of the unit.
- Use the controls on your Bluetooth device to select ITB396 in your Bluetooth settings to pair. If your device requests a password, enter the default password 0 0 0 0 . Refer to the user's manual for your specific device for instructions on pairing and connecting Bluetooth devices.
- When successfully paired and connected, a beep will issue from the soundbar and the Pairing Indicator will display a solid blue light. After initial pairing, the unit will stay paired unless unpoired manually by the user or erased due to a reset of the device. If your device should become unpaired or you find it is unable to connect, repeat the above steps.
Playing Audio Wirelessly
- After pairing to a Bluetooth device, use the controls on the connected Bluetooth Device to select a track.
- Play, pause or skip a selected track using the controls on the connected Bluetooth Device or the soundbar's remote.
- Audio played through the connected Bluetooth device will now be heard through the speakers.
Audio Inputs
Stereo RCA Inputs (Aux In)
When connecting two products using an RCA cable (not included), match the colored ports to their corresponding plugs.
- Connect the RCA cables (not included) to the RCA Stereo Inputs located on the back of the unit, and to the audio outputs on a television or other audio source.
- Press the Power button to power on the unit.
- Press the Source button to select Aux In, indicated by a white light.
- Audio played through the television will now be heard through the speakers.
Optical Input
You will need an audio source with an Optical Audio Output and a Digital Optical Audio Cable (included).
- Connect the Digital Optical Audio Cable to the optical output on the audio source and to the Optical Input on the speaker bar.
- Press the Power button to power the unit on.
- Press the Source button repeatedly to switch to SPDIF Mode, Indicated by a amber light.
- Using the native controls on your connected device, make sure the audio settings are set to PCM or Optical Audio and are turned On.
- Audio from the connected audio source will now be played through the speakers.
Important tips for optical audio:
Use the correct toslink cable and make sure that it is firmly seated in both source and sound bar sockets.
Optical output is activated on the source (they should see a red light emitting from the toslink socket). It may be labeled SPDF in the setting menu of the source.
The optical output is set to output PCM and not Dolby Digital.
Line In
3.5 mm audio input cable not included.
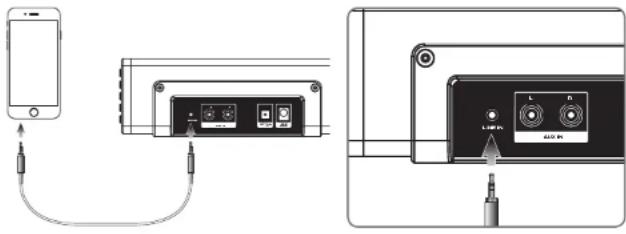
- Plug one end of a 3.5 mm audio input cable into the Line In on the unit and plug the other end of the cable into the audio output/headphone output on an MP3 Player or other audio source.
- Press the Power button to power the unit on.
- Press the Source button to select Line In, indicated by a green light.
- Audio played through the connected device will now be heard through the speakers. Use the controls on the connected device to play, pause, or skip selected tracks.
Stereo RCA Inputs (Aux In) - Detail

natural_image
Diagram of a device panel with connectors and two connected ports (no text or symbols visible)Optical Input - Detail

natural_image
Diagram of a device panel with ports and connectors, no visible text or symbolsLine In Line In - Detail
Contact Information
Website: www.iLiveElectronics.com
Email Support: prodinfo@dpiinc.com
Email Parts: partsinfo@dpiinc.com
Phone Support: 1-888-999-4215
Warranty
For Warranty Information and the most up-to-date version of this User's Guide, go to: www.iLiveElectronics.com
International Support
To download this User's Guide in English, Spanish, and French, or to get answers to frequently asked questions, visit the support section at: www.iLiveElectronics.com
Protect for Today Sustain for Tomorrow
Copyright © 2016 Digital Products International (DPI, Inc.) All other trademarks appearing herein are the property of their respective owners. Specifications are subject to change without notice.


- 37" HD Soundbar with Bluetooth Wireless and Subwoofer
- Safety Instructions & Warnings
- Important Safety Instructions
- FCCWarnings
- Additional Warnings and Precautions
- Table of Contents Setup
- Features & Specifications
- Includes
- Orientation
- Speaker Controls (Right Side)
- Remote
- Bluetooth Wireless
- Pairing a Bluetooth Device for the First Time
- Playing Audio Wirelessly
- Audio Inputs
- Stereo RCA Inputs (Aux In)
- Optical Input
- Important tips for optical audio:
- Line In
- Contact Information
- Warranty
- International Support
- Protect for Today Sustain for Tomorrow
Brand : iLive
Model : ITB396B
Category : Soundbar