
L42WD22 - Television RCA - Free user manual and instructions
Find the device manual for free L42WD22 RCA in PDF.


| Product Type | 42-inch LCD Television |
| Model | L42WD22 |
| Brand | RCA |
| Display Diagonal | 42 inches (16:9 aspect ratio) |
| Resolution | 1920 x 1080 (Full HD) - estimated based on model |
| Input Voltage | 120V AC, 60Hz |
| Power Consumption | Approximately 200W (typical) |
| Weight | Approximately 45 lbs (20 kg) with stand |
| Dimensions (W x H x D) with stand | Approximately 40.2 x 28.5 x 10.5 inches |
| VESA Wall Mount | 400 x 400 mm, M6 screws |
| Remote Control | Model R301F1 |
| Inputs | HDMI (2), Component, Composite, VGA, Coaxial RF |
| Outputs | Digital Audio Coaxial, Fixed/Variable Audio |
| Tuner | ATSC (digital) & NTSC (analog) |
| Sound System | Stereo, BBE, Dynamic Bass |
| Parental Controls | V-Chip with US & Canadian ratings |
| Cleaning Instructions | Turn off TV, use soft lint-free cloth; avoid ammonia or abrasive cleaners |
| Safety Certification | FCC Class B, Canadian ICES-003 |
| Warranty | 1 year parts (screen >32"), 90 days labor (≤32") |
Frequently Asked Questions - L42WD22 RCA
User questions about L42WD22 RCA
0 question about this device. Answer the ones you know or ask your own.
Ask a new question about this device
Download the instructions for your Television in PDF format for free! Find your manual L42WD22 - RCA and take your electronic device back in hand. On this page are published all the documents necessary for the use of your device. L42WD22 by RCA.
USER MANUAL L42WD22 RCA
natural_image
Black-and-white illustration of a flat-screen TV with butterflies flying around it, no text or symbols present.RCA
reality: reproduced.
LCD Users Guide
Connections......page 7
Menus......page 33
Remote......page 18
FAQs......page 40
Features ...... page 26
Warranty...... page 46
CAUTION
RISK OF ELECTRIC SHOCK DO NOT OPEN
Caution: To reduce the risk of electric shock, do not remove cover (or back). No user serviceable parts inside. Refer servicing to qualified service personnel.

This symbol indicates "dangerous voltage" inside the product that presents a risk of electric shock or personal injury.

This symbol indicates important instructions accompanying the product.
WARNING
To reduce the risk of fi re or electric shock, do not expose this product to rain or moisture. The apparatus shall not be exposed to dripping or splashing. No objects fi lled with liquids, such as vases, shall be placed on the apparatus.
WARNING
The TV is unstable if it is not properly attached to the base or mounted to the wall. Please follow the base or wall mounting instructions provided in the User's Guide to ensure your safety.

This symbol indicates that this product contains mercury. Special disposal of this product for environmental reasons may be required under the laws applicable to your jurisdiction. For disposal or recycling information, please contact your local authorities or the Electronic Industries Alliance: www.eiae.org.
Refer to the identifi cation/rating label located on the back panel of your product for its proper operating voltage.
FCC Regulations state that unauthorized changes or modifications to this equipment may void the user's authority to operate it.
Cable TV Installer: This reminder is provided to call your attention to Article 820-40 of the National Electrical Code (Section 54 of the Canadian Electrical Code, Part 1) which provides guidelines for proper grounding and, in particular, specifies that the cable ground shall be connected to the grounding system of the building as close to the point of cable entry as practical.
Important: This television is a table model and is designed to sit on a firm, flat, surface. Don't place the TV on soft carpeting or similar surface because the ventilation slots on the bottom of the unit will be blocked resulting in reduced lifetime from overheating. To assure adequate ventilation for this product, maintain a spacing of 4 inches from the top and sides of the TV receiver and 2 inches from the rear of the TV receiver and other surfaces.
Also, make sure the stand or base you use is of adequate size and strength to prevent the TV from being accidentally tipped over, pushed off, or pulled off. This could cause personal injury and/or damage the TV. Refer to the Important Safety Instructions on the next page.
Product Registration
Please fill out the product registration card (packed separately) and return it immediately. For US customers: Your RCA Consumer Electronics product may also be registered at www.rca.com/television. Registering this product allows us to contact you if needed.
Product Information
Keep your sales receipt to obtain warranty parts and service and for proof of purchase. Attach it here and record the serial and model numbers in case you need them. These numbers are located on the product.
Model No. ____ Serial No. ____ Purchase Date ____
Dealer/Address/Phone
BBE. Licensed by BBE Sound, Inc. under one or more of the following US patents: 5510752, 5736897. BBE and BBE symbol are registered trademarks of BBE Sound, Inc.
Important Safety Instructions
Important Safety Instructions
- Read these instructions.
-
Keep these instructions.
-
Heed all warnings.
-
Follow all instructions.
-
Do not use this apparatus near water.
-
Clean only with dry cloth.
-
Do not block any ventilation openings. Install in accordance with the manufacturer's instructions.
-
Do not install near any heat sources such as radiators, heat registers, stoves, or other apparatus (including amplifiers) that produce heat.
-
Do not defeat the safety purpose of the polarized or grounding-type plug. A polarized plug has two blades with one wider than the other. A grounding type plug has two blades and a third grounding prong. The wide blade or the third prong is provided for your safety. If the provided plug does not fit into your outlet, consult an electrician for replacement of the obsolete outlet.
-
Protect the power cord from being walked on or pinched particularly at plugs, convenience receptacles, and the point where they exit from the apparatus.
-
Only use attachments/accessories specified by the manufacturer.
-
Use only with the cart, stand, tripod, bracket, or table specified by the manufacturer, or sold with the apparatus. When a cart is used, use caution when moving the cart/apparatus combination to avoid injury from tip-over.
-
Unplug this apparatus during lightning storms or when unused for long periods of time.
-
Refer all servicing to qualified service personnel.

Servicing is required when the apparatus has been damaged in any way, such as power-supply cord or plug is damaged, liquid has been spilled or objects have fallen into the apparatus, the apparatus has been exposed to rain or moisture, does not operate normally, or has been dropped.
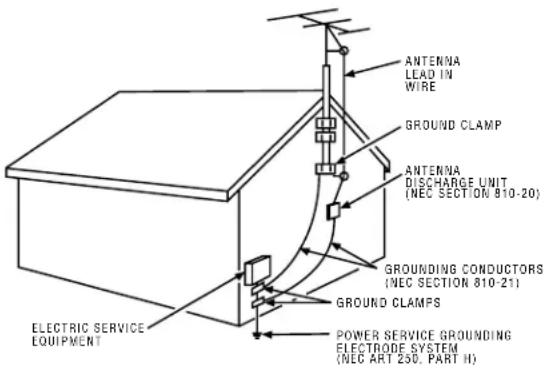
- If an outside antenna or cable system is connected to the product, be sure the antenna or cable system is grounded so as to provide some protection against voltage surges and built-up static charges. Section 810 of the National Electrical Code, ANSI/NFPA No. 70-1984 (Section 54 of Canadian Electrical Code, Part 1) provides information with respect to proper grounding of the mast and supporting structure, grounding of the lead-in wire to an antenna-discharge unit, size of grounding conductors, location of antenna-discharge unit, connection to grounding electrodes, and requirements for the grounding electrode. See following example.
Important Safety Instructions .... i
Chapter 1: Connections and Setup
Things to Consider Before You Connect .... 5
Protect Against Power Surges 5
Protect Devices from Overheating 5
Position Cables Properly to Avoid Audio Interference 5
Use Indirect Light 5
Check Supplied Parts 5
Get the Picture 6
Getting Channels 6
Choose Your Connection .... 7
Video (Basic) Connection 8
Component Video (Advanced) Connection .... 8
HDMI/DVI Connection 10
VGA Connection 12
Plug in the TV 13
Put Batteries in the Remote 13
Turn on the TV 13
How to Use the Remote Control to Complete the Initial Setup .... 13
Complete the Initial Setup 14
Set the Menu Language 14
Complete Channel Setup 14
What To Expect 15
Watching TV 15
Changing Channels 15
Explanation of Jacks (in alphabetical order) ...... 16
Buttons and Other Jacks On Your TV 17
Side Input Jacks 17
Side Panel Buttons 17
Chapter 2: Using the Remote Control
The Buttons on the Remote Control 18
Using the INPUT Button 19
Programming the Remote to Operate Other
Devices 19
Find Out If You Need to Program the Remote ... 19
Programming the Remote 20
How to Use the Remote After You've
Programmed It 21
Modes of Operation 21
Volume Punchthrough Feature 21
Deleting ALL Volume Punchthrough
Commands 22
Remote Code List 23
Chapter 3: Using the TV's Features
Channel Banner 26
Autotuning....26
Parental Controls and V-Chip 28
How V-Chip Works for USA and Canada ...... 28
Lock/Unlock Parental Controls 28
US V-Chip TV Ratings 29
Blocking Canadian V-Chip Ratings 30
V-Chip Movie Rating Limit 31
Block Channels 31
Front Panel Block 31
Blocking Unrated/Exempt Programs 31
Future Rating Region 32
Additional Features 32
EN-V Picture Processing 32
Screen Formats 32
Chapter 4: Using the TV's Menu System
Using the Menu System 33
Channel List Menu 33
Sound Menu 33
Picture Menu 35
Setup Menu 36
Parental Control Menu 39
Time Menu 39
Chapter 5: Other Information
Frequently Asked Questions (FAQs) 40
Troubleshooting....41
Mounting Your TV to the Wall 43
V-Chip Rating Explanations 44
US V-Chip Rating System 44
Canadian English V-Chip Rating System 44
Canadian French V-Chip Rating System 45
Limited Warranty 46
Care and Cleaning 47
Things to Consider Before You Connect
Protect Against Power Surges
- Connect all devices before you plug any of their power cords into the wall outlet or power strip. NEVER plug your TV into an outlet that is controlled by a wall switch.
- Turn off the TV and/or device(s) before you connect or disconnect any cables.
- Make sure all antennas and cables are properly grounded. Refer to the Important Safety Instructions at the beginning of the User's Guide.
Protect Devices from Overheating
- Don't block ventilation holes on any of the devices. Arrange the devices so that air can circulate freely.
- Don't stack devices.
- If you place devices in a stand, make sure you allow adequate ventilation.
- If you connect an audio receiver or amplifier, place it on the top shelf so the heated air from it won't flow around other devices.
Position Cables Properly to Avoid Audio Interference
- Insert each cable firmly into the designated jack.
- If you place devices above the TV, route all cables down the side of the back of the TV instead of straight down the middle.
- If your antenna uses 300-ohm twin lead cables, do not coil the cables. Also, keep the twin lead cables away from audio/video cables.
Use Indirect Light
Don't place the TV where sunlight or room lighting will be directed toward the screen. Use soft or indirect lighting.
Check Supplied Parts
Check that the following parts were packed with your product.
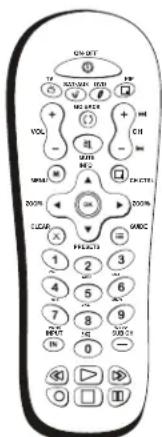
Remote control Part # R301F1
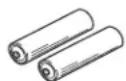
2 AA batteries
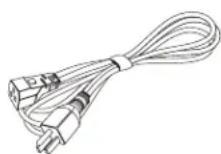
Power cord
Note: If you need to replace your remote, call 1-800-338-0376. A shipping and handling fee, and the appropriate sales tax, will be charged upon ordering. Have your Visa, MasterCard, or Discover Card ready.
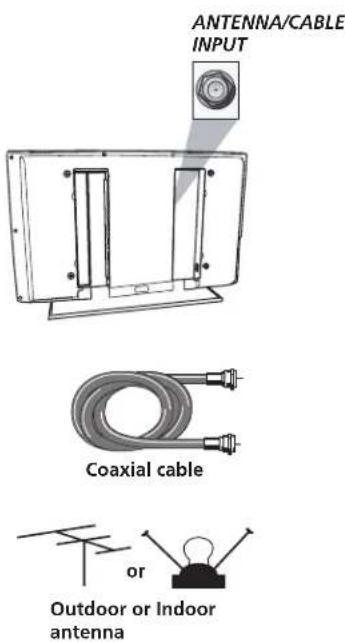
Get the Picture
The first part of connecting your TV is to get the picture, also known as the signal. The back panel of your TV allows you to receive analog and/or digital channels by using the ANTENNA/CABLE INPUT. See the graphic to the left for the location of the jack.
Getting Channels
What You Need
- Antenna ("rabbit ears") or outdoor antenna with coaxial cable
- Coaxial cable with cable service
OR
A. Do you have an indoor or outdoor antenna? If not, go to step B. If so, plug the antenna or coaxial cable from the wall outlet into the ANTENNA/CABLE INPUT to receive free off-air local digital and analog channels.
B. Do you have cable? If so, plug the coaxial cable from the wall outlet into the ANTENNA/CABLE INPUT to receive your cable channels.
C. Do you have a set-top box? If so, you need to call your cable company or satellite service provider. They may use special cables to allow you to view digital channels.
What You Need To Know
- Visit www.antennaweb.org to get help deciding what type of antenna to use to receive the local digital channels available to you. By entering where you live, this mapping program tells you what local analog and digital stations are available using a certain antenna.
- When you are ready to watch channels, the channel banner displays the type of channel you're viewing. Look for a D at the bottom of the screen for digital channels; look for an A for analog channels. Go to page 15 for more information.
Choose Your Connection
For additional assistance while using your RCA product, please visit www.rca.com/customersupport.
| There are several ways to connect your TV. Please use the following chart to determine which connection is best for you. Proceed to the appropriate page and connect your TV. | |||
| Jacks Used Cables Needed Go to... | |||
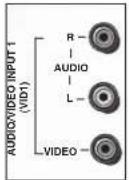 Video1Audio1 R and L Video1Audio1 R and L | 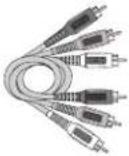 Audio/Video Audio/Video | page 8-9 | |
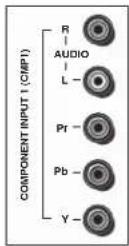 Y Pb PrAudio R and L Y Pb PrAudio R and L | 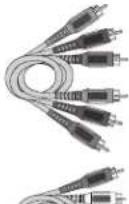 Component VideoAudio Component VideoAudio | page 8-9 | |
[HDMI 1/DVI] 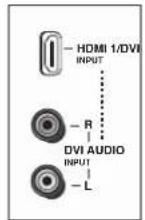 | 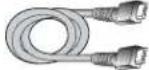 HDMITMOR HDMITMOR | page 10-11 | |
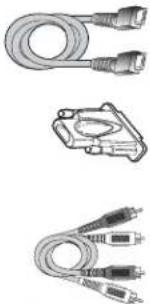 HDMITM+HDMI/DVI adapter+Audio HDMITM+HDMI/DVI adapter+Audio | |||
[VGA Video] 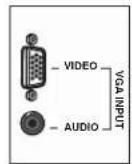 Audio Audio | 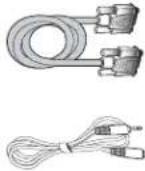 VGAAudio VGAAudio | page 12 | |
HDMI, the HDMI logo, and High-Definition Multimedia Interface are trademarks or registered trademarks of HDMI Licensing LLC.
Video (Basic) Connection
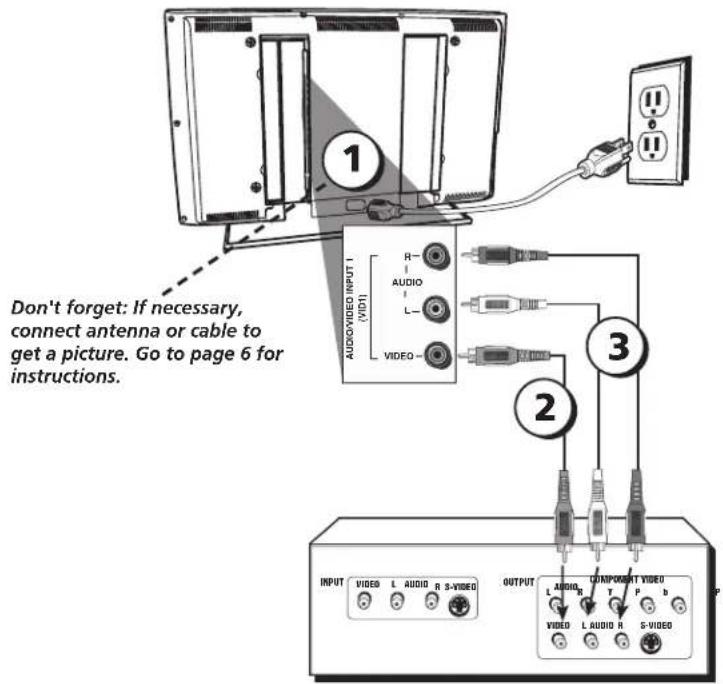
This is an example of a connection using the Video jack. Go to the top of page 9 for specific instructions.
Component Video (Advanced) Connection
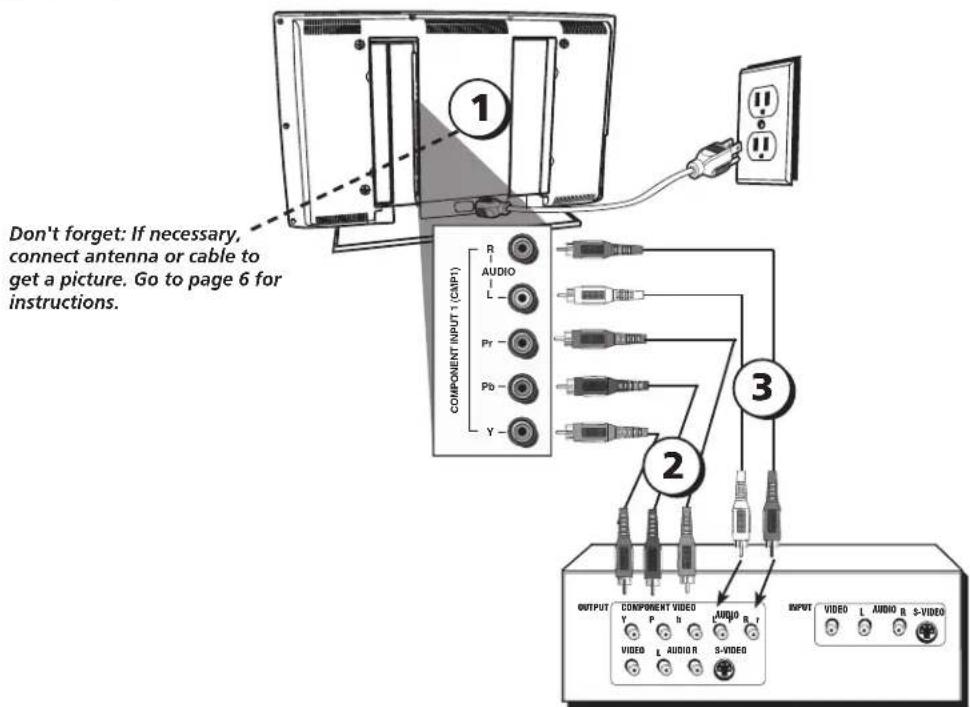
This is an example of a connection using the Component Video jacks. Go to the middle of page 9 for specific instructions.
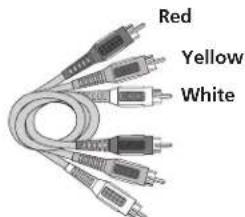
Composite cables are color coded- Yellow= video; Red= right audio; white= left audio
Connecting the Device with Video (Basic)
This connection allows you to connect a device that has a Video Out jack, for example, a DVD player.
Note: If the device you're connecting also has Component Video jacks and you have component video cables, we recommend you use the Component Video (Advanced) Connection instead. See instructions below.
Using the example of a DVD player:
①. If necessary, connect your cable and/or off-air antenna as described on page 6.
②. Connect your yellow video cable.
Connect a video cable to the VIDEO INPUT 1 jack on the back of the TV and to the Video Output jack on the DVD player.
③. Connect your red and white audio cables.
Connect the audio (red and white) cables to the AUDIO INPUT 1 R and I. jacks on the back of the TV and to the Audio Output jacks on the DVD player.
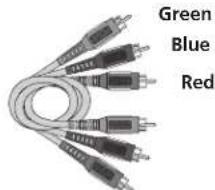
Component Video cables (Y Pb Pr) are color coded-Green, Blue and Red
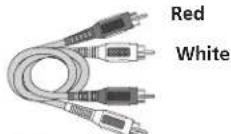
Audio cables are color coded- Red= right audio; white= left audio
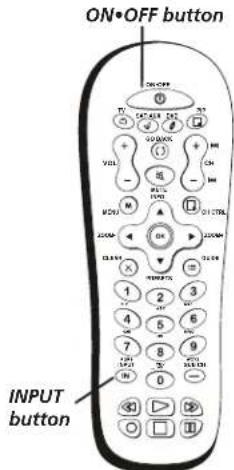
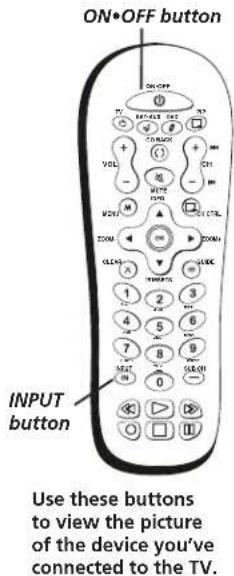
Use these buttons to view the picture of the device you've connected to the TV.
Connecting the Device with Component Video (Advanced)
This connection allows you to connect a device that has Y Pb Pr jacks, for example, a DVD player.
Using the example of a DVD player:
①. If necessary, connect your cable and/or off-air antenna as described on page 6.
②. Connect your Y Pb Pr component video cables.
Connect three video cables or special Y Pb Pr cables to the COMPONENT INPUT 1 (CMP1) Y Pb Pr jacks on the back of the TV and to the Y Pb Pr outputs on the DVD player.
③. Connect your red and white audio cables.
Connect the audio (red and white) cables to the CMP1 AUDIO R and L jacks on the back of the TV and to the Audio Output jacks on the DVD player.
Viewing the Picture from the Connected Device
- Plug in the TV (see page 13 for details) and the device, if they aren't already plugged in.
- Turn on the TV and the device you want to view, for example a DVD player.
- Repeatedly press the INPUT button on the remote control until you see VID1 (if connected to the VIDEO INPUT 1 jack) or CMP1 (if connected to the CMP1 jacks) displayed at the bottom of the TV's screen. To go back to viewing TV channels, use the number buttons to enter the channel or press CII+/- to go to the channel list from the input list.
Note: If the picture from the DVD player appears black and white and your device is connected to the VIDEO Input, you might be tuned to the wrong input. Make sure you press INPUT until you see VID1 displayed at the bottom of the TV's screen.
• If you're done connecting devices to your TV, go to page 13 to complete the Initial Setup.
• To continue connecting devices, go to the next page.
HDMI/DVI Connection
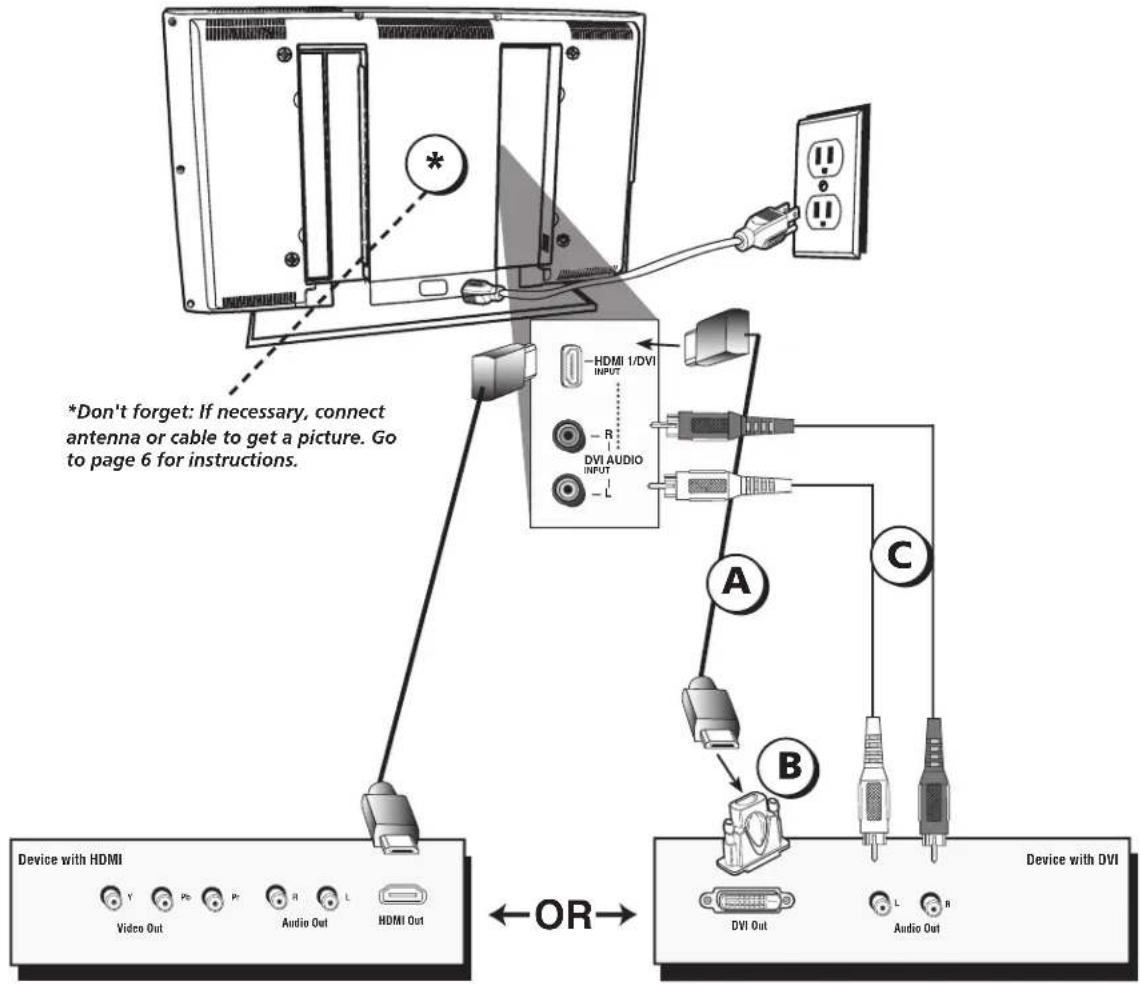
This is an example of a connection using the HDMI/DVI jack.
Connecting the Device
High-Definition Multimedia Interface (IIDMI) technology is an uncompressed digital connection that carries both video and audio data by way of an integrated mini-plug cable. Since HDMI technology is based on Digital Visual Interface (DVI), the jack on the back of your TV is also compatible with devices that have a DVI output jack.
Using the example of a set-top box:
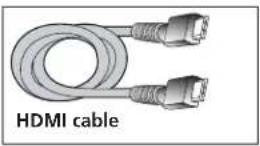
- If your set-top box has an HDMI jack, connect an HDMI cable.
Connect an HDMI cable to the HDMI1/DVI Input jack (or the HDMI2 jack if it is more convenient) on the back of the TV and to the HDMI Out jack on the back of the device.
-OR-
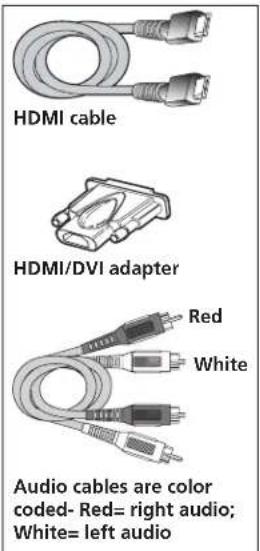
- If your set-top box has a DVI jack, connect an HDMI cable and an HDMI/DVI adapter.
A Connect an HDMI cable to the HDMI1/DVI Input jack on the back of the TV.
B Attach an HDMI/DVI adapter to the end of the HDMI cable, then connect the adapter to the DVI Out jack on the set-top box.
C. Since you're using an HDMI/DVI adapter, you need to connect Audio left and right cables to the DVI AUDIO R and L jacks on the back of the TV and to the R and L jacks on the back of the device.
Viewing the Picture from the Connected Device
The device in this connection is connected to the HDMI1/DVI jack. To view this device:
-
Plug in the TV (see page 13 for details) and the device, if they aren't already plugged in.
-
Turn on the TV and the device you want to view, for example a set-top box.
-
Repeatedly press the INPUT button on the remote control until you see HDMI displayed at the bottom of the TV's screen. To go back to viewing TV channels, use the number buttons to enter the channel or press CH+ or CH- buttons.
- If you're done connecting devices to your TV, go to page 13 to complete the Initial Setup.
- If you experience HDMI problems, go to the HDMI Troubleshooting section on page 42.
VGA Connection
This is an example of a connection using the VGA jacks.
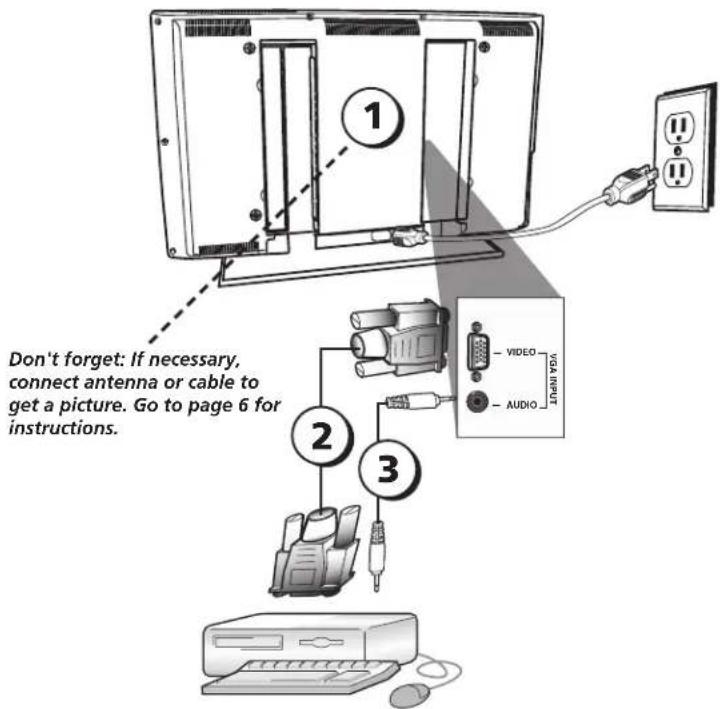
Connecting the Device
This connection allows you to connect to a personal computer.
-
If necessary, connect your cable and/or off-air antenna as described on page 6.
-
Connect your monitor cable.
Connect one end of a 15-pin monitor cable to the VGA VIDEO jack on the TV and the other end to the PC's video output jack. Note, if your PC's video output isn't 15-pin, you'll need an adapter that can connect to a 15-pin monitor cable.
- Connect your audio cable.
Connect a 3.5 mm stereo mini pin cable (sometimes referred to as 1/8" stereo mini pin) to the VGA AUDIO jack on the back of the TV and the other end to the Audio Output jack on the PC.
Notes: The maximum resolution is 1024 x 768. Be sure to set your PC to the correct monitor output setting.
To bear sound from the TV while using the PC, press the PRESETS button. Highlight PC Sound source and press the right arrow to choose TV tuner.
Viewing the PC
- Plug in the TV and the PC, if they aren't already plugged in.
- Turn on the TV and the PC.
- Repeatedly press the INPUT button on the remote control until you see VGA displayed at the bottom of the TV's screen. To go back to viewing TV channels, use the number buttons to enter the channel or press CH+ or CH- buttons.
Plug in the TV
Plug the end of the power cord into the back of the TV. Plug the other end into a grounded wall outlet. Insert the plug completely into the outlet. Do not plug into an outlet controlled by a light switch.
Put Batteries in the Remote
- Remove the battery compartment cover from the back of the remote by pushing the tab and lifting off the cover.
- Insert two fresh batteries. Make sure the polarities (+ and -) are aligned correctly.
- Replace the cover.
Turn on the TV
Turn on your TV by pressing the Power button on the front of the TV or ON•OFF on the remote control.
Tip
To access the setup menus manually, press MENU and choose Setup.
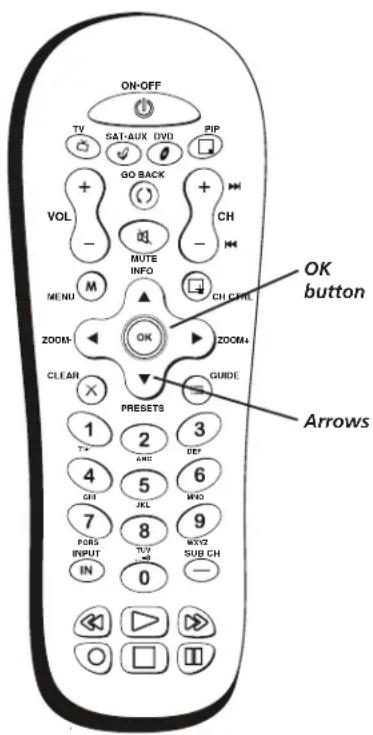
How to Use the Remote Control to Complete the Initial Setup
The technical term is “Navigation” – how you move through the on-screen menus. The theory is the same throughout the menu screens: highlight your choice and select it.
To highlight a menu item, press the arrow buttons on the remote to highlight one of the items listed on the screen. Use the up or down arrow button to move up or down. Use the right or left arrow button to view other selections for a menu choice or to display a sub-menu. More than one selection displays, for example, On...; a menu choice with a sub-menu displays dots (...).
Note: Highlighted means that the menu item stands out from other menu items on the list (appears darker, brighter, or a different color).
Complete the Initial Setup
The menu system in your TV allows the TV's features to work properly. The first time you turn on your TV, the language screen appears.
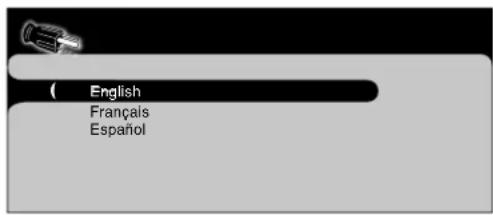
Set the Menu Language
The first part of the setup allows you to select your preferred language for the menu system.
If English is your preferred language, press OK. To choose another language, press the down arrow button until that language is highlighted, and press OK.
Complete Channel Setup
Make sure you've connected the TV to cable and/or an off-air signal before you start the next part of the setup.
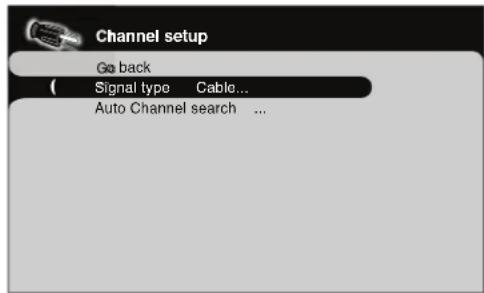
Set the Signal Type
If you connected Cable to your ANTENNA/CABLE jack, the option is chosen for you and you can press the down arrow button to continue. To choose Antenna, press the right arrow button and then press the down arrow button to continue.
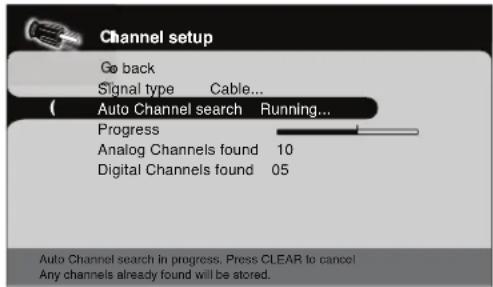
If you have analog and digital channels, the TV's search might take longer since it is looking for both.
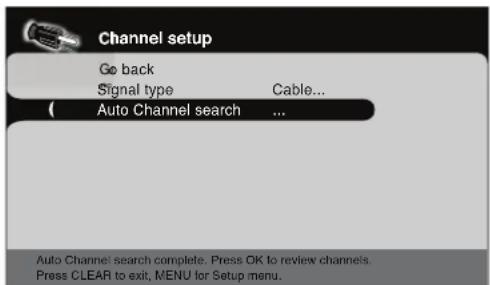
Once a channel search is complete, the Channel setup menu looks like this.
Complete the Channel Search
With Auto Channel Search highlighted, press OK to begin the channel search.
There are several things to be aware of when the TV's searches for channels.
If you chose Cable as your signal type, the search takes a while because it's looking for analog and digital channels, and then it's removing scrambled channels found. Here is what happens during the search:
-
The search first looks for digital channels and places the number of channels found next to Digital Channels found. This number will probably seem like a lot. This is because the number includes both scrambled (for example, Pay Per View) and non-scrambled channels. These channels are dependent upon what your cable company is sending.
-
The search then looks for analog channels and places the number of channels found next to Analog Channels found.
-
The search might appear as if it is complete, but as long as the search says Running, it is still in progress. What's happening at this point is the TV is removing scrambled channels from the channel list. When the search is finally complete, the Channel setup menu will look like the picture to the left. To exit the menu system, press CLEAR.
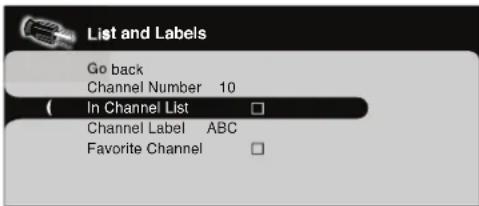
You might find there are still some channels in your list that are unavailable to view. To get rid of these channels, press MENU and choose Setup. Highlight and select List and Labels. Note that removing channels from your channel list may be time consuming, so you might want to do it later. Go to page 36 for details on editing your channel list.
What To Expect
Watching TV
- Remember: Look for an A at the bottom of the screen to see if you're watching an analog channel.
Analog video is sent in a 4/3 format, which your TV displays these channels in a 16/9 format. Press the ZOOM+/- button to view the different formats available. Go to page 32 for more explanation of screen formats.
- Remember: Look for a D at the bottom of the screen to see if you're watching a digital channel.
Most digital video is sent in a 16/9 format which does fill your screen, but sometimes is sent in 4/3 which does not fill your screen. It depends on how the station or source device is formatting the video. If there are bars on-screen, press the ZOOM+/- button to try a different format that may eliminate the bars. Some bars can't be removed because of the way the format is sent by the broadcaster. Go to page 32 for more explanation of screen formats.
A 10 CBS
Look for the A at the bottom of the screen to see if you're watching an analog channel.
D 10-1 CBS
Look for the D at the bottom of the screen to see if you're watching a digital channel.
Changing Channels
- Digital channels can have both primary channels (like the analog channel number) and sub-channels. To tune to a digital channel with a sub-channel, such as 10-1 as shown in the graphic to the left, enter the primary channel number (10), then press either the right arrow or the SUB CII button. Enter the sub-channel number (1) and press OK.
- Depending upon the type of signals you have connected to your HDTV, you might notice that the channels change slower than you're used to. This is perfectly normal. Digital cable channels sometimes take longer to tune.


Explanation of Jacks (in alphabetical order)
This section describes the jacks on the back panel of your TV. There are several ways to connect devices.
ANTENNA/CABLE INPUT Lets you connect a coaxial cable to receive the signal from your antenna, cable, or cable box.
AUDIO/VIDEO INPUT 1 (VID1) Lets you connect a device that has composite video jacks, such as a VCR or DVD player.
- LAUDIO Provides left audio connection when using the VIDEO INPUT 1 jack. The left audio connector is usually white.
- R AUDIO Provides right audio connection when using the VIDEO INPUT 1 jack. The right audio connector is usually red.
COMPONENT INPUTS Lets you connect a device that has component video jacks, such as a DVD player.
- CMP1 Y Pb Pr (Component Video) Provides optimum picture quality because the video is separated into three signals. Use three video-grade or component video cables for the connection. When using CMP1 Y Pb Pr, make sure you connect left and right audio cables to the CMP1 L and R AUDIO jacks.
- CMP1 L AUDIO Provides left audio connection when using the CMP1 video inputs. The left audio connector is usually white.
- CMP1 R AUDIO Provides right audio connection when using the CMP1 video inputs. The right audio connector is usually red.
- CMP2 Y Pb Pr (Component Video) Same as described for CMP1 Y Pb Pr and CMP1 Audio above. Make sure you connect the left and right audio cables to the CMP2 L and R AUDIO jacks.
DIGITAL AUDIO OUTPUT (Coaxial) Use a digital coaxial cable to connect your TV to a compatible audio receiver.
FIXED/VARIABLE AUDIO OUTPUT Use left and right audio cables to connect your TV to a compatible audio receiver. Make sure you set the Audio Output option correctly in the Advanced Sound menu. Go to page 35 for more information.
HDMI1/DVI INPUT Let you connect a device, such as a digital cable box, with an HDMI or a DVI output.
- HDMI1/DVI INPUT (High-Defi nition Multimedia Interface/Digital Visual Interface) Provides an uncompressed digital connection that carries both video and audio data by way of an integrated mini-plug cable. Since HDMI technology is based on Digital Visual Interface (DVI), the jack on the back of your TV is also compatible with DVI devices.
- DVI AUDIO L (used for DVI only) Provides left audio connection when using the HDMI1 jack for DVI. The left audio connector is usually white.
- DVI AUDIO R (used for DVI only) Provides right audio connection when using the HDMI1 jack for DVI. The right audio connector is usually red.
Note: Remember to connect the left and right audio cables because the DVI cable carries only the picture signal, not the sound.
HDMI2 Input Lets you connect a device, such as a digital cable box, with an HDMI output.
VGA INPUT Connect your computer, or other device with a VGA output, to this jack using a 15 pin D-sub cable.
VGA AUDIO (Stereo mini jack) Use to obtain sound when a PC is connected to the VGA jack. Use a 3.5 mm stereo mini pin cable (sometimes referred to as 1/8" stereo mini pin) to connect a PC to your TV.
VIDEO OUT PUT Connect a VCR or DVD-recorder to record digital and analog programs from the ANTENNA/CABLE INPUT (excluding copy-protected programs and component video formats) while the TV is turned on. You must leave the TV on the same channel you are recording.
Buttons and Other Jacks On Your TV
Side Input Jacks
(Headphones) Allows you to connect headphones to listen to the sound coming from the TV. To adjust volume control of the headphones, go to the Headphone Settings option in the Sound menu.
S-VIDEO INPUT Allows you to connect an S-Video cable from another device. Make sure you also connect audio cables from the device to the TV. To access a device connected to the S-VIDEO jack, press the INPUT button on your remote until VID2 appears at the bottom of the screen.
VIDEO INPUT 2 Receives video from another device such as a camcorder, video game console, VCR, or DVD player. To access a device connected to the VIDEO jack, press the INPUT button on your remote until VID2 appears at the bottom of the screen.
Note: Do not connect an S-Video and a regular video cable to the side jacks at the same time.
AUDIO L and R Receives audio from another device such as a camcorder, video game console, VCR, or DVD player. Use when connecting to the VIDEO or S-VIDEO Input.
Side Panel Buttons
If you cannot locate your remote, you can use the side panel buttons of your TV to operate many of the TV's features.
POWER Turns the TV on and off.
MENU/OK Brings up the TV Main menu. When in the menu system, displays sub-menus and selects highlighted items.
VOL ^ Increases the volume. In the 'TV menu system, acts like the right arrow button on the remote control and adjusts menu controls.
VOL ∨ Decreases the volume. In the TV menu system, acts like the left arrow button on the remote control and adjusts menu controls.
CH ∧ Scans up through the channel list.
CH VScans down through the channel list.
Chapter 2: Using the Remote Control
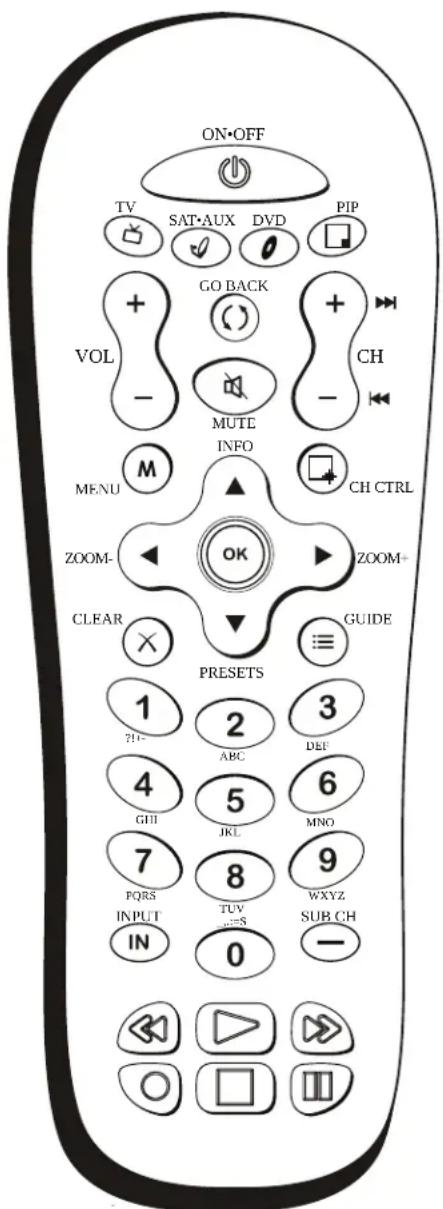
Remote control part number R301F1
Note: If you need to replace your remote, call 1-800-338-0376. A shipping and handling fee, and the appropriate sales tax, will be charged upon ordering. Have your Visa, MasterCard, or Discover Card ready.
The Buttons on the Remote Control
Alphanumeric Buttons Enter channel numbers; time settings; and options with letters, such as the Message option, using these buttons.
To enter a channel, press the number buttons and press OK (or just let the entry timeout).
To enter a digital channel with a sub-channel, enter the main channel, then press the SUB CH or right arrow button to enter the sub-channel and press OK.
Arrows Used to highlight different items in the TV menu and to adjust the menu controls. When viewing a channel, press the left or right arrow to change the screen format: 4/3, 16/9 zoom,
Cinerama, and 16/9. Go to page 32 for more information on screen formats.
CH + or CH - Scans up or down through the current channel list. Press once to change the channel up or down; press and hold to continue changing channels.
CH CTRL This button doesn't have a function for your model of TV.
CLEAR Removes any menu or display from the screen and returns you to normal viewing.
DVD Places the remote in DVD mode. If Auto Tuning is enabled, turns on the TV and tunes it to the DVD Channel. This button lights when you press a valid button in DVD mode (see Modes of Operation on page 21 for more details).
GO BACK Returns you to the previous channel.
GUIDE Displays an electronic program guide (when available).
INFO If no menus are on-screen, displays the channel banner; press again to clear the screen.
INPUT Accesses the available video input channels (VID1, VID2, CMP1, CMP2, VGA, HDMI1 and HDMI2). To resume TV viewing, press the number buttons to enter the channel or press CH+ or CH- buttons.
MENU Brings up the Main menu.
MUTE Reduces the TV's volume to its minimum level. Press again to restore the volume. To program this button to work with an audio system, follow the instructions for Volume Punchthrough Feature on page 21.
OK When in the menu system, selects highlighted items.
ON•OFF When in TV mode, turns the TV on or off. If in another mode (SAT•AUX or DVD) and programmed, will turn the device on or off.
PIP This button doesn't have a function for your model of TV.
PRESETS Displays Picture and Sound preset; CC Settings; Current Audio Track, PC Sound source; and CH+/CH- buttons (which works with the Favorite Channels option. Go to page 37 for more information).
REVERSE, PLAY, FORWARD, RECORD, STOP, PAUSE (buttons at bottom of the remote) If programmed, provides transport control for some remote-controllable devices, for example, VCRs or DVD players.
SAT•AUX Places the remote in SAT•AUX mode. If Auto Tuning is enabled, turns on the TV and tunes it to the satellite or cable box Video Input Channel. This button lights when you press a valid button in SAT•AUX mode (see Modes of Operation on page 21 for more details).
SUB CH When entering a digital channel that has a subchannel, press this button to access the subchannel entry field. Once the channel is entered, press the OK button to tune to the channel.
TV Turns on the TV and puts the remote in TV mode. Also displays current status.
VOL – or VOL + Decreases or increases the TV's volume. To program this button to work with an audio system, follow the instructions for Volume Punchthrough Feature on page 21.
ZOOM- or ZOOM + When viewing a channel, press to change the screen format: 4/3, 16/9 zoom, Cinerama, and 16/9. Go to page 32 for more information on screen formats.
Using the INPUT Button
Use the INPUT button to scroll through the available video input channels and view devices you have connected to the TV.
- Make sure the device you want to view is turned ON.
- Press INPUT to tune to an available video input source and view the device.
- To return to the previous channel, press INPUT until you return to the channel.
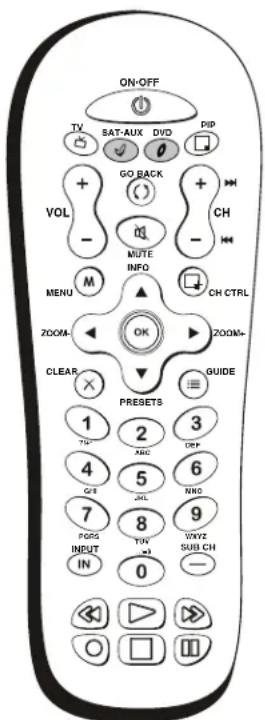
The darkened buttons are the device buttons that can be programmed.
Programming the Remote to Operate Other Devices
The universal remote can be programmed to operate many brands of remote-controllable VCRs, audio devices, DVD players, cable boxes, satellite receivers and other devices. In addition to being programmed to operate your television, it's already programmed to operate some RCA devices.
Notes: The TV button can't be programmed on this remote to control any device; it controls only this TV.
The remote may not be compatible with all models of all brands of devices. It also may not operate all functions of your device.
Find Out If You Need to Program the Remote
To determine whether the universal remote needs to be programmed to operate one of the devices connected to your TV, such as a VCR, do the following:
- Turn on the device (in this example, a VCR).
- Point the remote at the device.
- Press the corresponding device button (in this example, VCR).
- Press ON•OFF to see if the VCR responds. If the VCR doesn't respond, you need to program the remote to operate it.
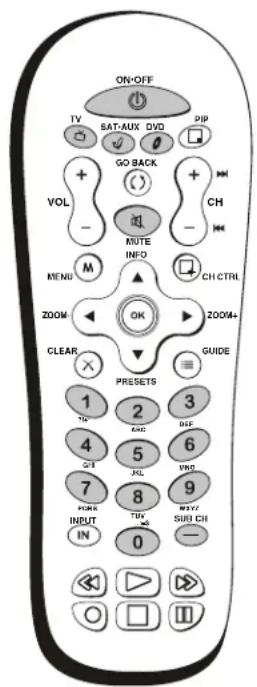
You'll use these darkened buttons for Direct Entry.
Programming the Remote
There are three ways to program the remote control to operate other devices: Direct Entry, Manual Code Search, and Automatic Code Search. If you have recently purchased the device you want to control or if the device has many codes, you might want to try the manual code search first.
Using Direct Entry
- Turn on the device you want to control.
- Look up the brand and code number(s) for the device in the code list at the end of this section.
- On your remote control, simultaneously press and hold the ON•OFF and MUTE buttons (approximately 3 seconds) until a device button remains lit. Then release the buttons.
- Press and release the device button (SAT•AUX or DVD) you want to program.
- Enter a three digit code from the code list.
- To test the code you've programmed for that device button, point the remote at the device and then press ON•OFF to see if the device responds to the remote control.
If the device turns off, you've entered the correct programming code for your device. Circle the code you entered for future reference.
If the device doesn't turn off, repeat these steps until you've tested all codes for your device's brand or try to run a manual code search.
Using Manual Code Search
Note: Before using manual code search, you must use Direct Entry first. This lets the remote know which type of device to begin searching codes. Then proceed with the following steps.
- Turn on the device you want to control.
- On your remote control, simultaneously press and hold the ON•OFF and MUTE buttons (approximately 3 seconds) until a device button remains lit. Then release the buttons.
- Press and release the device button (SAT•AUX or DVD) you want to program.
- Repeatedly press and release the ON•OFF button, watching for the device to respond. If it does turn off, press and release the OK button within 3 seconds to save the code. If you accidentally passed the code before saving it, press the left arrow button to backtrack through the codes; then use the right arrow button to go forward through the codes again.
When all codes have been searched, the device button flashes 3 times, then the remote exits manual code search and returns to normal operation.
Using Automatic Code Search
- Turn on the device you want to control.
- On your remote control, simultaneously press and hold ON•OFF and MUTE (approximately 3 seconds) until a device button remains lit. Then release the buttons.
- Press and release the device button you want to program.
continued on next page...
- Press and release the ON•OFF button once. There is a delay of approximately 6 seconds before the remote starts the code search.
The device buttons blinks each time the remote control sends a code to test with your device. Keep pointing the remote at the device.
- Once the device turns off, quickly press the OK button to save the code.
- If you accidentally passed the code before saving it, press the left arrow button to backtrack through the codes; then use the right arrow button to go forward through the codes again.
When all codes have been searched, the device button flashes 3 times, then the remote exits automatic code search and returns to normal operation.
How to Use the Remote After You've Programmed It
Once the remote has been programmed successfully, you are ready to use it to operate your devices.
To operate the device:
- Press the appropriate device button (SAT•AUX or DVD) to set the remote to control the device, for example, press DVD to control your DVD player.
- Press ON•OFF to turn the device ON or OFF.
- Use the remote buttons that apply to that device.
Note: The remote control may not be compatible with all brands and models of devices.
Modes of Operation
The button corresponding to the mode the remote is in lights up when you press any button that works in that mode. For example, if you're in TV mode and you press the VOL+ button, the TV button lights up. This tells you that the command to increase the volume is being sent to the TV (and not the satellite receiver, for example).
Volume Punchthrough Feature
You may find this feature helpful if you've connected your devices to an audio system, and you want to use the TV's remote control to operate the volume for a device that is connected to the audio system. An example follows:
Let's say you've connected your DVD player to your audio system. You've also programmed your TV remote control to operate your DVD player. Since the DVD player sends its volume through the audio system, you would have to bounce back and forth between two remote controls: the audio system's remote to adjust the volume and the TV's remote control to operate the DVD player.
The Volume Punchthrough feature eliminates the need for you to use two remote controls and saves a button press when you're using the TV remote to adjust the volume. In effect, you are telling the TV remote to retrieve and send volume commands from the audio system whenever the TV remote is in DVD mode.
Therefore, after you've successfully set up the Volume Punchthrough feature, whenever the TV remote is in DVD mode (press the DVD button) and you want to adjust the volume, you only have to press the VOL +/- or MUTE buttons. Follow the instructions below to set up Volume Punchthrough.
- On your remote control, simultaneously press and hold the ON•OFF and MUTE buttons (approximately 3 seconds) until a device button remains lit. Then release the buttons.
- Press and hold the MUTE button until the device button blinks off, then release the MUTE button.
- Press and release the device button that you programmed to operate the audio system (receiver or amplifier).
- Press and release the MUTE button.
- Now, test it by turning on your audio system.
- Turn on the device that is connected to the audio system (satellite receiver, for example).
- Put the TV's remote in SAT•AUX mode by pressing the SAT•AUX button.
- Press VOL+ or VOL-. The volume from the audio system should increase or decrease accordingly.
Deleting ALL Volume Punchthrough Commands
To delete all programmed Volume Punchthrough settings and return the remote control back to the factory defaults:
- Simultaneously press and hold the ON•OFF and MUTE buttons (approximately 3 seconds) until a device button remains lit. Then release the buttons.
- Press and hold the MUTE button until the device button blinks off, then release the MUTE button.
- Press and release the MUTE button until the device button light turns off.
- The remote returns to normal Volume/Mute control.
Remote Code List
Note: The codes are programmable to any of the device buttons (SAT•AUX or DVD) on the remote.
Audio Codes
| AIWA | 839 842 851 860 |
| APEX | 436 |
| BOSE | 672 |
| CARVER | 825 |
| CITIZEN | 826 |
| CRITRION | 448 |
| DENON | 803 817 852 |
| DELPHI | 708 |
| FISHER | 814 821 |
| GOLDSTAR | 766 |
| HARMAN KARDON | 801 818 |
| JVC | 790 813 819 |
| KENWOOD | 683 808 816 828 832 869 |
| KOSS | 415 |
| MAGNAVOX | 796 814 915 756 |
| MARANTZ | 688 824 |
| MITSUBISHI | 877 |
| NAD | 721 739 743 |
| NFO | 725 |
| NORCENT | 907 |
| ONKYO | 805 811 812 892 |
| OPTIMUS | 667 747 748 749 751 752 754 793 |
| PANASONIC | 791 810 815 823 863 864 891 950 |
| PHILIPS | 755 814 823 824 825 |
| PIONEER | 837 866 867 878 893 |
| RADIO SHACK | 706 754 793 806 865 866 867 868 875 |
| 878 879 | |
| RCA | 717 726 772 781 795 827 845 866 867 870 871 |
| 872 875 878 879 419 895 | |
| REALISTIC | 822 |
| SAIBA | 894 |
| SAMSUNG | 454 |
| SANYO | 705 |
| SCOTT | 768 |
| SHARP | 671 681 809 |
| SHERWOOD | 706 806 858 859 |
| SKYTI | 725 |
| SONY | 323 778 779 785 797 798 |
| 799 833 834 835 836 843 909 | |
| TAO | 725 |
| TEAC | 710 807 855 856 857 |
| TECHNICS | 791 810 815 823 863 864 |
| TTVION | 448 |
| VENTURER | 745 |
| XM RADIO | 708 725 |
| YAMAHA | 801 802 838 840 841 846 847 848 849 |
| ZENITHI | 676 730 749 759 765 766 784 814 787 850 |
| 405 |
Cable
| ABC | 461 464 465 466 463 |
| ADELPHIA | 512 511 |
| ALLEGRO | 525 524 |
| AMERICAST | 527 |
| ANTRONIX | 468 469 |
| ARCHER | 468 469 470 471 |
| AT&T | 511 |
| BELL SOUTH | 527 |
| CABLETENNA | 468 |
| CABLEVIEW | 468 |
| CABLEVISION | 506 |
| CENTURY | 471 |
| CITIZEN | 471 |
| COGECO | 511 |
| COLOR VOICE | 472 473 |
| COMCAST | 511 |
| COMTRONICS | 474 475 |
| CONTEC | 176 |
| DIGITAL MUSIC EXPRESS | 514 |
| EASTERN | 477 |
| EVERQUEST | 474 |
| GARRARD | 471 |
| GC ELECTRONICS | 469 |
| GEMINI | 536 479 |
| GE | 549 |
| OAK | 476 489 |
| PACE | 532 |
| PANASONIC | 460 508 |
| PARAGON | 486 488 |
| PHILIPS | 471 479 485 490 491 492 |
| PHILIPS MAGNAVOX | 505 534 |
| PIONTER | 478 506 493 494 |
| PULSAR | 186 |
| RADIO SHACK | 505 534 525 |
| RCA | 460 471 507 |
| REALISTIC | 469 |
| REGAL | 482 |
| RFGNCY | 477 |
| REMBRANDT | 463 |
| ROGERS | 506 |
| RUNCO | 486 |
| SAMSUNG | 474 494 |
| SCIENTIFIC ATLANTA | 498 497 506 535 512 466 496 |
| SHAW | 511 |
| SIGNAL | 174 |
| SIGNATURE | 463 |
| SI. MARX | 474 |
| SPRICER | 460 |
| STANDARD | 499 |
| STARCOM | 461 518 |
| STARGATE | 474 |
| STAR SIGHT | 507 |
| STAR TRAK | 516 |
| TANDY | 500 |
| TELEVIEW | 174 |
| TEXSCAN | 499 |
| TIME WARNER | 506 |
| TOCOM | 461 513 520 501 |
| TOSHIBA | 486 |
| TV86 | 487 |
| UNIKA | 168 469 471 |
| UNITED CABLE | 461 |
| UNIVERSAL | 468 469 470 471 502 524 |
| VIDEOWAY | 504 |
| VIDEOTRON | 506 |
| VIEWSTAR | 475 485 487 500 |
| VIDEO TECH | 550 |
| ZENITH | 503 525 471 486 521 522 523 |
| ZENITI NETWORK | 527 |
CD
| ADC | 660 |
| ADCOM | 661 714 |
| AIWA | 663 707 842 |
| AKAI | 715 737 830 |
| AUDIO TECHNICA | 665 |
| CALIFORNIA AUDIO LABS | 716 |
| CAPETRONIC | 669 |
| CARVER | 666 667 668 825 |
| CASIO | 777 |
| CITIZEN | 826 |
| CURTIS MATHES | 777 |
| DENON | 670 |
| EMERSON | 661 673 |
| FISITER | 667 675 676 677 718 |
| GENEXXA | 673 678 719 |
| GOLDSTAR | 720 |
| HARMAN KARDON | 680 691 |
| IHTACHI | 678 |
| INKEL | 681 |
| JC PENNEY | 690 777 |
| JVC | 682 813 |
| KENWOOD | 679 683 685 727 728 828 |
| KRELL | 666 |
| KYOCERA | 660 |
| LUXMAN | 686 687 729 738 |
| LXI | 777 |
| MAGNAVOX | 666 731 800 |
| MARANTZ | 666 688 689 732 |
| MCS | 690 777 |
| MGA | 691 |
| MISSION | 666 |
| MITSUBISHI | 691 692 |
| NAD | 721 743 |
| NAKAMICHI | 693 694 831 |
| NEC | 690 |
| NIKKO | 665 673 676 |
| NSM | 666 |
| ONKYO | 695 696 722 811 |
| OPTIMUS | 667 668 678 679 697 698 699 700 741 747 |
| 751 | |
| PANASONIC | 716 733 740 820 862 |
| PHILIPS | 666 731 825 |
| PIONFER | 678 701 702 719 750 837 876 |
| PROTON | 666 |
| QUASAR | 716 |
| RADIO SHACK | 668 699 706 750 786 868 874 876 |
| RCA | 661 667 703 723 750 795 841 873 871 876 |
| REALISTIC | 661 667 669 673 678 689 697 699 |
| ROTTI | 666 |
| SAE | 666 |
| SAMSUNG | 741 |
| SANSUI | 666 704 723 734 |
| SANYO | 667 705 718 735 742 |
| SCOTT | 661 673 |
| SEARS | 679 689 777 |
| SHARP | 679 689 |
| SHERWOOD | 681 689 698 706 859 |
| SIURF | 690 |
| SONY | 707 792 794 800 |
| STS | 660 |
| SYLVANIA | 666 |
| SYMPHONIC | 709 |
| TEAC | 676 689 699 709 710 711 856 |
| TECHNICS | 716 733 820 862 |
| TIETA DIGITAL | 731 |
| TOSHIBA | 721 |
| VICTOR | 682 |
| YAMAIIA | 665 712 713 724 846 |
| ZENITH | 676 730 759 784 850 |
DVD
| ADVENT | 922 |
| AFREEY | 117 |
| AIWA | 114 |
| AKAI | 395 435 |
| AMES | 431 |
| AMW | 917 918 |
| ANABA | 961 |
| APEX | 386 390 391 392 424 430 436 439 445 457 459938 949 943 401 |
| ASPIRE | 933 |
| A-TREND | 393 |
| AUDIOVOX | 921 |
| AXION | 921 |
| B & K | 978 |
| BLAUPUNKT | 430 |
| BODYSONIC | 417 |
| BOST | 672 |
| BROKSONIC | 391 932 967 |
| CENTRIOS | 951 |
| CIANGHONG | 401 |
| CINEVISION | 405 |
| CLASSIC | 401 431 |
| COBY | 926 946 947 916 445 928 894 |
| CONCEPT | 430 |
| CRITERION | 448 |
| CURTIS INTERNATIONAL | 929 928 |
| CYBERHOME | 395 985 939 |
| CYTRON | 446 388 |
| DAEWOO | 440 441 444 971 965 |
| DENON | 400 421 |
| DENZEL | 428 |
| DESAY | 958 |
| DIAMOND VISION | 948 892 896 |
| DIGIX | 951 |
| DIGITREX | 445 |
| DISNEY | 458 |
| DUAL | 447 984 956 428 446 |
| DURABRAND | 449 405 |
| DVD 2000 | 402 |
| ELTA | 134 135 |
| EMERSON | 405 456 458 940 899 |
| ESA | 956 |
| FARENHEIT | 960 |
| FISHER | 416 |
| FUNAI | 456 458 |
| GE | 409 430 |
| GOLDSTAR | 405 |
| GO-VIDEO | 407 426 455 431 937 971 454 902 901 |
| GPX | 936 941 |
| GRADIENTE | 415 |
| GREENHILL | 430 |
| HAAZ | 151 152 |
| HAIER | 935 |
| HARMAN KARDON | 427 |
| HITACHI | 404 407 419 428 |
| HITEKER | 415 |
| HUMAX | 912 |
| ILO | 959 |
| INFINITY | 417 |
| INSIGNIA | 405 456 905 921 430 |
| INITIAL | 430 |
| INTEGRA | 122 |
| JBL | 427 |
| JVC | 406 418 923 964 900 |
| JWIN | 390 893 895 |
| KAWASAKI | 945 449 |
| KENWOOD | 400 429 |
| KISS | 128 |
| KLH | 130 906 386 |
| KONKA | 410 411 412 413 905 |
| KOSS | 415 388 |
| KXD | 894 |
| LASONIC | 451 948 |
| LENOXX | 931 435 |
| LG | 405 972 907 |
| LINN | 443 |
| LITTON | 982 902 898 |
| MAGNAVOX | 398 108 979 981 980 456 915 911 969 |
| MARANTZ | 398 405 408 423 981 |
| MAXENT | 923 |
| MEDION | 911 446 903 896 |
| MEMOREX | 446 |
| MICROSOFT | 409 |
| MINTEK | 430 |
| MITSUBISHI | 402 |
| MUSTEK | 431 |
| MYRON & DAVIS | 962 |
| NAD | 405 433 |
| NAKAMICHI | 432 |
| NESA | 430 |
| NEXXTECH | 952 954 955 956 |
| NORCENT | 926 982 927 925 928 |
| ONKYO | 122 975 |
| OPTIMUS | 401 |
| ORION | 394 |
| ORITRON | 415 |
| PANASONIC | 387 396 400 437 974 950 970 |
| PACIFIC | 446 |
| PHILLIPS | 398 108 123 755 979 981 980 156 458 969 |
| PHILLIPS-MAGNAVOX | 398 108 123 979 980 |
| PIONTER | 403 404 976 977 968 909 |
| POLAROID | 385 949 957 |
| POLK AUDIO | 398 108 981 |
| PORTLAND | 435 |
| PROLINE | 415 |
| PROSCAN | 109 890 |
| PROSONIC | 926 |
| RADIO SHACK | 449 453 919 920 |
| RCA | 109 430 439 453 920 890 |
| REGENT | 931 |
| REOC | 451 |
| ROSEN | 930 |
| ROTEL | 406 |
| SABA | 919 |
| SAMSLNG | 407 451 455 912 963 891 |
| SAMPO | 417 |
| SANSUI | 394 |
| SANYO | 416 904 |
| SEARS | 394 456 |
| SEG | 428 |
| SHARP | 397 897 |
| SHERWOOD | 125 |
| SIITINCO | 430 |
| SIITINSONIC | 430 |
| SONIC BLUE | 937 |
| SONY | 987 988 989 389 399 986 |
| SOUNDSTORM | 910 911 |
| SUNGALE | 953 |
| SUPERSCAN | 456 |
| SV2000 | 456 |
| SYLVANIA | 456 458 |
| SYMPHONIC | 456 458 899 |
| TEAC | 404 449 |
| TECHNICS | 400 |
| TECHWOOD | 433 |
| TERAPIN | 943 |
| TEVION | 388 146 117 148 150 151 152 |
| THITA DIGITAL | 404 |
| TIVO | 912 909 |
| TOSHIBA | 391 398 973 924 983 |
| TREDEX | 941 |
| UNITED | 449 |
| VENTURER | 419 |
| WHARFEDALE | 442 417 |
| WHITE WESTINGHOUSE | 458 |
| X-BOX | 409 |
| XENIUS | 388 |
| YAMAHA | 400 420 979 980 |
| YAMAKAWA | 438 428 |
| ZENITH | 405 907 |
DVD/VCR Combo Codes
Where the code is listed as [###] the first is for the DVD and the second is for the VCR. Otherwise just the one code operates both the DVD and the VCR.
| APEX | 949 |
| BROKSONIC | 394 967 |
| CINEVISION | [405 245] |
| DAFWOO | 971 |
| DIAMOND VISION | 896 |
| DURABRAND | [105 215] |
| EMERSON | 456 [458 227] |
| FISIER | [416 267] |
| FUNAI | 456 [458 227] |
| GO-VIDEO | 407 426 455 971 |
| HITACHI | [419 227] |
| INSIGNIA | [405 245] |
| JVC | 418 |
| LG | 907 |
| MAGNAVOX | 156 [914 286] [969 286] |
| MEDION | 896 |
| PANASONIC | 437 |
| PHILIPS | 456 [969 286] |
| POLAROID | 949 |
| RCA | [409 255] |
| SAMSUNG | 155 963 |
| SANSUI | 394 |
| SANYO | [416 267] |
| SEARS | 394 |
| SONY | 389 |
| SYLVANIA | 456 [458 227] [458 236] |
| SYMPHONIC | 456 [458 227] [899 236] |
| TOSHIBA | 924 |
| WHITE WTSTINGHOUSE | [458 227] |
| ZENITH | [105 215] |
DVR/DVD Combos
| TIUMAX | 912 |
| PANASONIC | 387 |
| PIONEER | 909 977 |
| TIVO | 912 909 |
| TOSHIBA | 983 973 |
DVR Codes
Where codes are shown like this [###] each one can be used if you have 2 or more of the SAME device.
| AT&T | 373 |
| HUGHES | 580 |
| HUMAX | 912 |
| PANASONIC | 373 |
| PHILIPS | [371] [344] [345] |
| PIONEER | 909 977 |
| RCA | 409 |
| REPLAYTV | 373 |
| SONIC BLUE | 373 |
| SONY | 372 657 |
| TiVo | 371 372 344 345 657 983 912 909 |
| TOSHIBA | 983 |
DVR/Cable Combos
| CABLEVISION | 506 |
| ILLICO | 506 |
| PIONEER | 506 |
| ROGERS | 506 |
| SCIENTIFIC ATLANTA | 506 |
| TIME WARNER | 506 |
| VIDFOTRON | 506 |
DVR/SAT Combos
| BELL EXPRESSVU | 647 655 |
| DISH NETWORK | 655 617 |
| DREAMBOX | 620 |
| ECHOSTAR | 655 647 |
| EXPRESSVU | 647 655 |
| FORTEC STAR | 569 555 556 |
| HUGHES NETWORK | 621 580 |
| RCA | 653 |
| PHILIPS | 621 |
| PROSCAN | 653 |
| SAMSUNG | 583 |
| SONY | 657 659 |
| ULTIMATE TV | 653 659 |
| ZENITH | 656 |
Home Theatre in a Box
Where the code is listed as [*** ***] the first is for the DVD and the second is for the AUDIO. Otherwise just the one code operates both the DVD and the AUDIO.
| AIWA | [414 839] |
| AMW | 918 |
| APEX | 436 |
| BOSE | 672 |
| CRITERION | 448 |
| DURABRAND | 449 105 |
| EMERSON | 910 |
| JVC | 904 |
| KIII | 906 |
| KOSS | 415 |
| LENOXX | 931 |
| LG | 972 |
| MAGNAVOX | 915 [969 756] [408 756] |
| MYRON & DAVIS | 962 |
| NORCFNT | 928 |
| ONKYO | 975 |
| PANASONIC | 974 |
| PHILIPS | 755 [969 756] |
| PIONEER | 976 968 |
| RADIO SHACK | 449 894 895 [453 879] |
| RCA | 449 920 [453 879] |
| REGENT | 931 |
| SABA | 919 |
| SAMSUNG | 454 942 |
| SONY | 986 |
| TEVION | 448 |
| ZENITH | [405 787] |
Satellite/DTV Receivers
Where codes are shown like this [###] each one can be used if you have 2 or more of the SAME device or brand.
| AMPLICA | 575 |
| BELL EXPRESSVU | 654 647 655 628 |
| CHANNEL MASTER | 577 578 579 |
| CHAPPARAI | 560 561 |
| CHIFYENNE | 561 |
| DRAKE | 562 571 587 |
| DREAMBOX | 620 |
| DIRECTV | 622 632 629 621 623 576 586 616 613 630 |
| 634 636 638641 652 653 657 659 607 619 641 | |
| DISH NETWORK [655] [647] | 628 612 654 588 589 590 |
| DISHPRO | 588 589 590 654 |
| DX ANTENNA | 568 582 |
| ECHIOSPHIERE | 628 |
| ECIOSTAR [655] [647] | 628 612 654 588 589 590 |
| EXPRESSVU | 654 617 655 628 |
| FORTEC STAR | 569 555 556 557 558 559 |
| FUJITSU | 591 592 |
| GE | 636 649 637 622 653 650 651 652 |
| GEMINI | 595 |
| GENERAL INSTRUMENT (GI) [627] [642] [643] [644] | 648 |
| 640 645 561 565 566 593 | |
| GO VIDEO | 610 |
| HITACHI | 638 629 630 632 641 607 |
| IUGHIES NETWORK | 621 641 607 580 [632] [638] [629] |
| [630] | |
| JVC | 628 |
| KENWOOD | 598 |
| LUXOR | 599 |
| MAGNAVOX | 576 612 639 |
| MACOM | 600 |
| MITSUBISHI | 641 632 638 629 630 607 |
| MOTOROLA | 648 618 |
| NORSTAT | 601 |
| PACE | 614 615 616 |
| PANSAT | 584 |
| PANASONIC | 626 586 596 |
| PRIMESTAR | 627 640 |
| PHILIPS | 576 612 621 629 630 632 638 641 607 639 |
| PHILIPS-MAGNAVOX | 576 612 639 |
| PIONEER | 604 |
| PROSAT | 563 |
| PROSCAN | 636 637 650 653 651 652 |
| RCA [636] 649 [637] 622 658 653 650 651 652 098 | |
| REALISTIC | 567 603 |
| SAMSUNG | 594 583 613 616 619 |
| SHARP | 601 |
| SKY NETWORK | 614 615 646 |
| SIERRA I II III | 561 |
| SONY | 623 657 659 602 |
| STARCHOICE | 640 645 627 |
| STAR SIGHT | 633 |
| STAR TRAK | 608 |
| STS | 568 570 571 |
| SUPER GUIDE | 609 |
| SYLVANIA | 581 |
| TOSHIBA ....641 632 638 629 630 607 572 624 625 631 | |
| ULTIMATE TV | 653 659 |
| UNIDEN | 633 573 611 |
| UNITED | 597 |
| VIDEO CIPHER II | 574 |
| WEB TV | 612 585 |
| ZENITH | 617 634 656 595 646 562 574 587 635 |
VCR Codes
| Where codes are shown like this [xxx] each one can be used if you have 2 or more of the SAME device or brand. | |
| ACCELE | 354 |
| ADMIRAL | 226 |
| ADVENTURA | 251 |
| AIKO | 252 |
| AIWA | 215 227 269 251 |
| AKAI | 227 229 228 230 231 254 303 337 |
| ALLEGRO | 247 329 243 |
| AMERICAN HIGH | 292 |
| APEX | 949 |
| ASHA | 354 |
| AT&T | 373 |
| AUDIO DYNAMICS | 376 377 231 |
| AUDIOVOX | 245 |
| BELL & HOWELL | 268 |
| BEALMARK | 354 |
| BROKSONIC | 256 250 257 310 394 967 237 289 |
| CALIX | 215 |
| CANDLE | 210 215 351 231 242 241 |
| CANNON | 225 292 339 |
| CAPEHART | 329 |
| CARVER | 287 |
| CCF | 252 356 |
| CINEVISION | 215 |
| CITIZEN | 210 215 252 351 234 242 241 |
| COLORTYME | 234 |
| COLT | 356 |
| CRAIG | 215 351 356 248 |
| CURTIS MATIRES | 225 287 227 334 354 358 234 249 292 |
| CYBERNEX | 354 |
| DAEWOO | 279 240 250 252 334 242 244 251 971 |
| DBX | 376 377 234 |
| DIAMOND VISION | 896 |
| DIMENSIA | 225 |
| DURABRAND | 245 |
| DYNATECHI | 227 251 |
| ELECTROHOME | 245 254 |
| ELECTROPHONIC | 245 |
| EMERSON | 250 215 252 256 257 290 310 325 354 240 |
| 233 227 265 266 268 269 156 158 231 237 249 251 251 | |
| 259 262 263 270 289 292 301 330 341 | |
| FISHTER | 304 268 267 287 234 248 273 274 |
| FUJI | 229 292 |
| FUNAI | 227 456 458 251 |
| GARRARD | 251 |
| GE | 225 311 355 342 354 278 292 |
| GOLDSTAR | 227 245 338 329 346 234 |
| GRADIFNTE | 251 |
| GO-VIDEO | 351 375 107 126 455 971 368 |
| HARLEY DAVIDSON | 251 |
| IIARMAN KARDON | 234 254 |
| IIARWOOD | 350 |
| HEADQUARTER | 268 |
| HITACHI | 369 227 347 303 332 |
| HI-Q | 248 |
| INFINITY | 288 |
| INSIGNIA | 245 |
| INSTANT REPLAY | 227 292 |
| INTEQ | 215 |
| JC PENNEY | 225 245 268 354 369 376 377 292 303 332 |
| 343 234 | |
| JCL | 292 |
| JENSEN | 369 303 |
| JVC | 376 377 268 247 418 234 303 |
| KENWOOD | 268 376 377 231 303 |
| KLH | 356 |
| KODAK | 245 292 |
| LG | 227 329 338 907 |
| LLOYD | 227 | 251 |
| LOGIK | 356 | |
| LXI | 227 | 245 |
| MAGNAVOX 287 288 329 226 225 456 286 235 227 914 | ||
| 969 | 292 | |
| MAGNIN | 351 | |
| MARANIZ | 287 268 376 377 289 292 339 231 | |
| MARTA | 245 | |
| MATSUSIITA | 292 | |
| MEDION | 896 | |
| MEI | 292 | |
| MEMOREX . 287 245 268 304 310 329 354 226 227 337 | ||
| 248 251 | 292 | |
| MGA | 290 | 254 |
| MGN TECHNOLOGY | 354 | |
| MIDLAND | 278 | |
| MINOLTA | 369 | 332 |
| MITSUBISHI | 290 298 369 376 377 254 295 | |
| MONTGOMERY WARD | 226 | 300 |
| MOTOROLA | 226 | 292 |
| MTC | 227 | 354 251 |
| MULTITECH | 227 354 251 278 356 | |
| NEC | 268 376 377 289 301 302 303 231 249 | |
| NIKKO | 245 | |
| NOBLEX | 354 | |
| OLYMPUS | 292 | |
| OPTIMUS | 239 354 363 245 361 374 381 226 | |
| OPTIONICA | 354 | 300 |
| ORION | 256 | 310 |
| PANASONIC | 363 381 374 373 225 437 292 | |
| PENTAX | 369 234 332 | |
| PHILCO | 287 225 235 292 | |
| PHILIPS | 287 288 344 345 371 378 383 456 286 292 | |
| PHILIPS-MAGNAVOX | 287 288 226 | |
| PILOT | 245 | |
| PIONEER | 305 369 376 377 343 | |
| PORTLAND | 242 244 | |
| PROSCAN | 225 308 | |
| PROTTC | 356 | |
| PULSAR | 329 | |
| QUARTER | 268 | |
| QUARTZ | 268 | |
| QUASAR | 363 374 225 381 292 | |
| RADIO SHACK | 225 226 227 239 | |
| . 245 268 342 354 361 363 248 251 254 274 292 300 337 | ||
| RADIX | 245 | |
| RANDEX | 215 | |
| RCA ..[225] 245 [308] 309 311 312 313 314 315 316 335 | ||
| 342 | ||
| 354 369 228 278 292 332 | ||
| REALISTIC ... 225 226 227 245 268 354 361 363 248 251 | ||
| 254 274 292 300 337 | ||
| REPLAYTV | 373 | |
| RICOH | 353 | |
| RUNCO | 329 | |
| SAMSUNG | 354 358 240 369 455 942 963 230 337 | |
| SANKY | 226 329 | |
| SANSUI | 310 376 377 394 256 303 | |
| SANYO | 304 267 268 351 248 | |
| SCOTT | 210 250 257 290 341 257 263 | |
| SEARS ... 363 245 268 287 369 394 456 248 273 274 292 | ||
| 332 343 | ||
| SHARP | 360 361 226 227 266 212 254 300 | |
| SHINTOM | 229 353 369 356 357 | |
| SIOGUN | 354 | |
| SIGNATURE | 227 | |
| SINGER | 292 356 | |
| SONIC BLUE | 373 | |
| SONY ... 379 321 229 323 353 389 372 361 365 366 380 | ||
| STS | 369 292 332 | |
| SUPERSCAN | 456 | |
| SYLVANIA | 227 287 290 225 236 456 458 251 292 | |
| SYMPHONIC | 227 236 456 251 | |
| TANDY | 227 268 | |
| TASHIKO | 215 | |
| TATUNG | 303 | |
| TFAC | 227 251 303 | |
| TECHNICS | 292 | |
| TEKNIKA | 227 245 325 251 292 | |
| TIVO | 371 372 | |
| TMK | 354 249 301 | |
| TOSHIBA ... 240 261 260 287 290 358 369 924 274 341 | ||
| TOTVISION | 245 354 | |
| UNITECH | 351 | |
| VECTOR RESEARCH | 240 376 377 231 | |
| VICTOR | 376 377 | |
| VIDEO CONCEPTS | 240 376 377 234 254 | |
| VIDEOSONIC | 354 | |
| WARDS . 225 226 227 240 245 354 369 248 251 254 292 | ||
| 300 326 332 341 356 | ||
| WHITE WESTINGHOUSE | 227 279 |
| XR-1000 | 251 292 356 |
| YAMAHA | 376 377 234 303 |
| ZENITH 329 247 252 266 288 226 227 338 347 353 358 | |
| 245 229 310 232 232 376 377 279 368 243 | |
Web TV
| JVC | 612 |
| SONY | 585 |
Channel Banner
There are several indicators that might appear when you press the INFO button on the remote. This display is called the Channel Banner. The following list describes the items on the Channel Banner screen (left to right and top to bottom).
| Stereo | SAP | CC | |
| D 10 CBS | 4/3 Format | Zzz 00:25 | 6:05 PM |
TV-14 The current program rating.
Stereo Stereo appears when the current channel is broadcasting in stereo. Mono appears when the current channel is broadcasting in mono.
SAP The current channel is broadcasting SAP (Second Audio Program) information.
CC
Closed Captioning is available on the current cf
D 10 CBS The D means it's a digital channel. If it's an analog channel, A is displayed. The channel, sub-channel (if available for digital channels) and program (only for digital channels) you're currently viewing are displayed.
4/3 or 16/9 format Current screen format. If there are bars on-screen you might be able to get rid of them by pressing the ZOOM buttons on the remote. Go to page 32 for more information on screen formats.
Zzz 00:25 Current time left on sleep timer, if the sleep timer is set.
6:05 pm Current time.
Autotuning
Note: This feature only works with other RCA devices.
The Autotuning feature automatically tunes the TV to the correct video input channel for different devices you have connected to your TV. When you set up Autotuning in the menu system you don't have to remember to change your TV to the VID1 input, for example, when you want to watch a tape on the VCR. To set up the Autotuning feature:
| back | |
| Channel setup | ... |
| List and Labels | ... |
| Closed caption | ... |
| Preferences | ... |
| Message | ... |
- Press MENU (the MAIN MENU appears).
- Highlight Setup and press OK on your remote control.
- Highlight Autotuning and press OK.
- Choose which device button you would like to set:
Set VCR Channel If the DVD or SAT•AUX button is programmed to your VCR, lets you set up the channel the TV tunes to when you press the corresponding button.
Set DVD Channel Lets you set up the channel the TV tunes to when you press the DVD button.
Set SAT•AUX Channel Lets you set up the channel the TV tunes to when you press the SAT•AUX button.
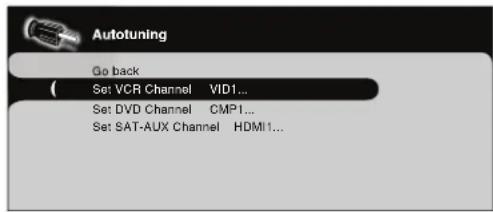
- Press the right arrow button to select the choice that matches the way you have the device connected to this TV.
You can select from the following inputs or channels:
Disabled Choose this if you don't have a device connected to the TV, or if you don't want the TV to automatically tune to the correct channel/input when you're using this device.
Channel 3 or 4 Device is connected to the ANTENNA/CABLE jack on the back of the TV, and you want the TV to tune to channel 3 when you press the corresponding button on the remote. Reminder: make sure the device's Channel 3/4 switch is set to channel 3.
VID1 or VID2 (Video Input) Device is connected to the VIDEO INPUT 1 jack on the back of the TV or the VIDEO INPUT 2 jack on the side of the TV and you want the TV to tune to the VIDEO input channel when you press the corresponding device button.
CMP1 or CMP2 (Component Video Input) Compatible component video source, such as an HIDTV tuner or satellite receiver, is connected to the three COMPONENT VIDEO INPUT jacks (Y Pb Pr) on the back of the TV and you want the TV to tune to the component video input channel (CMP1 or CMP2) when you press the corresponding device button.
VGA Device is connected to the VGA jack on the back of the TV and you want the TV to tune to the VGA input channel when you press the corresponding device button
HDMI1 or HDMI2 Device is connected to the HDMI1/DVI or HDMI2 jack on the back of the TV and you want the TV to tune to the HDMI input channel when you press the corresponding device button.
Parental Controls and V-Chip
The choices in the US V-Chip and Canada V-Chip menus involve software inside your TV (referred to as V-Chip) which allows you to block TV programs and movies. TV programs can be blocked by age-based ratings, such as TV-MA, which is explained on page 30. If available, TV programs can also be blocked by content, such as adult language (L). This is explained on page 30. Movies can only be blocked by age-based ratings. This is explained on page 31.
Once you block programs, you can unblock programs by entering a password.
By default, the software inside your TV is turned off or unlocked. For instructions to lock V-Chip, see below.
Note: Parental control settings are not available for HDMI1, HDMI2, CMP1, or CMP2 inputs. These settings must be set in the connected device's parental controls.
How V- Chip Works for USA and Canada
V-Chip reads the program's age-based rating (TV-MA, TV-14, etc.) and content themes [(Violence (V), Adult Language (L), etc.)]. If you have blocked the rating and/or content themes that the program contains, you will receive the message This channel is blocked. Change channel or press OK to enter your password and temporarily deactivate the parental controls.
Broadcasters are not required to provide content themes, so programs received with no content themes will only be blocked if you block their age-based rating. You can also block out programs that have been given an Exempt rating, and programs that are considered unrated. Go to page 44 for the US and Canada ratings explanations.
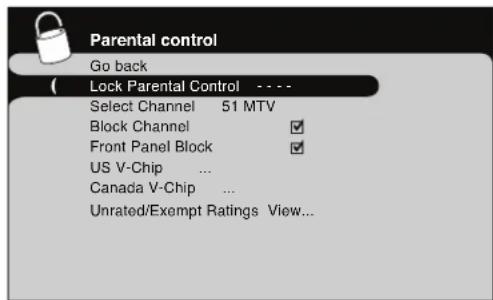
Lock/Unlock Parental Controls
Selecting this option lets you lock and unlock parental controls settings using a password.
If you do not lock parental controls, none of the settings for V-Chip, Channel Block, or Front Panel Block will take effect.
If you forget your password, turn off the TV. Simultaneously press and hold VOL v on the side panel and CLEAR on the remote for 10 seconds. Next time you enter the Parental control menu enter a new password.
The V-Chip Rating Screen
The following is an example of where items are located within the Rating Limit screen.
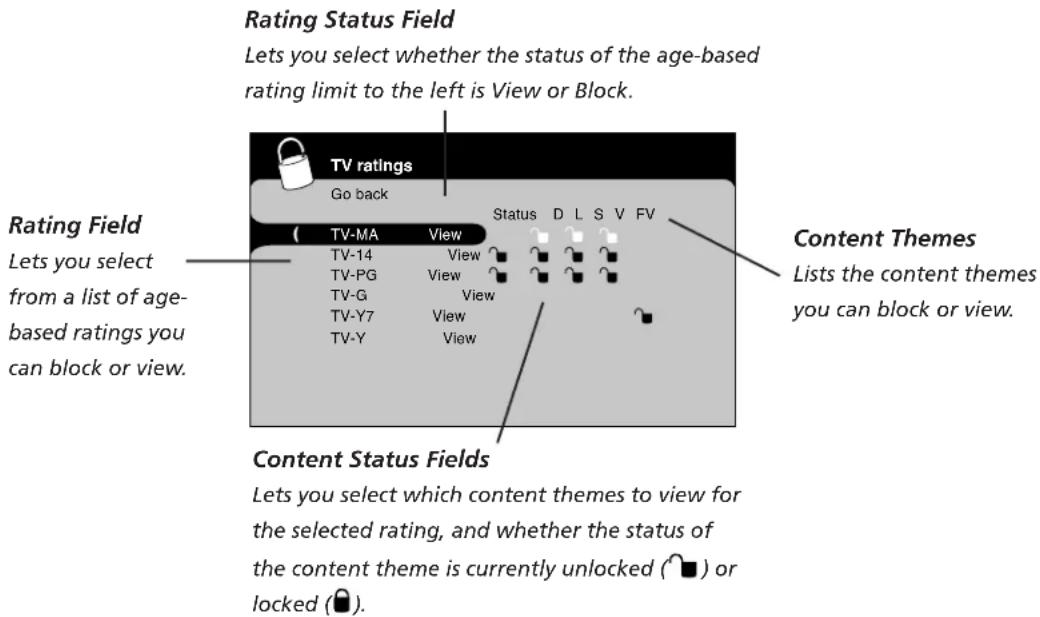
| Hierarchy of Age-Based Ratings | |
| TV-MA | Mature Audience Only |
| TV-14 | Parents Strongly Cautioned |
| TV-PG | Parental Guidance Suggested |
| TV-G | General Audience |
| TV-Y7 | Directed to Children 7 years and older |
| TV-Y | All Children |
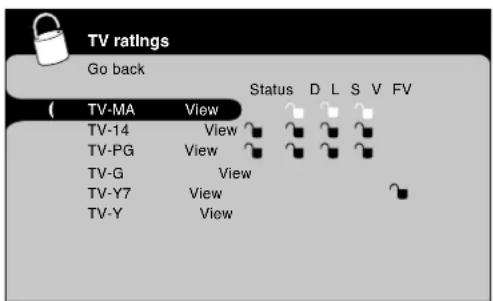
US V-Chip TV Ratings
Blocking Age-Based Ratings
You can automatically block all program ratings above a specified age-based rating level.
- Choose Parental control from the Main Menu. If Parental controls have previously been locked, you must enter your password.
- Highlight and select US V-Chip. Then select TV ratings.
- Press the up or down arrow button to scroll to the rating corresponding with the lowest rating you do not want the child to watch.
- Press the OK button to toggle between View and Block. The status for the rating and all higher ratings automatically changes to Block.
- Use the up/down arrow buttons to highlight Go back and press OK.
- Select Lock Parental Controls from the Parental Control menu for rating limits to take effect.
Note: If you forget your password, turn off the TV.
Simultaneously press and hold VOL v on the side panel and CLEAR on the remote for 10 seconds. Next time you enter the Parental control menu enter a new password.
To view age-based ratings after you've locked them, follow the same steps as above to unlock.
| Content Themes | |
| D | Sexually explicit dialogue |
| L | Adult language |
| S | Sexual situations |
| V | Violence |
| FV | Fantasy Violence |
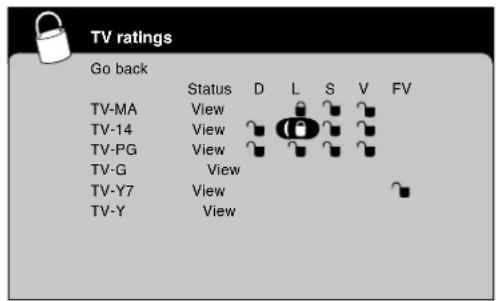
Blocking Specific Content Themes
You can block programs based on their content. (Content is represented by the D, L, S, V and FV on your screen.) When you block a content theme for a particular rating, you automatically block that content theme for higher rated programs as well.
To block program content:
- Determine the content themes you want to block.
- Press the down arrow button to scroll to the rating whose content theme you want to change.
- Press the right arrow button to move the highlight to a particular content theme.
- Press the OK button to change its status to lock. (In the example to the left, you block the language (L) corresponding with TV-14. The language for TV-MA is blocked as well.)
Notes: Broadcasters are not required to provide content themes or age-based ratings.
You must remember to lock Parental controls for rating limits to take effect.
To view content theme after you've locked them, follow the same steps as above to unlock. Note that if you unlock the language corresponding with TV-14, the language for TV-MA doesn't unlock. You have to unlock the content theme status for each rating separately.
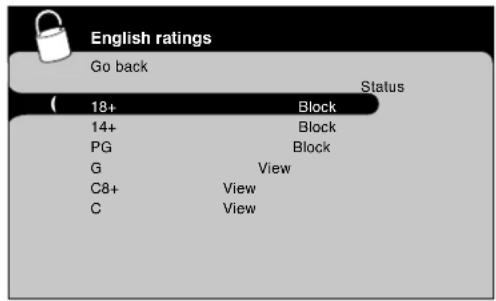
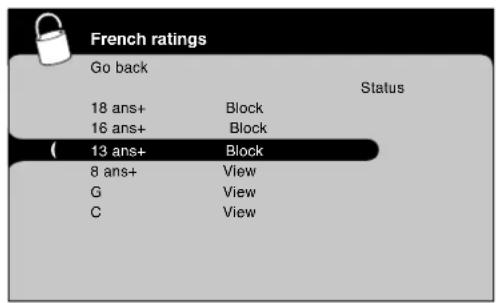
Blocking Canadian V-Chip Ratings
If you receive Canadian programs you can block Canadian English and French V-Chip by ratings only. When you block a particular rating, you automatically block the higher rated programs as well.
To block Canadian English and French program ratings:
- Select Canada V-Chip from the Parental control menu.
- Highlight English ratings or French ratings and press OK.
- Determine the rating you want to block.
- Press the down arrow button to scroll to the rating you want to change.
- Press the OK button to change its status to block (all ratings above the one you selected change to block).
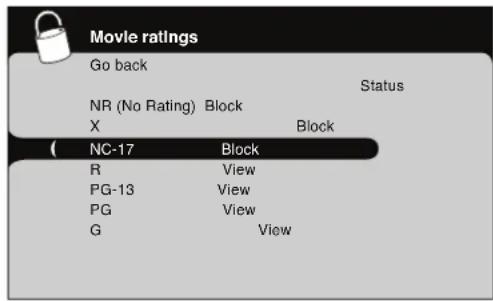
V-Chip Movie Rating Limit
Set movie rating limits by blocking movies rated above a specified level.
To access the Movie Rating Limit menu:
- Press MENU on the remote control (the TV's Main Menu appears).
- Select Parental Control.
- Select US V-Chip.
- Select Movie Ratings.
Blocking Movie Ratings
Once you are in the Movie Ratings menu, follow the same steps described for blocking Canadian ratings.
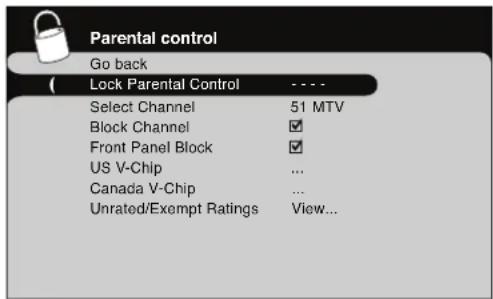
Block Channels
Turn this option on to block the channel you choose in the Select Channel option.
Use the number buttons to enter the channel you want to block, then press the down arrow button. Press OK to place a check mark in the Block Channel box to block the channel. When you tune to that channel you'll need to enter a password to view the channel if the TV is locked.
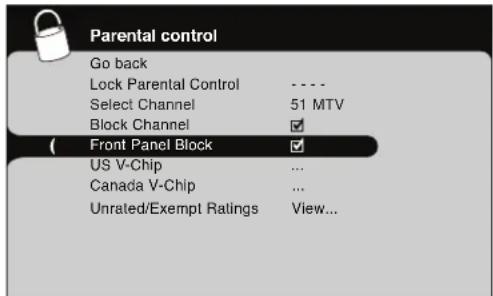
Front Panel Block
Select this option to block (disable) or unblock (enable) the TV's side panel buttons so that they can't be used by someone, like a young child. The remote still tunes to any channel. If you're using this to keep children from changing channels, remove access to any remote that is capable of operating the television while you have the front panel blocked.
Don't forget to lock parental controls after you change the status. If you don't, the front panel block will not take effect.
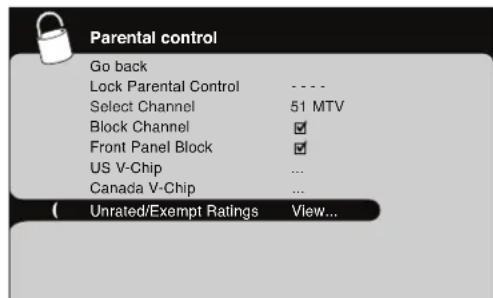
Blocking Unrated/Exempt Programs
The Unrated/Exempt Ratings option lets you decide if programs that the V-Chip recognizes as unrated or exempt can be viewed. Unrated TV programs may include news, sports, political, religious, local and weather programs, emergency bulletins, public announcements, and programs without ratings. The Exempt option applies to both USA and Canadian unrated programs and Canadian programs rated E.
View All unrated programs are available.
Block All unrated programs are not available.
Note: You must remember to lock Parental controls for rating limits to take effect.
Press the down arrow button to highlight Unrated/Exempt Ratings. Then press the right arrow button to toggle between View and Block.
Future Rating Region
You might notice an option in your Parental control menu that wasn't there before. This is because broadcasters have the capability to add a new rating system for TV programs. These ratings let you define additional parameters for parental controls. This option and its name are dependent on the content acquired from the broadcaster.
Note: These ratings are available only if the broadcaster is sending them.
Additional Features
There are additional features available unrelated to Parental Controls. These features can be found in other menus.

Picture Processing
With a focus on exceptional picture performance, all RCA models feature Enhanced Natural Vision (EN-V). EN-V picture processing is designed to provide enhanced color and contrast so you can enjoy a bright, crisp picture.
Go to page 35 to adjust picture settings.
Screen Formats
Screen format is the way the picture is displayed on your TV. Press the ZOOM +/- button on your remote to see if a different format is available for the video you are viewing. The format changes as you press the ZOOM buttons and the format type is displayed at the bottom of the screen.
Analog video is sent in a 4/3 format, which your TV displays in a 16/9 format. Most digital video is sent in a 16/9 format which does fill your screen, but sometimes is sent in 4/3 which does not fill your screen. It depends on how the station or device connected to your TV is formatting the video. If there are bars on-screen, press the ZOOM +/- button to try a different format that may eliminate the bars. Some bars can't be removed because of the way the format is sent by the broadcaster.
The different formats available and what they look like follow. Each format is available for analog video, but might not be available for digital video.
natural_image
Black-and-white photo of a dog sitting on a bench, no visible text or symbols4/3 16/9 zoom
natural_image
Black-and-white photo of a dog sitting on the floor with books and papers in the background (no visible text or symbols)
natural_image
Black-and-white photo of a dog sitting on the floor with books in the background (no visible text or symbols)16/9 Cinerama
natural_image
Black-and-white photo of a dog-like animal sitting on a surface, no visible text or symbolsChapter 4: Using the TV's Menu System
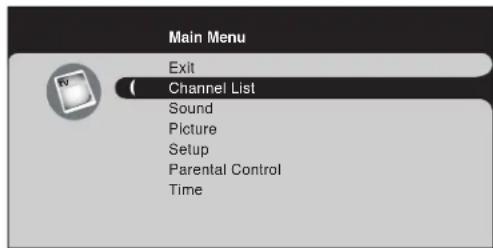
Using the Menu System
This section explores the menus of your TV. Each menu is outlined and detailed to help you get the most from your TV. The Parental control menu is discussed in the Features chapter.
To access the menu system:
- Press the MENU button.
- Use the up and down arrow buttons to highlight an option and press OK to display it. The name of the menu is displayed at the top of the menu screen.
- Press the up and down arrow buttons to move to a different option within the menu. If necessary, press the OK button to display the choices of the option you've highlighted. If available, use the text at the bottom of each screen for help.
- To return to the Main Menu, press the MENU button until it's displayed.
Note: Options in the menus that are grayed-out and can't be highlighted are unavailable or in progress.
Descriptions of each menu are discussed in the order they appear.
There are two ways to exit a menu:
- Press the CLEAR button. The menus are cleared from the screen and you return to TV viewing.
- Press the MENU button repeatedly until the menus disappear.
Channel List Menu
The Channel List menu allows you to view all the channels available in your channel list. Press the up or down arrow button to highlight a channel then press OK to tune to the channel and exit the menu.
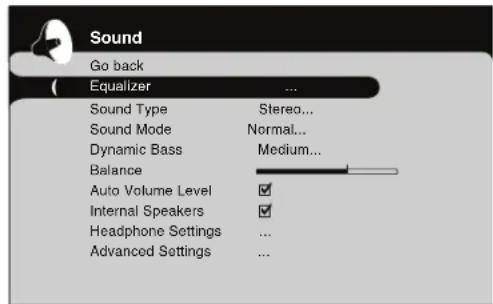
Sound Menu
The Sound menu lets you adjust audio output. To access the Sound menu, press MENU on the remote, and then select Sound from the Main Menu. The following audio items can be adjusted:
Equalizer The five-band graphic equalizer lets you adjust the audio frequency settings. You can select one of the five-band Equalizer Presets or create your own personal preset.
Sound Preset Allows you to choose a specific sound preset. Press the right arrow to cycle through the options: Standard, Movie, Voice, Music and Personal.
Frequency Range Displays the different graphic equalizer bands set for each Sound preset option. Choose a band and make adjustments. When you make adjustments, the Sound preset option automatically changes to Personal. Press the left or right arrow button to select the frequency (100Hz, 300Hz, 1kHz, 3kHz, 10kHz) you want to adjust. Then use the up or down arrow button to adjust the level. When you're done adjusting the levels, press the MENU button to exit.
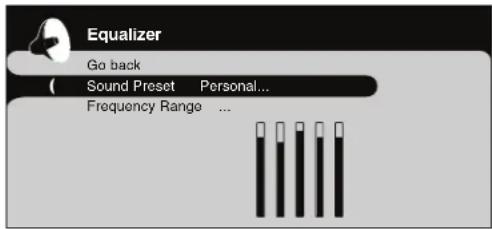
To view the frequency range of another Sound Preset option, press the right or left arrow until no band is selected and Frequency Range is highlighted. Then press the up arrow to highlight Sound Preset.
Sound Type Controls the way the sound comes through your speakers. The options available vary according to the input selected.
Mono (available for regular TV viewing only) Plays the sound in mono only. Use this setting when receiving broadcasts with weak stereo signals.
Stereo Splits the incoming stereo audio signal into left and right channels. Most TV programs and recorded materials have stereo audio. The word Stereo appears in the channel banner when you tune to a program that is broadcast in stereo.
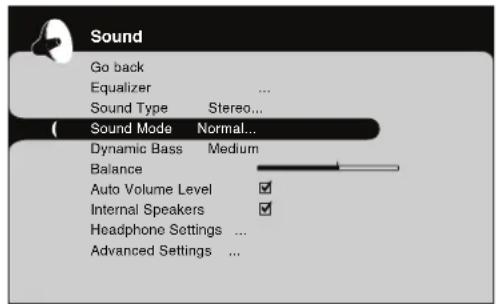
Sound Mode Provides special processing through your speakers (depending on the setting you chose as your Sound Type). The available audio modes are:
Normal Does not give any special processing, simply provides the mono or stereo sound provided by the signal you're watching.
Wide (available only for mono signals) “Widens” sound from mono broadcasts and mono devices connected to your TV for a fuller, more spacious sound.
Stereo Wide Available only for stereo signals. Gives a surround effect with more bass.
BEE. Restores clarity and presence for better speech intelligibility and musical realism.
Dynamic Bass Improves bass output. Displays a choice list of available settings you can adjust: Off, Medium and High.
Balance Adjusts how much audio is sent to the left and right speakers.
Auto Volume Level Reduces the annoying blasts in volume during commercial breaks, and also amplifies softer sounds in program material. Eliminates the need to constantly adjust the volume.
Internal Speakers Turn on or off the internal speakers. If you have a device connected to the Audio Output jacks on the back of the TV and you want to control the sound by the device instead, uncheck the box.
Headphone Settings Displays a choice list of available settings you can adjust: Volume, Bass and Treble. The Headphone sound option allows you to choose Stereo, Mono or Auto. These descriptions are same as for Sound Type (see above).
Advanced Settings
Second Audio Program (SAP) Plays the program's audio in a second language, if one is available. The letters SAP appear in the channel banner when you tune to a program that is broadcast with SAP information. SAP audio is broadcast in mono. SAP is also used to broadcast a program's audio with descriptions of the video for the visually impaired.
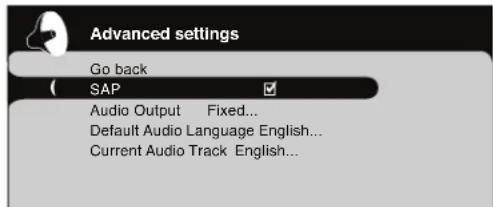
BBE. Manufactured under license from BBE Sound, Inc.
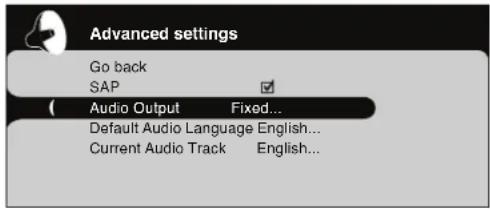
Audio Output Lets you choose a setting for the FIXED/VARIABLE AUDIO OUTPUT jacks.
- Variable Provides variable output from the AUDIO OUTPUT jacks. Use this setting if the TV is not connected to an audio receiver or amplifier and the volume is controlled by the TV.
- Fixed Provides fixed output from the AUDIO OUTPUT jacks to a receiver or amplifier. With the Fixed Output, the TV's volume control, graphic equalizer, and mute are disabled. This output is ideal when connecting to an audio receiver or amplifier that has its own remote control for controlling the volume.
Default Audio Language Choose the language you prefer for dialog on digital channels. If your preferred language is being broadcast with a program, then the TV plays it. If not, then the TV plays the default audio for the program (usually English in the U.S.). The default digital channel audio language options are English, Spanish, French, German, Italian, Japanese, Chinese, and Korean.
Current Audio Track Press the right arrow to choose from the audio languages available for the program you're watching. The language you choose becomes your preferred audio language for all digital channels until you turn the TV off. If the language you choose here is not being broadcast with a program, then the TV plays the default audio for the program (usually English in the U.S.).
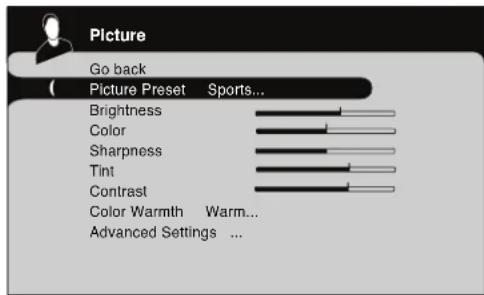
Picture Menu
The Picture menu contains menus and controls to confi gure how the picture looks. The Picture menu options apply to the video for the main TV and video input selections. All picture options can be applied to each input- VID1, VID2, CMP1 or CMP2, HDMI1 or HDM2, and VGA.
Picture Preset (not available on VGA) Displays a choice list that lets you select one of the preset picture settings: Vibrant, Cinematic, Natural, Sports, or Personal. Choose the setting that is best for your viewing environment.
Brightness Adjusts the brightness of the picture.
Color Adjusts the richness of the color.
Sharpness (not available on VGA) Adjusts the crispness of the edges in the picture.
Tint (not available on VGA) Adjusts the balance between the red and green levels.
Contrast Adjusts the difference between the light and dark areas of the picture.
Color Warmth Displays a choice list that lets you set one of three automatic color adjustments: Cool for a more blue palette of picture colors; Normal; or Warm for a more red palette of picture colors. The warm setting corresponds to the NTSC standard of 6500 K.
When you change any of these picture settings, the Picture Preset changes to Personal. Use the left or right arrow button to make adjustments. To return to the Picture menu, press the up or down arrow button.
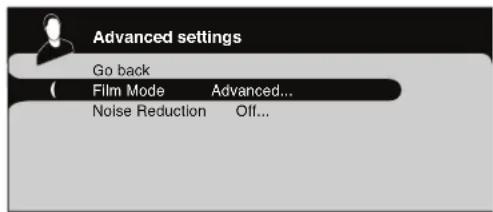
Advanced Picture Settings (not available on VGA)
Film Mode (3:2 Pulldown) Automatically detects video sources that were originally recorded on film (like most movies) and subsequently converted to a different format (for TV broadcast, for example). Film mode processes the converted signal so that it looks as close as possible to the original. Another name for this process is reverse 3:2 pulldown.
Advanced (recommended) enables the feature only when the TV detects that movie playback quality could be improved. Advanced is the default setting.
The Off setting turns off fi lm mode upconversion. Try using this setting if you think the reverse 3:2 pulldown is causing distortions in your picture.
Noise Reduction Reduces picture “static” or any type of interference. This feature is especially useful for providing a clearer picture in weak analog signal conditions. Press the right arrow to choose between: Off for no noise reduction; Low for a softer, smoother picture that retains picture sharpness and detail; Medium for a slightly softer picture than the Low setting; High for an even softer, smoother picture than the other settings (the picture detail is somewhat decreased).
Note: Video noise reduction is available for the CMP1 and CMP2 inputs only if the signal is 480i.
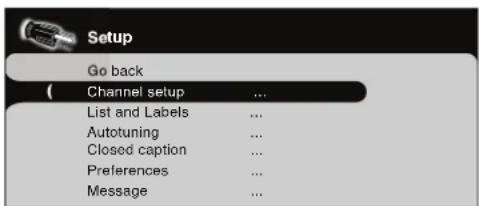
Setup Menu
The Setup menu lets you configure the TV to fit its surroundings and your preferences. To access the Setup menu, press MENU on the remote, and then select Setup from the Main Menu.
Channel Setup
Signal Type Choose the type of signal you have connected to the ANTENNA/CABLE INPUT.
Auto Channel Search Searches for channels the signal is receiving. Go to page 14 for more information.
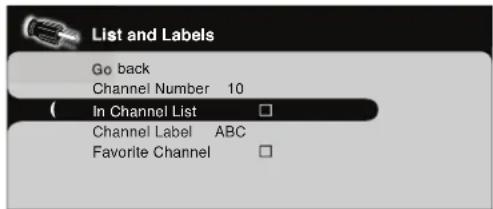
List and Labels Edit the channels in the list or choose labels for each channel.
Channel Number Use the number buttons on your remote to enter the channel number.
In Channel List If you've entered a channel you want to add to the channel list, highlight In Channel List and press the right arrow to place a check in the check box. If you've entered a channel you want to delete from the channel list, press the right arrow button to uncheck the box.
Channel Label Allows you to add a five character label, which is displayed on-screen when you tune to the channel entered in the Channel Number option. Press the up or down arrow button to enter a character. Continue to press the right arrow button to highlight the next space to add another character.
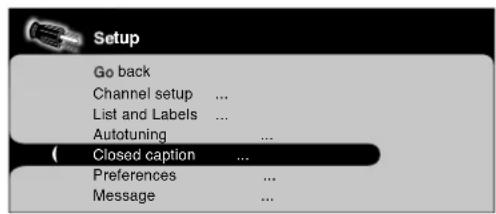
Favorite Channel The channel you entered for Channel
Number can be saved as a favorite channel. You can have up to 6 favorite channels. To access your favorite channels after they've been set, exit the menu system. Press the PRESETS (down arrow) button and then highlight CH+/CH-Buttons. Press the right arrow to choose Favorite Channels. Press the CLEAR button. When you press the CH+/CH- buttons, only the favorite channels you set will be available.
Autotuning Go to Chapter 3 for details about the Autotuning feature.
Closed Caption Many programs are encoded with closed-captioning information, which lets you display the audio portion of a program as text on the TV screen.
Note: Closed caption settings are not available for HDMI1, HDMI2, CMP1, or CMP2 inputs. These settings must be set in the connected device's menu.
Closed captioning is not available on all channels at all times. Only specific programs encoded with closed-captioning information. When a program is closed captioned, CC is displayed in the channel banner. See Chapter 3 for more information about the channel banner. The closed caption options are:
CC Setting Lets you choose the way closed captioning information appears on the screen.
Off No captioning information displayed.
On Always Captioning information shown always, when available.
On When Muted Displays captioning information, when available, whenever the TV's sound is muted by pressing the MU TE button. The captioning information is not displayed when the sound is not muted.
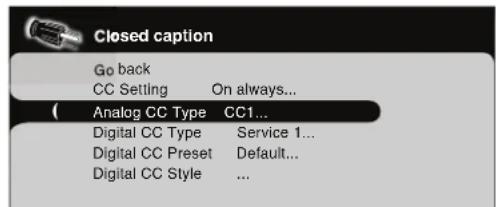
Analog CC Type If available, lets you select the captioning mode used for displaying captioning information. If you are unsure of the differences among the modes, you may prefer to leave the closed captioned mode set to CC1, which displays complete text of the program in the primary language in your area.
Digital CC Type If available, lets you select a closed caption service mode (1-6) for digital channels.
Digital CC Preset If available, lets you select between Default and Custom options. Custom changes according to what you set for the options below.
Digital CC Style If available, lets you customize the following display options:
Digital CC Size Lets you set the size of the digital closed-caption text. You can choose Standard, Large, or Small.
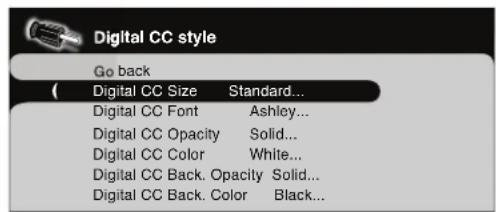
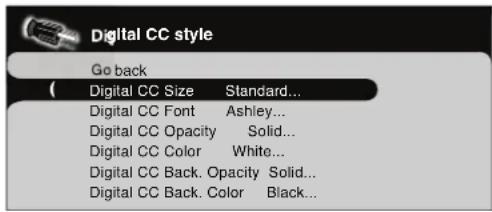
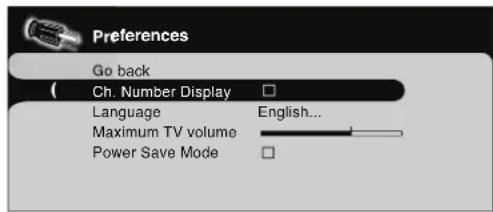
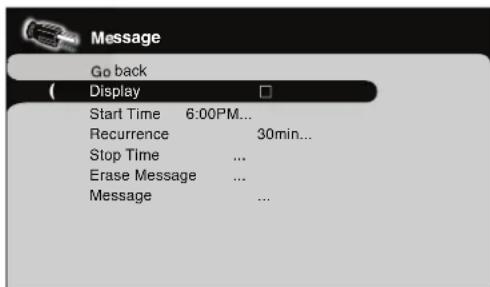
Digital CC Font Lets you select a character design for the digital closed-caption text. A font is a complete assortment of letters, numbers, punctuation marks, etc. in a given design. You can choose from a variety of fonts (Ashley, Floridian, etc.).
Digital CC Opacity Let you set the appearance of the digital closed-caption text: Solid, Transparent, Translucent, or Flashing.
Digital CC Color Lets you choose the color of the digital closed-caption text: White, Black, Red, Green, Blue, Yellow, Magenta, or Cyan.
Digital CC Back. Opacity Let you set the appearance of the space behind the digital closed-caption text: Solid, Transparent, Translucent, or Flashing.
Digital CC Back. Color Lets you choose the color of the area of the screen behind the digital closed-caption text: White, Black, Red, Green, Blue, Yellow, Magenta, or Cyan.
Note: These captioning style options only have an effect on true digital closed captions.
Not all captioning on digital channels is digital captioning—it depends on what the broadcaster is sending. If the closed captioning for a program is not digital, the Digital CC style settings will not have an effect.
Preferences
Ch. Number Display Turn this feature on if you want the channel number always available when you press the CH+ or CH- button.
Language Lets you select your preferred language for the menus: English, Español or Français.
Maximum TV volume This feature is intended to prevent volume from being turned up too loudly. Set the volume at the loudest level you'd want to hear. Press and hold OK to hear the maximum volume you set.
Power Save Mode If no signal is detected from the VGA input jack for 5 minutes, puts the TV in power save mode.
Message Set a message that appears at the bottom of the TV screen. Press the CLEAR button to clear the message. If Display is turned on, the message appears when the TV is turned back on after being turned off.
Display Turns on or off to display a message on the TV.
Start Time Set the time you want to display the message. Not available if the time hasn't been set in the Time menu.
"Monotype" is a trademark of Monotype Imaging, Inc. registered in the U.S. Patent and Trademark Office and may be registered in certain other jurisdictions.
"iType" is a trademark of Monotype Imaging, Inc. and may be registered in certain other jurisdictions.
"Floridian", "Plate Gothic", and "Screen" are trademarks of The Monotype Corporation and may be registered in certain other jurisdictions.
"Ashley" is a trademark of The Monotype Corporation Registered in the U.S. Patent and Trademark Office and may be registered in certain other jurisdictions.
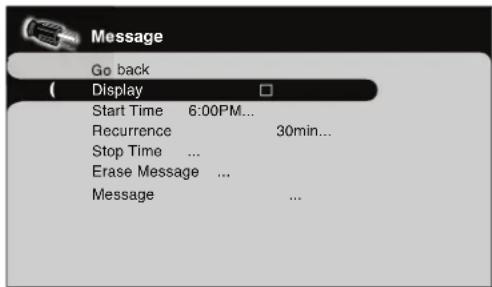
Recurrence Set how often to display the message- 10min- 60 min.
Stop Time Set the time you want to the message to stop.
Erase Message Clears all lines of text you've entered.
Message Press OK to enter a message. Enter up to 4 lines of text-25 characters per line. Press the right arrow button to start entering text on a line, then press the up and down arrow buttons to change characters. Press OK when you're done entering text for a line.
Parental Control Menu
The Parental control menu was explained in Chapter 3. Go to page 28 for more information.
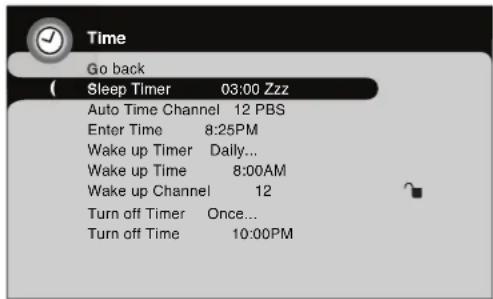
Time Menu
Sleep Timer Lets you set the TV to turn off after a given amount of time.
Auto Time Channel Choose your PBS station to have the TV set the time for you. Wait about one minute for the time to be set.
Enter Time If you didn't set the time reference channel, enter the current time manually. If it is eight o'clock, for example, you must first enter the number zero, then number eight. Use the OK button to choose between AM and PM.
Wake up Timer Lets you set the TV to turn itself on.
Note: The Wake up timer is available only when the time has been set.
Wake up Time Lets you set the time you want the TV to turn itself on.
Wake up Channel Lets you select a specific channel the TV tunes to when the wake up timer is set.
Turn off Timer Lets you set the TV to turn itself off.
Turn off Time Lets you set the time you want the TV to turn itself off.
Chapter 5: Other Information
Frequently Asked Questions (FAQs)
What's the quickest way to view High Defi nition (HD) video?
Connect an off-air antenna to the ANTENNA/CABLE Input to view free local digital channels. You might need to purchase an antenna. Go to page 6 for more information.
Visit www.antennaweb.org to get help deciding what type of antenna to use to receive the local digital channels available to you. By entering where you live, this mapping program tells you what local analog and digital stations are available using a certain antenna.
Are there other ways to view High Defi nition (HD) video?
Besides using an off-air antenna as mentioned above, you can also use a set-top box to receive digital video. Contact your cable company or satellite provider to purchase digital programming and have them connect the box for you to ensure you're viewing channels the best way.
How do I tell an analog channel from a digital channel?
Press the INFO button to display the channel banner. Look at the bottom left corner of the screen. An A is displayed for an analog channel. A D is displayed for a digital channel.
Why are there bars on my screen and can I get rid of them?
Most digital video is sent in a 16/9 format which does fill your screen, but sometimes is sent in 4/3 which does not fill your screen. It depends on how the station or device connected to your TV is formatting the video. If there are bars on-screen, press the ZOOM +/- button to try a different format that may eliminate the bars. Some bars can't be removed because of the way the format is sent by the broadcaster. The format changes as you press the ZOOM buttons and the format type is displayed at the bottom of the screen. For more information on screen formats, go to page 32.
Why does channel search find a lot of channels, but when I try to tune to them there's nothing there?
Some channels are enabled by the cable company that don't carry programming, such as video-on-demand. When channels are unavailable, your TV's screen is blank or appears like snow. You probably want to get rid of these so they no longer appear in your channel list. Remove these in the Channel List menu. Go to page 36 for more information.
Why does the first channel search take a long time?
If you have both analog and digital channels, the TV is looking for all available channels in the channel list. If you do have digital channels, the TV is also searching for scrambled channels, non-scrambled channels, and each sub-channel of that digital channel.
Troubleshooting
Most problems you encounter with your TV can be corrected by consulting the following troubleshooting list.
TV Problems
TV won't turn on
• Make sure the TV is plugged in.
- Check the wall receptacle (or extension cord) to make sure it is "live" by plugging in something else.
- The front panel controls may be locked (disabled). Use the remote control to unlock the front panel controls by selecting the Front Panel Block in the Parental control menu and press OK to uncheck the box.
No picture, no sound but TV is on
- You might be tuned to an input with no device connected to it to view. If you're trying to view a connected device, press INPUT until the picture from that device appears.
- Maybe the Signal Type option is set incorrectly. Go to page 14 for detailed instructions.
- The channel might be blank — change channels.
- If you're watching your VCR and it's connected with coaxial cable to the ANTENNA/CABLE jack, tune the TV to channel 3 or 4 (whichever channel is selected on the 3/4 switch on the back of your VCR). Also check to make sure the TV/VCR button on the VCR is in the correct mode (press the TV/VCR button on your VCR).
Sound okay, picture poor
- If you're getting a black and white picture from a device you've connected to your TV, you might have your video cables connected to the wrong jacks. A yellow Video cable connects to the yellow VIDEO input jack on the side or back of your TV; three video cables or bundled component video cables (red, blue, and green) connect to the corresponding COMPONENT INPUT jacks on the back of your TV.
- If you're getting no picture from a device you've connected to your TV, you might have your video cable connected to the VIDEO OUTPUT jack on the back of your TV. These jacks are used to connect recording devices. A yellow Video cable connects to the yellow VIDEO input jack on the side or back of your TV.
- Check antenna connections. Make sure all of the cables are firmly connected to the jacks.
- Try adjusting sharpness function to improve weak signals. Go to page 35 for more instructions.
No sound, picture okay
- Maybe the sound is muted. Try pressing the volume up button to restore sound.
- If using DVI, S-Video, or Y, PB, PR, remember to also connect the device's left and right audio output jacks to the TV's L and R Audio Input jacks.
- The sound settings may not be set correctly. Go to page 33 for more information.
- The internal speakers might be turned off. Go to page 34 for more information.
Blank screen
- Check your connections. If you used yellow, red, and white cables to connect, make sure they're connected to the yellow, red, and white VIDEO INPUT jacks on the side or back of the TV, not to the VIDEO OUTPUT jacks on the back of the TV.
- If you're trying to watch something that's playing on a device connected to the TV (like a DVD), press INPUT until you get to the correct video input channel.
- Make sure the device connected to the TV is turned on.
- Try another channel.
Buttons don't work
- The front panel controls may be locked (disabled). Use the remote control to unlock the front panel controls by selecting the Front Panel Block in the Parental control menu and press OK to uncheck the box.
- Unplug the TV for ten minutes and then plug it back in. Turn the TV on and try again.
TV turns off unexpectedly
- Sleep timer may have been activated. Go to page 39 for instructions.
- Electronic protection circuit may have been activated because of a power surge. Wait 30 seconds and then turn on again. If this happens frequently, the voltage in your house may be abnormally high or low.
- Unplug. Wait ten minutes. Plug in again.
TV turns on unexpectedly
- Wake up timer might have been activated. Go to page 39 for instructions.
Can't select certain channel
- Channel may be blocked or not approved in the Parental Controls menu.
- If using a VCR, check to make sure the TV/VCR button on the VCR is in the correct mode (press the TV/VCR button on your VCR).
- Press the TV button and then try to change channels.
Noisy stereo reception
- May be a weak station. Use Sound menu to choose mono sound.
Black box appears on the screen
- Closed-captioning might be on. Check Closed Caption in the Setup menu. Go to page 37 for more instructions.
Problems with HDMI Connection
- Make sure the HDMI or DVI device is turned on and the cables are firmly connected. If problems still occur, turn off your device. Re-connect your device. Reset the power by unplugging the power cord and plugging it back in.
- If you are tuned to the HDMI 1 or 2 input and you're receiving Unusable Signal message on-screen, press the INFO button on the remote. If Acquiring Channel appears in the channel banner, the HDMI or DVI device isn't responding. Contact the manufacturer of the HDMI or DVI device for further assistance.
- If you tune to the HDMI 1 or 2 input and you see snow, the video goes in and out, or the video takes a long time to appear, your HDMI or DVI device is having trouble sending video information to the TV. Re-connect your device. Reset the power by unplugging the power cord and plugging it back in. If problems persist, try connecting the Y Pb Pr jacks instead if they are available or contact the manufacturer of the HDMI or DVI device for further assistance.
- If you have black bars on each side of your picture, the device you connected might have a switch or a menu option allowing you to change the picture quality output that will fix this. Choose either 720p or 1080i.
- 480i signals aren't supported by the HDMI1/DVI or HDMI2 input.
The Remote Control Doesn't Work
- Something might be between the remote and the remote light sensor on the front of the TV. Make sure there is a clear path.
- Maybe the remote isn't aimed directly at the TV.
- Maybe batteries in remote are weak, dead, or installed incorrectly. Put new batteries in the remote. (Note, if you remove the batteries, you may have to reprogram the remote to operate other devices.)
Problems with V-Chip/Parental Controls
The rating limits don't work
- You must lock the settings. Go to the Main Menu (press MENU on your remote), select Parental control, select Lock Parental Controls.
I don't remember my password and I want to unlock the TV
- If you forget your password, turn the TV off. Simultaneously press and hold VOL v on the side panel and CLEAR on the remote for 10 seconds. Next time you enter the Parental control menu enter a new password
The V-Chip won't let me watch a program even though it's not rated as violent.
- Maybe the movie was given an NR (Not Rated) status. After you block movie ratings, you must set NR to View separately in order to view movies with an NR rating.
What Else Can I Do?
If you've been through the Troubleshooting section and nothing has fixed your problem, try rebooting your TV. Note that after a reboot you may need to run your TV through the setup process again. To do a reboot, unplug the power cord from the wall outlet, power strip, etc. Keep your TV unplugged for about 5 minutes. Then plug the TV back in, turn on the TV, and see if the problem is fixed. If the problem remains, then please visit www.rca.com/television for updated FAQs or contact RCA Customer Support at the support number provided in your Warranty under How To Get Service.
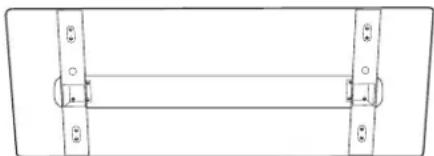
natural_image
Simple line drawing of a rectangular frame with vertical connectors and circular symbols at the ends (no text or labels)Bottom of the base
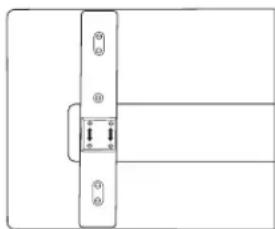
natural_image
Simple line drawing of a door handle with two buttons and a vertical lock (no text or symbols)Remove the screws from the four holes on each side of the bottom of the TV's base.
Mounting Your TV to the Wall
Caution: The wall mount must bear a minimum of five times the TV's net weight without causing damage.
To mount your TV to the wall you need to purchase a VESA wall mount. For models L37WD22 and L42WD22, purchase a VESA 400 x 400, M6 x 10mm; and model L46WD22 purchase a VESA 600 x 400, M6 x 10mm (400 x 400, for example, means the mounting measurements are 400mm horizontally and 400mm vertically; M6 x 10mm is the type screw that needs to be used).
- You need to remove the base first before attaching the wall mount.
A. Place the TV facedown on a surface that is soft, yet strong enough to hold the TV.
B. Use a screwdriver to remove the screws from the four holes on each side of the bottom of the TV's base as the arrows indicate to the left.
2. Make sure all cables are already connected to the TV.
3. Follow the directions included with the wall mount to mount the TV to the wall.
V-Chip Rating Explanations
US V-Chip Rating System
TV-MA (Mature Audience Only) Specifically designed to be viewed by adults and may be unsuitable for children under 17. It contains one or more of the following content themes: crude indecent language (L), explicit sexual activity (S), or graphic violence (V).
TV-14 (Parents Strongly Cautioned) Contains some material that many parents would find unsuitable for children under 14. Parents are strongly urged to exercise greater care in monitoring this program and are cautioned against letting children under the age of 14 watch unattended. This program contains one or more of the following content themes: intensely suggestive dialogue (D), strong coarse language (L), intense sexual situations (S), or intense violence (V).
TV-PG (Parental Guidance Suggested) Contains material that parents may find unsuitable for younger children. Many parents may want to watch it with their younger children. The program contains one or more of the following content themes: some suggestive dialogue (D), infrequent coarse language (L), some sexual situations (S), or moderate violence (V).
TV-G (General Audience) Most parents would find this program suitable for all ages. It contains little or no sexual dialogue (D) or situations (S), no strong language (L), and little or no violence (V).
TV-Y7 (Directed to Children 7 years and older) Designed for children ages 7 and above. It may be more appropriate for children who have acquired the developmental skills needed to distinguish between make-believe and reality. Themes and elements in this program may include mild fantasy violence (FV) or comedic violence, or may frighten children under the age of 7.
TV-Y (All Children) Themes and elements in this program are designed for a young audience, including children from ages 2-6. It is not expected to frighten younger children.
Canadian English V-Chip Rating System
18+ (Adults) Programming intended for adults 18 and older. It may contain elements of violence, language, and sexual content which could make it unsuitable for viewers under 18. Violence Guidelines: May contain violence integral to the development of the plot, character or theme, intended for adult audiences. Other Content Guidelines: May contain graphic language and explicit portrayals of nudity and/or sex.
14+ (Viewers 14 and over) Programming contains themes or content which may not be suitable for viewers under the age of 14. Parents are strongly cautioned to exercise discretion in permitting viewing by pre-teens and early teens. Violence Guidelines: May contain intense scenes of violence. Could deal with mature themes and societal issues in a realistic fashion. Other Content Guidelines: May contain scenes of nudity and/or sexual activity. There could be frequent use of profanity.
PG (Parental Guidance) Programming intended for a general audience but which may not be suitable for younger children (under the age of 8). Parents may consider some content inappropriate for unsupervised viewing by children aged 8-13. Violence Guidelines: Depictions of conflict and/or aggression will be limited and moderate; may include physical, fantasy, or supernatural violence. Other Content Guidelines: May contain infrequent mild profanity, or mildly suggestive language. Could also contain brief scenes of nudity.
G (General Audience) Programming considered acceptable for all ages groups. While not designed specifically for children, it is understood younger viewers may be part of the audience. Violence Guidelines: Will contain very little violence, either physical or verbal or emotional. Will be sensitive to themes which could frighten a younger child, will not depict realistic scenes of violence which minimize or gloss over the effects of violent acts. Other Content Guidelines: There may be some inoffensive slang, no profanity and no nudity.
C8+ (Children 8 and Older) Programming generally considered acceptable for children 8 years and over to watch on their own. Violence Guidelines: Violence will not be portrayed as the preferred, acceptable, or only way to resolve conflict or encourage children to imitate dangerous acts which they may see on television. Any realistic depictions of violence will be infrequent, discreet, of low intensity and will show the consequences of the acts. Other Content Guidelines: There will be no profanity, nudity or sexual content.
C (Children) Programming intended for children under age 8. Violence Guidelines: Careful attention is paid to themes which could threaten children's sense of security and well being. There will be no realistic scenes of violence. Depictions of aggressive behaviour will be infrequent and limited to portrayals that are clearly imaginary, comedic or unrealistic in nature. Other Content Guidelines: There will be no offensive language, nudity or sexual content.
Canadian French V-Chip Rating System
18+ (Adults) Programming is for adults only. This program contains sustained violence or extremely violent scenes.
16+ (Viewers 16 and over) Programming is not suitable for those under age 16. This program contains frequent scenes of violence or intensely violent scenes.
13+ (Viewers 13 and over) Programming may not be suitable for children under the age of 13. This program either contains several violent scenes or one or more scenes that are violent enough to affect them. Viewing in the company of an adult is therefore strongly recommended for children under the age of 13.
8+ (Viewers 8 and over) Not recommended for young children. This program is suitable for most audiences, but it contains mild or occasional violence that could upset young children. Viewing in the company of an adult is therefore recommended for young children (under the age of 8) who do not distinguish between reality and imagination.
G (General Audience) This program is suitable for audiences of all ages. It contains no violence, or any violence that it does contain is either minimal or is presented in a humorous manner, as a caricature, or in an unrealistic way.
Limited Warranty
What your warranty covers:
- Defects in materials or workmanship to the first consumer purchaser.
For how long after your purchase:
- 90 days from date of purchase for labor charges for screen sizes 32" and smaller. One year from date of purchase for labor charges for screen sizes larger than 32". At our option, we will either pay an Authorized RCA Service Center the labor to repair your television or replace your television with a new or refurbished unit.
- One year from date of purchase for parts. At our option, we will either supply new or refurbished parts to an Authorized RCA Service Center for them to repair your television or replace your television with a new or refurbished unit. After 90 days, labor charges will be at your expense for screen sizes 32" and smaller.
How you get service:
- Call 1-800-951-9582 or visit www.rca.com. Please have your unit's date of purchase and model/serial number ready. The model/serial number information can be found on the back of your unit.
- Proof of purchase in the form of a bill of sale or receipted invoice which is evidence that the product is within the warranty period must be presented to obtain warranty service. For rental firms, proof of first rental is also required.
What your warranty does not cover:
- Customer instruction. (Your Owner's Manual describes how to install, adjust, and operate your television. Any additional information should be obtained from your dealer).
• Installation and related adjustments.
• Signal reception problems not caused by your television.
• Damage from misuse or neglect. - Batteries.
- Customer replacement fuses.
- Damage from images burnt onto the screen.
• Special, incidental or consequential damages. - A television that has been modified or incorporated into other products or is used for institutional or other commercial purposes.
- A television purchased or serviced outside the U.S.A.
- Acts of nature, such as but not limited to lightning damage.
Product registration:
- Please complete and mail the Product Registration Card packed with your TV or register on-line at www.rca.com/television. It will make it easier to contact you should it ever be necessary. The return of the card is not required for warranty coverage.
Limitation of Warranty:
- THE WARRANTY STATED ABOVE IS THE ONLY WARRANTY APPLICABLE TO THIS PRODUCT. NO VERBAL OR WRITTEN INFORMATION GIVEN BY TTE TECHNOLOGY, INC., ITS AGENTS OR EMPLOYEES SHALL CREATE A GUARANTY OR IN ANY WAY INCREASE THE SCOPE OF THIS WARRANTY.
- REPAIR OR REPLACEMENT AS PROVIDED UNDER THIS WARRANTY IS THE EXCLUSIVE REMEDY OF THE CONSUMER. TTE TECHNOLOGY, INC. SHALL NOT BE LIABLE FOR SPECIAL, INCIDENTAL OR CONSEQUENTIAL DAMAGES RESULTING FROM THE USE OF THIS PRODUCT OR ARISING OUT OF ANY BREACH OF ANY EXPRESS OR IMPLIED WARRANTY ON THIS PRODUCT. THIS DISCLAIMER OF WARRANTIES AND LIMITED WARRANTY ARE GOVERNED BY THE LAWS OF THE STATE OF INDIANA. EXCEPT TO THE EXTENT PROHIBITED BY APPLICABLE LAW, ANY IMPLIED WARRANTY OF MERCHANTABILITY OR FITNESS FOR A PARTICULAR PURPOSE ON THIS PRODUCT IS LIMITED TO THE APPLICABLE WARRANTY PERIOD SET FORTH ABOVE.
How state law relates to warranty:
- Some states do not allow the exclusion nor limitation of incidental or consequential damages, or limitations on how long an implied warranty lasts, so the above limitations or exclusions may not apply to you.
- This warranty gives you specific legal rights, and you also may have other rights that vary from state to state.
If you purchased your product outside the United States:
- This warranty does not apply. See your dealer for warranty information.
Service calls which do not involve defective materials or workmanship are not covered by this warranty. Costs of such service calls are the sole responsibility of the purchaser.
Care and Cleaning
CAUTION: Turn OFF your TV before cleaning.
You can clean the TV as required, using a soft lint-free cloth. Be sure to occasionally dust the ventilation slots in the cabinet to help assure adequate ventilation.
IMPORTANT: Never use strong cleaning agents, such as ammonia-based cleaners, or abrasive powder. These types of cleaners will damage the TV.
The TV's screen may be cleaned with a soft, lint-free cloth as well. Take care not to scratch or mar the screen. If necessary, you may use a cloth dampened with warm water. While cleaning do not spray liquid directly on the screen, or allow liquid to run down the screen and inside the TV. Also, never place drinks or vases with water on top of the TV. This could increase the risk of fire or shock hazard or damage to the TV.
Manufactured under license from Dolby Laboratories.
Dolby and the double-D symbol are trademarks of Dolby Laboratories.
FCC Information
This equipment has been tested and found to comply with the limits for a Class B digital device, pursuant to Part 15 of the FCC Rules. These limits are designed to provide reasonable protection against harmful interference in a residential installation. This equipment generates, uses, and can radiate radio frequency energy and, if not installed and used in accordance with the instructions, may cause harmful interference to radio communications. However, there is no guarantee that interference will not occur in a particular installation. If this equipment does cause harmful interference to radio or television reception, which can be determined by turning the equipment off and on, the user is encouraged to try to correct the interference by one or more of the following measures:
- Reorient or relocate the receiving antenna.
- Increase the separation between the equipment and receiver.
- Connect the equipment into an outlet on a circuit different from that to which the receiver is connected.
- Consult the dealer or an experienced radio/TV technician for help.
This Class B digital apparatus complies with Canadian ICES-003.
Visit the RCA website at www.rca.com/television
Please do not send any products to the Indianapolis address listed in this manual or on the carton. This will only add delays in service for your product.
TTE
TTE Technology, Inc.
101 West 103rd Street
Indianapolis, IN 46290
©2007 TTE Technology Inc.
RCA and associated marks are trademarks of THOMSON S.A. used under license to TTE Corporation.
Printed in USA
TOCOM 16788070
- RCA
- CAUTION
- WARNING
- Product Registration
- Product Information
- Important Safety Instructions
- Chapter 1: Connections and Setup
- Chapter 2: Using the Remote Control
- Chapter 3: Using the TV's Features
- Chapter 4: Using the TV's Menu System
- Chapter 5: Other Information
- Things to Consider Before You Connect
- Protect Against Power Surges
- Protect Devices from Overheating
- Position Cables Properly to Avoid Audio Interference
- Use Indirect Light
- Check Supplied Parts
- Get the Picture
- Getting Channels
- What You Need
- OR
- What You Need To Know
- Choose Your Connection
- Video (Basic) Connection
- Component Video (Advanced) Connection
- Connecting the Device with Video (Basic)
- Connecting the Device with Component Video (Advanced)
- Viewing the Picture from the Connected Device
- HDMI/DVI Connection
- Connecting the Device
- Using the example of a set-top box:
- -OR-
- VGA Connection
- Viewing the PC
- Plug in the TV
- Put Batteries in the Remote
- Turn on the TV
- How to Use the Remote Control to Complete the Initial Setup
- Complete the Initial Setup
- Set the Menu Language
- Complete Channel Setup
- Set the Signal Type
- Complete the Channel Search
- There are several things to be aware of when the TV's searches for channels.
- What To Expect
- Watching TV
- Changing Channels
- Explanation of Jacks (in alphabetical order)
- Buttons and Other Jacks On Your TV
- Side Input Jacks
- Side Panel Buttons
- The Buttons on the Remote Control
- Using the INPUT Button
- Programming the Remote to Operate Other Devices
- Find Out If You Need to Program the Remote
- Programming the Remote
- Using Direct Entry
- Using Manual Code Search
- Using Automatic Code Search
- How to Use the Remote After You've Programmed It
- Modes of Operation
- Volume Punchthrough Feature
- Deleting ALL Volume Punchthrough Commands
- Remote Code List
- DVD/VCR Combo Codes
- DVR/DVD Combos
- DVR Codes
- DVR/Cable Combos
- DVR/SAT Combos
- Home Theatre in a Box
- Satellite/DTV Receivers
- VCR Codes
- Web TV
- Channel Banner
- Autotuning
- Parental Controls and V-Chip
- How V- Chip Works for USA and Canada
- Lock/Unlock Parental Controls
- The V-Chip Rating Screen
- US V-Chip TV Ratings
- Blocking Age-Based Ratings
- Blocking Specific Content Themes
- Blocking Canadian V-Chip Ratings
- V-Chip Movie Rating Limit
- Blocking Movie Ratings
- Block Channels
- Front Panel Block
- Blocking Unrated/Exempt Programs
- Future Rating Region
- Additional Features
- Picture Processing
- Screen Formats
- Using the Menu System
- Channel List Menu
- Sound Menu
- Advanced Settings
- Picture Menu
- Advanced Picture Settings (not available on VGA)
- Setup Menu
- Channel Setup
- Favorite Channel The channel you entered for Channel
- Preferences
- Parental Control Menu
- Time Menu
- Frequently Asked Questions (FAQs)
- Troubleshooting
- TV Problems
- TV won't turn on
- No picture, no sound but TV is on
- Sound okay, picture poor
- No sound, picture okay
- Blank screen
- Buttons don't work
- TV turns off unexpectedly
- TV turns on unexpectedly
- Can't select certain channel
- Noisy stereo reception
- Black box appears on the screen
- Problems with HDMI Connection
- The Remote Control Doesn't Work
- Problems with V-Chip/Parental Controls
- The rating limits don't work
- I don't remember my password and I want to unlock the TV
- The V-Chip won't let me watch a program even though it's not rated as violent.
- What Else Can I Do?
- Mounting Your TV to the Wall
- V-Chip Rating Explanations
- US V-Chip Rating System
- Canadian English V-Chip Rating System
- Canadian French V-Chip Rating System
- Limited Warranty
- What your warranty covers:
- For how long after your purchase:
- How you get service:
- What your warranty does not cover:
- Product registration:
- Limitation of Warranty:
- How state law relates to warranty:
- If you purchased your product outside the United States:
- Care and Cleaning
- FCC Information
- Visit the RCA website at www.rca.com/television
- TTE
Brand : RCA
Model : L42WD22
Category : Television