
EP-A3000 - Air purifier HITACHI - Free user manual and instructions
Find the device manual for free EP-A3000 HITACHI in PDF.


| Product Type | Air Purifier |
| Brand | Hitachi |
| Model | EP-A3000 |
| Power Supply | AC 220-240V, 50/60Hz |
| Power Consumption | Max: 43W (240V), Medium: 24W (240V), Silent: 20W (240V) |
| Airflow Rate (Max) | 3.2 m³/min (240V) |
| Airflow Rate (Medium) | 1.7 m³/min (240V) |
| Airflow Rate (Silent) | 1.2 m³/min (240V) |
| Applicable Floor Space | 22-25 m² |
| Dimensions (H x W x D) | 424 x 400 x 133 mm |
| Weight | 4.0 kg |
| Power Cord Length | Approx. 1.8 m |
| Filter Type | Allergen-free catechin deodorizing filter with pre-filter |
| Filter Replacement Interval | Approx. 2 years (based on 5 cigarettes/day) |
| Operation Modes | Auto (Air Purify, Odor, Pollen), Manual (Silent, Medium, Max) |
| Timer | 2-hour off-timer |
| Sensors | Odor sensor |
| Remote Control | Infrared remote (range up to 6m) |
| Pre-filter Cleaning | Washable (monthly) |
| Main Filter | Not washable, replace only |
| Safety Features | Automatic shut-off, overheat protection |
Frequently Asked Questions - EP-A3000 HITACHI
User questions about EP-A3000 HITACHI
0 question about this device. Answer the ones you know or ask your own.
Ask a new question about this device
Download the instructions for your Air purifier in PDF format for free! Find your manual EP-A3000 - HITACHI and take your electronic device back in hand. On this page are published all the documents necessary for the use of your device. EP-A3000 by HITACHI.
USER MANUAL EP-A3000 HITACHI
Read the "Safety Precautions" P.E-4-E-5 to ensure proper use.
natural_image
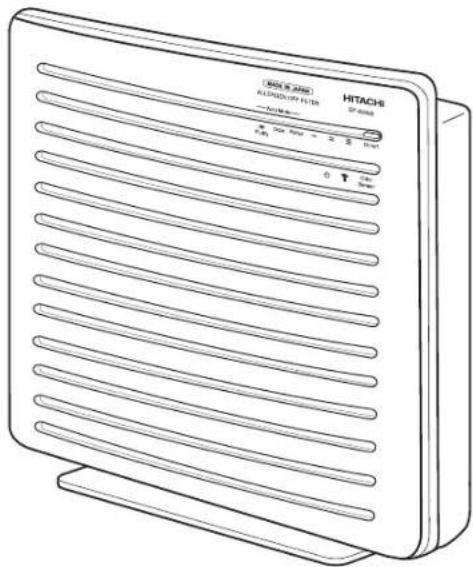
Line drawing of a Hitachi D-863 microcontroller with ventilation slots and control buttons (no text or symbols on the device itself)
Thank you for purchasing a Hitachi air purifi er.
This air purifi er is for home use only. Do not use it for any other purpose than air purifying.
Please read this instruction manual carefully before use to ensure proper operation of the unit.
Keep this manual for future reference in an easily accessible place.
Read the "Safety Precautions" P.E-4-E-5 to ensure proper use.
HITACHI
Inspire the Next
Instruction Manual
Hitachi Air Purifi er
Model
Desktop type
EP-A3000
Contents
Before Use
● Features / Name of Each Component / Operation Buttons and Indicators / Accessories
E-2
●Safety Precautions
E-4
● Cautions on Use
E-6
●Preparations for Operation
E-7
- Setting Filter in Purifier
E-7
- Inserting Batteries into Remote Controller
E-7
Installation
E-7
Operating Air Purifier
● Using Remote Controller ....
- Starting Operation
- Selecting Auto Mode
- Switching Airflow Rate
· Max Operation
- Using Timer
E-8
E-8
E-9
E-9
E-10
E-10
● Using the Control on Purifier
E-11
● Memory Function / Sensors / Auto Detection
E-11
Cleaning and Maintenance
●Cleaning
- Purifier Body · Pre-fi Iter
-Filter Replacement
- Replacement Interval · Precautions on Filter Handling · · · ·
- Replacing the Filter
E-12
E-12
E-13
E-13
E-13
●Troubleshooting Guide
E-14
●Replacement Parts
E-14
- Specifications
E-15
Features / Name of Each Component / Accessories
natural_image
Illustration of a notebook with a magnified inset showing the paper's edge detail (no text or symbols)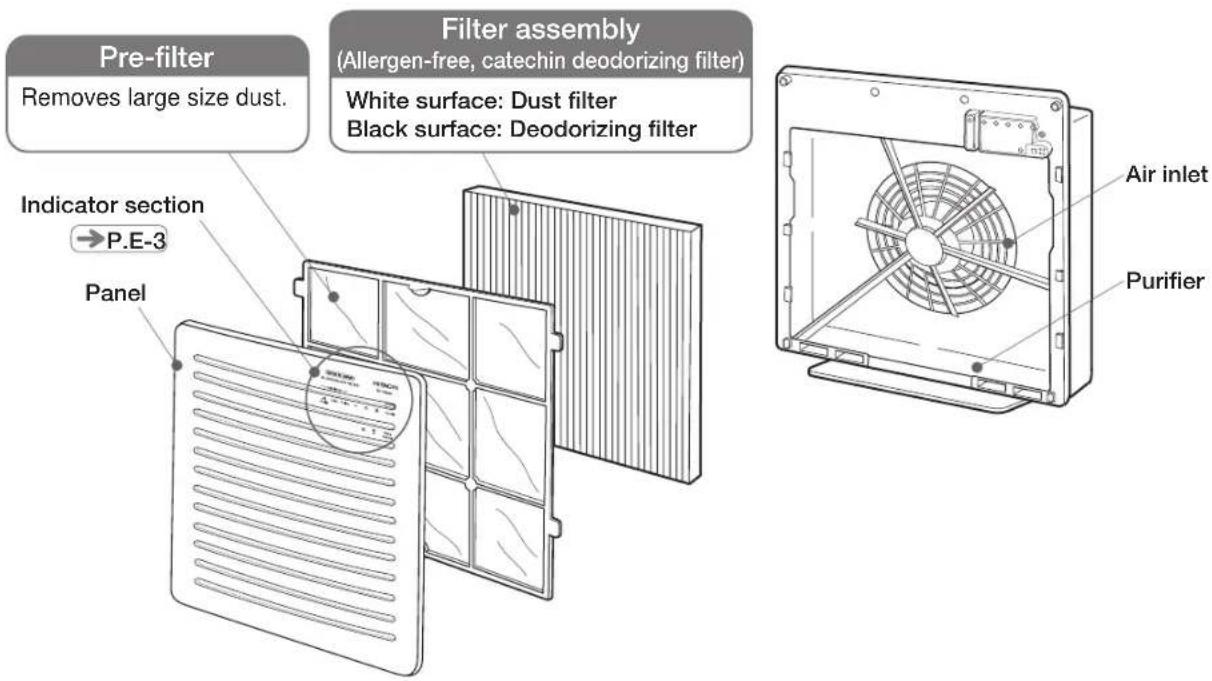
Operation Buttons and Indicators /
→ P.E-00
shows a page with further description.
Operation Buttons and Indicators
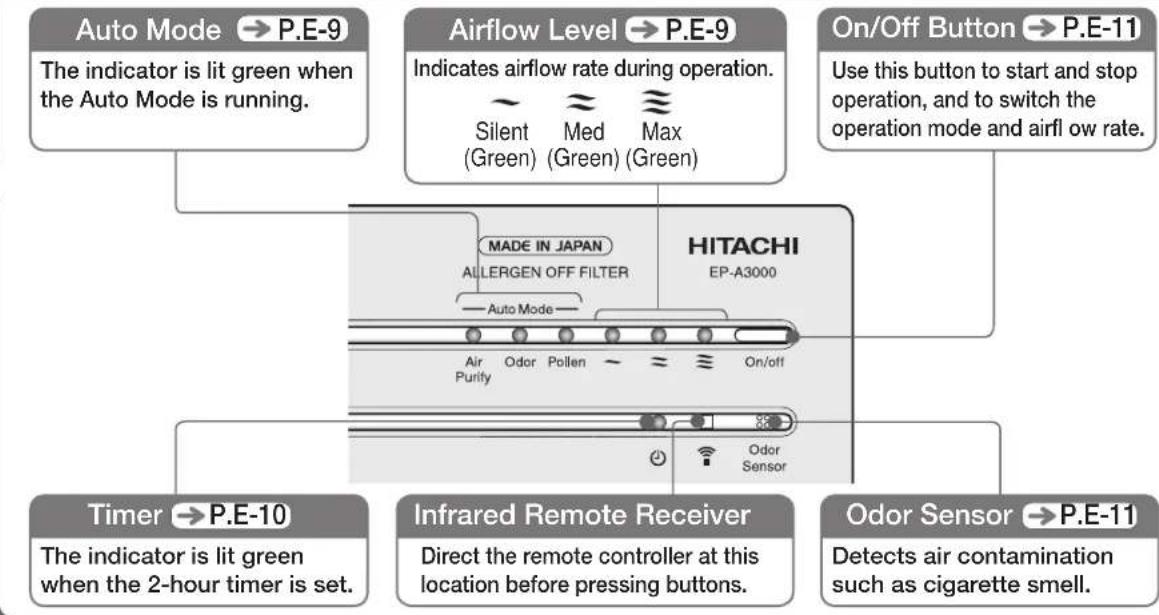
flowchart
graph TD
    A["Auto Mode"] --> B["The indicator is lit green when the Auto Mode is running."]
    C["Airflow Level"] --> D["Indicates airflow rate during operation."]
    E["On/Off Button"] --> F["Use this button to start and stop operation, and to switch the operation mode and airflow rate."]
    G["Timer"] --> H["The indicator is lit green when the 2-hour timer is set."]
    I["Infrared Remote Receiver"] --> J["Direct the remote controller at this location before pressing buttons."]
    K["Odor Sensor"] --> L["Detects air contamination such as cigarette smell."]
    M["MADE IN JAPAN ALLERGEN OFF FILTER"] --> N["HITACHI EP-A3000"]
    O["Auto Mode"] --> P["Air Purify"]
    Q["Odor Sensor"] --> R["On/off"]
    S["Allergen Off Filter"] --> T["Air Purify"]
Features / Name of Each Component / Operation Buttons and Inocations / Accessories
Remote Controller
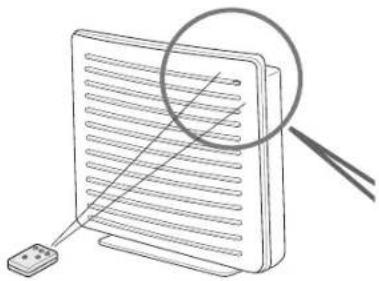
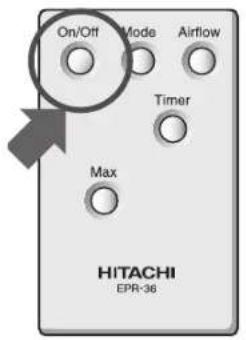
- Point the remote controller at the infrared receiver on the purifi er when you operate.
● The remote controllable distance is approx. 6m maximum when pointing the remote controller squarely to the receiver.
On/Off Button → P.E-8
Press this button to start or stop operation.
Mode Button → P.E-9
Press this button to switch the mode in automatic operations.
Max button → P.E-10
Press this button to start max operation.

Mode
Airflow


HITACHI
EPR-36
Airflow Button → P.E-9
Press this button to switch airflow rate.
Timer Button →P.E-10
Press this button to set Off-timer.
Note
● The remote control may not work in a room where inverter lighting apparatus or electronic quick start lighting apparatus is used, or when the infrared receiver is exposed to direct sunlight.
- If you operate the remote controller not pointing straight to the front face of the purifi er, the sensitivity will be reduced. Operate the controller from the place in front of the purifi er whenever possible.
Provided Accessories
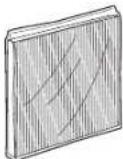
Filter
Housed inside the purifier.
- Be sure to remove this fi lter from plastic bag before operating the purifi er.
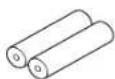
Remote controller "AAA" R03
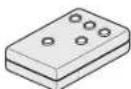
batteries for remote controller
Safety Precautions
- Please read the following safety precautions carefully before using the air purifier. To prevent injury to the user or other people and property damage, the following instructions must be followed. Also read the precautions appearing in the text carefully to ensure proper use.
■ Definition of each indication
Incorrect operation due to ignoring instruction will cause harm or damage. The seriousness is classified by the following indications.

WARNING
This symbol indicates the possibility of death or serious injury.

CAUTION
This symbol indicates the possibility of injury or damage to property.
Meanings of Symbols

Indicates "warning or caution".

Indicates "prohibition".

Indicates a "must".

WARNING
To Prevent Fire, Electric Shock and Injury
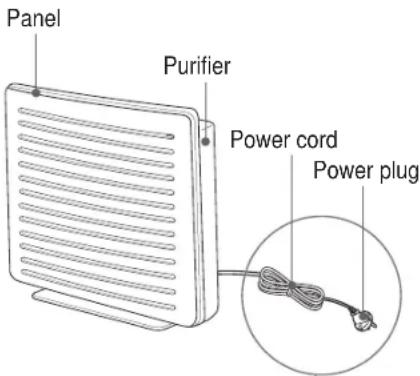
AC Outlet, Power Plug and Power Cord

- Before cleaning and other maintenance, be sure to unplug the power cord from the AC outlet. Never pull it out or insert it with wet hands.
- Securely insert the power plug into AC outlet.
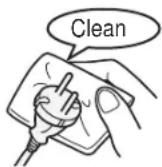
- Remove dust of the power plug periodically using a dry cloth.
- If the supply cord is damaged, it must be replaced by the manufacturer, its service agent or similarly qualified persons in order to avoid a hazard.

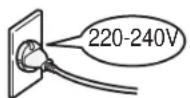
- Do not use with a voltage other than 220-240V AC.
- Do not damage the power cord. (Do not break, modify, forcibly bend, pull or twist it. Also do not place any heavy object on it or pinch it.)
- Do not use damaged power cord or power plug, or loose socket.
Miscellaneous

● Never attempt to disassemble, modify or repair by yourself.
- Do not put your fingers or wires into air outlet and inlet.
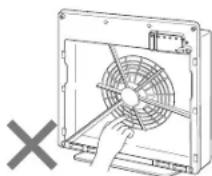

CAUTION
To Prevent Fire, Short-Circuit, Electric Shock, Injury and Failure
AC Outlet, Power Plug and Power Cord

- Be sure to hold the plug, not the power cord, when unplugging it from AC outlet.
- Unplug the power plug from the wall outlet when you do not use the air purifi er for a long time.
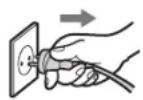
Place of Use

- Do not use in a humid place such as in bathroom.
- Do not place air purifi er near a hot object such as a heater.
- Do not use in a place where soot of oil, such as machine oil, is floating in the air.
- Do not use air purifi er in a kitchen as a substitute of ventilating fan.
- Do not use in a place where any organic solvent or chemicals are used.
- Do not use the air purifier in a place where a machine tool such as a grinder and welder that produces sparks such as fl ammable dust is installed.
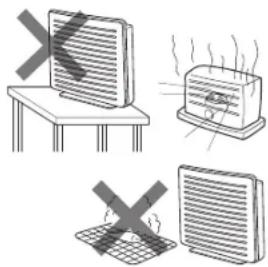
Purifier Body and Panel

- Do not use benzene or thinner when wiping or spray fl ammable gas such as insecticides.
- Do not let air purifi er intake infl ammables, lit cigarettes or incense.
- Do not put your finger or any other object into air outlet and inlet on the panel.
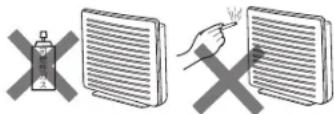
Miscellaneous

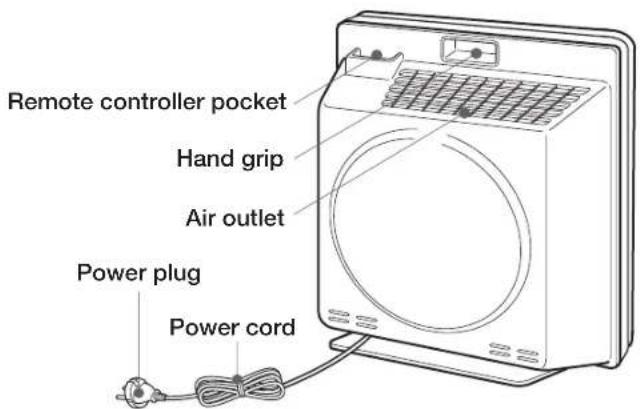
● Firmly hold the grip when carrying the air purifi er.
- Ventilate a room frequently if any heating appliance is simultaneously used with air purifier. Otherwise, it may cause carbon monoxide poisoning.
- Use dry cell batteries properly after reading the precautions on them.
- Use a genuine fi Iter for the Hitachi Air Purifi er. Other fi Iters may cause unit failure.
- The appliance is not to be used by children or persons with reduced physical, sensory or mental capabilities, or lack of experience and knowledge, unless they have been given supervision or instruction.
● Children should be supervised to ensure that they do not play with the appliance.
- Do not operate the unit when using fumigating (smoking) type insecticide. Using such insecticide will cause chemicals to accumulate in the unit and to be emitted by subsequent operation, which can be harmful to heath. After using insecticide, ventilate the room well before running the purifier.
To Prevent Floor Scratches or Wall Stains
During Cleaning / Place of Use

- During a loose lay purifier cloth the floor and place the purifier and detached components (panel and the like) on it.
Otherwise, it may cause scratches on the floor.

wall that cannot be scrubbed such as cloth-covered white wall.
The air purifi er will take in the surrounding air and may produce local stains.
Cautions on Use
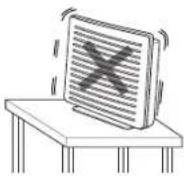
Do not install the air purifier in an unstable place, near any obstacles or on a floor.
Such installation may cause the air purifier to topple over or fall.
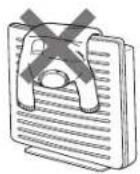
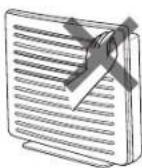
Do not block the air inlet or air outlet.
Blocking them may cause unit failure.
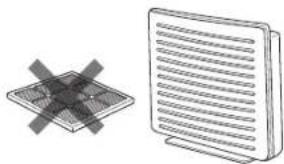
Do not run with filter detached.
No cleaning effect is obtainable without filter. Running without filter may also cause unit failure.
natural_image
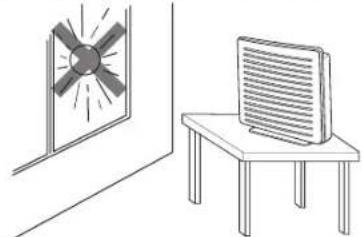
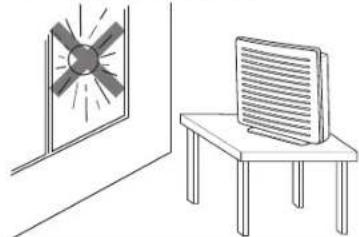
Illustration of a grid pattern with a cross symbol on the left and a rectangular grid on the right (no text or symbols)Do not place the purifier in a place exposed to direct sunlight.
Direct sunlight may cause deformation, discoloration or malfunction.
natural_image
Illustration of a window with a fan and a monitor on a table (no text or symbols)Do not block or touch the infrared receiver, odor sensor.
Infrared receiver may be stained or damaged to reduce its sensitivity.
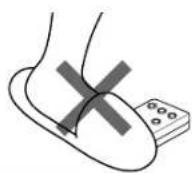
Do not subject remote controller to impact.
Do not drop the remote controller or step on it, and do not place any object on it. Doing so may cause unit failure.
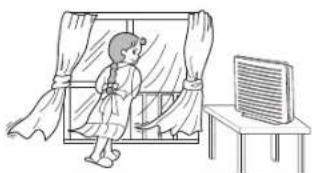
Ventilate closed room occasionally.
The air purifier does not have a ventilation effect.
* The air purifier cannot remove hazardous substance in cigarettes (carbon monoxide, etc.).
natural_image
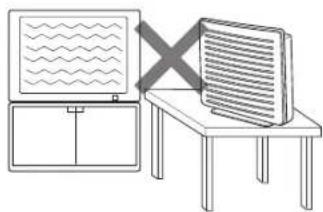
Illustration of a child standing in a window near a TV (no text or symbols visible)Do not use near television or radio.
Broadcast may be interfered. Install the air purifier 2m or more away from such devices.
natural_image
Simple line drawing of a monitor and a computer monitor with a cross symbol (no text or labels)Preparations for Operation
Note
- Lay a soft cloth or the like beneath the purifier to protect the floor against scratch.
● No cleaning effect is obtainable if the filter is installed with plastic bag. It may also be a cause of malfunction.
Setting Filter in Purifier (Perform the same procedure when replacing filter.)
1
Remove the panel.
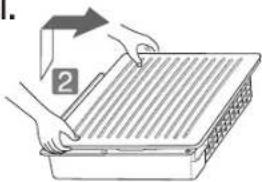
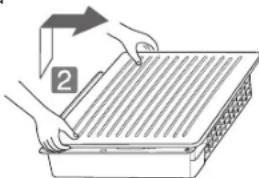
1 Lay the air purifier unit with the front upward on a stable and horizontal surface.
2 Put your fingers under the panel (two locations), lift the panel slowly and slide it slightly to the top side to remove.
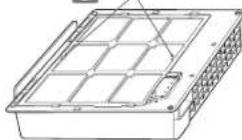
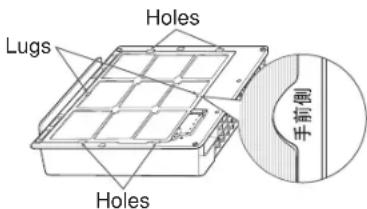
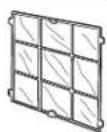
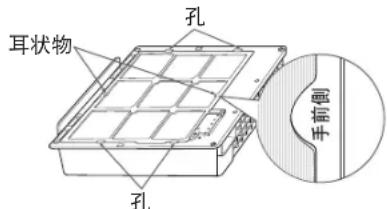
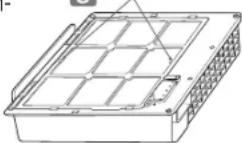
3 Hold the prefilter by the lugs to remove.
3
Lugs
2
Install the filter.
1 Take the filter out of the plastic bag and install it in the unit.
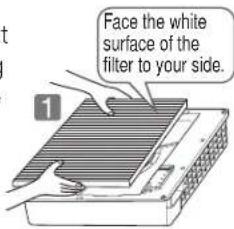
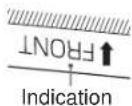
- Install the filter so that the arrow “ ↓ FRONT” on the filter side face faces the panel.
Note
- Do not open the panel forcibly. Parts may break.
3
Reinstall the panel on the unit.
1 Insert the four tabs of the prefilter securely into the holes on the unit.
●Install the filter so that the marking “手前側” on the filter side face will face the panel.
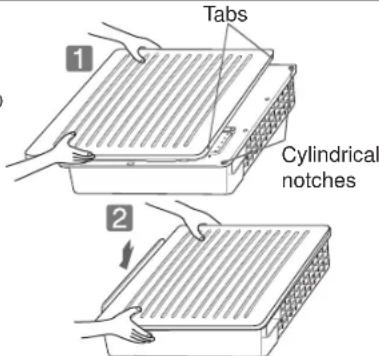
2 Insert the two tabs on the inside of the panel upper side securely into the two cylindrical notches on the top of the unit.
- Insert one tab into a cylindrical notch and then do the other tab in the same manner.
3 Gently push bottom of the panel until it clicks to close it securely.
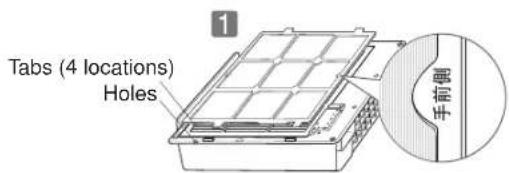
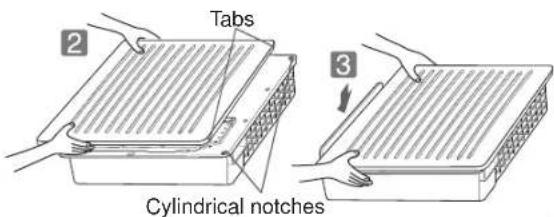
Inserting Batteries into Remote Controller
1
Remove the battery compartment cover.
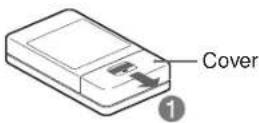
2
Insert batteries and close the cover.
- Insert the provided two "AAA" R03 batteries with the correct polarities as instructed.
●Since the batteries are provided when shipped from the factory, their lives may be shorter than brand-new ones because of self-discharge.
●Batteries are consumable - When replacing batteries, replace the two batteries simultaneously.
● Only use two manganese batteries or two alkali batteries. Do not mix them.
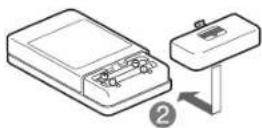
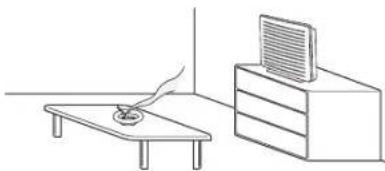
Installation
● Avoid any place close to heating appliance, and select a well-ventilated place.
Note
- Do not place the purifier on unstable pedestals or the like. Falling or dropping of the purifier may cause damage or failure.
natural_image
Simple line drawing of a desk with a coffee cup and a computer monitor on a cabinet (no text or symbols)E-7
Using Remote Controller
- Here we describe how to operate the air purifier using the remote controller. For the operation using the control on the purifier, please refer to P.E-11.
Starting Operation
●Remote Controller
●Air Purifier
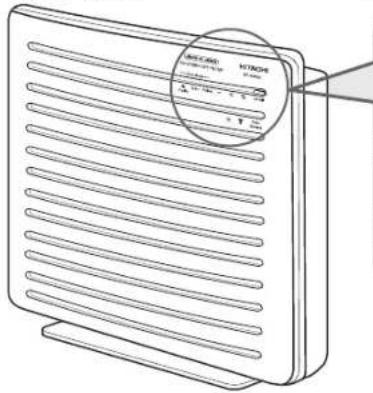
natural_image
Line drawing of a rectangular electronic device with horizontal slats and a circular inset highlighting its top edge (no text or symbols)●Indicator Section
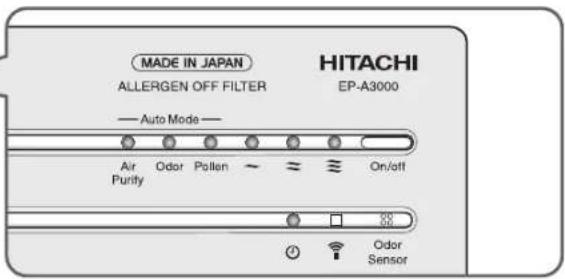
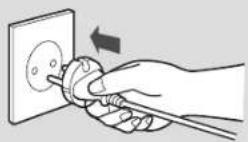
1 Securely insert the power plug into AC outlet.
On/Off
Press

button.

Operation starts and the indicators are lit.

On/Off
Pressing ○ button during operation will stop the operation.
- In the first 3 minutes after the power cord is plugged in, the unit checks the room air condition and saves it in memory. During the checking period, the "Air Purify" indicator blinks green. After 3 minutes pass, the blinking stops and the indicator goes out.
- You may start the operation within 3 minutes of plugging in the unit. In this case too, the "Air Purify" indicator continuously blinks and, after 3 minutes have passed, the indicator stops blinking and lights up solidly.
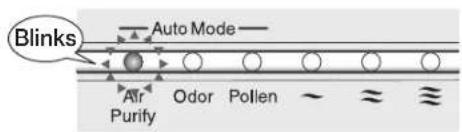
●The "Auto Mode" and "Airflow Level" indicators light up. (The "Air Purify" indicator in the Auto Mode blinks for 3 minutes and then lights up solidly.)
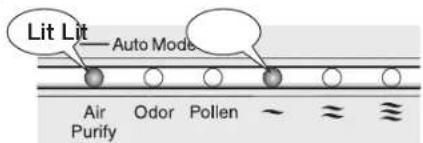
●The factory setting is "Air Purify" in the Auto Mode.
- From the second time onward, the memory function enables the operation with memorized conditions.
→ P.E-11
Stand-by Power Consumption
- So long as the power plug is left inserted in AC outlet, approx. 0.4W power will be consumed even if the unit is not used. (Unplug the power cord when the unit is left unused for an extended period of time.)
Selecting Auto Mode (Basics)
●3 Auto modes are available for your choice.
●The fan will not stop during operation in the Auto Mode.
Auto Modes and Tips for Selection
| Mode Tips for Selection | |
 | This is a normal operation mode.· The odor sensor detects the degree of air contamination, and airflow rate is switched automatically. |
 | This mode is recommended when you have concerns about room odor.· The odor sensor detects the degree of air contamination and switches to “MAX” operation quicker than when the unit operates in the “Air Purify” mode. |
| [Z6xw] | This mode is recommended when you have concerns about pollen contamination.· The operation with Medium airflow is continued for 20 minutes. Then, the odor sensor detects the degree of air contamination and automatic operation (at “Silent” or “Med” airflow rate) is continued for another 20 minutes. After that, these operations are repeated. |
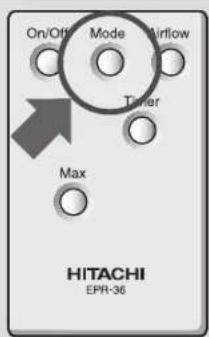
Mode
Press

button.

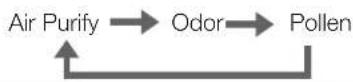
Operation mode switches every time you press this button.
●The selected mode indicator lights up (green).
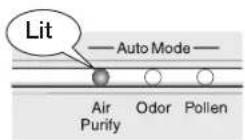
●Operation mode switches every time you press Mode button.
Note
●The airflow indicators automatically switch and light while the unit runs in the Auto Mode, but when the air in the room is clean, the last lit airflow indicator goes out. In this case, the fan is still rotating to detect the degree of air contamination.
Switching Airflow Rate
- You can select a desired airflow rate from the three different levels.
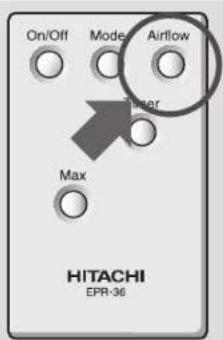
Airflow
Press

button.

Airflow rate switches every time you press this button.
● The indicator of the set airflow rate lights up.
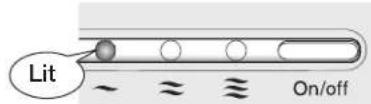
● Airflow rate changes in the following sequence.
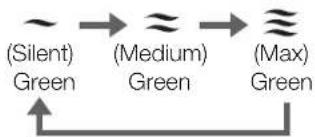
flowchart
graph LR
    A["(Silent) Green"] --> B["(Medium) Green"]
    B --> C["(Max) Green"]
Using Remote Controller (Continued)
Max Operation
●This operation is useful when many people smoke or when you want quick cleaning of room air.
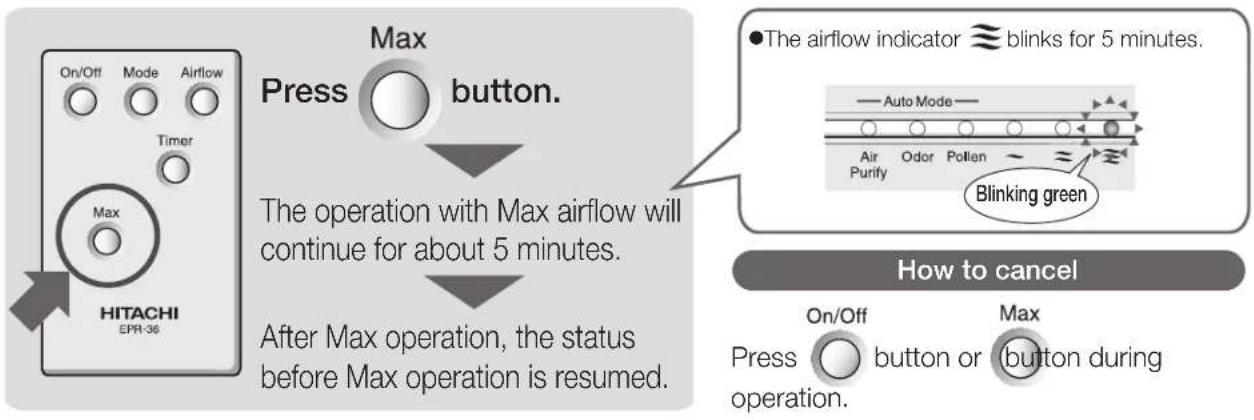
flowchart
graph TD
    A["On/Off"] --> B["Mode"]
    B --> C["Airflow"]
    D["Timer"] --> E["Max"]
    F["Max"] --> G["Press button."]
    H["HITACHI EPR-36"] --> I["After Max operation, the status before Max operation is resumed."]
    J["Press on Max"] --> K["Max"]
    L["Press on Max"] --> M["Max"]
    N["Press on Max"] --> O["Max"]
    P["Press on Max"] --> Q["Max"]
    R["Press on Max"] --> S["Max"]
    T["Press on Max"] --> U["Max"]
    V["Press on Max"] --> W["Max"]
    X["Press on Max"] --> Y["Max"]
    Z["Press on Max"] --> AA["Max"]
    AB["Press on Max"] --> AC["Max"]
    AD["Press on Max"] --> AE["Max"]
    AF["Press on Max"] --> AG["Max"]
    AH["Press on Max"] --> AI["Max"]
    AJ["Press on Max"] --> AK["Max"]
    AL["Press on Max"] --> AM["Max"]
    AN["Press on Max"] --> AO["Max"]
    AP["Press on Max"] --> AQ["Max"]
    AR["Press on Max"] --> AS["Max"]
    AT["Press on Max"] --> AU["Max"]
    AV["Press on Max"] --> AW["Max"]
    AX["Press on Max"] --> AY["Max"]
    AZ["Press on Max"] --> BA["Max"]
    BB["Press on Max"] --> BC["Max"]
    BD["Press on Max"] --> BE["Max"]
    BF["Press on Max"] --> BG["Max"]
    BH["Press on Max"] --> BI["Max"]
    BJ["Press on Max"] --> BK["Max"]
    BL["Press on Max"] --> BM["Max"]
    BN["Press on Max"] --> BO["Max"]
    BP["Press on Max"] --> BP1["Max"]
    BP2["Press on Max"] --> BP2["Max"]
    BP3["Press on Max"] --> BP3["Max"]
    BP4["Press on Max"] --> BP4["Max"]
    BP5["Press on Max"] --> BP5["Max"]
    BP6["Press on Max"] --> BP6["Max"]
    BP7["Press on Max"] --> BP7["Max"]
    BP8["Press on Max"] --> BP8["Max"]
    BP9["Press on Max"] --> BP9["Max"]
    BP10["Press on Max"] --> BP10["Max"]
    BP11["Press on Max"] --> BP11["Max"]
    BP12["Press on Max"] --> BP12["Max"]
    BP13["Press on Max"] --> BP13["Max"]
    BP14["Press on Max"] --> BP14["Max"]
    BP15["Press on Max"] --> BP15["Max"]
    BP16["Press on Max"] --> BP16["Max"]
    BP17["Press on Max"] --> BP17["Max"]
    BP18["Press on Max"] --> BP18["Max"]
    BP19["Press on Max"] --> BP19["Max"]
    BP20["Press on Max"] --> BP20["Max"]
    BP21["Press on Max"] --> BP21["Max"]
    BP22["Press on Max"] --> BP22["Max"]
    BP23["Press on Max"] --> BP23["Max"]
    BP24["Press on Max"] --> BP24["Max"]
    BP25["Press on Max"] --> BP25["Max"]
    BP26["Press on Max"] --> BP26["Max"]
    BP27["Press on Max"] --> BP27["Max"]
    BP28["Press on Max"] --> BP28["Max"]
    BP29["Press on Max"] --> BP29["Max"]
    BP30["Press on Max"] --> BP30["Max"]
    BP31["Press on Max"] --> BP31["Max"]
    BP32["Press on Max"] --> BP32["Max"]
    BP33["Press on Max"] --> BP33["Max"]
    BP34["Press on Max"] --> BP34["Max"]
    BP35["Press on Max"] --> BP35["Max"]
    BP36["Press on Max"] --> BP36["Max"]
    BP37["Press on Max"] --> BP37["Max"]
    BP38["Press on Max"] --> BP38["Max"]
    BP39["Press on Max"] --> BP39["Max"]
    BP40["Press on Max"] --> BP40["Max"]
    BP41["Press on Max"] --> BP41["Max"]
    BP42["Press on Max"] --> BP42["Max"]
    BP43["Press on Max"] --> BP43["Max"]
    BP44["Press on Max"] --> BP44["Max"]
    BP45["Press on Max"] --> BP45["Max"]
    BP46["Press on Max"] --> BP46["Max"]
    BP47["Press on Max"] --> BP47["Max"]
    BP48["Press on Max"] --> BP48["Max"]
    BP49["Press on Max"] --> BP49["Max"]
    BP50["Press on Max"] --> BP50["Max"]
Using Timer
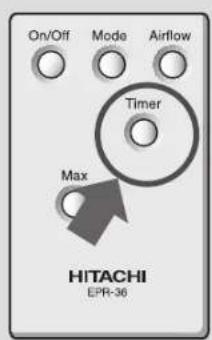
Timer
Press

button.

Off-timer (2 hours) is set.

Operation will stop approx.
2 hours after timer setting.
●The timer indicator is lit on.
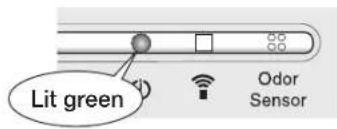
How to set/cancel
Timer
Every time you press ○ button, "Set" and "Cancel" will alternate.
Using the Control on Purifier
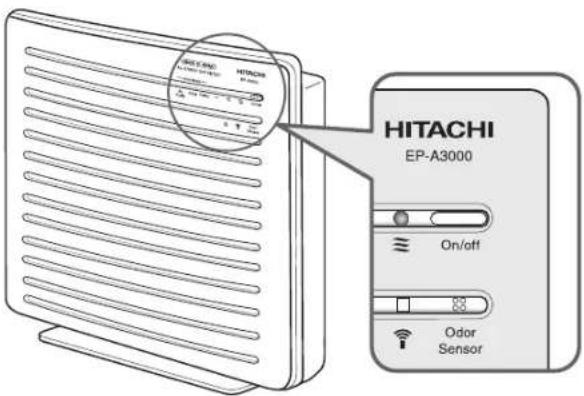
Press button.
On/off

Operation starts.
- Every time you press the On/off button to stop the unit, the lit indicator switches in the order shown below until stopping the unit.

flowchart
graph LR
    A["Air Purify"] --> B["Odor"]
    B --> C["Pollen"]
    C --> D["~"]
    D --> E["≈"]
    E --> F["Off"]
Memory Function / Sensors / Auto Detection
Memory Function (Only with the remote controller)
- When you stop the operation and then restart, the purifier will resume the operation status before shutdown.
- If you operate the purifier for approx. 5 seconds or longer, the operation status will be stored in memory. (If you stop the operation within less than 5 seconds, the operation status will not be stored in memory.)
- The timer setting is not saved in memory.
- The saved memory is cleared and the factory settings are restored by unplugging the power plug.
Odor Sensor
●The sensor detects odor in air such as cigarette smoke or odor of pet animals. Even when you feel the air is clean, the purifier may continue the operation if the odor sensor finds any gas component not removed by the filter. → P.E-14
Any of the following may also be detected by the odor sensor.
- Combustible gas when a combustion appliance is running, alcohol, odor of cosmetics, sprays, vapors, abrupt temperature changes, etc.
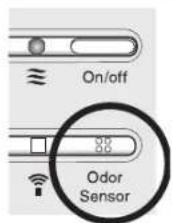
Auto Detection
●The air purifier unit detects the degree of air contamination in the room with the odor sensor and then starts automatic operation.
In the first 3 minutes after the power cord is plugged in, the unit will check room air condition and save it in memory. During the time, the "Air Purify" indicator will blink. After 3 minutes, the "Air Purify" indicator will go off and the purifier is now ready to operate.
- You may start the operation in less than 3 minutes after plugging the power cord.
In this case too, the "Air Purify" indicator will continue to blink, meaning the unit is checking the room air condition. After 3 minutes, the indicator will light solidly if the unit is running air purification operations in the Auto Mode.
- If you plug in the power cord under contaminated air condition, the sensor sensitivity may be reduced.
Cleaning (Guide for cleaning: Once a month)
Note
- Do not splash water on the purifier body. Water splash can be a cause of failure.
- Do not use a volatile solvent, such as gasoline, thinner, benzene, wax, kerosene, alcohol, etc. or polishing powder, or alkaline cleaner.
Such chemicals could cause deformation, discoloration, damage or removal of prints.
- When using a chemically treated cloth, follow its instructions.
● Never use dryer or heater to dry the purifier case. Heating could cause deformation.
Note
- Lay a soft cloth or the like beneath the purifier to protect the floor against scratch.
Purifier Body
- Remove dirt on the unit or panel with a soft cloth moistened with water or neutral detergent, and wrung. After removing dirt, wipe the unit or panel carefully so that there is no detergent on it.
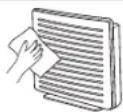
Pre-filter
●To clean the pre-filter, follow the steps below.
1
Remove the panel.
1 Lay the air purifier unit with the front upward on a stable and horizontal surface.
2 Put your fingers under the panel (two locations), lift the panel slowly and slide it slightly to the top side to remove.
natural_image
Illustration of hands handling a corrugated metal tray with a label '2' pointing to the tray (no text or symbols on the tray itself)2
Remove the pre-filter.
● Hold the lugs to remove the prefilter.
Note
- Do not open the panel forcibly. Parts may break.
3
Clean the pre-filter.
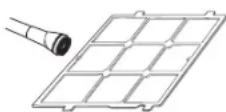
- Use a vacuum cleaner or the like to remove dust. If the dust cannot be removed, wash it off with water. After washing, fully drain the prefilter and then dry it in well-ventilated place where not exposed to sunlight.
- When you wash the prefilter, use a soft brush such as an old toothbrush.
- If you want to remove dust from the filter, use a vacuum cleaner or the like.
4
Reattach the pre-filter.
Insert the prefilter securely into the holes on the unit in the reverse order of step lock it in place.

●Install the filter so that the marking "手前侧" on the filter side face will face the panel.
5
Reattach the panel.
1 Insert the two tabs on the inside of the panel upper side securely into the two cylindrical notches on the top of the unit.
- Insert one tab into a cylindrical notch and then do the other tab in the same manner.

ntly push bottom of the panel until it clicks to close it securely.
●The pre-filter is a consumable part.
E-12 When damaged pre-filter needs to be replaced, purchase the replacement part (Part No. EP-BX40-002).
Filter Replacement
Replacement Interval
■The filter is a consumable part.
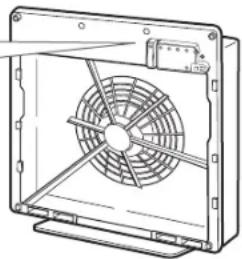
For the filter replacement interval, use approx. 2 years as a guide when the air purifier processes the smoke generated by 5 cigarettes smoking a day.
The dust filter should be replaced early if its color shows the resemblance to the color on the dirtiness label attached to the purifier body.
●The colors on the dirtiness label are shown as a guide only. Depending on the place of installation, actual color of contaminated filter may differ from the color shown on this label.
For a room with not much cigarette smoking
For a room with much cigarette smoking
Dirtiness label
Filter Replacement Guide
Replace the filter early if its color becomes similar to either color.
natural_image
Technical line drawing of a mechanical fan or vent assembly (no text or symbols)The filter may need to be replaced earlier depending on the place of installation and conditions of use. When dirt or odor becomes harder to remove, replace the filter earlier than suggested. Otherwise, the filter may generate odor.
■The filter should be replaced earlier in the following cases.
- When purifier intakes oily smoke, carbon substance (soot), etc. or when the smell of new building materials remains after a new house is built or the house is remodeled.
- When used in stores, such as in coffee shops, game parlors, barber shops, beauty parlors, or in offices or hotels.
- When purifier intakes large amounts of cigarette smoke.
- When purifier intakes combustion gas generated by heating appliances.
- When purifier intakes solvent content of paint, adhesive, etc.
- When used in dusty place near a road where the traffic is heavy.
Precautions on Filter Handling
■ Be sure to take the filter out of a plastic bag before use.
- Do not set the filter when it is still in a plastic bag. Otherwise, malfunction may result.
■Avoid rough handling.
- Do not squeeze, knead, roll up or pull the filter. Once the filter is broken, the cleaning effect will be lost.
■ Do not wash the filter.
●The filter is not washable for reuse. Purchase a new filter for replacement.
Replacing the Filter
■Use the filter No. EP-DX40E-902 separately available.
■Before replacing the filter, be sure to stop the purifier and unplug the power cord from AC outlet.
The filter contains synthetic resins inside. When you dispose of the filter, follow relevant local regulations on disposal.

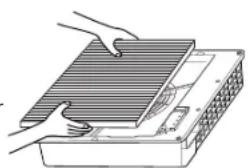
Take the filter out.
- Remove the panel and take the filter out. → P.E-7
natural_image
Illustration of hands installing or adjusting a rectangular panel on a device (no text or symbols visible)2 Install the filter.
●Take a new filter from the plastic bag and install it.
For installation procedures, refer to
"Preparations for Operation". → P.E-7
Note
- Do not open the panel forcibly. Parts may break.
Troubleshooting Guide
Before asking for repair
check the following once again
Symptom Soluti
No air blows out or power does not turn on
Smoke or smell is not efficiently removed, or there is an odor
No remote operation
The airflow rate will not decrease though the Auto Mode is selected and air in the room is clean.
The airflow rate will not increase though the Auto Mode is selected and air in the room is contaminated.
on
Check to see
●Is power plug securely inserted into AC outlet?
●Is breaker switched off?
- Is the filter dirty?
●Are polarities of batteries correct?
●Are batteries dead?
●Is the remote infrared receiver dirty?
- Is there anything nearby that the odor sensor might sense? For example,
• Any appliance generating combustion gas
• Alcohol, cosmetics, sprays, etc.
●Is the odor sensor blocked by any obstacle?
● Was the ambient air clean when the purifier power cord was plugged into AC outlet?

Securely insert the power plug into AC outlet.

Switch on breaker.

Replace the filter, referring to the "Filter Replacement". The filter may need to be replaced sooner depending on the place of installation and conditions of use.

Insert the batteries with correct polarities.

Replace the batteries.

Clean the remote infrared receiver.

Purifier may sense invisible gas component that cannot be cleaned by filter and continue operation. Ventilate the room by opening window, etc.

Refer to "Odor Sensor" and check if there is anything is detected by the sensor.

Remove the obstacle.

Change the airflow rate. Or open a window and plug the power cord into AC outlet when ambient air is clean.
Following Conditions Are Normal
Symptom Cause
The fan is rotating though the Auto Mode is selected and the airflow indicator is out.
Snapping noise when plugging power cord into AC outlet
Purifier body vibration during the "Max" operation

The unit is running in the Auto Mode and operation is on standby. This is normal.

Electric current flows to electric components such as the odor sensor at the same time power is turned ON. This is normal.

Vibration is caused by fan rotation. This is normal.
Replacement Parts (Separately Available)
- Filter
Designate the replacement part No. EP-DX40E-902 when ordering.
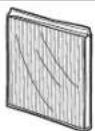
- Pre-filter
Designate the replacement part No. EP-BX40-002 when ordering.
Specifications
| Model EP-A3000 | ||||||
| Power supply AC220 | 50/60Hz AC240 50/60Hz | |||||
| Airflow switching Max | Medium Silent M | Max Medium Silent | ||||
| Power consumption (W) 37/43 21/20 18/16 37/43 25/24 22/20 | ||||||
| Airflow rate (m3/min) | 2.8/3.2 | 1.4/1.1 | 0.9/0.6 | 2.8/3.2 | 1.7/1.4 | 1.2/0.8 |
| Applicable floor space | 22/25m2 | |||||
| External dimensions | 424(H) x 400(W) x 133(D) mm | |||||
| Weight | 4.0 kg | |||||
| Length of power cord | Approx. 1.8m | |||||
感谢您购买日立空气净化器。
natural_image
Illustration of a notebook with a magnified view of its cover, showing no text or symbols.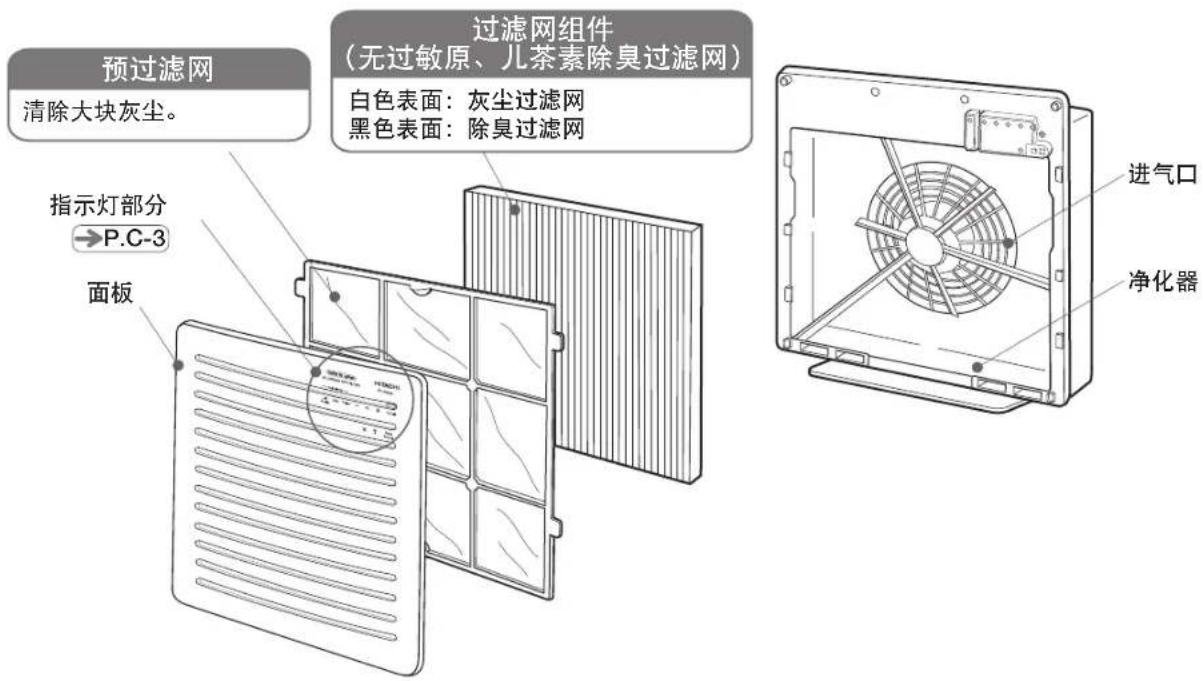
净化器主机和面板

杂项

natural_image
Simple line drawing of a grid with a cross mark on the left and a rectangular grid on the right (no text or symbols)切勿将净化器放在暴露在直射阳光的地方。
直射阳光可能会造成变形、褪色或故障。
natural_image
Simple line drawing of a window with a fan and a monitor on a table (no text or symbols)切勿阻挡或触摸红外接收器和异味感应器。
natural_image
Illustration of a child standing in a window near a TV (no text or symbols visible)切勿在电视机或收音机附近使用。
natural_image
Simple line drawing of a monitor and a flatboard with a cross mark, no text or symbols present.操作准备
注
natural_image
Illustration of hands handling a corrugated metal tray with a directional arrow (no text or symbols)natural_image
Simple line drawing of a minimalist room setup with a table, printer, and cabinet (no text or symbols)C-7
使用遥控器
- 风量按下列顺序变化。
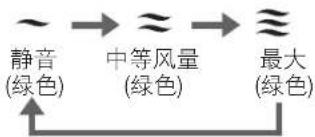
flowchart
graph LR
    A["~"] --> B["≈"]
    B --> C["≈"]
    C --> D["静音\n(绿色)"]
    B --> E["中等风量\n(绿色)"]
    C --> F["最大\n(绿色)"]
C-9
使用遥控器(续)
最大运转
natural_image
Illustration of hands holding a corrugated metal tray with a directional arrow (no text or symbols)2
拆下预过滤网。
● 抓住两个耳状物,去掉预过滤网。
natural_image
Line drawing of a Hitachi networking device with ventilation slots and control buttons (no text or symbols on the device itself)
natural_image
Diagram of a device with a magnified view showing internal structure (no text or symbols)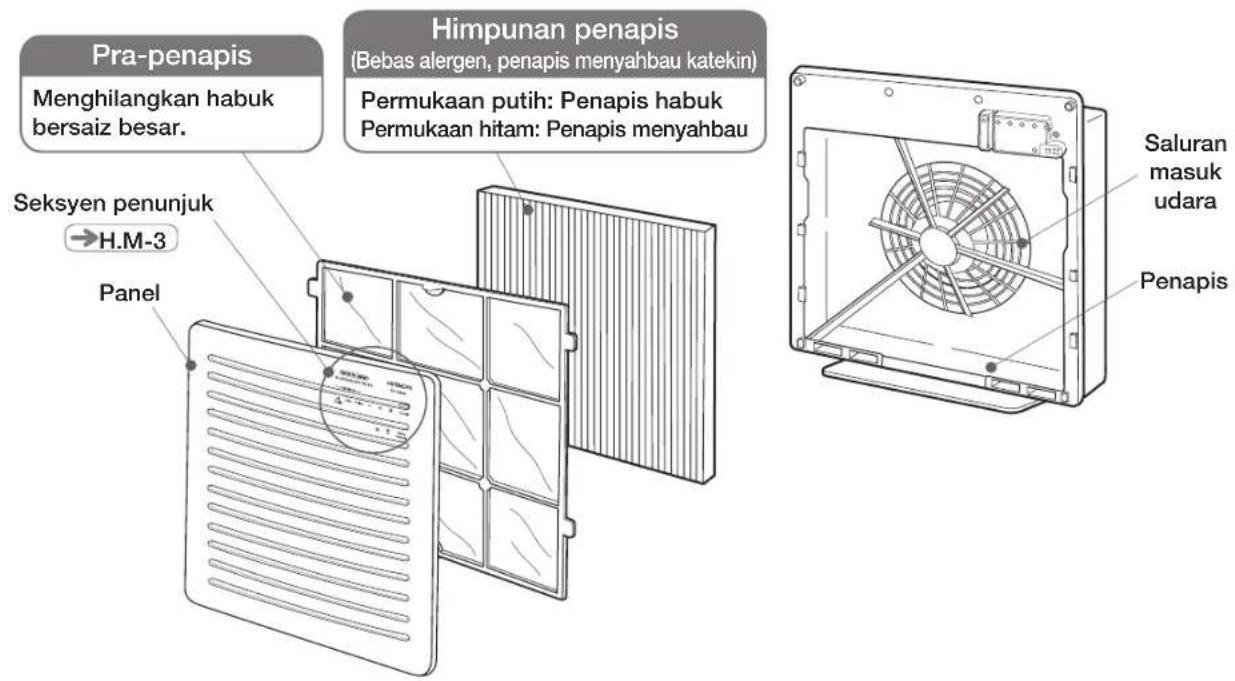
natural_image
Simple line drawing of a grid pattern with a cross symbol, no text or symbols presentnatural_image
Illustration of a window with a sunburst and a monitor on a table, no text or symbols presentnatural_image
Illustration of a person standing in bed near a TV, with curtains and a small table nearby (no text or symbols)natural_image
Simple line drawing of a monitor and a computer monitor with a cross symbol indicating cancellation or error (no text or symbols present)natural_image
Illustration of hands handling a corrugated metal tray with a handle, no text or symbols present3 Pemegang
2 Pasang penapis.
natural_image
Illustration of hands handling a rectangular object with horizontal lines, labeled with number 3 (no text or symbols on the object itself)Stand-by Power Consumption
natural_image
Illustration of hands installing or adjusting a component on a device (no text or symbols visible)
Pasang penapis.
natural_image
Line drawing of a Hitachi networking device with ventilation slots and control panel (no text or symbols on the device itself)
natural_image
Illustration of a notebook with a magnified view of its cover, showing no text or symbols.
flowchart
graph TD
    A["Hybrid Feature"] --> B["Local Features"]
    B --> C["Main Control Panel"]
    C --> D["External Components"]
    D --> E["Output Module"]

    subgraph A
        F[Hybrid Feature: 1.5mm T-9, 2.5mm T-9, 3.5mm T-9, 4.5mm T-9, 5.5mm T-9, 6.5mm T-9, 7.5mm T-9, 8.5mm T-9, 9.5mm T-9, 10.5mm T-9, 11.5mm T-9, 12.5mm T-9, 13.5mm T-9, 14.5mm T-9, 15.5mm T-9, 16.5mm T-9, 17.5mm T-9, 18.5mm T-9, 19.5mm T-9, 20.5mm T-9, 21.5mm T-9, 22.5mm T-9, 23.5mm T-9, 24.5mm T-9, 25.5mm T-9, 26.5mm T-9, 27.5mm T-9, 28.5mm T-9, 29.5mm T-9, 30.5mm T-9, 31.5mm T-9, 32.5mm T-9, 33.5mm T-9, 34.5mm T-9, 35.5mm T-9, 36.5mm T-9, 37.5mm T-9, 38.5mm T-9, 39.5mm T-9, 40.5mm T-9, 41.5mm T-9, 42.5mm T-9, 43.5mm T-9, 44.5mm T-9, 45.5mm T-9, 46.5mm T-9, 47.5mm T-9, 48.5mm T-9, 49.5mm T-9, 50.5mm T-9, 51.5mm T-9, 52.5mm T-9, 53.5mm T-9, 54.5mm T-9, 55.5mm T-9, 56.5mm T-9, 57.5mm T-9, 58.5mm T-9, 59.5mm T-9, 60.5mm T-9, 61.5mm T-9, 62.5mm T-9, 63.5mm T-9, 64.5mm T-9, 65.5mm T-9, 66.5mm T-9, 67.5mm T-9, 68.5mm T-9, 69.5mm T-9, 70.5mm T-9, 71.5mm T-9, 72.5mm T-9, 73.5mm T-9, 74.5mm T-9, 75.5mm T-9, 76.5mm T-9, 77.5mm T-9, 78.5mm T-9, 79.5mm T-9, 80.5mm T-9, 81.5mm T-9, 82.5mm T-9, 83.5mm T-9, 84.5mm T-9, 85.5mm T-9, 86.5mm T-9, 87.5mm T-9, 88.5mm T-9, 89.5mm T-9, 90.5mm T-9, 91.5mm T-9, 92.5mm T-9, 93.5mm T-9, 94.5mm T-9, 95.5mm T-9, 96.5mm T-9, 97.5mm T-9, 98.5mm T-9, 99.5mm T-9, 100mT
    subgraph Legend
        E --> F
        E --> G
        E --> H
        E --> I
        E --> J
        E --> K
        E --> L
        E --> M
        E --> N
        E --> O
        E --> P
        E --> Q
        E --> R
        E --> S
        E --> T
        E --> U
        E --> V
        E --> W
        E --> X
        E --> Y
        E --> Z
        E --> AA
        E --> AB
        E --> AC
        E --> AD
        E --> AE
        E --> AF
        E --> AG
        E --> AH
        E --> AI
        E --> AJ
        E --> AK
        E --> AL
        E --> AM
        E --> AN
        E --> AO
        E --> AP
        E --> AQ
        E --> AR
        E --> AS
        E --> AT
        E --> AU
        E --> AV
        E --> AW
        E --> AX
        E --> AY
    end

    %% Additional connections and labels in the diagram; the diagram shows multiple labeled components (e.g., 'ALLERGEN OFF FILTER', 'HiTACHI EP-A3000') and labels (e.g., 'Auto Mode', 'Odor Sensor'). The diagram includes annotations for each component and is not explicitly provided in the image itself.
    %% Note: The diagram contains labels and annotations that are not explicitly provided in the image itself.
natural_image
Illustration of a grid pattern with a cross symbol, next to a rectangular grid (no text or symbols)natural_image
Illustration of a sunburst light entering a window and a flat-screen TV on a table (no text or symbols)natural_image
Illustration of a person standing in front of curtains and a TV (no text or symbols present)natural_image
Simple line drawing of a monitor and a computer monitor with a cross symbol (no text or labels)natural_image
Illustration of hands handling a corrugated metal tray with a handle, no text or symbols present2
natural_image
Illustration of hands handling a rectangular object with horizontal lines, labeled with number 3 (no text or symbols on the object itself)natural_image
Simple line drawing of a desk with a coffee cup and a computer monitor on top (no text or symbols)T-7
natural_image
Illustration of hands holding a rectangular tray with a grid pattern, no text or symbols present2
HITACHI Inspire the Next
- HITACHI
- Inspire the Next
- Instruction Manual
- EP-A3000
- Contents
- Before Use
- Operating Air Purifier
- Cleaning and Maintenance
- Features / Name of Each Component / Accessories
- Operation Buttons and Indicators /
- Remote Controller
- On/Off Button → P.E-8
- Mode Button → P.E-9
- Max button → P.E-10
- Airflow Button → P.E-9
- Timer Button →P.E-10
- Note
- Provided Accessories
- Filter
- Safety Precautions
- Meanings of Symbols
- WARNING
- To Prevent Fire, Electric Shock and Injury
- AC Outlet, Power Plug and Power Cord
- Miscellaneous
- CAUTION
- To Prevent Fire, Short-Circuit, Electric Shock, Injury and Failure
- Place of Use
- Purifier Body and Panel
- To Prevent Floor Scratches or Wall Stains
- During Cleaning / Place of Use
- Cautions on Use
- Preparations for Operation
- Setting Filter in Purifier (Perform the same procedure when replacing filter.)
- 1
- Remove the panel.
- 2
- Install the filter.
- 3
- Reinstall the panel on the unit.
- Inserting Batteries into Remote Controller
- Remove the battery compartment cover.
- Insert batteries and close the cover.
- Installation
- Using Remote Controller
- Starting Operation
- Securely insert the power plug into AC outlet.
- On/Off
- Press
- button.
- Stand-by Power Consumption
- Selecting Auto Mode (Basics)
- Auto Modes and Tips for Selection
- Switching Airflow Rate
- Using Remote Controller (Continued)
- Max Operation
- Using Timer
- How to set/cancel
- Using the Control on Purifier
- Memory Function / Sensors / Auto Detection
- Memory Function (Only with the remote controller)
- Odor Sensor
- Auto Detection
- Cleaning (Guide for cleaning: Once a month)
- Purifier Body
- Pre-filter
- Remove the pre-filter.
- Clean the pre-filter.
- 4
- Reattach the pre-filter.
- 5
- Reattach the panel.
- Filter Replacement
- Replacement Interval
- Dirtiness label
- Precautions on Filter Handling
- Replacing the Filter
- Take the filter out.
- Install the filter.
- Troubleshooting Guide
- Before asking for repair
- Symptom Soluti
- on
- Check to see
- Following Conditions Are Normal
- Symptom Cause
- Replacement Parts (Separately Available)
- Specifications
- 净化器主机和面板
- 杂项
- 操作准备
- 注
- 使用遥控器
- 使用遥控器(续)
- 最大运转
- 拆下预过滤网。
- Pasang penapis.
- Pasang penapis.
- HITACHI Inspire the Next
Brand : HITACHI
Model : EP-A3000
Category : Air purifier