
EP-L110E - Air purifier HITACHI - Free user manual and instructions
Find the device manual for free EP-L110E HITACHI in PDF.


| Product Type | Air Purifier |
| Brand | Hitachi |
| Model | EP-L110E |
| Dimensions (W x D x H) | 380 x 200 x 500 mm |
| Net Weight | 4.8 kg |
| Power Supply | 220-240 V, 50 Hz |
| Power Consumption | 55 W (max) |
| Coverage Area | Up to 30 m² |
| Filtration System | Pre-filter, HEPA H13, Activated Carbon |
| Fan Speeds | 3 speeds + Sleep mode |
| Airflow (Max) | 180 m³/h |
| Noise Level | 25 – 48 dB(A) |
| Timer | 1-8 hours |
| Filter Replacement Indicator | Yes |
| Filter Life | 6-12 months (depending on usage) |
| Control Type | Touch panel + Remote control |
| Safety Features | Auto shut-off (tilt/overheat), child lock |
| Maintenance | Vacuum pre-filter monthly; replace HEPA & carbon filter as needed |
| Spare Parts | Replacement filter kit (part no. EP-L110E-F) |
| Certifications | CE, RoHS |
| Optional Features | Ionizer, UV-C light (if applicable) |
Frequently Asked Questions - EP-L110E HITACHI
User questions about EP-L110E HITACHI
0 question about this device. Answer the ones you know or ask your own.
Ask a new question about this device
Download the instructions for your Air purifier in PDF format for free! Find your manual EP-L110E - HITACHI and take your electronic device back in hand. On this page are published all the documents necessary for the use of your device. EP-L110E by HITACHI.
USER MANUAL EP-L110E HITACHI
natural_image
Black-and-white interior photo of a modern living room with a white sofa, wooden flooring, and large window with window blinds (no text or symbols visible)Thank you for purchasing a Hitachi air purifier.
This air purifier is for household use only.
Do not use it for any other purpose besides purifying air.
Please read this instruction manual carefully before using this product to ensure the unit is operated correctly.
For future reference, keep this manual in an easily accessible place.
Read "Safety Precautions" → (P.E-8 - E-12) to ensure correct use.
HITACHI Inspire the Next
Instruction Manual
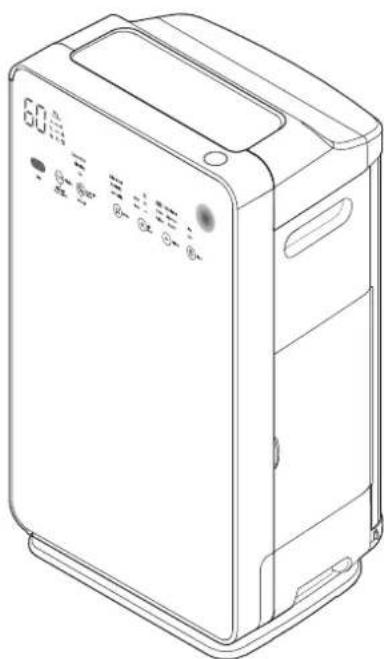
Hitachi Air Purifier with Humidifying Function
Model
EP-L110E
natural_image
Line drawing of a portable air purifier device with control panel and indicator lights (no text or symbols)Features
- Pre-fi Iter is automatically cleaned before dust accumulates.
Cleaning has never been easier!
- Collects various types of pollutants and odor particles in the air.
Allergen-free HEPA fi Iter for fi ne dust particles and washable deodorizing fi Iter collect pollutants and odor particles.
- Wide-area, high-speed dust collection
By sucking air from a wide area, the air purifi er EP-L110E can collect dust in a floor area of up to 79m². The larger the applicable floor area is, the faster the air purifi er can clean air.
Air Purify Mode
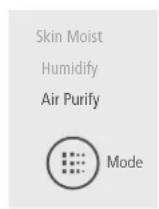
Automatically regulates the airflow according to the condition of the room air, and performs dust collection and deodorization.
Humidify Mode
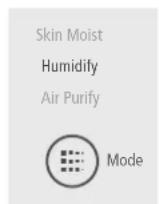
Humidifies clean air and increases humidity for dry rooms.
Skin Moist Mode
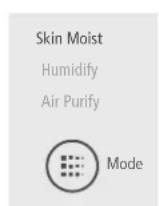
Increases room humidity and controls it to about 60%. Gives moisture to dry skin during winter, or during dry weather.
Contents
Before Use
Features E-2
Name of Each Component / Accessories .... E-4
Operating the Touch Operation Panel… E-6
Safety Precautions E-8
Cautions on Use E-13
Air Cleaner Deodorizing Performance ... E-13
Preparations for Operation ...... E-14
Setting Filter in Unit E-14
Filling Water Tank...... E-16
Installation E-18
Operating Air Purifi er
Operation E-19
Starting Operation E-19
Switching Touch Operation Panel Display… E-20
Selecting Operation Mode (Basic Operations) .... E-21
Switching Airflow Rate E-21
Useful Features E-22
Operating in Option E-22
Eco Saving Operation E-23
PM2.5 Sensor E-24
Switching Between Temperature /
Humidity Monitor Display E-24
Stopping Operation Using Off-timer …… E-24
Setting the Lock E-25
Setting and Running Auto Self Clean
(Pre-fi Iter Automatic Cleaning) E-26
Memory Function / Monitor /
Sensors / Auto Detection ...... E-28
Memory Function E-28
Air Sensor E-28
Odor Sensor E-28
Dust Sensor E-28
Temperature / Humidity Monitor
(Temperature / Humidity Sensor) …… E-28
Vibration Sensor E-29
Auto Detection E-29
Adjusting Sensory Sensitivity Setting …… E-29
Cleaning and Maintenance
Cleaning E-30
When the Filter Cleaning Indicator Comes On.... E-30
Replacing Humidifying Filter E-33
When the "Water Refi II" Indicator Comes On…… E-33
Water Tank E-34
Humidifying Filter E-35
Water Tank, Tank Cover, Water Tank Filter .... E-35
When the Empty Dust Indicator Comes On … E-36
Auto Self Clean Unit E-38
Rear panel, etc. E-39
Pre-fi Iter, Filter Assembly / Deodorizing Filter… E-40
Cleaning the Deodorizing Filter E-41
Purifi er E-42
Dust Sensor E-42
Replacing the Filter Assembly / De- odorizing Filter ...... E-43
Replacement Interval E-43
Handling the Filter Assembly /
Deodorizing Filter.... E-43
How to Replace the Filter Assembly /
Deodorizing Filter...... E-44
Troubleshooting Guide ...... E-45
Replacement Parts E-50
Specifications E-51
Name of Each Component / Accessories
Names of Each Component
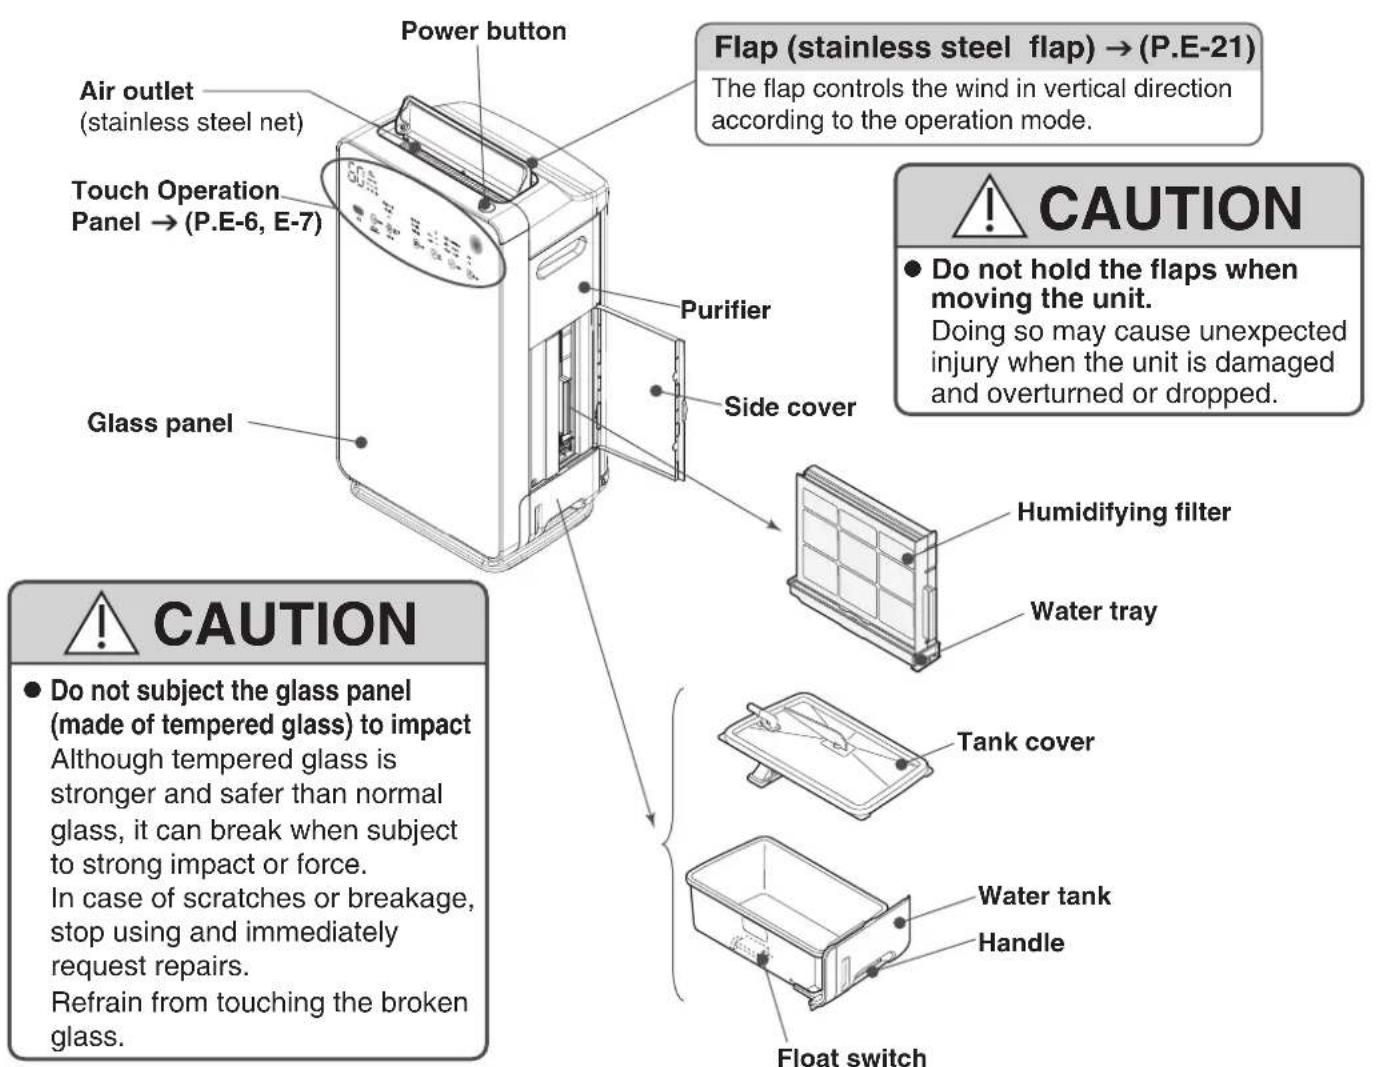
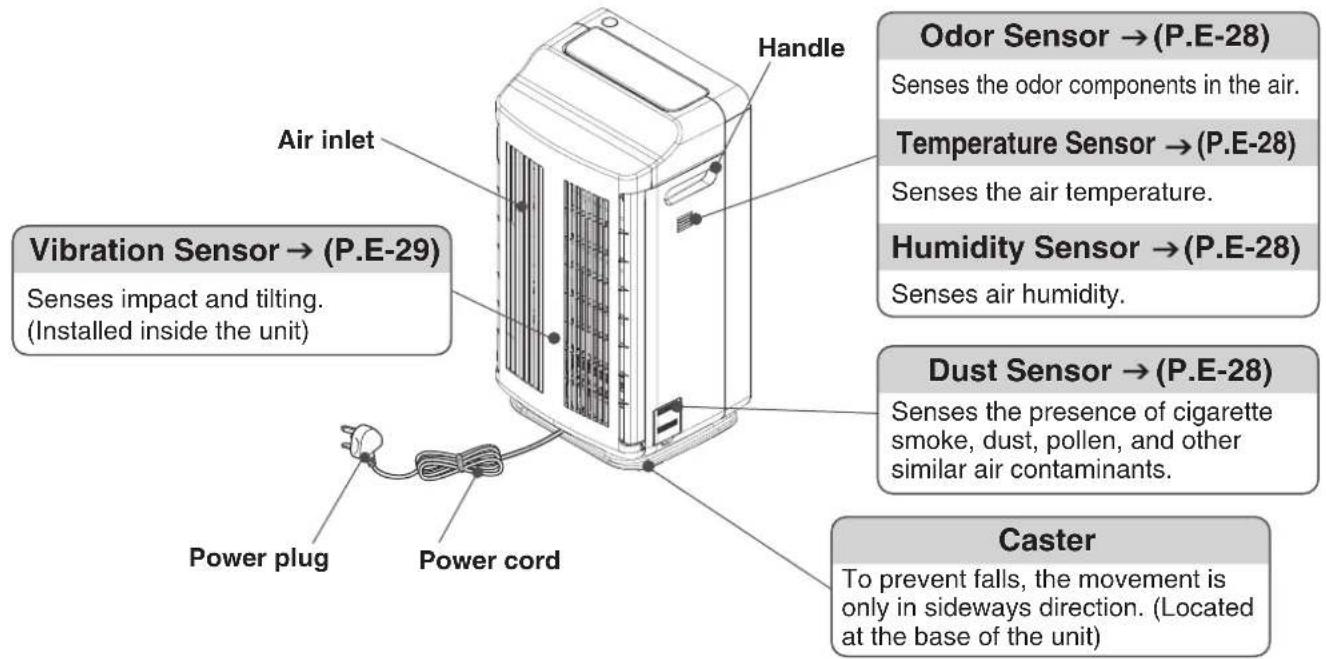
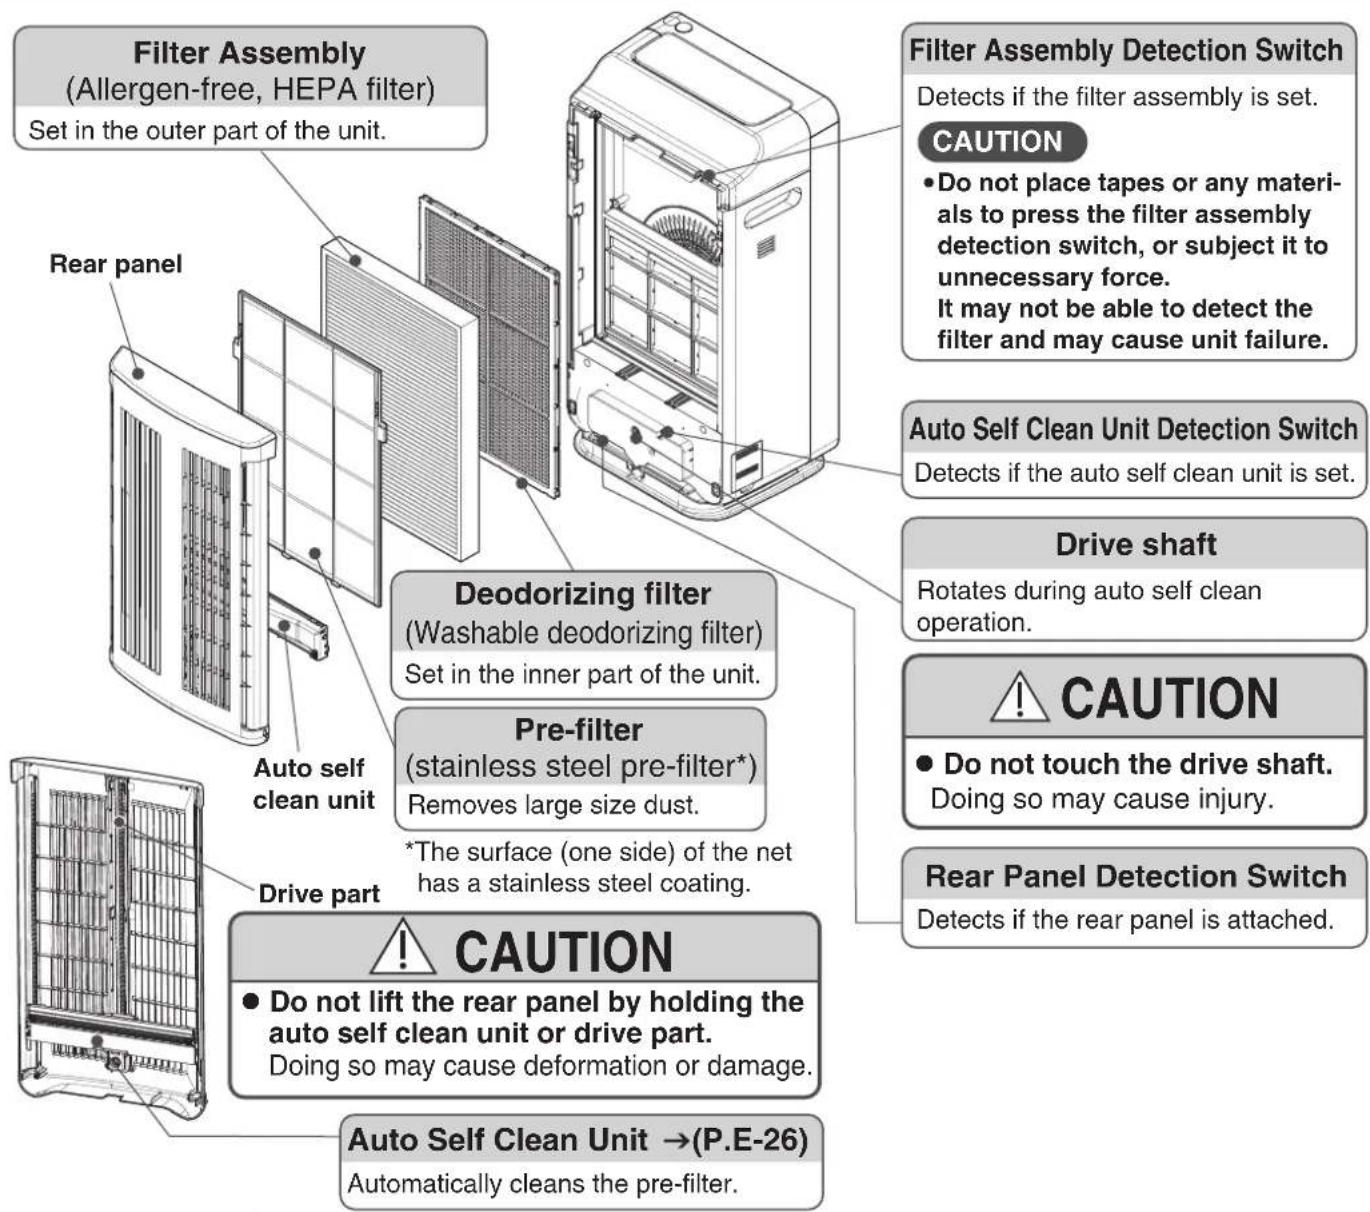
Accessories
Filter
Housed inside the purifier.
* The filter must be removed from the plastic packaging before operating the unit.
CAUTION
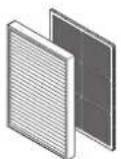
(Dust Filter (x1) (Deodorizing Filter (x1))
The vibration during transporting the unit might cause deodorizing agent granules to fall out from the filter.
- When removing the plastic cover of the filter and attaching the filter to the unit, make sure that your hands, clothes, and the surroundings will not get dirty.
● Wipe of any granules that may have fallen or clung to the filter.
● This will not affect the deodorizing performance.
Pre-filter
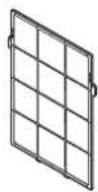
(x1)
Humidifying filter
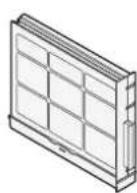
(x1)
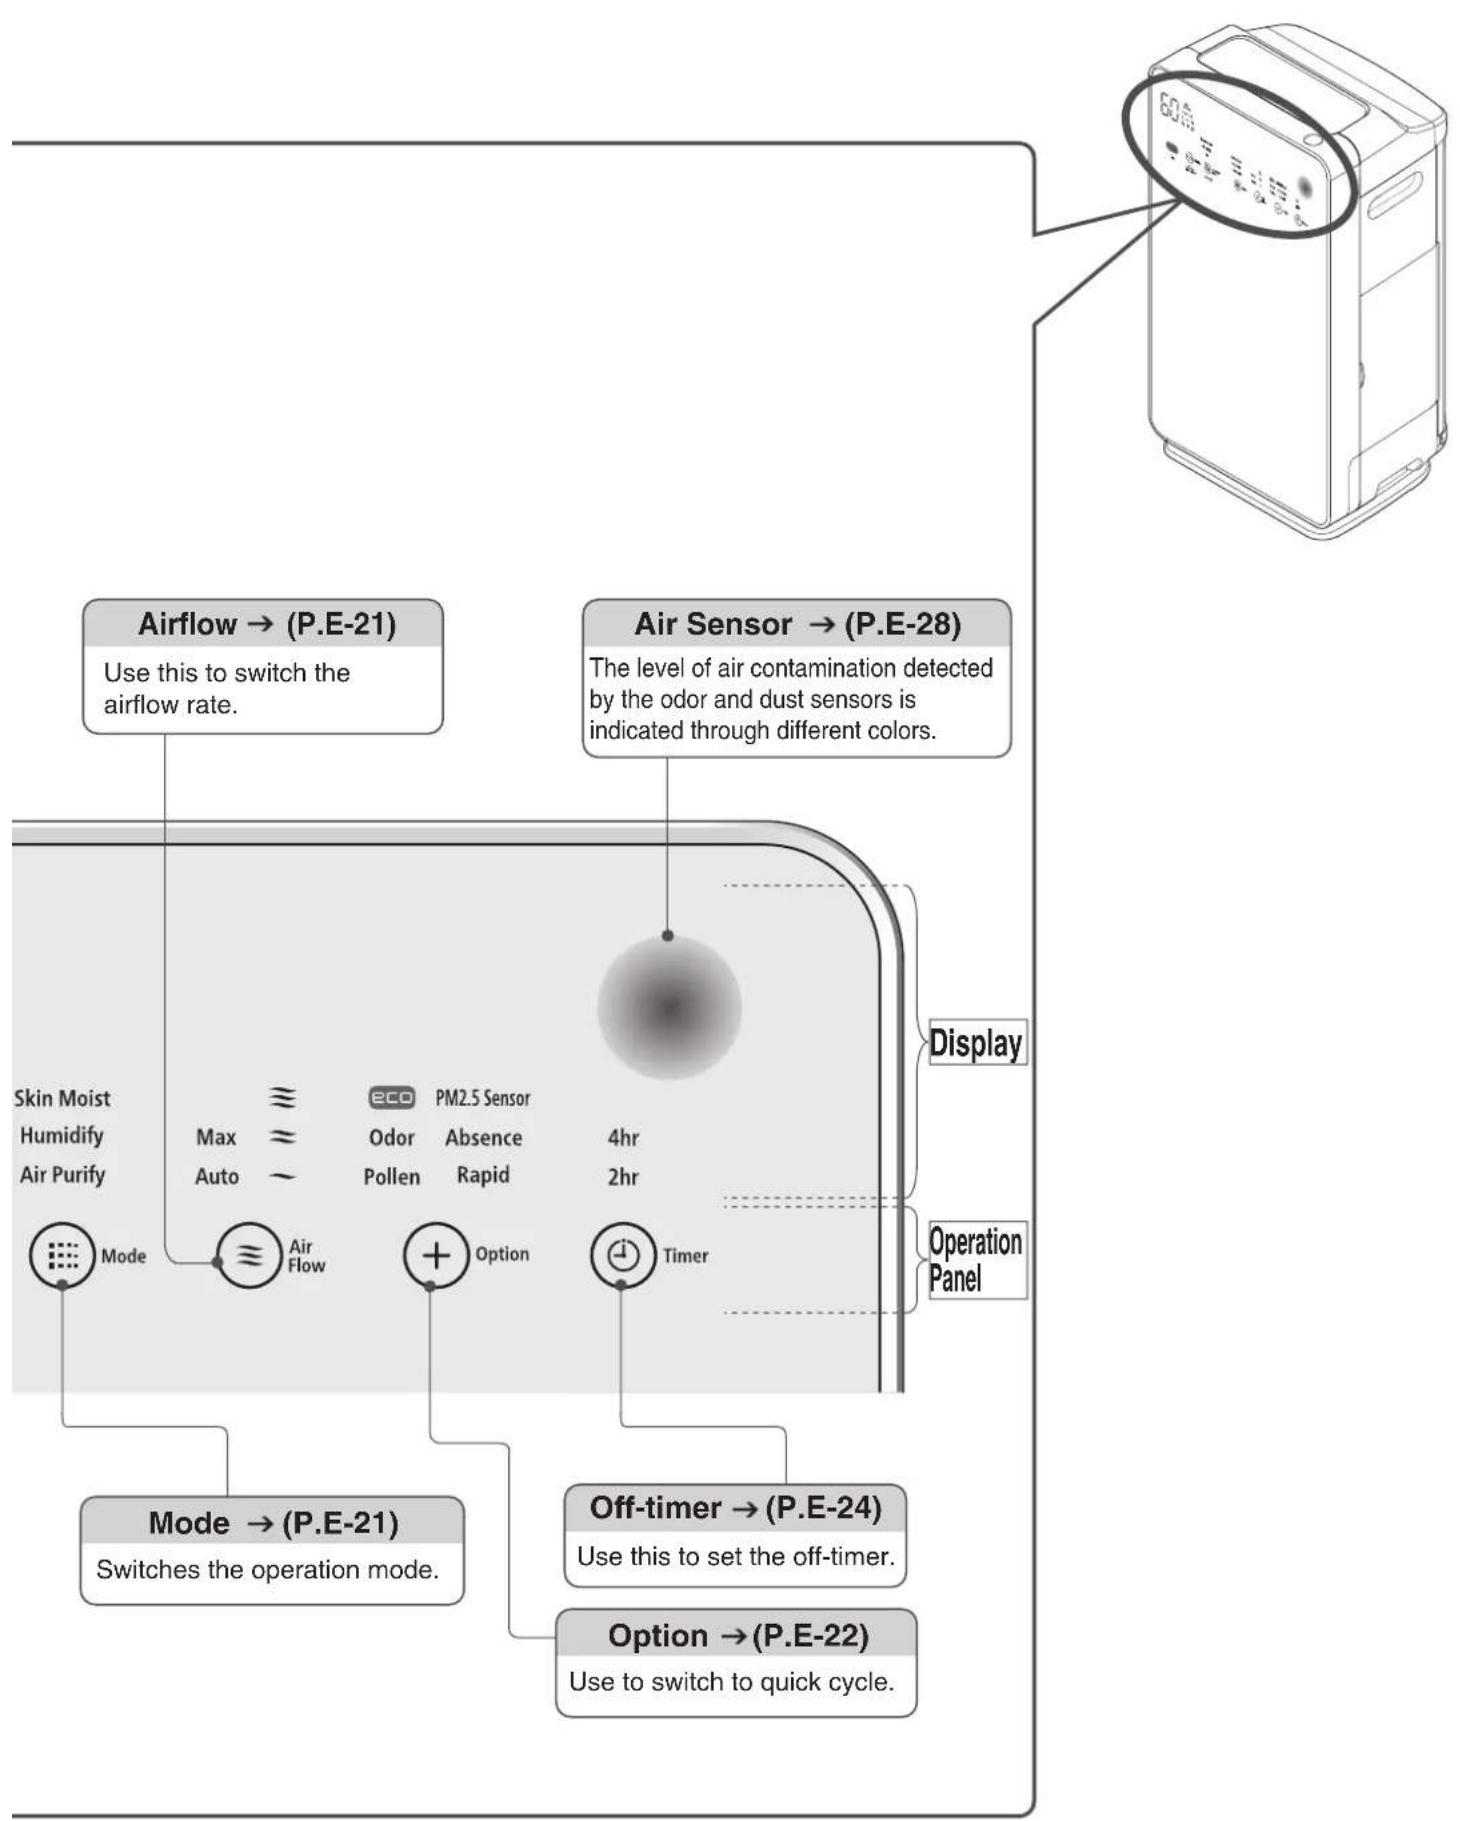
Operating the Touch Operation Panel
● The air purifying feature works in all operation modes.
● The touch operation panel is made of glass.
- If the touch operation panel display disappears, touch MENU to display it again.
The touch operation panel display will disappear when MENU is touched again.
● The upper part of the touch operation panel is the display section and the lower part is the control section.
- Use the touch operation panel to switch settings.
| Notification Display | |
| Temperature/ Humidity Monitor | • Displays the room temperature and humidity while operating. This should be taken as a guide only.→(P.E-28) • Displays notification contents that came out while operating. Example: [1, 1] → (P.E-45) |
| Filter Cleaning | Lights up when it is time to clean the humidifying filter. This notification (guide) is made based on the operation time.→(P.E-30 - E-33) (After the indicator lights up, unplug the power cord to reset and turn off the indicator.) |
| Water Refill | The indicator lights up when the water in the water tank is nearly empty.→(P.E-33, 34) |
 | The indicator lights up when the child lock is set.→(P.E-25) |
| [YKB2] | The indicator lights up when the unit is operating on timer.→(P.E-24) |
| [HS72] | The indicator lights up when the unit is operating with PM2.5 sensing.→(P.E-24) |
| [7XAT] | The indicator lights up when the unit is operating on humidify mode or skin moisturize mode.→(P.E-21) |
| Empty Dust | Lights up when dust should be discarded. This notification (guide) is made based on the operation time.→(P.E-36) (Once you unplug the power cord after the indicator lights up, the operation time will be reset and the indicator will go off.) |
| Cleaning | Lights up during the Auto Self Clean operation.→(P.E-26) |
Empty Dust
Cleaning
Display Switch
● Switches the display between temperature / humidity monitor. → (P.E-24)
● Switches the display of the touch operation panel. (Long-press for about 3 seconds) → (P.E-20)
MENU
- Touch this button first when the display or operation panel is off. When tapped again, it turns off the display or operation panel.
- Lock (Long-press MENU for about 3 seconds) Use this to prevent incorrect operation. → (P.E-25)
Filter Cleaning
Water Refill

MENU
Lock

Display

Auto Self Clean
Manual
Note
● The glass touch may have a different reaction depending on the surrounding temperature and humidity, physical condition of the user, and the condition of the electronic appliances near by the unit.
- If it does not respond after touching, release and try again.
If the interval between touches is short, the unit may respond incorrectly. The sensitivity will not change by the force applied when touching.
- There may be no response if the operation panel is wet or dirty. Wipe off with a dry cloth to use.
- The display may be difficult to view if the unit is placed in brightly lit places such as near a window with direct sun light.
Auto Self Clean → (P.E-26)
- Use this to set Auto Self Clean.
- Use this to manually perform Auto Self Clean.
(Long-press Auto Self Clean for about 3 seconds.)
Safety Precautions
- Please read the following safety precautions carefully before using the unit.
To prevent injury to the user or other people and property damage, the following instructions must be followed. Also read the precautions appearing in the text carefully to ensure correct use.
● Defi nition of each indication
Incorrect operations that are carried out as a result of ignoring instructions will cause harm or damage. The seriousness is classified by the following indications.

WARNING
This symbol indicates the possibility of death or serious injury.

CAUTION
This symbol indicates the possibility of injury or damage to property.
Meaning of Symbols

Indicates "warning or caution".

Indicates "prohibition".

Indicates "necessity".

WARNING
To Prevent Fire, Electric Shock and Injury
AC Outlet, Power Plug and Power Cord

- Remove dust from the blade and the blade mounting surface of the power plug. Otherwise, it may cause a fire.
- Be sure to unplug the power cord from the AC outlet when cleaning or not using the unit for an extended period of time.
Otherwise, it may cause an electric shock or injury.
- Be sure to hold the plug when unplugging it.
Otherwise, it may cause an electric shock or short-circuit, which may result in a fire.
- Securely insert the power plug into the AC outlet.
Otherwise, it may cause an electric shock, overheating or fire.

- Do not stop operation by unplugging the power plug.
Otherwise, it may cause fire, electric shock or malfunction.
● Never plug or unplug the power plug with wet hands.
Otherwise, it may cause an electric shock.
- Do not use a damaged power cord or power plug, or a loose AC outlet.
Otherwise, it may cause an electric shock, short-circuit or ignition.
- Do not damage the power cord.
(Do not break, modify, forcibly bend, pull or twist it. Also do not place any heavy objects on it, pinch it, or step on it when moving it with the caster.)
Otherwise, it may cause damage to the power cord, fire or ignition.
● Make sure to avoid inserting too many plugs into the AC outlet.
Otherwise, it may cause fire or ignition.
- Do not immerse the power plug in water, or pour water on it.
Do not use a power plug when wet.
Doing so may cause ground leakage, electrical shock and unit failure.
- If the supply cord is damaged, it must be replaced by the manufacturer, its service agent or similarly qualified persons in order to avoid a hazard.
- Do not use with a voltage other than 220-240V AC.
Otherwise, it may cause a fire or electric shock.
Before Use

● Ventilate the room frequently when in use with heating appliances.
Otherwise, it may cause carbon monoxide poisoning.
This product cannot remove carbon monoxide.
- When there is water leakage due to tilting of the unit, unplug the power cord from the AC outlet and request repairs.
It may cause fire due to electric shock and ground leakage.

- Do not block the air outlet or air inlets with laundry, cloth, curtains, etc.
Poor ventilation may cause overheating or fire.
- Do not use fl ammable materials (hair sprays, insecticides, air fresheners, etc.) near the unit.
Do not use benzene, thinner or alcohol to clean the purifier.
Otherwise, it may lead to cracking, electric shock, ignition, smoke or fire.
- Do not use in a kitchen as a substitute for a ventilation fan and range hood fan.
Otherwise, it may cause unit deformation by heat or it may ignite a fire in the filter.
Also, it may cause failure or a decrease in the lifespan of the pre-filter, filter assembly and deodorizing filter.
- Keep away from lit candles, mosquito coils, lit cigarettes, etc. Also, do not let smoke from these materials enter the unit.
Otherwise, it may cause fire.
- Do not operate the unit when using fumigating (smoking) type insecticide. Do not let chemicals enter the unit.
Use of such insecticides will cause chemicals to accumulate in the unit and depending on a person's sensitivity to these chemicals, it may be harmful to one's health.
- Do not place in a location where the air from the outlets will blow directly onto heating appliances.
Otherwise, it may cause incomplete combustion and carbon monoxide poisoning.
- Do not use in narrow spaces such as gaps between the furniture or closet.
Poor ventilation may cause overheating or fire.
- Do not operate the unit while the water tank or humidifying filter, filter assembly / deodorizing filter, etc. are detached.
Otherwise it may cause injury, water leakage or failure.
- Do not tilt or tip the unit over. Do not put your weight on the unit or step on it.
- Also, do not use it in an unstable place or anywhere near infants.
Otherwise, it may cause the unit to tip over due to vibration, which may cause an injury or unit failure.
Also, water may leak from the water tank, which may cause fire due to electric shock or short-circuit.
If the unit is tipped over or tilted, pick up the unit immediately. If water from the tank is leaking, unplug the power cord from the AC outlet and request repairs.
(When the unit is tipped over or tilted, the operation will stop.)
Cleaning

- When cleaning, do not splash water on the unit.
It may cause short-circuiting and electric shock.
- Do not add water by submerging or splashing water on the unit.
It may cause short-circuiting and electric shock.
- Do not tilt the unit to remove or clean the fi Iter.
The water may spill and may cause electric shock or unit failure.
Safety Precautions (Continued)

WARNING
Cleaning

- Do not use detergents when cleaning.
Usage of chlorine-based and acid type detergents will generate toxic gas and can cause a health threat.
Also, do not use neutral detergents as it may affect the plastic.
(Except when cleaning the humidifying filter)
- Do not use detergents when cleaning the water tank or water tray.
The detergent ingredients may damage the unit, which may cause water leakage, electric shock, injury and unit failure.
Place of Use

- Do not use in a location where there is huge amount of oily smoke such as in cafeterias and eateries.
The oil residue or dust deposited in the unit may cause fire, unit failure and unpleasant odor.
- Do not use in a location where there is flammable gas, corrosive gas or metallic dust, or risk of leakage of oil, fl ammable gas.
It may cause fire, explosion or unit failure.
- Do not use in a location where solvents such as paint and adhesives are being used or stored.
It may cause deterioration of parts or fire.
- Do not use in a location where soot from oil, such as machine oil, is floating in the air.
It may cause a crack, electric shock or fire.
- Do not use in a location where any chemical is used. (Hospitals, factories, laboratories, beauty salons, photographic laboratories, etc.)
Chemicals and solvents evaporating into the air deteriorate the unit. This causes water leakage and wets the furniture or may cause electric shock.
- Do not place on shelves, desks, tables, etc.
The unit may fall due to its movement and vibration which may cause water leakage and electric shock.
- Do not place in a location which has a thick carpet or uneven floor.
The unit may incline and fall which may cause water leakage and electric shock.
- Do not use in a humid place or in a place where it may easily be wet, such as in a bathroom.
It may cause electric shock or fire due to ground leakage.
- Do not place it near a hot object such as a heater.
It may cause deformation, discoloration, injury and unit failure.
- Do not put in places exposed to direct sunlight, wind and rain.
It may cause overheating, electric shock and fire due to ground leakage.
- Do not use in a location where a machine tool that produces flammable dust or sparks (such as a grinder or welder) is installed.
It may cause fire.
Miscellaneous

- Even after switching on, sometimes the air purifi er is inoperative or air does not come out. There may be “cracks” and scratches” in the power cord, or the unit has been moved which causes the operation to stop. There may also be unusual noise and vibration during operation. The unit may be deformed and unusually hot. There may be a burnt odor. If there are abnormalities aside from those mentioned, unplug the power cord immediately to prevent accidents and contact your dealer to request for checks or repairs.
These may cause fire due to electric shock, ground leakage or short-circuiting.
- Pay specific attention when the user of the air purifi er is the following: (Infants, children, the elderly, those who cannot control their body temperature)
When the body is exposed directly to the wind for a long time, health may be compromised.
- When carrying the air purifi er, unplug the power cord and drain the water in the water tank.
It may cause water leakage which may cause electric shock and ground leakage, and wets the furniture.

WARNING
Miscellaneous

- Do not put your finger or any other object (metal, paper, etc.) into the air inlet or outlet. It may cause injury, electric shock and fire.
- Do not drink or allow anyone to drink water from the water tank. Do not use for other purposes. It may cause a health threat or accident.
- Never attempt to disassemble, modify or carry out repairs by yourself. It may cause fire, electric shock or injury. (Contact your dealer for repairs)
- Do not operate detection switches (for the dust fi iter, auto self clean unit, and rear panel) using your fi ngers, rod, or tape.
Doing so may result in an injury, failure, or unexpected accident.
● Children should be supervised to ensure that they do not play with the appliance.

CAUTION
Moving the Air Purifi er

- Move only in sideways direction with the caster (to prevent from falling)
There are cases when the floor may be damaged based on the type of flooring. When the water tank has water contents, move slowly on an even floor to avoid spilling. Unplug the power cord from the AC outlet. - Lift the air purifi er when moving it along a mat, a fl oor susceptible to scratches, an uneven fl oor or a thick carpet.
It may damage the mat, floor and carpet and may cause unit failure and injury when tipped over. - When carrying the air purifi er, hold the handle fi rmly.
If you hold parts other than the handle, the unit may tip over and be damaged, and may cause an accident.
● Unplug the power cord from the AC outlet.
When moving the unit without unplugging, the power plug and power cord may be damaged.

- Do not carry the unit when it is filled with water.
· It may cause water leakage and injury.
- Carrying the unit while it is filled with water may cause the water to spill during operation.
- When carrying the air purifier, drain the water in the water tank and operate with the unit's set status.
- Do not touch, hold, or lift the moving flap.
It may cause an injury and unit failure.
When carrying the air purifier, hold the handle.
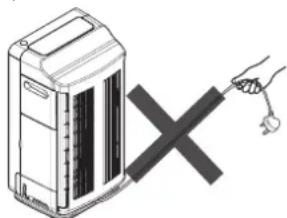
- Do not pull the power cord when moving the unit.
It may damage the power cord.
natural_image
Illustration of a portable heater with a hand holding a power plug and a black X symbol (no text or symbols present)Place of Use

- Do not use the air purifier near a wall that cannot be scrubbed, such as a white cloth-covered wall.
The air purifier will take in the surrounding air and may stain a wall near its air outlet.
- Do not use in storerooms for artworks and academic materials, or for other business purposes. It may deteriorate the quality of the stored products.
- Do not put water containers such as fl ower vases and fi sh bowls on top or near the unit.
Water deposited in the unit may cause electric shock, fire and unit failure.
- Do not use in locations near cooking appliances
It may cause deterioration of parts, electric shock and fire due to heat and oily smoke.
- Do not use on fl oors susceptible to scratches such as Cypress fl oors
It may damage the floor.
Safety Precautions (Continued)
CAUTION
Cleaning

● Perform panel and water tank removal and installation carefully.
It may cause water leakage and may cause injuries such as pinching your fingers.
- Hold the unit in place when pulling out the water tank and humidifying fi Iter so that it will not move.
Otherwise, the unit may suddenly move and cause water leakage and accidents.
- When cleaning, lay a soft cloth on the floor and place the unit and detached parts (panel, water tray, water tank, etc.) on it
Otherwise, it may scratch the floor.
- Attach the parts securely after cleaning
Do not use with the rear panel, pre-filter, dust filter, deodorizing filter, humidifying filter and any other parts detached. Otherwise, it may cause unit failure.
- Refi II the water tank with fresh water daily, and clean on a regular basis as instructed on “Cleaning”.
Continued use without regular cleaning may cause propagation of molds and bacteria due to dirt and water scale, which can result in unpleasant odors. In rare cases, it may cause health risk to users who have hypersensitive immune system. In this case, please seek medical advice.
- Only use fresh tap water (drinking water) for the water tank
Otherwise, it may cause deformation and deterioration of parts, unit failure or unpleasant odors due to propagation of molds and bacteria. Do not use hot water (over 40^ C), purified water, alkali ion water, mineral water, well water or other similar types of water. Also, refrain from putting organic solvents, chemicals, perfumes, air fresheners or other similar items in the water tank.

- When fi lling the tank with water, do not drop or subject the tank to impact
Otherwise, it may cause the water from the tank to leak and wet the floor. It may damage the float switch in the tank, which results in the water supply indicator not lighting up.
- Do not remove or subject the water tank's fl oat switch to excessive force.
The indicator will not light up even if the water tank is empty.
Miscellaneous

- Do not put water directly in the water tray
Doing so may cause water to overflow.
- Do not use the unit in case of water leakage
In case of water leakage, unplug the power plug from the outlet and request repairs.
- Do not allow the water to freeze
Otherwise, it may cause damage to the water tank and cause unit failure or electric shock. Whenever there is risk the water may freeze, drain the water tank.
- Do not move or stop the flap by hand or by any object
Otherwise, it may cause unit failure.
- If using the purifier around pets, do not subject any parts to urine and keep pets away from the power cord
Otherwise it can cause electric shock and fire. If there are damages, unplug and request repairs.
- Do not subject the glass panel (made of tempered glass) to impact
Although tempered glass is stronger and safer than normal glass, it can break when subjected to strong impact or force.
In case of scratches or breakage, stop using and immediately request repairs.
Refrain from directly touching the broken glass.

- Use only a genuine fi Iter for the Hitachi Air Purifi er
Other filters may cause unit failure.
- This appliance is not intended for use by persons (including children) with reduced physical, sensory or mental capabilities, or lack of experience and knowledge, unless they have been given supervision or instruction concerning use of appliance by a person responsible for their safety.
Cautions on Use
Do not operate with the fi Iter detached
Otherwise, no cleaning effect can be expected. It may also cause unit failure.
Do not block or touch the odor and dust sensors
It may reduce the sensitivity of the sensors.
Do not use in locations near cooking appliances
It may cause deformation and discoloration due to heat or oily smoke, unit damage or fire.
Place the purifier and the cooking appliance at least 1m apart from each other.
Ventilate closed rooms occasionally
The purifier does not have a ventilation effect (removal of carbon monoxide and other contaminants).
* The purifier cannot remove harmful substances in cigarettes (carbon monoxide, etc.).
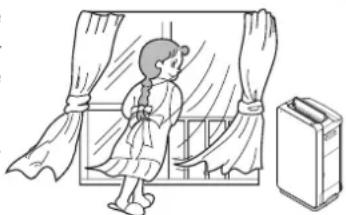
natural_image
Illustration of a child standing in a window with curtains and a door nearby (no text or symbols)Do not directly fan plants and animals
It may adversely affect them.
Refrain from placing any object on the unit and blocking the air inlet and outlet
Doing so may cause unit failure and injury.
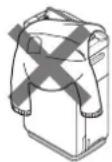
Refrain from moving (changing the orientation or lifting the unit, etc.) during operation
Moving the unit while in operation may cause the fan to hit the inner case, generate noise, pull and disconnect the power cord, and cause unit failure.
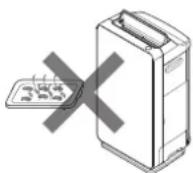
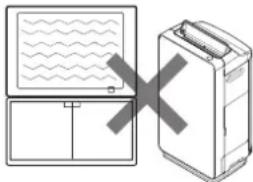
Do not use near television or radio
Doing so may interfere with broadcasts.
Please them at least 2m apart from each other.
The same applies for cordless phones and wireless microphones.
natural_image
Diagram showing a laptop with wavy screen and a box, next to a closed book with a cross symbol (no text or labels)Air Cleaner Deodorizing Performance
- The deodorizing fi Iter of the air purifi er does not remove all odors at once, but rather circulates the air in the room, removing odors gradually.
- The deodorizing fi Iter is disposable. The deodorizing performance of the fi Iter decreases with use.
- When the odor emitted from the vent becomes bothersome, soak and wash the deodorizing filter.→(P.E-41)
- When the deodorizing filter has absorbed strong odors or has been continually used in an odorous room, the odor components remain in the filter and unit, causing the odor to be emitted from the vent.
If this happens, you can decrease the amount of odor that remains in the unit by continuing to operate the purifi er while ventilating the room.
● The dust and other contaminants attached to the fi Iter and unit also contain odor components.
Periodically clean the fi Iter and unit so that odor is less likely to be emitted from the vent. (P.E-40 - E-42)
- If the odor emitted from the vent remains bothersome after cleaning, replace the fi Iter.→(P.E-43, E-44)
Preparations for Operation
CAUTION
● Movement with casters should be done slowly. The movement is only in sideways direction. (To prevent from falling)
● No cleaning effect will be experienced if the filter is set without detaching the plastic cover. It will also cause unit failure.
- Do not tip over or tilt the unit.
Setting Filter in Unit
- Setting procedure is the same with fi lter replacement. (Use only genuine Hitachi Air Purifi er fi lters.)
1
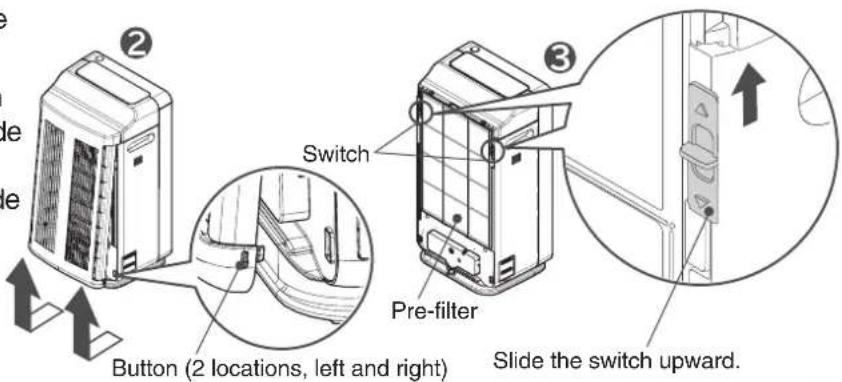
Remove rear panel and pre-filter
1 Place the unit on a flat and stable location.
② Press the buttons (2 locations on the left and right) on the lower side of the rear panel, slowly pull the pre-filter toward yourself, and slide it slightly upward to remove it.
③ Slide the switch upwards (2 locations) to release the lock.
4 Remove the pre-filter.
2
Remove the filter
(filter assembly and deodorizing filter)
① Remove the filter assembly from the unit.
② Remove the deodorizing filter.
③ Remove the filter from the plastic packaging.
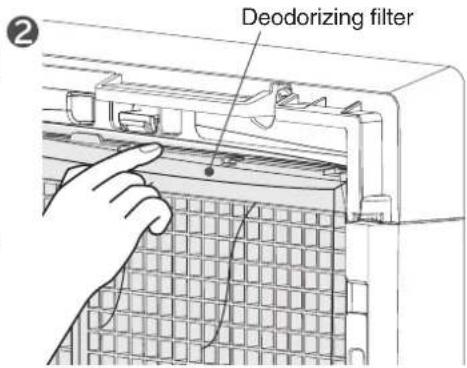
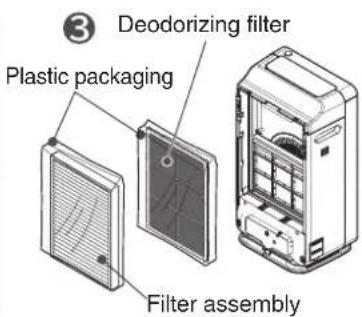
3
Install the deodorizing filter to the unit
① Set the filter at the deodorizing filter set position.
② While pressing the tabs on the unit, set the deodorizing filter and hook the tabs of the deodorizing filter with the tabs of the unit.
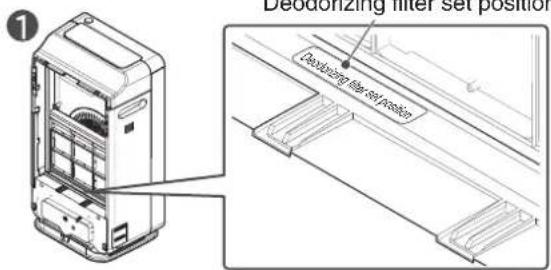
CAUTION
● The filter must be removed from the plastic packaging.
- Do not block the front side of the filter with cloth, paper or other materials.
Deodorizing filter tab
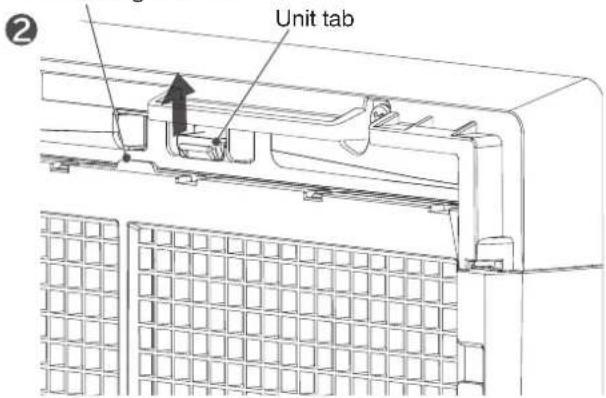
Install the filter assembly to the unit
CAUTION
- Do not put excessive force and deform the filter assembly. If the filter assembly is deformed, it will not be detected by the unit. “ [ ]” will be displayed on the temperature / humidity monitor, and the unit will not be able to operate. → (P.E45)
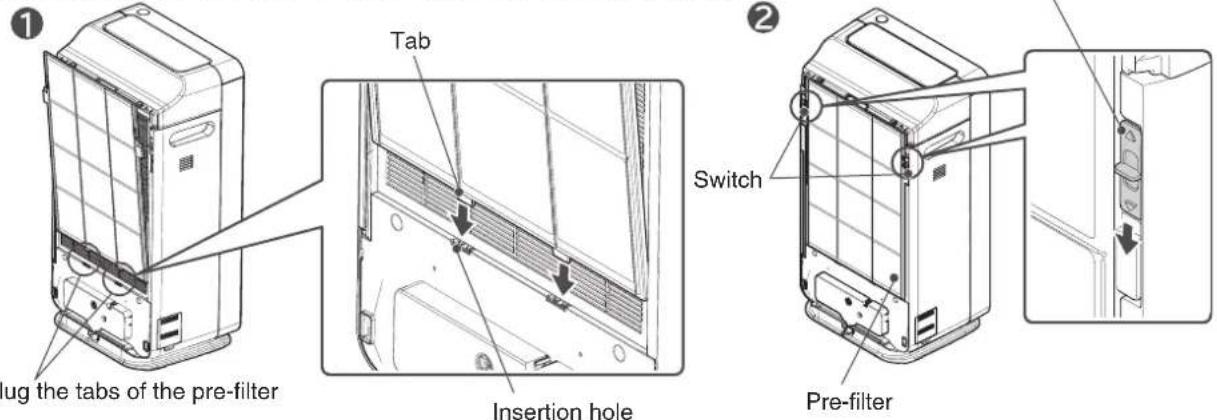
Install the pre-filter to the unit
① Securely plug the tabs of the pre-filter to the matching holes in the unit.
② Slide the switch downwards (2 locations) to lock.
③ Gently pull the pre-filter to make sure it is not out of place.
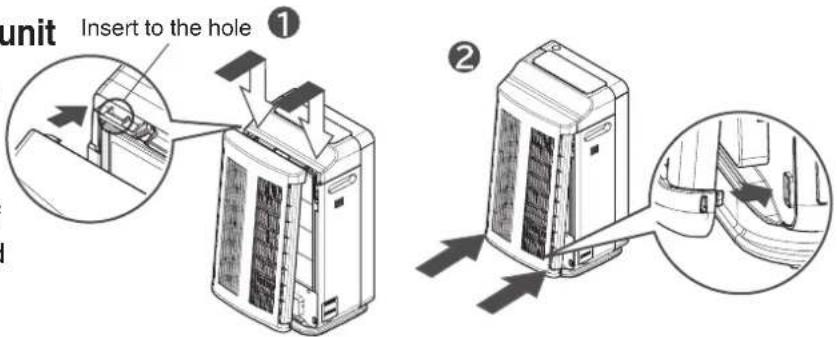
Attach the rear panel to the unit
1 Plug the tabs (2 locations) of the upper part of the rear panel to the matching holes in the unit.
② Gently push the bottom sides of the panel one after another, and close it securely until it clicks.
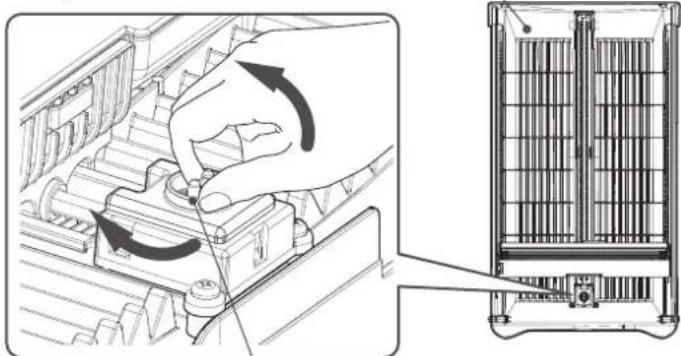
Note
- When the rear panel cannot be attached properly or "☐3" is displayed on the temperature / humidity monitor after the panel is attached
The drive connection part does not properly engage in some cases. In this case, remove the rear panel, slowly turn the drive connection part on the rear panel about 45 degrees to the left or right, and then attach the panel.
Rear panel
natural_image
Technical illustration showing a hand operating a mechanical component with arrows indicating rotation, alongside a close-up of the internal structure (no text or symbols)Drive connection part
Continued on next page
Preparations for Operation (Continued)
7
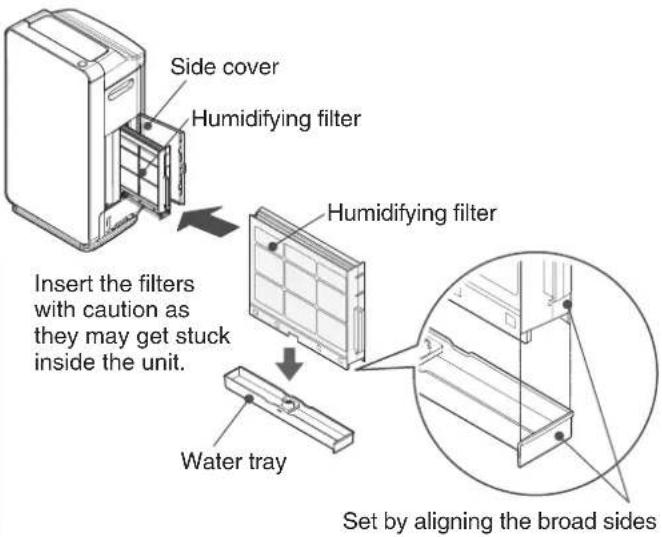
Check that the water tray set with humidifying filter is installed in the unit.
- If the humidifying filter is not installed, “ [2]” will appear in the temperature / humidity monitor and the unit will not operate. → (P.E-45)

CAUTION
- Do not forcibly open the side cover. Doing so may break the part.
- Securely insert the humidifying filter, making sure that it is pressed until it reaches the back of the unit. If it is not securely inserted, it may cause water leakage during operation.
Also, attach the filter while holding down the unit.
Filling Water Tank(When Running on "Humidify" and "Skin Moisture" Modes)
1
Remove the water tank from the unit
● Grab the water tank handle, and while slightly lifting it, gently pull the water tank.
CAUTION
- When removing the water tank from the unit, pull the water tank gently while pressing down the unit since a caster is attached on its base. (The caster does not have a stopper)
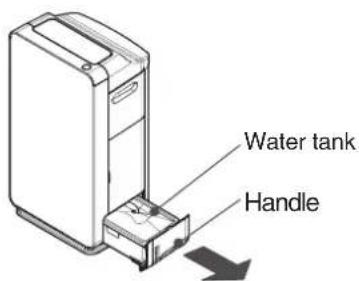
2
Remove the tank cover from the water tank
CAUTION
- Be careful not to injure your finger or nails when removing the tank cover.
- Make sure that the water tank filter is not subject to unnecessary force. If damaged, it will not be able to pump up water.
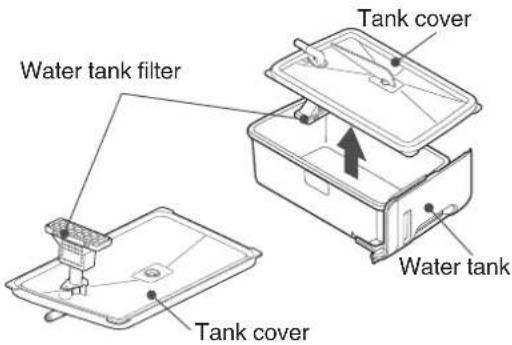
3
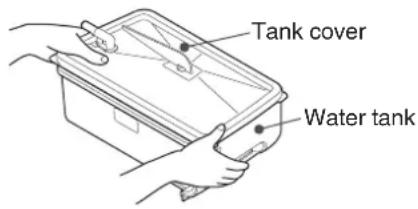
Rinse the water tank and tank cover with water and check the movement of the float switch.
- Rinse in running water for 2-3 times. Do not use detergent.
- Check if the float switch can move up and down.

CAUTION
- Do not to remove the float switch, or subject it to unnecessary force. Otherwise "Water Refill" will not be detected.
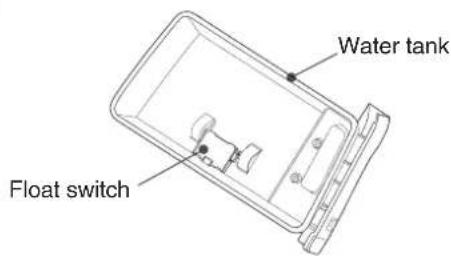
4
Put water in the water tank and place the tank cover.
- Fill the water tank, making sure that it does not exceed the line.
● Wipe the moisture around the water tank. - When filling the water tank away from the unit, attach the tank cover and hold it in place.

CAUTION
- If the water exceeds the fill line of the water supply, it may cause water leakage.
- Securely attach the tank cover. If it is not securely attached, it may cause water leakage during operation.
Make sure that the water does not exceed the line.
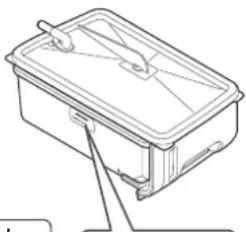
natural_image
Line drawing of a rectangular container with lid and handle, no text or symbols presentWater level
5
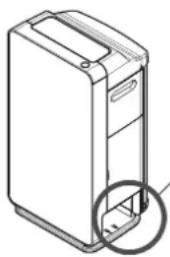
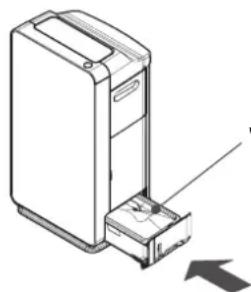
Install the water tank to the unit
- Wipe off water drops in the water tank holder (inner part) during installing the water tank.

CAUTION
- Securely install the tank, making sure that it is pressed until the back of the unit.
If it is not securely installed, it may cause water leakage during operation.
Also, hold down the unit to make sure that the unit will not move during installation.
CAUTION
- The water tank may be heavy when filled with water. Be careful not to injure your fingers, nails, or your back while handling.
natural_image
Line drawing of a computer tower case with a magnified inset showing internal components (no text or symbols)Water tank holder
natural_image
Diagram of a desktop computer with an open access port and directional arrow (no text or symbols)Water tank
Installation
- A caster is attached at the base of the unit, thus it should be set on an even, stable and sturdy floor. (No stopper attached to the caster)
- Avoid places near heating or cooling equipment and other similar equipment, and choose a location with a good air circulation.
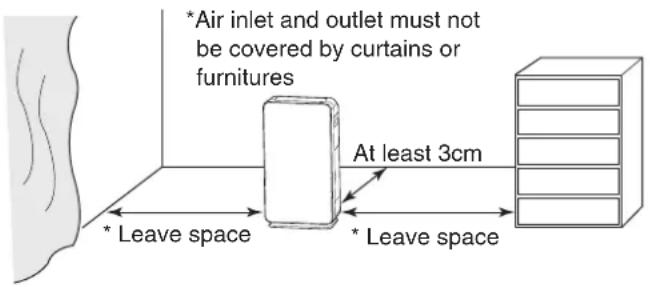
- Keep the rear at least 3cm away from the wall. Depending on the operating environment, walls or floors near the outlet may be stained as the unit draws in air. If this is a concern, move it from its current location and clean the surrounding walls and floors regularly.
- Be sure to provide space around the sides of the unit so that the inlets and vents are not blocked by curtains or furniture.
- Be careful not to pull or pinch the power cord.
- Leaving the unit at the same place for an extended period of time may leave stains on the walls and floors. When cleaning the unit, move it to another place and also include cleaning the floor.

WARNING
- Do not place on shelves, desks, tables or other similar places
Unit may fall due to vibration or tilting, and may cause injury, water leakage and electric shock.
● Using the unit in a tilted state may cause water leakage. - Moving the unit with the caster can be done on a sturdy and even floor. To move the unit on a mat, carpet, or places with uneven surface, carry the unit by its handle.
Operation
Starting Operation
1
Securely insert the power plug to the outlet
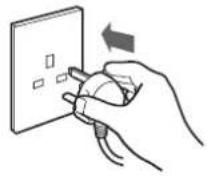
2
Press the

power button

Operation will start, and indicator will light up.

Pressing the ⏻ power button while the unit is operating will dim the indicator and stop the operation of the unit.
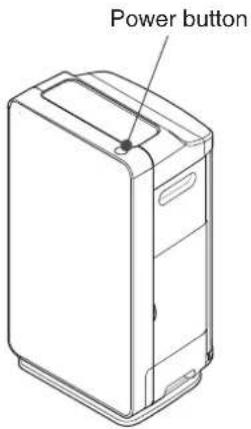
- After all indicators have light up at once, "Air Purify" and "Auto" will light up.
- For the first 3 minutes, the unit will check and store the condition of the room air.
During that time, the "Air Sensor" will flash a green light.
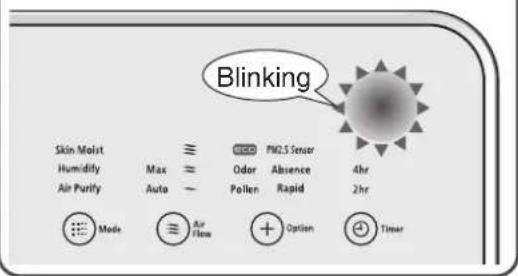
● "Air Purify" mode is set as a factory default.
- From the second use onward, the memory function enables operation based on the saved status. (P.E-28)
Standby Power Consumption
- As long as the power plug is inserted in the outlet, the unit consumes approximately 3W of power, even if the unit is not in use.
(Unplug from the outlet if the unit will not be used for an extended period of time.)
Operation (Continued)
Switching Touch Operation Panel Display
- Use this to adjust the unit to your preferred setting.
Long-press display °C/% Display for about 3 seconds and select touch operation panel Dimmer Type 1/2/Off

The touch operation panel display will switch at each press.
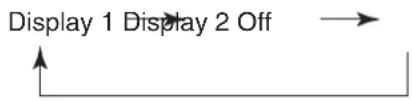
flowchart
graph TD
    A["Display 1 Display 2 Off"] --> B["Right Arrow"]
(When switching from Off to Display 1, the buzzer will ring twice (beep, beep) and the display will blink once.)
- If the lights in the touch operation panel display are turned off, tap the MENU and operate after the panel is displayed.
(Tapping the MENU again turns off the indicator of the touch operation panel display.)
Display Contents of the Operation Panel
| Operation Panel Display | Display Contents Example | |
| Display 1 | Select operation mode and airflow rate by tapping the panel.For power saving, the display and operation panel other than the notifi cation display and the air sensor will turn off approximately one minute after the unit stops operating. | 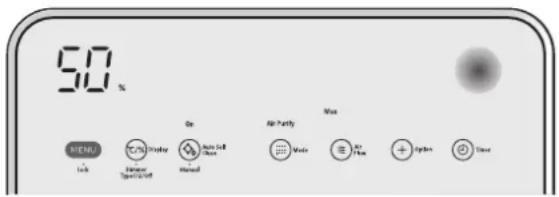 (When selecting Air Purify / Max) (When selecting Air Purify / Max) |
| Display 2 | When all indicators are on, tapping the operation panel and selecting operation mode, airfl ow rate or other similar buttons will make the display light of the selected buttons brighter.* The display may not be clear to look at when the unit is placed near windows with direct sunlight, and other similarly bright places. | 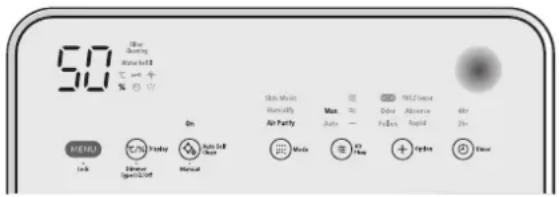 (When selecting Air Purify / Max) (When selecting Air Purify / Max) |
| Off | Display is the same as Display 1.The display, operation panel, notifi cation dis-play, and clean monitor go off approximately one minute after the unit stops operating. | 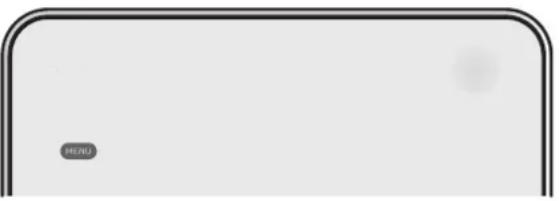 (When indicators are dimmed) (When indicators are dimmed) |
- In this instruction manual, the following examples are described in Display 1.
Selecting Operation Mode (Basic Operations)
● There are three operation modes to choose from. Use these modes according to your preference.
● The fan will not stop while the unit is operating in all operation modes.
(The fan may stop if the unit is set to eco saving operation mode. → (P.E-23))
● The air purifying feature works in all operation modes.
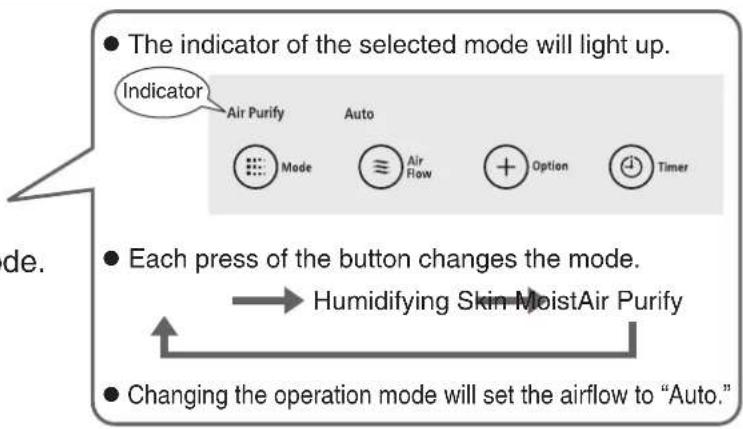
- Switching the operation mode will set the airflow to "Auto".
Operation Mode Patterns and Tips for Selection
| Operation Mode | Operation Pattern and Selection | Flap Direction |
| This operation mode is fit for normal use.· Odor and dust sensors will detect the level of room air contamination. Afterwards, the unit will switch the airflow rate automatically.· During “Auto” operation, the unit operates from silent to high airflow.· The humidifying operation is not performed. | Upward | |
| Controls the room humidity to about 50%.· During “Auto” operation, the unit operates from silent to high airflow. | Diagonal | |
| Increases room humidity and controls it to about 60%.· During “Auto” operation, the unit operates from silent to high airflow. | Diagonal |
Touch

Mode

Each touch changes the operation mode.
Switching Airflow Rate
● Each time ≈ Air flow button is pressed while the unit is operating, the mode switches in the following order.
| Operation Mode | Airflow |
| Air Purify | Auto → Max → ~ “Silent” → ≈ “Medium” → ≈ “High” → Auto → ... |
| Humidifying | |
| Skin Moist |
Useful Features
Operating in Option
Pollen
Once every hour, room air will be forcefully circulated in "High" airflow rate. Sensitivity of odor and dust sensors will increase, and depending on the level of air contamination, the unit will operate in either "High" or "Medium" airflow rate. The flap direction will be diagonal.
Use this when worried about pollens getting into the air.
Odor
Once every hour, room air will be forcefully circulated in "High" airflow rate. Sensitivity of odor sensor will increase, and depending on the level of air contamination, the unit will operate in either "High" or "Medium" airflow rate.
Use this regularly for environments with strong odors such as garbage, drainage, pet and other similar odors.

(Eco Saving Operation)
The unit automatically stops operation when the air becomes clean, saving electricity cost. → (P.E-23)
Rapid
For the first hour, the unit operates in “High” airflow rate, and depending on the level of air contamination, the unit will operate in either “High” or “Medium” airflow rate. For approximately 8 hours, room air will be forcefully circulated in “High” airflow rate for approximately 10 minutes once every hour. Sensitivity of odor sensors will increase, and depending on the level of air contamination, the unit will operate in either “High” or “Medium” airflow rate. Afterwards, high-speed will be deactivated and the airflow rate will return to its previous “Auto” operation mode.
Use this when grilling, cooking hot pot, or in similar instances where the room is exposed to a great deal of strong odor.
Absence
The unit will operate on “Max” airflow rate for the first five minutes (flap direction: upward), then it will operate for about 55 minutes in “High” airflow rate (flap direction: swing (30 minutes) upward), and the unit will stop operating afterwards.
(When in “Humidify” operation mode, the airflow rate is set to “Auto” depending on the humidity. The fl ap direction will be diagonal → (P.E-21))
Use this to clean the room air while away.
PM2.5 sensor
Switch to sensing that is suitable for small particles, like PM2.5 (general term for micro particles below 2.5 m).
→ (P.E-24)
Touch the

Option button
① You can select Option while operating in “Air Purify” and “Humidify” modes.
- Cannot switch while it has stopped or while operating "Skin Moist" mode.
② The Quick Cycle will be switched at each touch.
→ Pollen → Odor → eco Rapid AbsenceNo Display (Clear) PM2.5 sensor
(If it returns to No Display (Clear), it is in [Auto] airflow)
Note
- “PM2.5 sensor” can be selected only by touching an option during the operation in “Air Purify” mode. (It cannot be selected from “Humidify” mode.)
Eco Saving Operation
● The unit automatically stops operation when air becomes clean, saving electricity cost.
Also, if this status continues for longer than 8 hours, the unit will automatically stop operating.
(When in "Humidify" operation mode, the unit will not automatically stop depending on the humidity. → (P.E-21))
* Comparison of power consumption of automatic operation and eco saving operation in air purification mode.
Auto operation mode: 6.6wh, Eco Saving operation mode: 5.7wh Hitachi investigation
Normal Auto Operation
When the air is clean, the unit will continuously operate in "Silent" airflow rate and not stop.
Eco Saving Operation
When the air is clean and “Silent” airflow rate operation continues for 10 minutes or longer, the fan stops for about 50 minutes and the unit intermittently operates using “Silent” for about 10 minutes.
If this status continues for longer than 8 hours, the unit will automatically stop operating.
* During eco saving operation, the level of air contamination is detected by the odor and dust sensors. When the sensors detect odors and dust, the airflow rate will switch depending on the level of air contamination.
When the air is clean and the “Silent” airflow rate operation continues for 10 minutes or longer, the unit will start intermittent operation again.

Note
● Fan may stop, and temperature / humidity monitor display may change depending on the effect of the operation.
Useful Features (Continued)
PM2.5 Sensor
- Change into a sensor that is suitable for small particles, like PM2.5 (general term for micro particles below 2.5μm). The level of contamination in the air will be detected by the dust sensor, and the unit will operate automatically between “Medium” to “Max” airflow rate. (Odor sensor control will not be performed)
Note
- Operation modes other than "Air Purify" cannot be set.
● While operating in PM2.5 sensing, the air sensor will light up, then enlarge and shrink slowly. - For the first 90 seconds of operation, the unit will operate in "Max" airflow rate (air sensor: red).
● The flap direction will be diagonal. - It will not respond to the switching of sensor sensitivity. (P.E-29)
Switching Between Temperature / Humidity Monitor Display
● Temperature / Humidity monitor display alternately shows both temperature and humidity.

The display will switch between humidity (%) and temperature (^) each time the button is touched.
Humidity (%) Temperature (°C)

Stopping Operation Using Off-timer
- Set the off-timer to automatically stop the unit after the set operation time.


At each touch the following display will be appear on the display for setting.
No Display → 2hr → 4hr
| Display Setting Description | |
| No Display | Not Set |
| 2hr | Automatic stop after about 2 hours of operation |
| Automatic stop after about 4 hours of operation4hr | |
● Prevents accidental operation by children through restricting the operation.
● This can be set while the unit is operating.
The same process goes for unlocking the unit.
1
Long-press MENU for about 3 seconds
Lock
- After long-pressing MENU for about 3 seconds, a buzzer will ring once (beep) and the child lock indicator will lit.
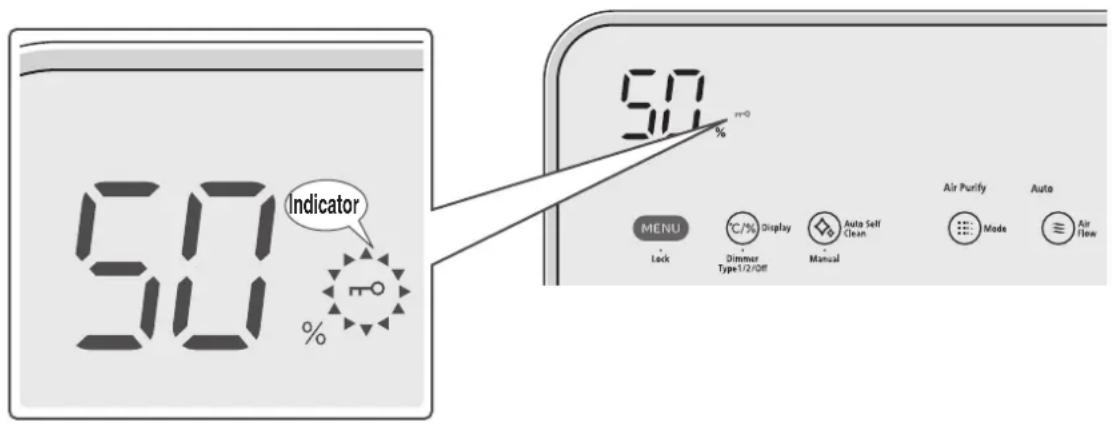
- To cancel the child lock, long-press MENU for about 3 seconds. Then the buzzer will ring twice (beep, beep), and the child lock will be canceled.
- Each time MENU is long-pressed for about 3 seconds, the child lock be set or cleared. The light will go off when the child lock is canceled.
Note
- After setting "Lock", no other buttons can be used except the Ⓐ power button and MENU
- In the event of a power interruption, restoring the power does not deactivate the child lock setting, even after
pressing the Ⓐ power button and after removing the power plug from the outlet. Hold four seconds and cancel the settings.
Useful Features (Continued)
Setting and Running Auto Self Clean (Pre-fi Iter Automatic Cleaning)
● The Auto Self Clean feature cleans the pre-fi Iter (stainless steel pre-fi Iter).
How to Set Auto Self Clean
Touch

Auto Self Clean
to set the timer.

At each touch the following display will be appear on the display for setting.
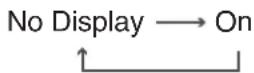
| Display Setting Description | |
| No Display | Auto Self Clean is not set. |
| On | Auto Self Clean is set. |
- By factory default, Auto Self Clean is not set.
CAUTION
- When using the air purifier with the auto self clean unit removed, do not set Auto Self Clean.
Auto Self Clean Operation
In the following cases, the pre-fi Iter is automatically cleaned:
- When operation is stopped by pressing the ⏻ power button and the total operation time has exceeded 48 hours.
(Cleaning is not performed when operation is stopped by the off-timer, Eco Saving, or Absence operation cycle.)
- When the unit has been continuously operated for over 48 hours.
If the sound of the Auto Self Clean operation is loud in a quiet environment, such as at night, operate Auto Self Clean manually when the operation sound will not be a concern. Then operate Auto Self Clean at that same time thereafter.
(When Auto Self Clean ends, the unit resumes operation in the former operation mode.)
* When Auto Self Clean is performed, the operation time is reset.
CAUTION
- When setting Auto Self Clean, be sure to attach the auto self clean unit. (P.E-37)
- If the auto self clean unit is not set, operating sounds will get louder for a few minutes for detection. This is not a malfunction.
- Do not remove the rear panel during the Auto Self Clean operation.
Doing so may cause failure.

CAUTION
- During Auto Self Clean operation, do not insert your finger or any other object into the unit from the rear panel.
Doing so may cause injury or failure.
Performing Auto Self Clean manually
- When you want to clean the pre-fi Iter immediately, you can do so manually by long-pressing Manual Auto Self Clean for about 3 seconds.
(Use this when you are concerned about the dust on the pre-fi liter or when Auto Self Clean is not set.)
- The Cleaning indicator lights up during the Auto Self Clean operation. While the air purifi er operates at "medium" power, the auto self clean unit moves up and down repeatedly to clean the pre-fi iter (approx. 6 to 8 minutes).
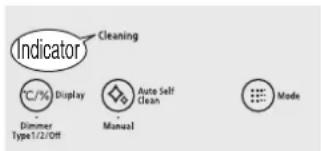
- If you want to temporarily stop the Auto Self Clean operation, touch 📋 Auto Self Clean .
The Cleaning indicator fl ashes and the operation pauses. Touch again to restart operation.
- The Auto Self Clean operation can be stopped by pressing the ⏻ power button.
If Auto Self Clean operation is stopped before completion, the auto self clean unit stops at the current position. The auto self clean unit returns to its original position (below the main unit) in the next Auto Self Clean operation.
Notices and requests regarding the Auto Self Clean operation
- If the Empty Dust indicator lights up, discard the accumulated dust and clean the auto self clean unit. The Empty Dust indicator lights up after approximately one year of operation (when the product is operated continuously) as a guide for cleaning. (P.E-36 - E-39)
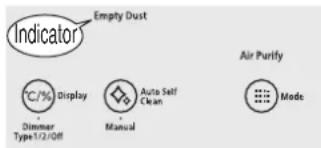
- The amount of dust differs depending on the environment that the product is used in. Check the dust box of the auto self clean unit frequently, discard dust, and clean the unit even when the Empty Dust indicator is not on. (P.E-36 - E-39)
For example, when used in a room with a lot of cotton dust (e.g. bedroom), the dust box may become full very quickly.
- Clean the auto self clean unit, rear panel, and other parts of the main unit frequently because dust and dirt get on them. (P.E-38, E-39)
- Dust attached on the pre-fi iter may not be removed by the brush of the auto self clean unit depending on the type and amount of dust and some of dust remains on the pre-fi iter. Dust may also attach to the back face of the pre-fi iter.
Check for remaining dust and clean the pre-fi iter on a regular basis.→(P.E-40)
- Tar from cigarettes, oily smoke from cooking, and fi ne dust particles are diffi cult to remove. Check dirt on the pre-fi liter and wash it with water on a regular basis.→(P.E-40)
● During Auto Self Clean operation, a whirring or rattling sound is generated.
Memory Function / Monitor / Sensors / Auto Detection
Memory Function
- When Ⓐ power button is turned on, the unit operates the previous operation mode set prior to turning off.
Air Sensor
- The level of air contamination detected by the odor and dust sensors is indicated by different colors.
Display Color : Green Orange Red
Dirtiness Level: Clean ←→Dirty
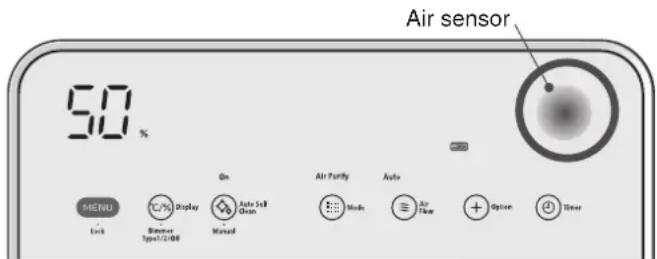
Note
- When the unit is placed in a location where contamination is difficult to detect, or when the sensor needs cleaning, the display may not change. (P.E-41)
● While operating in PM2.5 sensing, the air sensor display lights up and then blinks slowly.
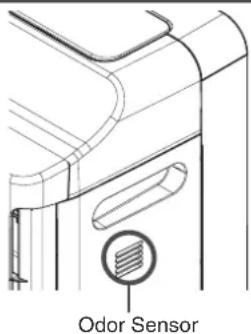
Odor Sensor
● The sensor detects odors in the air such as cigarette smoke or pet odors.
Even if you think the air is clean, the unit may continue the operation if the odor sensor detects any gas component that has not been removed by the fi Iter.
Also, any of the following may be detected by the odor sensor.
- Combustion gases from heating appliances during use, alcohol, odor of perfumes or cosmetics used in beauty parlors or aesthetic salons, sprays, vapors, abrupt temperature changes, etc.
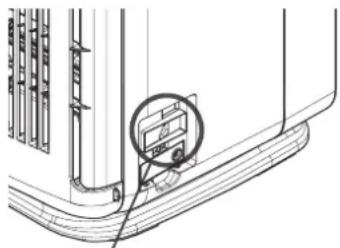
Dust Sensor
- The dust sensor is capable of sensing dust in the air such as cigarette smoke, house dust, pollen, etc.
The dust sensor may fail to sense dust stirred up when you lay out or put away bedding, which contains significantly fewer contaminants than cigarette smoke, etc. In such a case, the air sensor display may appear to be different from the apparent dust in the air.
● The dust sensor may not function properly if the sensor is dirty.
Carry out periodical cleaning of the dust sensor and the parts around it. →(P.E-41)
Cover is removed
natural_image
Technical line drawing of a mechanical assembly with a magnified inset showing a component detail (no text or symbols)Dust sensor
Temperature / Humidity Monitor (Temperature / Humidity Sensor)
● The values detected by the internal temperature / humidity sensors during operation will be displayed.
● The temperature / humidity monitor should be taken as a guide only.
- The indication may differ from thermometer / hygrometer readings. Also, there is a great difference in the display and the actual temperature and humidity when turning the unit on and switching airflow rate.
- Humidity will change as temperature changes.
- Temperature and humidity may differ between places with good air flow and those with bad air flow.
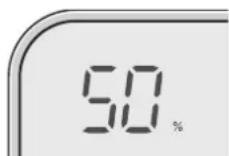
The estimated current temperature and humidity are displayed and updated every minute in increments of 1^ C and 1%.
(Displays “Lo” when the temperature is at -1°C or lower, and “Hi” when at 41°C or higher. Humidity is displayed between 20-85%. )
Vibration Sensor
● The sensor detects a fall and impact on the unit. (Installed inside the unit)
● The operation may stop due to tilting of the unit, strong vibrations or impact of a collision.
When the operation stops, “ 8 ” is displayed on the temperature / humidity monitor and the unit can no longer operate. →(P.E-45)
Auto Detection
- The air purifi er performs automatic operation by detecting room air contamination using the “Odor Sensor” and “Dust Sensor”, and room air temperature and humidity using the “Temperature / Humidity Sensor”.
During the first 3 minutes after the power is turned on, the unit will check the air condition of the room.
● The purifi er operates even while it checks the air condition of the room.
During this time, the "Air Sensor" fl ashes green.
- After checking the air condition, the “Air Sensor” will display the room air contamination using the “Odor Sensor” and the “Dust Sensor”.
- If you plug in the power cord in an environment containing contaminated air, the sensitivity of the sensor may be reduced.
To clean the air of the room, operate in "High" or "Max". Or open a window and unplug the power cord from the AC outlet when ambient air is clean and plug it back in after 10 minutes.
Adjusting Sensory Sensitivity Setting
- Sensitivity of the “Odor Sensor” and “Dust Sensor” which performs automatic switching of airflow rate can be adjusted in 3-step fashion.
You can adjust the sensor sensitivity setting as desired. - The "Odor Sensor" and "Dust Sensor" are similarly adjusted.
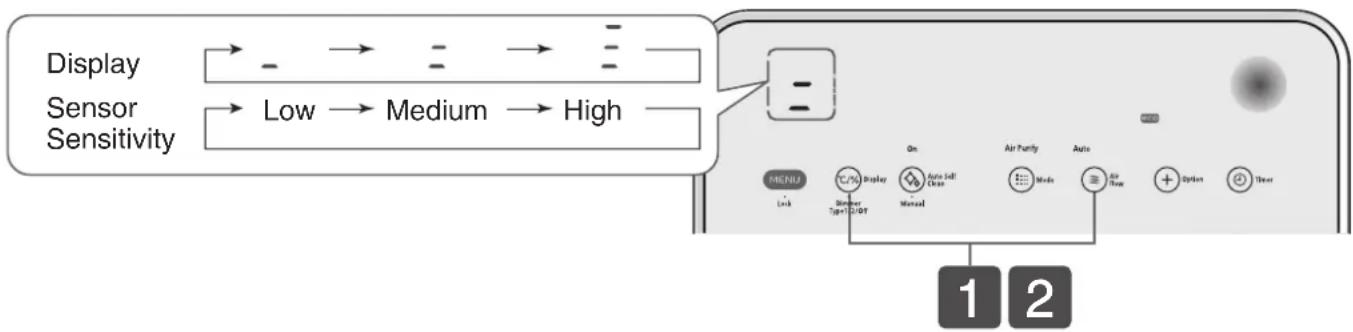
flowchart
graph LR
    A["Display Sensor Sensitivity"] --> B["Low"]
    B --> C["Medium"]
    C --> D["High"]
    D --> E["Main Control Panel"]
    E --> F["Menu: Display, Manual, Air Partly, Mode"]
    F --> G["Air Throw, Option, Thier"]
    style A fill:#f9f,stroke:#333
    style E fill:#ccf,stroke:#333
    style F fill:#cfc,stroke:#333
    style G fill:#fcc,stroke:#333
1
While pressing ℃/% Display, long-press ≈ Air flow for about 3 seconds
- The current sensitivity is indicated and displayed. (Factory setting is =)
2
While the sensitivity is being displayed (about 10 seconds), continue long-pressing ≈ Air flow for about 3 seconds, while pressing ℃/% Display once more.
- The sensitivity display will change from
3
Furthermore, when switching sensitivity, repeat procedure 2.
When repeating, the sensitivity display will switch like this ·s
- About 10 seconds after the sensitivity display has been switched, it will disappear and the selected sensor sensitivity will be set.
Note
- Switching the sensor sensitivity is not supported in the "PM2.5 Sensor" cycle. (P.E-24)
Cleaning

WARNING
- Do not stop operation by unplugging the power plug. Otherwise, it may cause fi re, electric shock or unit failure.

CAUTION
- Do not splash water on the unit. Doing so may cause a unit failure.
- Do not use volatile solvents, such as gasoline, thinner, benzene, wax, kerosene, alcohol, etc. or polishing powder, or detergent (used for kitchen or laundry). Such chemicals could cause deformation, discoloration, damage or removal of print labels.
- When using a chemically treated cloth, follow safety instructions.
- Do not use a dryer or heater to dry the unit. Heating could cause deformation, discoloration, damage or removal of print labels.
- Lay a soft cloth or similar material beneath and around the purifi er body to protect the fl oor against scratches and from getting wet.
- Do not tilt or tip over the unit.
When the Filter Cleaning Indicator Comes On
- The indicator lights up approximately 240 hours of performing the humidifying operation after the reset. (Guide for cleaning)
- The humidifying system employed in this product is the evaporating type that produces moisturized air by passing an air stream through the humidifying filter.
- Depending on the application environment, dirt or odor may adhere to the humidifying filter even when the "Humidify" or "Skin Moist" mode is not activated. Please clean immediately.
- When "Humidify" or "Skin Moist" mode is used, be sure to use tap water for the water tank.
- Although the humidifying filter has been treated against bacteria and mold, it may get slimy or moldy, or may become discolored to pink, red, green, brown, black or gray after a short period of use depending on the quality of tap water used, and the application environment. (Discoloration has no effect on humidifying performance.)
- It is recommended that the filter be cleaned as often as practicable regardless of whether the "Filter Cleaning" indicator lights up or not. Early replacement of the filter is recommended if it exhibits any of the following conditions despite periodic cleaning.
- Heavy dirt is present, attached hardened water scale is difficult to remove, bad odors, serious damage or deformation
- If you will not use the "Humidify" or "Skin Moist" mode, dispose any water remaining in the water tray and water tank. Failure to do so may cause dirt build-up or discoloration.
- If you continue to use the humidifying filter without cleaning it, the water scale attached to the filter will solidify and possibly come out from the vent.
1
Check if the operation has stopped before removing the power plug from the socket
● While operating, press the

power button and stop operation.
- Once you unplug the power cord, the humidifying operation time will be reset and the "Filter Cleaning" indicator will turn off. (If the "Filter Cleaning" indicator is off, the humidifying operation time will not be reset when you unplug the power cord.)
2
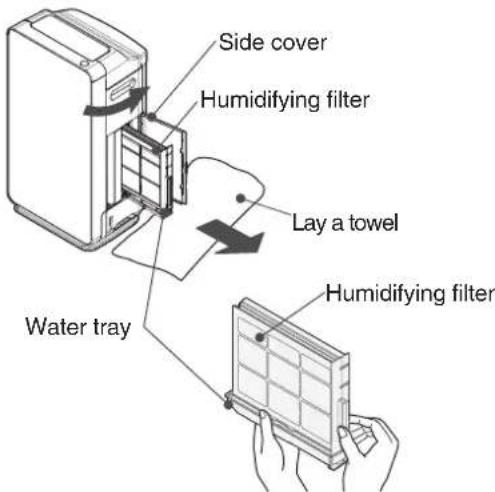
Open the side cover and remove the humidifying filter with the water tray
- There might be some water remaining in the water tray. Slightly pull out the water tray, hold it levelly and take it out. It is also recommended that you lay a towel.
CAUTION
- Do not forcibly open the side cover. Doing so may break the part.
- Since the bottom part of the unit has casters, hold down the unit while removing the water tray. (The casters do not have stoppers)
● Water might leak if there is remaining water in the water tray and it is tilted.
3
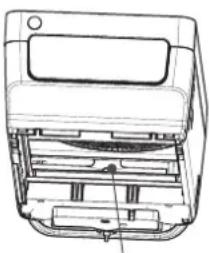
Clean the water tray mounting of the unit
1 Remove the rear panel, pre-filter, and filter assembly/deodorizing filter.
② Wipe off using a soft cloth.
If it is really dirty, clean using an old, soft toothbrush.
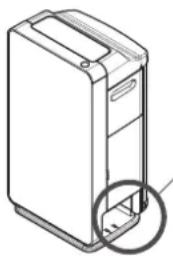
③ Using a towel, wipe off water droplets that have fallen inside the water tank holder (inner side).
natural_image
Technical line drawing of a device internal structure with no visible text or symbolsWater tray mounting
natural_image
Line drawing of a computer tower case with a magnified inset showing internal components (no text or symbols)Water tank holder
4
Remove the humidifying filter from the water tray
CAUTION
- Remove slowly as the water may splash out.
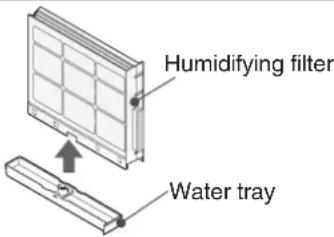
5
Clean the humidifying filter
1 Submerge the humidifying filter in any of water, lukewarm water or water with neutral kitchen detergent for 30 minutes or longer.
(If there is an unusual amount of dirt, remove the dirt by rubbing it off with your finger, etc.)
- Follow the precautions and usage described on the neutral kitchen detergent when using it. (Use only neutral kitchen detergent.)
② Replace with fresh water, and wash and rinse the humidifying filter by shaking it. (Repeat 2-3 times)
- When using neutral kitchen detergent, rinse the filter so as not to leave any detergent particles.
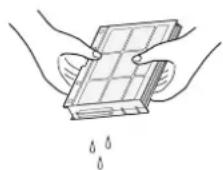
③ Shake lightly to remove water. (Until water is no longer dripping)
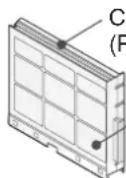
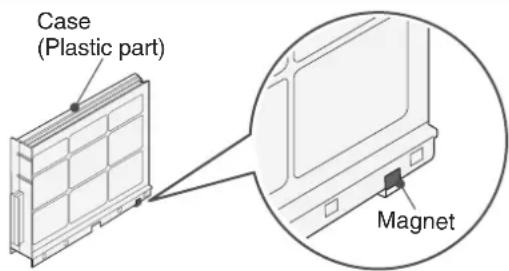
se
astic part)
Humidifying filter
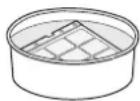
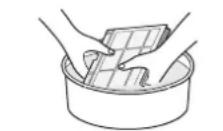
CAUTION
- Do not remove the humidifying filter from its case.
- A magnet is attached to the case in order to detect the humidifying filter.
Do not remove.
Keep away watches and other objects that may be affected by the magnet while cleaning.
Remove metal objects that were magnetized.
Use citric acid when it becomes hard to remove water scale
① Dissolve about 20g of citric acid in 3L of lukewarm water (40°C below) and soak the filter up to 30 minutes and wash.
(Clean off by scrubbing lightly with your fingers)
② Replace with fresh water, and wash and rinse the humidifying filter by shaking it. (Repeat 2-3 times)
③ Shake lightly to remove water.
(Until water is no longer dripping)
Use citric acids that are sold in pharmacies.
CAUTION
- Although citric acid is a food additive and considered harmless in terms of food hygiene, keep it out of the reach of children.
Continued on next page
Cleaning (Continued)
5
(Continued)
CAUTION
- When you use the product for a longer period, white or brown water scales may attach to the inner part of the water tray or on the surface of the humidifying filter.
Water scales are residue minerals from tap-water that have not evaporated. If you continue to use the filter without cleaning it, the water scale will come out from the vent in the form of a white powder, or solidify and become difficult to remove, resulting in lower humidifying performance. In such a case, replace the filter. - Depending on the quality of tap water used, water scale may attach quickly. In such a case, clean the filter on a frequent basis.
- Rinse the whole case without removing the humidifying filter. (It might become deformed or damaged if removed.)
- Do not deform the humidifying filter by scrubbing it with a brush or using excessive force. (This will damage it and decrease its performance.)
● A new humidifying filter may smell at the beginning. This is normal. - Replace the filter early if it is damaged. (P.E-33)

CAUTION
- Do not attach the humidifying filter to the unit if it has a lot of water. This might cause the water to leak.
6
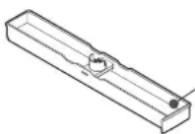
Clean the water tray
● Wash the water tray to remove dirt.
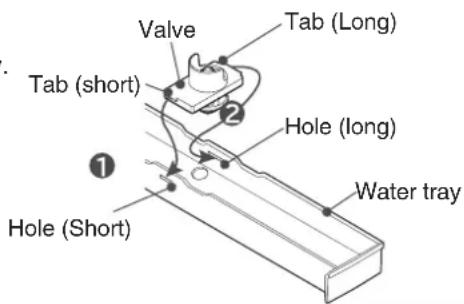
- If the valve is dirty with water scale, use an old, soft toothbrush to clean off the dirt.
- If the water tray valve has come off, attach the valve.
① Insert the valve tab (short) into the hole (short) of the water tray.
② Insert the valve tab (long) into the hole (long) of the water tray.
③ Check that the spring makes the valve return to its original position when the valve is pressed from below.
Water tray
7
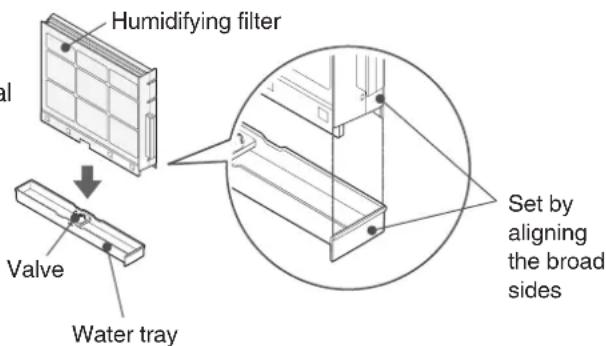
Set the humidifying filter
- Insert the humidifying filter in the water tray.
- Check that the spring makes the valve return to its original position when the valve is pressed from below.

CAUTION
- Insert the humidifying filter securely until it clicks. If it is not securely inserted, it may cause water leakage during operation.
8
Attach the water tray with the humidifying filter to the unit
- If the humidifying filter is not attached, “[2]” will be displayed on the temperature / humidity monitor, and the unit will not operate. →(P.E-45)

CAUTION
- Securely insert the humidifying filter, making sure that it is pressed until it reaches the back of the unit.
If it is not securely inserted, it may cause water leakage during operation.
Also, attach the filter while holding down the unit.
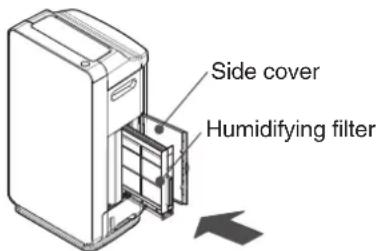
Insert the filters with caution as they may get stuck inside the unit.
9
Close side cover
10
Insert the power plug into the outlet and
press the

power button.
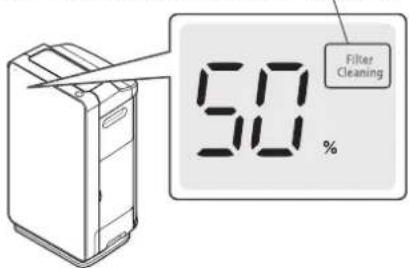
- After cleaning, make sure that the "Filter Cleaning" indicator is not lit. (The humidifying operation time is reset when the power cord is unplugged only if the "Filter Cleaning" indicator is lit.)
Make sure that the indicator is not lit.
Replacing Humidifying Filter
- The humidifying fi Iter is a disposable part. Performance of the fi Iter decreases with use. Replace it after 120 months of use as a guide (cleaning is necessary on a monthly basis).
- Early replacement of the filter is recommended if it exhibits any of the following conditions despite periodic cleaning. Heavy dirt is present, attached hardened water scale is difficult to remove, bad odors, serious damage or deformation Depending on the quality of tap water used, the application environment (level of air contamination), and the selected operation mode, the humidifying filter may degrade considerably early.
Humidifying Filter Replacement
Model: EPF-KVG900KF
■ Dispose of the humidifying filter according to local regulations.
When the Water Refi II Indicator Comes On
- When humidify or skin moisturize mode is used, the water supply indicator will light up even if there is remaining water (approximately 20mm from the bottom of the water tank).
1
Check if the operation has stopped before removing the power plug from the socket
● While operating, press the

power button and stop operation.
2
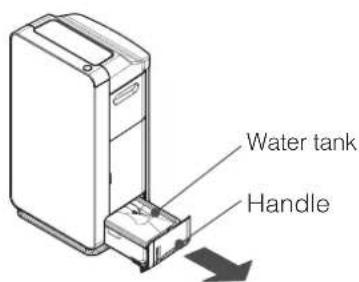
Remove the water tank from the unit
- Grab the water tank handle, and while slightly lifting it, gently pull the water tank.
CAUTION
- When removing the water tank from the unit, pull the water tank gently while pressing down the unit since a caster is attached on its base. (The caster does not have a stopper.)
Cleaning
3
Remove the tank cover from the water tank
CAUTION
- Be careful not to injure your finger or nails when removing the tank cover.
● Make sure that the water tank filter is not subject to unnecessary force. If damaged, it will not be able to pump up water.
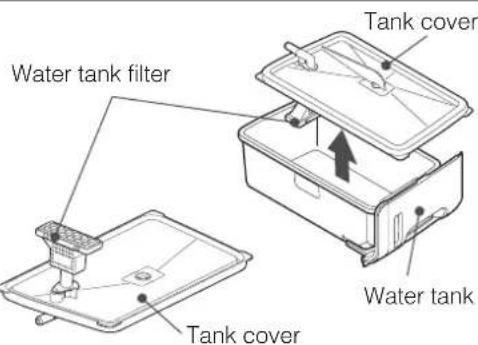
Continuation on the next page
Cleaning (Continued)
4
Rinse the water tank and tank cover with water and check the movement of the float switch.
- Rinse in running water for 2-3 times. Do not use detergent.
- Check if the float switch can move up and down.

CAUTION
- Do not to remove the float switch, or subject it to unnecessary force.
Otherwise "Water Refill" will not be detected.
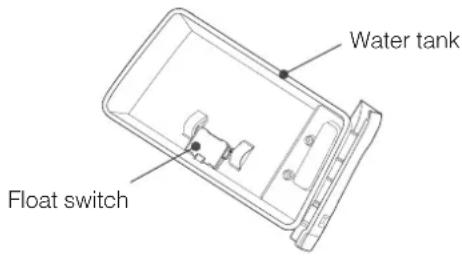
5
Put water in the water tank and place the tank cover.
- Fill the water tank, making sure it does not exceed the fill line found at the side of the water tank.
● Wipe the moisture around the water tank. - When filling the water tank away from the unit, attach the tank cover and hold it in place.
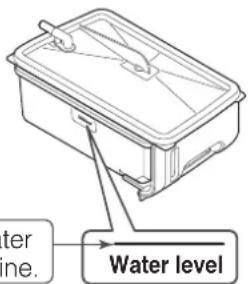
Make sure that the water does not exceed the line.
Water level

CAUTION
- If the water exceeds the fill line, it may cause water leakage.
- Securely attach the tank cover.
If it is not securely attached, it may cause water leakage during operation.
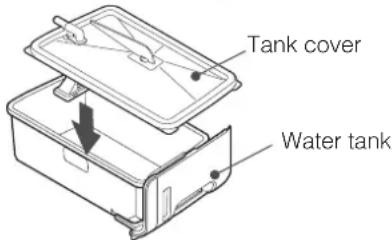
6
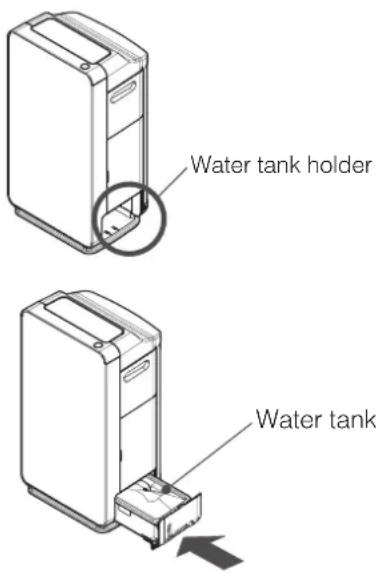
Install the water tank to the unit
- Wipe off water drops in the water tank holder during installing the water tank.
● The unit cannot operate without the water tank.

CAUTION
- Securely install the water tank, making sure that it reaches the back of the unit.
If it is not securely installed, it may cause water leakage during operation. Also, hold down the unit to make sure that the unit will not move during installation.
CAUTION
- The water tank may be heavy when filled with water. Be careful not to injure your fingers, nails, or your back while handling.
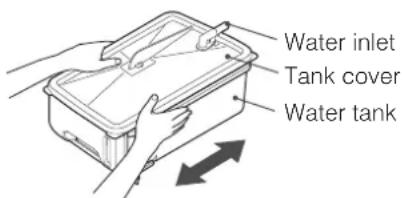
Water Tank (Guide for Cleaning: Daily)
- Replace water daily with fresh tap water. (Discard any remaining water in the tank)
- Pour a small amount of tap water, tighten the water tank cover, make sure that the water does not leak, and shake to wash. (Replace the water and repeat 2 to 3 times)
CAUTION
- Do not use detergent for cleaning.
- Before removing the water tank from the unit, press ⏻ power button to switch it off.
● There is a float switch inside the water tank. Without using excessive force, shake to wash.
Humidifying Filter (Guide for Cleaning: At Least Once a Month)
- Please clean following the procedure seen in "When the Filter Cleaning Indicator Comes On" → (P.E-30 - E-33)
- Depending on the environment it is used in, dirt or odor may adhere to the humidifying filter even when it is not in "Humidify" mode.
- It is recommended that the filter be cleaned often, regardless of whether the “Filter Cleaning” indicator lights up or not.
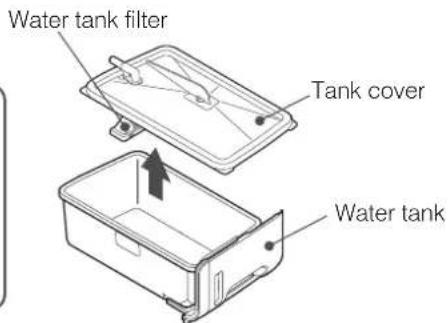
Water Tank, Tank Cover, Water Tank Filter (Guide for Cleaning: About Once a Month)
1
Remove the tank cover from the water tank
CAUTION
- Do not use detergent for cleaning.
- Be careful not to injure your finger or nails when removing the tank cover.
● Make sure that the water tank filter is not subject to unnecessary force. If damaged, it will not be able to pump up water.
2
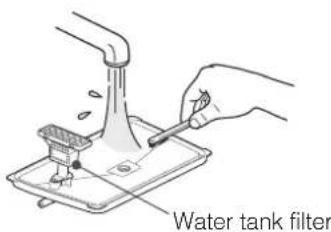
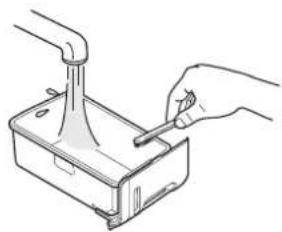
Rinse and remove dirt.
- Remove dirt by using cotton swabs or old, soft toothbrush.
Remove the water scale adhere to the float switch.
● Gently clean the water tank filter with running water. It may become damaged if cleaned roughly with toothbrush.
● The water tank filter is disposable. Replace the filter when torn, damaged, or when holes form. For replacement, purchase service parts (parts number EP-KVG900-039). → (P.E-44)
natural_image
Line drawing of a hand using a tool to press or install a mechanical component (no text or symbols present)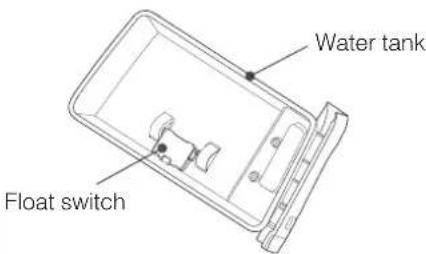

CAUTION
- Do not to remove the float switch, or subject it to unnecessary force. Otherwise "Water Refill" will not be detected.
3
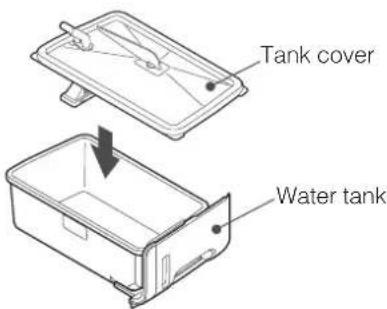
Wipe any moisture and attach the tank cover

CAUTION
● The tank cover must be pressed and securely attached to the water tank. Otherwise, it may cause water leakage.
CAUTION
● Make sure that the water tank filter is not subject to unnecessary force. If damaged, it will not be able to pump up water.
Cleaning (Continued)
When the Empty Dust Indicator Comes On
- The Empty Dust indicator lights up after approximately one year of operation (when the product is operated continuously) as a guide for cleaning.
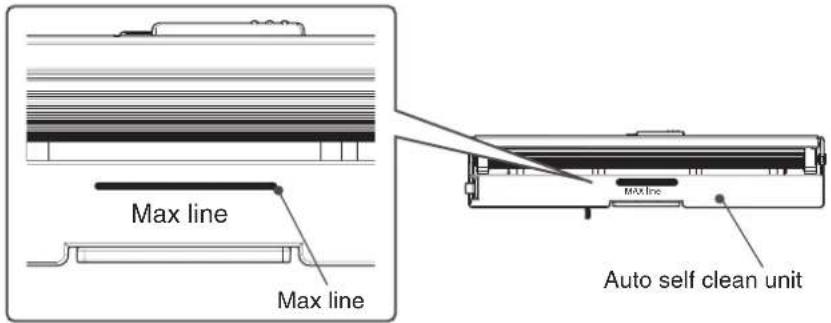
- The amount of dust differs depending on the environment. Check the dust box of the auto self clean unit frequently and discard dust even when the Empty Dust indicator is not on. If dust has been accumulated over the max line, empty out the dust box and clean the unit.
Verify that operation has stopped, and then unplug the power cord.
- When the purifier is still operating, press the
power button to stop operation. - Once you unplug the power cord, the operation time will be reset and the Empty Dust indicator will go off. (If the "Empty Dust" indicator is off, the auto self clean count will not be reset even if you unplug the power cord.)

Remove the rear panel → (P.E-14)
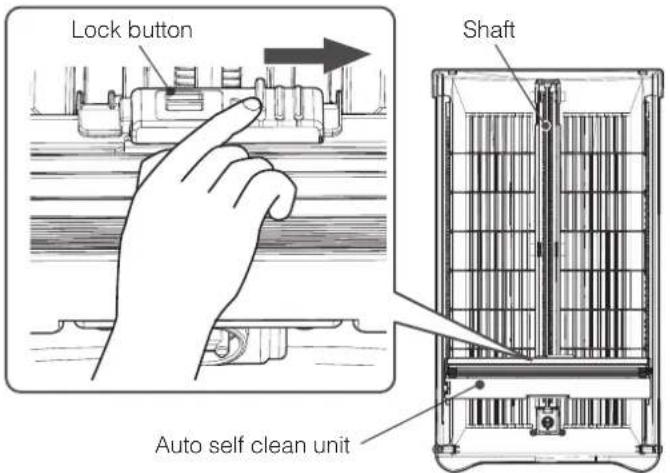
Remove the auto self clean unit
- Slide the lock button in the direction of the arrow, and remove the unit.
CAUTION
- Do not lift the air purifier by holding the shaft of the rear panel. It deforms the shaft, causing a failure.
- Do not forcibly remove the unit with the auto self clean unit still locked. Doing so may cause damage.
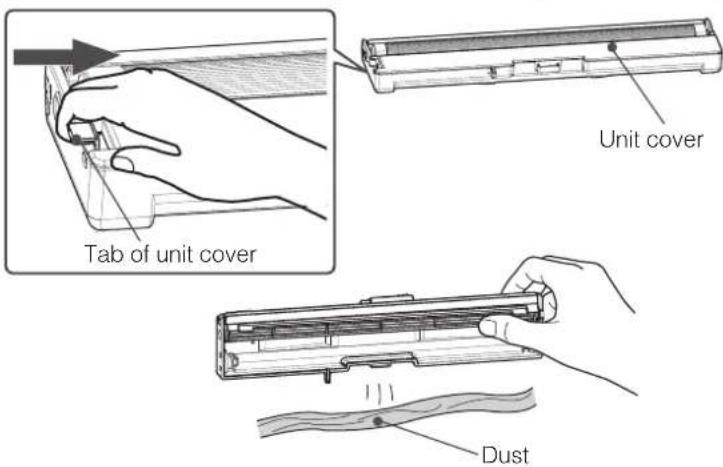
Remove the unit cover and discard the dirt
- Press the tab of the unit cover, lift up and remove the cover, and discard dust. Remove the unit cover carefully not to spill dust.
- Clean the auto self clean unit, rear panel, and other parts of the main unit frequently because dust and dirt get on them. (P.E-38, E-39)
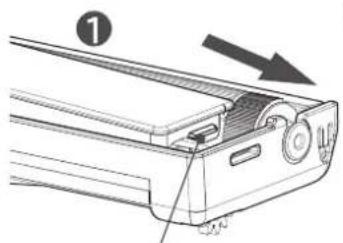
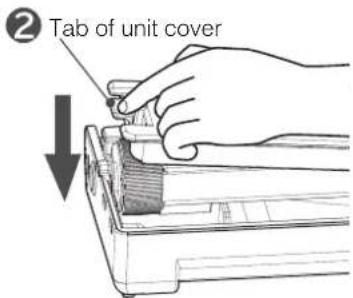
5
Attach the unit cover
1 Insert the tab of the unit cover into the hole of the dust box.
② Press down the tab of the unit cover and close the cover.
natural_image
Technical line drawing of a mechanical component with an arrow indicating direction (no text or symbols present)Tab of unit cover
6
Attach the auto self clean unit
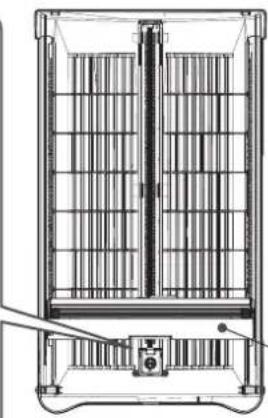
1 Insert the protruding portion below the auto self clean unit into the hole of the auto self clean unit attachment area.
② Slide the lock button until a clicking sound is heard and then attach the auto self clean unit.
CAUTION
- Do not install the auto self clean unit tilted. It may cause an abnormal sound or malfunction.
1
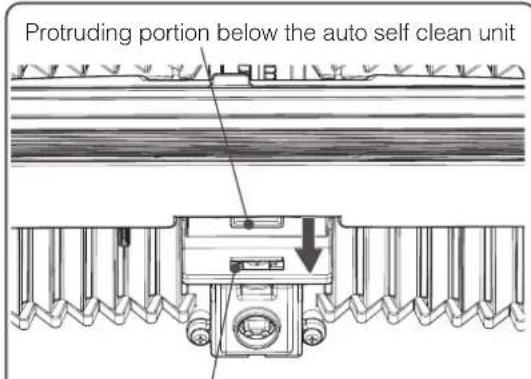
Hole of auto self clean unit attachment area
natural_image
Technical line drawing of a mechanical device with grid-like structure and mounting base (no text or symbols)2
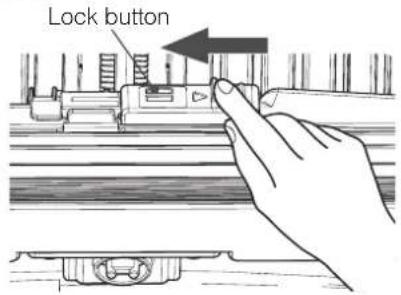
Attach the auto self clean unit horizontally.
7
Attach the rear panel → (P.E-15)
8
Insert the power plug into the outlet and
press the Ⓐ power button.
- After discarding the dirt, make sure that the "Empty Dust" indicator is not lit. (The humidifying operation time is reset when the power cord is unplugged only if the "Filter Cleaning" indicator is lit.)
Make sure that the indicator is not lit.
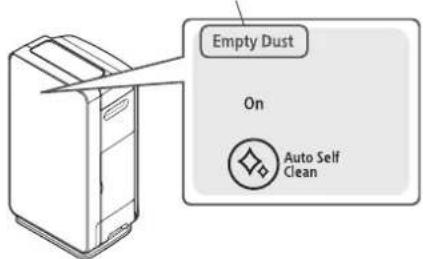
CAUTION
- When setting Auto Self Clean, be sure to attach the auto self clean unit.
- When using the product with the auto self clean unit removed, do not set Auto Self Clean. (P.E-26) If the Auto Self Clean operation is run with the auto self clean unit removed, the operation sound becomes louder for several minutes while trying to detect the auto self clean unit.
Cleaning (Continued)
Auto Self Clean Unit
● Clean the auto self clean unit frequently.
1
Check if the operation has stopped, and then unplug the power cord.
- When the unit is still operating, press the

power button to stop operation.
2
Remove the rear panel → (P.E-14)
3
Remove the auto self clean unit and unit cover and discard dust → (P.E-36)
4
Clean the auto self clean unit
- Discard dust, suck dust by lightly tapping the nozzle brush of a vacuum cleaner, and wipe the unit using a soft cloth.
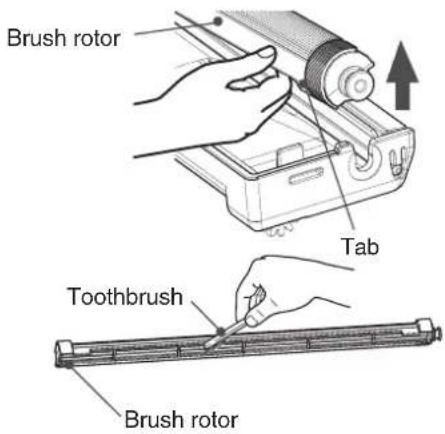
- If the unit is very dirty, remove the brush rotor and wash the unit with water.
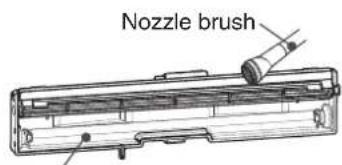
Auto self clean unit
4-1 Remove the brush rotor and wash the unit with water
- Pull up the tab on the right side of the brush rotor and remove the brush rotor.
- Remove dirt using a used soft toothbrush or something similar while rinsing with water.
- Thoroughly remove water, wipe any remaining water with a dry cloth, and dry the unit in a shade (for approximately one day in a well-ventilated area).
CAUTION
- Do not rub the brush nozzle of the vacuum cleaner with strong force or with a scourer. Doing so may damage the brush nozzle or scratch the surface.
- Do not use detergent.
4-2 Wash the fixed brush and dust box with water
● Wash them with running water.
● Thoroughly remove water and let the parts dry in a shade (approximately one day in a well-ventilated area).
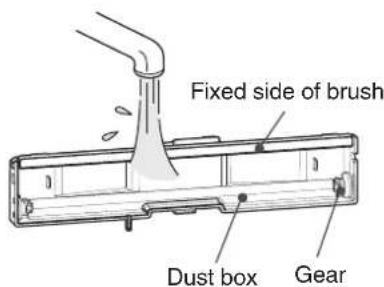
CAUTION
- Do not remove the fixed brush and gear of the auto self clean unit.
- Do not scrub them with a brush or sponge because it may break them or damage their surface.
- Do not use detergent.
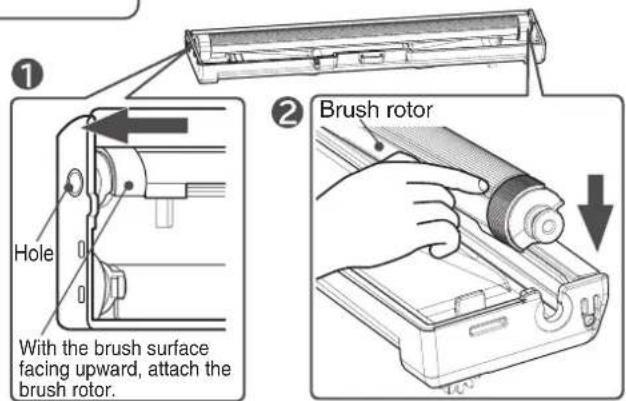
4-3 Attach the brush rotor
① Pass the left shaft of the brush rotor through the hole of the dust box.
② Press the right shaft of the brush rotor into the dust box.
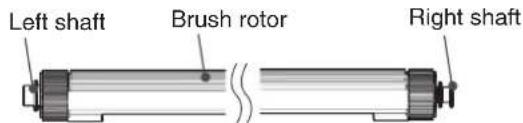
Note: The shape of the right and left shafts of the brush rotor is different.
5
Attach the unit cover → (P.E-37)
6
Attach the auto self clean unit → (P.E-37)
7
Attach the rear panel → (P.E-15)
Rear panel, etc.
- Clean the rear panel and other parts of the main unit frequently because dust and dirt get on them.
1
Confirm that operation has been stopped and then remove the power plug from the socket.
- If the product is operating, press the

power button to stop operation.
2
Remove the rear panel → (P.E-14)
3
Remove the auto self clean unit → (P.E-36)
4
Clean the rear panel
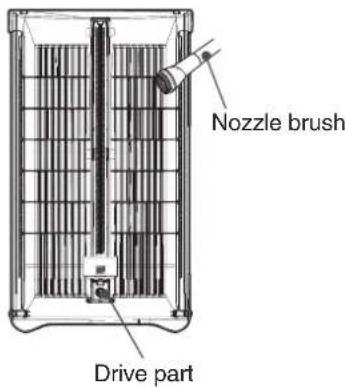
- Clean the drive part as well.
- Remove dust using a vacuum cleaner or commercially-available dust remover.
When using a vacuum cleaner, lightly tap the nozzle brush. On small concave areas, remove dust by lightly scrubbing the areas with a soft toothbrush.
- If the part is extremely dirty, wipe it with a soft cloth after wetting it and ringing it out.
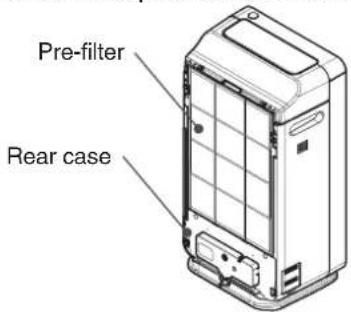
● Clean areas around the pre-filter and rear case as well.
5
Attach the auto self clean unit → (P.E-37)
6
Attach the rear panel → (P.E-15)
Cleaning (Continued)
Pre-fi Iter, Filter Assembly / Deodorizing Filter
Clean the pre-fi Iter, dust fi Iter, and deodorizing fi Iter frequently because dust and dirt get on them.
1
Check if the operation has stopped before removing the power plug from the socket
● While operating, press the

power button and stop operation.
2
Remove the rear panel and pre-filter → (P.E-14)
3
Cleaning
Pre-filter
- Remove dust using a vacuum cleaner.
- Lightly clean using the nozzle brush of the vacuum cleaner and vacuum the dust.
- Remove dirt by washing with water.
- If it is extremely dirty, wash it with water and a soft sponge without using excessive force. Drain well and let it dry in a well-ventilated area away from direct sunlight.
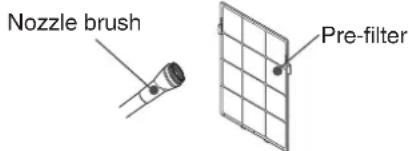
Note: Clean the back face as well.
CAUTION
- The stainless coating of the surface will peel off if it is rubbed with the floor nozzle of a vacuum cleaner or a scrub.
- Do not use detergent (kitchen or laundry use) for cleaning.
Filter assembly/Deodorizing filter
- The dust on the filter assembly or deodorizing filter may emit an odor. Be sure to remove the dust using a vacuum cleaner or the like.
- Lightly clean using the nozzle brush of the vacuum cleaner and vacuum the dust.
CAUTION
- Do not put excessive force and deform the filter assembly. If the filter assembly is deformed, it will not be detected by the unit. “[1]” will be displayed on the temperature / humidity monitor, and the unit will not be able to operate. → (P.E-45)
- If the odor from the air outlet becomes a bother, soak the deodorizing filter as soon as possible. (P.E-41)
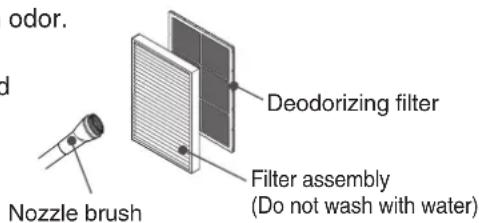
4
Attach each filter → (P.E-14, E-15)
5
Attach the pre-filter and rear panel to the unit → (P.E-15)
- The pre-fi liter is disposable. When the pre-fi liter needs to be replaced because of the stainless coating is peeling on its surface or breakage, please purchase a service part (part no. EP-LVG70-042). (P.E-50)
Cleaning the Deodorizing Filter (Guide for Cleaning: About Once Every 6 Months) To maintain deodorizing performance, frequent washing is recommended.
- If the odor from the air outlet becomes a bother, clean the deodorizing filter immediately.
1
Remove dust from the surface
- Remove using a vacuum cleaner.
- Lightly clean using the nozzle brush of the vacuum cleaner and vacuum the dust.
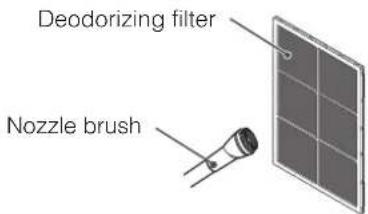
2
Soak the deodorizing filter
- Soak in water or lukewarm water (below 40°C) for about 3 hours.
Note
- After soaking, some deodorizing agent granules might fall out. However, the deodorizing performance will not be affected.
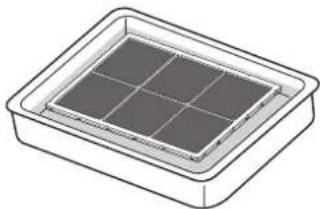
natural_image
Illustration of a rectangular container with a grid pattern on top (no text or symbols)
CAUTION
- Do not remove the deodorizing filter from its case. This will damage the filter.
- Do not scrub using a brush. This will damage the filter.
- Do not use any detergent. The detergent smell will cling on to the deodorizing filter and may damage it.
3
Dry the deodorizing filter
● Dry properly in a well-shaded area. (Place it in a well-ventilated area for about 1 day)

CAUTION
- Do not use when wet. Wipe off any remaining droplets of water. The water droplets will go out of the air outlet, decreasing deodorizing effect, and may become the source of odor.
- Do not dry using a dryer or heater appliances.
This will cause deformation. - Do not use excessive force on the deodorizing filter.
This will damage the filter. If the tabs on the case come off, press down the tabs.
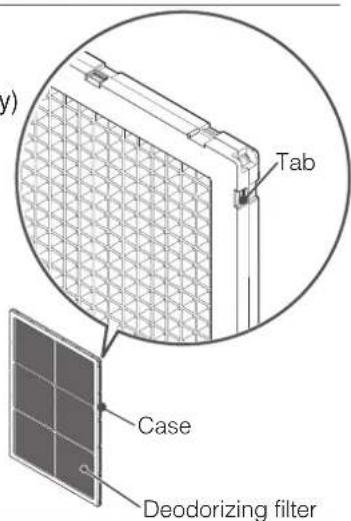
4
Set the deodorizing filter and attach the panel on the purifier body → (P.E-14, E-15)
● The deodorizing filter is disposable.
There might be some odor left even if the deodorizing filter has been soaked and cleaned.
Replace filter if the odor becomes a bother. → (P.E-43, E-44)
CAUTION
● The deodorizing filter cannot remove the odor of harmful substances in cigarettes (carbon monoxide, etc.). or continuously occurring odors.
- Use in places with strong smells such as cigarettes or barbecue will shorten the life of the deodorizing filter. In such a case, be sure to use the deodorizing filter while ventilating the room.
Cleaning (Continued)
Purifi er(Guide for Cleaning: About Once a Month)
- Wipe off dirt on the unit and glass panel, rear panel, and the surface using a soft, damp cloth.
- Clean adhering chemicals such as oil components and insecticides regularly.
- Remove dust from the surfaces of the rear panel air inlet, dust sensor, odor sensor, temperature sensor, and humidity sensor using a vacuum cleaner and wipe off using a soft cloth.
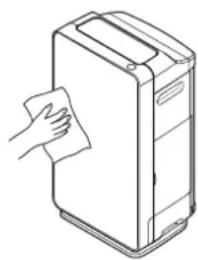
natural_image
Line drawing of a hand cleaning a rectangular device with a cloth (no text or symbols)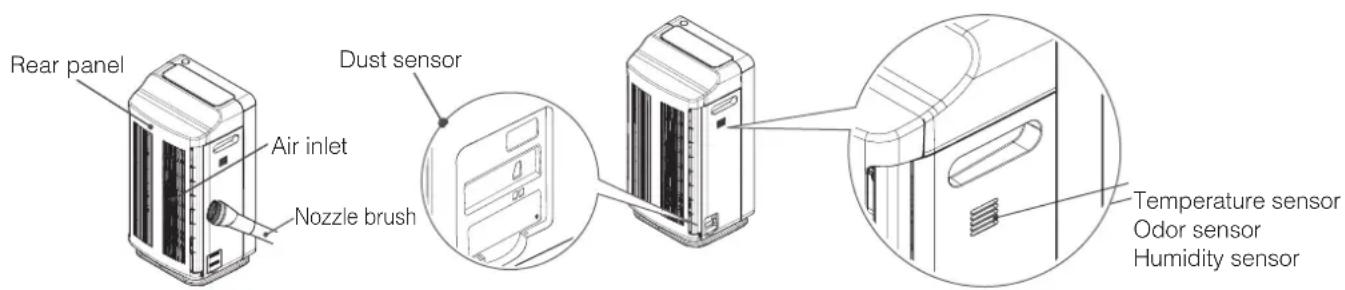
Dust Sensor (Guide for Cleaning: At Least Once Every 3-6 Months)
● Clean regularly at least once every 3-6 months.
The dust sensor is less likely to detect dirt in the air if it is not cleaned regularly.
If the sensor is dirty, it might not work properly and will detect dust even if the air is clean.
1
Check if the operation has stopped before removing the power plug from the socket
- While operating, press the ⏻ power button and stop operation.
2
Remove dust sensor cover and collect the dust
- Place your finger on the lower part and press.
- Remove the dust cover, vacuum well using the nozzle brush of the vacuum cleaner, and wipe using a soft cloth.
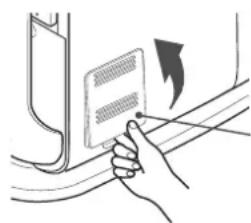
natural_image
Hand inserting a card into a vehicle's seat, showing the blade and handle (no text or symbols)Dust sensor cover
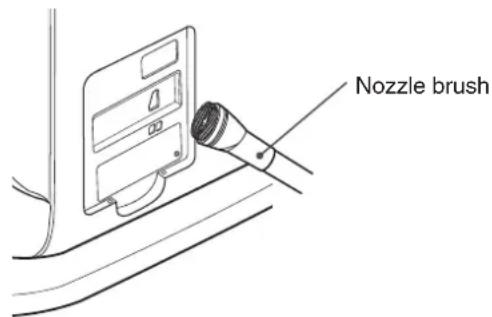
3
Wipe the lens with a cotton swab (commercial product)
- When dirt is difficult to remove, wipe the lens with a cotton swab slightly moistened with water, then wipe with a dry cotton swab after.
- Remove all dust around the lens.
● After cleaning, attach the dust sensor cover. - After cleaning, plug the air purifier in a clean environment and turn on in Purify/Auto operation mode. If the Air Sensor does not turn green after about 10 minutes, there might be remaining dust left.
Please clean it again.
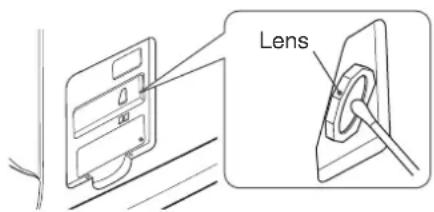
CAUTION
- Do not put excessive force on the lens. This may cause damage.
- Do not use excessive force when removing and attaching the tabs of the dust sensor cover. This may cause damage.
Replacing the Filter Assembly / Deodorizing Filter
Replacement Interval
■ The fi Iter is disposable. The deodorizing performance of the fi Iter decreases with use.
The standard life of a fi Iter assembly and a deodorizing fi Iter is approximately 10 years as determined by the Japan Electrical Manufacturers' Association.
- A test according to JEM1467(Japan Electrical Manufacturers' Association) was conducted. If 5 cigarettes are smoked per day:
[Filter Assembly] Number of years is up to the point the air purifying time takes twice as long as when the filter was new.
[Deodorizing Filter] Number of years is up to the point the deodorizing rate (ammonia, acetaldehyde, and acetic acid usually contained in tobacco) becomes half as when the filter was new.
* This is only a guide. It differs from the actual use in an average household.
■ The filter assembly should be replaced immediately if its color resembles any of the colors on the dirtiness label attached to the unit.
- The colors on the dirtiness label only serve as a guide. Depending on the installation location, the actual color of the contaminated filter may differ from the color on the label.
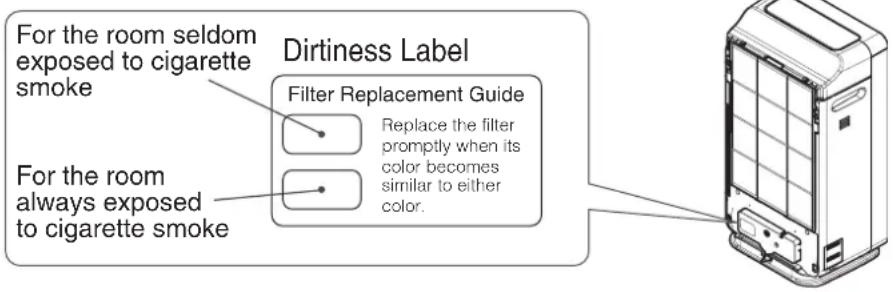
■ Replace the deodorizing fi Iter when it becomes diffi cult to remove odor.
■ Depending on the location and usage, it may also be shortened. If it becomes diffi cult to remove dust or odor, replace the fi iter immediately. Otherwise, the fi iter may generate odors.
■ The following cases will shorten the life of the fi Iter:
- When the purifi er takes in oily smoke, carbon substances (soot), etc. or when the smell of new building materials remains after the construction or remodeling of a building
- When used in stores, such as in coffee shops, game parlors, barber shops, beauty parlors, hotels, inns, and offi ces
- When used in places with strong smells such as cigarettes, barbecue, aroma oils, or air fresheners
- When the purifi er takes in combustion gases generated by heating appliances
- When the purifi er takes in solvents such as paints, adhesives, etc.
- When used in dusty locations near roads subject to heavy traffic c.
Handling the Filter Assembly / Deodorizing Filter
■ Make sure to take the fi Iter out of its plastic cover before using.
- Do not set the fi Iter while it is still inside the plastic cover. This may cause a unit failure.
■ Avoid handling it roughly.
- Do not crush, crumple, or roll the fi iter.
When the filter is broken, it will not have any cleaning effect.
■ Do not wash the fi Iter assembly.
- The filter assembly cannot be reused even after washing. Please buy and replace it with a new filter assembly.
■ The fi Iter contains plastic. Dispose of the fi Iter according to local regulations.
Replacing the Filter Assembly / Deodorizing Filter (Continued)
How to Replace the Filter Assembly / Deodorizing Filter
1
Check if the operation and the fan have stopped, and then unplug the power cord
● While operating, press the

power button and stop operation.
2
Remove the rear panel and pre-filter → (P.E-14)
3
Remove the old filter → (P.E-14)
- Remove the filter assembly first, then the deodorizing filter.
CAUTION
- Do not put excessive force and deform the filter assembly. If the filter assembly is deformed, it will not be detected by the unit. " [1 ] " will be displayed on the temperature / humidity monitor, and the unit will not be able to operate. → (P.E-45)
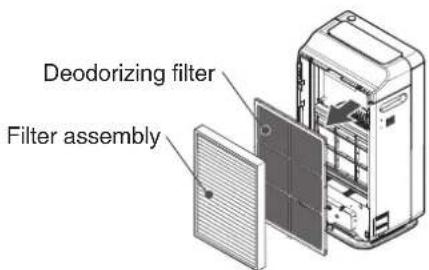
4
Remove the plastic packaging of the new filter, and attach the filter in the unit

CAUTION
- Use only a genuine filter for the Hitachi Air PurifierOther filters may cause unit to malfunction.
1 Attach the deodorizing filter in the unit. - Set the filter at the deodorizing filter set position.
② While pressing the tabs on the unit, set the deodorizing filter and hook the tabs of the deodorizing filter with the tabs of the unit. ③ Attach the filter assembly to the unit.
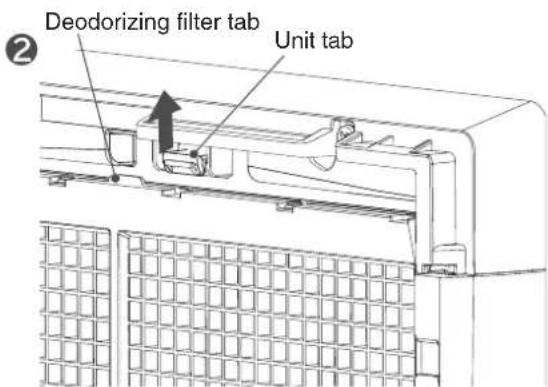
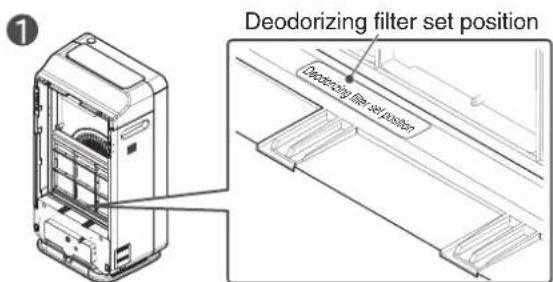
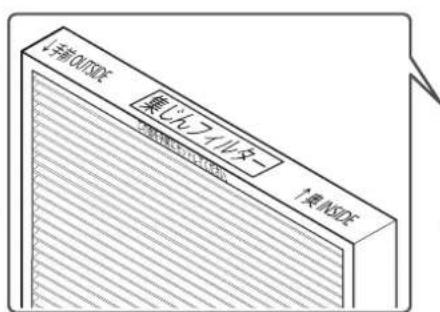
CAUTION
- If the filter is set while without removing its plastic packaging, it will not be able to have a cleaning effect. It will also cause unit malfunction.
- The vibration during transporting the unit might cause deodorizing agent granules to fall out from the filter.
- When removing the plastic cover of the filter and attaching the filter to the unit, make sure that your hands, clothes, and the surroundings does not get dirty.
- Wipe off any granules that may have fallen or clung to the filter.
- This will not affect the deodorizing performance.
5
Attach the pre-filter and rear panel to the unit → (P.E-15)
Troubleshooting Guide
When a notification is displayed on the temperature/humidity monitor
| Notifi cation Display and Details | Solution |
 The fi Iter assembly is not set. The fi Iter assembly is not set. | Install the fi Iter assembly.If the same message appears, the fi Iter assembly may be deformed and cannot be used.Replace the fi Iter assembly. |
 The humidifying fi Iter is not set. The humidifying fi Iter is not set. | Install the humidifying fi Iter. |
 The rear panel is not attached. The rear panel is not attached. | Attach the rear panel properly.Plug the tabs (2 locations) of the upper part of the rear panel and press the left and right parts of the lower part until a clicking sound is heard. →(P.E-15) |
 The vibration sensor has detected something. The vibration sensor has detected something. | Unplug from outlet and plug it again.If the unit fell over and water from the tank is leaking, make sure to unplug it from the outlet and request repairs. |
 Fan is not rotating. Fan is not rotating. | Unplug from outlet and plug it again.If the same message appears, discontinue use, make sure to unplug it from the outlet, and request repairs. |
Note: If the problem cannot be solved, request repair.
Troubleshooting Guide(Continued)
Before Requesting Repairs
| Symptom Check Solution | ||
| Air does not come out or it will not turn on | ● Is the power plug properly inserted in the outlet? Insert the power plug properly in the outlet. | |
| ● Is the breaker switched off? Switch on breaker. | ||
| ● Did you turn on the “Power” button on the unit? Press the “Power” button to turn on. | ||
| ● Are the fi lter assembly, deodorizing fi lter, and humidifying fi lter correctly installed in the unit? Install fi lters correctly in the unit. → (P.E-14 - E-16) | ||
| It cannot be operated | ● Is the child lock set? Cancel the setting. | → (P.E-25) |
| ● Are there any water droplets or dust on the operation panel? | Wipe off with a soft cloth. → (P.E-6, E-7) | |
| ● Are you wearing any gloves or have bandages? Touch it directly. | ||
| ● Are you touching any other buttons? Touch one at a time. | ||
| The operation stopped midway | ● Are there any strong impact or is the unit tilted? | Make sure not to subject the unit to strong impacts. Or place it in on a stable, even location. |
| ● Is it operating in “Absence” or “Eco Saving Operation” cycle? | Switch to other quick cycles. → (P.E-22, E-23) | |
| The airfl ow rate does not decrease even though the air is clean | ● Is the airfl ow rate switched? | Touch Airfl ow Level button and select Auto or another airfl ow rate. → (P.E-21) |
| ● Is it operating in Humidify or Skin Moist mode? | If the humidity is low, the airflow will not decrease. | |
| The airfl ow rate does not increase even though the air is contaminated | ● Is the airfl ow rate switched? | Touch Airfl ow Level button and select Auto or another airfl ow rate. → (P.E-21) |
| ● Is the odor sensor opening blocked by dust or any other objects? | Clean the odor sensor. → (P.E-42) | |
| ● When the power plug is in the outlet, did the air around become clean? | Switch the airfl ow rate. → (P.E-21) Or open a window, unplug the power plug from the outlet when the surrounding air becomes clean, and plug it in again after 10 seconds. → (P.E-29) | |
| The air sensor display color does not change from green | ● Is the unit placed in a location where it cannot be reached by odors and dust? | Try moving it to another location. |
| ● Is the dust sensor dirty? | Clean the dust sensor. → (P.E-42) | |
| ● Is the odor sensor opening blocked by dust or any other objects? | Clean the odor sensor. → (P.E-42) | |
| The air sensor display color does not change from red | ● Is there anything nearby that the odor sensor may detect? Heating appliances that generate combustion gases Alcohol, cosmetics, sprays, etc. | The purifi er may detect components of invisible gas that cannot be cleaned by the fi lter and still continue operating. Open a window for ventilation. → (P.E-29) |
| ● Is the dust sensor dirty? | Clean the dust sensor. → (P.E-42) | |
| ● Is the odor sensor opening blocked by dust or any other objects? | Clean the odor sensor. → (P.E-42) | |
| The rear panel cannot be attached | ● The drive connection part does not properly engage in some cases. | Slowly turn the drive connection part on the rear panel about 45 degrees to the left or right, and then attach the panel. → (P.E-15) |
| Symptoms Check Solution | ||
| The water is leaking | ● Is the water tank correctly installed in the unit? | Install the water tank correctly in the unit.→(P.E-16, E-17) |
| ● Is the tank cover securely attached? | Attach the tank cover securely.→(P.E-16) | |
| ● Is the humidifying fi liter securely installed in the unit? | Securely install the humidifying fi liter in the unit. →(P.E-32) | |
| ● Was the unit tilted or carried while there was still water inside? | Place the unit on even ground, and do not carry the unit while there is still water inside.Also, when transferring the unit on casters, there is a risk of spilling the water, therefore, transfer the unit slowly across a fl at surface. | |
| ● Are there any cracks in the water tank or tank cover? | Immediately stop using the unit, go to your shop dealer and request repairs. | |
| ● Is water leaking from the tank? | Immediately stop using the unit, go to your shop dealer and request repairs. | |
| The Filter Cleaning indicator does not turn off | ● If you unplug the power cord, does the Filter Cleaning indicator reset? | Once you unplug the power cord, the humidifying operation time will reset and the indicator will turn off.→(P.E-30) |
| The touch operation panel display disappeared | ● Did you set the touch operation panel display to be hidden? | Hold display switch button for 3 seconds and switch the display settings. →(P.E-20) |
| It is hard to remove the smell or the unit has a smell | ● Is the pre-fi liter too dirty? | Refer to “Pre-filter” in “Cleaning” when cleaning the pre-fi liter.→(P.E-40) |
| ● Is the fi liter dirty?Or is it time to replace the fi liter? | Refer to “Replacing the Filter Assembly / Deodorizing Filter” when replacing the fi liter.Depending on the location or usage, the replacement interval may be shorter. →(P.E-43, E-44) | |
| ● Is the humidifying fi liter dirty?Or is it time to replace the humidifying fi liter? | Refer to “When the Filter Cleaning Indicator Comes On” in “Cleaning” when cleaning the humidifying fi liter. →(P.E-30 - E-33) | |
| The airflow rate switched in the middle of operation | ● Is it set in “Auto” airflow rate, or “Pollen” or “Eco Saving Operation” quick cycles? | Switch airflow rate and quick cycle.→(P.E-21 - E-23) |
| ● Are the rear panel, fi liters, and humidifying fi liter correctly set? | Set them correctly. | |
| The Empty Dust indicator does not turn off | ● If you unplug the power cord, does the Empty Dust indicator reset? | Once you unplug the power cord, the operation time will be reset and the indicator will go off. →(P.E-36, E-37) |
Troubleshooting Guide(Continued)
Humidifying
| Symptoms Check Solution | ||
| The unit does not humidify (the humidity does not increase) | ● Is the water supply indicator lit? Fill the tank with water. →(P.E-33, E-34) | |
| ● Is the Filter Cleaning indicator lit? | Refer to “When the Filter Cleaning Indicator Comes On” in “Cleaning” when cleaning the humidifying fi Iter. →(P.E-30 - E-33) | |
| ● Is the Humidity Monitor displaying 70%? | It automatically operates according to the humidity level. →(P.E-21) | |
| ● Is the room too large or ventilated? | The humidity may not increase depending on the size of the room, the installation location, whether windows are open or closed, and the state of ventilation. Use the unit in combination with another humidifi er. | |
| ● Is a heater used in the room? | Depending on the heater used, the air in the room may become dry, causing the humidity to not increase. Use the unit in combination with another humidifi er. | |
| The humidifying performance is inadequate (Water in the water tank has not decreased) | ● Is the airflow rate weak? | When the “Medium” or “Silent” airflow rate is selected, the humidifying performance is lessened. Set the airflow rate to “High” or “Max”. →(P.E-21) |
| ● Is there any dust on the pre-fi Iter? | Refer to “Pre-filter” in “Cleaning” when cleaning the pre-fi Iter. →(P.E-40) | |
| ● Is the humidifying fi Iter correctly set? Or is it dirty with water scales? | Set the humidifying fi Iter correctly. →(P.E-32) Clean or replace the humidifying fi Iter if it is dirty. →(P.E-30 - E-33) | |
| ● The humidifying performance varies depending on the level of humidity and temperature of the room. | If the humidity level is high, such as on a rainy day, or if the temperature of the room is low, the humidifying performance decreases. | |
Auto Self Clean
| Symptoms Check Solution | ||
| Auto Self Clean does not operate | ● Is “ON” on the auto self clean display lit? | Change the Auto Self Clean setting to On.→(P.E-26) |
| Dust remains on the pre-fi liter | ● Dust on the pre-fi liter may remain according to the use conditions and the type and amount of dust. | Clean the pre-fi liter.→(P.E-40) |
| The purifi er makes a loud sound after the power is turned on or before the Auto Self Clean operation. | ● Is the auto self clean unit attached on the rear panel? | If the rear panel is not attached, the operation sound becomes louder for several minutes while trying to detect the auto self clean unit.Attach the auto self clean unit. Or, use the air purifi er without setting Auto Self Clean.→(P.E-26) |
Sounds and Vibrations
| Symptoms Cause (This is normal) | |
| When using humidify or skin moisturize modes, the purifi er sometimes makes whir-ring and gargling sounds | It is the sound of the unit pumping water from the water tank for a few seconds every few minutes. |
| The unit makes rattling sounds when it is being moved | It is the sound of the metal ball inside the “Vibration Sensor”. |
| The flap makes whirring, rattling, and rumbling noises when it is opened, closed, or in swing mode | It is the sound of the motor that moves the fl ap. |
| The unit vibrates when it is on “Max” airfl ow rate. | It is because of the rotation of the fan. |
| The airflow rate frequently switches in the middle of humidify mode and the sound is distracting | It is because the airflow rate is controlled automatically. When the humidity changes, the airfl ow rate may switch to “High”.If it becomes a distraction, switch to your preferred airfl ow rate.→(P.E-21)The humidifying performance will decrease when it is switched to a weaker airfl ow rate. |
| When switching the operation mode or air-flow rate, the purifier sometimes makes whirring and whirling sounds | This is the sound of the unit changing the rotational speed of the motor. |
| During Auto Self Clean operation, the puri-fier sometimes makes whirring and rattling sounds | This is the sound of the motor operating the auto self clean unit. |
| Sound of the Auto Self Clean operation is loud in a quiet environment, for example at night. | Adjust the time to start the Auto Self Clean operation.→(P.E-26) |
Heat and Smells
| Symptoms Cause (This is normal) | |
| The air coming out of the air outlet smells | The unit's parts have a smell when it is fi rst used.Or the deodorizing performance of the deodorizing fi Iter has decreased.Clean the deodorizing fi Iter.→(P.E-40, E-41)Or there are odors clinging to the humidifying fi Iter. Clean the humidifying fi Iter.→(P.E-30 - E-33) |
| The Touch Operation Panel is warm | The unit's interior is lined with control circuits.This causes the unit to become warm. |
Troubleshooting Guide(Continued)
Operations / Others
| Symptoms Cause (This is normal) | |
| There is no vapor or mist visible | As the unit employs an evaporating type that produces moisturized air by passing an air stream through the humidifying fi liter, no vapor or mist is visible. |
| The movement of the fl ap is unstable, or its direction is misaligned | It may have become misaligned when it was moved by hand. If it does not work properly because it was moved by hand, stop it by pressing the "Power" button once, and start the operation again. |
| The temperature and humidity monitor readings differ from the room thermometer and hygrometer readings. | The temperature and humidity displayed on the monitor is merely a guide.Depending on the difference of room environment, the display may differ. |
| The fan stopped | The fan may stopif it is set in eco saving operation. → (P.E-23) |
| The rotation does not increase smoothly when "Max" airfl ow rate is used | The rotation gradually increases.It takes approximately 1 minute for the rotation to increase. |
| Noise enters the television and radio | Separate the purifi er from the television and radio, or change the orientation of the purifi er.Or, use an outlet in a different location. |
| When turning on the power, Auto Self Clean automatically starts. | The purifi er is checking whether or not the auto self clean unit is attached. This is not a malfunction.→ (P.E-26) |
| Strips of dirt are attached to the dust fi liter | When the auto self clean unit operates, strips of fi ne dust may attach to the dust fi liter. |
| Dust or dirt is attached to the back side of the pre-fi liter | Depending on the type and amount of dust attached to the pre-fi liter, the Auto Self Clean operation may not be able to completely remove it.If there is dust remaining, clean the fi liter.→ (P.E-40) |
| When the operation mode or airfl ow rate is changed, the fan stops or rotation becomes unstable | This is a temporary occurrence when changing the airfl ow rate. It will stabilize as time passes. |
Replacement Parts
Purchase from Hitachi Home Appliances dealers.
● Filter assembly for Hitachi Air Purifi er(Allergen-free, HEPA fi Iter)EPF-LVG110H | ● Deodorizing fi Iter for Hitachi Air Purifi erEPF-KVG900D |
● Pre-fi Iter (stainless steel pre-fi Iter)Specify service part EP-LVG70-042.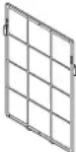 | ● Replacement humidifying fi Iter for Hitachi Air Purifi erEPF-KVG900KF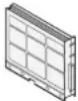 |
● Water tank fi IterSpecify service part EP-KVG900-039.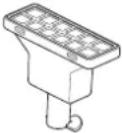 | |
● Auto self clean unitSpecify service part EP-L110E-922.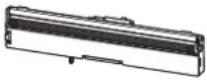 | ● Brush rotorSpecify service part EP-LVG90-011. |
Specifications
| Power Supply AC 220-240V 50-60Hz | ||||
| Applicable Floor Space 79m | 2 | |||
| Max High Medium Silent | ||||
| Airflow Rate (m3/min.) 11.0 4.0 3.1 1.1 | ||||
| Power Consumption (W) 95 13 11 8 | ||||
| Operating Sound (dB) 55 32 25 | 14 | |||
| Tank Capacity | Approx. 2.5L | |||
| Unit Dimensions | 673mm (H) × 360mm (W) × 291mm (D) | |||
| Weight | Approx. 13.7kg | |||
| Power Cord Length | Approx. 1.8m | |||
- HITACHI Inspire the Next
- Instruction Manual
- Hitachi Air Purifier with Humidifying Function
- EP-L110E
- Features
- Air Purify Mode
- Humidify Mode
- Skin Moist Mode
- Contents
- Before Use
- Operating Air Purifi er
- Cleaning and Maintenance
- Name of Each Component / Accessories
- Names of Each Component
- Accessories
- Filter
- CAUTION
- Pre-filter
- Humidifying filter
- Operating the Touch Operation Panel
- Display Switch
- MENU
- Note
- Auto Self Clean → (P.E-26)
- Safety Precautions
- Meaning of Symbols
- WARNING
- To Prevent Fire, Electric Shock and Injury
- AC Outlet, Power Plug and Power Cord
- Cleaning
- Safety Precautions (Continued)
- Place of Use
- Miscellaneous
- Moving the Air Purifi er
- Cautions on Use
- Do not operate with the fi Iter detached
- Do not block or touch the odor and dust sensors
- Do not use in locations near cooking appliances
- Ventilate closed rooms occasionally
- Do not directly fan plants and animals
- Refrain from placing any object on the unit and blocking the air inlet and outlet
- Refrain from moving (changing the orientation or lifting the unit, etc.) during operation
- Do not use near television or radio
- Air Cleaner Deodorizing Performance
- Preparations for Operation
- Setting Filter in Unit
- 1
- Remove rear panel and pre-filter
- 2
- Remove the filter
- 3
- Install the deodorizing filter to the unit
- Install the filter assembly to the unit
- Install the pre-filter to the unit
- Attach the rear panel to the unit
- Preparations for Operation (Continued)
- 7
- Check that the water tray set with humidifying filter is installed in the unit.
- Filling Water Tank(When Running on "Humidify" and "Skin Moisture" Modes)
- Remove the water tank from the unit
- Remove the tank cover from the water tank
- Rinse the water tank and tank cover with water and check the movement of the float switch.
- 4
- Put water in the water tank and place the tank cover.
- 5
- Install the water tank to the unit
- Installation
- Operation
- Starting Operation
- Standby Power Consumption
- Operation (Continued)
- Switching Touch Operation Panel Display
- Selecting Operation Mode (Basic Operations)
- Touch
- Switching Airflow Rate
- Useful Features
- Operating in Option
- Pollen
- Odor
- (Eco Saving Operation)
- Rapid
- Absence
- PM2.5 sensor
- Touch the
- Eco Saving Operation
- Normal Auto Operation
- Useful Features (Continued)
- Switching Between Temperature / Humidity Monitor Display
- Stopping Operation Using Off-timer
- Long-press MENU for about 3 seconds
- Setting and Running Auto Self Clean (Pre-fi Iter Automatic Cleaning)
- How to Set Auto Self Clean
- Auto Self Clean Operation
- Performing Auto Self Clean manually
- Notices and requests regarding the Auto Self Clean operation
- Memory Function / Monitor / Sensors / Auto Detection
- Memory Function
- Air Sensor
- Odor Sensor
- Dust Sensor
- Temperature / Humidity Monitor (Temperature / Humidity Sensor)
- Vibration Sensor
- Auto Detection
- Adjusting Sensory Sensitivity Setting
- When the Filter Cleaning Indicator Comes On
- Check if the operation has stopped before removing the power plug from the socket
- Open the side cover and remove the humidifying filter with the water tray
- Clean the water tray mounting of the unit
- Remove the humidifying filter from the water tray
- Clean the humidifying filter
- Use citric acid when it becomes hard to remove water scale
- Cleaning (Continued)
- (Continued)
- 6
- Clean the water tray
- Set the humidifying filter
- 8
- Attach the water tray with the humidifying filter to the unit
- Close side cover
- Insert the power plug into the outlet and
- press the
- power button.
- Replacing Humidifying Filter
- When the Water Refi II Indicator Comes On
- Water Tank (Guide for Cleaning: Daily)
- Humidifying Filter (Guide for Cleaning: At Least Once a Month)
- Water Tank, Tank Cover, Water Tank Filter (Guide for Cleaning: About Once a Month)
- Rinse and remove dirt.
- Wipe any moisture and attach the tank cover
- When the Empty Dust Indicator Comes On
- Verify that operation has stopped, and then unplug the power cord.
- Remove the rear panel → (P.E-14)
- Remove the auto self clean unit
- Remove the unit cover and discard the dirt
- Attach the unit cover
- Attach the auto self clean unit
- Attach the rear panel → (P.E-15)
- press the Ⓐ power button.
- Auto Self Clean Unit
- Clean the auto self clean unit
- 4-1 Remove the brush rotor and wash the unit with water
- 4-2 Wash the fixed brush and dust box with water
- 4-3 Attach the brush rotor
- Rear panel, etc.
- Pre-fi Iter, Filter Assembly / Deodorizing Filter
- Remove the rear panel and pre-filter → (P.E-14)
- Filter assembly/Deodorizing filter
- Attach each filter → (P.E-14, E-15)
- Attach the pre-filter and rear panel to the unit → (P.E-15)
- Cleaning the Deodorizing Filter (Guide for Cleaning: About Once Every 6 Months) To maintain deodorizing performance, frequent washing is recommended.
- Remove dust from the surface
- Soak the deodorizing filter
- Dry the deodorizing filter
- Set the deodorizing filter and attach the panel on the purifier body → (P.E-14, E-15)
- Purifi er(Guide for Cleaning: About Once a Month)
- Dust Sensor (Guide for Cleaning: At Least Once Every 3-6 Months)
- Remove dust sensor cover and collect the dust
- Wipe the lens with a cotton swab (commercial product)
- Replacing the Filter Assembly / Deodorizing Filter
- Replacement Interval
- Handling the Filter Assembly / Deodorizing Filter
- Replacing the Filter Assembly / Deodorizing Filter (Continued)
- How to Replace the Filter Assembly / Deodorizing Filter
- Troubleshooting Guide
- Troubleshooting Guide(Continued)
- Before Requesting Repairs
- Humidifying
- Auto Self Clean
- Operations / Others
- Replacement Parts
Brand : HITACHI
Model : EP-L110E
Category : Air purifier