
XAP-1510 - Access Point Luxul - Free user manual and instructions
Find the device manual for free XAP-1510 Luxul in PDF.


| Brand | Luxul |
| Model | XAP-1510 |
| Product Type | High Power AC1900 Dual-Band Wireless Access Point |
| Wireless Standards | IEEE 802.11a/b/g/n/ac |
| Frequency Bands | 2.4 GHz and 5 GHz |
| Maximum Data Rate | Up to 1900 Mbps (AC1900) |
| Interfaces | 1x Gigabit Ethernet PoE port |
| PoE Support | Yes, includes PoE injector (100-240V AC input) |
| Mounting | Ceiling, wall, or desk (mounting brackets and rubber feet included) |
| LED Indicators | Power (green), 2.4 GHz (blue), 5 GHz (blue) |
| Reset Button | Yes, located under mount (reboot or restore factory defaults) |
| Security | WPA2, open security default (configurable) |
| Default IP Address | 192.168.0.10 |
| Default Admin Credentials | Username: admin, Password: admin |
| Wireless Controller Compatibility | Compatible with Luxul Wireless Controller |
| Certifications | FCC Part 15, Industry Canada |
| Operating Temperature | 0°C to 40°C (32°F to 104°F) typical |
| Humidity | 10% to 90% non-condensing |
| Maintenance | Clean with dry cloth; do not use liquids or solvents |
| Included Accessories | Two mounting brackets, hardware, PoE injector, power adapter, Ethernet cable |
Frequently Asked Questions - XAP-1510 Luxul
User questions about XAP-1510 Luxul
0 question about this device. Answer the ones you know or ask your own.
Ask a new question about this device
Download the instructions for your Access Point in PDF format for free! Find your manual XAP-1510 - Luxul and take your electronic device back in hand. On this page are published all the documents necessary for the use of your device. XAP-1510 by Luxul.
USER MANUAL XAP-1510 Luxul
No part of this publication, or any other publication may be modified or adapted in any way, for any purposes without permission in writing from Luxul. The material in this manual is subject to change without notice. Luxul reserves the right to make changes to any product to improve reliability, function, or design. No license is granted, either expressly or by implication or otherwise under any Luxul intellectual property rights. An implied license only exists for equipment, circuits and subsystems contained in this or any Luxul product.
FCC Compliance
This device complies with Part 15 of the FCC Rules. Operation is subject to the following two conditions: (1) this device may not cause harmful interference, and (2) this device must accept any interference received, including interference that may cause undesired operation.
FCC ID: W59XAP1510
IC: 8584A-XAP1510
FCC Statement—Wireless FCC 2.4GHz & 5GHz 802.11abgn
This equipment has been tested and found to comply with the limits for a Class B digital device, pursuant to Part 15 of the FCC Rules.

Hereby, Luxul, 14203 Minuteman Drive, Suite 201, Draper, Utah, 84020 declares that this Luxul XAP-1510 is in compliance with the essential requirements and other relevant provisions of Directive 1995/5/EC. For a copy of this report send a self addressed stamped envelope to: Luxul CE, 14203 Minuteman Drive, Suite 201, Draper, Utah, 84020.
Industry Canada (RSS-Gen Issue 4)
CAN ICES-3(B)/NMB-3(B)
Sales
P: 801-822-5450 E: sales@luxul.co
Technical Support
P: 801-822-5450 Option 3 E: support@luxul.com
© 2015 Luxul. All Rights Reserved. LUX-QIG-XAP-1510-v3 07271511
READ ME FIRST
QUICK INSTALL GUIDE

natural_image
White electronic device with ventilation slots and indicator lights, set against a green abstract background (no text or symbols visible)High Power AC1900
Dual-Band Wireless Access Point XAP-1510
Includes:
One: High Power AC1900 Dual-Band Wireless AP
▶Two: Mounting Brackets and Hardware
One: PoE Injector and Power Adapter
One: Ethernet Cables
LUXUL
READ ME FIRST - CONTROLLER COMPATIBILITY
This XAP-1510 is compatible with the Luxul Wireless Controller for fast, configuration and deployment of wireless networks with multiple APs.
√ Note: If you'll be using this AP with a Wireless Controller, refer to the Quick Install Guide included with the Wireless Controller for setup instructions.
AP SETUP AND CONFIGURATION

Physical Installation
The XAP-1510 access point is designed for simple and efficient installation and can be located one of three ways. First, the included mount is designed to attach directly to several different regions' standard electrical boxes. Second, the XAP-1510 may be mounted on a ceiling or wall without a box by using the included mount as a guide to mark attachment locations. Finally, the XAP-1510 can be placed on a fl at surface by attaching the included rubber feet to the mount.
Caution: Attach the rubber feet to the mount and attach the mount to the AP for fl at surface placement to avoid overheating and failure.
Single Access Point Placement: Because the signal generated by the XAP-1500 is omnidirectional, the unit should be located as near as possible to the center of the desired coverage area.

XAP-1510 Single AP Coverage Pattern
Multiple Access Point Placement: You may need to experiment with AP placement to optimize the roaming experience. Place APs to ensure adequate coverage, but not so far apart that there is no signal overlap. Adjacent APs should overlap enough that the client device has a good connection to the AP to which it is currently attached, but also sees the next-nearest AP. Ideally, roaming clients should see signal strength of two overlapping APs in the range of -60 to -70 dBm at the midway point between two APs. To learn more about AP placement, visit luxul.com/ap-placement.
Ideally, roaming clients should see signal strength of two overlapping APs in the range of -60 to -70 dBm at the midway point between two APs

XAP-1510 Multiple AP Coverage and Overlap
√ Note: Consider using Ekahau HeatMapper to assist with this process, available from www.ekahau.com. Luxul also offers an informative "How-To" video on HeatMapper at luxul.com/how-to-videos.
AP SETUP AND CONFIGURATION CONT.

Connecting Ethernet and Power
Ethernet and Power
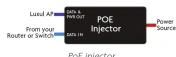
To apply power and network simultaneously, simply connect one end of an Ethernet cable to a PoE switch, and the other end to the XAP-1510 PoE port. To connect power and Ethernet separately, fi rst connect an Ethernet cable from the supplied PoE Injector Data & PWR Out port to the PoE port on the XAP-1510. An Ethernet cable length of up to 300 feet can be used.
Next, connect an Ethernet cable from your Router or Switch to the Data IN port on the PoE Injector. Finally, connect the AC cord to the included PoE Injector, then to the AC outlet.
√ Note: Category-6 shielded twisted pair is recommended for best
results and stable data transmission at the highest data rates.
However, CAT5/CAT5e/CAT6 UTP cable can also be used.
PoE Injector Setup
Data In: Connect an Ethernet cable from your router or switch to the
Data In port of the included PoE Injector
Data & PWR Out: Connect an Ethernet cable from the Data & PWR Out
port of the included PoE Injector to the PoE Port of the XAP-1510
▶AC Power: Connect the included AC Cord to the Power Input of the
Included Injector first and then to the AC outlet.

Preparing for Access
IP Addressing
If the XAP-1510 is connected to a network with a 192.168.0.X address scheme, and your computer shares a similar address on the same network, you can skip to the next step, Access and Setup
√ Note: If another device on your network shares the 192.168.0.10 address, you'll need to temporarily reassign or remove that device while you configure the XAP-1510.
If your network uses an address scheme other than 192.168.0.X, you'll need to set a temporary static IP address on the computer you're using for configuration. To do so, set the IP address of your computer to an address in the 192.168.0.X range, then set the Gateway/Router address to 192.168.0.10 (the default IP address of the XAP-1510).
Once you're finished configuring the AP, you can return your computer's IP configuration to normal, typically "Obtain Automatically/DHCP."
√ Note: Visit http://luxul.com/ip-addressing to learn more about changing your computer's IP address and getting connected.

Access and Setup
Getting Connected
Connecting Via an Ethernet Device: Use Ethernet cable to connect your computer to the PoE switch or PoE injector to which the XAP-1510 is connected. Ethernet is the preferred method of connection. Connecting Via a Wireless Device: Connect your client device to the XAP-1510 default wireless network named Luxul1510. The wireless network will run in Open Security mode, so no passphrase is required until Wireless Security is configured.
Logging In
To access the AP's web configuration, open your web browser and enter the AP's default 192.168.0.10 IP address in the address fi eld. Log in to the AP using the default user name and password:
Default IP: 192.168.0.10
Username: admin
Password: admin
√ Note: If another device on your network shares the 192.168.0.10 address, you'll need to temporarily reassign or remove that device while you configure the XAP-1510.
√ Note: The XAP-1510 is not a router and will need to be connected to a network with a router in order to deliver Internet access.

Hardware Operation
LED Indicators
Enclosure: If the green Power LED is on, the XAP-1510 is powered and working. If the Power LED is OFF, the AP is not receiving power or the LED has been turned off in the AP's web interface. If the green Power LED is blinking, the XAP-1510 is booting. The two blue LEDs indicate indicate each of the 2.4GHz and 5GHz networks are configured and broadcasting.

XAP-1510 LED's
PoE Injector: If the PWR LED is On, Power is Connected to the injector. If the PWR LED is Off, the injector is not receiving power.
Reset Button
The Reset button is located underneath the mount and marked RESET. It may be used to reboot the AP or to re factory default settings.
Reboot the AP: With the XAP-1510 powered on, simply press and release the Reset button.
Restore Factory Defaults: With the XAP-1510 powered on, press and hold the Reset button for 10 seconds, then release the button and the XAP-1500 will restore factory defaults and
CAUTION: Holding the Reset button for more than a few seconds will restore the AP to factory default and remove any custom configuration.


- FCC Compliance
- IC: 8584A-XAP1510
- FCC Statement—Wireless FCC 2.4GHz & 5GHz 802.11abgn
- Sales
- Technical Support
- READ ME FIRST
- QUICK INSTALL GUIDE
- High Power AC1900
- Dual-Band Wireless Access Point XAP-1510
- Includes:
- READ ME FIRST - CONTROLLER COMPATIBILITY
- AP SETUP AND CONFIGURATION
- Physical Installation
- AP SETUP AND CONFIGURATION CONT.
- Connecting Ethernet and Power
- Ethernet and Power
- PoE Injector Setup
- Preparing for Access
- IP Addressing
- Access and Setup
- Getting Connected
- Logging In
- Hardware Operation
- LED Indicators
- Reset Button
Brand : Luxul
Model : XAP-1510
Category : Access Point