XAP-1440 - Access Point Luxul - Free user manual and instructions
Find the device manual for free XAP-1440 Luxul in PDF.


| Product Type | AC1200 Dual-Band Outdoor Wireless Access Point |
| Brand | Luxul |
| Model | XAP-1440 |
| Wireless Standard | 802.11ac (Dual-Band) |
| Frequency Bands | 2.4 GHz and 5 GHz |
| Max Data Rate | Up to 1200 Mbps (combined) |
| Port | 1 Gigabit Ethernet with PoE |
| Power Method | 802.3at Power over Ethernet (PoE+) |
| Included PoE Injector | Yes (with power cord) |
| Default IP Address | 192.168.0.10 |
| Default Username | admin |
| Default Password | admin |
| LED Indicators | Power (green) and WLAN (blue) |
| Reset Button | Yes (inside cable gland; hold 10 seconds for factory reset) |
| Mounting | Pole or wall mount using included bracket |
| Cable Gland | Yes (weatherproof Ethernet connection) |
| Ethernet Cable Length | Up to 300 ft (90 m) |
| Recommended Cabling | CAT5e or CAT6 UTP |
| RF Compliance | Adjust elevation angle 0 to -20 degrees |
| Safety Warning | Keep away from overhead power lines and electrical circuits |
| Controller Compatibility | Compatible with Luxul Wireless Controller |
| Setup Method | Web interface via browser |
Frequently Asked Questions - XAP-1440 Luxul
User questions about XAP-1440 Luxul
0 question about this device. Answer the ones you know or ask your own.
Ask a new question about this device
Download the instructions for your Access Point in PDF format for free! Find your manual XAP-1440 - Luxul and take your electronic device back in hand. On this page are published all the documents necessary for the use of your device. XAP-1440 by Luxul.
USER MANUAL XAP-1440 Luxul
natural_image
White rectangular electronic device with a perforated grille and a black connector at the bottom (no text or symbols visible)AC1200 Dual-Band Outdoor Wireless Access Point
XAP-1440
Includes:
XAP-1440 Wireless Access Point
PoE Injector and Power Cord
Mounting Bracket and Hardware
Ethernet Cable
READ ME FIRST - CONTROLLER COMPATIBILITY
This XAP-1440 is compatible with the Luxul Wireless Controller for fast, easy configuration and deployment of wireless networks with multiple APs.

Note: If you'll be using this AP with a Wireless Controller, refer to the Quick Install Guide included with the Wireless Controller for setup instructions.
AP SETUP AND CONFIGURATION

Physical Installation
The XAP-1440 access point is designed for simple and efficient installation. However, due to the inherent complexity of outdoor installation, installation should be performed only by experienced professionals.
Because the signal generated by the XAP-1440 is directional, the unit should be located at the perimeter of the desired coverage area, with the large flat surface aimed toward the center.
Mounting the Access Point
Mounting the access point is a simple process outlined in the following steps.
-
Refer to the included Mounting Guide leaflet to assemble the mount and secure the AP to a pole or wall mount.
-
Thread the Ethernet cable through the cable gland assembly as shown, connect it to the Ethernet connector, secure the cable gland to the threaded recess on the access point, then tighten the cable gland nut to secure and seal the cable gland.

natural_image
Diagram of a mechanical transmission line with connector components (no text or labels)Cable gland exploded view
- Adjust the access point for best performance. The vertical elevation angle can be adjusted with the four hex screws on the mount, while the horizontal angle can be adjusted by loosening the clamp and rotating the assembly on the pipe.

CAUTION: To comply with RF regulations, the AP should be adjusted from 0 to -20 degrees (horizontal to downward-facing).

Warning: Do not locate the access point where it can come into contact with overhead power lines or other electric circuits. When installing the antenna, take extreme care not to come into contact with such circuits, as they may cause serious injury or death.

Note: For proper installation and grounding of the antenna, please refer to national and local codes (e.g. U.S.: NFPA 70, National Electrical Code, Article 810, Canada: Canadian Electrical Code, Section 54). Statement 280.
AP SETUP AND CONFIGURATION CONT.

Connecting Ethernet and Power
Ethernet and Power
The XAP-1440 is PoE ready and supports 802.3at PoE. A PoE injector is included with the device. To apply power, simply connect the end of the Ethernet cable to which the access point is connected to the provided PoE injector or other PoE switch. An Ethernet cable length of up to 300 feet can be used.

Note: Luxul recommends at least Cat-5e unshielded twisted pair (CAT5e UTP) cabling. To ensure best performance and stable data transmission at 1000 Mbps, use Category-6 unshielded twisted pair (CAT6 UTP).
PoE Injector Setup
Data In: Connect an Ethernet cable from your router or switch to the Data In port of the included PoE Injector
Data & PWR Out: Connect an Ethernet cable from the Data & PWR Out port of the included PoE Injector to the PoE Port of the XAP-1440
▶AC Power: Connect the included AC Cord to the Power Input of the Included Injector first and then to the AC outlet.


Preparing for Access
IP Addressing
If the XAP-1440 is connected to a network with a 192.168.0.X address scheme, and your computer shares a similar address on the same network, you can skip to the next step, Access and Setup.

Note: If another device on your network shares the 192.168.0.10 address, you'll need to temporarily reassign or remove that device while you configure the XAP-1440.
If your network uses an address scheme other than 192.168.0.X, you'll need to set a temporary static IP address on the computer you're using for configuration. To do so, set the IP address of your computer to an address in the 192.168.0.X range.
Once you're finished configuring the AP, you can return your computer's IP configuration to normal, typically "Obtain Automatically/DHCP."

Note: Visit http://luxul.com/ip-addressing to learn more about changing your computer's IP address and getting connected.

Note: The XAP-1440 is not a router and will need to be connected to a network with a router in order to deliver Internet access.

Access and Setup
Getting Connected
Connecting Via an Ethernet Device: Use Ethernet cable to connect your computer to the PoE switch or PoE injector to which the XAP-1440 is connected. Ethernet is the preferred method of connection.
Connecting Via a Wireless Device: Connect your client device to the XAP-1440 default wireless network named Luxul_XAP-1440. The wireless network will run in Open Security mode, so no passphrase is required until Wireless Security is configured.
Logging In
To access the AP's web configuration, open your web browser and enter the AP's default 192.168.0.10 IP address in the address field. Log in to the AP using the default user name and password:
Default IP: 192.168.0.10
Username: admin
Password: admin
Once logged in, use Quick Setup and follow the online help to configure the access point as desired.
5 Hardware Operation
LED Indicators
The LED indicators are located on the bottom portion of the enclosure, near the cable gland.
PWR: If the green Power LED is On, the XAP-1440 is powered. If the Power LED is Off, the XAP-1440 is not receiving power. The Power LED blinks when the XAP-1440 is booting.

natural_image
Close-up of a white wall-mounted smart control panel with two indicator lights and Wi-Fi icons, next to a curved surface (no text or symbols visible)WLAN: If the blue LED is On, the wireless radio is active and wireless access is enabled. Off indicates the wireless radio is not active and wireless access is disabled.
PoE Injector: If the Green ON LED is illuminated, power is connected to the injector. If the ON LED is not lit, the injector is not receiving power.
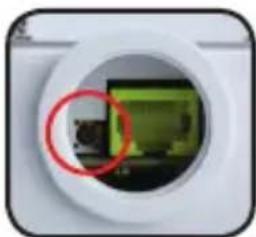
Reset Button: The Reset button is located inside the cable gland opening of the XAP-1440 and is used to restore factory default settings. To Restore Default Settings, with the XAP-1440 powered on, press and hold the Reset button for approximately 10 seconds, then release.
natural_image
Close-up of a white camera lens showing internal green screen with red circle highlighting the lens (no text or symbols visible)
CAUTION: Holding the Reset button for more than a few seconds will restore the AP to factory default and remove any custom configuration.
Sales
801-822-5450
sales@luxul.com
Technical Support
801-822-5450
support@luxul.com
Copyright and Trademark Notices
No part of this document may be modified or adapted in any way, for any purposes without permission in writing from Luxul. The material in this document is subject to change without notice. Luxul reserves the right to make changes to any product to improve reliability, function, or design. No license is granted, either expressly or by implication or otherwise under any Luxul intellectual property rights. An implied license only exists for equipment, circuits and subsystems contained in this or any Luxul product.
© Copyright 2017 Luxul. All rights reserved. The name Luxul, the Luxul logo, the Luxul logo mark and Simply Connected are all trademarks and or registered trademarks of Luxul Wireless, Inc. All other trademarks and registered trademarks are property of their respective holders.
LUX-QIG-XAP-1440-v1 05111701
A brand of legrand®

natural_image
Abstract network diagram with interconnected nodes and lines on a dark background (no text or symbols)

- AC1200 Dual-Band Outdoor Wireless Access Point
- Includes:
- READ ME FIRST - CONTROLLER COMPATIBILITY
- AP SETUP AND CONFIGURATION
- Physical Installation
- Mounting the Access Point
- AP SETUP AND CONFIGURATION CONT.
- Connecting Ethernet and Power
- Ethernet and Power
- PoE Injector Setup
- Preparing for Access
- IP Addressing
- Access and Setup
- Getting Connected
- Logging In
- Hardware Operation
- LED Indicators
- Sales
- Technical Support
- Copyright and Trademark Notices
Brand : Luxul
Model : XAP-1440
Category : Access Point