
M5 - Video projector AAXA Technologies - Free user manual and instructions
Find the device manual for free M5 AAXA Technologies in PDF.


| Product Type | Video Projector |
| Brand | AAXA Technologies |
| Model | M5 |
| Dimensions (W x D x H) | 4.5 x 2.5 x 1.0 inches (114 x 63 x 25 mm) |
| Weight | 0.5 lbs (227 g) |
| Power Supply | DC 5V / 2A via USB |
| Battery Type | Rechargeable lithium-ion 3000 mAh |
| Display Technology | DLP with LED light source |
| Native Resolution | 854 x 480 (WVGA) |
| Brightness | 80 lumens |
| Contrast Ratio | 1000:1 |
| Lamp Life | 20,000 hours |
| Connectivity | HDMI, USB, microSD, AV, Audio out |
| Built-in Speaker | Yes, 1 watt |
| Media Playback | Video, photo, music |
| Keystone Correction | Manual vertical (±15°) |
| Focus Adjustment | Manual |
| Remote Control | Included (IR) |
| Maintenance | Clean lens with soft cloth; keep vents free of dust |
| Safety | Avoid looking into lens; do not block ventilation |
| Spare Parts / Repairability | Replacement batteries available; consult service center for repairs |
Frequently Asked Questions - M5 AAXA Technologies
User questions about M5 AAXA Technologies
0 question about this device. Answer the ones you know or ask your own.
Ask a new question about this device
Download the instructions for your Video projector in PDF format for free! Find your manual M5 - AAXA Technologies and take your electronic device back in hand. On this page are published all the documents necessary for the use of your device. M5 by AAXA Technologies.
USER MANUAL M5 AAXA Technologies
natural_image
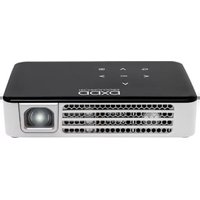
Exterior view of a white modular projector with black top and front panel, no visible text or symbols on bodyUser Guide
Caution!
WARNING: Please use this product as instructed. Misuse may cause injury or death.
DO NOT use while driving
DO NOT expose to water or wet surfaces. Electric shock may occur.
DO NOT expose the projected LED image to your eyes or the eyes of others
DO NOT block or restrict airflow from ventilation holes as this may cause the projector to overheat
Keep the projector, battery, or charger away from any heat sources
Caution for Battery Use
- Do not pierce or puncture the battery with sharp objects
- Do not heat the product or expose it to high temperature.
- Do not wet it or place it in any liquid
Caution for Headphone Use
- Prolonged use at high volume may impair your hearing.
- High volume during walking or driving may cause distractions and result in injury or death
Table of Contents
Chapter 1: M5 at a Glance
M5 Introduction 1
Remote & Keypad 2
Accessories 3
Chapter 2: Getting Started
Powering On / Off 4
Focus Adjustment / Throw
Distance 5
External Input/Outputs 6
Connecting to a Computer VGA • • 9
Connecting to a Computer HDMI •• 11
Connecting to Composite Video • • 13
Connecting to HDMI Video • • • • 15
Connecting to Speaker or
Headphones 17
Connecting a Micro SD Card •• 18
Connecting a USB Stick 20
Chapter 3: Menu Screens
Main Menu 22
Video Player Menu 23
Photo Viewer Menu 27
Music Player Menu 31
Text Viewer Menu 34
Chapter 4: Setup Menu
Settings 35
Brightness Feature 40
Keystone 41
Chapter 5: Technical Details
Troubleshooting 43
Specifications 45
Notes 46
M5 at a Glance
Chapter 1
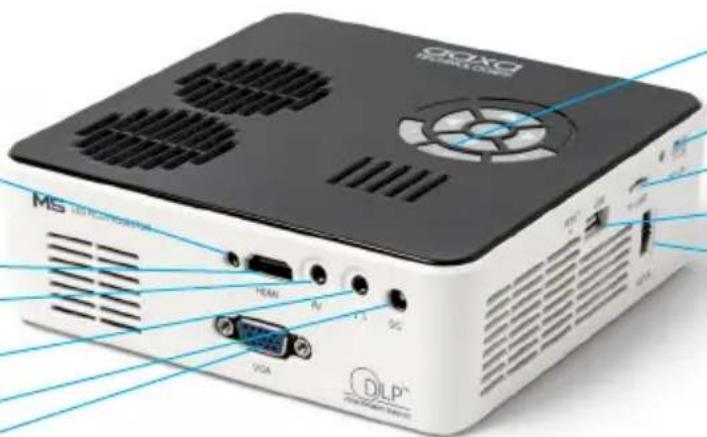
Main Unit Front/Back
Infrared Receiver
(Remote Control)
HDMI
AVPort
Headphone Out
DC Port
VGA Port
natural_image
Exterior view of a DILP device with labeled ports and connectors (no readable text beyond branding)Power Button
Power Switch
Micro SD Card
USB Port
Focus Adjustment
Remote & Keypad

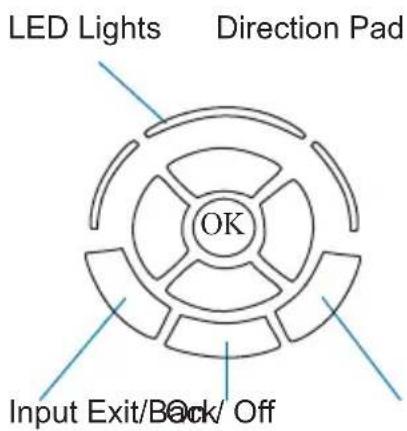
Remote
Both the keypad and remote can be used to navigate through the menus. The Main Menu Navigation on the remote functions exactly the same as the directional pad on the M5 unit.
NOTE: Pressing power on the remote will only put the projector in STANDBY mode. Toggle the "ON/OFF" switch on the side of the projector to fully turn the projector off.
Accessories
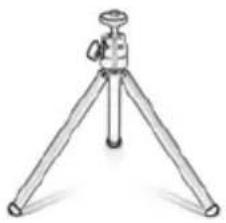
natural_image
Line drawing of a tripod-mounted surveying instrument (no text or symbols)Tripod

Remote

natural_image
Illustration of a multi-pin connector with multiple Ethernet ports (no text or symbols)A/V Cable

natural_image
Line drawing of a cable and plug assembly (no text or symbols)Power Adapter

natural_image
Black rectangular object with a handle, resembling a briefcase or case (no text or symbols visible)Carrying Case
*Under various circumstances, the actual accessories may be different from those shown in the pictures above.
Additional accessories are availbale for purchase at www.aaxatech.com
Getting Started
Chapter 2
Powering ON the projector
- Connect the power cord to the M5.
- Connect the other end of the power cord into the wall power source.
- Toggle the On / Off switch on the side of the projector to the "ON" position --the projector should automatically turn on.
- If the projector does not automatically turn on with the "Power Switch" toggled to the "ON" position, press the "ON/OFF POWER" ⏻ button on the keypad and hold for 2-3 seconds to start the projector.
Standby Mode
- To transition to "STANDBY" mode, press the power button ⏻n the keypad or the remote control.
- The optical engine should power off and the fan should stop spinning. The projector is now in "STANDBY" mode and can be turned on using the remote control.
*Note: Standby mode will still consume a small amount of power.
Powering OFF the projector
- To turn off the projector, toggle the "Power Switch" to the "OFF" position. This will fully turn off the projector.
Focus Adjustment / Throw Distance
Focus Adjustment
- Spin the focus wheel up or down until the image becomes clear.

natural_image
Simple diagram showing a vertical bar inside an oval and a vertical line on the right (no text or symbols)Throw Distance Chart
| Throw Distance | Diagonal Size |
| Units: Inches | Units: Inches |
| 20 | 19 |
| 30 | 29 |
| 40 | 38 |
| 50 | 48 |
| 60 | 57 |
| 70 | 67 |
| 80 | 76 |
| 90 | 86 |
Throw Ratio 1.20
Projection Angle: 100% Offset
*minimum throw distance: 10 inches

External Inputs and Outputs

Connecting to a Computer via VGA
Step 1:
Connect one end of the VGA Cable to your computer's VGA Adapter.
Step 2:
Connect the other end of the VGA Cord to your M5's VGA port.

Step 3:
In the Main Menu Select the "Inputs" icon and then the "VGA" Icon.


Select "VGA" icon Select "INPUT" icon
Connecting to a Computer Cont.
Step 4:
Enabling VGA on your Computer – To enable VGA output on your computer most computers require “turning on” the video output feature. Each computer is different. Please consult your owner’s manual for instructions to enable VGA output. Below are standard instructions for a Windows 10 computer – not all systems are the same.
Step 5:

Press Windows+P to toggle through display settings. Select either "Duplicate" or "Extend" depending on your viewing option.
*NOTE: different operating systems may differ
Step 6:

- Right click on computer desktop and select "Screen Resolution"
- Display Properties window will pop up
- If a secondary monitor is grayed out, click on it and select "Extend these displays" in the "Multiple Displays" drop down
- If the image is blurry or the text is not legible, adjust the screen resolution. We recommend 1280x800.
Connecting to a Computer via HDMI
Step 1:
Connect one end of the HDMI Cable to your computer's HDMI Adapter.
Step 2:
Connect the other end of the HDMI Cord to your M5's HDMI port.

Step 3:
In the Main Menu Select the "Inputs" icon and then the "HDMI" Icon.
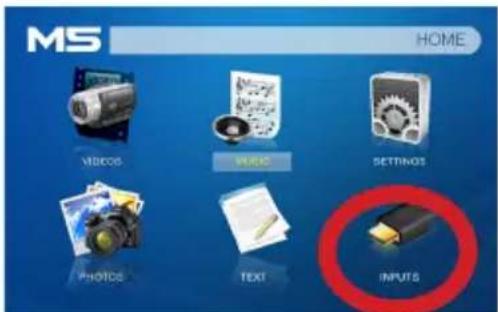
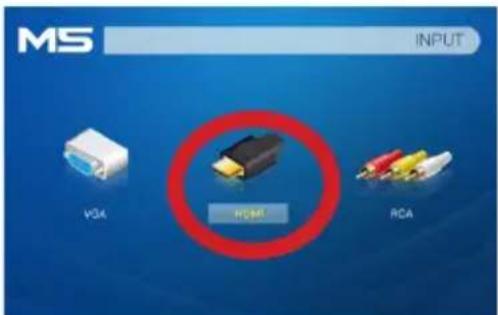
Select "INPUT" icon Select "HDMI" icon
Connecting to a Computer Cont.
Step 4:
Enabling HDMI output on your Computer – To enable HDMI output on your computer most computers require “turning on” the video output feature. Each computer is different. Please consult your owner’s manual for instructions to enable HDMI output. Below are standard instructions for a Windows 10 computer – not all systems are the same.
Step 5:
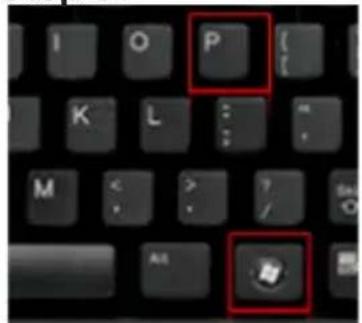
Press Windows+P to toggle through display settings. Select either "Duplicate" or "Extend" depending on your viewing option.
*NOTE: different operating systems may differ
Step 6:

- Right click on computer desktop and select "Screen Resolution"
- Display Properties window will pop up
- If a secondary monitor is grayed out, click on it and select "Extend these displays" in the "Multiple Displays" drop down
- If the image is blurry or the text is not legible, adjust the screen resolution. We recommend 1280x800.
Connecting to Composite Video
Step 1:
Connect the 3.5mm Composite A/V Cable to the back of the M5.

natural_image
Two electronic components: a black plug with threaded tip and a black button labeled 'AV' (no text or symbols on the devices themselves)Step 2:
Connect the composite end of the AV Cable (Red, White, Yellow) to your device.

natural_image
Two images showing a red and white audio jack connected to two blue cables, with no visible text or symbols.
Connecting to Composite Video Cont.
Step 3:
In the Main Menu


Select "INPUT" icon Select "RCA"
Step 4:
Turn on your multimedia device.
Connectivity with multimedia devices
The M5 can connect to many media devices including: iPod, iPhone, iPad, VHS players, DVD players, Blu-Ray players, smart phones, cameras, video game consoles and other peripherals with ease.
*Some smart phones require video out capabilities to be displayed with the M5. Check with your phone manufacturer.
Connecting to HDMI Video
Step 1:
Connect one end of the HDMI to your M5's HDMI Adapter

natural_image
Two electronic components: a black USB cable and a black HDMI connector, shown side by side with no visible text or symbols.Step 2:
Connect the opposite end of the HDMI cable to your device.

natural_image
Close-up of a USB connector and its HDMI logo (no text or symbols on the device itself)Note: Apple devices require a specialized HDMI adapter (Sold separately by Apple)

Connecting to HDMI Video Cont.
Step 3:
In the Main Menu


Select "HDMI" iconSelect "INPUT" icc
Step 4:
Turn on your multimedia device. If available select 1280x800 or 1920x1080.
Connectivity with multimedia devices
The M5 can connect to many media devices including: iPod, iPhone, iPad, VHS players, DVD players, Blu-Ray players, smart phones, cameras, video game consoles and other peripherals with ease.
*Some smart phones require video out capabilities to be displayed with the M5. Check with your phone manufacturer.
Connecting Speakers / Headphones

Step 1: Connect your speakers/headphones to the projector's audio port.
Step 2: Ensure that the projector and/or the headphones are powered on.
Step 3: Place the headphones on and enjoy!
*CAUTION: Prolonged use of headphones at a high volume may impair hearing.
Micro SD Card
How to insert your Micro SD Card
- Slide in your SD card into the SD card slot on the side of the M5 (facing down as shown in picture).
• Gently slide the SD card until it clicks into place.
How to access your Micro SD Card
- Once your SD Card has been inserted, you can navigate to any media content in the main menu.
• After selecting the media content, choose the SD card selection. - You can now access the data on your SD card through the onboard media player
*Review the Specification section of this manual to read about the supported file formats.
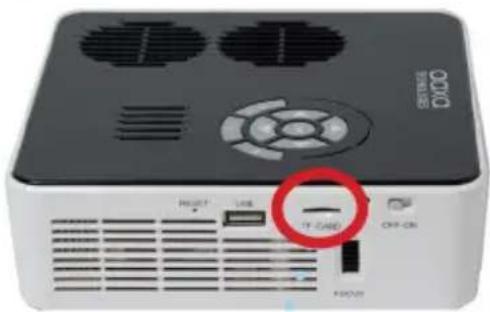

(up to 32 GB)
Note: Microsoft Office and PDF file formats are not supported. To view a slideshow convert your slideshow into JPEG pictures first.
Micro SD Card Cont.

Media Player menu
- In the main menu select the type of file you wish to play.
- Select the MicroSD icon to access your files.

File Menu System
- The M5 will show all folders and files you have on your SD Card in the C: drive.
- Use the directional buttons to navigate to different folders or files.

Return: Brings you back to the main menu
USB Drive
How to insert your USB Drive
- Slide your USB Drive into the USB port (as shown in picture).
• Gently slide the drive until it cannot go in any further.
How to access your USB Drive
- Insert your USB Drive into the projector.
- Use the navigation pad to choose the USB Drive icon from the main menu to access your files.
- Choose your desired file.
*Review the Specification section of this manual to read about the supported file formats.

(up to 32 GB)
Note: Microsoft Office and PDF file formats are not supported. To view a slideshow convert your slideshow into JPEG pictures first.
USB Drive Cont.

Media Player menu
- In the main menu select the type of file you wish to play.
- Select the USB Drive icon to access your files.

File Menu System
- The M5 will show all folders and files you have on your USB Drive.
- Use the directional buttons to navigate to different folders or files.

Return: Brings you back to the main menu
Menu Screens
Chapter 3
Main Menu
The M5 features a built in PMP (Portable Media Player) function.
This function allows the projector to play videos, pictures, music files, and text directly from your connected devices.

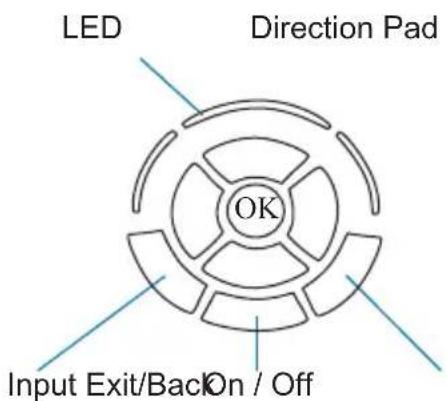
- Press the left and right directional buttons to choose an icon from the main menu.
- To select a menu option press the "OK" button in the middle of the navigation pad.
- To go back to the previous screen, press the "Back" button.
- To Jump back to the submenu press the "Menu" button once.
- To return to the main menu press and hold the "Return" button.
Video Player Menu
Opening a file:
- Select the "Video" icon (Fig. 3.1).
- From the sub menu (Fig. 3.2), select the storage media with the stored files.
- Choose which file you wish to play.
Fig. 3.1

Fig. 3.2

The M5 will show all folders and files you have on your USB or MicroSD drive. Use the navigation buttons to select folders or files.
Previewing Files:
- Press the directional keys to highlight the item of interest
- Wait 2-3 seconds and a preview of the video will show on the screen
Video Player Menu
While Playing Videos
While playing videos the volume and keystone is adjustable. Further controls are available in the video player submenu - which is accessed through the "OK" button.

natural_image
Circular diagram with directional arrows and central 'OK' label, no readable text or symbols beyond the labelVolume Up
Volume Down
Positive Keystone Adjustment
Negative Keystone Adjustment

Enter Video Player Submenu
- To open/hide the video playback menu, use the "OK" and "Back" Buttons on the projector.
Video Player Sub-Menu
Playing Videos
The Video Player Sub-Menu can be accessed by pressing "OK" during video playback. To exit the Video Player Sub-Menu press the "Back" button or wait 5 seconds. To navigate the Playback Menu use the directional buttons on the navigation pad or remote to highlight the option you wish to choose (Fig 3.3).
- To open/hide the video playback menu, use the "OK" and "Back" buttons on the projector.

natural_image
Circular diagram with directional arrows and central 'OK' label, no readable text or symbols beyond the label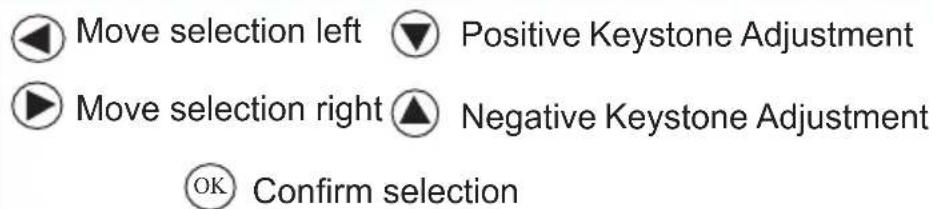
Fig. 3.3

Video Playback FAQ
How do I loop a video?
- Choose either USB or SD Card for playback


- Navigate the folders until you reach the file you wish to play.
- Highlight the file you want to play, then confirm the selection.
- Move selection on video player menu to "repeat", and confirm the selection.
- The video will now loop after playback is finished.
How do I preview a video?
- Choose the "video" option from the main menu
- Navigate using either remote or onboard buttons to the file you wish to preview.
- Highlight the file. *Do not select the file, just highlight it.
- Wait for 3-4 seconds.
- A preview screen will pop up on the lower right for the video.
Photo Menu
Opening A File:
- Select the "Photo" icon (Fig. 3.4)
- From the sub menu (Fig. 3.5), select the storage media with the stored files.
- Choose which file you wish to play.
Fig 3.4

Fig 3.5

The M5 will show all folders and files you have on your USB or MicroSD drive. Use the navigation buttons to select folders or files.
Previewing Files:
- Press the directional keys to highlight the desired file.
- Wait 2-3 seconds and a preview of the picture will show on the screen.
Photo Menu
While Viewing Pictures
While viewing pictures the keystone is adjustable. Further controls are available in the Photo Submenu - which is accessed through the "OK" button.

natural_image
Circular diagram with directional arrows and central 'OK' label, no readable text or symbols beyond the label
Previous Picture

Positive Keystone Adjustment

Next Picture

Negative Keystone Adjustment

Enter Photo Player Submenu
- To open/hide the Photo Playback menu, use the "OK" and "Back" Buttons on the projector.
Photo Sub-Menu
Viewing Pictures:
The Photo Sub-Menu can be accessed by pressing "OK" during picture slide-show playback. To exit the Photo Sub-Menu press the "Back" button or wait 5 seconds. To navigate the playback menu use the directional buttons on the navigation pad or remote to highlight the option you wish to choose (Fig 3.6).
- To open/hide the photo playback menu, use the "OK" and "Back" button on the projector.

natural_image
Circular diagram with directional arrows and the word 'OK' at center (no text or symbols beyond the label)Move selection left
Positive Keystone Adjustment
Move selection right
▲ Negative Keystone Adjustment
OK Confirm selection
Fig 3.6

Photo Slideshow FAQ
How do I play a slideshow?
- Choose either USB or SD Card for playback

-
Navigate to the folder that contains the pictures you wish to view in the slideshow
-
Confirm selection of the first picture.
-
Press "play" in the photo menu
-
Slideshow will now play.
-
NOTE: Selecting "repeat" will loop slideshow.
How do I manually control the slideshow?
- After selecting the photo you wish to be displayed, you can press "play" to start the slideshow (as outlined in the previous FAQ).
- To manually control the slideshow, you must stop the slideshow with the "stop" button.
- You may use either the controls on your remote or on top of the projector itself to flip through the pictures in the current playlist.
- You can change the SlideShow duration in the Settings Menu (Main Menu -> Settings -> Picture)
Music Player Menu
Opening A File:
- Select the "Music" icon (Fig. 3.7).
- From the Sub-Menu (Fig. 3.8), select the storage media with the stored files.
- Choose which file you wish to play.
Fig. 3.7
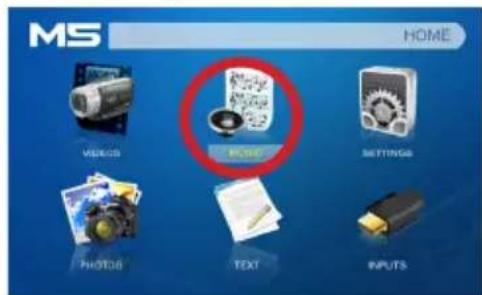
Fig. 3.8
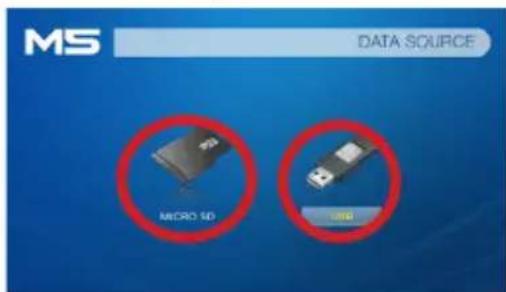
The M5 will show all folders and files you have on your USB or MicroSD drive. Use the navigation buttons to select folders or files.
Previewing Files:
- Press the directional keys to highlight the desired file
- Wait 2-3 seconds and a preview of the audio will show on the screen
Music Player Menu
Listening To Audio:
To adjust the volume use the left and right button on the projector or the volumes keys on the remote. To navigate the playback menu, push the "OK" button to open the menu and use the directional buttons on the navigation pad or remote highlight the option you wish to choose (Fig 3.9).
- To open/hide the music playerback menu, use the "OK" and "Back" button on the projector.

Fig. 3.9

Music Playback FAQ
How do I loop a song?
- Choose either USB or SD Card for playback


- Navigate the folders until you reach the file you wish to play.
- Highlight the file you want to play, then confirm the selection.
- Move selection on music player menu to "repeat", and confirm the selection.
- The song will now loop after playback is finished.
How do I create a song playlist?
- Insert your media device (either microSD card or USB) into computer.
- Make a new folder on media device (folder name will be the name of the playlist).
- Transfer songs from computer to the new folder, name accordingly.
- Remove media device from computer and insert into projector.
- Navigate to Audio section, then choose appropriate media device.
- Navigate to your playlist folder.
- Start at first song.
- Playback will follow each successive song on the list.
*To create a special order for the list, add numerical numbering to the beginning of each file.
E-Book Viewer Menu
Opening A File:
- Select where the files are located from the main menu.
- Select the "Text" icon (Fig 3.10)
- Choose which file you wish to play.

Fig. 3.10
The M5 will show all folders and files you have on your USB or MicoSD Drives. Use the navigation buttons to select folders or files.
Viewing Text Files:
The M5 Micro Projector allows you to view text files. Select the file you want to view in the file menu for the particular storage device on which the file is stored. You can press the left and right arrow buttons on the directional pad or remote to flip through the pages you have in the present folder.
Note: Microsoft Office and PDF file formats are not supported. To view a slideshow convert your slideshow into JPEG pictures first.
Setup Menu
Chapter 4
The Settings Menu can be accessed by selecting "Settings" on the main menu

Within the settings menu there are four more submenus that allow you to customize your M5 to the settings you want.
Picture
- Picture Mode
• Color Temperature - Aspect Ratio
- Brightness Mode
- Projection
Sound
- Sound Mode
Time
- SLEEP Timer
- Auto Sleep
Option
- OSD Language
- Restore Factory Default
- Blending
- OSD Duration
Picture Settings
Picture Mode
• Changes the picture mode to different settings depending on your usage.
Color Temperature
- Adjusts the color temperature from hot to cool (red to blue).
Aspect Ratio
• Changes the aspect ratio of the picture - Auto, 4:3, 16:9*
Brightness Mode
- Choose between Eco, Standard and Boost**
Projection
• Flips the projected image.

*Caution: Some pictures may be cut off when aspect ratio is set incorrectly
**Boost mode should only be used in low temperature environments with adequate clearance of exhaust / intake vents. A tripod is highly recommended. DO NOT block vents while operating in Boost mode.
Sound Settings

Sound Mode
• Changes the sound mode depending on what is currently playing.
Time Settings
Sleep Timer
- Sets when projector goes to sleep.
Auto Sleep
- Sets auto sleep function where projector will turn off when not in use or if there is no signal.

Option Settings

OSD Language
• Changes the language of the device. Options include English, Spanish, Chinese, German, French
- Restores the projector to factory settings.
Blending
- Blends images connected to device with background
OSD Duration
- Allows the projector to set a duration for the selected OSD language.
Brightness Feature

There are 3 different power modes for the M5: Boost, Standard, and Eco.
- Boost: The brightest mode. Only available while plugged in.
- Standard: A normal mode. Only available while plugged in.
- Eco: A battery saving mode that reduces picture brightness. 70 minute battery run time.
Keystone Adjustments

natural_image
Two side-by-side photos showing a football player in action and a close-up of a jersey with number 23 on the field, both without any visible text or symbols.What is Keystoneing?
"Keystoning" occurs when a projector is aligned non-perpendicularly to a screen, or when the projection screen has an angled surface. The image that results from one of these misalignments will look trapezoidal rather than square.
Digital Keystone Adjustments
By adding a special, selectable algorithm to the scaling, some new projectors are able to alter the image before it reaches the projection lens. The result is a squared image, even at an angle.
Keystone Adjustments FAQ
How to Correct Keystone
- If the image looks trapezoidal with the base larger (as pictured right), press the bottom button on the directional pad on the top of the M5 until the keystone effect corrects and the picture turns into a square projection.
- If the image looks trapezoidal with the top larger (as pictured right), press the top button on the directional pad on the top of the M5 until the keystone effect corrects and the picture turns into a square projection.
natural_image
Group of soccer players celebrating on a field (no visible text or symbols)

natural_image
Action shot of a soccer match with players in blue and yellow uniforms competing for the ball on the field (no visible text or signage)
natural_image
Action shot of a soccer match with players in action on the field (no visible text or symbols)

natural_image
Action shot of a football match with players in blue and yellow jerseys competing for the ball on the field, surrounded by spectators (no visible text or signage)Technical Details
Chapter 5
Troubleshooting
IMAGE IS BLURRED
| Possible Causes Solution | |
| The Projector is not in focus Adjust the focus with the focus adjustment dial until the image comes into focus | |
| The Projector is offset from plane / angle of operation | Move the projector so that it is both 180 degrees and on an evern plane with the screen. |
NO SYNC, NO SIGNAL
- Be sure to setup the computer to enable a video signal output. On some laptops this is done by pressing and holding Function F5 key. If using the M5 as an external monitor on Windows based systems, this can be done by selecting "extend my desktop to this monitor". The native resolution of the M5 projector is 1280x800. Depending on the video driver different resolutions may need to be selected for proper output.
Technical Details
Troubleshooting
THE PROJECTOR DOES NOT TURN ON
| Possible Causes Solution | |
| There is no power Check to ensure the power outlet source is good.Check the power adapter to ensure a proper connection with the wall outlet as well as the projector. Confirm that the unit is charged and has enough power | |
| The power button was not held long enough To power on the projector, the power button needs to be depressed for a full 3 seconds. Try holding the power button until the optical engine turns on | |
NO PICTURE / FILE NOT SUPPORTED
| Possible Causes Solution | |
| The video source is not properly connected or selected | Check the video source signal to ensure that it is properly connected. Select the current input source by choosing the input desired from the main menu |
| Incorrect file extension / Video is encoded with incorrect codec | Please refer to “Specifications” page to see which file types and codex are supported. Verify that the file was encoded properly. |
Specifications
Brightness:
Native Resolution:
Contrast Ratio:
Aspect Ratio:
Projection Lens:
Image Size:
Lamp:
Video in:
900 Lumens
1280x800
2000:1
16:9
Manual Focus
10\~150 inches
Triple RGB LEDs with Vibrant Color
Technology Life 20,000hrs
Composite A/V
VGA
HDMI
Audio Output:
SD Card:
USB:
Dimensions:
Weight:
Supported File Formats:
2.0 W stereo speaker
3.5 mm audio jack
MicroSD Card Slot
(32GB maximum)
5 Pin USB 2.0 (Full Size)
(32GB maximum)
6" x 6" x 1.8"
1.95 lbs
MP3, WMA, OGG, WAV, AVI, WMV, SMV,
BMP, JPG, GIF, TXT
Notes
Please direct all customer service inquiries to:
AAXA Technologies, Inc.
17691 Mitchell N., Unit #B
Irvine, CA 92614
(714) 957-1999
info@aaxatech.com
- Caution!
- Caution for Headphone Use
- Table of Contents
- Chapter 1: M5 at a Glance
- Chapter 2: Getting Started
- Chapter 3: Menu Screens
- Chapter 4: Setup Menu
- Chapter 5: Technical Details
- M5 at a Glance
- Chapter 1
- Main Unit Front/Back
- Remote & Keypad
- Accessories
- Getting Started
- Chapter 2
- Powering ON the projector
- Standby Mode
- Powering OFF the projector
- Focus Adjustment / Throw Distance
- Focus Adjustment
- Connecting to a Computer via VGA
- Step 1:
- Step 2:
- Step 3:
- Connecting to a Computer Cont.
- Step 4:
- Connecting to a Computer via HDMI
- Connecting to Composite Video
- Connecting to Composite Video Cont.
- Connectivity with multimedia devices
- Connecting to HDMI Video
- Connecting to HDMI Video Cont.
- Connecting Speakers / Headphones
- Micro SD Card
- How to insert your Micro SD Card
- How to access your Micro SD Card
- Micro SD Card Cont.
- Media Player menu
- File Menu System
- USB Drive
- How to insert your USB Drive
- How to access your USB Drive
- USB Drive Cont.
- Menu Screens
- Chapter 3
- Main Menu
- Video Player Menu
- Opening a file:
- Previewing Files:
- While Playing Videos
- Enter Video Player Submenu
- Video Player Sub-Menu
- Playing Videos
- Video Playback FAQ
- How do I loop a video?
- How do I preview a video?
- Photo Menu
- While Viewing Pictures
- Enter Photo Player Submenu
- Photo Sub-Menu
- Viewing Pictures:
- Photo Slideshow FAQ
- How do I play a slideshow?
- How do I manually control the slideshow?
- Music Player Menu
- Listening To Audio:
- Music Playback FAQ
- How do I loop a song?
- How do I create a song playlist?
- E-Book Viewer Menu
- Viewing Text Files:
- Setup Menu
- Chapter 4
- Picture
- Sound
- Time
- Option
- Picture Settings
- Picture Mode
- Color Temperature
- Aspect Ratio
- Brightness Mode
- Projection
- Sound Settings
- Sound Mode
- Time Settings
- Sleep Timer
- Auto Sleep
- Option Settings
- OSD Language
- Blending
- OSD Duration
- Brightness Feature
- Keystone Adjustments
- Digital Keystone Adjustments
- Keystone Adjustments FAQ
- How to Correct Keystone
- Technical Details
- Chapter 5
- Troubleshooting
- NO SYNC, NO SIGNAL
- Specifications
- Notes
Brand : AAXA Technologies
Model : M5
Category : Video projector