
EPL636S1 - Range hood ELICA - Free user manual and instructions
Find the device manual for free EPL636S1 ELICA in PDF.


| Brand | Elica |
| Model | EPL636S1 |
| Product type | Range hood |
| Width | 90 cm (36 inches) |
| Power supply | 120 V AC, 60 Hz, 15 or 20 A |
| Number of speeds | 4 speeds (1 to 4) |
| Lighting | 2 halogen lamps 120 V, 50 W max, GU10 base |
| Timer | Yes, adjustable from 1 to 60 minutes |
| Clock | Yes, 12-hour format |
| Display | Digital display with backlight |
| Ventilation type | External exhaust (6-inch round duct) or recirculation (charcoal filter option) |
| Grease filters | 2 dishwasher-safe metal filters |
| Charcoal filters | Optional, replace every 4 to 6 months |
| Temperature alarm | Yes, automatically activates 3rd speed at >149 °F (65 °C) |
| Filter saturation signal | Yes: grease after 40 h, charcoal after 120 h |
| Acoustic signals | Can be enabled/disabled |
| Installation type | Wall mounting or under cabinet |
| Duct | Metal only, minimum diameter 6 in. (15.2 cm) |
| Minimum distance from cooking surface | 30 in. (76.2 cm) |
| Warranty | 2 years parts and labor |
| Consumable parts | Halogen bulbs, grease filters, charcoal filters |
Frequently Asked Questions - EPL636S1 ELICA
User questions about EPL636S1 ELICA
0 question about this device. Answer the ones you know or ask your own.
Ask a new question about this device
Download the instructions for your Range hood in PDF format for free! Find your manual EPL636S1 - ELICA and take your electronic device back in hand. On this page are published all the documents necessary for the use of your device. EPL636S1 by ELICA.
USER MANUAL EPL636S1 ELICA
natural_image
Isometric line drawing of a kitchen chimney structure (no text or symbols)EN Contents page 2
FR Sommaire page 15
Important safety Notice....3
Electrical & Installation requirements 4
Electrical requirements 4
Before installing the hood 4
List of Materials....5
Parts supplied 5
Parts not supplied 5
Dimensions and Clearances....5
Duct Options and Examples....6
Installing Preparation....6
Mounting the duct cover bracket....7
Ceiling / wall ducting 7
Installation 8
Mounting the hood 8
Electrical Connection....9
Description of the hood & Controls.... 10
Controls....10
Maintenance ....11
Available Accesories....12
Warranty 13
APPROVED FOR RESIDENTIAL APPLIANCES
READ AND SAVE THESE INSTRUCTIONS
PLEASE READ ENTIRE INSTRUCTIONS BEFORE PROCEEDING.
INSTALLATION MUST COMPLY WITH ALL LOCAL CODES.
IMPORTANT: Save these Instructions for the Local Electrical Inspector's use.
INSTALLER: Please leave these Instructions with this unit for the owner.
OWNER: Please retain these instructions for future reference.
Safety Warning: Turn off power circuit at service panel and lock out panel, before wiring this appliance.
Requirement: 120 V AC, 60 Hz. 15 or 20 A Branch Circuit
READ AND SAVE THESE INSTRUCTIONS
Important safety Notice
CAUTION
FOR GENERAL VENTILATING USE ONLY. DO NOT USE TO EXHAUST HAZARDOUS OR EXPLOSIVE MATERIALS OR VAPOURS.
WARNING
TO REDUCE THE RISK OF FIRE, ELECTRIC SHOCK, OR INJURY TO PERSONS, OBSERVE THE FOLLOWING:
A. Use this unit only in the manner intended by the manufacturer. If you have questions, contact the manufacturer.
B. Before servicing or cleaning the unit, switch power off at service panel and lock service panel disconnecting means to prevent power from being switched on accidentally. When the service disconnecting means cannot be locked, securely fasten a prominent warning device, such as a tag, to the service panel.
C. Installation work and electrical wiring must be done by qualified person(s) in accordance with all applicable codes & standards, including fire-rated construction.
D. Sufficient air is needed for proper combustion and exhausting of gases through the flue (Chimney) of fuel burning equipment to prevent back- drafting. Follow the heating equipment manufacturers guideline and safety standards such as those published by the National Fire Protection Association (NFPA), the American Society for Heating, Refrigeration and Air Conditioning Engineers (ASHRAE), and the local code authorities.
E. When cutting or drilling into wall or ceiling, do not damage electrical wiring and other hidden utilities.
F. Ducted systems must always be vented to the outdoors.
CAUTION
To reduce risk of fire and to properly exhaust air, be sure to duct air outside - do not vent exhaust air into spaces within walls, ceilings, attics, crawl spaces, or garages.
WARNING
TO REDUCE THE RISK OF FIRE, USE ONLY METAL DUCT WORK.
Install this hood in accordance with all requirements specified.
WARNING
To reduce the risk of fire or electric shock, do not use this hood with any external solid state speed control device.
WARNING
TO REDUCE THE RISK OF A RANGE TOP GREASE FIRE.
a) Never leave surface units unattended at high settings. Boilovers cause smoking and greasy spillovers that may ignite. Heat oils slowly on low or medium settings.
b) Always turn hood ON when cooking at high heat or when flambeing food (I.e. Crepes Suzette, Cherries Jubilee, Peppercorn Beef Flambe').
c) Clean ventilating fans frequently. Grease should not be allowed to accumulate on fan or filter.
d) Use proper pan size. Always use cookware appropriate for the size of the surface element.
WARNING
TO REDUCE THE RISK OF INJURY TO PERSONS, IN THE EVENT OF A RANGE TOP GREASE FIRE, OBSERVE THE FOLLOWING: ^a
a) SMOTHER FLAMES with a close-fitting lid, cookie sheet, or other metal tray, then turn off the gas burner or the electric element. BE CAREFUL TO PREVENT BURNS. If the flames do not go out immediately, EVACUATE AND CALL THE FIRE DEPARTMENT.
b) NEVER PICK UP A FLAMING PAN - you may be burned.
c) DO NOT USE WATER, including wet dishcloths or towels - a violent steam explosion will result.
d) Use an extinguisher ONLY if:
1) You know you have a class ABC extinguisher, and you already know how to operate it.
2) The fire is small and contained in the area where it started.
3) The fire department is being called.
4) You can fight the fire with your back to an exit.
^a Based on “Kitchen Fire Safety Tips” published by NFPA.
OPERATION
a. Always leave safety grills and filters in place. Without these components, operating blowers could catch onto hair, fingers and loose clothing.
The manufacturer declines all responsibility in the event of failure to observe the instructions given here for installation, maintenance and suitable use of the product. The manufacturer further declines all responsibility for injury due to negligence and the warranty of the unit automatically expires due to improper maintenance.
CAUTION
Automatically operated device - to reduce the risk of injury disconnect from power supply before servicing.
Electrical & Installation requirements
Electrical requirements
IMPORTANT
Observe all governing codes and ordinances.
It is the customer's responsibility:
To contact a qualified electrical installer.
To assure that the electrical installation is adequate and in conformance with National Electrical Code, ANSI/NFPA 70 — latest edition*, or CSA Standards C22.1-94, Canadian Electrical Code, Part 1 and C22.2 No.0-M91 - latest edition** and all local codes and ordinances.
If codes permit and a separate ground wire is used, it is recommended that a qualified electrician determine that the ground path is adequate.
Do not ground to a gas pipe.
Check with a qualified electrician if you are not sure range hood is properly grounded.
Do not have a fuse in the neutral or ground circuit.
IMPORTANT
Save Installation Instructions for electrical inspector's use.
The range hood must be connected with copper wire only.
The range hood should be connected directly to the fused disconnect (Or circuit breaker) box through metal electrical conduit.
Wire sizes must conform to the requirements of the National Electrical Code ANSI/NFPA 70 — latest edition*, or CSA Standards C22.1-94, Canadian Electrical Code Part 1 and C22.2 No. 0-M91 - latest edition** and all local codes and ordinances.
A U.L.- or C.S.A.-listed conduit connector must be provided at each end of the power supply conduit (at the range hood and at the junction box).
Copies of the standards listed may be obtained from:
* National Fire Protection Association Batterymarch Park Quincy, Massachusetts 02269
** CSA International 8501 East Pleasant Valley Road Cleveland, Ohio 44131-5575
Before installing the hood
- For the most efficient air flow exhaust, use a straight run or as few elbows as possible. CAUTION: Vent unit to outside of building, only.
- At least two people are necessary for installation.
- Fittings material is provided to secure the hood to most types of walls/ceilings, consult a Qualified Installer, check if they perfectly fit with your cabinet/wall.
- Do not use flex ducting.
- COLD WEATHER installations should have an additional backdraft damper installed to minimize backward cold air flow and a nonmetallic thermal break to minimize conduction of outside temperatures as part of the ductwork. The damper should be on the cold air side of the thermal break. The break should be as close as possible to where the ducting enters the heated portion of the house.
- Make up air: Local building codes may require the use of Make-Up Air Systems when using Ducted Ventilation Systems greater than specified CFM of air movement. The specified CFM varies from locale to locale. Consult your HVAC professional for specific requirements in your area.
Removing the packaging
CAUTION!
Remove carton carefully, wear gloves to protect against sharp edges.
WARNING!
Remove the protective film covering the product before putting into operation.
List of Materials
Parts supplied
Removing the packaging
CAUTION!
Remove carton carefully, wear gloves to protect against sharp edges.
WARNING!
Remove the protective film covering the product before putting into operation.
• Hood canopy assembly with blower, transition.
• 2 Halogen lamps.
• 2 Grease filters.
- Duct cover.
- Hardware bag with:
- Template.
• Duct cover support bracket (1 piece)
• Use, care and installation guide
• Wood screws (6 pieces - 5 x 45) - Assembly screws
-2(2.9×6.5)
- 2 (3.5 × 9.5)
• Hood attachment anchors screws
-2(8×40)
- 4 (10 × 50)
Parts not supplied
Optional Accessories
• Ductless Recirculating Kit
To be used only in the Ductless (Recirculating) version includes: 2 charcoal filters and deflector
• Professional Stainless Steel Grease filter
Tools/Materials required
- Wire nuts
- Tape to mount template
- 6" rounded metal duct length to suit installation
- Measuring tape
- Pliers
- Gloves
- Knife
- Safety glasses
• Electric drill with 5/16" and 3/8" Bits - Strain relief
- Spirit level
- Duct tape
- Screwdrivers:
Phillips (Posidrive) # 2
Torx # 2
- Wire cutter/stripper
- Masking tape
- Hammer
• Saw, jig saw or reciprocating saw
Dimensions and Clearances

Ducting Options and Examples
Closely follow the instructions set out in this manual.
All responsibility, for any eventual inconveniences, damages or fires caused by not complying with the instructions in this manual, is declined.
Venting methods
The hood is equipped with a transition B for discharge of fumes to the outside (Ducting version).
Should it not be possible to discharge cooking fumes and vapour to the outside, the hood can be used in the Ductless (Recirculating) version. Attach a charcoal filter and the deflector F on the duct cover support bracket G. Fumes and vapours are recycled through the top grille H by means of a duct connected to the transition B and the transition mounted on the deflector F.
NOTE: For ductless (Recirculating) version only: purchase the Ductless Recirculating Kit.
Minimum Duct Size (Ducting/Ductless version): 6" Round Pipe.


Preparation
Do not cut a joist or stud unless absolutely necessary. If a joist or stud must be cut, then a supporting frame must be constructed.
Fittings material is provided to secure the hood to most types of walls/ceilings.
However, a qualified technician must verify suitability of the materials in accordance with the type of wall/ceiling.
Before making cutouts, make sure there is proper clearance within the ceiling or wall for exhaust vent.
CAUTION:
FOR GAS RANGES INSTALLATION: MOUNT THIS HOOD SO THAT THE BOTTOM EDGE IS AT 30" (76,2 CM) ABOVE THE COOKING SURFACE.
HOUSEHOLD USE. PLEASE, READ INSTALLATION MANUAL FOR SPECIFIC APPLICATION.
Check your ceiling height and the hood height maximum before you select your hood.
Mounting the duct cover bracket
Option A - Fixed heigh duct cover
• From the horizontal line traced in the previous section, trace a horizontal parallel line as shown below.
- Center the bracket in the top horizontal line and align it with the centerline, as described in the followingG drawing.
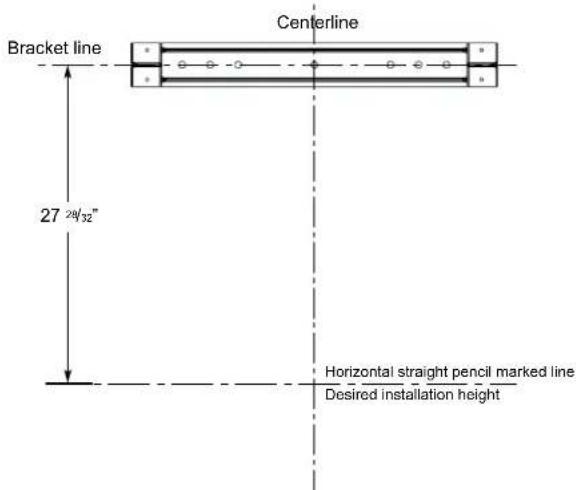
Mark screw holes locations in the wall.
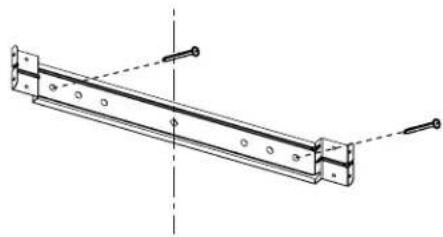
IMPORTANT. Check to be sure that holes locations are leveled, and correctly centered by the vertical centerline. Drill 5/16" pilot holes in the marked locations. Install wall fastener anchors.
Drive wood screws, by hand, into the fasteners to allow anchors to expand. Remove screws.
Secure the bracket to the wall with wood screws and/or fasteners.
natural_image
Technical line drawing of a mechanical bracket with mounting holes and dashed alignment lines (no text or symbols)Option B - Telescopic duct cover
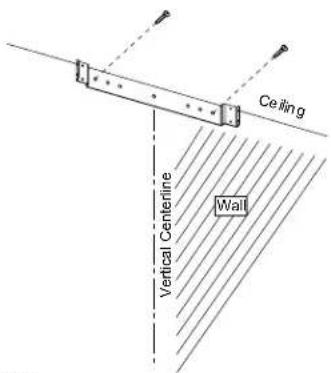
The duct bracket should be installed against the back wall and flush with the ceiling. This bracket will hold the duct cover in place at the top (this a extra accessory available not included with the hood).
Secure the bracket to the wall:
- Align the marked centerline on the bracket with the centerline on the wall.
• Mark 2 screw hole locations in the wall. - Drill 5/16" pilot holes in the marked locations.
• Install wall fastener anchors. - Drive wood screws, by hand, into the fastener to allow anchors to expand. Remove the screws.
- Secure the bracket to the wall with wood screws and/or fasteners.
Ceiling ducting
If the duct will vent straight up to the ceiling:
- Use level to draw a line straight up, from the centerline on the template to the ceiling.
- Measure at least 4 -12/16 " from the back wall to the circle center of an 6- 12 " hole on the ceiling.
Wall ducting
If ductwork will vent to rear:
- Use a level to draw a line straight up from the centerline on the template.
- Measure at least 23 - 12/16" (the measure might vary dependig on the elbow used) above the pencil line that] indicates the bottom installation height, to the circle center of an 6 - 12 " diameter duct hole (Hole may be elongated for duct elbow).
House wiring location
- The junction box is located on the top left side of the hood.
- Wiring should enter the back wall at least 20" above the bottom of the installation height, and within 3 ^5/16 " of the left side of the centerline.

Install framing for hood support
- If drywall is present, mark the screw hole locations. Remove the template.
- Cut away enough drywall to expose 2 vertical studs at the holes location indicated by the template.
Install two horizontal supports at least 4" X 2" between two wall studs at the bottom and upper mounting holes installation location. - The horizontal support must be flush with the room side of the studs.
Use cleats behind both sides of the support to secure to wall studs.
• Reinstall drywall and refinish.
IMPORTANT- Framing must be capable of supporting 100 lbs.

Mounting the hood WARNING:
• 2 people are required to lift and position the hood onto the mounting screws.
- Place the template on the wall along the horizontal line, make sure the template is leveled and centered with the centerline.
• Mark "upper" screw holes locations in the wall.
• IMPORTANT. Check to be sure that hole locations are leveled and correctly centered by the vertical centerline.
- Drive "upper" wood screws by hand. Leave 14 " of distance between the screw head and the wall.
- Remove the grease filter and mount the hood onto the "upper" screws.

natural_image
Technical line drawing of a mechanical assembly with labeled component C (no text or symbols present)- Mark "lower" wood screw holes locations in the wall using a pencil.

natural_image
Line drawing of a kitchen appliance with a hand holding a tool, no text or symbols present- Remove the hood.
- Drive "lower" wood screws, by hand. Remove screws.
- Mount the hood onto the "upper" screws.
- Drive and tighten the "upper" wood screws, by hand.
- Drive and tighten the "lower" wood screws, by hand.

natural_image
Technical line drawing of a vehicle roof structure with directional arrows indicating motion (no text or symbols)Connecting the ductwork
• Install ductwork, making connections in the direction of airflow as illustrated.
- Push duct over the exhaust outlet.
- Wrap all duct joints and the flange connections with duct tape for an airtight seal.
• Make the same connection in the wall or ceiling vent exit.

Electrical connection
WARNING
Electrical Shock Hazard
Warning: Turn off power circuit at the service panel before wiring this unit.
120 VAC, 15 or 20 Amp circuit required.
ELECTRICAL GROUNDING INSTRUCTIONS
THIS APPLIANCE IS FITTED WITH AN ELECTRICAL JUNCTION BOX WITH 3 WIRES, ONE OF WHICH (GREEN/YELLOW) SERVES TO GROUND THE APPLIANCE. TO PROTECT YOU AGAINST ELECTRIC SHOCK, THE GREEN AND YELLOW WIRE MUST BE CONNECTED TO THE GROUNDING WIRE IN YOUR HOME ELECTRICAL SYSTEM, AND IT MUST UNDER NO CIRCUMSTANCES BE CUT OR REMOVED.
Failure to do so can result in death or electrical shock.
-
Disconnect power.
-
Remove terminal box cover.
-
Remove the knockout in the terminal box and install a UL listed or CSA approved 12 " strain relief.
-
Run home power supply wiring through 12 " strain relief into terminal box.

A. UL listed wire connectors
B. White wires
C. Black wires
D. Green (or bare) wire connected to
yellow-green wires
E. Home power supply
-
Use UL listed wire connectors and connect white wires (B) together.
-
Use UL listed wire connectors and connect black wires (C) together.
Electrical Shock Hazard
Electrically ground blower.
Connect ground wire to green and yellow ground wire in terminal box.
Failure to do so can result in death or electrical shock.
-
Connect green (or bare) ground wire from home power supply to the 2 yellow-green ground wires (D) in terminal box using UL listed wire connectors.
-
Tighten strain relief screw.
-
Install terminal box cover.
-
Reconnect power.
Mounting the duct cover
Note: Upper Duct Cover may be placed upside down to hide (or unhide) louver holes.
• Position the duct cover over the mounted hood.
- Slide the bottom of the duct into the canopy area.
- Position the top of the duct over the duct mounting bracket. If a telescopic duct cover is used, grab the upper part of the telescopic duct cover, pull it and place it in the duct cover mounting bracket.
- Secure the top of the duct with 2 assembly screws provided.

natural_image
Technical line drawing of a mechanical device with a cylindrical component and a base unit, showing no text or symbols.Install the grease filter and turn power on at service panel. Check operation of the hood.
If range hood does not operate:
- Check that the circuit breaker is not tripped or the house fuse blown.
- Disconnect power supply. Check that wiring is correct.
- Check that the internal General ON/OFF Push button Switch is switched ON.
To get the most efficient use from your new range hood, read the "Use and Care Information" section.
Keep your Installation Instructions and Use and Care Guide close to range hood for easy reference.
Description of the hood & Controls
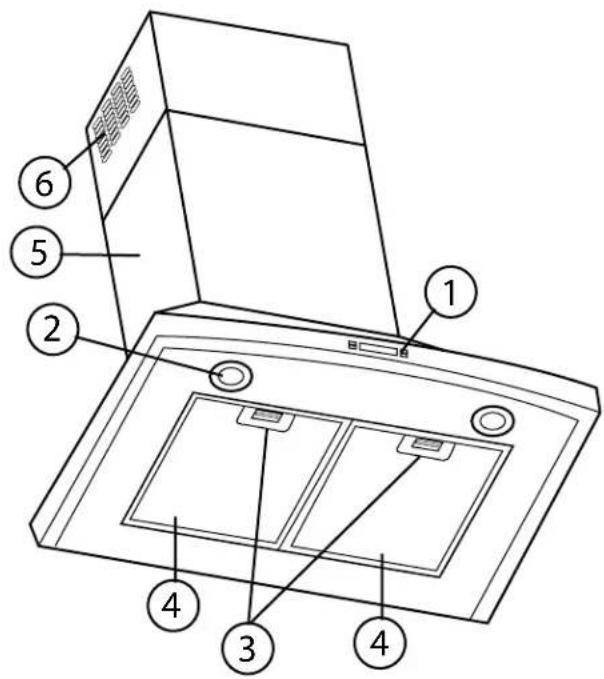
- Blower and light controls
- Lamp housings
- Grease filter Handle
- Grease filter
- Duct covers
- Louver holes (Only for Recirculating version)
Controls
Use the high suction speed in cases of concentrated kitchen vapours. It is recommended that the cooker hood suction is switched on for 5 minutes prior to cooking and to leave in operation during cooking and for another 15 minutes approximately after terminating cooking.
Note: Hood retains last speed setting when aspiration switch is turned off.
Description of control panel

1. Light Button
- Press lamp button to turn ON the light on High Intensity (Lamp state previously OFF).
- Press lamp button to turn ON the light on Low Intensity (Lamp state previously ON).
- Press lamp button to turn OFF the light (Lamp state previously ON).
2. Timer Button
- The default timer setting is 10 minutes, and it can be adjusted between 60 minutes and 1 minute.
- After pressing the timer button, the control enters to a timer setup mode, and user can adjust the timer countdown time with the "+" and "-" buttons within 5 seconds. The timer can be initiated immediately pressing the timer button, after setting the timer duration or pressing the timer button twice (default 10 minutes setting).
- If no action occurs within 5 seconds, the countdown will start.
- During the timer setup the "+" and "-" buttons are dedicated to the timer and no motor action will occur.
- Once the timer is initiated, it can be cancelled by pressing the timer button again.
3. Display
• Shows the hood settings.
- The display will be lit at low intensity when the hood is not operating.
- Pressing any key the display will light up at high intensity.
- The display will be lit at high intensity when the hood is operating.
If no key is pressed within a minute the display will return to being lit at low intensity.
4. “-” Button. Speed Decrease / OFF
- This button is used to decrease the fan speed, or turn OFF the fan.
- The fan will turn OFF if the "-" button is pressed and the hood was in the first speed.
- If the fan is at second speed and the “-” button is pressed, the fan will be set to first speed.
- If the fan is at third speed and the “-” key is pressed, the fan will be set to second speed.
- If the fan is at fourth speed and the “-” button is pressed, the fan will be set to third speed.
- If the fan is OFF and the "-" button is pressed, the control backlight will light up.
5. “+” Button. Speed Increase / ON
- This button is used to increase the fan speed, or turn ON the fan.
- The fan will turn ON if the “+” button is pressed and the hood was OFF.
- If the fan is at first speed and the "+" button is pressed, the fan will be set to second speed.
- If the fan is at second speed and the "+" button is pressed the fan will be set to third speed.
- If the fan is at third speed and the "+" button is pressed, the fan will be set to fourth speed.
- If the fan is at fourth speed and the "+" button is pressed, a beep will sound.
Clock programming
- The clock can be reprogrammed at any time except during an active timed function.
- The clock can be displayed in a twelve hour format and valid clock times are from 1:00 to 12:59.
- The clock can be reprogrammed pressing the "Timer" button for 3 seconds, and after, the clock can be adjusted with the "+" and "-" buttons.
- The user can have minute increments / decrements of 1 minute, but if the user keep pressing the "+" / "-" buttons for more than 1 second, the increments / decrements will be of 5 minutes.
- During this option the control will round to the nearest 5 minutes.
- The user can finish on reprogramming the clock pressing the "Timer" button.
• After 1 minute of no button pressed the control will accept the programmed clock time and will add one minute to the set clock
Grease filter saturation alarm (Optional)
- After thirty fan functional hours, the display will show "Grease Filter" if the fan is active. When this icon is shown in the display, the grease filters installed are required to be washed.
- To reset the grease filter saturation alarm the user must press the "+" button for 5 seconds, after this action the icon "Grease filter" is not displayed, and the hood has the normal display operation.
Charcoal filter saturation alarm (Optional)
- After one hundred and twenty functional hours of the fan, the display will show "Charcoal Filter" if the fan is active. When this icon flashes on display, the charcoal filters installed are required to be replaced or reactivated.
- To reset the charcoal filter saturation indication the user must press the "-" button for 5 seconds, after this time the icon "Charcoal filter" is not displayed and the hood has the normal display operation.
Audible signal activation and deactivation
- The audible signals can be activated or deactivated pressing the "Light" button for 5 seconds.
- If the audible signal is activated, a tone must sound and the "Snd" symbol must appear on the display for 3 seconds.
- If the audible signal is deactivated, the "Snd" symbol must appear on the display for 3 seconds and no tone must sound.
Charcoal filter inclusion and exclusion (Recirculating accessories)
- The charcoal filter inclusion or exclusion can be set by pressing the "+" and "-" buttons at the same time for 5 seconds.
- The Inclusion or exclusion of charcoal filter must be selected while the lamps and the motor are OFF.
- When the charcoal filter has been excluded, the charcoal filter alarm is disabled.
Heat sensor
- The control is equipped with a heat sensor that will turn on the blower at third speed if excessive heat occurs (over 149^ or 65^ ) surrounding the control area.
- If the blower is OFF or if it is operating at first speed, the blower will be set automatically to third speed, the display shows the word "CArE" to indicate that heat sensor has detected an excessive heat.
- During this state, the user may raise the blower speed to fourth speed but can not decrease the speed.
- When the temperature level on the hood drops to normal, the blower will operate in the setting defined by the user before the alarm occurred.
Maintenance
ATTENTION! Before performing any maintenance operation, isolate the hood from the electrical supply by switching off at the connector and removing the connector fuse.
Or if the appliance has been connected through a plug and socket, then the plug must be removed from the socket.
Cleaning
Do not spray cleaners directly to the control while cleaning the Hood. The cooker hood should be cleaned regularly (at least with the same frequency with which you carry out maintenance of the fat filters) internally and externally. Clean using the cloth dampened with neutral liquid detergent. Do not use abrasive products. DO NOT USE ALCOHOL!
WARNING:
Failure to carry out the basic cleaning recommendations of the cooker hood and replacement of the filters may cause fire risks.
Therefore, we recommend observing these instructions.
The manufacturer declines all responsibility for any damage to the motor or any fire damage linked to inappropriate maintenance or failure to observe the above safety recommendations.
Grease Filter
Traps cooking grease particles.
The filters should be washed frequently using non aggressive detergents, either by hand or in the dishwasher, which must be set to a low temperature and a short cycle.
When washed in a dishwasher, the grease filter may discolour slightly, but this does not affect its filtering capacity.
To remove the grease filter, pull the spring release handle.

natural_image
Diagram showing a downward arrow and a rectangular object on a horizontal line, no text or symbols presentReplacing the Halogen Lamps
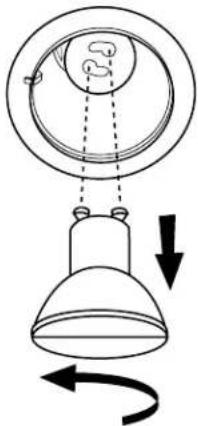
Turn off the hood insert and allow the halogen lamp to cool. To avoid damage or decreasing the life of the new bulb, do not touch bulb with bare fingers. Replace bulb, using tissue or wearing cotton gloves to handle bulb. If new lamps do not operate, make sure the lamps are inserted correctly before calling service.
- Disconnect power.
- Push up on the lens and turn it counterclockwise.
- Remove the bulb and replace it with a 120-volt, 50-watt maximum halogen bulb with a GU10 base. Turn it clockwise to lock it into place.
- Repeat steps 2-3 for the other bulb if needed.
- Reconnect power.
Available Accessories
Charcoal Filter
If the model is not vented to the outside, the air will be recirculated through disposable charcoal filters that help remove smoke and odors.
The charcoal filters cannot be cleaned.
They must be replaced.
Cover the grill that protects the suction motor with the carbon filter so that the slots on the filter correspond to the pins on the sides of the motor protection grill.
Turn the carbon filter clockwise to block them (bayonet fixing). The charcoal filters should be replaced every 4-6 months (depending on hood usage).
NOTE: DO NOT rinse, or put charcoal filters in an automatic dishwasher.
NOTE: Charcoal filters are not included with the hood.
They must be ordered from your supplier.
Order the needed kit specifying your hood model and width size.

natural_image
Exploded view diagram of a mechanical device showing internal components and a rotating knob (no text or labels)Air deflector installation (Recirculating version)
- Assemble the air deflector with the duct cover bracket with 2 - assembly screws provided.
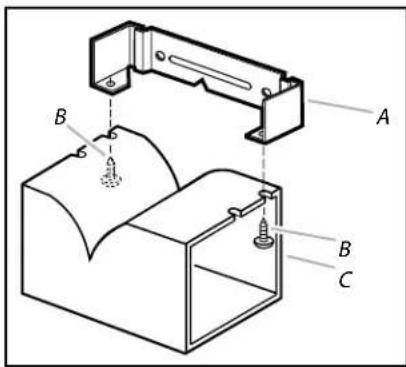
A. Vent cover bracket
B. 2.9 x 6.5 mm screws
C. Deflector
- Measure from the bottom of the air deflector to the bottom of the hood outlet.

A. Air deflector
B. Vent clamp
C. X = length to cut vent duct
D. Vent duct
E. Exhaust outlet
- Cut the duct to the measured size (X).
- Remove the air deflector.
- Slide the duct onto the bottom of the air deflector.
- Place the assembled air deflector and duct over the exhaust outlet from the hood.
- Reassemble the air deflector to the duct cover bracket with 2 assembly screws.
- Seal connections with vent clamps.
Warranty
ELICA North America
TWO-YEARS LIMITED WARRANTY
TO OBTAIN SERVICE UNDER WARRANTY
Owner must present proof of original purchase date. Please keep a copy of your dated proof of purchase (sales slip) in order to obtain service under warranty.
PARTS AND SERVICE WARRANTY
For the period of two (2) years from the date of the original purchase, Elica will provide free of charge, non consumable parts or components that failed due to manufacturing defects. During these two (2) years limited warranty, Elica will also provide free of charge, all labor and in-home service to replace any defective parts.
WHAT IS NOT COVERED
• Damage or failure to the product caused by accident or act of God, such as, flood, fire or earthquake.
- Damage or failure caused by modification of the product or use of non-genuine parts.
- Damage or failure to the product caused during delivery, handling or installation.
• Damage or failure to the product caused by operator abuse.
- Damage or failure to the product caused by dwelling fuse replacement or resetting of circuit breakers.
• Damage or failure caused by use of product in a commercial application.
• Service trips to dwelling to provide use or installation guidance.
• Light bulbs, metal or carbon filters and any other consumable part.
• Normal wear of finish.
- Wear to finish due to operator abuse, improper maintenance, use of corrosive or abrasive cleaning products/pads and oven cleaner products.
WHO IS COVERED
This warranty is extended to the original purchaser for products purchased for ordinary residential use in North America (Including the United States, Guam, Puerto Rico, US Virgin Islands & Canada).
This warranty is non-transferable and applies only to the original purchaser and does not extend to subsequent owners of the product. This warranty is made expressly in lieu of all other warranties, expressed or implied, including, but not limited to any implied warranty of merchantability or fitness for a particular purpose and all other obligations on the part of Elica North America, provided, however, that if the disclaimer of implied warranties is ineffective under applicable law, the duration of any implied warranty arising by operation of law shall be limited to two (2) years from the date of original purchase at retail or such longer period as may be required by applicable law.
This warranty does not cover any special, incidental and/or consequential damages, nor loss of profits, suffered by the original purchaser, its customers and/or the users of the Products.
WHO TO CONTACT
To obtain Service under Warranty or for any Service Related Question
Please Call:
• Elica North America Authorized Service at (888) 732-8018
Or by Writing To:
- Elica North America, Attention Customer Service, 222 Merchandise Mart Plaza Suite 947, Chicago, IL 60654 USA
infoamericas@elica.com
Français
Sommaire
* La National Fire Protection Association, Batterymarch Park Quincy, Massachusetts, 02269
** La CSA International, 8501 East Pleasant Valley Road, Cleveland, Ohio, 44131-5575
natural_image
Technical line drawing of a mechanical bracket with mounting holes and dashed alignment lines (no text or symbols)natural_image
Technical diagram of a mechanical assembly with labeled component C (no text or symbols present)natural_image
Line drawing of a hand holding a tool near a window frame (no text or symbols)natural_image
Technical line drawing of a mechanical component with dimension lines and arrows indicating motion (no text or symbols)A. Airflow
B. Duct tape over seam
natural_image
Technical line drawing of a mechanical device with a cylindrical component and a base unit, showing motion indicators (no text or symbols)natural_image
Diagram showing a downward arrow and a lightning bolt on a horizontal line, no text or symbols presentnatural_image
Diagram of a lamp with a hanging head and arrow indicating rotation (no text or symbols)Accesoires
Filtres à charbon
natural_image
Exploded view diagram of a mechanical device showing internal components and a circular component with an arrow indicating rotation (no text or symbols present)Electrical Connection....34
* National Fire Protection Association Batterymarch Park Quincy, Massachusetts 02269
** CSA International 8501 East Pleasant Valley Road Cleveland, Ohio 44131-5575
Antes de instalar la campana
natural_image
Technical line drawing of a mechanical bracket with mounting holes and dashed alignment lines (no text or symbols)Salida al techo
natural_image
Technical line drawing of a mechanical assembly with labeled component 'C' (no text or symbols beyond label)natural_image
Line drawing of a hand holding a tool near a window frame (no text or symbols)natural_image
Technical line drawing of a mechanical component with dimension lines and arrows indicating motion (no text or symbols)natural_image
Technical line drawing of a mechanical device with a cylindrical component and a base unit, showing no text or symbols.natural_image
Diagram showing a downward arrow and a rectangular object with a lightning bolt, no text or symbols presentAccesorios
Filtros de Carbón
natural_image
Exploded view diagram of a mechanical device showing internal components and a circular component with an arrow indicating rotation (no text or symbols present)LI30TA Ed. 04/12 Printed in Mexico
- APPROVED FOR RESIDENTIAL APPLIANCES
- READ AND SAVE THESE INSTRUCTIONS
- Important safety Notice
- CAUTION
- WARNING
- OPERATION
- Electrical & Installation requirements
- Electrical requirements
- IMPORTANT
- Before installing the hood
- Removing the packaging
- CAUTION!
- WARNING!
- List of Materials
- Parts supplied
- Parts not supplied
- Optional Accessories
- Tools/Materials required
- Dimensions and Clearances
- Ducting Options and Examples
- Venting methods
- Preparation
- CAUTION:
- Mounting the duct cover bracket
- Option A - Fixed heigh duct cover
- Option B - Telescopic duct cover
- Secure the bracket to the wall:
- Ceiling ducting
- Wall ducting
- House wiring location
- Install framing for hood support
- Mounting the hood WARNING:
- Connecting the ductwork
- Electrical connection
- Electrical Shock Hazard
- ELECTRICAL GROUNDING INSTRUCTIONS
- Mounting the duct cover
- If range hood does not operate:
- Description of the hood & Controls
- Controls
- Description of control panel
- Light Button
- Timer Button
- Display
- “-” Button. Speed Decrease / OFF
- “+” Button. Speed Increase / ON
- Clock programming
- Grease filter saturation alarm (Optional)
- Charcoal filter saturation alarm (Optional)
- Audible signal activation and deactivation
- Charcoal filter inclusion and exclusion (Recirculating accessories)
- Heat sensor
- Maintenance
- Cleaning
- WARNING:
- Grease Filter
- Traps cooking grease particles.
- Replacing the Halogen Lamps
- Available Accessories
- Charcoal Filter
- Air deflector installation (Recirculating version)
- Warranty
- ELICA North America
- TWO-YEARS LIMITED WARRANTY
- TO OBTAIN SERVICE UNDER WARRANTY
- PARTS AND SERVICE WARRANTY
- WHAT IS NOT COVERED
- WHO IS COVERED
- WHO TO CONTACT
- Français
- Sommaire
- Accesoires
- Filtres à charbon
- Antes de instalar la campana
- Salida al techo
- Accesorios
- Filtros de Carbón
Brand : ELICA
Model : EPL636S1
Category : Range hood