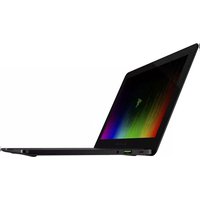
Blade Stealth - Laptop RAZER - Free user manual and instructions
Find the device manual for free Blade Stealth RAZER in PDF.


| Product Type | Ultraportable Gaming Laptop |
| Brand | Razer |
| Model | Blade Stealth |
| Processor | Intel Core i7 (6th Gen) |
| Memory | 8 GB LPDDR3 (onboard) |
| Storage | 256 GB PCIe SSD |
| Display | 12.5-inch QHD (2560x1440) or UHD (3840x2160) Touchscreen |
| Keyboard | Chroma backlit anti-ghosting keyboard with individually lit keys |
| Webcam | 2.0 MP front-facing |
| Audio | Stereo speakers with Dolby Digital Plus Home Theater Edition |
| Connectivity | Thunderbolt 3 (USB-C), 2x USB 3.0, HDMI 1.4b, 3.5mm combo jack |
| Wireless | Wi-Fi 802.11ac, Bluetooth 4.2 |
| Battery | Lithium-ion polymer, 53.6 Wh (typical) |
| Battery Charging Time | Approximately 3 hours (when powered off) |
| Power Adapter | USB-C 45W AC adapter |
| Dimensions (W x D x H) | 12.6 x 8.1 x 0.52 inches (320 x 206 x 13.2 mm) |
| Weight | Approximately 2.75 lbs (1.25 kg) |
| Operating System | Windows 10 Home (64-bit) |
| Software | Razer Synapse for customization and cloud sync |
| Warranty | 1 year limited manufacturer's warranty (battery: 1 year) |
| Package Contents | Laptop, USB-C power adapter, micro-fiber cleaning cloth, quick start guide |
| Cleaning Instructions | Use included micro-fiber cloth; avoid liquids and abrasives |
| Operating Temperature | 0°C to 40°C (32°F to 104°F) |
| Regulatory Compliance | FCC Class B, CE, etc. |
Frequently Asked Questions - Blade Stealth RAZER
User questions about Blade Stealth RAZER
0 question about this device. Answer the ones you know or ask your own.
Ask a new question about this device
Download the instructions for your Laptop in PDF format for free! Find your manual Blade Stealth - RAZER and take your electronic device back in hand. On this page are published all the documents necessary for the use of your device. Blade Stealth by RAZER.
USER MANUAL Blade Stealth RAZER
natural_image
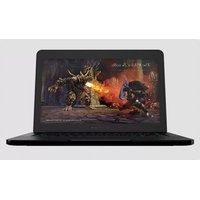
Abstract white line drawing of a flowing, organic shape on black background (no text or symbols)Designed for Gamers, the Razer Blade Stealth sets the new standard for ultra-mobility and extreme performance. The incredibly thin 0.52" CNC aluminum chassis encases an Intel® Core™ i7 processor, PCIe SSD, and the most visually stunning 12.5" high-resolution touch display. Never before seen in a notebook, the full-spectrum individually-lit Chroma keyboard enables unique personalization. The Razer Blade Stealth packs a full array of connectivity including Thunderbolt™ 3 (USB-C), 2x USB 3.0, HDMI, Bluetooth, and Wireless-AC for superior speed. For extreme performance, the Razer Blade Stealth fuses seamlessly with the optional Razer Core via Thunderbolt 3, delivering desktop graphics and expanded connectivity.
CONTENTS
- PACKAGE CONTENTS / REGISTRATION / TECHNICAL SUPPORT.... 3
- BASIC FEATURES .... 5
- SETTING UP YOUR RAZER BLADE STEALTH 6
- USING YOUR RAZER BLADE STEALTH .... 12
- CONFIGURING YOUR RAZER BLADE STEALTH .... 13
- SAFETY AND MAINTENANCE.... 37
7.LEGALESE....39
1. PACKAGE CONTENTS / REGISTRATION / TECHNICAL SUPPORT
PACKAGE CONTENTS
• Razer Blade Stealth 12" Notebook for Gamers
• USB-C power adapter
- Micro-fiber cleaning cloth
- Quick start guide
REGISTRATION
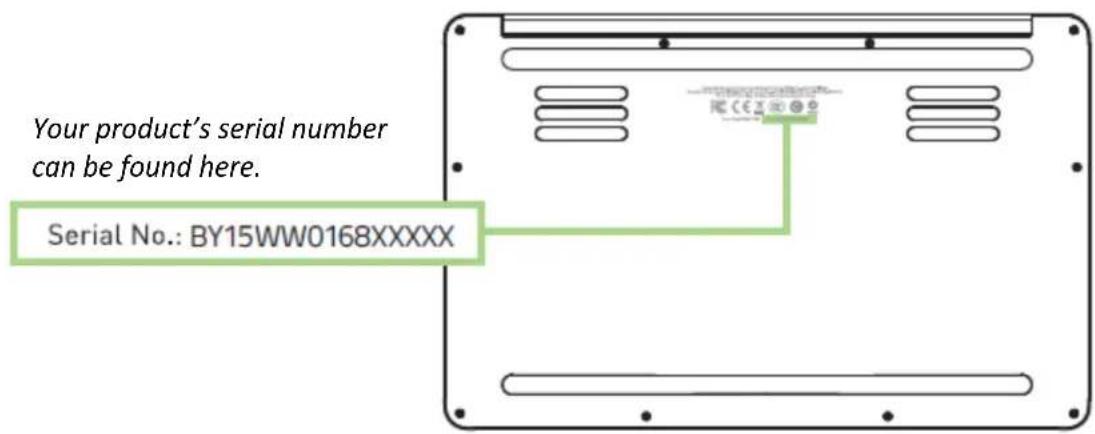
Visit www.razerzone.com/razer-id to sign up for a Razer ID now to get a wide range of Razer benefits. For example, get real-time information on your product's warranty status via Razer Synapse. To learn more about Razer Synapse and all its features, visit www.razerzone.com/synapse.
If you already have a Razer ID, register your product by clicking on your email address within the Razer Synapse application and select Warranty Status from the dropdown list.
To register your product online, visit www.razerzone.com/registration. Please note that you will not be able to view your warranty status if you register via the website.
TECHNICAL SUPPORT
What you'll get:
- 1 year limited manufacturer's warranty.
• 1 year limited battery warranty. - Access to manual and free online technical support at www.razersupport.com.
For further assistance, contact us:
| Country | Phone | |
| Australia | 1800-172937 | www.razersupport.com/contact-us |
| Canada / US | 1-855-87-25233 (BLADE) | |
| Dubai | 971-4-388-33-71 | |
| Korea | 798-8523-8003 | |
| Malaysia | 1800-8872937 | |
| Philippines | 1800-18530041 | |
| Singapore | 800-601-1456 | |
| Taiwan | 809 093 203 | |
| Thailand | +66 2018 2411 | |
| International | 1-760-448-8997 |
Other support options are also available by visiting www.razersupport.com.
2. BASIC FEATURES
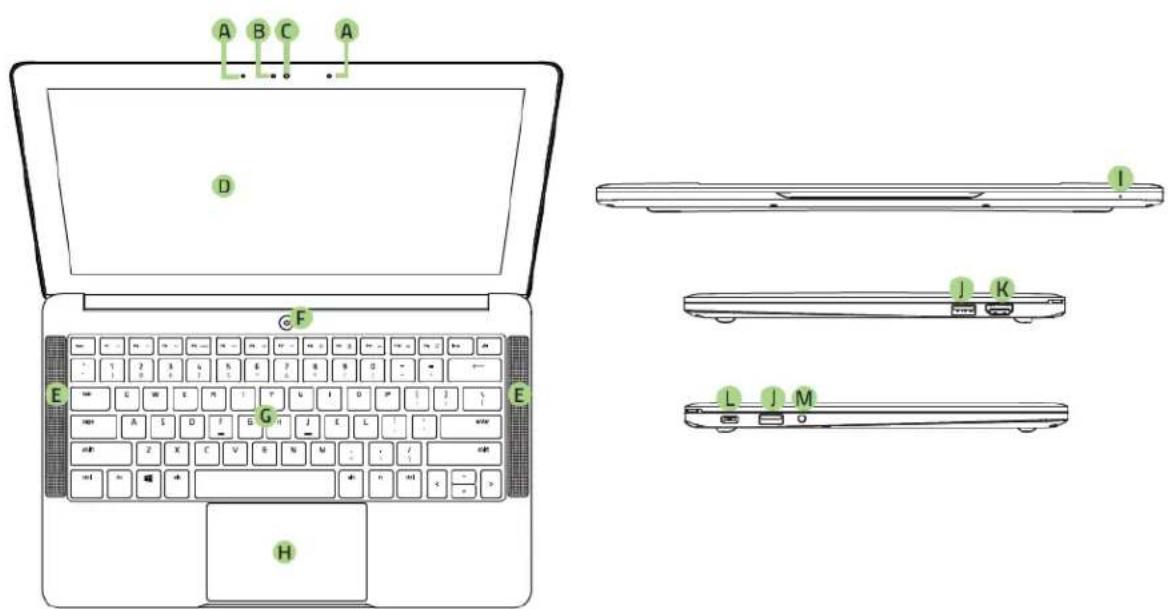
A. Array Microphone
B. Webcam Indicator Light
C. 2.0 MP Webcam
D. 12.5" QHD touch / UHD touch display
E. Stereo speakers incorporating Dolby® Digital Plus Home Theater Edition
F. Power Button
G. Anti-ghosting keyboard with Chroma backlighting
H. Multi-touch trackpad
I. Front LED Power Indicator
J. 2x USB 3.0 Ports
K. HDMI 1.4b Port
L. Power Port /
Thunderbolt ^TM 3 (USB-C)
M. 3.5mm Combo Port
3. SETTING UP YOUR RAZER BLADE STEALTH
Connect the Power Adapter as follows:

Make sure that the AC plug is properly inserted into the power outlet and the power adapter. An indicator will light up to show that the adapter is receiving appropriate power. Insert the power adapter's USB-C connector into the Razer Blade Stealth's power port. Press the power button to turn on your Razer Blade Stealth.

For first time use, please fully charge your Razer Blade Stealth or connect it to a power outlet before turning it on. It takes approximately 3 hours to fully charge the Razer Blade Stealth.
CONNECTING TO THE INTERNET
Disclaimer: The screens shown are subject to change based on the current version of your Operating System.
- Click the wireless network icon (图标) to bring up the Wireless network list.
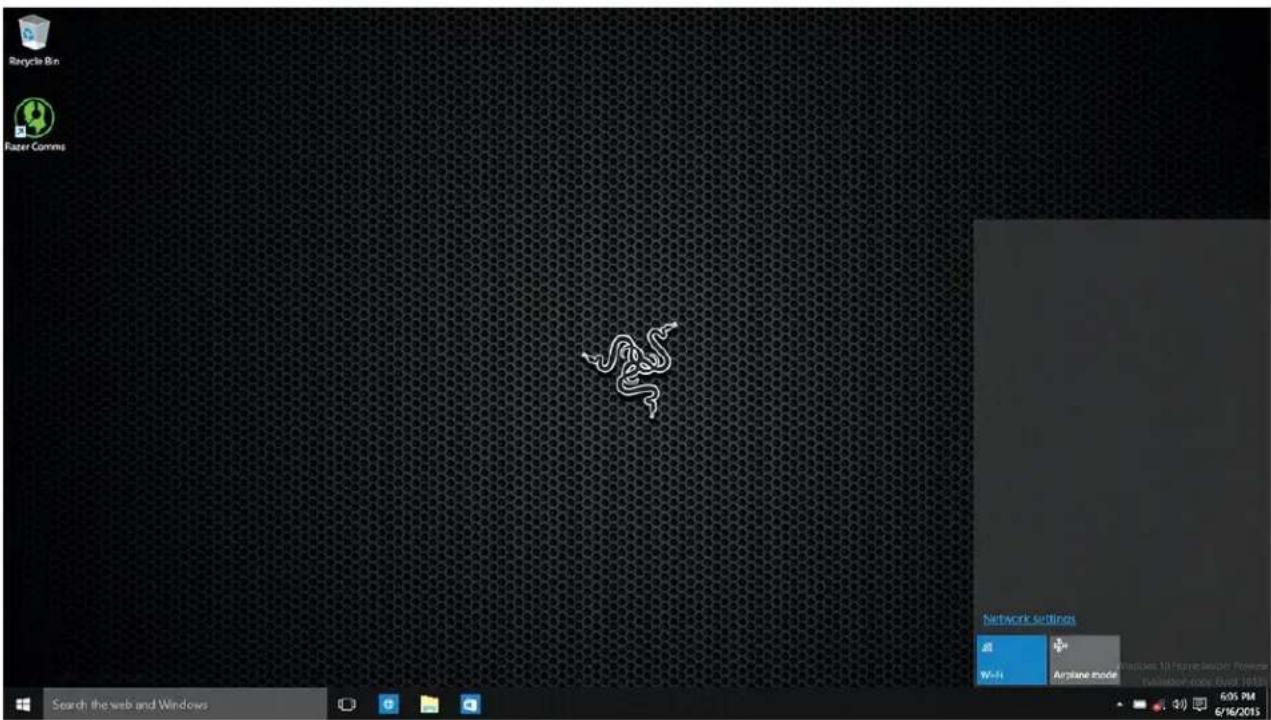
- Turn on wireless by clicking the Wi-Fi button on the bottom left corner of this window. The system will automatically search for wireless networks in range.

- Click the network you wish to connect to and click Connect.

- Enter the network password (if any) and select whether to enable network sharing. Click Next.

- Once you are connected to the wireless network, click anywhere outside the window to return to the desktop.
RAZER SYNAPSE ACCOUNT CREATION & INSTALLATION
Razer Synapse allows you to sync your Razer Blade Stealth and other supported Razer peripherals to a cloud server to download driver and firmware updates. You will also be able to configure the Switchblade User Interface, key bindings, profiles, macros, backlighting and more within the application. In addition, Razer Synapse will allow you to immediately register your product and get real-time information on your product's warranty status. All your custom settings will be stored in the cloud too.
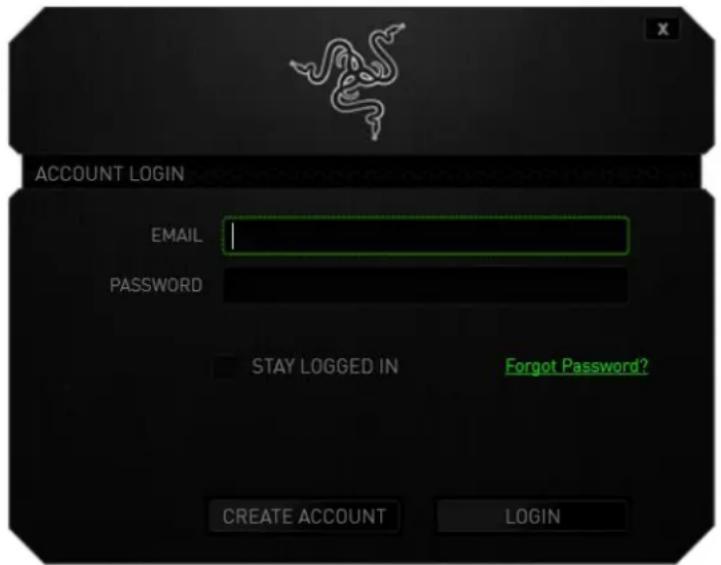
- Razer Synapse will start automatically once you enter Windows 10.
- Register for a Razer ID and confirm your new account.
- Open Razer Synapse and login to your account.
- Wait until Synapse automatically downloads and installs the necessary drivers.
KEYBOARD FUNCTION KEYS

| Function Keys | To activate the features below, press the ‘Fn’ key and the respective key. |
 [BXAW][BZYK] [BXAW][BZYK] | The audio volume controls allow you to mute ( ), decrease ( ) and increase ( ) the audio output. |
| [TXOA][-] | Toggles the monitor output. |
[B6CVI]  | The media keys allow you to play/pause ( ) a track or skip tracks backward ( ) and forward ( ). ➔ |
[DXOZ] [SWOD] [SWOD] | The screen brightness keys allow you to customize the brightness of the screen. |
  | The keyboard brightness keys allow you to customize the brightness of the keyboard |
5. CONFIGURING YOUR RAZER BLADE STEALTH
Disclaimer: The features listed here require you to log in to Razer Synapse. These features are also subject to change based on the current software version and your Operating System.
SYSTEM TAB
The System Tab is your default tab when you first install Razer Synapse. This tab allows you to customize your device's profiles and key assignments.
![SYSTEM MACROS STATS KEYBOARD TRACKPAD LIGHTING GAMING MODE POWER SELECT PROFILE Profile PROFILE NAME Profile SHORTCUT FN + 1 LINK PROGRAM Switch primary and secondary function [Fn] Keys Last cloud back-up on: Sync Now Razer Blade Stealth](/content/2026/05/950115/images/52f2cec3114cb8df37ffcc1af9f3213b52818a9b497c5277b133e3f6c8ab1098.jpg)
Profile
A profile is a convenient way of organizing all your custom settings and you can have an infinite number of profiles at your disposal. Any changes made within each tab are automatically saved to the current profile and stored into the cloud servers.

You can create a new profile by clicking the + button or delete the current profile by clicking the button. The button allows you to Copy, Import, and Export profiles. Your current profile by default is named "Profile" however; you can rename it by typing on the text field below PROFILE NAME.
Each profile can be set to FN + 0 - 9 using the SHORTCUT dropdown menu for fast profile switching. Each profile can also be set to automatically activate when you run a program or application through the use of the LINK PROGRAM option.
Keyboard Tab
The Keyboard Tab is where you can modify the basic functionalities of your device such as key assignments and trackpad sensitivity to suit your gaming needs. The changes made in this tab are automatically saved to your current profile.
![SYSTEM MACROS STATS KEYBOARD TRACKPAD LIGHTING GAMING MODE POWER SELECT PROFILE Profile PROFILE NAME Profile SHORTCUT FN : 1 LINK PROGRAM Switch primary and secondary function [Fn] Keys Last cloud back-up on: Sync Now Razer Blade Stealth](/content/2026/05/950115/images/4bfb05219fa62f2cb131fbf0620e56e2802c22803960a5caf1049e1f0c3f6fab.jpg)
Key Assignment Menu
Initially, each key is set to DEFAULT. However, you may change the function of this key by clicking the desired key to access the Key Assignment Menu.
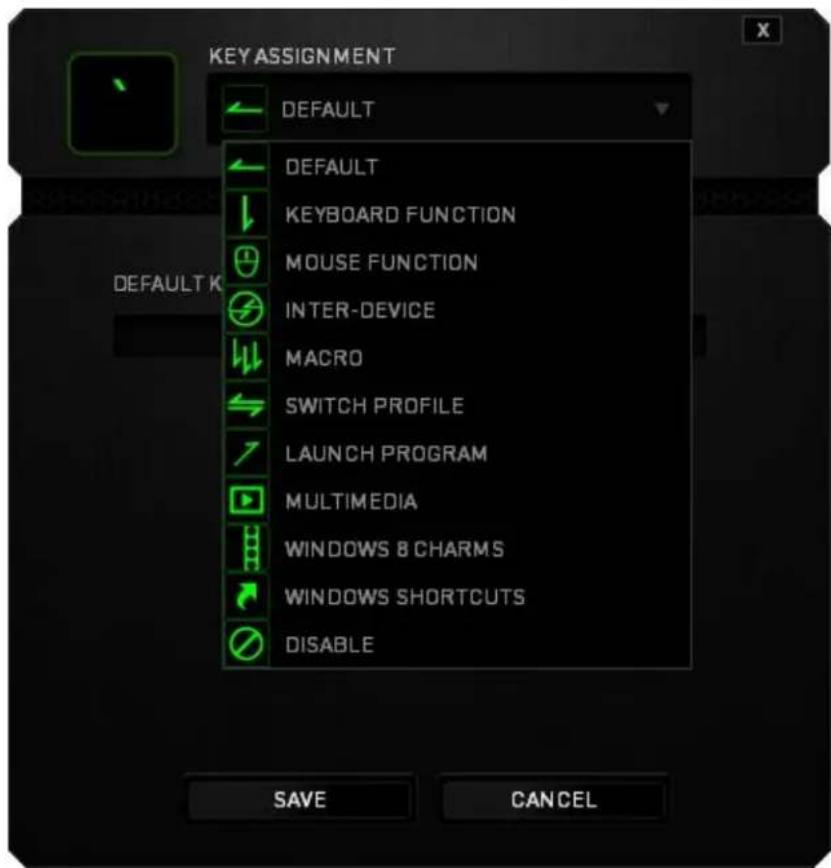
Listed below are the customization options and their description.

Default
This option enables you to return the key to its original function. To choose the DEFAULT, simple select it from the Key Assignment Menu.

Keyboard Function
This option enables you to change any key into another keyboard function. To choose a keyboard function, select KEYBOARD FUNCTION from the Key Assignment Menu and enter the key you wish to use on the given field below. You may also include modifier keys such as Ctrl, Shift, Alt or any of those combinations.

Mouse Function
This option allows you to change any key into a mouse button function. To choose a mouse function, select MOUSE FUNCTION from the Key Assignment Menu and an ASSIGN BUTTON submenu will appear.
Listed below are the functions which you can choose from the Assign Button submenu:
Left Click - Performs a left mouse click using the assigned button.
Right Click - Performs a right mouse click using the assigned button.
Scroll Click - Activates the universal scrolling function.
Double Click - Performs a double left click using the assigned button.
Mouse Button 4 - Performs a "Backward" command for most internet browsers.
Mouse Button 5 - Performs a "Forward" command for most internet browsers.
Scroll Up - Performs a "Scroll Up" command using the assigned button.
Scroll Down - Performs a "Scroll Down" command using the assigned button.
Scroll Left - Performs a "Scroll Left" command using the assigned button.
Scroll Right - Performs a "Scroll Right" command using the assigned button.

Inter-device
Inter-device allows you to change the functionality of other Razer Synapse-enabled devices. Some of these functionalities are device-specific such as using your Razer gaming keyboard to change the Sensitivity Stage of your Razer gaming mouse. When you select Inter-device from the Key Assignment Menu, a sub-menu will appear.
DEVICE TO LINK allows you to choose which currently connected Razer device can be linked while FUNCTION allows you to choose which functionality you want to use for the linked device.

Macro
A Macro is a prerecorded sequence of keystrokes and button presses that is executed with precise timing. By setting a key to Macro, you can conveniently execute a chain of commands. When you select this option from the Key Assignment Menu, a submenu will appear which allows you to choose a prerecorded macro command. See the MACROS TAB to learn more about creating Macro commands.

Switch Profile
The Switch Profile enables you to change profiles on the fly and immediately load all your pre-configured settings. When you select Switch Profile from the Key Assignment Menu, a sub-menu will appear that will allow you to choose which profile to use. An on-screen display will automatically appear whenever you switch profiles.

Launch Program
Launch Program allows you to launch a program or a website using the assigned key. When you select Launch Program from the Key Assignment Menu, two options will appear which allow you to search for the specific program you want to open or write the address of the website you want to visit.

Multimedia Function
This option allows you to bind multimedia playback controls to your device. After selecting Multimedia Function, a submenu will appear. Listed below are the multimedia playback controls you can choose from the submenu:
Volume Down - Decreases the audio output.
Volume Up - Increases the audio output.
Mute Volume - Mutes the audio.
Mic Volume Up - Increases the microphone volume.
Mic Volume Down - Decreases the microphone volume.
Mute Mic - Mutes the microphone.
Mute All - Mute both microphone and audio output.
Play / Pause - Play, pause, or resume playback of the current media.
Previous Track - Play the previous track.
Next Track - Play the next track.

Windows 8 Charms
This option enables you to assign the key into an Operating System shortcut command. For more information please visit: http://windows.microsoft.com/en-us/windows-8/getting-around-tutorial

Windows Shortcuts
This option enables you to assign the key into an Operating System shortcut command. For more information please visit: http://support.microsoft.com/kb/126449

Disable
This option renders the assigned key unusable. Use Disable if you do not want to use the key or if it interferes with your gaming.
Trackpad Configuration
You can adjust the response of the trackpad and change the gestures by clicking the links on the user interface.

Listed below are the options and their descriptions.
Trackpad Settings
Use this link to select your primary button, set the scroll behavior, and change the touchpad delay.
Windows PC Settings
Use this link to edit gestures, cursor pointing options, and other advance features.
Lighting Tab
The Lighting Tab is where you can customize the color of the lighting of individual keys or select pre-loaded lighting effects to be applied to the entire keyboard. You can also adjust the brightness of the keyboard lighting when plugged in or running on battery. Changes made in this tab will be automatically saved to the current profile.

Pre-loaded lighting effects
A number of pre-loaded lighting effects can be selected and applied to your keyboard lighting as a whole, such as spectrum lighting, breathing etc. The default effect is spectrum lighting. Select your desired effect and their corresponding properties (such as color) from the bottom area of this tab.
| Name | Description | How to set up | |
 | Spectrum cycling | The lighting on the keyboard will cycle between 16.8 million colors indefinitely | Default effect. No further customization required |
 | Wave | The keyboard lighting will scroll in the direction selected with a default spectrum of colors | Select either left-to-right or right-to-left wave direction |
 | Static | The keyboard will remain lit in the selected color | Select the desired lighting color |
 | Breathing | The keyboard lighting fades in and out of the selected color(s) | Select up to 2 colors for this setting |
 | Reactive | Keys on the keyboard will light up in the selected color when pressed. The lit key will fade off after a specified period of time. | Select the color of the keys and the length of time for the key to remain lit. |
 | Ripple | The keyboard lighting ripples on key press, centered around the pressed key. Each ripple spreads across the entire keyboard once. | Select the initial ripple color. |
Advanced lighting configuration
Accessible from Razer Synapse, is an advanced Chroma configurator for your Chroma-enabled device. Click the link from the Lighting tab to open this configurator.
1) Select the zones on the keyboard to customize. You can select multiple regions with the CTRL key.
2) Add an Effect layer for the selected region.
3) Customize the effects using the various options.
4) Click the APPLY button to save and apply all configurations to your mouse mat.

Customized lighting effects
You can also select the lighting color for each key individually. Select the Effect "Custom" and select the key to change. Then pick a color using the color picker.
The “Custom” option also includes templates for various game genres such as FPS, MOBA, MMO and RTS etc.
Gaming Mode Tab
The Gaming Mode Tab helps you prevent accidental key presses. Depending on your settings, you may choose to disable the Windows key, Alt + Tab and Alt + F4. Furthermore, you can maximize the effect of Anti-Ghosting by activating the Gaming mode function.

Power Tab
The Power Tab allows you to manage your device's energy consumption when running on batteries. You can also set your device to enter sleep mode when it has been idle for a certain amount of time.
![SYSTEM MACROS STATS KEYBOARD TRACKPAD LIGHTING GAMING MODE POWER SELECT PROFILE Profile PROFILE NAME Profile SHORTCUT FN + 1 LINK PROGRAM SWITCH OFF LIGHTING ✓ When on battery power ✓ When display is turned off or in Sleep mode ✓ When idle for [minutes] 1 5 10 15 Last cloud back-up on: Sync Now Razer Blade Stealth](/content/2026/05/950115/images/4148fe54f7191e94fd48d751cc8ffe57a979551a5e3d28b97f0ce0669e4f7148.jpg)
MACROS TAB
The Macros Tab allows you to create a series of precise keystrokes and button presses. This tab also allows you to have numerous macros and extremely long macro commands at your disposal.

The Macro section works similarly to Profile wherein you can rename a macro by typing on the field below MACRO NAME. There are also other options available in the macro
section such as creating a new macro by clicking the button and deleting the
current macro by clicking the button. The button allows you to Copy, Import, and Export macros.
To create a macro command, simply click the button press will your keystrokes and button presses will automatically register on the macro screen. When
you are done recording your macro commands, click on the button to end the session.
The Macro section allows you to input the delay in-between commands. In RECORD DELAY the delay in-between commands are registered as how it is entered. The DEFAULT DELAY uses a predefined time (expressed in seconds) as the delay. And NO DELAY omits all the pauses in-between keystrokes and button presses.
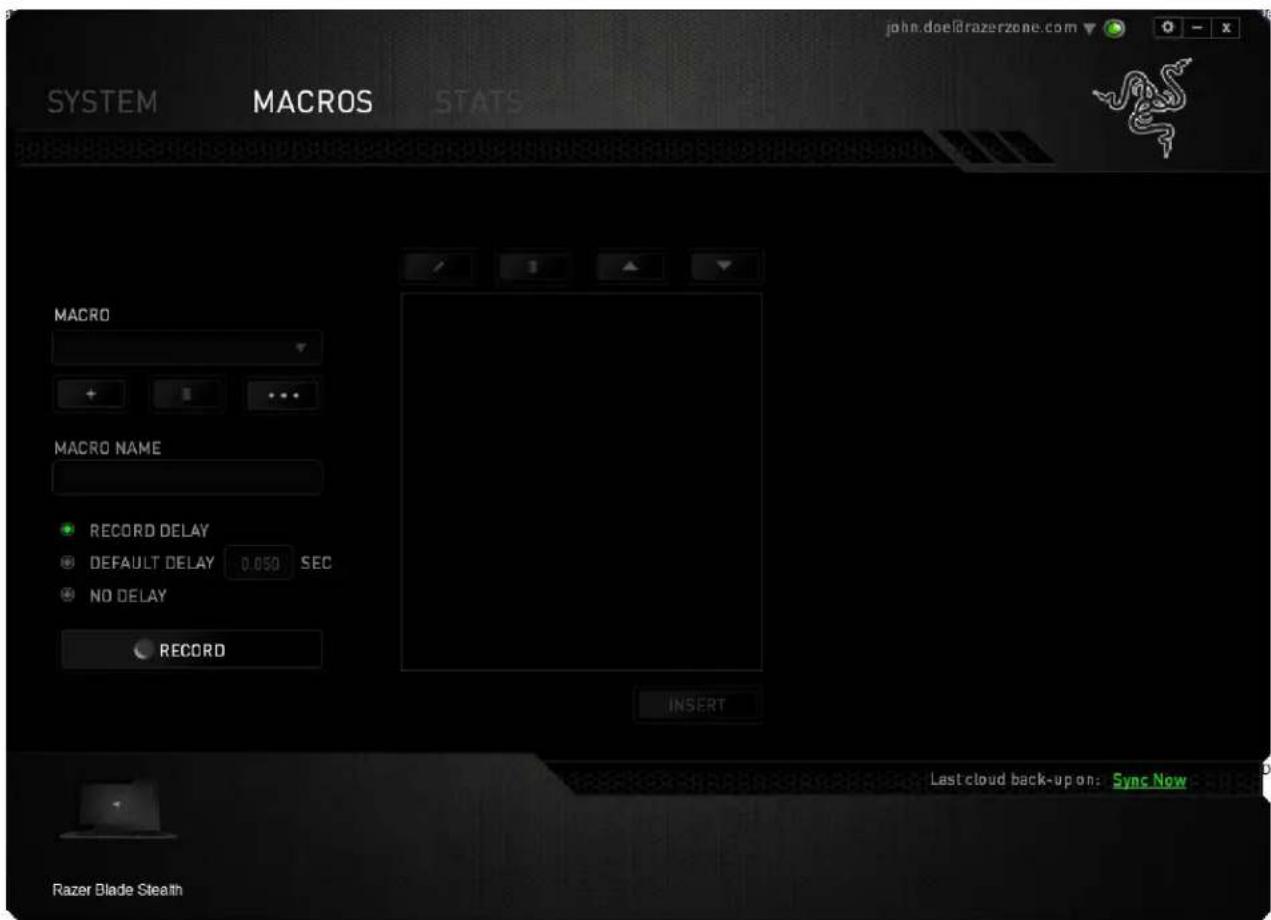
Note: You may use up to three decimal places when inserting values on the seconds (sec) field.
Once you have recorded a macro, you may edit the commands you have entered by selecting each command on the macro screen. Each keystroke or button press is arranged sequentially with the first command shown at the top of the screen.
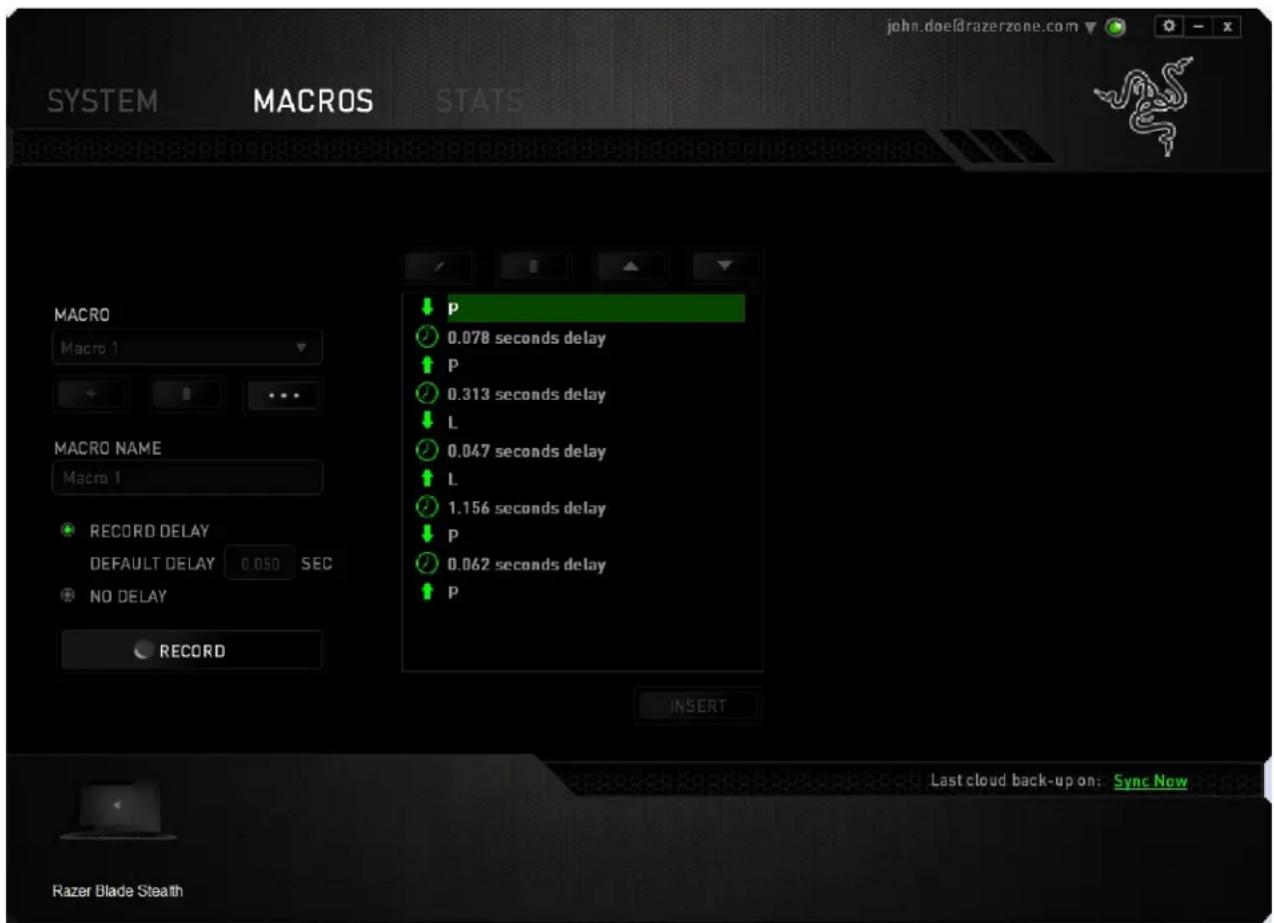
The button allows you to edit a particular command and the button enables you to delete a command. The ▲ and ▼ buttons gives you the option to move the command up or down.
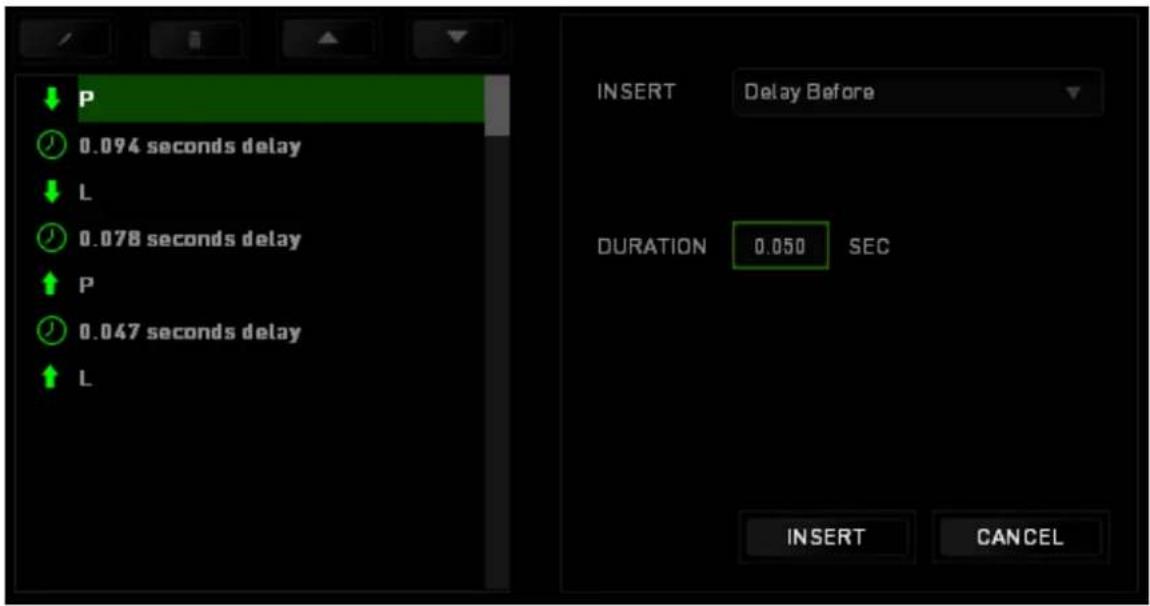
The INSERT allows you to put in additional keystrokes, button presses or time delays either before or after the selected command.
Once you have pressed the INSERT new display window will appear beside the list of macro commands. The dropdown menu on this window allows you to choose a keystroke or a delay to be added in before or after the highlighted macro command.

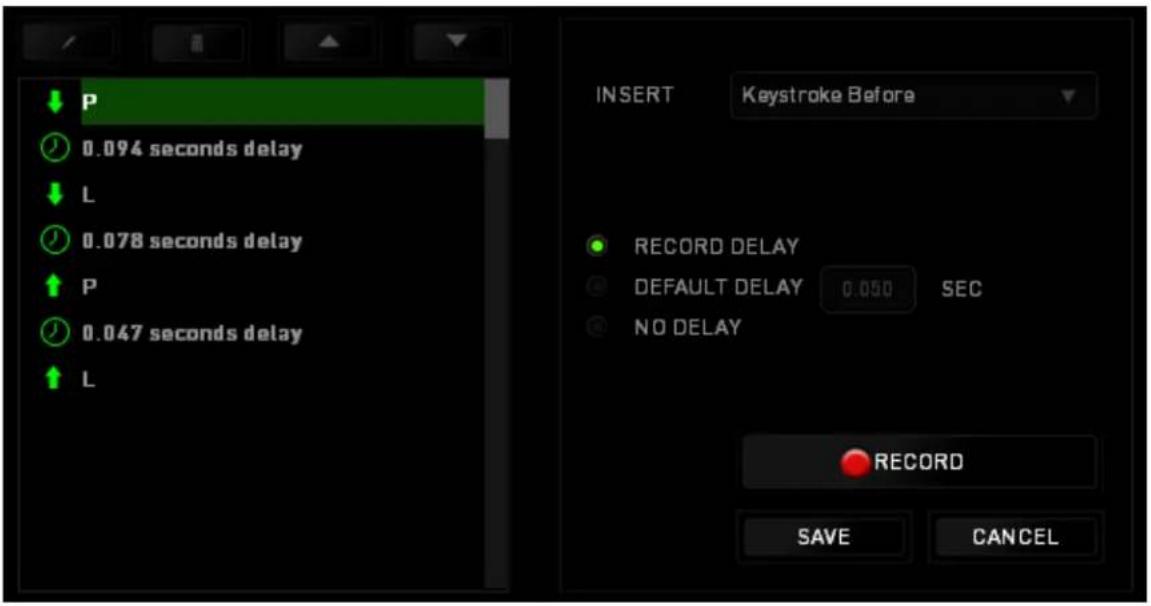
You may add in a new set of macro commands by clicking the keystroke menu; or input time delays on the duration field using the delay menu.
STATS & HEATMAPS
Note: The images shown here are for reference only and may differ from the actual device.
Stats & Heatmaps help you analyze your gameplay by tracking your in-game mouse clicks, mouse movement and keyboard usage and visualizing it in form of heatmap overlays. This function is disabled by default. To enable this function, click the notification icon next to your user name in the Razer Synapse window and select "Enable Stats & Heatmaps".

Confirm to enable the function in the dialog box that appears. Return to Razer Synapse and a new “Stats” tab will be available. Simply click the tab to open the function window.
![SYSTEM MACROS STATS keyboard TRACKPAD LIGHTING GAMING MODE POWER SELECT PROFILE Profile PROFILE NAME Profile SHORTCUT FN + 1 LINK PROGRAM Switch primary and secondary function [Fn] Keys Last cloud back-up on: Sync Now Razer Blade Stealth](/content/2026/05/950115/images/3795b072d2bd7a9e7cfd810759d7b8a123bf3e00a0fb0ec4eef824f5ddf14497.jpg)
Games List
Stats & Heatmaps work by tracking the usage of all supported devices for each game. When the feature is enabled, it automatically scans your system for installed games and adds them to the Games List located on the left side of the screen. Click to show or hide the Games List.

From this list, you can add more games that have not been automatically detected, using the button, edit games with the button or re-scan your system with the button to search for newly installed games.
Stats Tab
By default, the Stats Tab shows you the overall statistics of all your Razer devices for all games and all time. You can select a specific game via the game list on the left side, change the time period using the SHOWING dropdown menu, or the Razer device using the DEVICES dropdown menu.
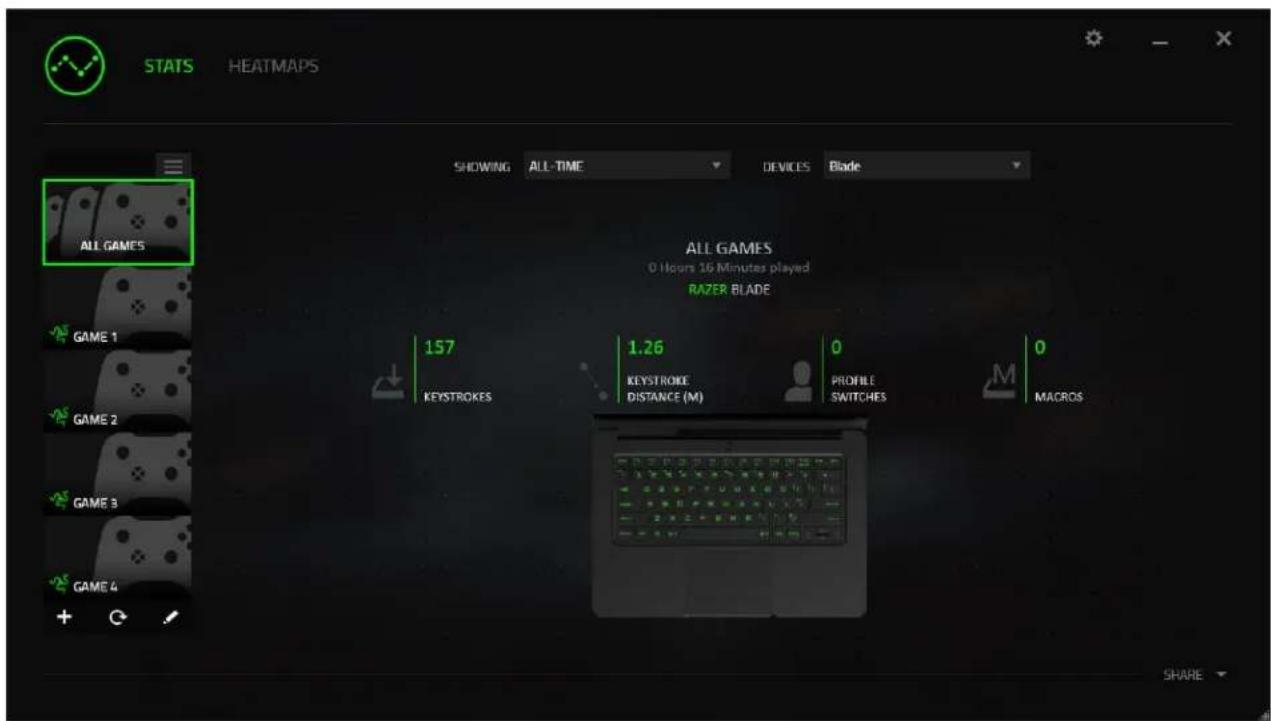
Heatmaps Tab - Keyboard
Heatmaps Tab shows the most frequently used keys on your Razer device for each game on your Games List.

Social Media
You can share your heatmap image on social media networks such as Facebook or Twitter directly from Razer Synapse.
From the Heatmaps tab, click the Share button on the bottom right of the screen. You will be prompted to login to the selected social media using an existing account if you have not already done so.
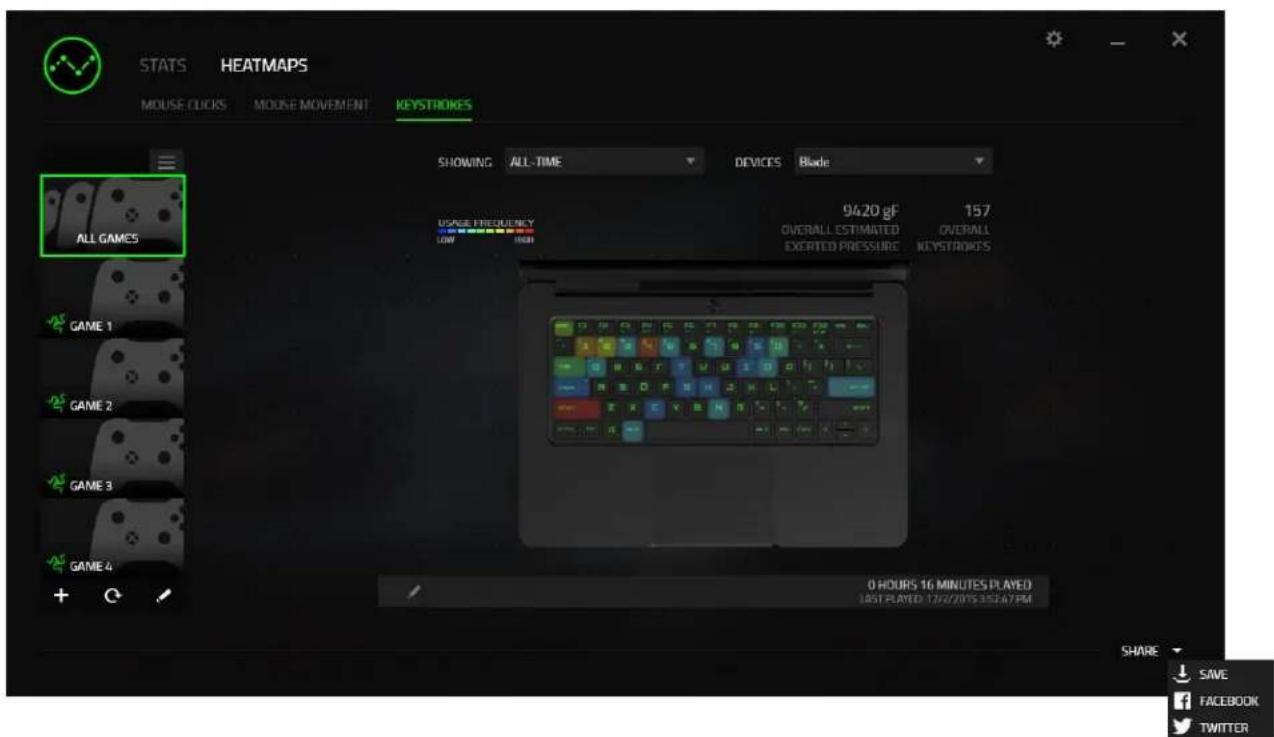
You can also login to your social media accounts first from the "SETTINGS" screen.
From the Stats & Heatmaps window, click Select the "ACCOUNTS" tab. Click CONNECT next to the social media network you wish to sync with. Enter your login details and wait for the connection to complete.

6. SAFETY AND MAINTENANCE
SAFETY GUIDELINES
In order to achieve maximum safety while using your Razer Blade Stealth, we suggest that you adopt the following guidelines:
- Should you have trouble operating the device properly and troubleshooting does not work, unplug the device and contact the Razer hotline or go to www.razersupport.com for support. Do not attempt to service or fix the device yourself at any time.
- Do not take apart the device (doing so will void your warranty) and do not attempt to operate it under abnormal current loads.
- Keep the device away from liquid, humidity or moisture. Operate the device only within the specific temperature range of 0^ C ( 32^ F) to 40^ C ( 104^ F). Should the temperature exceed this range, unplug and switch off the device in order to let the temperature stabilize to an optimal level.
COMFORT
Research has shown that long periods of repetitive motion, improper positioning of your computer peripherals, incorrect body position, and poor habits may be associated with physical discomfort and injury to nerves, tendons, and muscles. Below are some guidelines to avoid injury and ensure optimum comfort while using your Razer Blade Stealth.
- Position your laptop directly in front of you. If you have an external mouse, position it next to the laptop. Place your elbows next to your side, not too far away and your mouse within easy reach.
- Adjust the height of your chair and table so that the laptop is at or below elbow height.
-
Keep your feet well supported, posture straight and your shoulders relaxed.
-
During gameplay, relax your wrist and keep it straight. If you do the same tasks with your hands repeatedly, try not to bend, extend or twist your hands for long periods.
- Do not rest your wrists on hard surfaces for long periods. When using an external mouse, use a wrist rest to support your wrist while gaming.
- Do not sit in the same position all day. Get up, step away from your desk and do exercises to stretch your arms, shoulders, neck and legs.
- If you should experience any physical discomfort while using your laptop, such as pain, numbness, or tingling in your hands, wrists, elbows, shoulders, neck or back, please consult a qualified medical doctor immediately.
BATTERY
The Razer Blade Stealth contains an internal, lithium-ion polymer rechargeable battery. In general, the life expectancy of such batteries is dependent upon usage. Heavy daily usage use will result in shorter battery life. Casual use will extend battery life. If you suspect that the lithium-ion rechargeable battery inside the Razer Blade Stealth may be drained (has a low charge), try charging it. If the battery does not recharge after several attempts, it may be non-operational. Dispose of batteries according to your local environmental laws and guidelines.
7. LEGALESE
COPYRIGHT AND INTELLECTUAL PROPERTY INFORMATION
© 2016 Razer Inc. All rights reserved. Razer, For Gamers. By Gamers, and the triple-headed snake logo are trademarks or registered trademarks of Razer Inc. and/or affiliated companies in the United States or other countries. All other trademarks and trade names are the property of their respective owners and other company and product names mentioned herein may be trademarks of their respective companies.
Windows and the Windows logo are trademarks of the Microsoft group of companies.
Manufactured under license from Dolby Laboratories.
Dolby, Dolby Home Theater and the double-D symbol are trademarks of Dolby Laboratories.
Razer Inc. (“Razer”) may have copyright, trademarks, trade secrets, patents, patent applications, or other intellectual property rights (whether registered or unregistered) concerning the product in this guide. Furnishing of this guide does not give you a license to any such copyright, trademark, patent or other intellectual property right. The Razer Blade Stealth (the “Product”) may differ from pictures whether on packaging or otherwise. Razer assumes no responsibility for such differences or for any errors that may appear. Information contained herein is subject to change without notice.
LIMITED PRODUCT WARRANTY
For the latest and current terms of the Limited Product Warranty, please visit www.razerzone.com/warranty.
LIMITATION OF LIABILITY
Razer shall in no event be liable for any lost profits, loss of information or data, special, incidental, indirect, punitive or consequential or incidental damages, arising in any way out of distribution of, sale of, resale of, use of, or inability to use the Product. In no event shall Razer's liability exceed the retail purchase price of the Product.
COSTS OF PROCUREMENT
For the avoidance of doubt, in no event will Razer be liable for any costs of procurement unless it has been advised of the possibility of such damages, and in no case shall Razer be liable for any costs of procurement liability exceeding the retail purchase price of the Product.
GENERAL
These terms shall be governed by and construed under the laws of the jurisdiction in which the Product was purchased. If any term herein is held to be invalid or unenforceable, then such term (in so far as it is invalid or unenforceable) shall be given no effect and deemed to be excluded without invalidating any of the remaining terms. Razer reserves the right to amend any term at any time without notice.
FCC DECLARATION OF CONFORMANCE
This equipment has been tested and found to comply with the limits for a Class B digital device, pursuant to part 15 of the FCC Rules. These limits are designed to provide reasonable protection against harmful interference in a residential installation. This equipment generates, uses and can radiate radio frequency energy and, if not installed and used in accordance with the instructions, may cause harmful interference to radio communications. However, there is no guarantee that interference will not occur in a particular installation. If this equipment does cause harmful interference to radio or television reception, which can be determined by turning the equipment off and on, the user is encouraged to try to correct the interference by one or more of the following measures:
- Reorient or relocate the receiving antenna.
- Increase the separation between the equipment and the receiver.
- Connect the equipment into an outlet on a circuit different from that to which the receiver is connected.
- Consult the dealer or an experienced radio TV technician for help.
For more information, refer to the online help system on www.razerzone.com.
FCC CAUTION STATEMENT
Any changes or modifications not expressly approved by the party responsible for compliance could void the user's authority to operate this equipment.
This device complies with Part 15 of the FCC Rules. Operation is subject to the following two conditions:
(1) This device may not cause harmful interference, and
(2) This device must accept any interference received, including interference that may cause undesired operation.
IMPORTANT NOTE:
FCC Radiation Exposure Statement:
This equipment complies with FCC radiation exposure limits set forth for an uncontrolled environment. End users must follow the specific operating instructions for satisfying RF exposure compliance. This transmitter must not be co-located or operating in conjunction with any other antenna or transmitter.
USAGE RESTRICTIONS
This Razer device was developed and designed to comply with the various wireless and telecom agency requirements throughout the world. This ensures that the device do not cause any harm to Public Switching Telecommunication Networks (PSTN) and do not violate any power and frequency spectrum allocations on a country by country basis. This device was also designed to be compliant with regulatory agency limits for Electromagnetic Compatibility (EMC).
IMPORTANT NOTICE FOR USE IN HEALTHCARE ENVIRONMENTS
This Razer device is not a medical device and is not listed under UL or IEC 60601 (or equivalent). This device should be kept at a certain distance to avoid harmful effects to patients or medical equipment.
AVIATION USAGE RESTRICTIONS
Certain restrictions apply to this device while on-board an aircraft. Razer encourages you to understand these restrictions to ensure the flight's safety and security.

- CONTENTS
- PACKAGE CONTENTS / REGISTRATION / TECHNICAL SUPPORT
- PACKAGE CONTENTS
- REGISTRATION
- TECHNICAL SUPPORT
- What you'll get:
- BASIC FEATURES
- SETTING UP YOUR RAZER BLADE STEALTH
- CONNECTING TO THE INTERNET
- RAZER SYNAPSE ACCOUNT CREATION & INSTALLATION
- CONFIGURING YOUR RAZER BLADE STEALTH
- SYSTEM TAB
- Profile
- Keyboard Tab
- Key Assignment Menu
- Default
- Keyboard Function
- Mouse Function
- Inter-device
- Macro
- Switch Profile
- Launch Program
- Multimedia Function
- Windows 8 Charms
- Windows Shortcuts
- Disable
- Trackpad Configuration
- Trackpad Settings
- Windows PC Settings
- Lighting Tab
- Pre-loaded lighting effects
- Advanced lighting configuration
- Customized lighting effects
- Gaming Mode Tab
- Power Tab
- MACROS TAB
- STATS & HEATMAPS
- Games List
- Stats Tab
- Heatmaps Tab - Keyboard
- Social Media
- SAFETY AND MAINTENANCE
- SAFETY GUIDELINES
- COMFORT
- BATTERY
- LEGALESE
- COPYRIGHT AND INTELLECTUAL PROPERTY INFORMATION
- LIMITED PRODUCT WARRANTY
- LIMITATION OF LIABILITY
- COSTS OF PROCUREMENT
- GENERAL
- FCC DECLARATION OF CONFORMANCE
- FCC CAUTION STATEMENT
- IMPORTANT NOTE:
- USAGE RESTRICTIONS
- IMPORTANT NOTICE FOR USE IN HEALTHCARE ENVIRONMENTS
- AVIATION USAGE RESTRICTIONS
Brand : RAZER
Model : Blade Stealth
Category : Laptop