
Mixmaster Compact Pro MX5950 - Food processor SUNBEAM - Free user manual and instructions
Find the device manual for free Mixmaster Compact Pro MX5950 SUNBEAM in PDF.


| Product Type | Stand Mixer with Detachable Hand Mixer |
| Model | Mixmaster Compact Pro MX5950 |
| Speed Control | 10 speeds with '0' OFF position |
| Beating Action | Twin Motor 3-Way Beating Action (counter-rotating beaters + rotating bowl) |
| Bowl Material & Capacity | Stainless steel, 3 litre (not dishwasher safe) |
| Attachments Included | V-groove beaters (2) and heavy-duty dough hooks (2) |
| Boost Feature | Provides extra power for heavy mixtures |
| Tilt-back Head | Yes, with locking mechanism for easy bowl/attachment access |
| Hand Mixer Conversion | Detachable head transforms into hand mixer |
| Bowl Speed Control | Separate dial on neck for high/low bowl rotation speed |
| Eject Button | For easy release of beaters/dough hooks |
| Cleaning | Wipe exterior with damp cloth; wash beaters/dough hooks in warm soapy water or dishwasher; bowl hand wash only |
| Safety Features | Automatic shut-off when head is raised; lockable tilt; precautions for cord and children |
| Warranty | 12 months replacement or repair (Australia/New Zealand) |
| Country of Origin | Made in China to Sunbeam specifications |
| Recommended Use | Household and similar applications (e.g., staff kitchens, farm houses, B&Bs) |
Frequently Asked Questions - Mixmaster Compact Pro MX5950 SUNBEAM
User questions about Mixmaster Compact Pro MX5950 SUNBEAM
0 question about this device. Answer the ones you know or ask your own.
Ask a new question about this device
Download the instructions for your Food processor in PDF format for free! Find your manual Mixmaster Compact Pro MX5950 - SUNBEAM and take your electronic device back in hand. On this page are published all the documents necessary for the use of your device. Mixmaster Compact Pro MX5950 by SUNBEAM.
USER MANUAL Mixmaster Compact Pro MX5950 SUNBEAM
Sunbeam's Safety Precautions 1
Features of your Mixmaster® Compact Pro 2
Using your Mixmaster® Compact Pro 4
Role of the Twin-Motor 3-Way Beating Action 6
Mixing Guide 6
Care and Cleaning 7
Important instructions – retain for future use.
Sunbeam's Safety Precautions
SAFETY PRECAUTIONS FOR YOUR SUNBEAM MIXMASTER COMPACT PRO.
- Never eject beaters or dough hooks when the appliance is in operation.
-
Ensure fingers are kept well away from moving beaters and dough hooks.
-
Do not operate for more than 3 minutes at a time when mixing heavy loads. None of the recipes in this manual are considered a heavy load.
- Switch off the appliance and disconnect from supply before changing accessories or approaching parts that move in use.
Sunbeam is very safety conscious when designing and manufacturing consumer products, but it is essential that the product user also exercise care when using an electrical appliance. Listed below are precautions which are essential for the safe use of an electrical appliance:
- Read carefully and save all the instructions provided with an appliance.
- Always turn the power off at the power outlet before you insert or remove a plug. Remove by grasping the plug - do not pull on the cord.
- Turn the power off and remove the plug when the appliance is not in use and before cleaning.
- Do not use your appliance with an extension cord unless this cord has been checked and tested by a qualified technician or service person.
- Always use your appliance from a power outlet of the voltage (A.C. only) marked on the appliance.
- This appliance is not intended for use by persons (including children) with reduced physical, sensory or mental capabilities, or lack of experience and knowledge, unless they have been given supervision or instruction concerning use of the appliance by a person responsible for their safety.
- Children should be supervised to ensure that they do not play with the appliance.
-
The temperature of accessible surfaces may be high when the appliance is operating.
-
Never leave an appliance unattended while in use.
- Do not use an appliance for any purpose other than its intended use.
- Do not place an appliance on or near a hot gas flame, electric element or on a heated oven.
- Do not place on top of any other appliance.
- Do not let the power cord of an appliance hang over the edge of a table or bench top or touch any hot surface.
- Do not operate any electrical appliance with a damaged cord or after the appliance has been damaged in any manner. If damage is suspected, return the appliance to the nearest Sunbeam Appointed Service Centre for examination, repair or adjustment.
- For additional protection, Sunbeam recommend the use of a residual current device (RCD) with a tripping current not exceeding 30mA in the electrical circuit supplying power to your appliances.
- Do not immerse the appliance in water or any other liquid unless recommended.
- Appliances are not intended to be operated by means of an external timer or separate remote control system.
- This appliance is intended to be used in household and similar applications such as: staff kitchen areas in shops, offices and other working environments; farm houses; by clients in hotels, motels and other residential type environments; bed and breakfast type environments.
If you have any concerns regarding the performance and use of your appliance, please visit www.sunbeam.com.au or contact the Sunbeam Consumer Service Line.
Ensure the above safety precautions are understood.
Features of your Mixmaster® Compact Pro – MX5950
10 speed control switch
10 speeds that range from high speeds for whisking and low speeds for kneading.
Eject button
The eject button effortlessly releases the beaters or dough hooks for easy cleaning.
Twin motor 3-way beating action
Sunbeam have further developed the famous 3-way beating action. The patent pending twin-motor design enables one motor to drive the individual beaters, each turning in opposite directions. The other motor drives the bowl, thus combined, this new technology results in a more powerful and thorough mixing result.
Special 'V-groove' beaters
Specially designed for optimum mixing and aeration. the beaters are positioned off-centre for easy addition of ingredients during mixing.
3 litre stainless steel mixing bowl
Ideal for mixing delicate ingredients.
Dough hooks
The heavy-duty steel dough hooks take the hard work out of kneading dough and other heavy mixtures.
Boost button
The Boost feature provides that extra power when you need it.
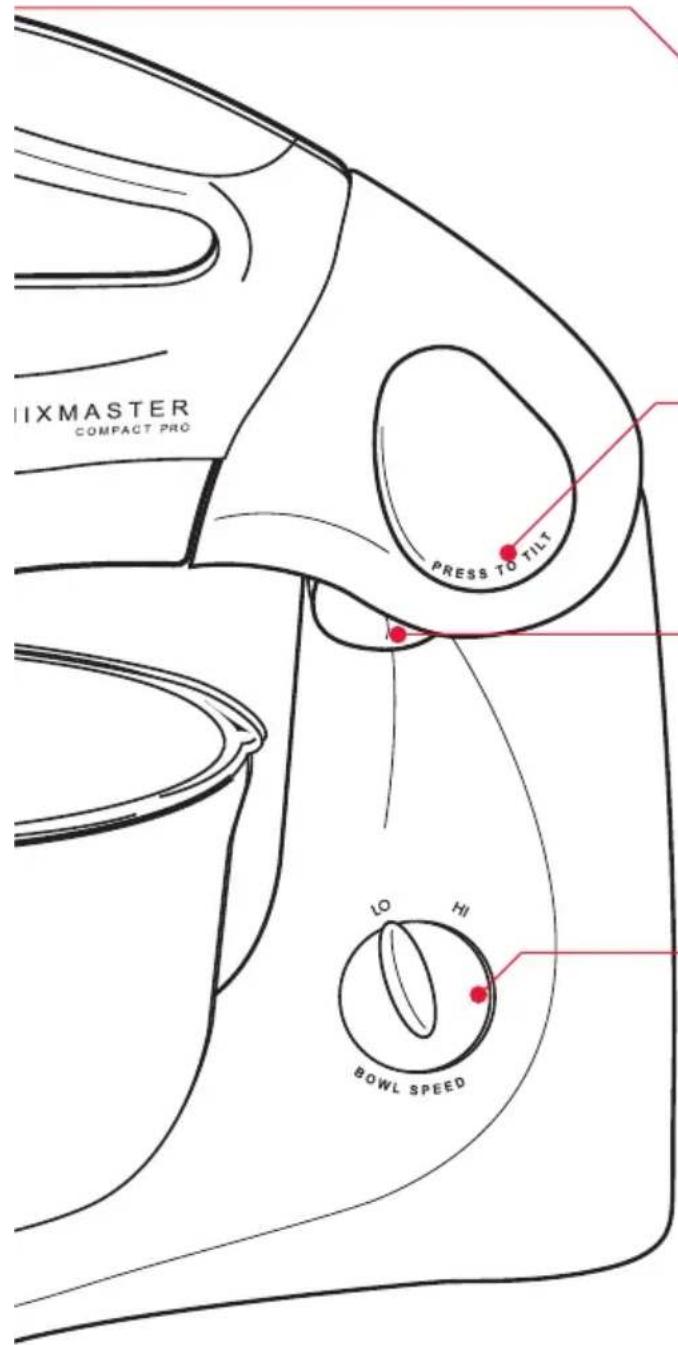
Tilt back locking head button
The head of the mixer tilts back and locks securely into position to allow for easy removal of the mixing bowl and beaters.
Hand beater release button
Designed for maximum use the mixer transforms into a convenient hand mixer, as the head of the mixer simply detaches from the mixing stand.
Bowl speed control dial
Using your Sunbeam Mixmaster® Compact Pro
Before use
Before assembling your mixer, be sure the power cord is unplugged from the power outlet and the speed control switch is in the '0' OFF position.
- Press the 'tilt' button, located on top of the neck of the mixer. While the button is depressed, hold the handle and ease the head of the mixer back, see figure 1. The mixer head will lock into this tilt position, see figure 2.
- Select the desired attachments, depending
Figure 1
Press 'tilt' button and tilt mixer head backward
on the mixing task to be performed: beaters for whisking, mixing and beating, or dough hooks for kneading.
Inserting the beaters
3a. Beaters can be inserted in either socket, as the beaters are identical.
Inserting the dough hooks
3b. To insert the dough hooks, place the dough hook with the small washer into the left socket. Place the other dough hook into the right socket.
Note: Ensure both beaters or dough hooks are fully inserted into the correct sockets or your mixing results may be affected.
- Place the 3 litre mixing bowl onto the turntable and lock into place, see figure 3.
Figure 3
Figure 2
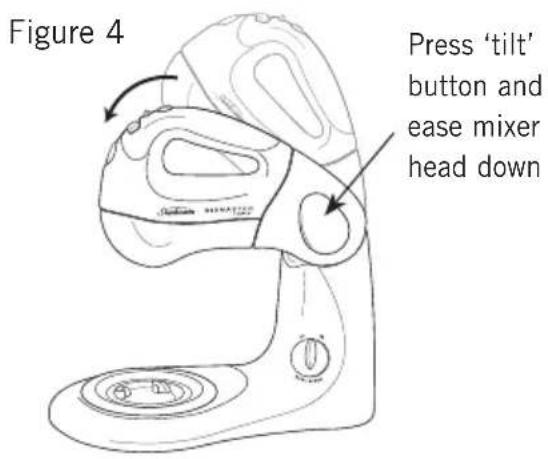
- To lower the head of the mixer and beaters/dough hooks into the bowl, depress the 'tilt' button, hold the handle with the other hand and ease the head of the mixer down. A 'click' will indicate when the head has reached the correct position, see figure 4 over page.
Using your mixer
-
With the speed control switch in the '0' OFF position, plug the power cord into a 230-240V AC power outlet.
-
Use the speed control switch to turn the mixer 'ON' and 'OFF' and to control the mixing speeds.
Clearly marked instructions for correct mixing speeds for each type of mixture are shown in the Mixing Guide on page 6.
Tip: Always start mixing at slow speeds and increase the speed gradually to prevent ingredients splashing out of the mixing bowl.
When adding dry ingredients use the lowest speed to prevent the 'snow storm' effect.
Tip: When kneading yeast doughs, use 'LO' speed 1 to achieve best results.
-
When mixing is complete, turn the speed control switch to the 'O' OFF position and unplug the cord from the power outlet.
-
Hold down the 'tilt' button and ease the head of the mixer back until the mixer head is locked into the tilt position, see figures 1 and 2.
-
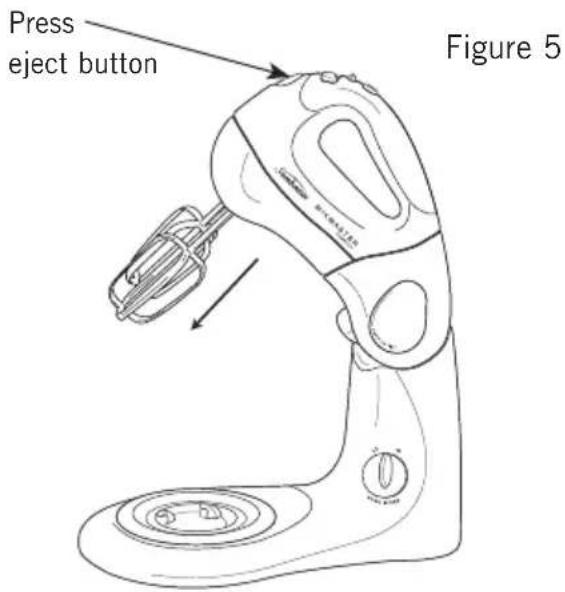
To remove the beaters/dough hooks, place fingers loosely around the spindles and press the eject button located at the front of the head of the mixer, see figure 5.
Role of the Twin-Motor 3-way Beating Action
One motor is located in the head of the mixer. This drives the individual beaters, turning each in opposite directions.
The second motor is located in the neck of the mixer and drives the turntable, in turn rotating the bowl. High or low bowl speed can be selected by simply turning the control dial positioned on the neck of the mixer, see figure 6.
These actions combine to ensure a more powerful and thorough mixing result.
Figure 6

Mixing Guide
| Mixing Task Recommended Speed(s) | |
| Folding & Blending | ‘LO’ 1 and 2 |
| Light Mixing | ‘LO’ 3 and 4 |
| Creaming & Beating ‘HI’ 2 and 3 or | ‘LO’ 5 |
| Whipping & Aerating ‘HI’ 4, 5 and Boost | |
Care and Cleaning
Before cleaning your Sunbeam Mixmaster® Compact Pro, ensure the power is turned off at the power outlet, then remove the plug.
Wipe over the outside area of the mixer and turntable with a dampened cloth and polish with a soft dry cloth.
Wipe any excess food particles from the power cord.
Wash the mixing bowl, beaters and dough hooks in warm soapy water and wipe dry. The beaters and dough hooks may also be placed and washed in the dishwasher.
Important: Do not place the mixing bowl in the dishwasher.
Maintenance Service
Your Sunbeam Mixmaster® Compact Pro should be regularly checked. After approximately four years of domestic use, the grease in the gear compartment should be examined (commercial use after two years). We suggest at that time you send the Mixer to your nearest Sunbeam Appliance Service Centre to ensure efficient, correct servicing.
Note: The mixer and the turntable have been factory oiled and no additional home oiling is necessary.
Storage
Keep your mixer in a convenient position on your kitchen bench ready for use at all times. Place the beaters and dough hooks into the bowl (storage of beaters and dough hooks in a drawer with other kitchen equipment may cause damage).
Note: Never wind the power cord around the motor after use as the warmth of the motor may cause damage to the power cord.
Notes
12 Month Replacement Guarantee
This Sunbeam product is covered by a 12 month replacement or repair warranty, which is in addition to your rights under the Australian Consumer Law (if your product was purchased in Australia) or New Zealand Consumer Guarantees Act (if your product was purchased in New Zealand).
Should you experience any difficulties with your product during the warranty period, please contact our customer service line for advice on 1300 881 861 in Australia, or 0800 786 232 in New Zealand.
Australia
www.sunbeam.com.au 1300 881 861
Units 5 & 6, 13 Lord Street,
Botany NSW 2019
Australia
New Zealand
www.sunbeam.co.nz 0800 786 232
Level 6, Building 5, Central Park,
660-670 Great South Road, Greenlane, Auckland
New Zealand
Upon receipt of your claim, Sunbeam will seek to resolve your difficulties or, if the product is defective, advise you on how to obtain a replacement or refund.
To assist us in managing warranty claims, we recommend you register your product as soon as practicable after purchase by creating a MySunbeam account on our website and uploading a copy of your original receipt.
In order to make a claim under our warranty, you must have the original proof of purchase documentation for the product and present it when requested (if not already uploaded to our website).
Should your product develop any defect within 12 months of purchase because of faulty materials or workmanship, we will replace or repair it, at our discretion, free of charge. A product presented for repair may be replaced by a refurbished product of the same type rather than being repaired. Refurbished parts may be used to repair the product.
Our replacement or repair warranty only applies where a defect arises as a result of faulty material or workmanship during the warranty period. Your warranty does not cover misuse or negligent handling (including damage caused by failing to use the product in accordance with this instruction booklet), accidental damage, or normal wear and tear.
Your warranty does not:
• cover freight or any other costs incurred in making a claim, consumable items, accessories that by their nature and limited lifespan require periodic renewal (such as filters and seals) or any consequential loss or damage; or
• cover damage caused by:
- power surges, power dips, voltage supply problems, or use of the product on incorrect voltage;
- servicing or modification of the product other than by Sunbeam or an authorised Sunbeam service centre;
- use of the product with other accessories, attachments, product supplies, parts or devices that do not conform to Sunbeam specifications; or
- exposure of the product to abnormally corrosive conditions; or
- extend beyond 3 months if the product is used in commercial, industrial, educational or rental applications.
The benefits given to you by our warranty are in addition to other rights and remedies under law in relation to the product.
In Australia our goods come with guarantees that cannot be excluded under the Australian Consumer Law. You are entitled to a replacement or refund for a major failure and for compensation for any other foreseeable loss or damage. You are also entitled to have the goods repaired or replaced if the goods fail to be of acceptable quality and the failure does not amount to a major failure.
Our goods also come with guarantees that cannot be excluded under the New Zealand Consumer Guarantees Act.
If your warranty claim is not accepted, we will inform you and if requested to do so by you, repair the product provided you pay the usual charges for such repair. You will also be responsible for all freight and other costs.
Should your product require repair or service after the warranty period, contact your nearest Sunbeam service centre. For a complete list of Sunbeam's service centres, visit our website or call our customer service line for advice on 1300 881 861 in Australia, or 0800 786 232 in New Zealand.
Need help with your appliance?
Contact our customer service team or visit our website for information and tips on getting the most from your appliance.
Australia | visit www.sunbeam.com.au
phone 1300 881 861
mail Units 5 & 6, 13 Lord Street,
Botany NSW 2019 Australia.
New Zealand | visit www.sunbeam.co.nz
phone 0800 786 232
mail Level 6, Building 5,
Central Park,
660-670 Great South Road,
Greenlane, Auckland.
Sunbeam Corporation Limited | ABN 45 000 006 771
Sunbeam Corporation is a division of GUD Holdings Limited.
Sunbeam is a registered trademark.
'Mixmaster' is a registered trademark of Sunbeam Corporation.
Made in China to Sunbeam's specification.
Due to minor changes in design or otherwise,
the product you buy may differ slightly from the one shown here.
Approved by the appropriate electrical regulatory authorities.
©Copyright Sunbeam 2015.
- Important instructions – retain for future use.
- Sunbeam's Safety Precautions
- SAFETY PRECAUTIONS FOR YOUR SUNBEAM MIXMASTER COMPACT PRO.
- Sunbeam is very safety conscious when designing and manufacturing consumer products, but it is essential that the product user also exercise care when using an electrical appliance. Listed below are precautions which are essential for the safe use of an electrical appliance:
- Features of your Mixmaster® Compact Pro – MX5950
- speed control switch
- Eject button
- Twin motor 3-way beating action
- Special 'V-groove' beaters
- litre stainless steel mixing bowl
- Dough hooks
- Boost button
- Tilt back locking head button
- Hand beater release button
- Bowl speed control dial
- Using your Sunbeam Mixmaster® Compact Pro
- Before use
- Inserting the beaters
- Inserting the dough hooks
- Using your mixer
- Role of the Twin-Motor 3-way Beating Action
- Mixing Guide
- Care and Cleaning
- Maintenance Service
- Storage
- Notes
- Month Replacement Guarantee
- Australia
- New Zealand
- Your warranty does not:
- • cover damage caused by:
- Need help with your appliance?
Brand : SUNBEAM
Model : Mixmaster Compact Pro MX5950
Category : Food processor