
Mini Glass MultiChopper FCP1000 - Food processor SUNBEAM - Free user manual and instructions
Find the device manual for free Mini Glass MultiChopper FCP1000 SUNBEAM in PDF.


| Product Type | Mini Food Processor / Chopper |
| Model | Mini Glass MultiChopper FCP1000 |
| Brand | Sunbeam |
| Bowl Material | Glass |
| Capacity | 1.5 cups (approximately 350 ml) |
| Power | 200 Watts |
| Dimensions (H x W x D) | 8.5 x 4.5 x 4.5 inches (approx.) |
| Weight | 1.5 lbs (approx. 0.7 kg) |
| Functions | Chop, mix, blend, puree, emulsify |
| Speed Settings | Single speed with pulse function |
| Blade Material | Stainless steel |
| Safety Features | Safety lock lid; motor stops when bowl is removed |
| Dishwasher Safe | Yes, removable parts (bowl, lid, blade) |
| Care Instructions | Hand wash recommended; dry thoroughly before storage |
| Power Cord Length | 24 inches (approx. 60 cm) |
| Voltage | 120V, 60Hz (for North America) |
| Warranty | 1 year limited |
Frequently Asked Questions - Mini Glass MultiChopper FCP1000 SUNBEAM
User questions about Mini Glass MultiChopper FCP1000 SUNBEAM
0 question about this device. Answer the ones you know or ask your own.
Ask a new question about this device
Download the instructions for your Food processor in PDF format for free! Find your manual Mini Glass MultiChopper FCP1000 - SUNBEAM and take your electronic device back in hand. On this page are published all the documents necessary for the use of your device. Mini Glass MultiChopper FCP1000 by SUNBEAM.
USER MANUAL Mini Glass MultiChopper FCP1000 SUNBEAM
natural_image
Close-up of a Sunbeam blender with clear plastic casing and digital caliper (no text or symbols on the device itself)Contents
Sunbeam's Safety Precautions 1
Features of your Glass Mini MultiChopper 2
How to assemble your Glass Mini MultiChopper 3
Using your Glass Mini MultiChopper 4
Chopping
Guide
5
Care and Cleaning 5
Recipes
6
Important Instructions - retain for future use
Sunbeam's Safety Precautions
SAFETY PRECAUTIONS FOR YOUR SUNBEAM GLASS MINI MULTICHOPPER FOOD CHOPPER.
• Always operate on a flat surface
- Do not remove the motor housing while the blades are still in motion.
- Do not use the appliance continuously for more than 30 seconds at a time with heavy loads.
Sunbeam is very safety conscious when designing and manufacturing consumer products, but it is essential that the product user also exercise care when using an electrical appliance. Listed below are precautions which are essential for the safe use of an electrical appliance:
- Read carefully and save all the instructions provided with an appliance.
- Always turn the power off at the power outlet before you insert or remove a plug. Remove by grasping the plug - do not pull on the cord.
- Turn the power off and remove the plug when the appliance is not in use and before cleaning.
- Do not use your appliance with an extension cord unless this cord has been checked and tested by a qualified technician or service person.
- Always use your appliance from a power outlet of the voltage [A.C. only] marked on the appliance.
- This appliance is not intended for use by persons (including children) with reduced physical, sensory or mental capabilities, or lack of experience and knowledge, unless they have been given supervision or instruction concerning use of the appliance by a person responsible for their safety.
- Children should be supervised to ensure that they do not play with the appliance.
- Never leave an appliance unattended while in use.
-
Appliances are not intended to be operated by means of an external timer or separate remote control system.
-
Use extreme care when handling blades as they are extremely sharp.
• Do not blend hot ingredients.
• Any misuse may lead to potential injury. -
Switch off the appliance and disconnect from supply before changing accessories or approaching parts that move in use.
-
Do not use an appliance for any purpose other than its intended use.
- Do not place an appliance on or near a hot gas flame, electric element or on a heated oven. Do not place on top of any other appliance.
- Do not let the power cord of an appliance hang over the edge of a table or bench top or touch any hot surface.
- Do not operate any electrical appliance with a damaged cord or after the appliance has been damaged in any manner. If damage is suspected, return the appliance to the nearest Sunbeam Appointed Service Centre for examination, repair or adjustment to avoid a hazard.
- For additional protection, the appliance should be supplied through a residual current device (ROD) with a tripping current not exceeding 50mA in the electrical circuit supplying power to your appliances.
- Do not immerse the appliance in water or any other liquid unless recommended.
- This appliance is intended to be used in household and similar applications such as: staff kitchen areas in shops, offices and other working environments; farm houses; by clients in hotels, motels and other residential type environments; bed and breakfast type environments.
If you have any concerns regarding the performance and use of your appliance, please visit www.sunbeam.com.au or contact the Sunbeam Consumer Service Line. Ensure the above safety precautions are understood.
Features Of Your Glass Mini MultiChopper How to assemble
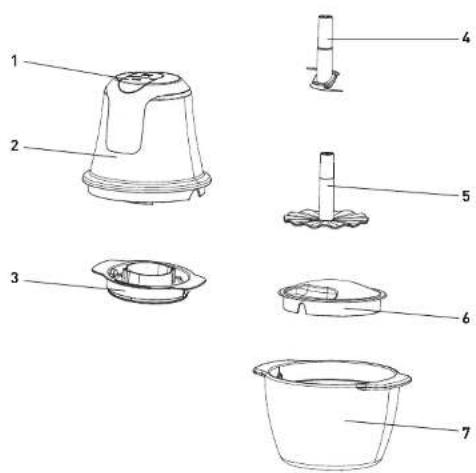
- 2-Speed Buttons
- Motor
- Cover
- Chopping Blade attachment
- Whisk attachment
- Storage Cover
- Glass Bowl
ss Mini MultiChopper
- Before using, wash cover, storage cover, bowl, blade and whisk in warm soapy water, rinse and dry thoroughly.
- Place bowl on a flat surface and place the chopping blade or whisk inside the bowl so it rests on the metal spindle at the bottom of the bowl.
-
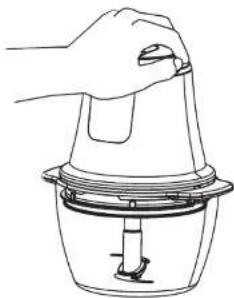
Place the cover on top of the bowl, so that the upper stem of the chopping blade/whisk comes through the centre hole in the cover. The 2 cutouts on the cover should match up with the 2 protrusions on the sides of the bowl. The cover needs to be aligned with the bowl.
-
Place the motor on top of the cover, relating if necessary to drop into place. The motor will 'float' in the opening of the cover, so that it can be pressed down further to activate the chopping blade/whisk.
natural_image
Line drawing of a hand using a blender to press or adjust the lid (no text or symbols)- To use the storage cover, remove the motor, cover and blade/whisk. Place the storage cover on top of the bowl.
Using your Glass Mini MultiChopper Chopping Guide
- Place either the blade or whisk attachment into the base of the bowl on the spindle.
- Add ingredients into the bowl. If using solid ingredients cut into approx 1.5cm pieces.
NOTE: Maximum capacity for solid ingredients is 3 cups/750mL. Maximum capacity for liquid ingredients is 1 cup/250mL.
- Place the cover and motor on top of the bowl.
- Plug the cord into an outlet. Press and hold either button on the top of the motor to activate the chopping blade/whisk. Button "I" is for softer ingredients and button "II" is for harder ingredients.
NOTE: To avoid liquefying the ingredients, do not over chop them. Use short presses to pulse until desired consistency is achieved.
- When finished chopping, release button, allowing blade to stop rotating before removing contents.
- Remove the motor and cover and grasp the stem of the chopping blade/whisk. Empty processed food from the bowl only after the chopping blade/whisk has been removed.
CAUTION: Blades are sharp. Handle with care.
- If storing food in the bowl, remove chopping blade/whisk before placing storage cover on to the bowl.
NOTE: Storage cover will not form an airtight seal. To be used as a cover only.
This table below provides a guide to maximum quantities and chopping times for a variety of foods. The table is a guide only. Chopping times may vary according to the result you want to achieve.
| FOODQTYTIME | ||
| Almonds & Nuts | 1/3 Cup Pulse for 15 seconds | Pulse for 20 seconds for fine chop. |
| Fresh Herbs 1 loosely packed Cup Chop for 50 seconds | ||
| Hard Cheese 120 grams Chop for 50 seconds | ||
| Garlic Cloves 1 Cup, peeled Pulse for 20 seconds | ||
| Chocolate 120 grams Chop for 30 seconds | ||
| Onion | 1 Cup, cut into quarters | Pulse for 15 seconds |
| Tomatoes | 1 Cup, cut into quarters | Pulse for 15 seconds |
| Meat | 180 grams Pulse for 15 seconds | |
| Egg Whites | 2 egg whites | Pulse for 45 seconds to whip |
| Whipping cream | 1 cup | Pulse for 45 seconds to whip |
Maximum food quantity should not exceed 3 cups and maximum liquid quantity should not exceed 1 cup as marked on the glass bowl.
Care and Cleaning
CAUTION: Turn off and unplug the appliance before cleaning, allowing chopping blades to stop rotating before disassembling.
- Wash the bowl, cover, storage cover, chopping blades and whisk in warm soapy water. Rinse and dry thoroughly.
NOTE: Cover, bowl, chopping blade and whisk attachment can be placed in the dishwasher.
CAUTION: Do not immerse motor in water while cleaning. This may cause electric shock, injury, or damage to the product.
- To clean the motor, wipe the exterior with a damp cloth or sponge. Dry thoroughly with a soft cloth.
CAUTION: Blades are sharp. Handle with care.
ZA'ATAR SPICE BLEND
MAKES 2 CUPS
PREP TIME: 5 mins
2 the dried thyme leaves
2 tos whole cumin seeds
7 tos coriander seeds
2 tbs toasted sesame seeds
2 lbs sumac
1 tspn fennel seeds
1 tspn kosher salt
½ tspn or more chili flakes - optional
-
Using the chopping blade attachment, place all the ingredients into the bowl.
-
Process on SPEED TWO until well blended.
-
Store in an airlight container for up to 6 months.
Tip: This Middle Eastern spice blend is perfect for coating chicken, lamb or seasoning vegetables, hummus or a sprinkle in baba gancush.
DUKKAH
MAKES 2 CUPS
PREP TIME: 5 mins
½ cup roasted almonds
1/2 cup pecans
7 tbs sesame seeds
2 tbs coriander seeds
1 lspin cumin seeds
1 lspn fennel seeds
½ tspn pepper
½ tspn salt flakes
-
Using the chopping blade attachment, place all the ingredients into the bowl.
-
Process on SPEED TWO, to a coarse mix.
-
Store in an airtight container for up to 6 months.
Tip: This spicy nutty mix is perfect for entertaining and goes well sprinkled on hummus or dips, sprinkle on peached eggs with avocado on toast, sprinkle on soups and salads. Serve with olive oil and turn into a dip for bread. Use as a coating for chicken, roasted veggies or grilled veggies, or tofu.
RecipesRecipes
TROPICAL FRUIT SALSA (Savoury)
MAKES 2 CUPS
PREP TIME: 8 mins
½ mango, flesh removed
½ avocado, peeled and stone removed
½ small red papaya, peeled and deseeded
½ long red chilli, deseeded
1 sprig coriander [optional]
1 lspn fish sauce
↑ tspn lime juice
-
Using the chopping blade attachment, place all the fruit, chilli and coriander into the bowl.
-
Pulse on SPEED ONE until just chopped.
-
Remove blade and mix through fish sauce and lime juice.
-
Store in glass chopper bowl in refrigerator until required.
Tip: Serve with seafood or chicken.
FROZEN FRUIT SALSA (Sweet)
MAKES 2 CUPS
PREP TIME: 7 mins
1 cup frozen mixed berries
½ cup peaches, tinned or fresh
2 kiwi fruit, peeled, cut into quarters
2 fresh mint leaves
- Using the chopping blade attachment,
place all the ingredients into the bowl.
- Pulse on SPEED ONE until just chopped. Serve immediately
Tip: Serve with yoghurt, fresh cream or ice cream, pavlova, waffles, pancakes or ice cream cones.
GARLIC FETA DIP
MAKES 2 CUPS
PREP TIME: 10 mins
150g feta cheese, cubed
100g cream cheese, softened
13 cup Greek yogurt
3 cloves garlic
1 sprig fresh dill, or to taste
1 lbs lemon juice, plus lime zest, to top salt and black pepper, to taste
1 Roma tomato, diced
Fresh herbs, to top
Olive oil, to top
Pila chips, bruschella, or crackers, to serve
- Using the chopping blade attachment, place all the cheeses, yoghurt, garlic, dill, lemon juice, salt and pepper into the bowl.
- Process on SPEED TWO until smooth.
- Remove blade and place into serving bowl, garnish with diced tomato, fresh herbs and a drizzle of olive oil.
- If you are not going to serve immediately, store in glass chopper bowl in refrigerator until required for up to 3 days.
CHIMICHURRI SAUCE
MAKES 1 CUP
PREP TIME: 7 mins
^3 /4 cup packed fresh flat-leaf parsley
14 cup packed fresh coriander
½ tspn red chilli flakes
3 cloves garlic
3 shallots (scallions), washed and roots removed, chopped roughly
12 cup olive oil
2 tbs red wine vinegar
2 tspn lime juice (or lemon)
12 tspn salt
14 tspn black pepper
- Using the chopping blade attachment, place all the ingredients into the bowl.
- Process on SPEED TWO until smooth.
- Remove blade and place into serving bowl.
- If you are not going to serve immediately, store in glass chopper bowl in refrigerator until required for up to 1 week.
Tip: Perfect dipping sauce for grilled meats, roasted chicken pieces, topping on a burger, tossed with a pasta salad, potato salad or tossed into roasted veggies.
RecipesRecipes
AVOCADO HUMMUS
MAKES 1 ½ CUPS
PREP TIME: 10 mins
220g no-salt-added chickpeas, drained reserving 1 lbs liquid
12 ripe avocado
12 tspn ground coriander seeds
2 tbs tahini
2 tbs extra-virgin olive oil
12 lemon juiced
1 clove garlic
12 tspn ground cumin
½ tspn paprika
½ tspn salt
Black pepper to taste
Olive oil for serving, pita crisps, crackers, raw vegetables
- Using the chopping blade attachment, place all the ingredients into the bowl.
- Process on SPEED TWO until smooth.
- Remove blade and place into serving bowl, drizzle with olive oil.
- Serve with pita crisps, vegetables and crackers of choice.
KIDDY FISH NUGGETS
MAKES: 14 small
PREP TIME: 15 mins
COOK TIME: 4 mins
350g fresh, skinless and boneless white fish
1 egg while
34 tspn lemon zest
1 tbs lemon juice
12 tspn garlic powder
12 tspn coarse sea salt
1 cup Panko breadcrumbs, divided into half (whole wheat or gluten-free breadcrumbs could also be used)
Avocado or vegetable oil for cooking
1. Using the chopping blade attachment, place all the ingredients (only 12 cup of the breadcrumbs) into the bowl. Pulse on SPEED TWO until just chopped.
2. Place remaining 12 cup breadcrumbs in a shallow bowl or plate. Remove the blade from the chopper bowl.
3. Make heaped tablespoon-sized patties out of the fish mixture. Place the patty in the breadcrumbs and turn to coat on all sides. Press gently to ensure the crumbs adhere.
4. To pan fry, heat about a tablespoon of oil in a large skillet or non-stick pan. When oil is hot, add nuggets to the pan. Add more oil as needed. Cook until golden brown then flip and cook the other side, about 2 minutes per side. (Also ideal for Air Frying)
Tip: These patties can be frozen once cooked and kept for up to 3 months.
Recipes Recipes
CAULIFLOWER CAKES
MAKES 8
PREP TIME: 15 mins
COOK TIME: 20 mins
200g of cauliflower, cut into florets and steamed
2 slices brown bread, ripped into chunks 1 egg
50g grated cheddar
a few chives or fresh thyme, snipped olive oil spray
- Heal the oven to 180^ C and line a baking tray with baking paper.
- Place the bread into the chopper bowl and process until a fine breadcrumb. Add the cauliflower, egg, grated cheese, chives and a little black pepper and process on SPEED TWO until you have a chunky consistency.
- Form into 8 patties. Arrange them on the baking tray and spray with a little olive oil spray.
- Cook for 20 mins or until golden and starting to crisp around the edges.
FRESH BREADCRUMBS
- Take any leftover day-old bread, ideally without seeds or grains, and cut off all the crusts. Cut the bread into large cubes.
- Place the bread into the chopper bowl just to the maximum line and process on SPEED ONE until you have a consistency you like.
- Either use immediately, or place breadcrumbs into snap lock bags and store in the freezer for up to three months.
Tip: Pump up the flavour of your breadcrumbs and add some additions to them:
- Smoked paprika, cumin, ground coriander or ground allspice are all delicious additions.
- Crumble your favourite dried herbs into the breadcrumbs.
- Grate hard cheeses, such as parmesan and pecorino.
- Sprinkle a teaspoon of grated lime, lemon or orange zest through.
- Ground chilli will give a kick to breadcrumbs.
CHOCOLATE PEANUT BUTTER WHIPPED CREAM
MAKES 1 ½ CUPS
PREP TIME: 5 mins
250ml thickened cream
14 cup soft icing sugar mixture
2 lbs smooth peanut butter (not natural)
1 tbs unsweetened cocoa powder
- Add all the ingredients to the chopping bowl with the whisk attachment in place
- Process on SPEED ONE for approximately 20 seconds or until a smooth thick consistency
- Taste and adjust sweetness as desired.
Tlp: This can be used as a filling in tart shells, cake toppings and fillings or a dip with fruit.
SALTED CARAMEL CREAM
MAKES: 1½ cups
PREP TIME: 5 mins
1 cup thickened cream
14 cup soft icing sugar mixture
1½ tbs caramel flavouring
1 tspn salt flakes
- Add all the ingredients to the chopping bowl with the whisk attachment in place.
- Process on SPEED ONE for approximately 15 seconds or until a smooth thick consistency
- Taste and adjust sweetness as desired.
Tip: This can be used as a filling or a topping in tarts, pastries, cakes, waffles, pancakes or with fruits.
WarrantyNotes

This Sunbeam product is covered by a 12 month replacement or repair warranty, which is in addition to your rights under the Australian Consumer Law
(if your product was purchased in Australia) or New Zealand Consumer Guarantees Act (if your product was purchased in New Zealand)
Upon receipt of your claim, Sunbeam will seek to resolve your difficulties or, if the product is defective, advise you on how to obtain a replacement or refund.
To assist us in managing warranty claims, we recommend you register your product as soon as practicable after purchase by creating a MySunbeam account on our website and uploading a copy of your original receipt.
In order to make a claim under our warranty, you must have the original proof of purchase documentation for the product and present it when requested (if not already uploaded to our website).
Should your product develop any defect within 12 months of purchase because of faulty materials or workmanship, we will replace or repair it, at our discretion, free of charge. A product presented for repair may be replaced by a refurbished product of the same type rather than being repaired. Refurbished parts may be used to repair the product.
Should you experience any difficulties with your product during the warranty period, please contact Sunbeam Customer Care
Australia www.sunbeam.com.au 1300 881 861 Suite 1, Level 1, 13 Lord Street, Botany NSW 2019 Australia
New Zealand www.sunbeam.co.nz 0800 786 232 Level 6, Building 5, Central Park, 660-670 Great South Road Greenlane, Auckland New Zealand
Our replacement or repair warranty only applies where a defect arises as a result of faulty material or workmanship during the warranty period. Your warranty does not cover misuse or negligent handling including damage caused by failing to use the product in accordance with this instruction booklet, accidental damage, or normal wear and tear.
Your warranty does not:
• cover freight or any other costs incurred in making a claim, consumable items, accessories that by their nature and limited lifespan require periodic renewal (such as filters and seals) or any consequential loss or damage; or
• cover damage caused by: - power surges, power dips, voltage supply problems, or use of the product on incorrect voltage;
- servicing or modification of the product other than by Sunbeam or an authorised Sunbeam service centre; - use of the product with other accessories, attachments, product supplies, parts or devices that do not conform to Sunbeam specifications; or - exposure of the product to abnormally corrosive conditions; or
- extend beyond 3 months if the product is used in commercial, industrial, educational or rental applications.
The benefits given to you by our warranty are in addition to other rights and remedies under law in relation to the product.
In Australia our goods come with guarantees that cannot be excluded under the Australian Consumer Law. You are entitled to a replacement or refund for a major failure and for compensation for any other foreseeable loss or damage. You are also entitled to have the goods repaired or replaced if the goods fail to be of acceptable quality and the failure does not amount to a major failure.
Our goods also come with guarantees that cannot be excluded under the New Zealand Consumer Guarantees Act.
If your warranty claim is not accepted, we will inform you and if requested to do so by you, repair the product provided you pay the usual charges for such repair. You will also be responsible for all freight and other costs.
Should your product require repair or service after the warranty period, contact your nearest Sunbeam service centre. For a complete list of Sunbeam's service centres, visit our website or call our customer care line for advice on: 1300 881 861 in Australia, or 0800 786 232 in New Zealand.
Sunbeam
Need help with your appliance?
Contact our Customer Care Team or visit our website for information and tips on getting the most from your appliance.
AUSTRALIA
Visit: www.sunbeam.com.au
Phone: 1300 881 861
Mail: Suite 1, Level 1, 13 Lord Street, Botany NSW 2019
NEW ZEALAND
Visit: www.sunbeam.co.nz
Phone: 0800 786 232
Mail: Level 6, Building 5, Central Park, 660–670 Great South Road, Greenlane, Auckland

NEWELL AUSTRALIA PTY LTD ABN 68 075 071 233
Due to continued product improvements, product illustrations and photographs in this User Guide may differ slightly from the actual product.
PN: 4119A
FCP1000_21EM1 (ANZ) GCDS-SUN-JC
- Contents
- Important Instructions - retain for future use
- Sunbeam's Safety Precautions
- Features Of Your Glass Mini MultiChopper How to assemble
- ss Mini MultiChopper
- Using your Glass Mini MultiChopper Chopping Guide
- Care and Cleaning
- ZA'ATAR SPICE BLEND
- MAKES 2 CUPS
- PREP TIME: 5 mins
- DUKKAH
- RecipesRecipes
- TROPICAL FRUIT SALSA (Savoury)
- PREP TIME: 8 mins
- FROZEN FRUIT SALSA (Sweet)
- PREP TIME: 7 mins
- GARLIC FETA DIP
- PREP TIME: 10 mins
- CHIMICHURRI SAUCE
- MAKES 1 CUP
- AVOCADO HUMMUS
- MAKES 1 ½ CUPS
- KIDDY FISH NUGGETS
- MAKES: 14 small
- PREP TIME: 15 mins
- COOK TIME: 4 mins
- Recipes Recipes
- CAULIFLOWER CAKES
- MAKES 8
- COOK TIME: 20 mins
- FRESH BREADCRUMBS
- CHOCOLATE PEANUT BUTTER WHIPPED CREAM
- SALTED CARAMEL CREAM
- MAKES: 1½ cups
- WarrantyNotes
- Sunbeam
- Need help with your appliance?
- AUSTRALIA
- NEW ZEALAND
Brand : SUNBEAM
Model : Mini Glass MultiChopper FCP1000
Category : Food processor