
FPIC3677RF - Cooker FRIGIDAIRE - Free user manual and instructions
Find the device manual for free FPIC3677RF FRIGIDAIRE in PDF.


| Product Type | Induction Cooktop |
| Brand | Frigidaire |
| Model | FPIC3677RF |
| Dimensions (W x D x H) | 91.4 cm x 51.1 cm x 7.3 cm (36" x 20 1/8" x 2 7/8") |
| Electrical Supply | 240/208 V, 60 Hz, single-phase, 50 A |
| Burner Type | Induction |
| Number of Cooking Zones | 5 zones (estimate for 36" model) |
| Cooking Surface | Ceramic Glass |
| Controls | Touch |
| Main Features | Pan detection, auto shut-off, child lock (assumed) |
| Maintenance and Cleaning | Use a specific cleaning cream, do not use abrasive products |
| Safety | Grounding required, safety shut-off in case of overheating, control lock |
| Installation | Respect a minimum clearance of 76.2 cm (30") above the surface |
| Electrical Connection | 3 or 4 wire cable, 240/208 V, 60 Hz |
| Repairability | Contact a qualified technician; parts available through after-sales service |
| Country of Manufacture | China (printed in China) |
Frequently Asked Questions - FPIC3677RF FRIGIDAIRE
User questions about FPIC3677RF FRIGIDAIRE
0 question about this device. Answer the ones you know or ask your own.
Ask a new question about this device
Download the instructions for your Cooker in PDF format for free! Find your manual FPIC3677RF - FRIGIDAIRE and take your electronic device back in hand. On this page are published all the documents necessary for the use of your device. FPIC3677RF by FRIGIDAIRE.
USER MANUAL FPIC3677RF FRIGIDAIRE
INSTALLATION AND SERVICE MUST BE PERFORMED BY A QUALIFIED INSTALLER.
IMPORTANT: SAVE FOR LOCAL ELECTRICAL INSPECTOR'S USE.
READ AND SAVE THESE INSTRUCTIONS FOR FUTURE REFERENCE.
FOR YOUR SAFETY: Do not store or use gasoline or other flammable vapors and liquids in the vicinity of this or any other appliance.
IMPORTANT INSTALLATION INFORMATION
- All electric cooktops run off a single phase, three-wire or four-wire cable, 240/208 volt, 60 hertz, AC only electrical supply with ground.
• Minimum distance between cooktop and overhead cabinetry is 30" (76.2 cm).
* 30" (76.2 cm) min. for unprotected cabinet and 24" (61 cm) min. for cabinet with protected bottom surface.
DO NOT apply any sealant along the perimeter. The cooktop must breath freely.
Cooktop Dimensions
4" X 8" (10.2 cm x 20.3 cm)
opening to route armored cable
if a panel is present
Cooktop Cutout Dimensions
Figure 1
COOKTOP DIMENSIONS CUTOUT DIMENSIONS
| A. WIDTH | B. DEPTH | C. HEIGHT | D. WIDTH | E. DEPTH | F. WIDTH | G. DEPTH | H. HEIGHT | ||
| Min. Max. | Min. Max. | ||||||||
| 30 (76.2) | 20^5/_8 (52.4) | 2^7/_5 (7.3) 28 | ^1/_4 (71.8) | 19^3/_8 (49.2) | 28^1/_2 (72.4) | 28^5/_3 (72.7) | 19^5/_8 (49.8) | 19^3/_4 (50.2) | 3^5/_8 (9.2) |
| 36 (91.4) | 20^1/_8 (51.1) | 2^7/_5 (7.3) 33 | ^5/_8 (85.4) | 18^7/_8 (47.9) | 33^7/_8 (86) | 34 (86.4) | 19^1/_8 (48.6) | 19^1/_4 (48.9) | 3^3/_8 (9.2) |
All dimensions are stated in inches and (cm).
Allow 2" (5 cm) space below the armored cable opening to clear the electric cable and allow space for installation of the junction box on the wall at the back of the cooktop.
P/N A01705202 (1603) Rev. B
English – pages 1-8
Spanish – pages 9-16
Français – pages 17-24
Printed in China
induction cooKtoP inStALLAtion inStRuctionS
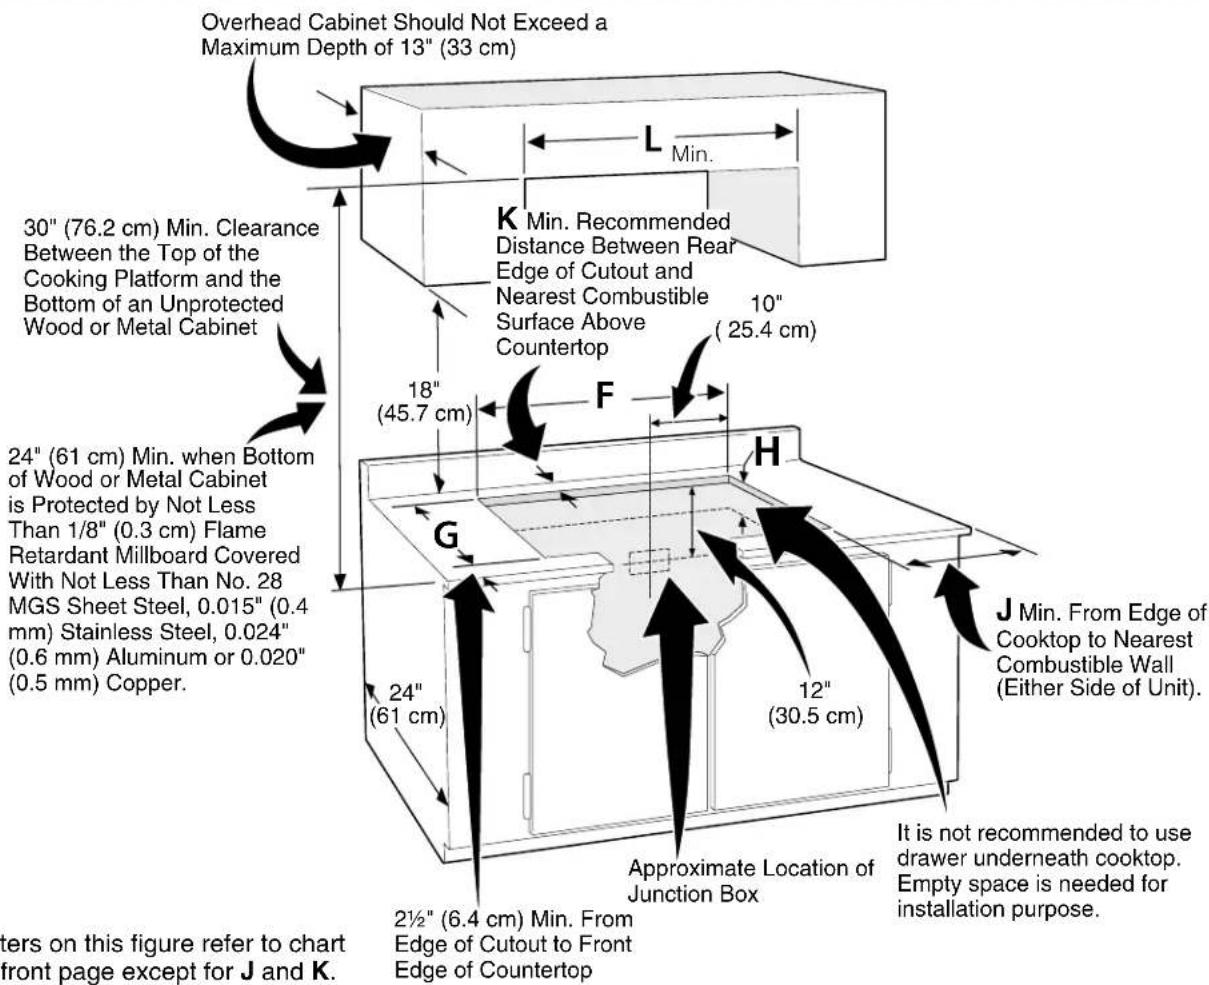
Figure 2 – COUNTERTOP CUTOUT OPENING
!CAUTION To eliminate the risk of burns or fire by reaching over heated surfaces, cabinet storage space located above the cooktop should be avoided. If cabinet storage is provided, risk can be reduced by installing a range hood that projects horizontally a minimum of 5" (12.7 cm) beyond the bottom of the cabinets.
| MODEL J K L | |||
| 30" 2" | (5.1cm) 1 1/2" (3.8cm) 30" (76.2cm) | ||
| 36" 2" | (5.1cm) 2" (5.1cm) 36" (91.4cm) | ||
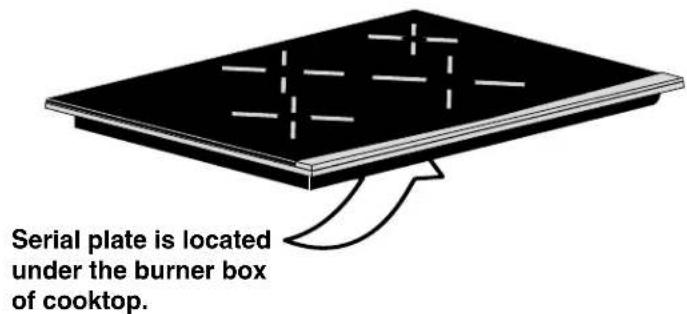
Model and Serial Number Location
The serial plate is located under the cooktop.
When ordering parts for or making inquires about your cooktop, always be sure to include the model and serial numbers and a lot number or letter from the serial plate on your cooktop.
induction cooKtoP inStALLAtion inStRuctionS
Important Notes to the Installer
- Read all instructions contained in these installation instructions before installing the cooktop.
- Remove all packing material before connecting the electrical supply to the cooktop.
- Observe all governing codes and ordinances.
- Be sure to leave these instructions with the consumer.
- Only certain cooktop models may be installed over certain built-in electric oven models. Approved cooktops and built-in ovens are listed by the MFG ID number and product code.
Important Note to the Consumer
Keep these instructions with your Use and Care Guide for future reference.
IMPORTANT SAFETY INSTRUCTIONS
- Be sure your cooktop is installed and grounded properly by a qualified installer or service technician.
- This cooktop must be electrically grounded in accordance with local codes or, in their absence, with the National Electrical Code ANSI/NFPA No. 70—latest edition in the United States.
WARNING The electrical power to the cooktop must be shut off while line connections are being made. Failure to do so could result in serious injury or death.
Provide Electrical Connection
Install the junction box under the cabinet and run 120/240 or 120/208 Volt, AC wire from the main circuit panel. NOTE: DO NOT connect the wire to the circuit panel at this time.
Electrical Requirements
Observe all governing codes and local ordinances.
- A 3-wire or 4-wire single phase 120/240 or 120/208 Volt, 60 Hz AC only electrical supply is required on a separate circuit fused on both sides of the line (time-delay fuse or circuit breaker is recommended). DO NOT fuse neutral.
- A circuit breaker or fuse rated at 50 Amp is required for 36" models and 40 Amp for the 30" model.
NOTE: Wire sizes and connections must conform with the fuse size and rating of the appliance in accordance with the National Electrical Code ANSI/NFPA No. 70—latest edition and local codes and ordinances.
WARNING An extension cord must not be used with this appliance. Such use may result in a fire, electrical shock, or other personal injury.
- The appliance should be connected to the fused disconnect (or circuit breaker) box through flexible armored or nonmetallic sheathed cable. The flexible armored cable extending from this appliance should be connected directly to the grounded junction box. The junction box should be located as shown in Figure 2 with as much slack as possible remaining in the cable between the box and the appliance, so it can be moved if servicing is ever necessary.
- A suitable strain relief must be provided to attach the flexible armored cable to the junction box.
Unpacking Instructions
- Unpack and visually inspect the cooktop.
- Be sure the bottle of cleaner conditioner packed in the literature bag is left where the user can find it easily. It is important that the ceramic-glass cooktop be pretreated before use. See Cooktop Cleaning and Maintenance section in the Use and Care Guide.
Electrical Connection
Connect the flexible armored cable that extends from the surface unit to the junction box using a suitable strain relief at the point the armored cable enters the junction box. Then make the electrical connection as follows.
Electrical ground is required on this appliance.
WARNING This appliance is equipped with a copper conductor flexible cable. If connection is made to aluminum house wiring, use only special connectors which are approved for joining copper and aluminum wires in accordance with the National Electrical Code and local codes and ordinances. Improper connection of aluminum house wiring to copper leads can result in a short circuit or fire. Follow the connector manufacturer recommended procedure closely.
This appliance is manufactured with a supply wire and a frame connected green or bare copper grounding wire.
WARNING DO NOT ground to a gas supply pipe. DO NOT connect to electrical power supply until appliance is permanently grounded. Connect the ground wire before turning on the power.
induction cooKtoP inStALLAtion inStRuctionS
If the cable from appliance is equipped with 3 wires:
Where local codes permit connecting the appliance-grounding conductor to the neutral (white) wire (see figure 3):
- Disconnect the power supply.
- In the circuit breaker, fuse box or junction box, connect appliance and power supply cable wires as shown in figure 3.
WARNING You may not ground the cooktop through the neutral (white) wire if cooktop is used in a new branch circuit installation (1996 NEC), mobile home, recreational vehicle, or where local codes do not permit grounding to the neutral (white) wire.

Figure 3 - 3-WIRE GROUNDED JUNCTION BOX
When grounding to the neutral (white) wire is prohibited, you must use a 4-wire power supply cable. See Figure 4. Failure to heed this warning may result in electrocution or other serious personal injury.
If cooktop is used in a new branch circuit installation (1996 NEC), mobile home, recreational vehicle, or where local codes DO NOT permit grounding to the neutral (white) wire (see figure 4):
- Disconnect the power supply.
- In the circuit breaker, fuse box or junction box, connect appliance and power supply cable wires as shown in figure 4.
Cable from Power Supply

Figure 4 - 4-WIRE GROUNDED JUNCTION BOX
!WARNING If connecting to a 4-wire power supply cable electrical system, the appliance frame connected ground wire MUST NOT be connected to the neutral wire of the 4-wire electrical system.
NOTE TO ELECTRICIAN: The armored cable leads supplied with the appliance are UL-listed for connection to larger gauge household wiring. The insulation of the leads is rated at temperatures much higher than temperature rating of household wiring. The current carrying capacity of the conductor wire is governed by the temperature rating of the insulation around the wire, rather than the wire gauge alone.
induction cooKtoP inStALLAtion inStRuctionS
If the cable from appliance is equipped with 4 wires:
Where local codes permit connecting the appliance-grounding conductor (wire) to the neutral (white) wire (see figure 5):
- Disconnect the power supply.
- In the circuit breaker, fuse box or junction box, connect appliance and power supply cable wires as shown in figure 5.

WARNING This appliance is manufactured with a white neutral power supply and a frame connected copper wire. The frame is grounded by connection of grounding lead to neutral lead at the termination of the conduit, if used in USA, in a new branch circuit installation (1996 NEC), mobile home, recreational vehicles, where local code do not permit grounding trough the neutral (white) wire or in Canada, disconnect the white and green lead from each other and use ground lead to ground unit in accordance with local codes, connect neutral lead to branch circuit-neutral conductor in usual manner see Figure 6. If your appliance is to be connected to a 3 wire grounded junction box (US only), where local code permit connecting the appliance-grounding conductor to the neutral (white) see Figure 5.
If cooktop is used in a new branch circuit installation (1996 NEC), mobile home, recreational vehicle, or where local codes DO NOT permit grounding through the neutral (white) wire (see figure 6):
- Disconnect the power supply.
- Separate the green (or bare copper) and white appliance cable wires.
- In the circuit breaker, fuse box or junction box: connect appliance and power supply cable wires as shown in figure 6.
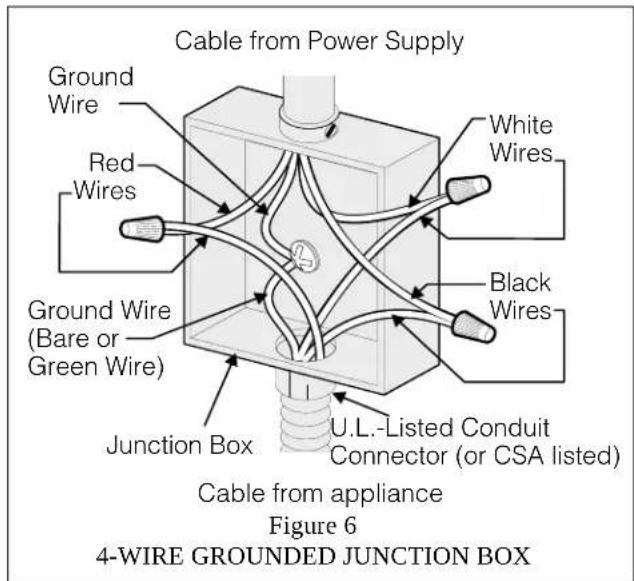
WARNING If connecting to a 4-wire power supply cable electrical system, the appliance frame connected ground wire MUST NOT be connected to the neutral wire of the 4-wire electrical system.
NOTE TO ELECTRICIAN: The armored cable leads supplied with the appliance are UL and CSA-recognized for connection to larger gauge household wiring. The insulation of the leads is rated at temperatures much higher than temperature rating of household wiring. The current carrying capacity of the conductor is governed by the temperature rating of the insulation around the wire, rather than the wire gauge alone.
induction cooKtoP inStALLAtion inStRuctionS
Cooktop Installation
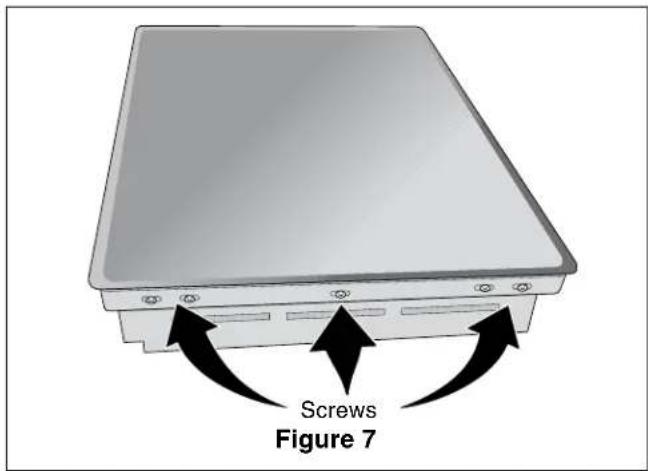
- Visually inspect the cooktop for damage. Also make sure all cooktop screws are tight (see Figure 7).
- Install the retainer brackets. See Figure 8.
The retainer brackets MUST be installed, to meet local codes or, in their absence, with the National Electrical Code ANSI/NFPA No. 70—latest edition (see Figure 8).
- Set the cooktop into the countertop cutout.
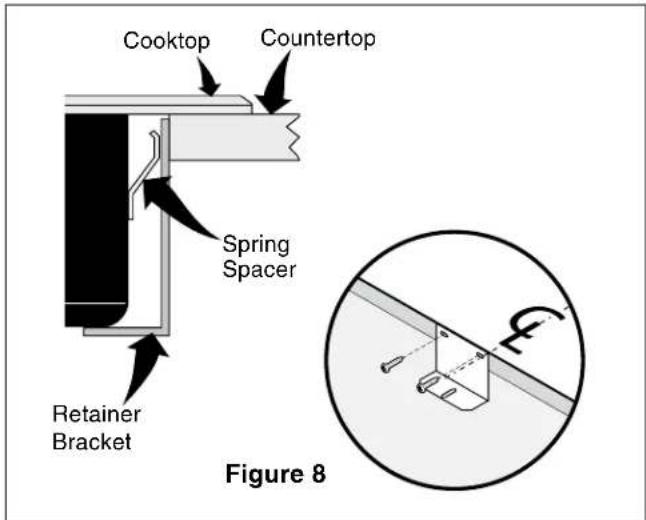
NOTE: Do not use caulking compound; cooktop should be removable for service when needed.
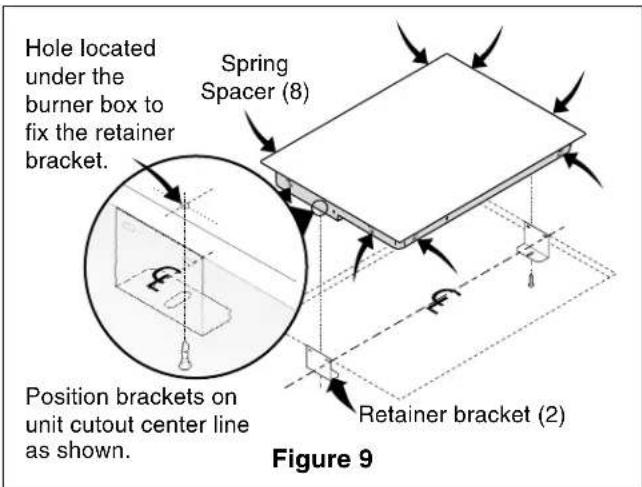
WARNING Do not remove the spring spacers on the edges of the cooktop. These spacers center the cooktop in the space provided. The cooktop must be centered to prevent excess heat buildup that may result in heat damage or fire (see Figure 9).
- Fix the cooktop to the bracket using the screws supplied (see Figure 9).
Granite countertop Installation Kit
A Granite Countertop Installation kit # 903061-9010 can be ordered through a Service Center or by phone at 1-877-ELECTROLUX (1-877-435-3287).
Checking Operation
Refer to the Use and Care Guide for operation.
CAUTION Do not touch cooktop glass or elements.
They may be hot enough to burn you.
Before You Call for Service
Read the Before You Call for Service Checklist and operating instructions in your Use and Care Guide. It may save you time and expense. The list includes common occurrences that are not the result of defective workmanship or materials in this appliance.
Refer to your Use and Care Guide for service phone numbers.
induction cooKtoP inStALLAtion inStRuctionS
For typical under counter installation of an electric built-in oven see Figure below.
Only certain cooktop models may be installed over certain built-in electric oven models. Approved cooktops and built-in ovens are listed by the MFG ID number and product code (see the insert sheet included in the literature package and cooktop installation instructions for dimensions).
WARNING
To reduce the risk of personal injury and tipping of the wall oven, the wall oven must be secured to the cabinet (s) by mounting brackets.
208/240 Volt junction box for built-in oven.

Cut an opening in wood base minimum 4" x 4" (10.2 X 10.2 cm), 2" (5 cm) from left side filler panel, to route armoured cable to junction box.
Note 1: 4" x 4" (10.2 X 10.2 cm) opening to route armoured cable from cooktop to junction box.
* If no cooktop is installed directly over the oven unit, 5" (12.7 cm) maximum is allowed above the floor.
| CUTOUT DIMENSIONS | |||
| F. WIDTH G. DEPTH H. HEIGHT | |||
| 27" (68.6 cm) Wall Oven | 24 78 " (63.2 cm) Min. 25 14 " (64.1 cm) Max. | 23 12 " (59.7 cm) Min. | 27 14 " (69.2 cm) Min. 28 14 " (71.8 cm) Max. |
| 30" (76.2 cm) Wall Oven | 28 12 " (72.4 cm) Min. 29" (73.7 cm) Max. | 23 12 " (59.7 cm) Min. | 27 14 " (69.2 cm) Min. 28 14 " (71.8 cm) Max. |
Figure 10- TYPICAL UNDER COUNTER INSTALLATION OF A SINGLE ELECTRIC BUILT-IN OVEN WITH AN ELECTRIC COOKTOP MOUNTED ABOVE
NOTES
P/N A01705202 (1603) Rev. B
English – pages 1-8
Spanish – pages 9-16
Français – pages 17-24
Impreso en China
| MODELO J K | ||||
| 30" | 7 1/2" | (19.1cm) | 1 1/2" (3.8cm) | |
| 36" | 7 1/2" | (19.1cm) | 2" (5.1cm) | |
Figura 2 – EL CORTE DE LA PARTE SUPERIOR DEL ARMARIO
| DIMENSIONES DE ABERTURA | |||
| F. ANCHURA G. PROFUNDIDAD H. ALTURA | |||
| 27" (68.6 cm)Horno de pared | 24 7/8" (63.2 cm) Min.251⁄4" (64.1 cm) Max. | 231⁄2" (59.7 cm) | 271⁄4" (69.2 cm) Min.281⁄4" (71.8 cm) Max. |
| 30" (76.2 cm)Horno de pared | 281⁄2" (72.4 cm) Min.29" (73.7 cm) Max. | 231⁄2" (59.7 cm) | 271⁄4" (69.2 cm) Min.281⁄4" (71.8 cm) Max. |
P/N A01705202 (1603) Rev. B
English – pages 1-8
Spanish – pages 9-16
Français – pages 17-24
INSTRUCTIONS D'INSTALLATION POUR TABLE DE CUISSON À INDUCTION
- INSTALLATION AND SERVICE MUST BE PERFORMED BY A QUALIFIED INSTALLER.
- IMPORTANT INSTALLATION INFORMATION
- induction cooKtoP inStALLAtion inStRuctionS
- Model and Serial Number Location
- Important Notes to the Installer
- Important Note to the Consumer
- IMPORTANT SAFETY INSTRUCTIONS
- Provide Electrical Connection
- Electrical Requirements
- Unpacking Instructions
- Electrical Connection
- If the cable from appliance is equipped with 3 wires:
- Where local codes permit connecting the appliance-grounding conductor to the neutral (white) wire (see figure 3):
- If the cable from appliance is equipped with 4 wires:
- Cooktop Installation
- Granite countertop Installation Kit
- Checking Operation
- Before You Call for Service
- WARNING
- NOTES
- INSTRUCTIONS D'INSTALLATION POUR TABLE DE CUISSON À INDUCTION
Brand : FRIGIDAIRE
Model : FPIC3677RF
Category : Cooker