
Gallery FGAC7044U1 - Dehumidifier FRIGIDAIRE - Free user manual and instructions
Find the device manual for free Gallery FGAC7044U1 FRIGIDAIRE in PDF.


| Product Type | Dehumidifier |
| Brand | Frigidaire |
| Model | Gallery FGAC7044U1 |
| Capacity (Pints per Day) | 70 pints (approx.) |
| Dimensions (Approx.) | 15" W x 11" D x 24" H |
| Weight (Approx.) | 40 lbs |
| Power Supply | 115 V, 60 Hz, 8.5 A |
| Plug Type | 3-prong grounding plug |
| Operating Temperature Range | 41°F to 96°F (5°C to 35°C) |
| Humidity Control | 35% to 85% RH in 5% increments, plus Continuous mode |
| Fan Speeds | High and Low |
| Timer | Delay Start/Stop, 0.5 to 24 hours |
| Water Removal | Removable bucket (approx. 16 pints) or continuous drain via garden hose |
| Filter Type | Washable mesh filter |
| Filter Cleaning Indicator | Yes, after 250 hours of operation |
| Bucket Full Indicator | Yes, with auto shut-off |
| WiFi Connectivity | Yes, compatible with Frigidaire app |
| FCC / IC Compliance | FCC Part 15 Class B, ICES-003 |
| Warranty | 1 year limited, 5 years on sealed system |
| Safety Features | Auto shut-off on bucket full, 3-minute compressor delay, child safety precautions |
Frequently Asked Questions - Gallery FGAC7044U1 FRIGIDAIRE
User questions about Gallery FGAC7044U1 FRIGIDAIRE
0 question about this device. Answer the ones you know or ask your own.
Ask a new question about this device
Download the instructions for your Dehumidifier in PDF format for free! Find your manual Gallery FGAC7044U1 - FRIGIDAIRE and take your electronic device back in hand. On this page are published all the documents necessary for the use of your device. Gallery FGAC7044U1 by FRIGIDAIRE.
USER MANUAL Gallery FGAC7044U1 FRIGIDAIRE
natural_image
Simple line drawing of a rectangular container with a side port and handle (no text or symbols)TABLE OF CONTENTS
Important Safety Instructions 2
Location 3
How It Works...3......
FCC statement 4
Dehumidifier Features 5
Operating Instructions 5-9
Care And Cleaning 10
Storage 10
Before You Call 11
Major Appliance Limited Warranty 12

NOTE:
This USE & CARE MANUAL provides specific operating instructions for your model. Use the dehumidifier only as instructed in this USE & CARE MANUAL. These instructions are not meant to cover every possible condition and situation that may occur. Common sense and caution must be practiced when installing, operating, and maintaining any appliance.

WARNING
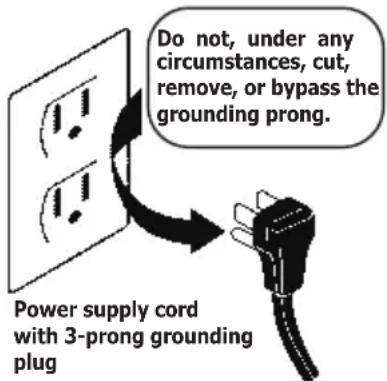
Avoid fire hazard or electric shock. Do not use an extension cord or an adaptor plug. Do not remove any prong from the power cord.
Grounding type wall receptacle

WARNING
For Your Safety
- Do not store or use gasoline or other flammable vapors and liquids in the vicinity of this or any other appliance. Read product labels for flammability and other warnings.
- Discard water from bucket. Water is not potable and cannot be used for drinking.

WARNING
Child Safety Precautions
- Destroy the carton, plastic bags, and any packing materials immediately after the dehumidifier is unpacked. Children should never use these items for play.
- Do not leave children unattended in an area where the appliance is operating.
- Do not allow them to sit or stand on the appliance.

WARNING
Electrical Information
- For your safety and protection, this dehumidifier is equipped with a three-prong grounding plug on the power cord. Do not, under any circumstances, cut or remove the round ground prong from the plug.
- Your dehumidifier must be plugged directly into a properly grounded and polarized three-prong receptacle. If the wall receptacle you intend to use will not accept a three-prong plug, or if you are not sure the outlet is adequately grounded or protected by a time delay fuse or circuit breaker, have a qualified electrician install the proper outlet according to the National Electrical Code and applicable local codes and ordinances. Do not use an extension cord or an adapter plug.
- Never unplug the dehumidifier by pulling on the power cord. Always grip the plug firmly and pull straight out from the receptacle.
Do not pinch, bend, or knot the power cord.

SAFETY PRECAUTIONS
DANGER! Avoid Serious Injury or Death
• This dehumidifier contains no user-serviceable parts. Always call an authorized Electrolux servicer for repairs.
Do not insert or place fingers or objects into the air discharge area or front grille of the unit.
Do not start or stop the dehumidifier by unplugging the power cord or turning off the power at the electrical box.
• Do not cut or damage the power cord.
• If the power cord is damaged, it should only be replaced by an authorized Electrolux servicer.
- In the event of a malfunction (sparks, burning smell, etc.), immediately stop the operation, disconnect the power cord, and call an authorized Electrolux servicer.
• Do not operate the dehumidifier with wet hands.
• Do not pull on the power cord.
• Do not drink any water from the dehumidifier.

SAFETY PRECAUTIONS
CAUTION! Avoid Injury or damage to the unit or other property
• Do not direct airflow at fireplaces or other heat related sources as this could cause flare ups.
• Do not climb on or place objects on the unit.
• Do not hang objects off the unit.
• Do not place containers with liquids on the unit.
• Turn off the dehumidifier at the power source when it will not be used for an extended period of time.
- Operate the unit with air filter in place.
• Do not block or cover the intake grille, discharge area and outlet ports.
- Ensure that any electrical/electronic equipment is one yard away from the unit.
• Do not use or store flammable gases near the unit.
| Location | Selecting a LocationIMPORTANT:1. Dehumidifier must be operated in an enclosed area to be most effective. Close all doors, windows, and other outside openings to the room. The effectiveness of the dehumidifier depends on the rate at which new moisture-laden air enters the room.2. Place dehumidifier in a location that does not restrict airflow through the front of the unit or out of the louvers on the left side of cabinet.3. A dehumidifier operating in a basement will have little or no effect in drying an adjacent enclosed storage area, such as a closet, unless there is adequate circulation of air in and out of the area. It may be necessary to install a second dehumidifier in the enclosed area for satisfactory drying.4. The dehumidifier must be installed on a level floor that will support it with a full bucket of water.5. There should be a minimum of 12 inches clearance around the dehumidifier. |
| How It Works | When the unit is started, the fan begins to pull moisture-laden air across the dehumidifying coils. The coils condense or draw moisture from the air, and air flows through the top louvers into the room as dry, warm air. Moisture removed from air is collected in a bucket on the front of the dehumidifier.The unit is designed to operate between 41 °F (5 °C), and 96 °F (35 °C). The unit will not work properly if the temperature is out of this temperature range, or the performance of the unit will fall greatly.The "Compressor" circuit has an automatic 3 minute time delayed start if the unit is turned off and on quickly. This prevents overheating of the compressor and possible circuit breaker tripping. Make sure the tank is fitted correctly otherwise unit will not turn on. |
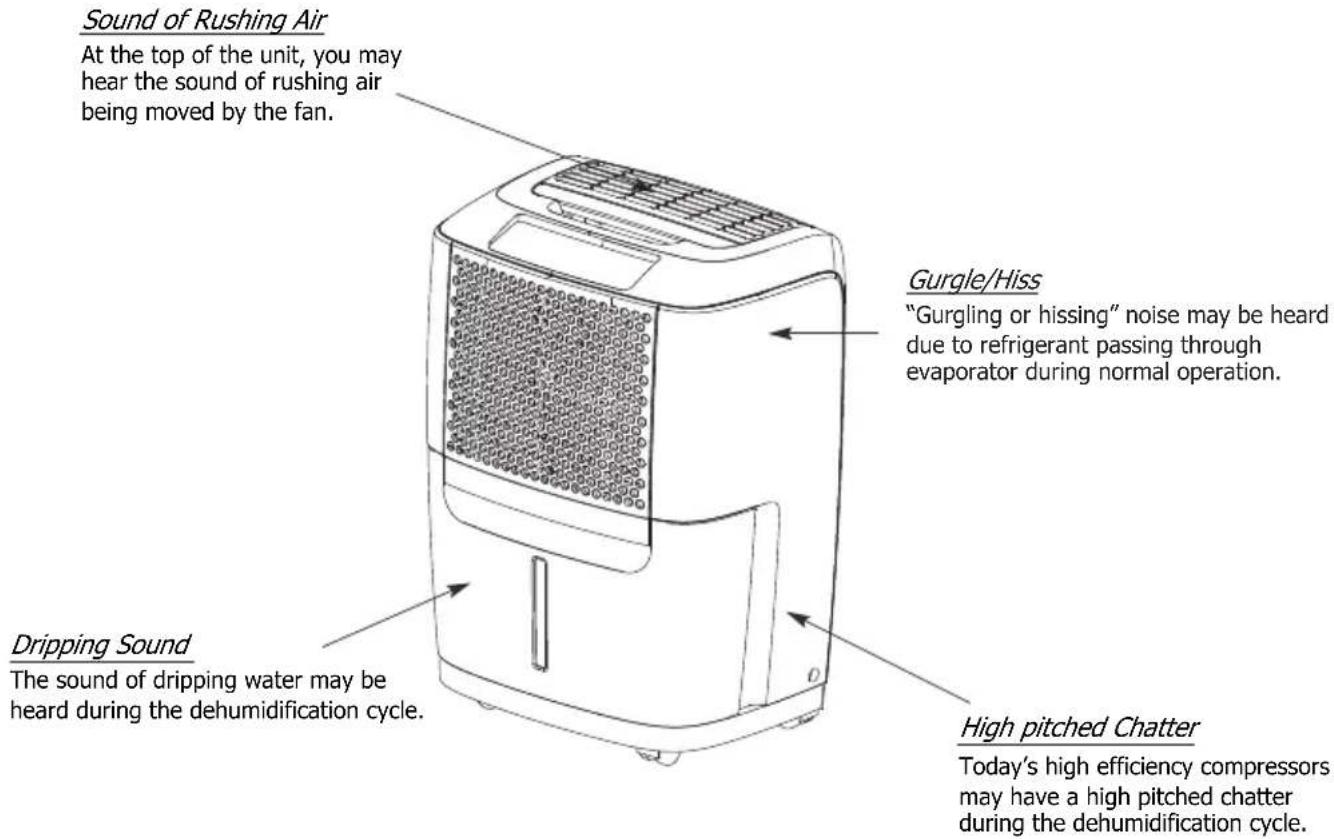
Normal Sounds
FCC Interference Statement
This equipment has been tested and found to comply with the limits for a Class B digital device, pursuant to part 15 of the FCC Rules. These limits are designed to provide reasonable protection against harmful interference in a residential environment. This equipment generates, uses, and can radiate radio frequency energy and, if not installed and used in accordance with the instructions, may cause harmful interference to radio communications. However, there is no guarantee that interference will not occur in a particular installation. If this equipment does cause harmful interference to radio or television reception, which can be determined by tuning the device off and on, the user is encouraged to try to correct the interference by one or more of the following measures:
• Reorient or relocate the receiving antenna.
- Increase the separation between the device and receiver.
- Connect the equipment into an outlet other than the one used for the receiver.
- Consult the dealer or an experienced radio/TV technician for assistance.
This device complies with Part 15 of the FCC Rules. Operation is subject to the following two conditions: (1) This device may not cause harmful interference, and (2) This device must accept any interference received, including interference that may cause undesired operation.
FCC CAUTION: Any changes or modifications not expressly approved by the party responsible for compliance could void the user's authority to operate the equipment.
Host device Labeling
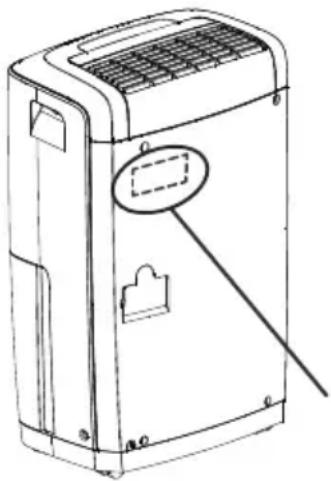
This device includes the following module.
Contains FCC ID: 2AIBX-WD115
RF exposure statement
This equipment complies with FCC radiation exposure limits set forth for an uncontrolled environment. This equipment should be installed and operated with minimum 20 cm between the radiator and your body. This transmitter must not be collocated or operating in conjunction with any other antenna or transmitter unless authorized to do so by the FCC.
INDUSTRY CANADA (IC) STATEMENT
This Class B digital apparatus complies with Canadian ICES-003.
This device complies with Industry Canada license-exempt RSS standard(s). Operation is subject to the following two conditions: (1) this device may not cause interference, and (2) this device must accept any interference, including interference that may cause undesired operation of the device.
RF Exposure
The antenna (or antennas) must be installed so as to maintain at all times a distance minimum of at least 20 cm between the radiation source (antenna) and any individual. This device may not be installed or used in conjunction with any other antenna or transmitter.
Host device Labeling
This device includes the following module.
Contains IC: 21700-NIUX
natural_image
Line drawing of a portable air conditioner unit with ventilation grilles and a handle (no text or symbols)This is the location of the module.
Dehumidifier Features
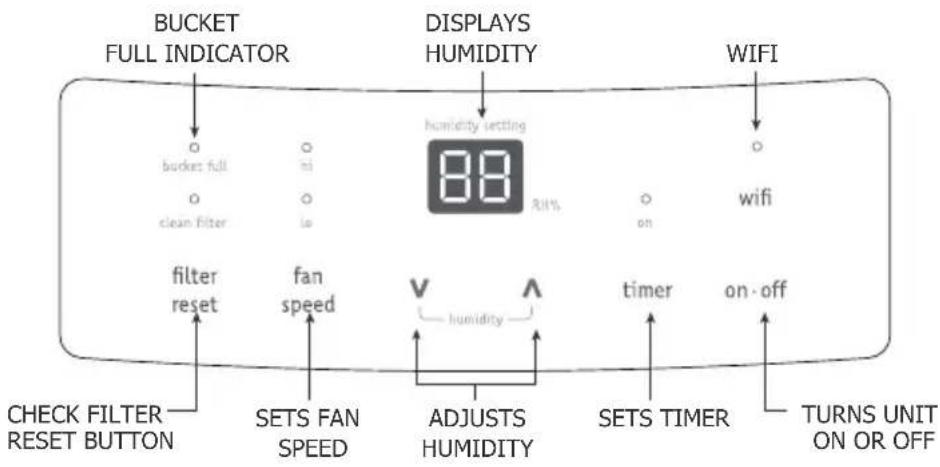
ELECTRONIC CONTROL
Before you begin, thoroughly familiarize yourself with the control panel and all its functions (as shown below). The unit can be controlled by the touch pad alone or with the Frigidaire app*.
flowchart
graph TD
    A["Bucket full indicator"] --> B["clean filter"]
    B --> C["filter reset"]
    C --> D["CHECK FILTER RESET BUTTON"]
    D --> E["SETS FAN SPEED"]
    E --> F["ADJUSTS HUMIDITY"]
    F --> G["SETTS TIMER"]
    G --> H["TURNS UNIT ON OR OFF"]
    I["DISPLAYS HUMIDITY"] --> J["humidity setting 88%"]
    K["WIFI"] --> L["wifi"]
    M["Humidity setting 88%"] --> N["RT%"]
    O["RT%"] --> P["on"]
    Q["RT%"] --> R["on-off"]
*Refer to the Quick Start Guide that came with your Smart Dehumidifier for detailed instructions on setting up your dehumidifier for connected operation from your smart phone or tablet.
Operating Instructions
Allow the unit to reach room temperature before operating. To begin operating the dehumidifier, follow these steps:

NOTE:
Unit must be upright for one hour prior to operating.
- Plug the power cord into a properly grounded 115 volt AC outlet.

NOTE:
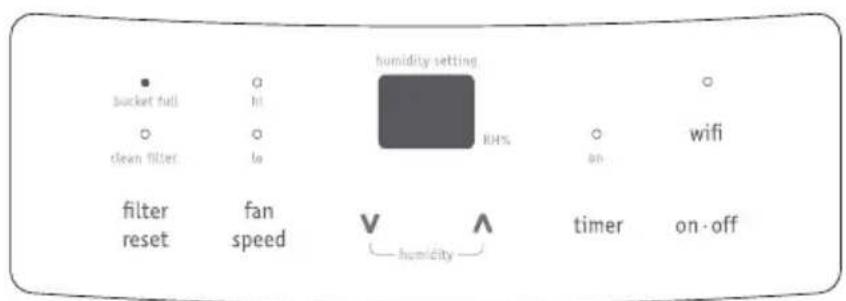
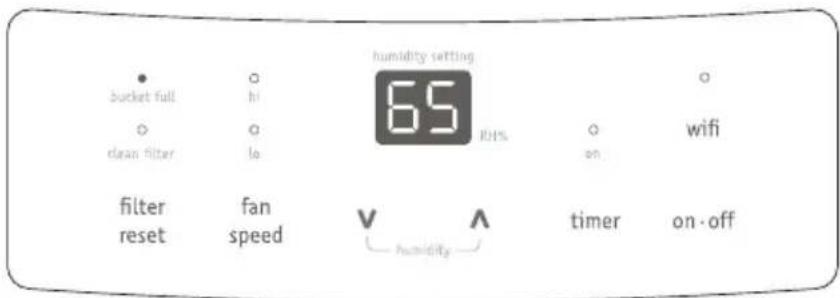
If the "BUCKET FULL" light is on, remove the bucket and re-install to reset the float switch.
Operating Instructions (continued)
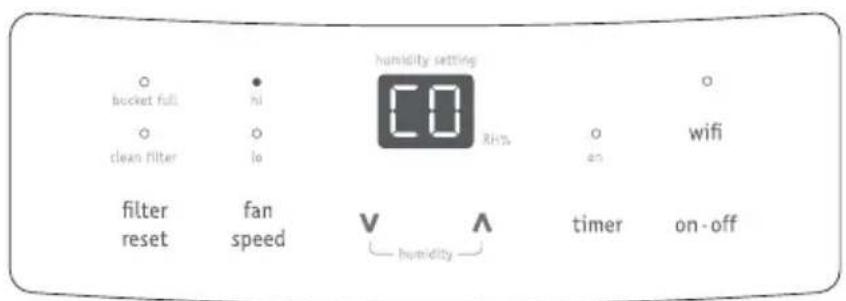
- To turn the unit on, press the ON/OFF button. The unit will run in the factory setting of CONTINUOUS and high fan speed. In the CONTINUOUS mode, the unit will only display CO and not the room humidity. It is recommended you leave the unit running in the CONTINUOUS setting for the first three or four days until the sweating and dampness odors have stopped.
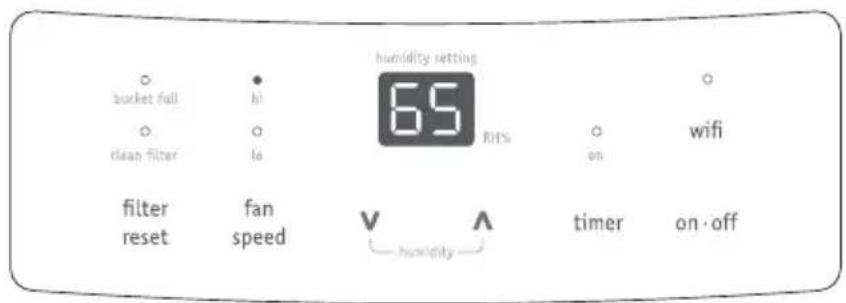
- After a few days when the Relative Humidity has declined, press the HUMIDITY ∧ or ∨ buttons to choose a value between 35% to 85%, so the room is kept at a comfortable humidity. Pressing the ∧ or ∨ buttons will change the humidity selection in 5% increments. After you have set the desired humidity, the readout will display the actual room humidity. If at any time you want to return to the CONTINUOUS Mode, pressing the HUMIDITY ∨ button will lower the Relative Humidity through the 5% increments until the display reads CO.
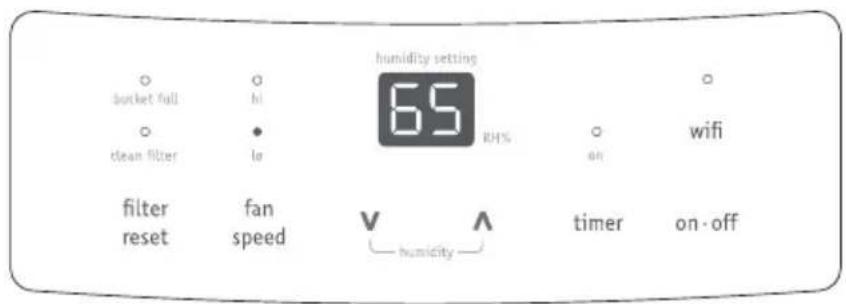
- You can also use the FAN SPEED button to change the fan speed to HIGH or LOW. The indicator light will show the setting you have selected. A higher fan speed will result in quicker moisture removal.
Operating Instructions (continued)
- The CLEAN FILTER light will illuminate after 250 hours of operation. At this time refer to the care and cleaning section to remove and clean the filter. Once the filter has been cleaned and replaced, simply press the FILTER button to extinguish the light.
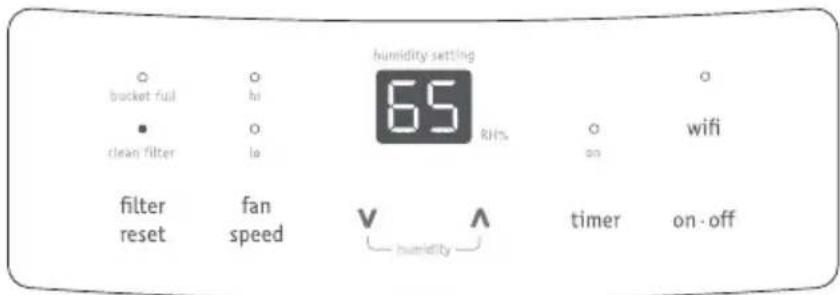
- The TIMER function enables you to either Delay Start or Delay Stop the unit in the choice from 0.5 hour to 24 hours. If the unit is running, then selecting Timer will turn the unit off in the hours that will be set (Delay Stop). If the unit is off, then selecting Timer will turn the unit on in the hours that will be set (Delay Start).
TIMER setting: First press TIMER button, then adjust timer setting, by tapping or holding the A or V button to change the delay timer at 0.5 hour increments, up to 10 hours, then by 1 hour increments up to 24 hours. The control will count down the time remaining (8,7.5,7, etc.) until the unit either starts or stops. For the Delay Start, the fan speed and humidity maintained will be the same as previous setting. After TIMER setting finishes, pressing TIMER button again at any time will stop the TIMER function. The Delay Start/Stop Feature will work until the unit either starts or stops. Once that happens the above steps have to be repeated.

NOTE:
- Before entering TIMER setting, make sure power is being supplied to the unit.
- Before entering TIMER setting, make sure pressing HUMIDITY ∧ or √ button sets one desired room humidity first.
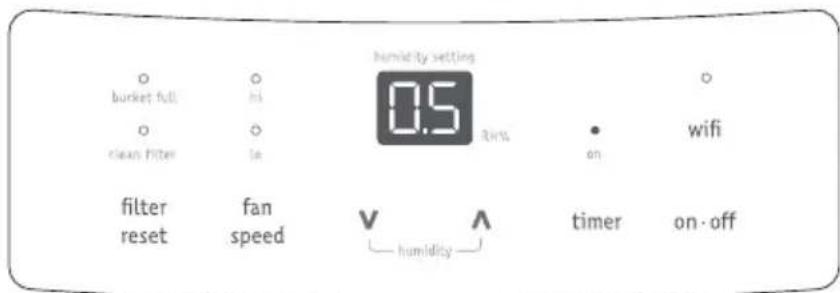
- To shut the unit down, press the ON/OFF button.
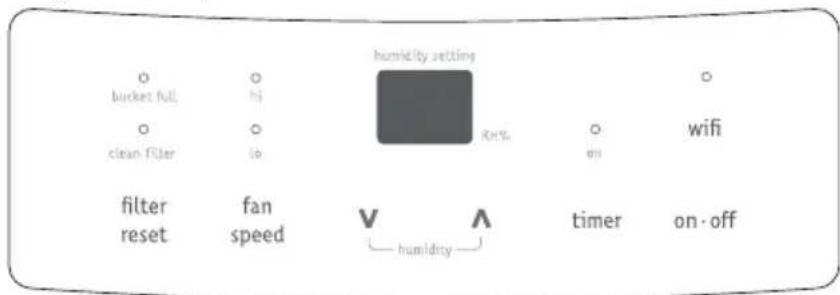
Note: After a power outage, the unit will memorize the last setting and return the unit to the same setting once power is restored.
Fault Codes
- If the display reads "AS" or "ES", a sensor has failed. Contact your Authorized Frigidaire Service Center.
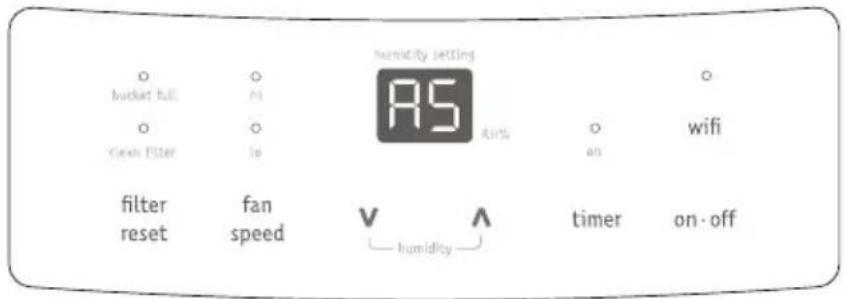
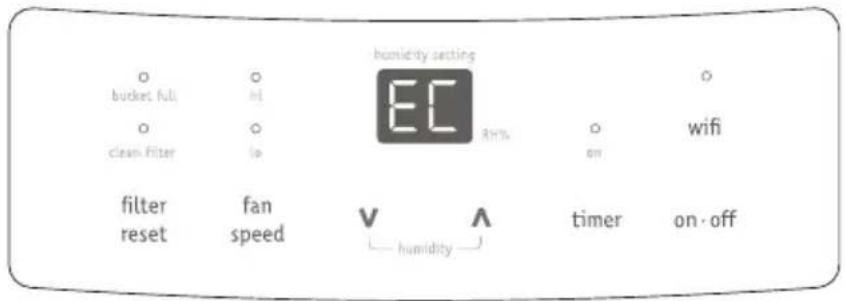
- If the display reads "EC", check the following operating conditions. Outlet voltage should be 115V±10% and the surrounding temperature should be with in the range of 41 °F to 96 °F. Unplug the unit and plug it in again under normal operating conditions. If the "EC" code persists, contact your Authorized Frigidaire Service Center.
Removing Collected Water
- Emptying the Bucket:
a. When the bucket is full, the unit will shut down and the BUCKET FULL indicator will illuminate.
b. Do not move the unit at this time otherwise water may spill on the floor.
c. Press sides of bucket gently to unclip the bucket from the unit.
d. Remove the bucket as shown in the photographs below and empty the bucket.

WARNING
Discard water from bucket. Water is not potable and cannot be used for drinking.
Removing Collected Water (continued)

e. Replace the empty bucket back into the unit and once seated correctly, the unit will start up again.
f. You should hear a click when the bucket is in the correct position
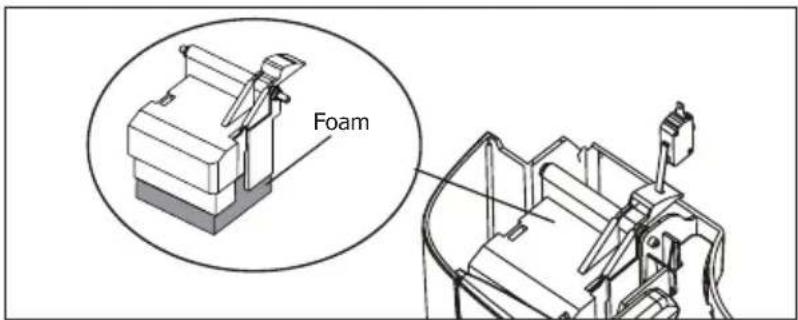
If the bucket full light does not extinguish, check that the float is correctly snapped in place as indicated by the diagram.

NOTE:
The foam embedded under the float(shown in the diagram below) is a functional part, which can not be removed.
- Continuous Drainage:
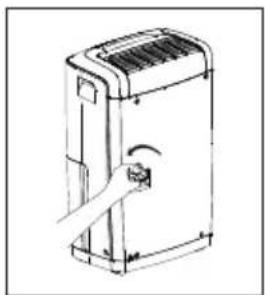
a. For continuous drainage operation, you will need a garden hose and a drain nearby to discharge the water into.
b. Unscrew the drain cap on the back side of the unit. (fig.1)
c. Insert the female threaded end of the hose onto the drain connector of the unit. (fig.2)
d. Screw the garden hose onto the threaded portion of the drain connector. (fig.3)
e. Make sure the hose is secure so there are no leaks.
f. Direct the hose toward the drain, making sure that there are no kinks that will stop the water flowing.
g. Place the end of the hose into the drain. (fig.4)
h. Select the desired humidity setting and fan speed on the unit for continuous draining to start.
natural_image
Line drawing of a portable air conditioner unit with a handle and ventilation grille (no text or symbols)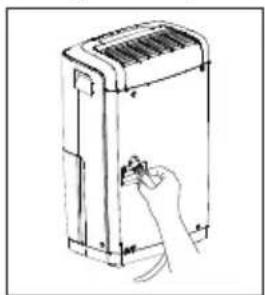
natural_image
Line drawing of a hand inserting a small component into a device (no text or symbols)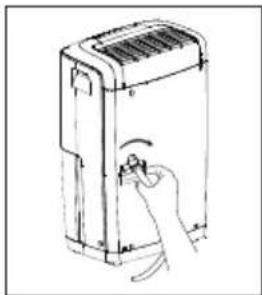
natural_image
Line drawing of a hand holding a device with a knob, no text or symbols present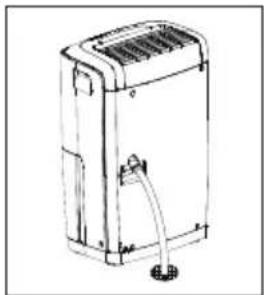
natural_image
Line drawing of a portable electronic device with ventilation grilles and a plug (no text or symbols)fig. 2 fig. 3 fig. 4 fig. 1

NOTE:
- Check the seal between the hose and the drain connector. If there is a small leak then replace the hose gasket and re-tighten the hose.
- It is recommended that a Dehumidifier Drain Hose - 1/2" (12.7 mm) or larger be used. Make sure there are no kinks or elevations in the hose.
- If the mode of continuous drainage is not chosen, the drain cap must be screwed securely to prevent leakage.
Care and Cleaning & Storage
Care and Cleaning
1. Filter
a. Remove the filter every two weeks based on normal operating conditions.
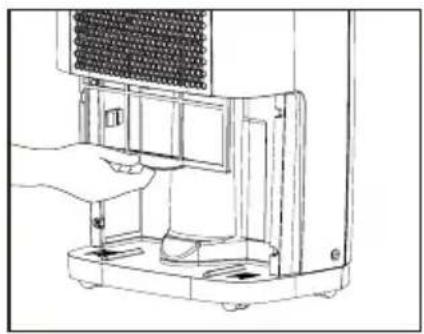
b. To remove the filter, remove Bucket then pull filter downwards.
c. Wash the filter with clean water then dry.
d. Re-install the filter, then replace Bucket.
2. Cabinet
a. Dust cabinet with an oil-free cloth, or using a damp cloth.
b. Vacuum grill using brush attachment.
3. Water Bucket
a. Clean bucket with warm water and detergent.
natural_image
Line drawing of a hand inserting a component into a device (no text or symbols visible)Storage
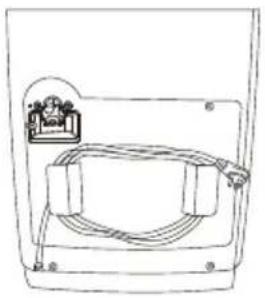
When unit is not in use, unplug and use the cord wrap shown for your model type.
natural_image
Simple line drawing of a mechanical or electrical component with a coiled wire and a top component (no text or symbols)Before calling for service, review this list. It may save you time and expense. This list includes common occurrences that are not the result of defective workmanship or materials in this appliance.
OCCURRENCE SOLUTION
| DEHUMIDIFIER DOES NOT OPERATE. | Wall plug disconnected. Push plug firmly into wall outlet. |
| House fuse blown or circuit breaker tripped. Replace fuse with time delay type or reset circuit breaker. | |
| The dryness level you selected has been reached. Dehumidifier automatically shuts off when selected amount of moisture has been removed from the air. If you want to remove more moisture, Select 'CONTINUOUS' by using the humidity button or knob. After the dehumidifier starts, reset the control to the desired setting. | |
| Bucket not installed properly. See "Removing Collected Water". | |
| Water in the bucket has reached its preset level. Dehumidifier automatically turns off when this occurs. Empty bucket and return bucket to position. | |
| Dehumidifier is not turned on. Turn unit on. | |
| "BUCKET FULL" light is on. Remove bucket, empty water and re-install correctly. | |
| DEHUMIDIFIER RUNS TOO MUCH. | Windows or doors near dehumidifier are open to outdoors. Close all windows or doors to outside. |
| Area to be dehumidified is too large. Check with your dealer to see if capacity is adequate. | |
| Air movement through dehumidifier is blocked. Grill may be dirty. Use brush attachment of vacuum cleaner to clean grill. See "Care and Cleaning". Dehumidifier must be placed in a space that does not restrict air flowing into the rear coil or out of the front grill. | |
| Dehumidifier has been installed or restarted recently. The higher the moisture in the room, the longer the dehumidifier will operate. | |
| Dehumidifier is in the CONTINUOUS mode and will remain on in this mode, use the humidity button or knob to set a RH% higher level. | |
| DEHUMIDIFIER IS OPERATING BUT ROOM IS NOT DRY ENOUGH. | Humidity setting is too high. Press the HUMIDITY button or rotate knob to a lower setting or choose CONTINUOUS for maximum dryness. |
| Dehumidifier has been installed or restarted recently. The higher the moisture in the room air, the longer it takes for the room air to become dry. | |
| Dehumidifier does not have sufficient clearance to operate. Air flow to front grill is blocked. See "Selecting a Location". | |
| Room temperature is too low. Unit will not operate satisfactorily if the room temperature is below 41 °F(5 °C). See "Operating Conditions". | |
| Refer to causes under DEHUMIDIFIER RUNS TOO MUCH. | |
| FROST APPEARS ON COILS ABOVE BUCKET. | Dehumidifier has been turned on recently. This is normal due to refrigerant rushing through the coil. Frost will usually disappear within 60 minutes. |
| Room Temperature is too low. All models will operate satisfactorily at temperatures greater than 41 °F (5 °C). | |
| FAN NOISE. | Air is moving through the dehumidifier. This is a normal sound. |
| TROUBLE CONNECTING THE SMART APPLIANCE TO YOUR WIFI NETWORK OR EXPERIENCING AN ISSUE WITH THE APP. | Please visit Frigidaire.com and select the Owner Support section to view Frequently Asked Questions. |
If These Solutions Fail, Call 1-800-944-9044 For Frigidaire Service.
Major Appliance Limited Warranty
Your appliance is covered by a limited one-year warranty and a limited 2-5 year warranty on the sealed system (the compressor, condenser, evaporator and tubing). For one year from your original date of purchase, Electrolux will pay all costs for repairing or replacing any parts of this appliance that prove to be defective in materials or workmanship when such appliance is installed, used and maintained in accordance with the provided instructions. From the second to the fifth year from your original purchase date, Electrolux will repair or replace any parts in the Sealed Refrigeration System (compressor, condenser, evaporator and tubing) that prove to be defective in materials or workmanship. In years 2-5, the consumer will be responsible for diagnostic, labor and parts costs as well as any removal, transportation and reinstallation expenses which are incurred during service on components other than those covered under the Sealed Refrigeration System 5-year warranty.
Exclusions This warranty does not cover the following:
- Products with original serial numbers that have been removed, altered or cannot be readily determined.
- Product that has been transferred from its original owner to another party or removed outside the USA or Canada.
- Rust on the interior or exterior of the unit.
- Products purchased "as-is" are not covered by this warranty.
- Food loss due to any refrigerator or freezer failures.
- Products used in a commercial setting.
- Service calls which do not involve malfunction or defects in materials or workmanship, or for appliances not in ordinary household use or used other than in accordance with the provided instructions.
- Service calls to correct the installation of your appliance or to instruct you how to use your appliance.
- Expenses for making the appliance accessible for servicing, such as removal of trim, cupboards, shelves, etc., which are not a part of the appliance when it is shipped from the factory.
- Service calls to repair or replace appliance light bulbs, air filters, water filters, other consumables, or knobs, handles, or other cosmetic parts.
- Surcharges including, but not limited to, any after hour, weekend, or holiday service calls, tolls, ferry trip charges, or mileage expense for service calls to remote areas, including the state of Alaska.
- Damages to the finish of appliance or home incurred during installation, including but not limited to floors, cabinets, walls, etc.
- Damages caused by: services performed by unauthorized service companies; use of parts other than genuine Electrolux parts or parts obtained from persons other than authorized service companies; or external causes such as abuse, misuse, inadequate power supply, accidents, fires, or acts of God.
- Limitations and/or restrictions on smart appliance connectivity outside Electrolux's control including, but not limited to, software incompatibility, inadequate home wireless network capability/range and internet availability.
DISCLAIMER OF IMPLIED WARRANTIES; LIMITATION OF REMEDIES
CUSTOMER'S SOLE AND EXCLUSIVE REMEDY UNDER THIS LIMITED WARRANTY SHALL BE PRODUCT REPAIR OR REPLACEMENT AS PROVIDED HEREIN. CLAIMS BASED ON IMPLIED WARRANTIES, INCLUDING WARRANTIES OF MERCHANTABILITY OR FITNESS FOR A PARTICULAR PURPOSE, ARE LIMITED TO ONE YEAR OR THE SHORTEST PERIOD ALLOWED BY LAW, BUT NOT LESS THAN ONE YEAR. ELECTROLUX SHALL NOT BE LIABLE FOR CONSEQUENTIAL OR INCIDENTAL DAMAGES SUCH AS PROPERTY DAMAGE AND INCIDENTAL EXPENSES RESULTING FROM ANY BREACH OF THIS WRITTEN LIMITED WARRANTY OR ANY IMPLIED WARRANTY. SOME STATES AND PROVINCES DO NOT ALLOW THE EXCLUSION OR LIMITATION OF INCIDENTAL OR CONSEQUENTIAL DAMAGES, OR LIMITATIONS ON THE DURATION OF IMPLIED WARRANTIES, SO THESE LIMITATIONS OR EXCLUSIONS MAY NOT APPLY TO YOU. THIS WRITTEN WARRANTY GIVES YOU SPECIFIC LEGAL RIGHTS. YOU MAY ALSO HAVE OTHER RIGHTS THAT VARY FROM STATE TO STATE.
If You Need Service Keep your receipt, delivery slip, or some other appropriate payment record to establish the warranty period should service be required. If service is performed, it is in your best interest to obtain and keep all receipts. Service under this warranty must be obtained by contacting Electrolux at the addresses or phone numbers below. You will be responsible for any service charges incurred due to limitations and/or restrictions on smart appliance connectivity outside Electrolux's control including, but not limited to, software incompatibility, inadequate home wireless network capability/range and internet availability.
This limited warranty only applies in the USA and Canada. In the USA, your appliance is warranted by Electrolux Major Appliances North America, a division of Electrolux Home Products, Inc. In Canada, your appliance is warranted by Electrolux Canada Corp. Electrolux authorizes no person to change or add to any obligations under this warranty. Obligations for service and parts under this warranty must be performed by Electrolux or an authorized service company. Product features or specifications as described or illustrated are subject to change without notice.
USA
1.800.944.9044
Electrolux Major Appliances
10200 David Taylor Drive
Charlotte, NC 28262

Electrolux
Canada
1.800.265.8352
Electrolux Canada Corp.
5855 Terry Fox Way
Mississauga, Ontario, Canada
L5V 3E4
- TABLE OF CONTENTS
- NOTE:
- WARNING
- For Your Safety
- Child Safety Precautions
- Electrical Information
- SAFETY PRECAUTIONS
- DANGER! Avoid Serious Injury or Death
- CAUTION! Avoid Injury or damage to the unit or other property
- Normal Sounds
- FCC Interference Statement
- Host device Labeling
- RF exposure statement
- INDUSTRY CANADA (IC) STATEMENT
- RF Exposure
- Dehumidifier Features
- ELECTRONIC CONTROL
- Operating Instructions
- Operating Instructions (continued)
- Fault Codes
- Removing Collected Water
- Removing Collected Water (continued)
- Care and Cleaning & Storage
- Care and Cleaning
- Filter
- Cabinet
- Water Bucket
- Storage
- Major Appliance Limited Warranty
- Exclusions This warranty does not cover the following:
- DISCLAIMER OF IMPLIED WARRANTIES; LIMITATION OF REMEDIES
Brand : FRIGIDAIRE
Model : Gallery FGAC7044U1
Category : Dehumidifier