
Refresh - Water dispenser Bunn - Free user manual and instructions
Find the device manual for free Refresh Bunn in PDF.


| Product Type | Water Dispenser |
| Brand | Bunn |
| Model | Refresh |
| Dimensions (H x W x D) | 15 x 10 x 10 inches |
| Weight | 10 lbs |
| Power Supply | 120V / 60Hz |
| Power Consumption | 500W (heating), 100W (cooling) |
| Water Capacity | 3 gallons |
| Hot Water Temperature | 185°F - 200°F |
| Cold Water Temperature | 40°F - 50°F |
| Dispensing Modes | Hot, Cold, Room Temperature |
| Filter Type | Built-in carbon filter |
| Material | Stainless steel reservoir, plastic casing |
| Cleaning Instructions | Descale every 3 months using white vinegar or commercial descaler |
| Filter Replacement | Every 6 months or 300 gallons |
| Safety Features | Child safety lock on hot water tap, auto shut-off when empty |
| Certifications | UL, Energy Star |
| Warranty | 1 year limited |
Frequently Asked Questions - Refresh Bunn
User questions about Refresh Bunn
0 question about this device. Answer the ones you know or ask your own.
Ask a new question about this device
Download the instructions for your Water dispenser in PDF format for free! Find your manual Refresh - Bunn and take your electronic device back in hand. On this page are published all the documents necessary for the use of your device. Refresh by Bunn.
USER MANUAL Refresh Bunn
natural_image
Two BUNN water purifier units with ventilation grilles and fan bases (no visible text or symbols)INSTALLATION & OPERATING GUIDE
BUNN-O-MATIC CORPORATION
To ensure you have the latest revision of the Operating Manual, or to view the Illustrated Parts Catalog, Programming Manual, or Service Manual, please visit the Bunn-O-Matic website, at www.bunn.com. This is absolutely FREE, and the quickest way to obtain the latest catalog and manual updates. For Technical Service, contact Bunn-O-Matic Corporation at 1-800-286-6070.
BUNN-O-MATIC COMMERCIAL PRODUCT WARRANTY
Bunn-O-Matic Corp. ("BUNN") warrants equipment manufactured by it as follows:
1) Airpots, thermal carafes, decanters, GPR servers, iced tea/coffee dispensers, MCR/MCP/MCA single cup brewers, thermal servers and ThermoFresh® servers (mechanical and digital) 1 year parts and 1 year labor.
2) All other equipment - 2 years parts and 1 year labor plus added warranties as specified below:
a) Electronic circuit and/or control boards - parts and labor for 3 years.
b) Compressors on refrigeration equipment - 5 years parts and 1 year labor.
c) Grinding burrs on coffee grinding equipment to grind coffee to meet original factory screen sieve analysis - parts and labor for 4 years or 40,000 pounds of coffee, whichever comes first.
These warranty periods run from the date of installation BUNN warrants that the equipment manufactured by it will be commercially free of defects in material and workmanship existing at the time of manufacture and appearing within the applicable warranty period. This warranty does not apply to any equipment, component or part that was not manufactured by BUNN or that, in BUNN's judgment, has been affected by misuse, neglect, alteration, improper installation or operation, improper maintenance or repair, non periodic cleaning and descaling, equipment failures related to poor water quality, damage or casualty. In addition, the warranty does not apply to replacement of items subject to normal use including but not limited to user replaceable parts such as seals and gaskets. This warranty is conditioned on the Buyer 1) giving BUNN prompt notice of any claim to be made under this warranty by telephone at (217) 529-6601 or by writing to Post Office Box 3227, Springfield, Illinois 62708-3227; 2) if requested by BUNN, shipping the defective equipment prepaid to an authorized BUNN service location; and 3) receiving prior authorization from BUNN that the defective equipment is under warranty.
THE FOREGOING WARRANTY IS EXCLUSIVE AND IS IN LIEU OF ANY OTHER WARRANTY, WRITTEN OR ORAL, EXPRESS OR IMPLIED, INCLUDING, BUT NOT LIMITED TO, ANY IMPLIED WARRANTY OF EITHER MERCHANTABILITY OR FITNESS FOR A PARTICULAR PURPOSE. The agents, dealers or employees of BUNN are not authorized to make modifications to this warranty or to make additional warranties that are binding on BUNN. Accordingly, statements by such individuals, whether oral or written, do not constitute warranties and should not be relied upon.
If BUNN determines in its sole discretion that the equipment does not conform to the warranty, BUNN, at its exclusive option while the equipment is under warranty, shall either 1) provide at no charge replacement parts and/or labor (during the applicable parts and labor warranty periods specified above) to repair the defective components, provided that this repair is done by a BUNN Authorized Service Representative; or 2) shall replace the equipment or refund the purchase price for the equipment.
THE BUYER'S REMEDY AGAINST BUNN FOR THE BREACH OF ANY OBLIGATION ARISING OUT OF THE SALE OF THIS EQUIPMENT, WHETHER DERIVED FROM WARRANTY OR OTHERWISE, SHALL BE LIMITED, AT BUNN'S SOLE OPTION AS SPECIFIED HEREIN, TO REPAIR, REPLACEMENT OR REFUND.
In no event shall BUNN be liable for any other damage or loss, including, but not limited to, lost profits, lost sales, loss of use of equipment, claims of Buyer's customers, cost of capital, cost of down time, cost of substitute equipment, facilities or services, or any other special, incidental or consequential damages.
392, A Partner You Can Count On, Air Infusion, AutoPOD, AXIOM, BrewLOGIC, BrewMETER, Brew Better Not Bitter, BrewWISE, BrewWIZARD, BUNN Espress, BUNN Family Gourmet, BUNN Gourmet, BUNN Pour-O-Matic, BUNN, BUNN with the stylized red line, BUNNlink, Bunn-OMatic, Bunn-O-Matic, BUNNserve, BUNNSERVE with the stylized wrench design, Cool Froth, DBC, Dr. Brew stylized Dr. design, Dual, Easy Pour, EasyClear, EasyGard, FlavorGard, Gourmet Ice, Gourmet Juice, High Intensity, iMIX, Infusion Series, Intellisteam, My Café, Phase Brew, PowerLogic, Quality Beverage Equipment Worldwide, Respect Earth, Respect Earth with the stylized leaf and coffee cherry design, Safety-Fresh, savemycoffee.com, Scale-Pro, Silver Series, Single, Smart Funnel, Smart Hopper, SmartWAVE, Soft Heat, SplashGard, The Mark of Quality in Beverage Equipment Worldwide, ThermoFresh, Titan, trifecta, TRIFECTA (sylized logo), Velocity Brew, Air Brew, Beverage Bar Creator, Beverage Profit Calculator, Brew better, not bitter., Build-A-Drink, BUNNSource, Coffee At Its Best, Cyclonic Heating System, Daypart, Digital Brewer Control, Element, Milk Texturing Fusion, Nothing Brews Like a BUNN, Picture Prompted Cleaning, Pouring Profits, Signature Series, Sure Tamp, Tea At Its Best, The Horizontal Red Line, Ultra are either trademarks or registered trademarks of Bunn-O-Matic Corporation. The commercial trifecta® brewer housing configuration is a trademark of Bunn-O-Matic Corporation.
CONTENTS
Warranty 2
User Notices 3
Initial Set-Up & Electrical Requirements 4
CE Requirements 4
Plumbing Requirements 5
Plumbing Hookup 5
Carbon Dioxide Hookup 5
Filling the Water Bath....6
Purging the Water Lines 6
Changing Water Filter Cartridge Warning....7
Dispenser Use....7
Cleaning & Preventative Maintenance....7
Electrical Wiring Schematic Diagram 8
Plumbing Schematic Diagram 9
Coolant Schematic Diagram....10
USER NOTICES
Carefully read and follow all notices on the equipment and in this manual. They were written for your protection. All notices are to be kept in good condition. Replace any unreadable or damaged labels.
This equipment must be installed to comply with the International Plumbing Code of the International Code Council and the Food Code Manual of the Food and Drug Administration (FDA). For models installed outside the U.S.A., comply with the applicable Plumbing/Sanitation Code.
00656.0001
WARNING
◆ Use only on a properly protected circuit capable of the rated load.
♦ Electrically ground the chassis.
◆ Follow national/local electrical codes.
◆ Do not use near combustibles.
♦ Do not deform plug or cord.
FAILURE TO COMPLY RISKS EQUIPMENT DAMAGE, FIRE OR SHOCK HAZARD.
READ THE ENTIRE OPERATING MANUAL
BEFORE USING THIS PRODUCT
00986.0002M 10/14 ©1994 Bunn-O-Matic Corporation
00986.0002
WARNING
Moving Parts.
Do not operate unit with this panel removed.
Risk Of Electrical Shock.
Disconnect power before servicing unit.
27442.0000
CHARGE
Type R134A, Amount 7 oz (198 gm)
Design Pressures:
High 335 psi (23 bar) (2.31 MPa)
Low 88 psi (6 bar) (0.61 MPa)
33461.0007
COMPRESSOR
ON
OFF
41509.0001
DISPENSE
ON
OFF
41509.0002
WATER FILTER
RESET
41509.0003
PROGRAM
MODE
41509.0004
SET CO ^2 PRESSURE
110 - 120 PSIG
41509.0005
INITIAL SET-UP
CAUTION: The dispenser is very heavy! Use care when lifting or moving it. Use at least two people to lift or move the dispenser. Place dispenser on a sturdy counter or shelf able to support at least 125 lbs. (57 kg).
The dispenser is designed for indoor use only, in ambient temperatures ranging from 50^ F to 90^ F ( 10^ C to 32^ C). Avoid locating the machine where it will be subject to direct sunlight or exposed to other external heat sources. Allow a minimum clearance of 6" at the back and top of the dispenser, and a minimum of 4" at either side of the dispenser for proper air circulation. Leave some space so the dispenser can be moved for cleaning.
ELECTRICAL REQUIREMENTS
CAUTION: The dispenser must be disconnected from the power source until specified in Electrical Hook-Up.
The 120V rated dispensers have an attached cord set and require a 2-wire, grounded, individual branch circuit rated 120 volts ac, 15 amp, single phase, 60Hz. The mating connector must be a NEMA 5-15R.
Refer to the data plate for exact electrical requirements.
ELECTRICAL HOOK-UP
CAUTION: Improper electrical installation will damage electronic components.
- An electrician must provide electrical service as specified.
- Using a voltmeter, check the voltage and color coding of each conductor at the electrical source.
- Confirm that the compressor switch and the dispense switch are in the OFF position (see Figure 1).
- Connect the dispenser to the power source.
- If plumbing is to be hooked up later, be sure the dispenser is disconnected from the power source. If plumbing has been hooked up, the dispenser is ready for Initial Fill.
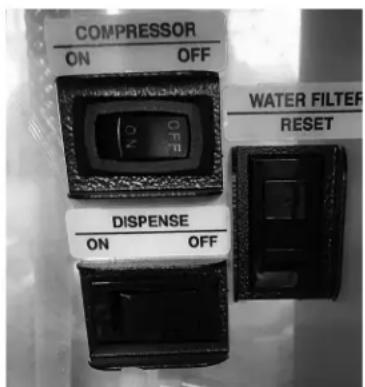
Figure 1
P4373
PLUMBING REQUIREMENTS
The dispenser must be connected to a COLD WATER system with an operating pressure between 30 and 100 psig (.207 and .690 mPa). This water source must be capable of producing a minimum flow rate of 3 fluid ounces (88.7 milliliters) per second. A shut off valve should be installed in the line that will supply the dispenser. A water filter has been included with the dispenser. The water filter should be installed as close as possible to the inlet of the machine, but downstream of the shut off valve (see Figure 2). The new water filter should be flushed with at least five gallons of water before hooking it up to the dispenser. The main water inlet is a 3/8" (9.52 mm) MFL connection.
NOTE- At least 18 inches (457 mm) of an FDA approved flexible beverage tubing, such as reinforced braided polyethylene, before the dispenser will facilitate movement to clean the countertop. It can be purchased direct from BUNN-O-MATIC (part number 45848.10____[see Illustrated Parts Catalog for complete part number.]) BUNN-O-MATIC does not recommend the use of saddle valves to install the dispenser. The size and shape of the hole(s) made in the supply line(s) by saddle valves may restrict water flow.
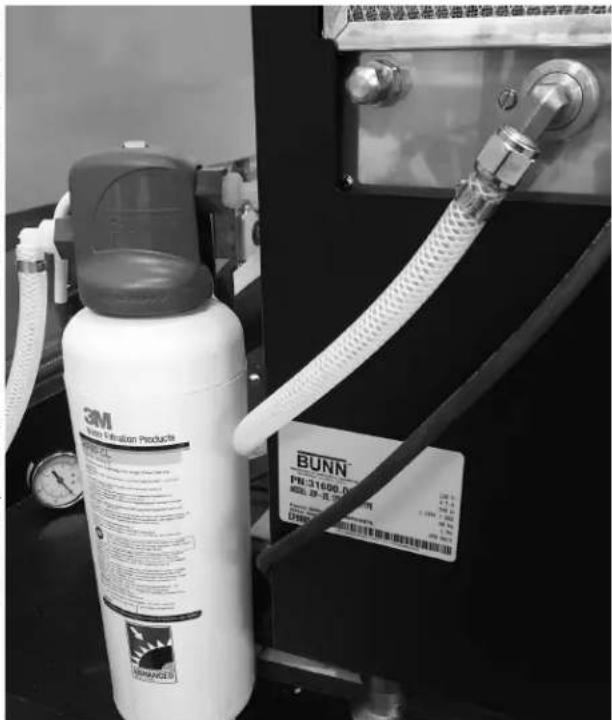
Figure 2
P4372
As directed in the International Plumbing Code of the International Code Council and the Food Code Manual of the Food and Drug Administration (FDA), this equipment must be installed with adequate backflow prevention to comply with federal, state and local codes. For models installed outside the U.S.A., you must comply with the applicable Plumbing /Sanitation Code for your area.
PLUMBING HOOK-UP
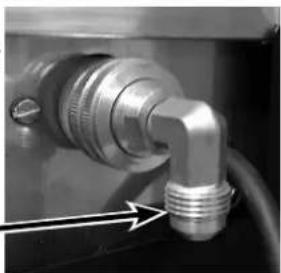
The plumbing connection is a 3/8" male flare adapter located on the rear of the water dispenser (Figure 3).
NOTE – Water pipe connections and fixtures directly connected to a potable water supply shall be sized, installed, and maintained in accordance with federal, state, and local codes.
natural_image
Close-up of a metallic pipe fitting with a threaded connector, no visible text or symbolsFigure 3
CARBON DIOXIDE HOOK-UP
The dispenser will need to be connected to an external CO_2 source. An external CO_2 pressure regulator will need to be installed in the supply line to the dispenser. The external CO_2 supply connection is a 14 " MFL (Figure 4) located on the back of the machine.
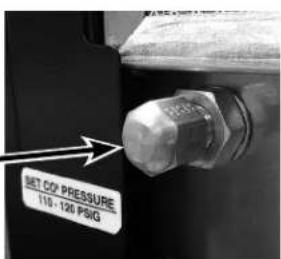
Figure 4
FILLING THE WATER BATH
- Plug the dispenser into an electrical outlet and turn on the water supply to the dispenser.
- Flip the dispense switch to ON. The water bath will begin to fill. The water bath will fill and automatically shut off when the water bath is full.
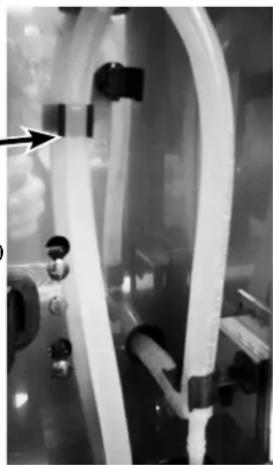
- Check the sight glass to confirm that the water bath is full (See Figure 5).
Once the water bath is full, flip the compressor switch to ON. It will take several hours to create the ice bank required for full dispenser performance, but there will be chilled water in one to two hours. During this time, some further trickling from the water bath into the drip tray is expected due to expansion caused by the ice bank formation.
natural_image
Close-up of a mechanical piping system with transparent tubing and valves (no visible text or symbols)Figure 5
PURGING THE WATER LINES (PUSH & HOLD VERSION)
- Insure that the dispense switch is ON.
- Dispense water from the STILL WATER lines until the cloudy appearance dissipates and the water flows clear. Next, dispense water from the SPARKLING WATER lines until again the cloudy appearance dissipates and the water flows clear.
- Open the external CO2 supply line. Set the external CO2 pressure regulator to 120 psig (.827 mPa).
- Dispense sparkling water until carbonation appears.
- The machine is now ready for use.
PURGING THE WATER LINES (PORTION CONTROL VERSION)
- Insure that the dispense switch is ON.
- Dispense water from the STILL WATER lines by pressing & holding the "+" button (Figure 6), till the cloudy appearance dissipates and the water flows clear.
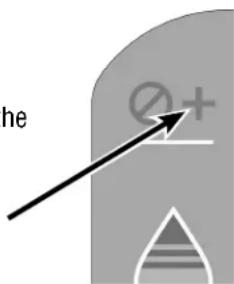
Figure 6
- Dispense water from the SPARKLING WATER lines by pressing & holding the "+" button (Figure 7), till the cloudy appearance dissipates and the water flows clear.
- Open the external CO₂ supply line. Set the external CO₂ pressure regulator to 120 psig (.827 mPa).
- Dispense sparkling water until carbonation appears.
- The machine is now ready for use.
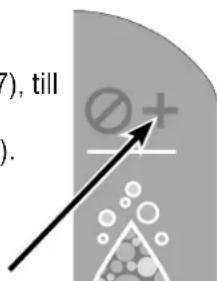
Figure 7
CHANGE WATER FILTER CARTRIDGE WARNING
The water filter cartridge will need to be changed after 4,500 gallons of use. When the water usage gets close to 4,500 gallons, the blue LED will flash slowly to indicate that it is nearly time to replace the water filter cartridge. When the water usage exceeds 4,500 gallons, the blue LED will flash rapidly to indicate that it is time to replace the water filter cartridge. Once the water filter cartridge has been replaced, push and hold the water filter reset switch for 3 seconds to clear the warning.
CHANGING THE WATER FILTER CARTRIDGE:
- To change the water filter cartridge, shut off the water supply line and remove the water supply line at the dispenser.
- Turn the water filter cartridge counterclockwise to remove it from its mounting bracket.
- Install the new water filter cartridge into the mounting bracket by turning it clockwise until it is tight.
- The new water filter cartridge should be flushed with at least five gallons of water before re-connecting the water supply line at the dispenser.
DISPENSER USE
Press and Hold Dispensing:
- Place a container beneath the dispensing nozzle.
- Press and hold either the “still” water switch or the “sparkling” water switch until the beverage reaches the desired level, then release.
Portion Control Dispensing:
The portion sizes are preset but can be changed as follows:
- Set the program switch to the ON position.
- Press and hold the large and medium buttons on the left (STILL WATER) until you hear the machine "beeps" three times.
- Place a container beneath the dispensing nozzle then press and hold the appropriate dispense switch until the desired amount has been dispensed. The machine will record the amount of time that the button is pressed continuously. If the button is released too soon, simply empty the container and start over.
- Repeat step 3 for each of the dispense switches as desired.
- Turn the program switch to the OFF position.
CLEANING & PREVENTIVE MAINTENANCE
Daily:
- Wipe splash panel, areas around dispense nozzle with a clean, damp cloth.
- Wipe external surfaces with a clean, damp cloth.
Monthly: Clean Condenser Coils and Air Filter:
- Removable air filter can be cleaned in warm soapy water.
- Use a soft bristle brush to clean the build up of dirt in the condenser.
ELECTRICAL WIRING SCHEMATIC DIAGRAM
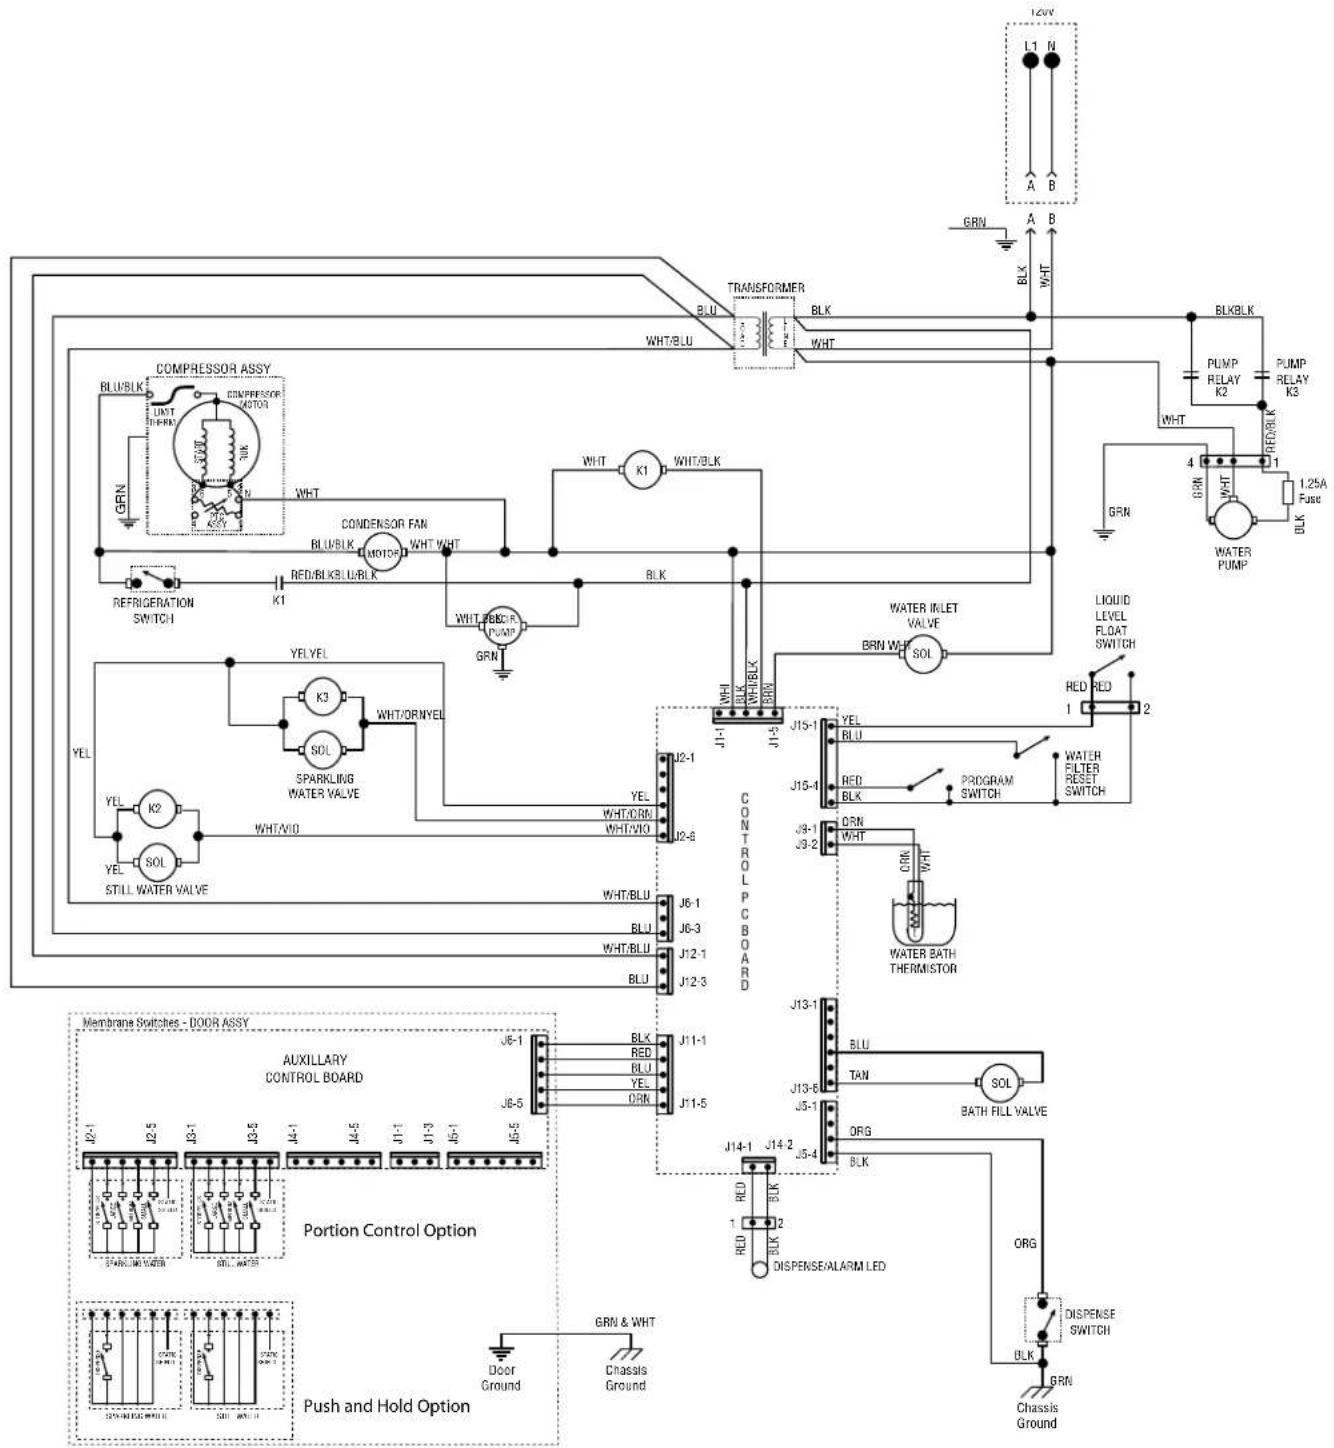
120 VOLTS AC SINGLE PHASE
PLUMBING SCHEMATIC DIAGRAM
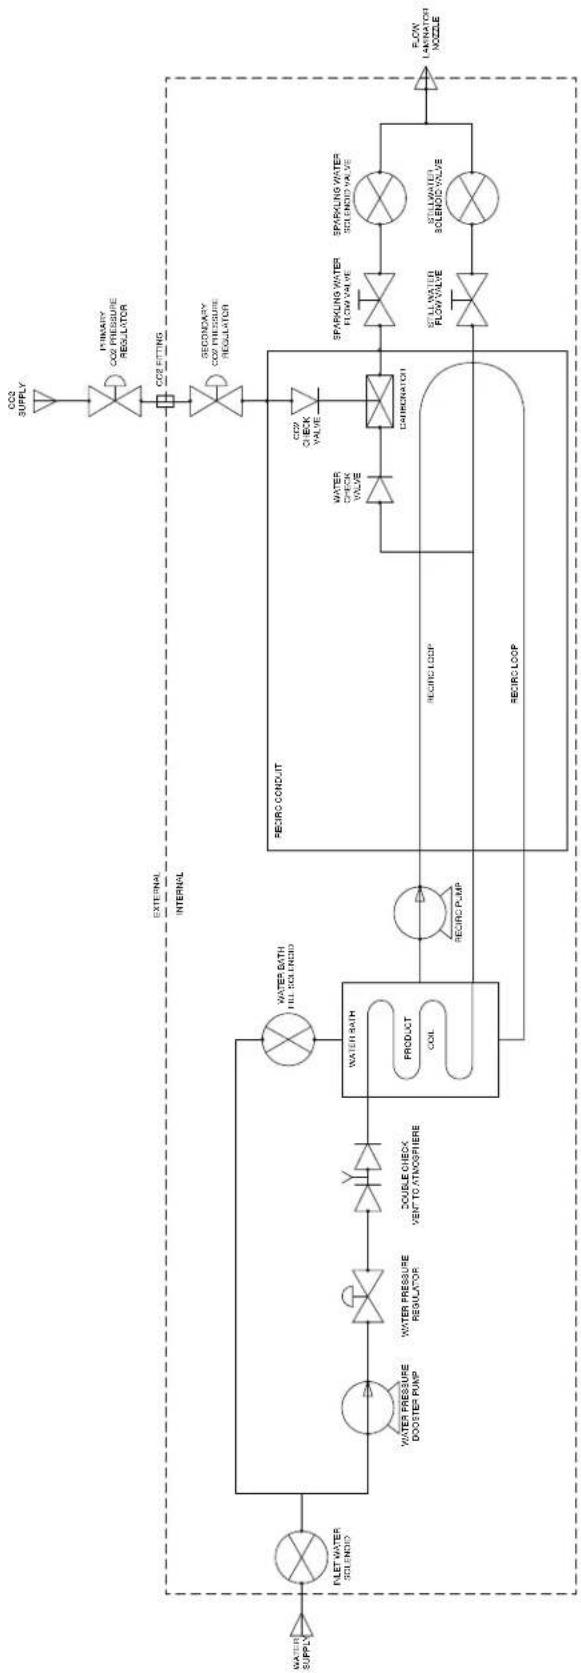
flowchart
graph LR
    A["WATER SUPPLY"] --> B["FLET WATER SOLICOID"]
    B --> C["Water Pressure DOOSTER PUMP"]
    C --> D["Water Pressure REGULATOR"]
    D --> E["DOUBLE CHECK VENT TO ATMOSPHERE"]
    E --> F["EXTERNAL INTERNAL"]
    F --> G["CO2 SUPPLY"]
    G --> H["PRIMARY CO2 PRESSURE REGULATOR"]
    H --> I["CO2 FITTING"]
    I --> J["SECONDARY CO2 PRESSURE REGULATOR"]
    J --> K["CO2 CHECK VALVE"]
    K --> L["DALLIMINATION"]
    L --> M["SPARKING WATER FLOW VALVE"]
    M --> N["STILLWATER FLOW VALVE"]
    N --> O["STILLWATER SOLICOID VALVE"]
    O --> P["FLOW LAMINATOR NOZZLE"]
    F --> Q["EXTERNAL INTERNAL"]
    Q --> R["CO2 CONDUIT"]
    R --> S["PRODUCT COIL"]
    S --> T["RECIRC PUMP"]
    T --> U["RECIRC LOOP"]
    U --> V["RECIRC LOOP"]
    V --> W["EXTERNAL INTERNAL"]
    W --> X["CO2 SUPPLY"]
COOLANT SCHEMATIC DIAGRAM
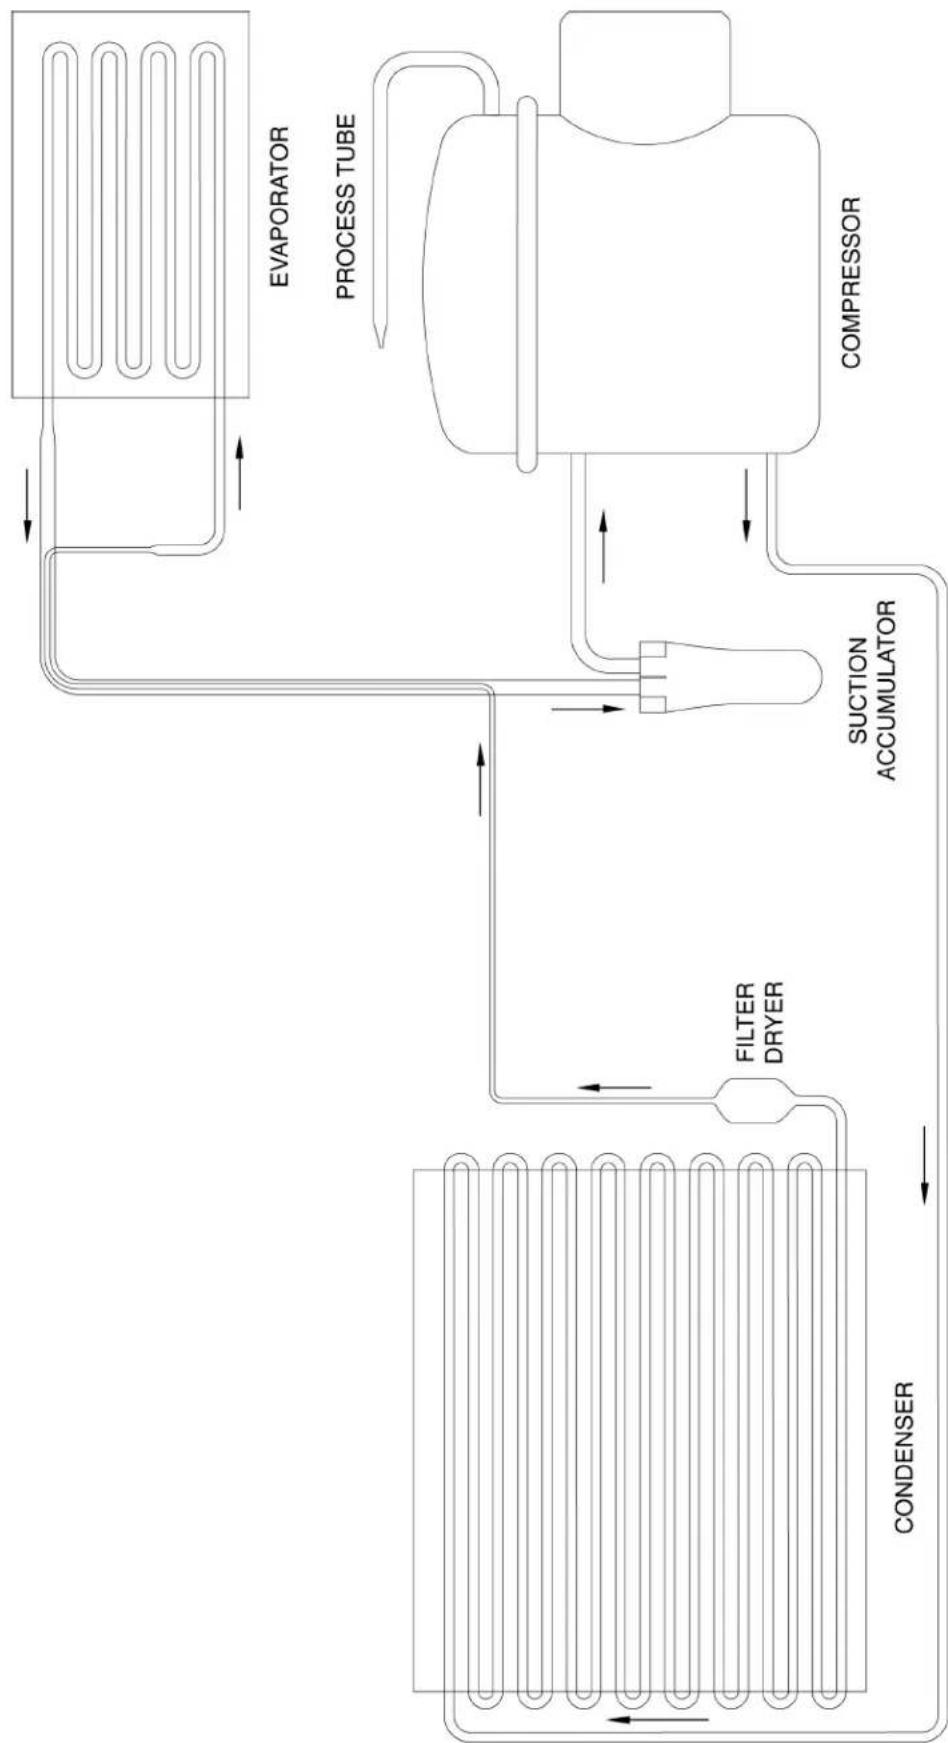
flowchart
graph LR
    A["CONDENSER"] --> B["FILTER DRYER"]
    B --> C["SUCTION ACCUMULATOR"]
    C --> D["COMPRESSOR"]
    D --> E["EVAPORATOR"]
    E --> F["PROCESS TUBE"]
    F --> C
    C --> G["Condenser"]
- INSTALLATION & OPERATING GUIDE
- BUNN-O-MATIC COMMERCIAL PRODUCT WARRANTY
- CONTENTS
- USER NOTICES
- WARNING
- INITIAL SET-UP
- ELECTRICAL REQUIREMENTS
- ELECTRICAL HOOK-UP
- PLUMBING REQUIREMENTS
- PLUMBING HOOK-UP
- CARBON DIOXIDE HOOK-UP
- FILLING THE WATER BATH
- PURGING THE WATER LINES (PUSH & HOLD VERSION)
- PURGING THE WATER LINES (PORTION CONTROL VERSION)
- CHANGE WATER FILTER CARTRIDGE WARNING
- CHANGING THE WATER FILTER CARTRIDGE:
- DISPENSER USE
- Press and Hold Dispensing:
- Portion Control Dispensing:
- CLEANING & PREVENTIVE MAINTENANCE
- Daily:
- Monthly: Clean Condenser Coils and Air Filter:
- PLUMBING SCHEMATIC DIAGRAM
Brand : Bunn
Model : Refresh
Category : Water dispenser