
D1 - Access Control System ZKTeco - Free user manual and instructions
Find the device manual for free D1 ZKTeco in PDF.


| Product Type | Access Control System |
| Brand | ZKTeco |
| Model | D1 |
| Verification Methods | Fingerprint (1:N, 1:1), Password |
| Fingerprint Capacity | 1,000 templates |
| Attendance Record Capacity | 50,000 records |
| Display | Color screen |
| Keypad | Numeric keys with T9 input |
| Interfaces | USB host, SD card slot, Ethernet, WLAN (WiFi) |
| Dimensions (approx.) | 200 x 150 x 50 mm |
| Weight (approx.) | 0.5 kg |
| Power Supply | 12V DC (adapter included) |
| Power Consumption | < 5W |
| Operating Temperature | 0°C to 45°C |
| Operating Humidity | 20% to 80% |
| Main Functions | User management, department management, shift settings, schedule management, attendance reports, real-time monitoring |
| Security | Fingerprint characteristic extraction only; no image storage |
| Maintenance | Clean fingerprint sensor with a soft, dry cloth; avoid liquids and excessive moisture |
| Included Accessories | USB cable, power adapter, mounting screws, user manual |
| Compliance | CE, FCC, RoHS |
| Repairability | Designed with modular components; firmware updates via USB; contact ZKTeco service for spare parts |
Frequently Asked Questions - D1 ZKTeco
User questions about D1 ZKTeco
0 question about this device. Answer the ones you know or ask your own.
Ask a new question about this device
Download the instructions for your Access Control System in PDF format for free! Find your manual D1 - ZKTeco and take your electronic device back in hand. On this page are published all the documents necessary for the use of your device. D1 by ZKTeco.
USER MANUAL D1 ZKTeco
1.1 Recommended Operation Steps....1
1.2 Finger Placement....1
1.3 Verification Modes....1
1.3.1 Fingerprint Verification .... 1
1.3.2 Password Verification 2
2 Main Menu....3
3.User Management 4
3.1.Add a User 4
3.1.1 Enter a User ID and Name 4
3.1.2 Enroll a Fingerprint 4
3.1.3 Enroll a Password 5
3.1.4 Select Department and Privilege Settings....5
3.2 User Management....5
3.2.1 Search a User 6
3.2.2 Query a Record 6
3.2.3 Edit a User 6
3.2.4 Delete a User 7
3.2.5 Add a User 7
4 Department Set ★ 8
4.1 Add a Department 8
4.2 Edit a Department 8
4.3 Delete a Department 8
5 Shift Set★ 9
5.1 Attendance Rule 9
5.2 Shift Setting....9
5.3 Schedule....10
5.3.1 Department-based Scheduling 10
5.3.2 Individual-based Scheduling 10
6 Report Management....12
6.1 Download Att. Report 12
6.2 Download Att. Setting Report....13
6.3 Set Setting Reports 15
7 System Setting....16
7.1 System Setting 16
7.2 Date/Time....17
7.3 Timing State Switching Setting....17
7.4 Bell Settings....18
7.5 Update firmware....18
7.6 Ethernet★ 19
7.7 Reset Opts....20
8 Data Management....21
8.1 Download/Upload 21
8.2 Delete/Clear 21
9 Record Query 22
10 System Information 23
11 Appendix....24
USB Client 24
T9 input 24
Quick Query of Attendance Records....24
Self-Service Attendance Terminal FAQs....25
Statement on Human Rights and Privacy 30
Environment-Friendly Use Description....31
1 Instruction for Use
1.1 Recommended Operation Steps
Step 1: Set a department (not required if the default department is used). For details, see 4 Department Set.
Step 2: Enroll users. For details, see 3 User Management.
Step 3: Set attendance rules (not required if the default rule is used). For details, see 5.1 Attendance Rule.
Step 4: Set shifts (not required if the default shift is used). For details, see 5.2 Shift Setting.
Step 5: Arrange schedules of employees (not required if the default schedule is used). For details, see 5.3 Schedule.
Step 6: Record employees' attendance. Check that the device time is precise and start attendance.
Step 7: Download and review reports. For details, see 6.1 Download Att. Report.
1.2 Finger Placement
Recommended fingers: The index finger, middle finger or the ring finger; the thumb and little finger are not recommended (because they are usually clumsy on the fingerprint collection screen).
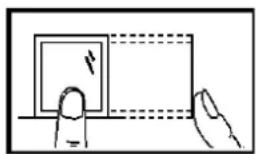
1) Proper finger placement:
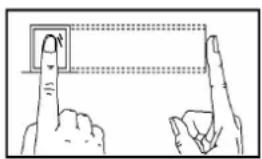
The finger is flat to the surface and centered in fingered guide.
2) Improper finger placement:
Not flat to the surface
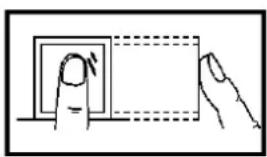
natural_image
Simple line drawing of a hand pressing a square button into a rectangular frame (no text or symbols)Slanting
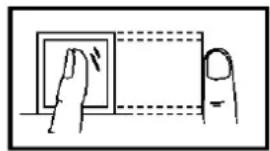
natural_image
Simple line drawing of a hand pressing a button on a screen (no text or symbols)Off-center
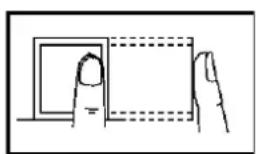
natural_image
Simple line drawing of a hand pressing a square on a dotted rectangle (no text or symbols)Off-center
natural_image
Simple line drawing of a hand pressing a square on a horizontal surface, with no text or symbols present.1.3 Verification Modes
1.3.1 Fingerprint Verification
1: N Fingerprint Verification
The terminal compares current fingerprint collected by the fingerprint collector with all fingerprint data on the terminal.
Press your finger on the fingerprint collector by adopting the proper finger placement. For details, see 1.2 Finger
Placement.
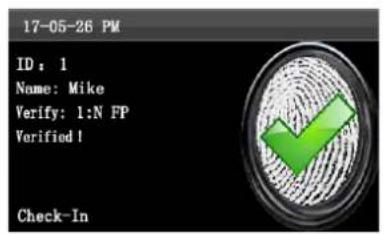
When verification successful, an interface shown above.
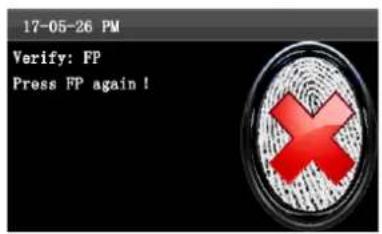
When verification failed, an interface shown above.
1:1 Fingerprint Verification
In the 1:1 fingerprint verification mode, the terminal compares current fingerprint collected through the fingerprint collector with that in relation to the user ID entered through keyboard. Adopt this mode only when it is difficult to recognize the fingerprint.
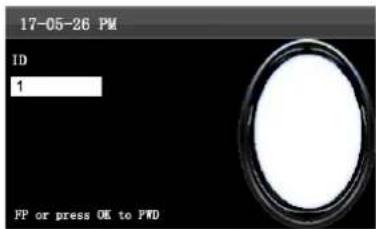
Enter the user ID using keypad on the initial interface. Then press OK. Place the enrolled finger properly on the fingerprint sensor.
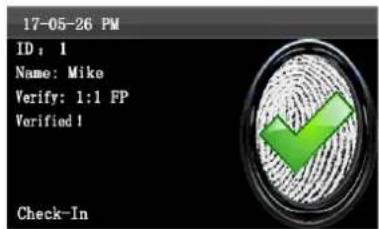
When verification successful, an interface shown above.
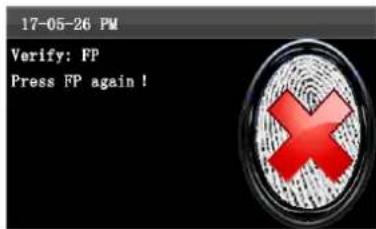
When verification failed, an interface shown above.
Notes:
- If it says that the enroll number is wrong, it means that there is no such number
- If the device says "Please press again", place the finger on the fingerprint sensor again. You can try another 2 times by default. If it fails after 2 times, return Step 1 for second operation.
1.3.2 Password Verification
In the password verification mode, the terminal compares the password entered with that in relation to the user ID.
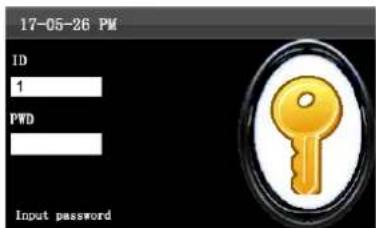
Enter the user ID and PWD using keypad on the initial interface. Then press OK.
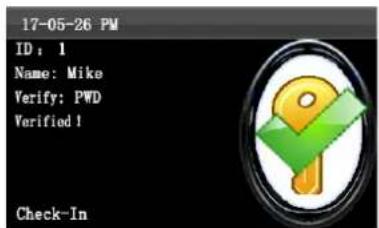
When verification successful, an interface shown above.
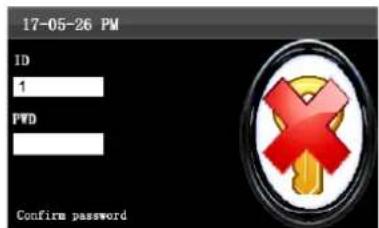
When verification failed, an interface shown above.
Notes:
If the device says "Invalid ID", enter the password again. You can try another 2 times by default. If it fails after 2 times, return Step 1 for second operation.
2 Main Menu
The self-service attendance terminal that integrates the prevalent SSR technology in Europe and America is launched to reduce management costs effectively, provide convenience for employees, and minimize the requirement for computer skills of users. The device allows setting attendance rules, shifts, and schedules for employees, without the need for attendance software. Users can download attendance reports for review and statistics.
This menu item allows you to add, browse, and manage user information, including the employee ID, name, fingerprint, password, card ID, department, and rights. You can add, edit, or delete basic information about employees.
This menu item allows you to browse department information, add, edit, or delete department IDs or names.
This menu item allows you to set attendance rules and required shifts and to arrange schedules for employees. The device supports a maximum of 24 shifts.

This menu item allows you to download statistical reports of attendance or attendance setting reports to a USB flash drive or SD card, or to upload attendance setting reports in which shifts are set and employees' schedules are arranged. The device gives priority to the schedules in an attendance setting report.

This menu item allows you to set system-related parameters, including the basic parameters, Date/Time, Timing State Switching Setting, SMS Setting and so on, to enable the terminal to meet user requirements to the greatest extent in terms of functions and display.

This menu item allows you to upload or download user data or attendance data, delete attendance data and all user data, and revoke management rights.
Through an SD card or a USB disk, import user information and attendance data from the attendance machine to related software or other fingerprint recognition devices.

This menu item allows you to easily query the attendance records saved on the device.
This menu item allows you to check the storage status as well as version information of the device.
3. User Management
3.1. Add a User
Through this submenu, you can browse the user information stored on the terminal, including the user ID, name, fingerprint, password, department, and user role.
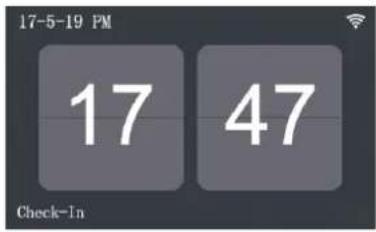
Press M/OK on the initial interface.
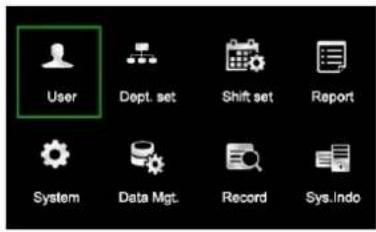
Select User and press OK.
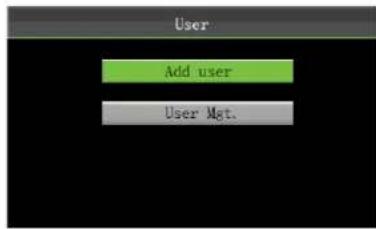
Select Add user and press OK.
3.1.1 Enter a User ID and Name
The terminal automatically allocates an ID starting from 1 for every user in sequence. If you use the ID allocated by the terminal, you may skip this section.
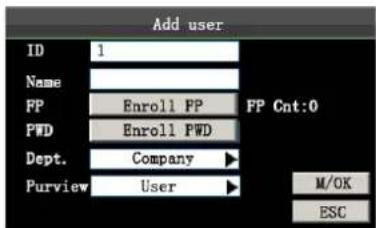
Select User ID.
Enter the user ID using keypad, then press OK.
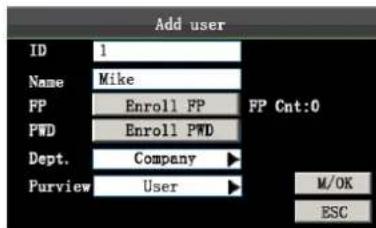
Press ▼ to select Name.
Press M/OK to open input method.
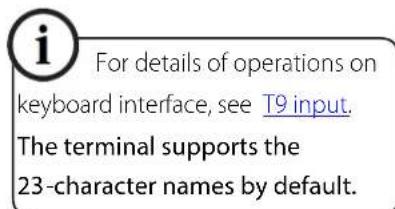
Press ▲/▼ to switch input method and enter the Name.
3.1.2 Enroll a Fingerprint
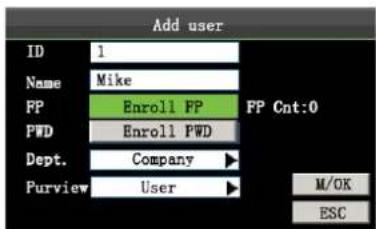
Press ▼ select Enroll FP and press M/OK.
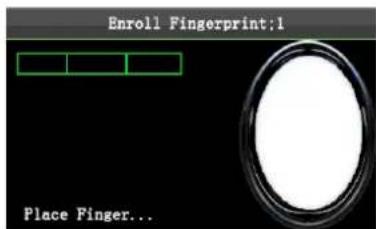
Place your finger on the fingerprint sensor properly. For details, see 1.2 Finger Placement.
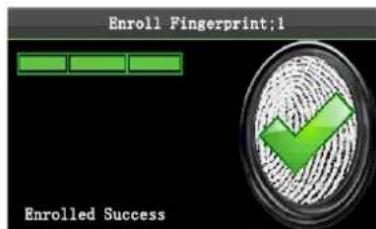
Place the same finger on the fingerprint collector for three consecutive times correctly until enrollment succeeds.
Note: If the enrollment fails, the system will display a prompt message and return to the [Enroll Fingerprint] interface. In this case, you need to repeat the operations of step 2.
3.1.3 Enroll a Password
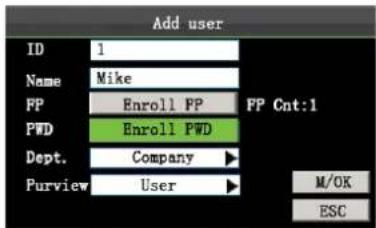
Press ▼ to select Enroll PWD. Press OK.
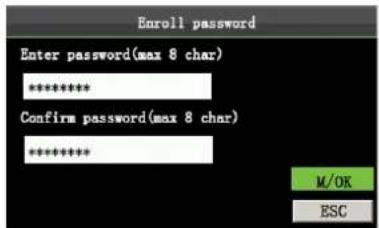
Enter a password using keypad and Re-enter the password, press M/OK.
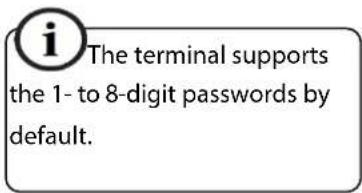
3.1.4 Select Department and Privilege Settings
Administrators: An administrator is granted rights to operate all menus in addition to the fingerprint- and password-based attendance recording.
Ordinary users: An ordinary user is only allowed to record attendance through fingerprint and password verification and query attendance records.
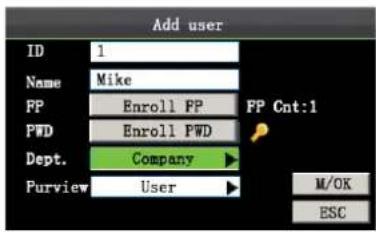
Press ▼ to select Dept.. Press OK to select department.
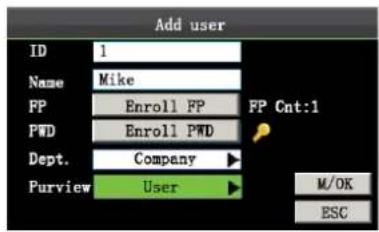
Press ▼ to select Purview. Press OK to select Purview.
Finally, press ▲/▼ to select M/OK and press M/OK. Till now, a user is added.
3.2 User Management
Generally the user information stored on the device needs to be modified in the wake of the personnel changes in a company. To facilitate modification of user information, our device allows users to add, delete, query and modify user information conveniently.
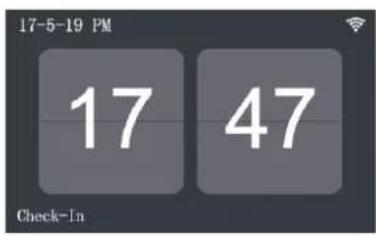
Press M/OK on the initial interface.
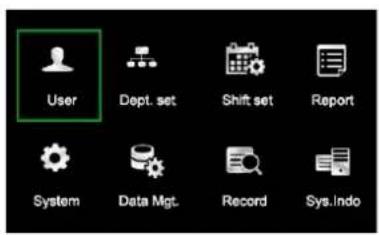
Select User and press OK.
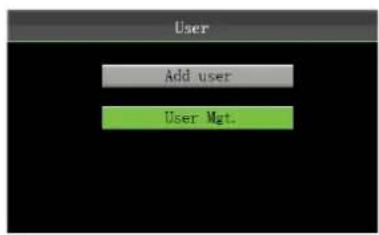
Select User Mgt. and press OK.
3.2.1 Search a User
| ID | Name | FP | FWD |
| 1 | Mike | 1 | * |
| 2 | Jack | 1 | * |
| #3 | Tom | 2 | * |
| 4 | David | 1 | * |
| Find(1) | |||
| Record(2) | |||
| Edit (OK) | |||
| Delete(0) | |||
| Add(3) | |||
| Up(<) | |||
| Down(>) | |||
| (1/1) | |||
User Mgt. interface
Press 1 to enter
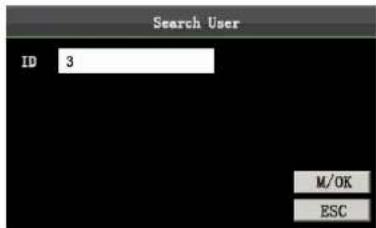
Enter the user ID, such as 3, and press OK.
| ID | Name | FP | PWD |
| 1 | Mike | 1 | * |
| 2 | Jack | 1 | * |
| 30 | Tom | 2 | 4 |
| 4 | David | 1 | * |
| Find (1) Record (2) Edit (OK) Delete (0) Add (3) Up (<) Down (>) (1/1) |
The cursor to the user to be queried.

Note: "#" as shown in the figure above means the user is an administrator, and "*" means the user has already enrolled a password or card.
3.2.2 Query a Record
| ID | Name | FP | FWD |
| 1 | Mike | 1 | * |
| 2 | Jack | 1 | * |
| #3 | Tom | 2 | * |
| 4 | David | 1 | * |
| Find(1) | |||
| Record (2) | |||
| Edit (OK) | |||
| Delete (0) | |||
| Add (3) | |||
| Up (<) | |||
| Down (>) | |||
| (1/1) | |||
Press ▲/▼ to select a user and press 2.
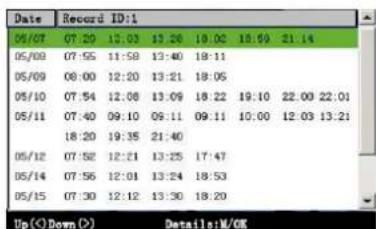
Press ▲/▼ to scroll the attendance record row by row. Press ▲to scroll the attendance record page by page.
| ID | Name | Time | Verify | State |
| 1 | Mike | 05-07 07:30 | F | 0 |
| 1 | Mike | 05-07 12:03 | F | 1 |
| 1 | Mike | 05-07 13:28 | F | 0 |
| 1 | Mike | 05-07 18:02 | F | 1 |
| 1 | Mike | 05-07 18:59 | F | 4 |
| 1 | Mike | 05-07 21:14 | F | 5 |
Press M/OK to query detailed information of an employee:

Notes displayed at the bottom of the screen explain all letter meanings.
Verification: validation status.
F: fingerprint verification. P: password verification I: Card verification
Status attendance status.
0: check-in
1: check-out
4: overtime check-in
5: overtime check-out
3.2.3 Edit a User
| ID | Name | FP | FWD | Find(1) |
| 1 | Mike | 1 | * | Record (2) |
| 2 | Jack | 1 | * | Edit (OK) |
| #3 | Tom | 2 | * | Delete (0) |
| 4 | David | 1 | * | Add (3) |
| Up (<) | ||||
| Down (>) | ||||
| (1/1) |
Press ▲/▼ to select a user and press M/OK.
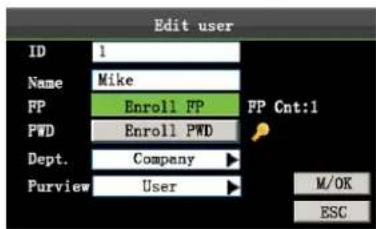
The User ID cannot be modified, and the other operations are similar to those performed to add a user.
3.2.4 Delete a User
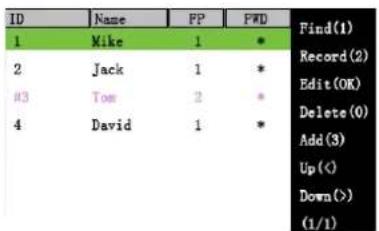
Press ▲/▼ to select a user and press 0.
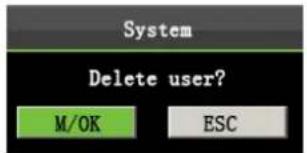
Press M/OK to delete the user or ESC to return without deleting.
The option "Delete user" is in either of the following cases to delete all information of an employee from the device:
1) The fingerprint or password of this employee is no longer required.
2) This employee has resigned.

Note: Deleting a user will not result in the deletion of the user's attendance records which can be downloaded to ed software for query.
3.2.5 Add a User
The Add user option is used to facilitate administrators to add users. For details, see 3.1. Add a User.
4 Department Set ★
Browse department information. Add, edit, or delete department IDs or names.
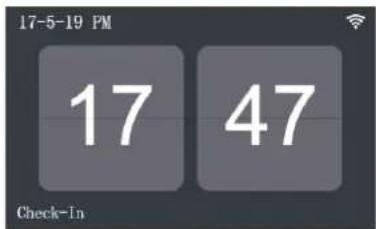
Press M/OK on the initial interface.
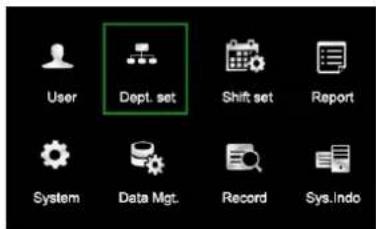
Select Dept.set and press OK.
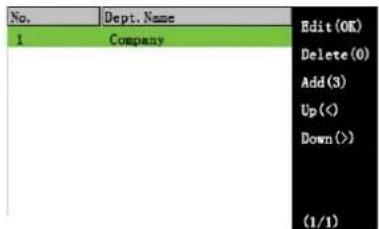
Enter Department set interface as shown as figure.
4.1 Add a Department
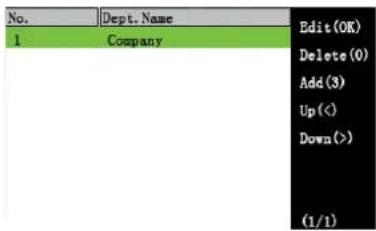
Press 1 to enter Add Dept. interface.
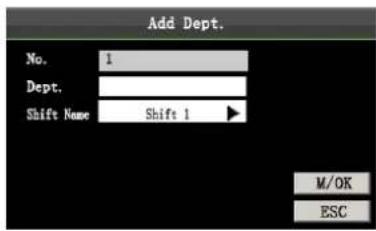
Enter the department name using the T9 input method. Press /←to select Shift Name and press M/OK.
No.: The attendance machine automatically assigns work IDs for departments that start from 1 and increase sequentially.
Dept.: Enter the department name using the T9 input method. (For detailed operations, see T9 input.)
4.2 Edit a Department
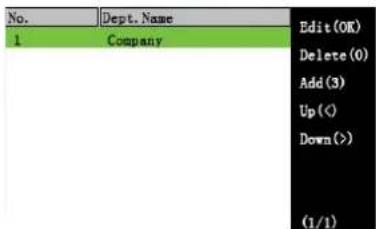
Press ▲/▼ to select a department to be edited and press M/OK.
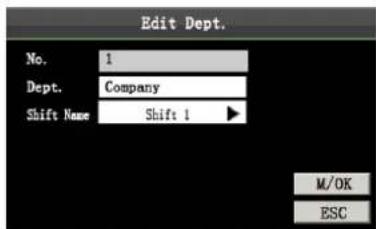
The Edit department operations are similar to those performed to add department.
4.3 Delete a Department
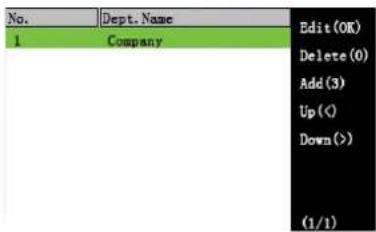
Press ▲/▼ to select a department and press 0.
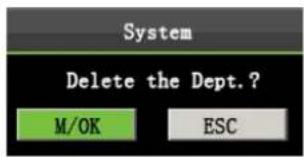
Press M/OK to delete the user or ESC to return to the User Mgt. interface without deleting.
5 Shift Set★
This menu item allows you to set attendance rules and required shifts and to arrange schedules for employees.
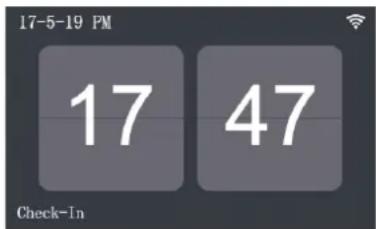
Press M/OK on the initial interface.
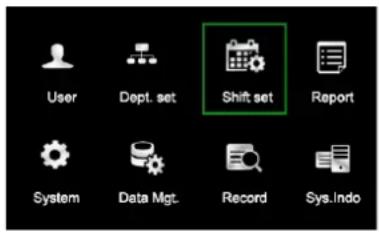
Select Shift set and press OK.
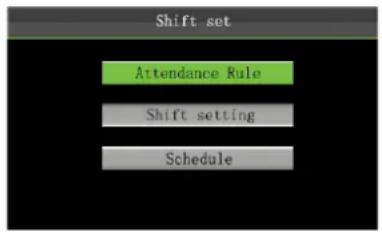
Select Attendance Rule and press OK.
5.1 Attendance Rule
All attendance statistics are collected based on attendance rules. Attendance rules regarding how to calculate late arrival and early leave and how to arrange schedules need to be set first. Once set, they should not be modified from time to time because a modification may cause deviation in attendance record and a modification in the middle of a month may even disarrange the schedules.
Schedule Type: Department-based scheduling and individual-based scheduling are supported. If a company uses one timetable, only one department needs to be set and department-based scheduling is recommended. If departments have their respective timetables, department-based scheduling is recommended. If employees may take different shifts, individual-based scheduling is recommended.
Default Shift: When individual-based scheduling is used, employees who are not scheduled take the default shift. Set attendance rules by referring to the instructions in the text box on the right.
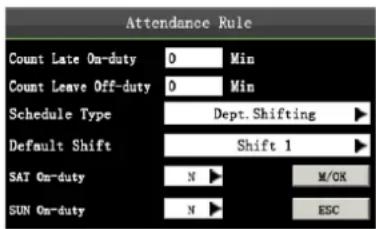
Press ▲/▼ to move the cursor to a desired option. Enter a desired value in the entry box using the numeric keypad. Press ◀/► in the scroll box to switch to the desired value. After finishing the setting, press OK to save your settings and go back to the previous interface.
Press ▲/▼ to select M/OK. Press M/OK for saving.
5.2 Shift Setting
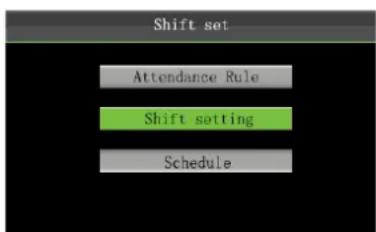
Press ▼ to select Shift setting, Press M/OK
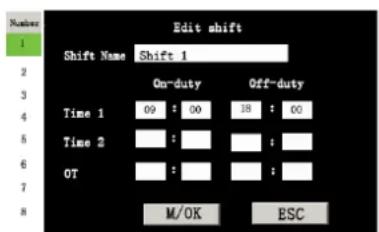
Press ▲/▼ to select a shift from the list, and press ▶ to display the Edit shift interface
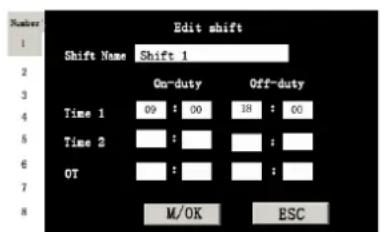
Press ▲/▼ to choose corresponding shift attributes. Enter the time using the numeric keypad. Press M/OK
Note: The device supports a maximum of 24 shifts including two default shifts (shift 1 and shift 2). All shifts can be edited and a single shift includes three time ranges at most.
5.3 Schedule
As the basis of attendance calculation, shifts should be set based on the actual condition of a company. If no shift is set, the system makes attendance calculations based on default shifts set in attendance rules.
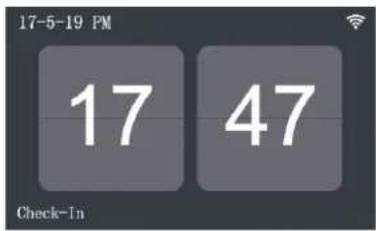
Press M/OK on the initial interface.
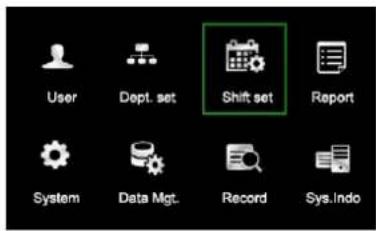
Select Shift set and press OK.
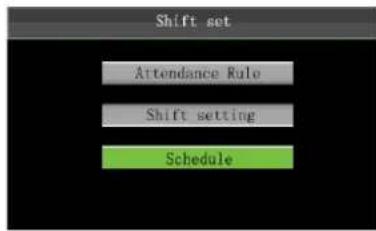
Select Schedule and press OK.
5.3.1 Department-based Scheduling
The Schedule type in Attendance Rule is Department shifting.
- Scheduling Records Query
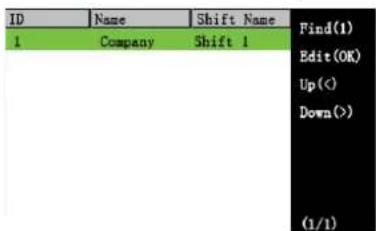
Press 1 to enter Scheduling records Query
2.Edit Schedule
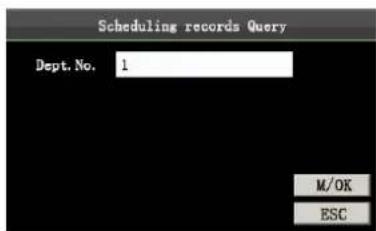
Enter a No. and press OK. Enter 1 as shown as in figure.
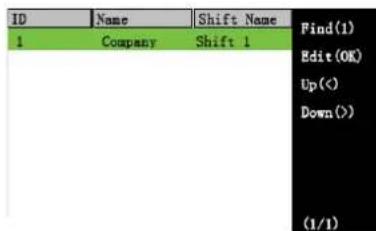
The department's scheduling records as shown as in figure.
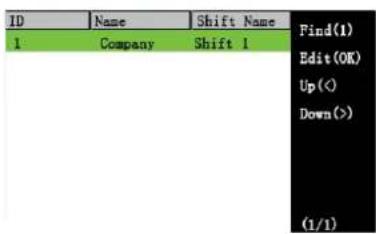
Press ▲/▼ to select a shift then press M/OK.
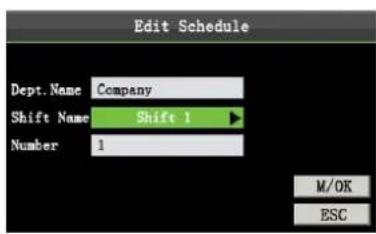
Press ◀/▶ to select Shift Name, like: Shift2, Press M/OK.
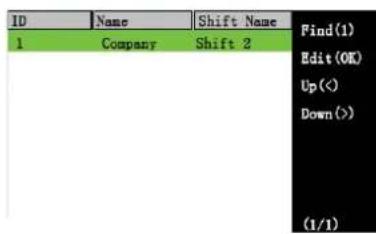
When editing successful, an interface shown above.
5.3.2 Individual-based Scheduling
The Schedule type in Attendance Rule is Personal shift.
- Add Schedule
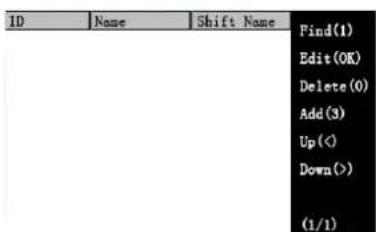
Press 3 to enter Add Schedule interface.
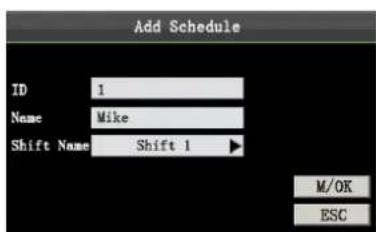
Enter an ID. The device automatically displays the name. Press ▲/▼ to select Shift Name and then press M/OK.
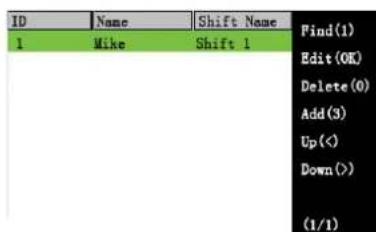
When adding successful, an interface shown above.
2. Edit Schedule
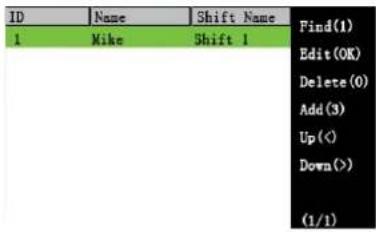
Press ▲/▼ to select a shift then press M/OK.
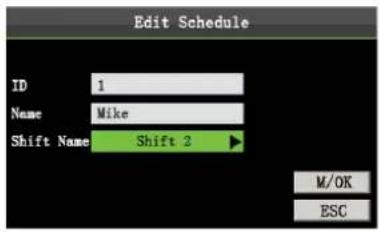
Press ▶▶ select Shift Name, like Shift 2, press ▲/▼ to select M/OK then press M/OK.
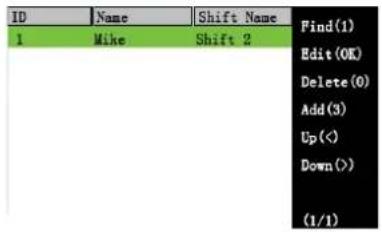
When adding successful, an interface shown above.

Note: The User ID cannot be modified, and the other operations are similar to those performed to add a shift.
3. Scheduling Records Query
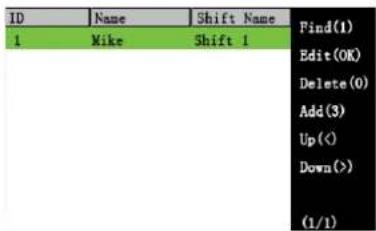
Press 1 to enter Scheduling records Query
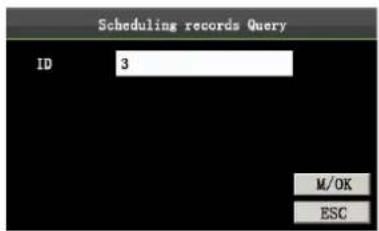
Enter an ID number and press OK. Enter 3 as shown as in figure.
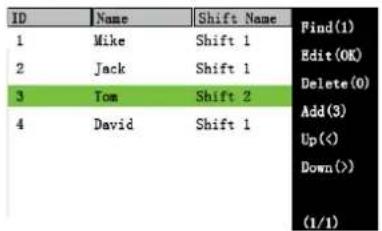
The user's scheduling records as shown as above.
4. Delete a shift
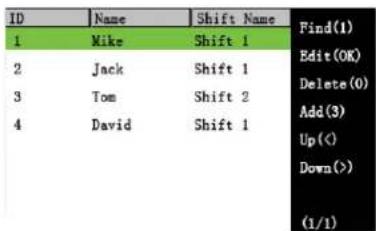
Press ▲/▼ to select a shift then press 0.
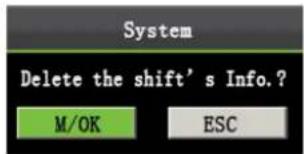
Press M/OK to delete. Press ESC to exit
6 Report Management

Note:
- The schedules in attendance setting reports have priority over those set on the device in attendance calculation.
- The attendance machine downloads information onto the USB disk when a USB disk and an SD card are inserted simultaneously.
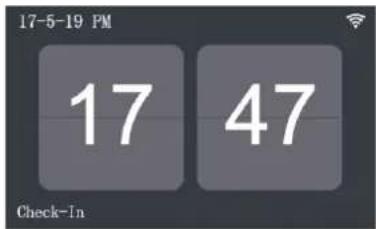
Press M/OK on the initial interface.
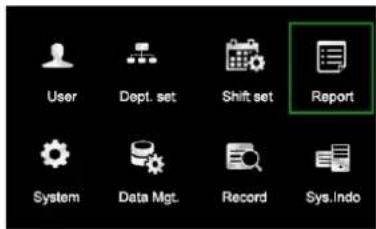
Select Report and press M/OK. Select
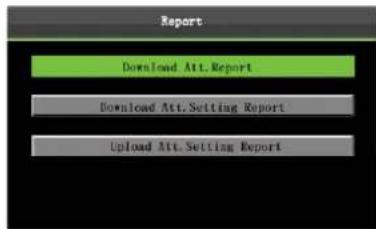
Download Att. Report and press M/OK.
6.1 Download Att. Report
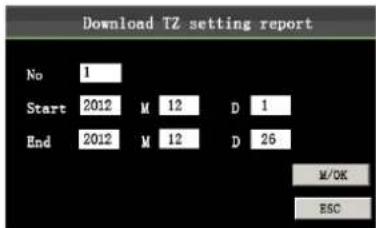
Enter the start and end dates using keypad then press OK.
flowchart
graph TD
    A["Computer"] -->|Data Flow| B["Payment Terminal"]
    B -->|Feedback| A
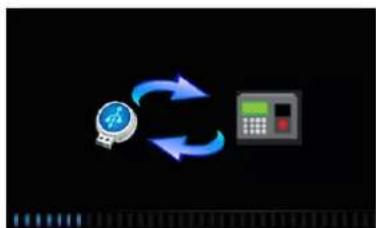
Downloading.....
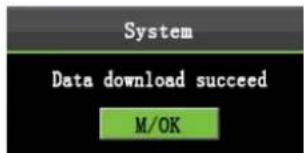
Data download succeed!
Press M/OK to take out the USB disk or SD card.
The SSRTemplateS.xls shall be stored in the USB disk or SD card. The schedule information, statistical report of attendance, attendance Record Report, Exception Statistic Report and card report can be viewed on a PC. The following reports show the preceding information:
To make reports more understandable, a report containing two-day attendance records of four employees is provided as an example.
Schedule Information Report: The report allows you to view schedule records of all employees.
| Schedule Information Report | |||||||||||||||||||||||||||||||||
| Stat Date: 2013-01-01 ~ 2013-01-03 Special shifts:25-Ask for leave, 26-Out, Null-Holiday | |||||||||||||||||||||||||||||||||
| ID | Name | Department | 1FEB | 2MAR | |||||||||||||||||||||||||||||
| 1 | Joe | company | 1 | 1 | |||||||||||||||||||||||||||||
| 2 | David | company | 1 | 1 | |||||||||||||||||||||||||||||
| 3 | Mark | company | 1 | 1 | |||||||||||||||||||||||||||||
| 4 | Tom | company | 1 | 1 | |||||||||||||||||||||||||||||
Statistical Report of Attendance: The report allows you to query attendance of each person in a specified period. Salaries can be calculated directly based on this report.

Note: The unit of Work hour and Overtime hour in the Statistical Report of Attendance is HH:MM. For example,
17:50 indicates that the on-duty time is 17 hours and 50 minutes.
Statistical Report of Attendance
| D | Name | Department | Work hour | Late | Leave early | Overtime hour | All Days(Nor./Real) | Out(Day) | Absent(t/Day) | AFL(Day) | Additem payment | Deduction payment | Real pay | Note | ||||||||
| Normal | Real | Times | Min | Times | Min | Workday | Holiday | Label | Overtime | Subsidy | Late/Leave | AFL | Outpayment | |||||||||
| 1 | Joe | company | 18:00 | 17:50 | 0 | 0 | 1 | 10 | 00:00 | 00:00 | 2/2 | 0 | 0 | 0 | ||||||||
| 2 | David | company | 18:00 | 17:48 | 1 | 12 | 0 | 0 | 00:00 | 00:00 | 2/2 | 0 | 0 | 0 | ||||||||
| 3 | Mark | company | 18:00 | 08:50 | 1 | 5 | 1 | 10 | 00:00 | 00:00 | 2/2 | 0 | 0 | 0 | ||||||||
| 4 | Tom | company | 18:00 | 18:00 | 0 | 0 | 0 | 0 | 00:00 | 00:00 | 2/2 | 0 | 0 | 0 | ||||||||
➢ Attendance Record Report: The report lists the daily attendance records of all employees within a specified period.
Attendance Record Report
| Att. Time 2013-01-01~2013-01-02 Tabulationr 2013-01-02 | |||||||||||||||||||||||||||||||
| 1 | 2 | ||||||||||||||||||||||||||||||
| ID: | 1 | Name: | Joe | Dept: | company | ||||||||||||||||||||||||||
| 07:26 | 07:54 | ||||||||||||||||||||||||||||||
| 12:25 | 12:58 | ||||||||||||||||||||||||||||||
| 13:31 | 13:51 | ||||||||||||||||||||||||||||||
| 17:30 | 18:52 | ||||||||||||||||||||||||||||||
| ID: | 2 | Name: | David | Dept: | company | ||||||||||||||||||||||||||
| 07:36 | 09:12 | ||||||||||||||||||||||||||||||
| 12:26 | 15:50 | ||||||||||||||||||||||||||||||
| 13:31 | 15:51 | ||||||||||||||||||||||||||||||
| 15:31 | 15:52 | ||||||||||||||||||||||||||||||
| ID: | 3 | Name: | Mark | Dept: | company | ||||||||||||||||||||||||||
| 07:30 | 09:05 | ||||||||||||||||||||||||||||||
| 12:30 | |||||||||||||||||||||||||||||||
| 17:50 | |||||||||||||||||||||||||||||||
| ID: | 4 | Name: | Jack | Dept: | company | ||||||||||||||||||||||||||
| 07:45 | 08:11 | ||||||||||||||||||||||||||||||
| 12:50 | 17:55 | ||||||||||||||||||||||||||||||
| 18:31 | 18:08 | ||||||||||||||||||||||||||||||
Exception Statistic Report: The report displays the attendance exceptions of all employees within a specified period so that the attendance department handles the exceptions and confirm them with the employees involved and their supervisors.
Exception Statistic Report
| ID | Name | Department | Date | First time zone | Second time zone | Late time(Min) | Leave early(Min) | Absence (Min) | Total(Min) | Note | ||
| On-duty | Off-duty | On-duty | Off-duty | |||||||||
| 1 | Joe | company | 2013-01-01 | 07:26 | 17:50 | 0 | 10 | 0 | 10 | |||
| 2 | David | company | 2013-01-02 | 09:12 | 18:52 | 12 | 0 | 0 | 12 | |||
| 3 | Mark | company | 2013-01-01 | 07:50 | 17:50 | 0 | 10 | 0 | 10 | |||
| 4 | Tom | company | 2013-01-02 | 09:05 | 5 | 0 | 535 | 540 | ||||
Card Report: The report can substitute for clock-based cards and can be sent to each employee for confirmation.
Card Report
| Dept. | company | Name | Joe | Dept. | company | Name | David | Dept. | company | Name | Mark | ||||||||||||||||
| Date | 2013-01-01 - 2013-01-03 | ID | 1 | Date | 2013-01-01 - 2013-01-03 | ID | 2 | Date | 2013-01-01 - 2013-01-03 | ID | 3 | ||||||||||||||||
| Absent (Day) | AFL (Day) | Out (Day) | On-duty | Overtime(H) | Lato | Leave early | Absent (Day) | AFL (Day) | Out (Day) | On-duty | Overtime(H) | Lato | Leave early | Absent (Day) | AFL (Day) | Out (Day) | On-duty | Overtime(H) | Late | Leave early | |||||||
| Non-duty | Non-duty | (Times) | (Min) | (Times) | (Min) | Non-duty | Non-duty | (Times) | (Min) | (Times) | (Min) | Non-duty | Non-duty | (Times) | (Min) | (Times) | |||||||||||
| 0 | 0 | 0 | 2 | 0.0 | 0.0 | 0 | 0 | 1 | 10 | 0 | 0 | 0 | 2 | 0.0 | 0.0 | 1 | 12 | 0 | 0 | 0 | 0 | 0 | 1 | 5 | 1 | 10 | |
| Att. Report | Att. Report | Att. Report | |||||||||||||||||||||||||
| Year Date | First time zone | Second time zone | Overtime | Year Date | First time zone | Second time zone | Overtime | Year Date | First time zone | Second time zone | Overtime | ||||||||||||||||
| On-duty | Off-duty | On-duty | Off-duty | Check-in | Check-Out | On-duty | Off-duty | On-duty | Off-duty | Check-in | Check-Out | On-duty | Off-duty | On-duty | Off-duty | Check-in | Check-Out | ||||||||||
| 01 FEB | 07:26 | 17:50 | 01 FEB | 07:36 | 18:31 | 01 FEB | 07:50 | 17:50 | |||||||||||||||||||
| 02 MAR | 07:54 | 18:52 | 02 MAR | 09:12 | 18:52 | 02 MAR | 09:05 | ||||||||||||||||||||
6.2 Download Att. Setting Report
If shifts are complex or the shifts of a person are not fixed, it is recommended that the attendance setting report be downloaded and shifts and schedules be set for employees in the attendance setting report.
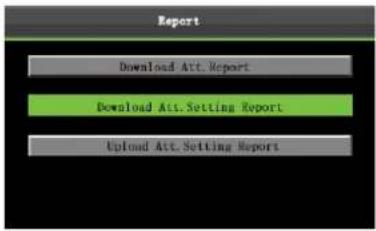
Press ▼ to select Download Att. Report then press OK.
flowchart
graph TD
    A["Device Icon"] --> B["Payment Terminal"]
    B --> C["Return Loop"]
    C --> A
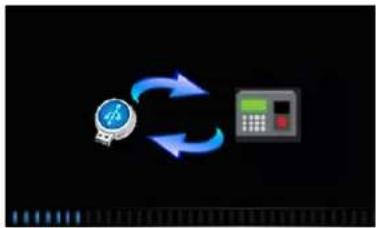
Downloading.....
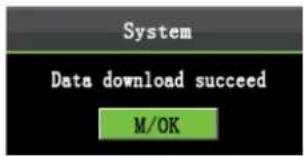
Data download succeed! Press M/OK to take out the USB disk or SD card.
Open the setting "AttSettingE.xls" in the USB disk or SD card on a PC. Set the Shift in the Attendance setting report. The shifts that have been set on the attendance machine shall be displayed. (For more details, see 5.2 Shift Setting) You can modify the 24 shifts and add shifts. After modification, the shifts shall prevail on the attendance machine. For more details, see "How to arrange schedules using the attendance setting report" in the "Self-Service Attendance Terminal FAQs"
| Attendance Setting Report | ||||||
| Shift | ||||||
| Number | First time zone | Second time zone | Overtime | |||
| 1 | On-duty | Off-duty | On-duty | Off-duty | Check-in | Check-Out |
| 1 | 9.00 | 18.00 | ||||
| 2 | 9.00 | 12.00 | 13.30 | 18.00 | ||
| 3 | 9.00 | 12.00 | 13.30 | 18.00 | ||
| 4 | 9.00 | 12.00 | 13.30 | 18.00 | ||
| 5 | 9.00 | 12.00 | 13.30 | 18.00 | ||
| 6 | 9.00 | 12.00 | 13.30 | 18.00 | ||
| 7 | 9.00 | 12.00 | 13.30 | 18.00 | ||
| 8 | 9.00 | 12.00 | 13.30 | 18.00 | ||
| 9 | 9.00 | 12.00 | 13.30 | 18.00 | ||
| 10 | 9.00 | 12.00 | 13.30 | 18.00 | ||
| 11 | 9.00 | 12.00 | 13.30 | 18.00 | ||
| 12 | 9.00 | 12.00 | 13.30 | 18.00 | ||
| 13 | 9.00 | 12.00 | 13.30 | 18.00 | ||
| 14 | 9.00 | 12.00 | 13.30 | 18.00 | ||
| 15 | 9.00 | 12.00 | 13.30 | 18.00 | ||
| 16 | 9.00 | 12.00 | 13.30 | 18.00 | ||
| 17 | 9.00 | 12.00 | 13.30 | 18.00 | ||
| 18 | 9.00 | 12.00 | 13.30 | 18.00 | ||
| 19 | 9.00 | 12.00 | 13.30 | 18.00 | ||
| 20 | 9.00 | 12.00 | 13.30 | 18.00 | ||
| 21 | 9.00 | 12.00 | 13.30 | 18.00 | ||
| 22 | 9.00 | 12.00 | 13.30 | 18.00 | ||
| 23 | 9.00 | 12.00 | 13.30 | 18.00 | ||
| 24 | 9.00 | 12.00 | 13.30 | 18.00 | ||
i Enter the on/off duty time in the corresponding columns, where the First time zone shall be the on/off duty time of Time 1 5.2 Shift Setting in and the Second time zone shall be the on/off duty time of Time 2. For the correct schedule time format, see "What is the correct time format used in the setting reports" in the "Self-Service Attendance Terminal FAQs."
Set a schedule setting report
Enter the ID, Name, and Department respectively on the left of the Schedule Setting Report. Set shifts for employees on the right of the Schedule Setting Report, where shifts 1–24 are shifts those set in the Attendance setting report and shift 25 is for leave and shift 26 is for out.
| Schedule Setting ReportSpecial shifts: 25-Ask for leave, 26-Out, Null-Holiday | ||||||||||||||||||||||||||||||||||||
| Schedule date | 2013-1-1 | |||||||||||||||||||||||||||||||||||
| ID | Name | Department | Card number | 1 | 2 | 3 | 4 | 5 | 6 | 7 | 8 | 9 | 10 | 11 | 12 | 13 | 14 | 15 | 16 | 17 | 18 | 19 | 20 | 21 | 22 | 23 | 24 | 25 | 26 | 27 | 28 | 29 | 30 | 31 | ||
| TUE | WED | THU | FR | SAT | SUN | MON | TUE | WED | THU | FR | SAT | SUN | MON | TUE | WED | THU | FR | SAT | SUN | MON | TUE | WED | THU | FR | SAT | SUN | MON | TUE | WED | THU | ||||||
| 1 | Joe | company | ||||||||||||||||||||||||||||||||||
| 2 | David | company | ||||||||||||||||||||||||||||||||||
| 3 | Mark | company | ||||||||||||||||||||||||||||||||||
| 4 | Jack | company | ||||||||||||||||||||||||||||||||||
Notes:
- The shifts of only 31 days can be arranged in one schedule setting report. For example, if the scheduling date is 2012-1-1, the schedule setting report contains the schedules of 31 days after 2012-1-1, that is, schedules from 2012-1-1 to 2012-1-31. If the scheduling date is 2012-1-6, the schedule setting report contains the schedules of 31 days after 2012-1-6, that is, schedules from 2012-1-6 to 2012-2-5.
- If no schedule setting report is set, all employees use the report 1 by default from Monday to Friday.
6.3 Set Setting Reports
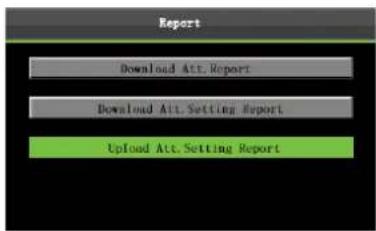
Select Upload Att. Setting Report then press OK.
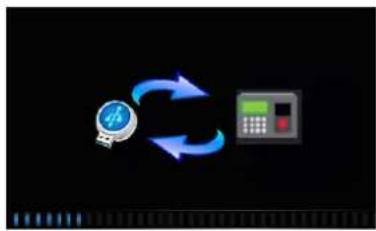
flowchart
graph TD
    A["Device Icon"] --> B["Payment Terminal"]
    B --> C["Return Loop"]
    C --> A
Uploading table.....
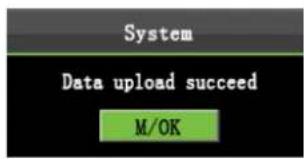
Data upload succeed! Press M/OK to take out the USB disk or SD card.
The employee information, shifts, and departments in the setting reports can be viewed after you select User, Dept set, and Shift set respectively on the initial interface.
Then you can view the information of employees, shifts, and departments either on relevant interfaces or in downloaded standard reports.

Note: If the schedule time format is incorrect, an interface shown in the following figure will be displayed:
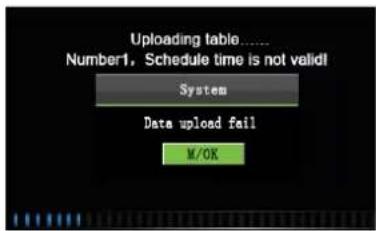

For the correct schedule time format, see "What is the correct time format used in the setting reports" in the "Self-Service Attendance Terminal FAQs"
Press M/OK.
Re-upload the attendance setting report after modification.
7 System Setting
7.1 System Setting
Set system parameters to meet user requirements to the greatest extent in terms of functions and display.
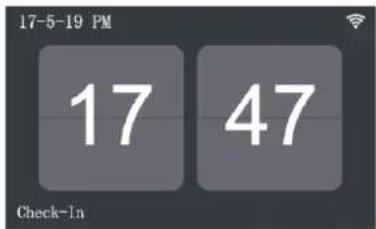
Press M/OK on the initial interface.
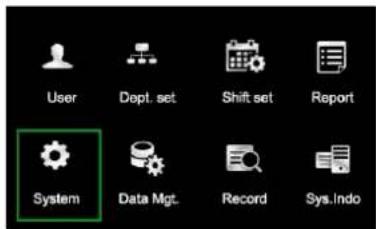
Select System and press M/OK.
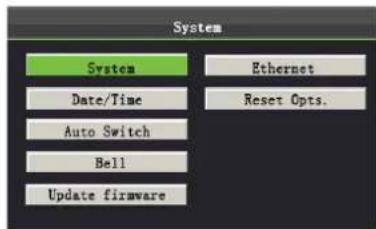
Select System and press M/OK.
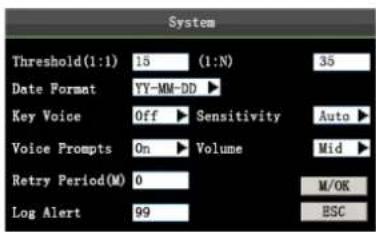
Move the cursor to the desired option by pressing ▲/▼. Enter a desired value in the entry box by using the keypad. Press ▶ in the scroll box to switch to the desired value. After finishing the setting, press M/OK to save your settings and return to the previous interface. Press ESC to cancel your settings and return to the previous interface.
■ S et system parameters.
Threshold (1:1): This option is used to set the extent of matching between an input ID/fingerprint and that stored in templates in the ID and fingerprint identification mode.
Threshold (1: N): This option is used to set the extent of matching between an input ID/fingerprint and all those stored in templates.
The recommended thresholds are as follows:
| FRR | FAR | Match threshold | |
| 1:N | 1:1 | ||
| High | Low | 45 | 25 |
| Medium | Medium | 35 | 15 |
| Low | High | 25 | 10 |
Date Format: This option is used to set the time format displayed on the initial interface of the device.
Select a desired date format by pressing▶. The device supports 10 date formats: YY-MM-DD, YY/MM/DD, YY.MM.DD, MM-DD-YY, MM/DD/YY, MM.DD.YY, DD-MM-YY, DD/MM/YY, DD.MM.YY and YYYYMMDD.
Key Voice: Set whether to generate a beep sound in response to every keystroke by pressing ▶. Select Y to enable the beep sound, and select N to mute.
Voice prompts: Set whether to generate a voice prompt in response to every operation by pressing ▶.
Retry Period: If a user's attendance record already exists and the user signs in again within the specified period (unit: minute), his/her second attendance record will not be stored. (Value scope: 0–60. 0: Save all the records passing the verification.)
Log Alert: When the available space is insufficient to store the specified number of attendance records, the device will automatically display a warning message. (Value scope: 1—99.0: No warning message is displayed when the free space is zero.)
Lan: You can select a language for the device based on your requirements. (optional feature)
Sensitivity: Set the fingerprint collection sensitivity. It is recommended to use the default value Medium. When dryness results in slow reactions of the fingerprint collector, you may set this option to High to enhance the fingerprint collector's sensitivity. When high humidity results in illegible fingerprint images, you may set this option to Low.
7.2 Date/Time
This menu item allows you to calibrate the date and time of the device.
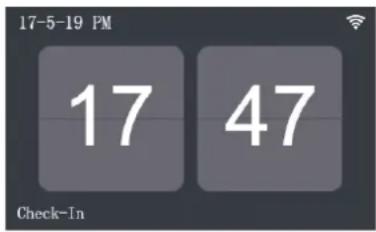
Press M/OK on the initial interface.
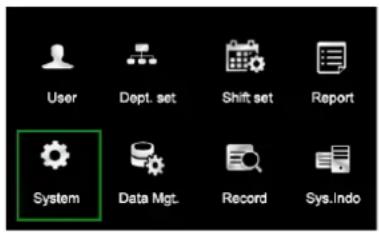
Select System and press M/OK.
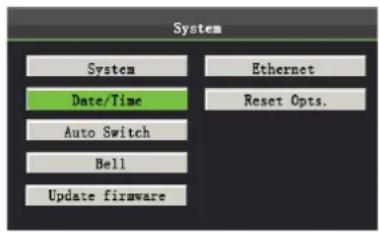
Select Date/Time and press M/OK.
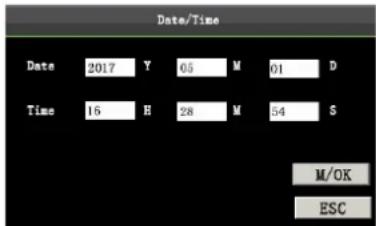
Enter the desired value by using the keypad. Press M/OK to save.
Note: The date and time of the device must be set accurately to ensure the accuracy of attendance time.
7.3 Timing State Switching Setting
When it comes the set times, the attendance machine will automatically switch its attendance state. The current attendance state is shown on the initial interface.

Note: The attendance status is downloaded together with attendance records. Users can view the attendance status by using attendance software. The attendance status does not affect attendance calculation, which is based on the preset shift time.
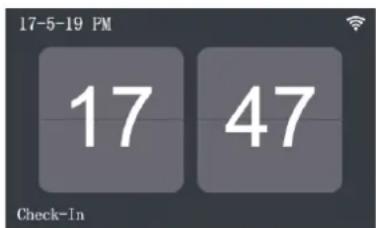
Press M/OK on the initial interface.
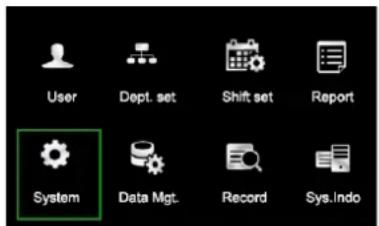
Select System and press M/OK.
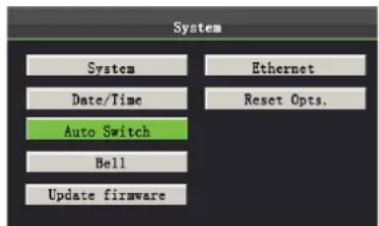
Select Auto Switch and press M/OK.
| No. | Switch time | Switch name | State | |
| 1 | 00: 00 | Check-In | ✓ | |
| 2 | 00: 00 | Check-Out | ✓ | |
| 3 | 00: 00 | Break-Out | ✓ | |
| 4 | 00: 00 | Break-In | ✓ | |
| 5 | ||||
| 6 | ||||
| 7 | ||||
| 8 | ||||
Press ▲/▼ to select the item and press M/OK.
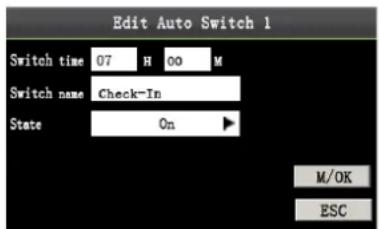
Set parameters by referring to the instructions in the following text box and press M/OK.
| No. | Switch time | Switch name | State |
| 1 | 07: 00 | Check-In | ✓ |
| 2 | 00: 00 | Check-Out | ✓ |
| 3 | 00: 00 | Break-Out | ✓ |
| 4 | 00: 00 | Break-In | ✓ |
| 5 | |||
| 6 | |||
| 7 | |||
| 8 |
As shown in the preceding figure, when the time reaches 07:00, the attendance status switches to Check-In.
Press ▲/▼ to switch among the entry boxes. Enter the switch time using the numeric keypad and the switch name using the T9 input method. Press ◀/▶ to choose a state. After the setting is complete, press M/OK to save and go back to the previous interface. Press ESC to cancel the setting and go back to the previous interface.
7.4 Bell Settings
Lots of companies need to ring their bells to signal the start and end of work shifts, and they usually manually ring their bells or use electric bells. To lower costs and facilitate management, we integrate the time bell function into the FRT. You can set the alarm time and duration for ringing the bell based on your requirements, so that the attendance machine will automatically play the selected ring tone, and stop playing the ring tone after the set duration.
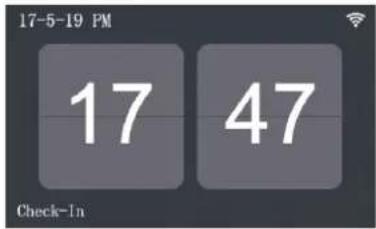
Press M/OK on the initial interface.
| Bell | Time | King | State |
| Bell1 | bell01.wav | ||
| Bell2 | bell01.wav | ||
| Bell3 | bell01.wav | ||
| Bell4 | bell01.wav | ||
| Bell6 | bell01.wav | ||
| Bell6 | bell01.wav | ||
| Bell7 | bell01.wav | ||
| Bell8 | bell01.wav |
Press ▲/▼ to select a bell then press M/OK.
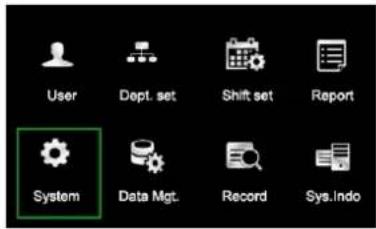
Select System and press M/OK.
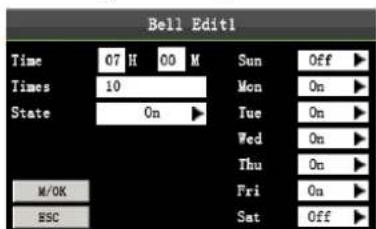
Press ▲/▼ and M/OK to select items. When the setting is completed, press OK to save the setting and exit.
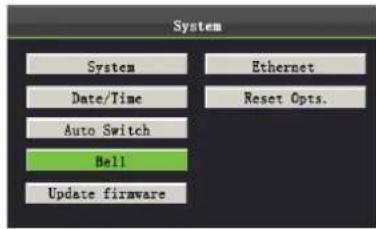
Select Bell and press M/OK.
| Bell | Time | Rings | State |
| Bell1 | 7:00 | bell101.wav | √ |
| Bell2 | bell101.wav | ||
| Bell3 | bell101.wav | ||
| Bell4 | bell101.wav | ||
| Bell6 | bell101.wav | ||
| Bell6 | bell101.wav | ||
| Bell7 | bell101.wav | ||
| Bell8 | bell101.wav |
When editing successful, an interface shown above.
Time: Set a time point of one day or several days from Sunday to Saturday when the attendance machine automatically plays a bell ring tone.
Times: Set the alarm times.
State: Set whether to enable the bell.
7.5 Update firmware
You can upgrade the firmware program of the FFR terminal by using the upgrade file in the USB disk through this parameter.
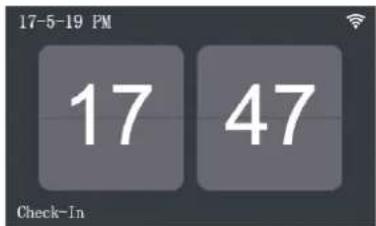
Press M/OK on the initial interface.
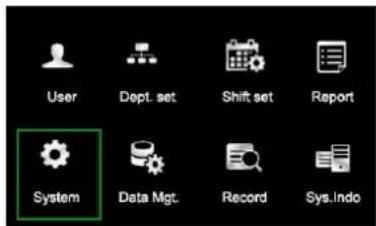
Select System and press M/OK. Select
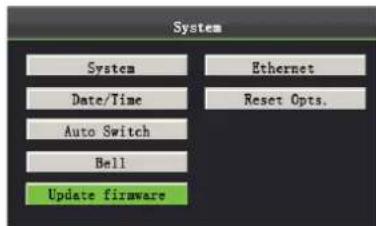
Update firmware and press M/OK.

If you need such upgrade file, please contact technician. Usually, firmware upgrade is not recommended.
7.6 Ethernet ★
- WLAN Mode
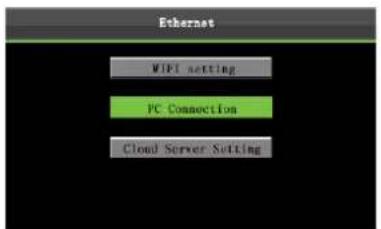
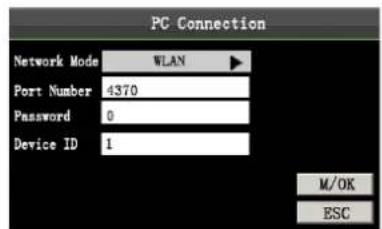
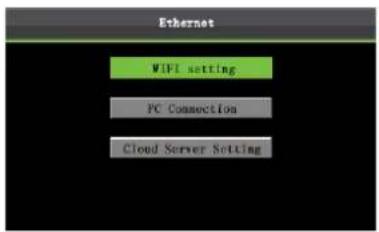
In the initial interface, press [M/OK] > System. > Ethernet > PC Connection, set the network mode as WLAN Mode. Press [M/OK] to return to the Ethernet setting interface.
Network Mode: It provides WLAN, hotspot or close three connection modes.
Port Number: This is the default, do not need to modify.
Password: To improve the security of attendance data, connection password needs to be set here. Connection password must be input when PC software is to connect device to read data. System password is 0 by default.(namely, there is no password.) it can be set as other value. After setting, the password must be input if software is to communicate with device. Or the connection will fail. The password length is 1-6 digits.
Device ID: The device ID ranges from 1 to 254. If the communication method is RS485, inputting this device ID in the software communication interface is required.
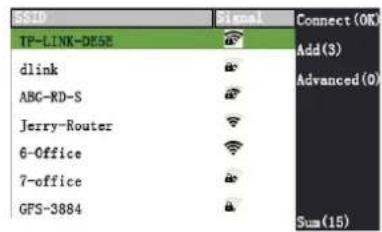
Press ▲/▼ to select WIFI setting and Press [M/OK]. Select an available WIFI; press [M/OK] to enter the password input interface. Input password and press [M/OK]. When the WIFI is connected successfully, the initial interface will display the
logo. Select the connected WIFI signal, press 0 to view the IP address and other information.
- Hotspot Mode
PC (installation ZKTime5.0 attendance software) can be connected directly through the WIFI attendance machine for data transmission. Mobile phone APP can directly access attendance "wireless hotspot" for WIFI punch.
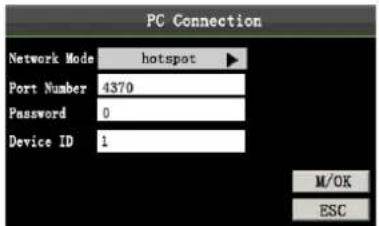
In the initial interface, press [M/OK] > System. > Ethernet > PC Connection, set the network mode as Hotspot Mode. Press [M/OK] to return to the Ethernet setting interface.
Press ▲/▼ to select WIFI setting and Press [M/OK] to enter the hotspot setting interface.
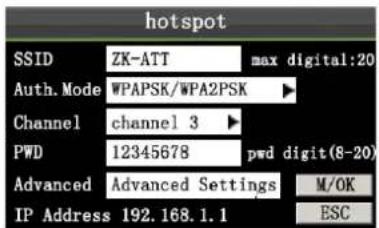
Network SSID: The distinguished name of the wireless network to be accessed. (Case sensitivity; the maximum length is 20).
Authentication Type: Select whether to encrypt (OPEN) and encryption mode (WPAPSK, WPA2PSK, WPAPSK / WPA2PSK three ways).
Channel: Wireless channel, the wireless signal as the transmission medium data transmission channel.
Password: When the authentication type is selected as the encryption mode, enter the password (8 \~ 20 bits) here. When the WIFI terminal device wants to connect to the device, enter the correct password to access it.
Advanced settings: Set the IP address in the wireless hotspot mode is equivalent to setting the IP address of the network segment of the router gateway. After the phone is connected, the IP address obtained is the network segment of the set IP address.
- Cloud Server Setting
Settings used for connecting with Cloud Server, such as server address and port settings.
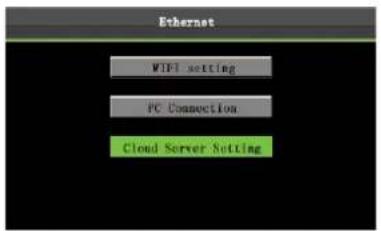
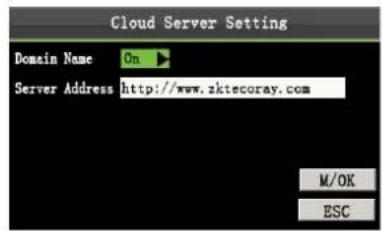
In the initial interface, press [M/OK] > System. > Ethernet > Cloud Server Setting to enter the Cloud Server setting interface.
When the Webserver is connected successfully, the main interface will display the logo.
This submenu is used to connect the Webserver-related settings, such as Webserver IP address and port settings.
Domain Name: When the domain name mode is enabled, you access a website using a domain name in the format of http://; otherwise, you must enter an IP address for website access.
Server Address: IP address of Webserver.
Server port: Port used by Webserver.
7.7 Reset Opts.
Make device's communication option, system option and so on reset to the state of factory.
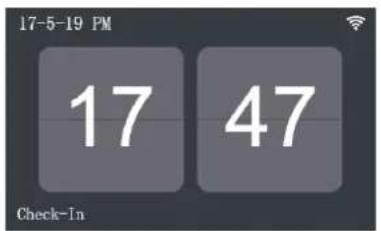
Press M/OK on the initial interface.
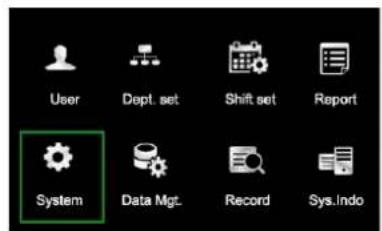
Select System and press M/OK.
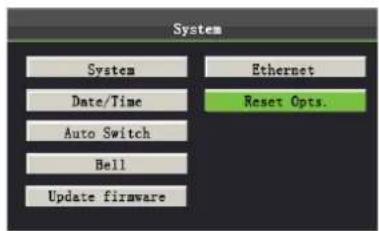
Press ▲/▼ to select Reset Opts.
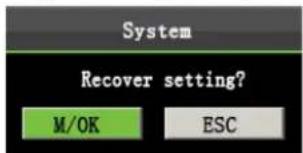
Press M/OK to reset,
Press ESC to exit.
8 Data Management
The device allows downloading user data and attendance data to a USB flash drive so that the data can be processed by proper attendance software. It also allows user data from other devices to be uploaded to this device.
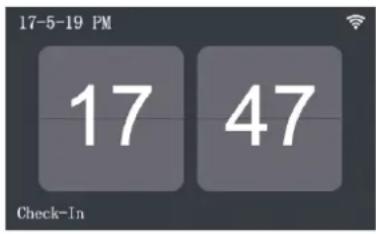
Press M/OK on the initial interface.
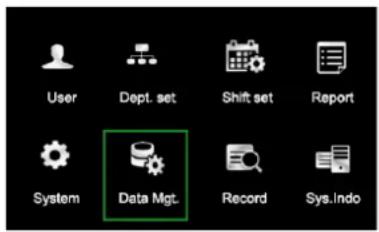
Select Data Mgt. and press M/OK. Select
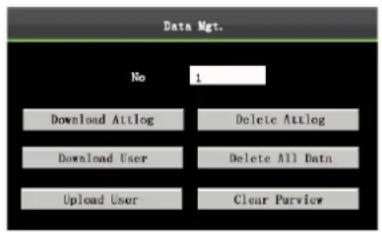
t Download Attlog and press M/OK.
8.1 Download/Upload
Download Attlog (Download attendance data): Download all the attendance data from the popular color-screen FRT to the USB host or SD card.
Download User (Download user data): Get all the equipment user information and fingerprint saved to the USB host or SD card.
Upload User (Upload User Data): Upload the user information and fingerprints from the USB host or SD card to the device.
The following uses attendance data as an example to describe how to download user data:
- Insert an USB host or SD card into the USB host or SD card slot on the device.
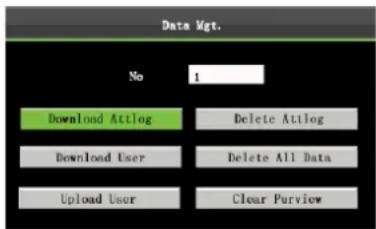
Select Download Attlog then press M/OK.
flowchart
graph TD
    A["Data Input"] --> B["Processing Unit"]
    B --> C["Output"]
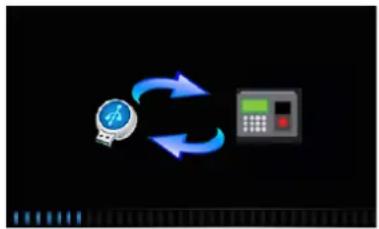
Downloading...
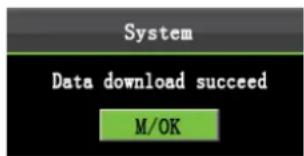
Data download succeed.
8.2 Delete/Clear
Delete Attlog: Delete all the attendance records.
Delete all Data: Delete all the information of enrolled personnel, including their fingerprints and attendance records.
Clear Purview: Set all the administrators to ordinary users.
The following uses attendance data as an example to describe how to delete user data:
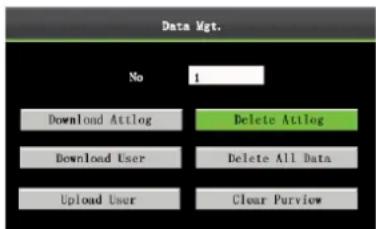
Press ▲/▼ to select Delete Attlog then press M/OK.
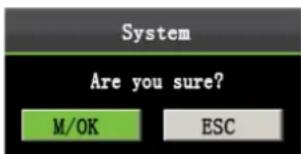
Press M/OK to delete, Press ESC to exit.
9 Record Query
Employees can view their saved attendance records by entering any query conditions. According to the entered query conditions, records that meet the specified query conditions will be displayed on the screen.
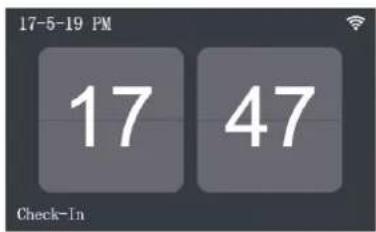
Press M/OK on the initial interface.
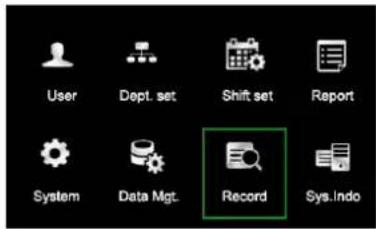
Select Record and press M/OK.
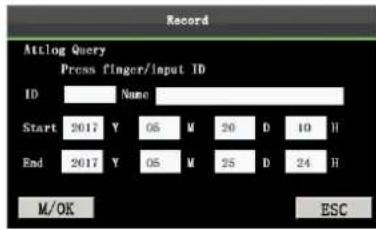
Press finger/input ID/Punch Card, enter the Start and End using keypad, then press OK.
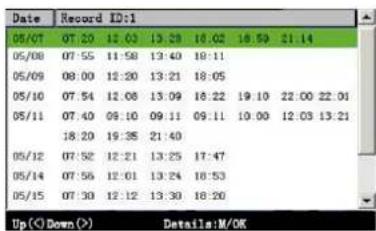
Showing records above
| ID | Name | Time | Verify | State |
| 1 | Mike | 05-07 07:30 | F | 0 |
| 1 | Mike | 05-07 12:03 | F | 1 |
| 1 | Mike | 05-07 15:28 | F | 0 |
| 1 | Mike | 05-07 18:02 | F | 1 |
| 1 | Mike | 05-07 18:59 | F | 4 |
| 1 | Mike | 05-07 21:14 | F | 5 |
Press M/OK to view the details of the attendance records.
The attendance details of the employee with user ID of 1 on
May 7 are as in figure:

Note: For the other two record query modes, see "Quick Query of Attendance Records."

Notes displayed at the bottom of the screen explain all letter meanings.
Verification: validation status.
F: fingerprint verification.
P: password verification
I: Card verification
Status: attendance status.
0: check-in
1: check-out
4: overtime check-in
5: overtime check-out
10 System Information
You can check the storage status as well as version information of the popular color-screen FRT through the Sys.Info. menu item.
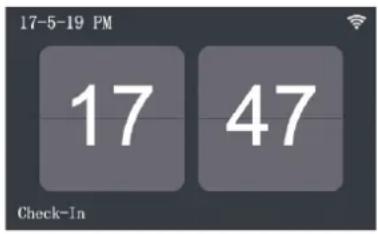
Press M/OK on the initial interface.
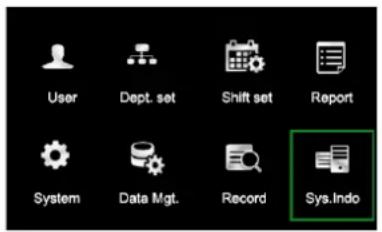
Select Sys. Info and press M/OK.
Free Space: The number of enrolled users, administrators and passwords is displayed on the Free Space interface. The total fingerprint storage capacity and occupied capacity as well as the total attendance storage capacity and occupied capacity are graphically displayed respectively, as shown below:
Device: The equipment name, serial number, version information, manufacturer and date of manufacture are displayed on the Device interface.
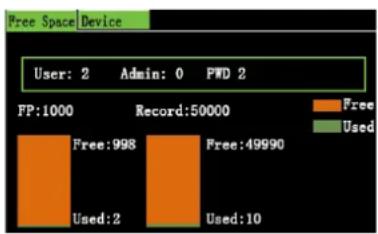
Free Space
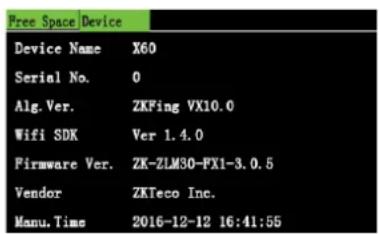
Device

Note: The figure above is for reference only. Please refer to the actual object.
11 Appendix
USB Client
The device can communicate with computers. You can connect it to a computer through a USB cable to view the attached quick start guide.
T9 input
T9 input (intelligent input) is quick and high efficient. The device support T9 Chinese, T9 English and symbol input. There are 3 or 4 English letters on numeric keys (0-9), for example, A, B, C are on numeric key 1. Press the corresponding key once, and the program will generate effective spelling. By using T9 input, names, SMS content and some symbols can be input.
The T9 input method is used to enter texts such as employee names, department names, and shift names.
![Edit user ID 1 Name FP Enroll FP FP Cnt:0 PWD Enroll PWD [Am]](/content/2026/05/949768/images/4ec035f1a24cc8d994813da4773ca0bc08d1aa72f5bde8acfa086e039c0212a8.jpg)
Press the M/OK key to enable the T9 input method.
![Edit user ID 1 Name PP Enroll FP PP Cnt:0 PWD Enroll PWD [Am] A B C](/content/2026/05/949768/images/9586c4160bf1eb408430f4ec5a0dca909b380f74b986c6d92f4a32d3f79deec6.jpg)
Press ▲/▼ to switch to the English or character mode. Enter 2 and press the keys from 3 to A.
![Edit user ID 1 Name Angel FP Enroll FP FP Cnt:0 PWD Enroll PWD [Am]](/content/2026/05/949768/images/20d11e00ac527fc115cffa8ec204b739de29def19673e5fc5b44e0488e996d14.jpg)
Enter letters Angel in the same manner.
Quick Query of Attendance Records
This function allows ordinary users to query their attendance records of current day to make sure whether there are any missing records or time errors so as to inform administrators to record exceptions in time.
Operation description
Mode 1: Save the attendance records and query quickly:
For example, after successful fingerprint matching, the employee with user ID of 1 can view his/her attendance records of current day after pressing M/OK.
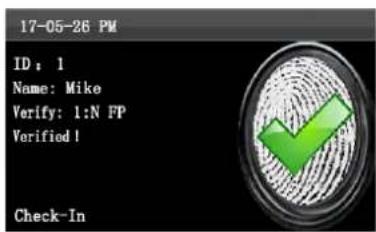
Verified!
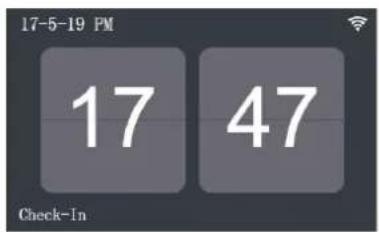
Press M/OK within 10 seconds.
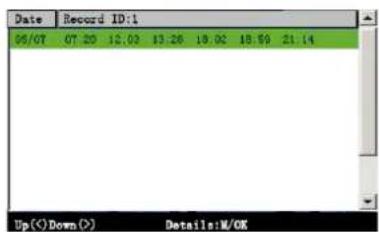
View all attendance records of an employee on current day.
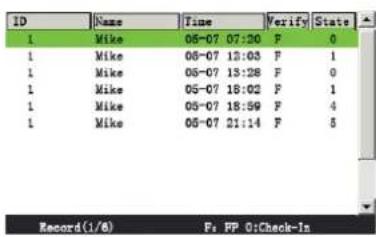
Press M/OK to view the details of the attendance records.

- The picture is for reference only.
- Press ▲/▼ to view the attendance records row by row. Press ◀/▶ to view the attendance records page by page.
Mode 2: Query directly and quickly without saving the attendance records*:
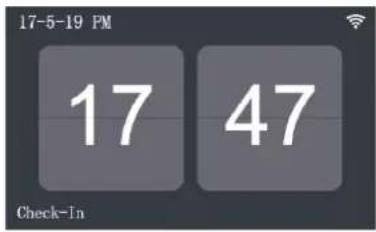
Press 0 on the initial interface to display the Record interface.
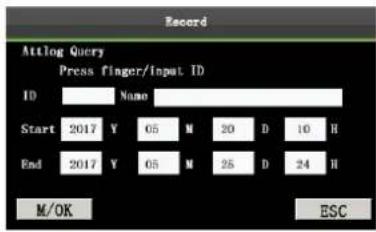
Press finger/input ID/Punch Card, enter the Start and End using keypad, then press OK.
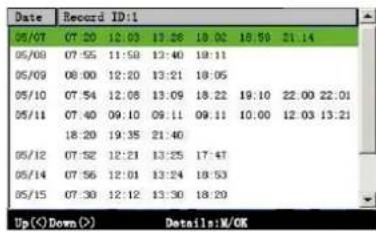
Showing records above
| ID | Name | Time | Verify | State |
| 1 | Mike | 05-07 07:30 | F | 0 |
| 1 | Mike | 05-07 12:03 | F | 1 |
| 1 | Mike | 05-07 13:28 | F | 0 |
| 1 | Mike | 05-07 18:02 | F | 1 |
| 1 | Mike | 05-07 18:59 | F | 4 |
| 1 | Mike | 06-07 21:14 | F | 5 |
Press M/OK to view the details of the attendance records.
The attendance details of the employee with user ID of 1 on May 7 are as in figure:

Notes displayed at the bottom of the screen explain all letter meanings.
Verification: validation status.
F: fingerprint verification. P: password verification I: Card verification
Status: attendance status.
0: check-in 1: check-out 4: overtime check-in 5: overtime check-out

Notes:
- Three ways for entering the query conditions: 1) Press the enrolled finger. The user ID and the name corresponding to the fingerprint will be automatically displayed. 2) Enter the desired employee information in ID and Name. 3) Sweep the enrolled card. The employee ID and name corresponding to the card will be automatically displayed. 2.1,000 records can be displayed on this interface.
Self-Service Attendance Terminal FAQs
- Does self-service attendance terminal support scheduling based on every other days? A: No.
- Can the setting records downloaded from the device be edited on WPS software? A: Yes. Setting records are supported in Microsoft Office 2003, Microsoft Office 2007, and WPS Office 2012 Personal.
- What is the attendance calculation flow adopted by the self-service attendance terminal? A. SSR attendance calculation flow.
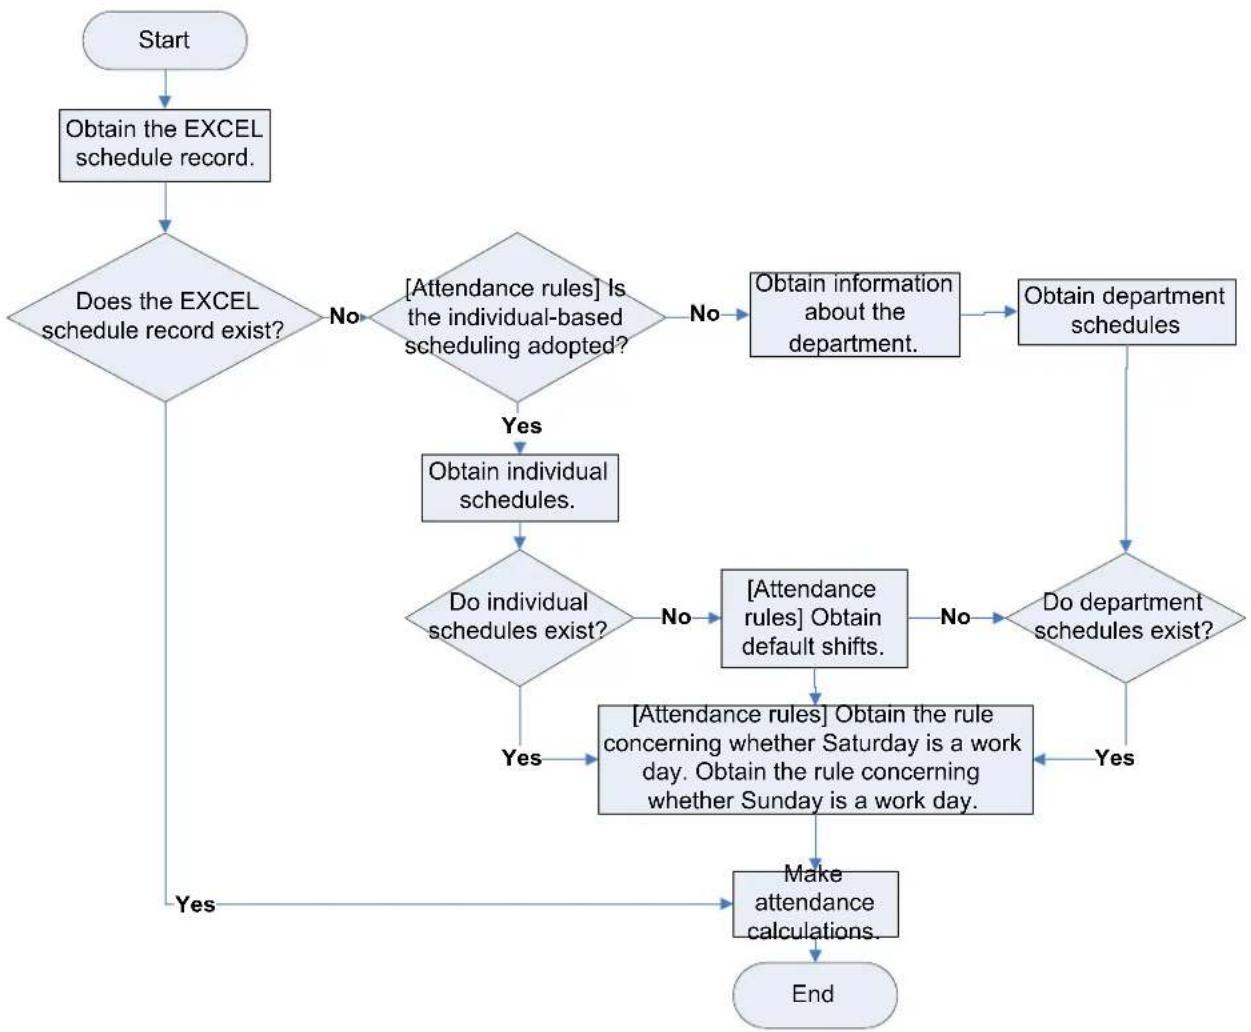
flowchart
graph TD
    A["Start"] --> B["Obtain the EXCEL schedule record."]
    B --> C{Does the EXCEL schedule record exist?}
    C -->|No| D{[Attendance rules] Is the individual-based scheduling adopted?}
    D -->|No| E["Obtain information about the department."]
    E --> F["Obtain department schedules"]
    F --> G{Do department schedules exist?}
    G -->|Yes| H["End"]
    G -->|No| I["Do individual schedules exist?"]
    I --> J{[Attendance rules] Obtain default shifts.]
    J -->|No| K["Obtain individual schedules."]
    K --> L{Do individual schedules exist?}
    L -->|Yes| M["End"]
    L -->|No| N["Obtain department schedules"]
    N --> O{Do department schedules exist?}
    O -->|Yes| P["End"]
    O -->|No| Q["Obtain department schedules"]
    Q --> R{Do department schedules exist?}
    R -->|Yes| S["End"]
    R -->|No| T["Obtain department schedules"]
    T --> U{Do department schedules exist?}
    U -->|Yes| V["End"]
    U -->|No| W["Obtain department schedules"]
    W --> X{Do department schedules exist?}
    X -->|Yes| Y["End"]
    X -->|No| Z["Obtain department schedules"]
    Z --> AA{Do department schedules exist?}
    AA -->|Yes| AB["End"]
    AA -->|No| AC["Obtain department schedules"]
    AC --> AD{Do department schedules exist?}
    AD -->|Yes| AE["End"]
    AD -->|No| AF["Obtain department schedules"]
    AF --> AG{Do department schedules exist?}
    AG -->|Yes| AH["End"]
    AG -->|No| AI["Obtain department schedules"]
    AI --> AJ{Do department schedules exist?}
    AJ -->|Yes| AK["End"]
    AJ -->|No| AL["Obtain department schedules"]
    AL --> AM{Do department schedules exist?}
    AM -->|Yes| AN["End"]
    AM -->|No| AO["Obtain department schedules"]
    AO --> AP{Do department schedules exist?}
    AP -->|Yes| AQ["End"]
    AP -->|No| AR["Obtain department schedules"]
    AR --> AS{Do department schedules exist?}
    AS -->|Yes| AT["End"]
    AS -->|No| AU["Obtain department schedules"]
    AU --> AV{Do department schedules exist?}
    AV -->|Yes| AW["End"]
    AV -->|No| AX["Obtain department schedules"]
    AX --> AY{Do department schedules exist?}
    AY -->|Yes| AZ["End"]
    AY -->|No| BA["Obtain department schedules"]
4. How to calculate special overtime hours?
The following cases are deemed special overtime:
- When an EXCEL schedule record exists and attendance reports are used for attendance calculation, there are check-in and check-out records though there is no schedule (or rest is arranged) for the current date.
- When no EXCEL schedule record is available, there are check-in and check-out records though Saturday and Sunday are non-work days.
Overtime hours refer to the duration counted from the first check-in time to the last check-out time on the current day.
5. How to arrange schedules using the attendance setting report?
Step 1: Insert a USB flash drive into the USB port or SD card into the SD port of the device and download the Attendance Setting Report.xls to the USB flash drive or SD card.
Step 2: Open the Attendance Setting Report.xls on a computer.
Step 3: Set shifts in the Attendance Setting Report.xls.
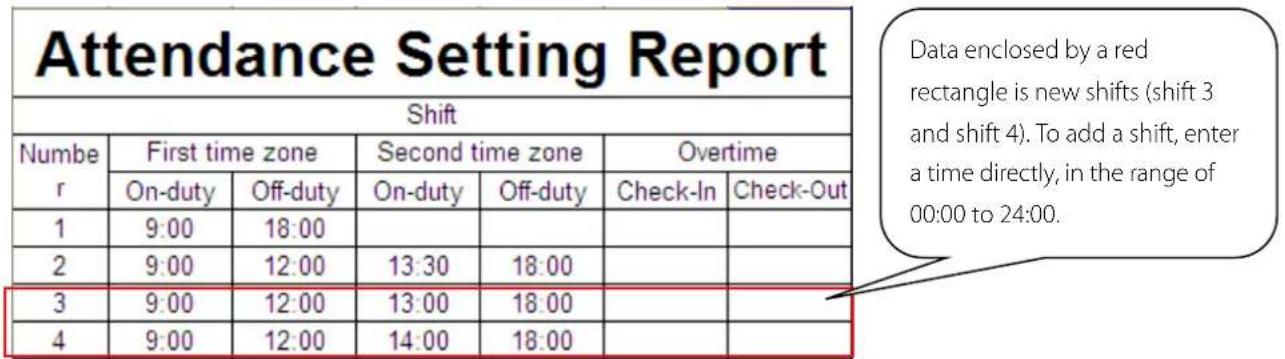
Step 4: Arrange schedules for employees.
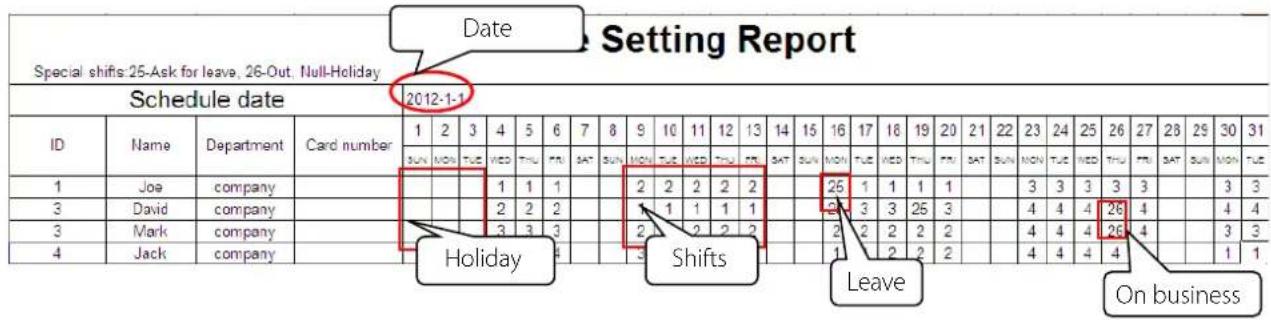

Note: Dates must be set correctly. For example, if the scheduling date is 2012-1-1, the schedule setting report
contains the schedules of 31 days after 2012-1-1, that is, schedules from 2012-1-1 to 2012-1-31. If the scheduling date is 2012-1-6, the schedule setting report contains schedules of 31 days after 2012-1-6, that is, schedules from 2012-1-6 to 2012-2-5.
Step 5: Insert a USB flash drive into the USB port or SD card into the SD port of the device and upload the Attendance Setting Report.xlsto the device. Then, schedules in the Attendance Setting Report can be used.
6. What is the correct time format used in the setting reports?
A. The correct time format is shown in the following table.
| Shift No. | First Time Range | Second Time Range | Overtime Range | |||
| On-duty | Off-duty | On-duty | Off-duty | Check-in | Check-out | |
| 1 | 09:00 | 18:00 | ||||
| 2 | 09:00 | 12:00 | 13:30 | 18:00 | ||
| 3 | 9:5 | 18:00 | ||||
Incorrect time formats are as follows:
● A time value is beyond the time range, such as 24:00.
● A time value contains Chinese characters, for example, 9: 00, which differs from 9:00.
● A time value is preceded by a space. As shown in the following table, there is a space in front of 09:00 in shift 1.
| ShiftNo. | First Time Range | Second TimeRange | Overtime Range | |||
| On-duty | Off-duty | On-duty | Off-duty | Check-in | Check-out | |
| 1 | 09:00 | 18:00 | ||||
| 2 | 09:00 | 12:00 | 13:30 | 18:00 | ||
| 3 | 9:5 | 18:00 | ||||
● A time value contains special characters, for example, _9:00 and 09:-1.
The device performs validity check and error tolerance for other formats.
7. How does the self-service attendance terminal collect the correct attendance time based on the preset shift time?
A: The device collects attendance time based on the following principles:
a) Adopt the earliest time for normal attendance and the nearest time for abnormal attendance.
b) Adopt the normal attendance time if the normal attendance time and abnormal attendance time coexist.
c) Adopt a median in the attendance time range.
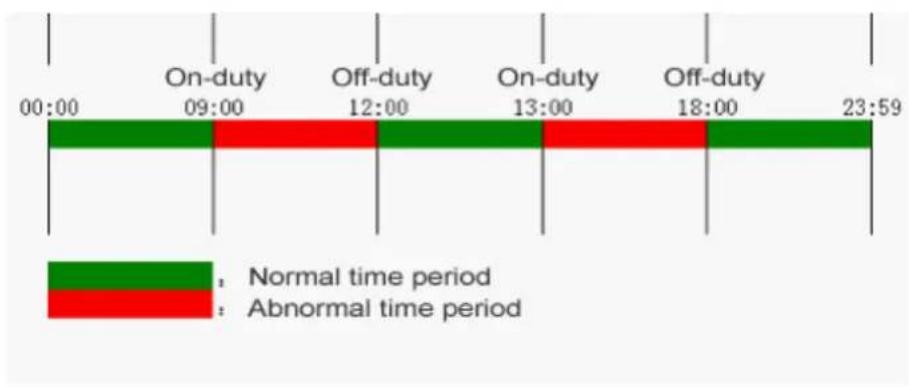
line
| Time | Time Period | Normal Time Period | Abnormal Time Period | | :--- | :--- | :--- | :--- | | 00:00 | On-duty | Green | - | | 09:00 | On-duty | Red | - | | 12:00 | Off-duty | Green | - | | 13:00 | On-duty | Green | Red | | 18:00 | Off-duty | Green | Red | | 23:59 | Off-duty | Green | Red |The following uses four examples to describe the preceding principles.
Example 1: normal attendance
| Attendance Time Range | 09:00 — 12:00 | 13:00 — 18:00 | ||||
| Attendance time of #1 employee | 8:30, 8:35, 11:55,12:01, 12:50, 18:02,19:00 | |||||
| Statistical result based on attendance rules | 8:30 | 12:01 | 12:50 | 18:02 | ||
Description: The attendance time 8:30 and 8:35 are earlier than the on-duty time 9:00 and they are within the normal attendance time range. Therefore, 8:30 is adopted for the on-duty time 9:00 based on the principle of adopting the earliest time for normal attendance. 18:02 and 19:00 are later than the off-duty time 18:00, and therefore, 18:02 is adopted based on the same principle.
Example 2: Late arrival
| Attendance Time Range | 09:00 — 12:00 | 13:00 — 18:00 | ||||
| Attendance time of #1 employee | 9:01, 9:04, 12:01, 12:50, 18:00 | |||||
| Statistical result based on attendance rules | 9:01 | 12:01 | 12:50 | 18:00 | ||
Description: Employer 1 checks in for work at 9:01 and 9:04 and he/she is late based on the preset on-duty time. Based on the principle of adopting the nearest time for abnormal attendance, the correct check-in time is 9:01 rather than 9:04 because 9:01 is nearer 9:00.
Example 3: Early leave
| Attendance Time Range | 09:00 — 12:00 | 13:00 — 18:00 | ||||
| Attendance time of #1 employee | 8:50, 11:40,11:55, 12:50, 18:01 | |||||
| Statistical result based on attendance rules | 8:50 | 11:55 | 12:50 | 18:01 | ||
Description: The attendance time 12:50 is adopted based on the principle of adopting a median in the attendance time range. For the attendance time range from 9:00 to 12:00, the normal check-out time range for the off-duty time 12:00 is from 12:00 to 12:30 (that is, 12:00 + (13:00 - 12:00)/2 ). Therefore, the calculated time of attendance is shown in the preceding table.
Example 4: Absence
Case 1:
| Attendance Time Range | 09:00 — 12:00 | 13:00 — 18:00 | ||||
| Attendance time of #1 employee | 8:50, 12:50, 18:01 | |||||
| Statistical result based on attendance rules | 8:50 | 12:50 | 18:01 | |||
Description: The attendance time 12:50 is adopted based on the principle of adopting a median in the attendance time range. For the attendance time range from 9:00 to 12:00, the normal check-out time range for the off-duty time 12:00 is from 12:00 to 12:30 (that is, 12:00 + (13:00 - 12:00)/2). Therefore, the check-out time is blank. The normal check-in time range for the on-duty time 13:00 is from 12:30 to 13:00. The calculated time of attendance is shown in the preceding table.
Case 2:
| Attendance Time Range | 09:00 — 12:00 | 13:00 — 18:00 | |||||
| Attendance time of #1 employee | 8:50, 11:55, 12:20, 18:01 | ||||||
| Statistical result based on attendance rules | 8:50 | 12:20 | 18:01 | ||||
Description: The time 12:20 is adopted based on the principle of adopting a median in the attendance time range. The normal check-out time range for the off-duty time 12:00 is from 12:00 to 12:30 (that is, 12:00 + (13:00 - 12:00)/2). Therefore, the check-out time of the employee is 12:20. The normal check-in time range for the on-duty time 13:00 is from 12:30 to 13:00. Therefore, the check-in time of the employee is blank. The calculated time of attendance is shown in the preceding table.
Statement on Human Rights and Privacy
Dear Customers:
Thank you for choosing the hybrid biometric products designed and manufactured by us. As a world-renowned provider of biometric technologies and services, we pay much attention to the compliance with the laws related to human rights and privacy in every country while constantly performing research and development.
We hereby make the following statements:
- All of our fingerprint recognition devices for civil use only collect the characteristic points of fingerprints instead of the fingerprint images, and therefore no privacy issues are involved.
- The characteristic points of fingerprints collected by our products cannot be used to restore the original fingerprint images, and therefore no privacy issues are involved.
- We, as the equipment provider, shall not be held legally accountable, directly or indirectly, for any consequences arising due to the use of our products.
- For any dispute involving the human rights or privacy when using our products, please contact your employer directly.
Our other police fingerprint equipment or development tools will provide the function of collecting the original fingerprint image of citizens. As for whether such a type of fingerprint collection constitutes an infringement of your privacy, please contact the government or the final equipment provider. We, as the original equipment manufacturer, shall not be held legally accountable for any infringement arising thereof.
Note: The law of the People's Republic of China has the following regulations regarding the personal freedom:
- Unlawful arrest, detention or search of citizens of the People's Republic of China is prohibited; infringement of individual privacy is prohibited.
- The personal dignity of citizens of the People's Republic of China is inviolable.
- The home of citizens of the People's Republic of China is inviolable.
- The freedom and privacy of correspondence of citizens of the People's Republic of China are protected by law.
At last we stress once again that biometrics, as an advanced recognition technology, will be applied in a lot of sectors including e-commerce, banking, insurance and legal affairs. Every year people around the globe suffer from great loss due to the insecurity of passwords. The fingerprint recognition actually provides adequate protection for your identity under a high security environment.
Environment-Friendly Use Description
| The Environment Friendly Use Period (EFUP) marked on this product refers to the safety period of time in which the product is used under the conditions specified in the product instructions without leakage of noxious and harmful substances.The EFUP of this product does not cover the consumable parts that need to be replaced on a regular basis such as batteries and so on. The EFUP of batteries is 5 years. | ||||||
| Names and Concentration of Toxic and Hazardous Substances or Elements | ||||||
| Parts Name | Toxic and Hazardous Substances or Elements | |||||
| Pb | Hg | Cd | Cr6+ | PBB | PBDE | |
| Chip resistor × | ○ | ○ | ○ | ○ | ○ | |
| Chip capacitor × | ○ | ○ | ○ | ○ | ○ | |
| Chip inductor × | ○ | ○ | ○ | ○ | ○ | |
| Chip diode | × | ○ | ○ | ○ | ○ | ○ |
| ESD components | × | ○ | ○ | ○ | ○ | ○ |
| Buzzer | × | ○ | ○ | ○ | ○ | ○ |
| Adapter | × | ○ | ○ | ○ | ○ | ○ |
| Screws | ○ | ○○ | × | ○○ | ||
| ○: Indicates that this toxic or hazardous substance contained in all of the homogeneous materials for this part is below the limit requirement in SJ/T11363-2006.x: Indicates that this toxic or hazardous substance contained in at least one of the homogeneous materials for this part is above the limit requirement in SJ/T11363-2006.Note: 80% of the parts in this product are manufactured with non-hazardous environment-friendly materials. The hazardous substances or elements contained cannot be replaced with environment-friendly materials at present due to technical or economical constraints. | ||||||
- System Setting....16
- Data Management....21
- Record Query 22
- System Information 23
- Appendix....24
- Instruction for Use
- Recommended Operation Steps
- Finger Placement
- Verification Modes
- Fingerprint Verification
- 1: N Fingerprint Verification
- 1:1 Fingerprint Verification
- Notes:
- Password Verification
- Main Menu
- User Management
- Add a User
- Enter a User ID and Name
- Enroll a Fingerprint
- Enroll a Password
- Select Department and Privilege Settings
- User Management
- Search a User
- Query a Record
- Edit a User
- Delete a User
- Add a User
- Department Set ★
- Add a Department
- Edit a Department
- Delete a Department
- Shift Set★
- Attendance Rule
- Shift Setting
- Schedule
- Department-based Scheduling
- Individual-based Scheduling
- Edit Schedule
- Scheduling Records Query
- Delete a shift
- Report Management
- Note:
- Download Att. Report
- Download Att. Setting Report
- Set a schedule setting report
- Set Setting Reports
- System Setting
- System Setting
- ■ S et system parameters.
- Date/Time
- Timing State Switching Setting
- Bell Settings
- Update firmware
- Ethernet ★
- - Hotspot Mode
- - Cloud Server Setting
- Reset Opts.
- Data Management
- Download/Upload
- Delete/Clear
- Record Query
- System Information
- Appendix
- USB Client
- T9 input
- Quick Query of Attendance Records
- Self-Service Attendance Terminal FAQs
- How to calculate special overtime hours?
- How to arrange schedules using the attendance setting report?
- What is the correct time format used in the setting reports?
- How does the self-service attendance terminal collect the correct attendance time based on the preset shift time?
- Example 3: Early leave
- Example 4: Absence
- Statement on Human Rights and Privacy
- Dear Customers:
- Environment-Friendly Use Description
Brand : ZKTeco
Model : D1
Category : Access Control System