OP200 - Access Control System ZKTeco - Free user manual and instructions
Find the device manual for free OP200 ZKTeco in PDF.

| Product Type | Access Control Terminal |
| Brand | ZKTeco |
| Model | OP200 |
| Dimensions (H x W x D) | 180 mm x 82 mm x 55 mm |
| Weight | 0.4 kg |
| Power Supply | 12V DC |
| Current Consumption | < 500 mA |
| Authentication Methods | Fingerprint, RFID Card, PIN |
| Fingerprint Capacity | 3,000 templates |
| Card Capacity | 10,000 cards |
| Communication | RS485, TCP/IP, Wiegand |
| Display | 2.4-inch TFT color screen |
| Operating Temperature | 0°C to 45°C |
| Operating Humidity | 20% to 80% |
| Protection Rating | IP54 |
| Maintenance | Clean fingerprint sensor with a soft, dry cloth |
| Safety Features | Tamper alarm, anti-passback |
| Spare Parts / Repairability | Replacement power adapter and mounting bracket available |
| Included Accessories | Mounting kit, power adapter, user manual |
| Warranty | 1 year |
Frequently Asked Questions - OP200 ZKTeco
User questions about OP200 ZKTeco
0 question about this device. Answer the ones you know or ask your own.
Ask a new question about this device
Download the instructions for your Access Control System in PDF format for free! Find your manual OP200 - ZKTeco and take your electronic device back in hand. On this page are published all the documents necessary for the use of your device. OP200 by ZKTeco.
USER MANUAL OP200 ZKTeco
1 Appearance& installaon& wiring 2
1.1 OP-200 Features 2
1.2 OP-200 Pin Layout 3
1.3 Dimensions & Installaon 4
1.4 Power Connecon 5
1.5 Ethernet Connecon 6
1.6 RS485 Connecon 7
1.7 Wiegand Output Connecon 8
1.8 LED Connecon 9
1.9 Standard Installaon....10
2 OP-200 Master Conguraon 11
2.1 Communicaon Sengs....11
2.2 Webserver Sengs....11
2.3 Master/Slave Sengs 12
2.4 Backup to USB Flash drive 12
3 OP-200 Slave Conguraon 13
3.1 Comm. Sengs....13
3.3 Master/Slave Sengs 13
4 Lenel-OnGuard conguraon 14
4.1 OnGuard Opera Installaon....14
4.2 Basic Lenel OnGuard Conguraon 15
4.3 OnGuard Conguraon Necessary to Receive Opera Events in OnGuard 18
4.4 ZK Opera Service Conguraon 20
4.5 ZK Opera Service 21
4.6 Troubleshoong 22
5 Amag-Symmetry Conguraon 26
5.1 Overview....26
5.2 ZK Opera Service Installaon 27
5.3 Basic Amag Symmetry Conguraon 27
5.3.1 Data Connect License 28
5.3.2 Amag SQL Server conguraon 28
5.3.3 Symmetry Unique Employee Reference 28
5.3.4 Data Export Conguraon 30
5.3.5 Inial Export 31
5.3.6 ZK Opera Service Conguraon 32
5.4 ZK Opera Service 35
5.5 Troubleshoong 37
6 OP-200 Connect Lenel Soware 39
6.1 Start the OnGuard soware, local at the "System Tree": 39
6.2 Click the "Hardware" to add one "Access Panel": 39
6.3 Add OP-200: 39
7 OP-200 Master Sengs on Webserver 43
7.1 Install the SilkID driver. 43
7.2 Conguraon of SilkID driver for SSL (Oponal) 43
7.2.1 Cercate Installaon 43
7.2.2 Conguring the Firefox Browser 46
7.3 OP-200 Webserver sengs 49
7.3.1 Login Web Server 49
7.3.2 Conguraon- Name the Readers 50
7.3.3 Set Card formats 51
7.3.4 Congure Door Sengs....52
7.3.5 Reader Input and Output sengs 53
7.3.6 Backup Database 56
7.3.7 Personnel management & ngerprint registraon....57
8 Proper Fingerprint Enrollment 61
9 Enroll & Vericaon OP-200 64
10 Trouble Shoongs 66
Safety Precautions
The following precautions are to keep the user safe and prevent any damage to the OP-200. Please read carefully before installation.

Do not install the OP-200 in a place subject to direct sun light, humidity, dust or soot.

Do not place the OP-200 near magnetic objects.

Do not place the OP-200 next to heating equipment.

Be careful not to expose OP-200 to liquids or chemicals.

Do not let children touch the OP-200 without Supervision.

Do not drop or damage the OP-200.

Do not disassemble, repair or alter the OP-200.

Do not use the OP-200 for any purposes other than those specified.

Clean the OP-200 fingerprint sensor with moist or dry lint-free cloth.
Contact your OP-200 supplier in case of any problem!
1 Appearance& installation& wiring
1.1 OP-200 Features
Front view

text_image
OP-200 1 2 3 4 5 6 7 8 9 < 0 > + 2.4-Inch Color Screen Touch Keypad LED Indicator Fingerprint Sensor & Card ReaderLeft side view

text_image
USB Port Reset Button rdRight side view

text_image
SpeakerBottom view

text_image
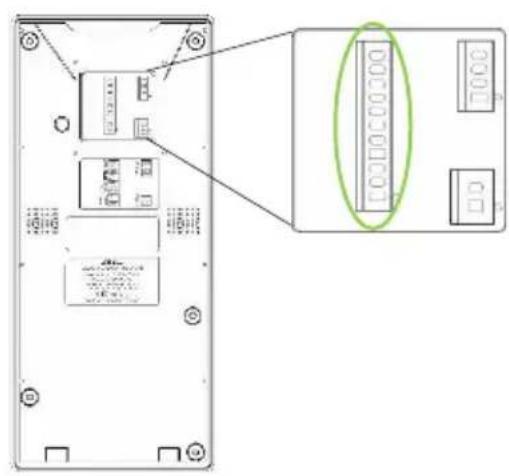
Security Screw holes (for securing the OP-200 onto its back plate)1.2 OP-200 Pin Layout
Rear view

text_image
4 Pin Cable Connectors _ Ethernet 11 Pin Cable Connectors 2 Pin Cable Connectors _ Power In Tamper Switch ZKTow Access Control Terminal Status Input: CC E=70mA Magnetic Output: 25V Operating Power Input: 25V Operating Power Input: 25V RRC Ins: 25V RS485 RS232 Wiegand Out LED Input 485B 485A GND TXD RXD GND WD1 WD0 RLED GLED BEEP Ethernet RJ45-6 RJ45-3 RJ45-2 RJ45-1 Power In GND +12V1.3 Dimensions & Installation
Front view
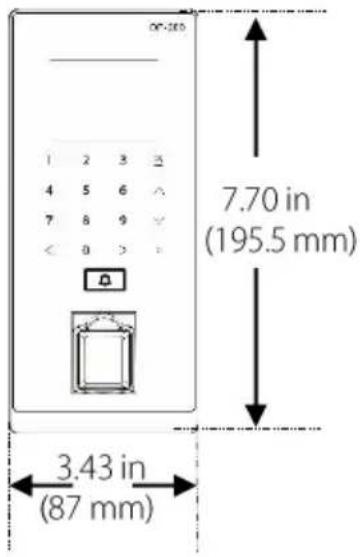
text_image
OP-280 1 2 3 △ 4 5 6 ↗ 7 8 9 ↙ < 0 > - 7.70 in (195.5 mm) 3.43 in (87 mm)Left side view
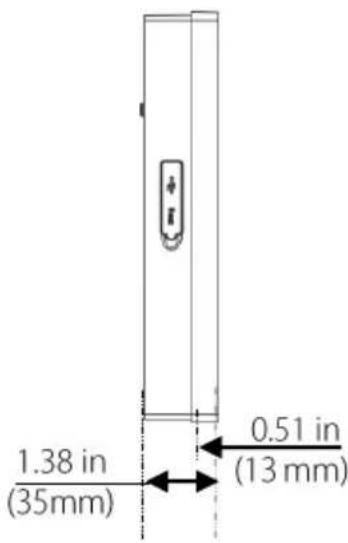
text_image
1.38 in (35mm) 0.51 in (13 mm)Rear view
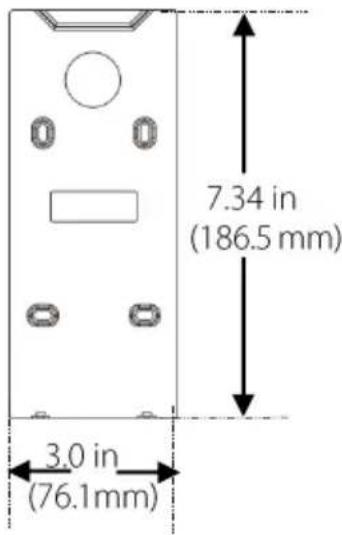
text_image
7.34 in (186.5 mm) 3.0 in (76.1mm)Mounting the OP-200 on Wall

natural_image
Pure electrical circuit lines without any symbols1 Affix the OP-200 back plate onto the wall using wall mount screws.
Note: We recommend drilling the mounting plate screws into solid wood (i.e. stud/beam). If a stud/beam cannot be found, use supplied drywall plastic anchors.

text_image
Diagram showing a device with labeled buttons and a green indicator light pointing to a panel with circular elements, illustrating a process or operation.2 Connect the OP-200 to its back plate.
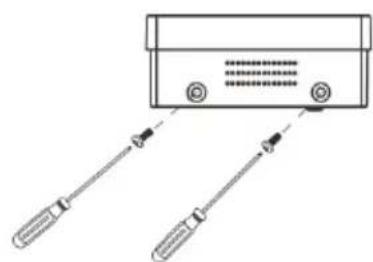
natural_image
Diagram of a device with two sensors connected to a terminal block (no text or symbols)3 Use security screws to fasten the OP-200 to back plate.
1.4 Power Connection

Without PoE
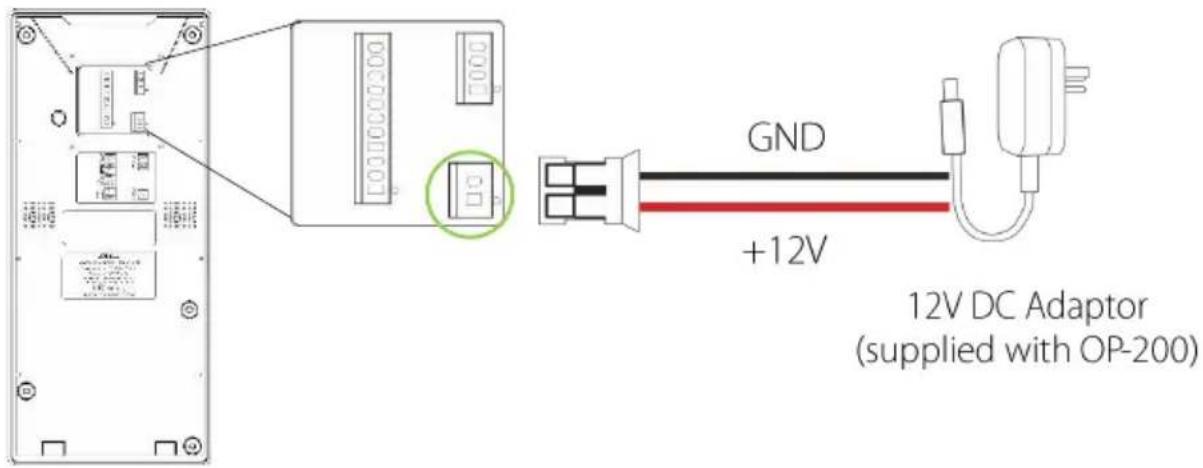
text_image
GND +12V 12V DC Adaptor (supplied with OP-200)
With PoE (Optional)

flowchart
graph LR
    A["Device with ports and connectors"] --> B["Device with two 12V DC power units"]
    B --> C["Device connected to Power + Data"]
    C --> D["PoE Switch"]
Recommended Power Supply:12V DC, at least 750mA (per OP-200)
1.5 Ethernet Connection

LAN Connection

text_image
Diagram showing connection between a device, switch, router, and OnGuard server with labeled ports and wiring paths1.6 RS485 Connection

OSDP Connection

text_image
Technical diagram of a device rear panel with labeled components and an inset showing a green oval highlighting a specific component.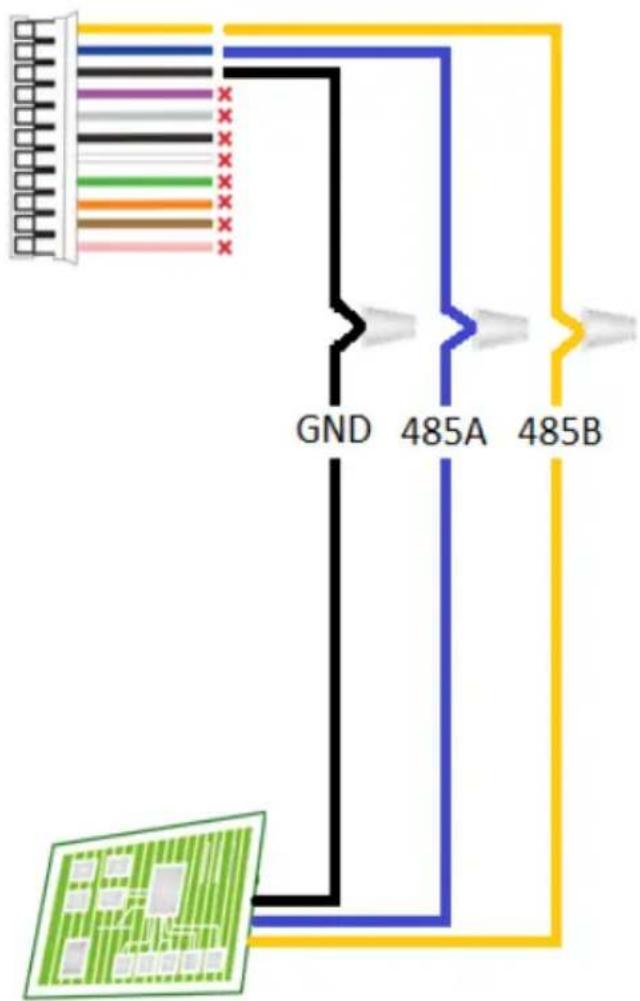
text_image
GND 485A 485B| DESCRIPTION | WIRE | ||
| 485B | Yellow | ||
| 485A | Blue | ||
| GND | Black | ||
| TXD | × | Purple | |
| RXD | × | Gray | |
| GND | × | Black | |
| WD1 | × | White | |
| WD0 | × | Green | |
| RLED | × | Orange | |
| GLED | × | Brown | |
| BEEP | × | Pink | |
Controller Panel
× Do not use
Important Notes:
- For RS485 communication use shielded twisted pair wire.
- To minimize chance of signal interference with RS485 communication, it's recommended using a bus topology instead of star topology.
- Adjust the communication speed as needed. The signal strength varies depending on wiring conditions, and it may be necessary to lower the baud rates.
- The GND Signal may be omitted if and only if the GND potential difference is less than ±5V .
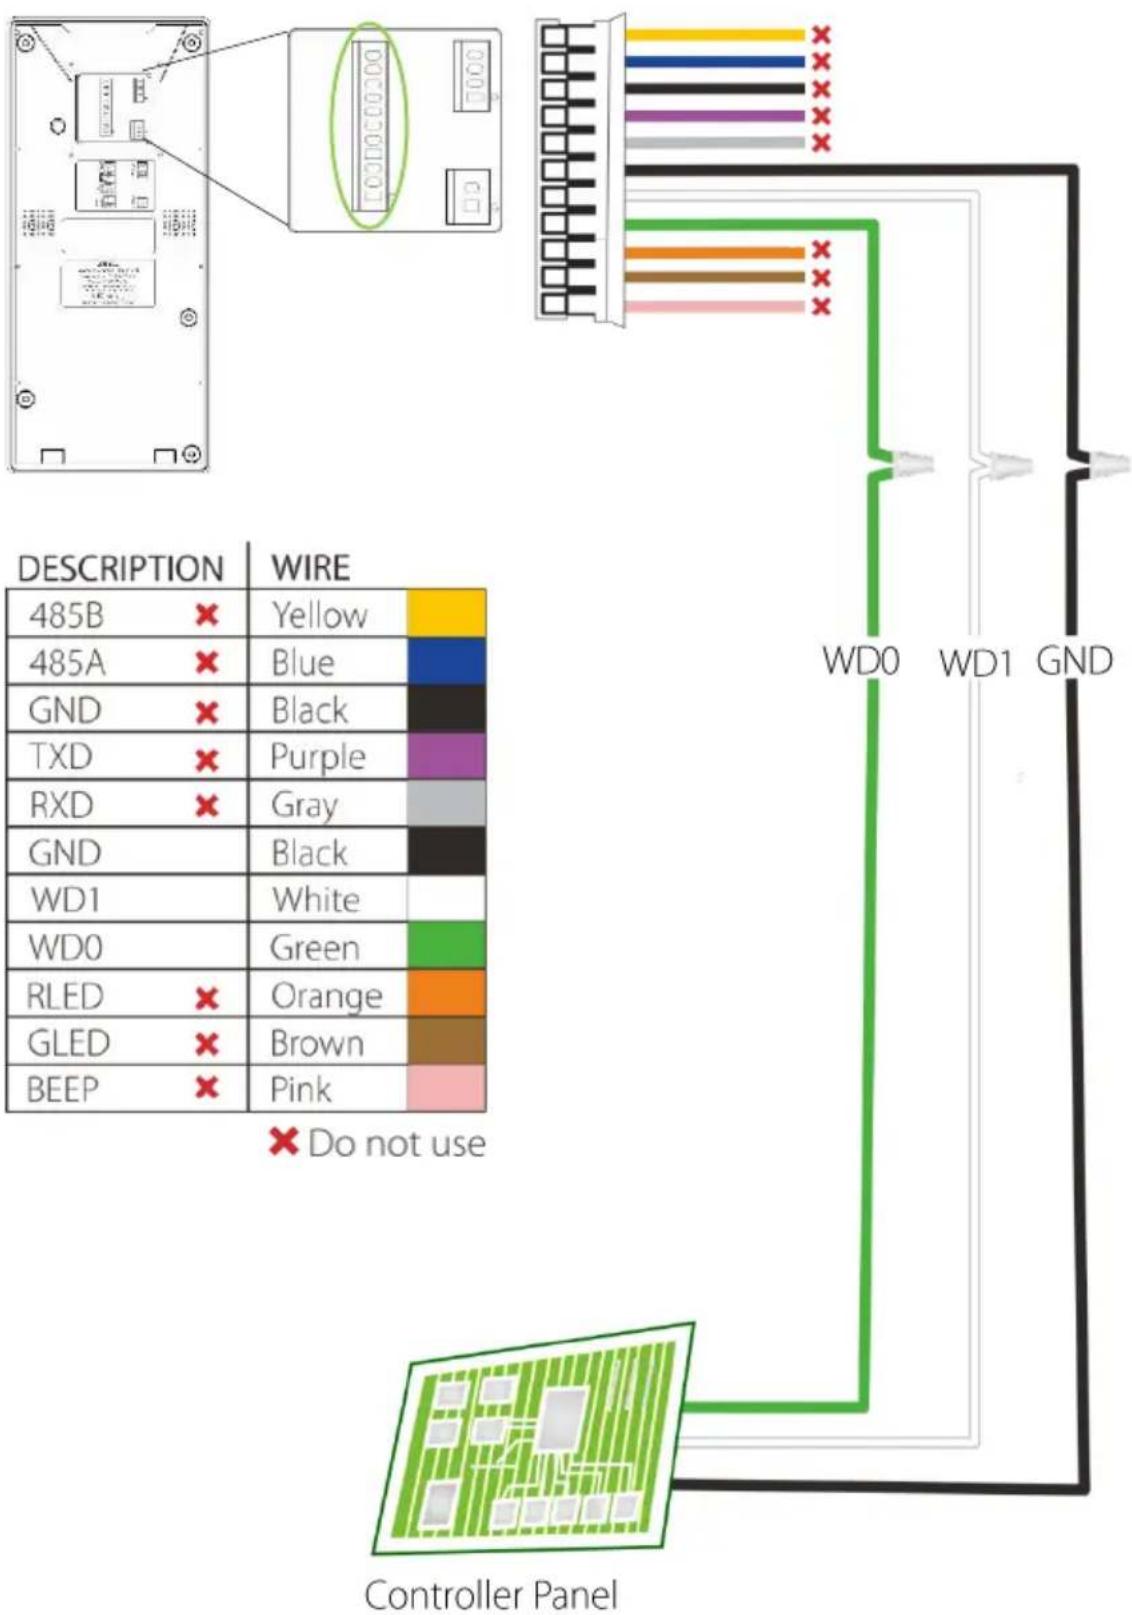
1.7 Wiegand Output Connection
text_image
DESCRIPTION WIRE 485B × Yellow 485A × Blue GND × Black TXD × Purple RXD × Gray GND WD1 White WD0 Green RLED × Orange GLED × Brown BEEP × Pink × Do not use WD0 WD1 GND Controller Panel1.8 LED Connection
text_image
Diagram of a device rear panel with labeled ports and an inset showing a green oval highlighting the port number.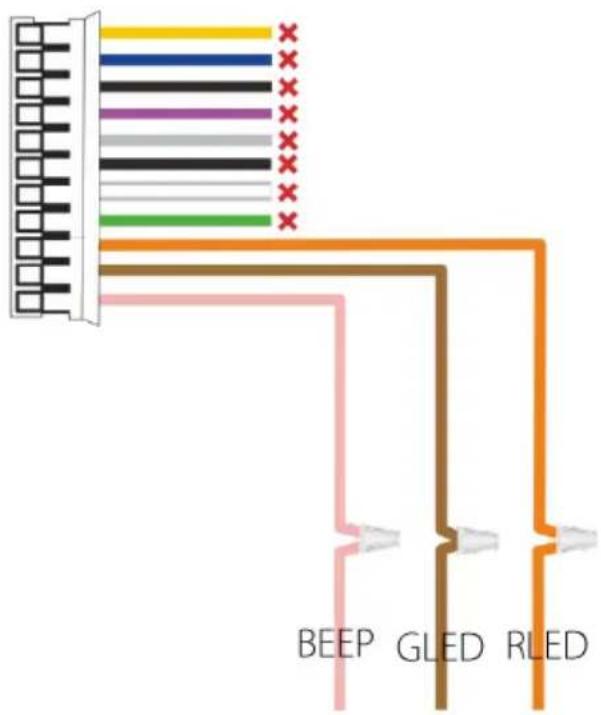
text_image
BEEP GLED RLED| DESCRIPTION | WIRE | ||
| 485B | × | Yellow | |
| 485A | × | Blue | |
| GND | × | Black | |
| TXD | × | Purple | |
| RXD | × | Gray | |
| GND | × | Black | |
| WD1 | × | White | |
| WD0 | × | Green | |
| RLED | Orange | ||
| GLED | Brown | ||
| BEEP | Pink | ||
× Do not use

natural_image
Green circuit board pattern with grid and rectangular cutouts (no text or symbols)Controller Panel
1.9 Standard Installation

flowchart
graph TD
    PC["PC"] -->|TCP/IP| Switch["Switch"]
    Switch -->|TCP/IP| OP-200Master["OP-200 Master"]
    Switch -->|TCP/IP| OP-200Slave["OP-200 Slave"]
    Switch --> Lock["Lock"]
    Lock --> ControllerPanel["Controller Panel"]
    OP-200Master -->|OP-200 Slave| Slave1["OP-200 Slave"]
    OP-200Master -->|OP-200 Slave| Slave2["OP-200 Slave"]
    OP-200Master -->|OP-200 Slave| Lock
    OP-200Master -->|OP-200 Slave| Lock
    style PC fill:#f9f,stroke:#333
    style Switch fill:#ccf,stroke:#333
    style OP-200Master fill:#cfc,stroke:#333
    style OP-200Slave fill:#fcc,stroke:#333
    style Lock fill:#ffc,stroke:#333
2 OP-200 Master Configuration
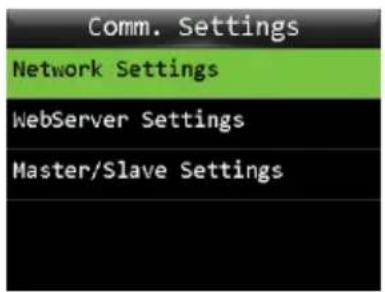
2.1 Communication Settings
text_image
Comm. Settings Network Settings WebServer Settings Master/Slave Settings
text_image
Network Settings IP Address 192.168.1.138 Subnet Mask 255.255.255.0 Gateway 192.168.1.1 DNS
text_image
Network Settings 192.168.1.138 Subnet Mask 255.255.255.0 Gateway 192.168.1.1 DNS 8.8.8.8Press → → Main Menu configure.
Comm. Settings
Network Settings to
The Parameters below are the factory default values.
Please configure the parameters for the actual network.
IP Address: 192.168.1.201
Subnet Mask: 255.255.255.0
Gateway: 192.168.1.1
DNS: 8.8.8.8
2.2 Webserver Settings

text_image
Comm. Settings Network Settings WebServer Settings Master/Slave Settings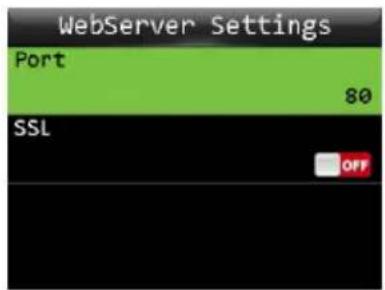
text_image
WebServer Settings Port 80 SSL OFFClick Main Menu → Comm. Settings Webserver Settings.
Port: The default Port is 80, normally you don't need modify it, but if it is necessary, you can change it.
SSL: the network connection is encrypted in the transport layer, which is used to ensure the security of network data transmission.
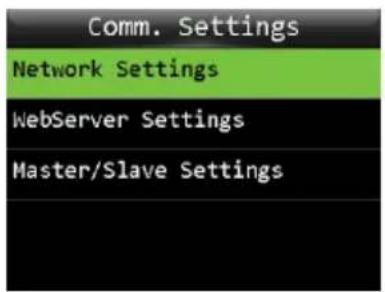
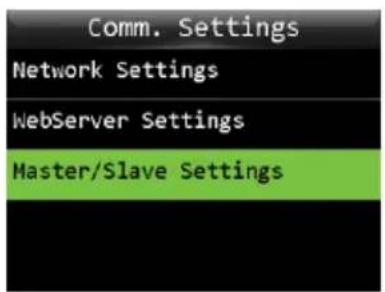
2.3 Master/Slave Settings

text_image
Comm. Settings Network Settings WebServer Settings Master/Slave Settings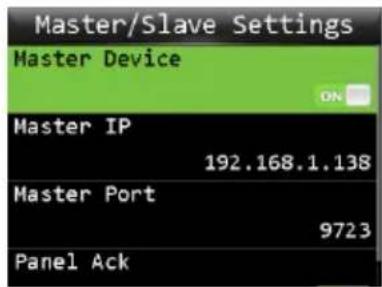
text_image
Master/Slave Settings Master Device ON Master IP 192.168.1.138 Master Port 9723 Panel Ack
text_image
Master/Slave Settings Master Device ON Switching from Master to Slave will RESTART the device? OK (->) Cancel ([->)Click Main Menu → Comm. Settings Master/Slave Settings.
Turn on Master Device, the device will be used as master reader, the following data will be same as Comm Settings, don't need change.
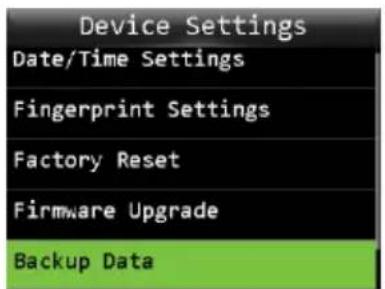
2.4 Backup to USB Flash drive
text_image
Device Settings Date/Time Settings Fingerprint Settings Factory Reset Firmware Upgrade Backup Data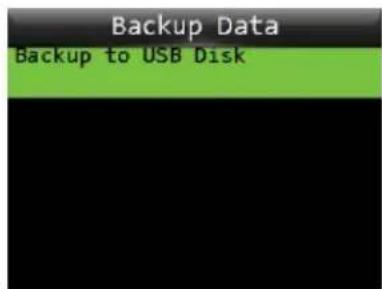
text_image
Backup Data Backup to USB Disk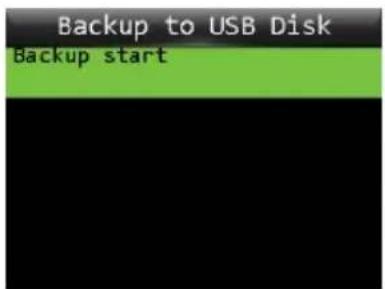
text_image
Backup to USB Disk Backup start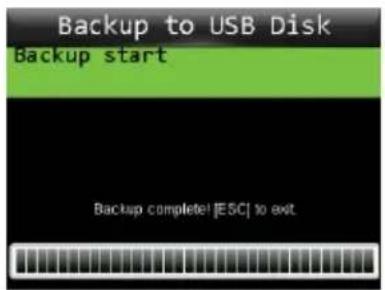
text_image
Backup to USB Disk Backup start Backup complete! [ESC] to exitInsert the USB disk to the reader, click Main Menu → Device Settings
Backup Data → Backup to USB Disk Backup start, the data (user data and network settings) in the device will be copied to the disk. And you can restore the data with the USB disk too. The menu path is:
Main Menu → Device Settings Restore Data Restore from USB Disk Restore start.
Slave reader doesn't have this function.
3 OP-200 Slave Configuration
3.1 Comm. Settings
text_image
Comm. Settings Network Settings WebServer Settings Master/Slave Settings
text_image
Network Settings IP Address 192.168.1.138 Subnet Mask 255.255.255.0 Gateway 192.168.1.1 DNS
text_image
Network Settings 192.168.1.138 Subnet Mask 255.255.255.0 Gateway 192.168.1.1 DNS 8.8.8.8Press → → Main Menu configure.
Comm. Settings
Network Settings to
Set the IP of slave readers.
3.2 Master/Slave Settings
text_image
Comm. Settings Network Settings WebServer Settings Master/Slave Settings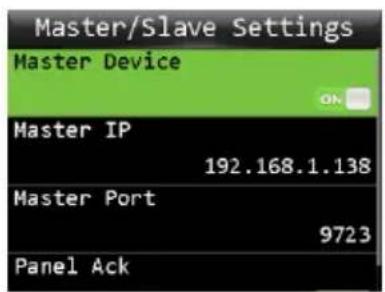
text_image
Master/Slave Settings Master Device ON Master IP 192.168.1.138 Master Port 9723 Panel Ack
text_image
Master/Slave Settings Master Device Switching from Slave to Master will RESTART the device? OK (->]) Cancel ([->)Click Main Menu → Comm. Settings Master/Slave Settings.
Turn off Master Device, the device will be used as slave reader. And please set the Master IP (the IP of the master reader), Master Port is default, don't need change.
Panel Ack: If you open this function, the reader will get feedback (verify successfully or unsuccessfully) from controller panel.
4 Lenel-OnGuard configuration
4.1 OnGuard Opera Installation
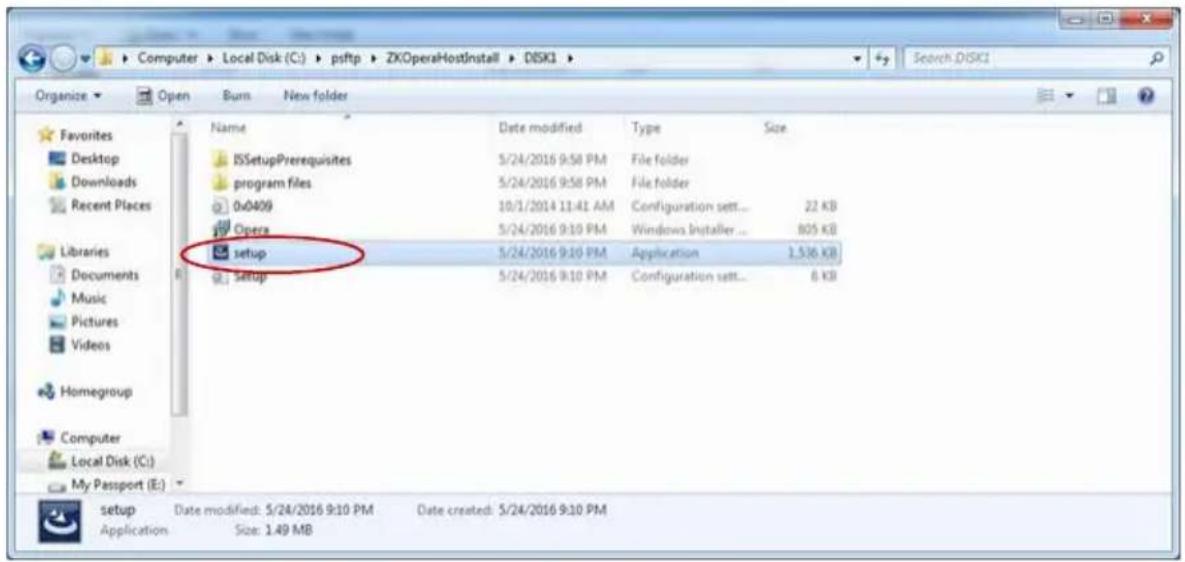
Extract the ZKOperaHostInstall zip file and run setup from ZKOperaHostInstall-\DISK1 folder.
text_image
Computer > Local Disk (C:) > psftp > ZKOperaHostInstall > D5K1 > Organize Open Burn New folder Favorites Desktop Downloads Recent Places Libraries Documents Music Pictures Videos Homegroup Computer Local Disk (C:) My Passport (E:) Name Data modified Type Size ISSetupPrerequisites 5/24/2016 9:58 PM File folder program files 5/24/2016 9:58 PM File folder 0x0409 10/1/2014 11:41 AM Buslntalier... 22 KB Opera 5/24/2016 9:10 PM Windows Installer... 805 KB setup 5/24/2016 9:10 PM Application 1.536 KB Setup 5/24/2016 9:10 PM Configuration sett... 6 KB setup Date modified: 5/24/2016 9:10 PM Date created: 5/24/2016 9:10 PM Application Size: 1.49 MBThe installation is currently simple and self-explanatory.
When asked to choose a platform, select Lenel for a Lenel integration.
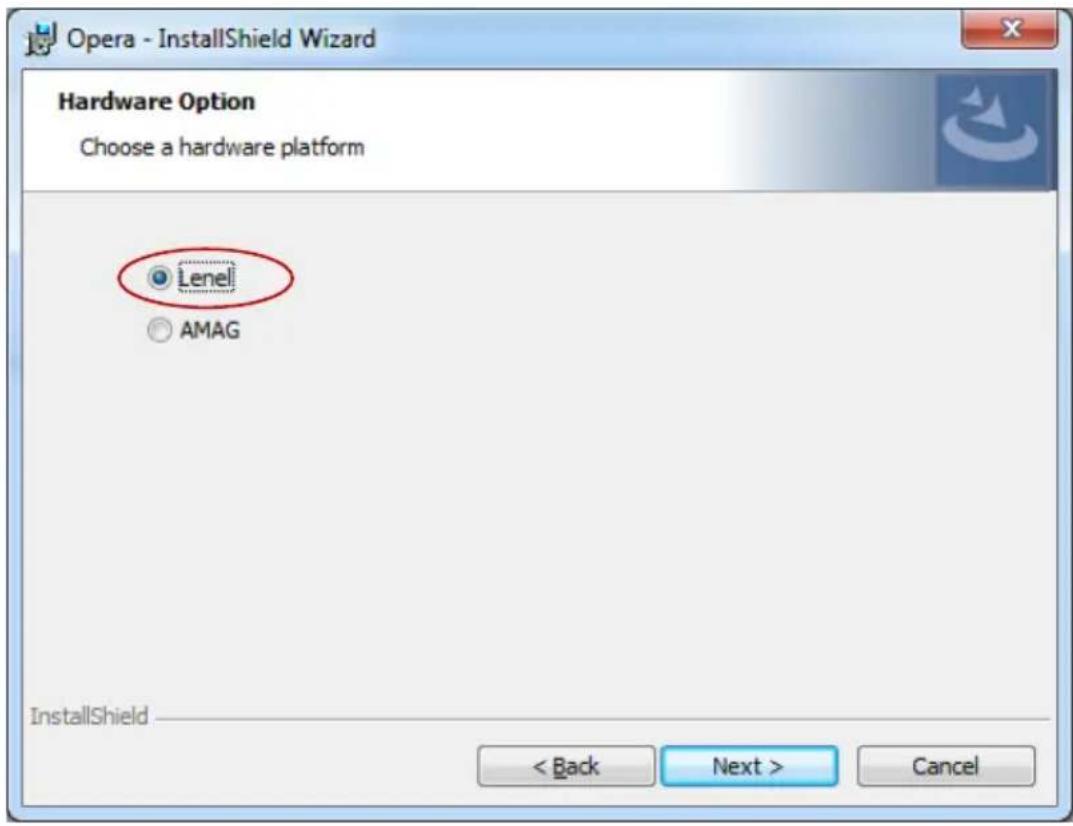
text_image
Opera - InstallShield Wizard Hardware Option Choose a hardware platform Lenel AMAG InstallShield < Back Next > Cancel4.2 Basic Lenel OnGuard Configuration
All OnGuard related configuration is for OnGuard DataCondulT support and is not specific to Opera at all. DataCondulT is the OnGuard feature which allows 3rd party applications, such as the ZK Opera Service, to integrate with OnGuard via the Windows Management Instrumentation (WMI) interface.
Chapter 2, Getting Started, of the The OnGuard DataConduIT User Guide should be read and understood. The following notes review the main points.
OnGuard DataCondulT is installed as part of a standard OnGuard server installation.
DataCondulT must be installed on the same machine as the OnGuard Linkage Server if you want to receive events through DataCondulT. As covered earlier, it is simplest to have DataCondulT, the OnGuard Linkage Server, and the ZK Opera Service all installed and running on the main OnGuard server machine.
DataConduIT is a licensed OnGuard feature.
When a client such as the ZK Opera Service makes a call into DataCondulT, the first thing DataCondulT does is decide whether the client is permitted to perform the operation. To do this, DataCondulT checks which Windows account has made the DataCondulT call. This is the account that the ZK Opera Service is configured to run under. Once DataCondulT retrieves this account, it attempts to perform automatic single sign-on (SSO) using this account. This is the same SSO mechanism used by all OnGuard applications. If the SSO succeeds, then the ZK Opera Service is logged on to the system as the appropriate OnGuard user. DataCondulT then uses the OnGuard user information to decide whether the client has permission to perform the requested operation.
It is not possible to use OnGuard internal authentication with DataConduIT. Automatic SSO is the only authentication mechanism. Therefore, to use DataConduIT, single sign-on must be configured.
To configure single sign-on in OnGuard:
-
Add the directory that you wish to use. (For more information please refer to "Add a Directory" in the Directories Folder chapter of the OnGuard System Administration User Guide.)
-
Link the user account that you want to use automatic single sign-on to a directory account. (For more information please refer to "Link a User Account to a Directory Account" in the Users Folder chapter of the OnGuard System Administration User Guide.)
Each OnGuard software manual contains the "Log into the Application Using Single Sign-On" procedure. Refer to this procedure to log into OnGuard after single sign-on has been configured.
For a user to be able to use DataCondulT, the user must have the DataCondulT service user permission. This permission may be set on the Software Options sub-tab of the System Permission Groups form in the Users folder in System Administration. All functionality available through DataCondulT is controlled by the same permissions that you are already using to manage data in ID CredentialCenter. The ZK Opera Service requires permissions to view and search Cardholders and Badges and to log DataCondulT events.
As covered above, make sure you have an OnGuard user that has a Directory Account for single sign on and has permissions for DataConduIT:

text_image
System Administration - System Accounts - [Share] Application Edit View Administration Access Control Monitoring Window Help Users Search System Permission Groups Cashholder Permission Groups Monitor Permission Groups Report Permission Groups Roll-Page Permission Groups Name Systems Cashholder Monitor Report Field/Page ID Info Administrator, Administrator Systems Admin Cashholder Admin Monitor AdminThis is the same Directory Account (windows account) that must be configured to run the ZK Opera Service.

text_image
ZK Opera Properties (Local Computer) General Log On Recovery Dependencies Log on as: ● Local System account □ Allow service to interact with desktop ● This account: .\Ken Browse... Password: Boradilla Confirm password: Boradilla Help me configure user account log on options. OK Cancel ApplyThe LS DataConduIT service must also be configured to run under the same account.
In the OnGuard System Administration application, in the Administration \ System Options page, make sure that Generate software events is checked and make sure that the host name of the Linkage Server is configured. It is simplest to run the Linkage Server on the same machine as the main OnGuard server machine.

text_image
System Administration - System Account - System Options Application Edit View Administration Access Control Monitoring Value Additional Hardware Logical Access Window Help Log on authorization warning Rules Text Password options Inferior string passwords Download Security Generate defaults errors FPS risks Enable FPS risks controls or options Configuration Download Service host Message Broker Service host KES CELL-PC Message Broker Service host KES CELL-PC Message Broker Service host Message Broker Service host Message Broker Service host Message Broker Service host Message Broker Service host Message Broker Service host Message Broker Service host Message Broker Service host Message Broker Service host Message Broker Service host Message Broker Service host Message Broker Service host Message Broker Service host Message Broker Service host Message Broker Service host Message Broker Service host Message Broker Service host Message Broker Service host Message Broker Service host Message Broker Service host Message Broker Service Host Message Broker Service Host Message Broker Service Host Message Broker Service Host Message Broker Service Host Message Broker Service Host Message Broker Service Host Message Broker Service Host Message Broker Service Host Message Broker Service Host Message Broker Service Host Message Broker Service Host Message Broker Service Host Message Broker Service Host Message Broker Service Host Message Broker Service Host Message Broker Service Host Message Broker Service Host Message Broker Service Host Message Broker Service Host Message Broker Service Hosp Message Broker Service Host Message Broker Service Host Message Broker Service Host Message Broker Service Host Message Broker Service Host Message Broker Service Host Message Broker Service Host Message Broker Service Host Message Broker Service Host Message Broker Service Host Message Broker Service Host Message Broker Service Host Message Broker Service Host Message Broker Service Host Message Broker Service Host Message Broker Service Host Message Broker Service Host Message Broker Service Host Message Broker Service Host Message Broker Service HCCS CELL-PC Message Broker Service HostMake sure that the LS DataConduit and LS Linkage Server OnGuard services are running.

text_image
Services File Action View Help Services (Local) Services (Local) LS DataConduit Service Stop the service Rebust the service Description The DataConduit Service is a platform for integrating with IT systems, providing access to ID management data, access control events, and real-time notification when changes are made to cardholders and their credentials. Name Description Status Startup TypeLoad On As LS Client Update Server The Client... Manual Local System... LS Communication Server The Comm... Manual Local System... LS Config Downloaded Service This service... Manual Local System... LS DataConduit Message Queue Serv:The LS Data Manual Local System... LS DataConduit Service The DataCo... Started Automatic Ken LS DataExchange Server The DataExc... Started Manual Local System... LS Global Output Server The Global... Manual Local System... LS ID Allocation The ID Alloc... Manual Local System... LS License Server The License... Started Automatic Local System... LS Linkage Server The Linkage... Started Automatic Local System... LS Login Driver The Login D... Started Automatic Local System... LS Message Broker Provides m... Started Automatic Local System... LS PTZ Tour Server LPTZ Tour... Manual Local System... LS Replicator Ruplicator is... Manual Local System... LS Site Publication Server This service... Manual Local System... LS Video Archive Server The Video A... Manual Local System... State Center Extension Service Show Mod... Download Local Service Extended Standard /4.3 OnGuard Configuration Necessary to Receive Opera Events in OnGuard
In OnGuard System Administration, go to the Additional Hardware \ DataCondulT Sources page and create a DataCondulT source called Opera. It is important that Opera is the Name given. DataCondulT is based on names.
OP200 Quick Start Guide

text_image
System Administration - System Account - [DataConduit Sources] Application Edit View Administration Access Control Monitoring Video Additional Hardware Logical Access Window Help DataConduit T Sources DataConduit T Devices DataConduit T Sub-Devices Name Digital Open Open Status: Status Online Buildtime: prior: GMT 06.00 (Existing Time: US$ Canada) Daylight exerings Add Modify Delete Help Multiple Selection Close Cashholders Readers and Deses Case Formats DataConduit Sources Assets Configuration System Options Users Ready CASH NUM INFO.CNA DataCondulT Device can be created underneath the Opera source for each OP-200 in the system. The names given must match the name of each OP-200 Opera Reader in the Opera system. This step is optional, but will allow the Device attribute to be filled in for the events logged into OnGuard.
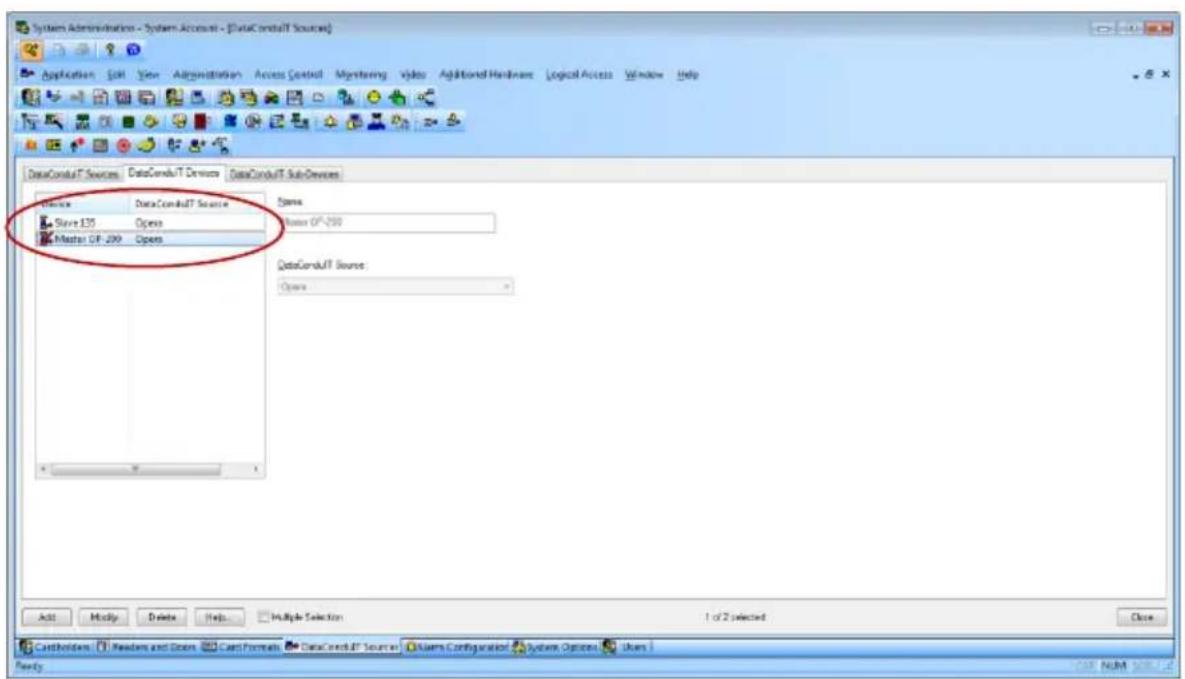
text_image
System Administration - System Account - [DataConduit Sources] Application Edit View Appropriation Access Control Monitoring Video Additional Hardware Logical Access Window Help DataConduit T Sources DataConduit T Devices DataConduit Sub-Devices Device DataConduit T Source Slave E35 Open Master GF 299 Open Name Master GF 299 DataConduit Source Open Add Modify Delete Help Multiple Selection Close Cashholders Readers and Doors Cart Formats DataConduit T Sources Users Configuration Systems Options Users Ready NUM
text_image
ZKAccess 192160.201.134 8055/#module=dev&de-Type=3D_CONTROLLER git stash with eclipse admin [Sign Out] [Help] ZKT200 Home Monitoring Access Control Configuration Administration Opera Readers Name Model Address Master OP-200 OP200 Slave 135 OP200 02/02/2016 17:43 [About]4.4 ZK Opera Service Configuration
The ZK Opera Service configuration tool is used to specify the Host and Port of the master OP-200 to communicate with. This can also be used to configure credentials to communicate with a remote DataConduIT. However, it is simplest if OnGuard DataConduIT and Opera are installed on the same machine.
Run the configuration app to set the IP address and port of the master OP-200. This information is stored in the Windows registry where the ZK Opera Service will read it. As such, the configuration app needs to run as administrator or as another account with registry write permission.
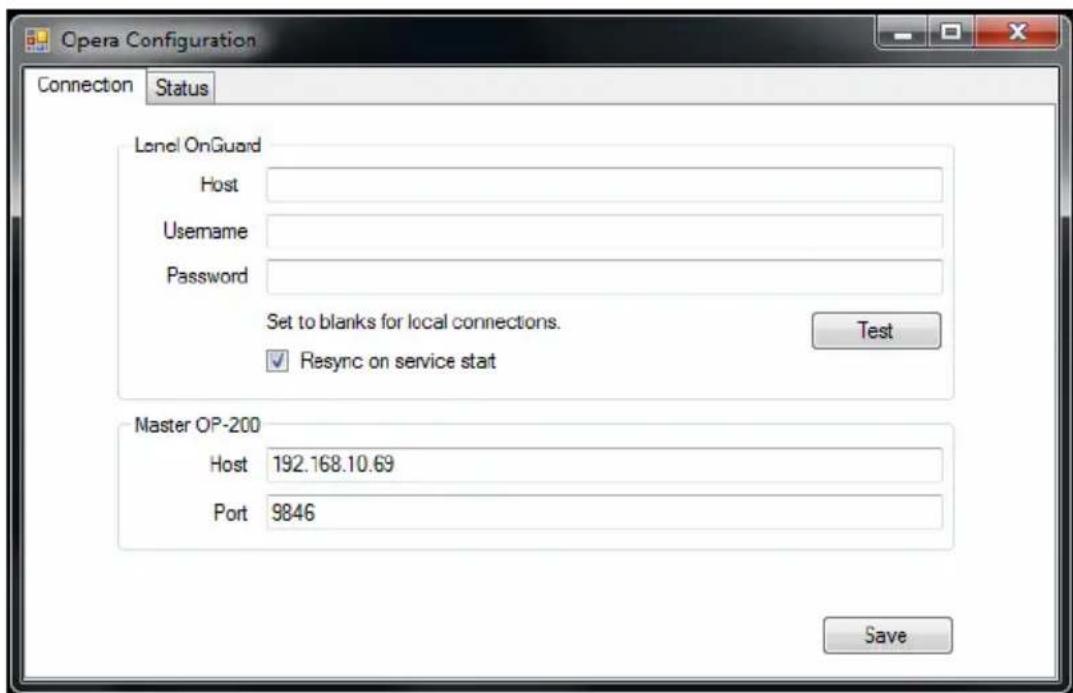
text_image
Opera Configuration Connection Status Level OnGuard Host Username Password Set to blanks for local connections. Test ✓ Resync on service start Master OP-200 Host 192.168.10.69 Port 9846 SaveThe Lenel OnGuard credentials can be left blank for a setup where the ZK Opera Service and OnGuard DataConduIT are on the same machine. In this case, the Test button will only work if the configuration app is being run under
a Windows Account with SSO capability to Lenel OnGuard and with DataConduIT authority.
When Resync on service start is checked, the service will do a full re-sync with the OnGuard database every time it starts up. This can be checked to ensure full synchronization if the ZK Opera Service is ever down when OnGuard changes are made. This can be turned off for faster startup, a manual resync request is also supported.
4.5 ZK Opera Service
Future versions of the installer may collect this information and automatically set it up, but currently the ZK Opera Service must be manually configured for the account that it will run under.
Configure the ZK Opera Service to run under the Windows account setup for SSO with OnGuard and DataConduIT from the OnGuard section above.

text_image
ZK Opera Properties (Local Computer) General Log On Recovery Dependencies Log on as: ○ Local System account □ Allow service to interact with desktop ● This account: .\Ken Browse... Password: Borussia Confirm password: Borussia Help me configure user account log on options. OK Cancel ApplyFuture versions of the installer may also automatically set this up, but please ensure that the service is configured to be restarted on all failures and restarts after 1 minute.
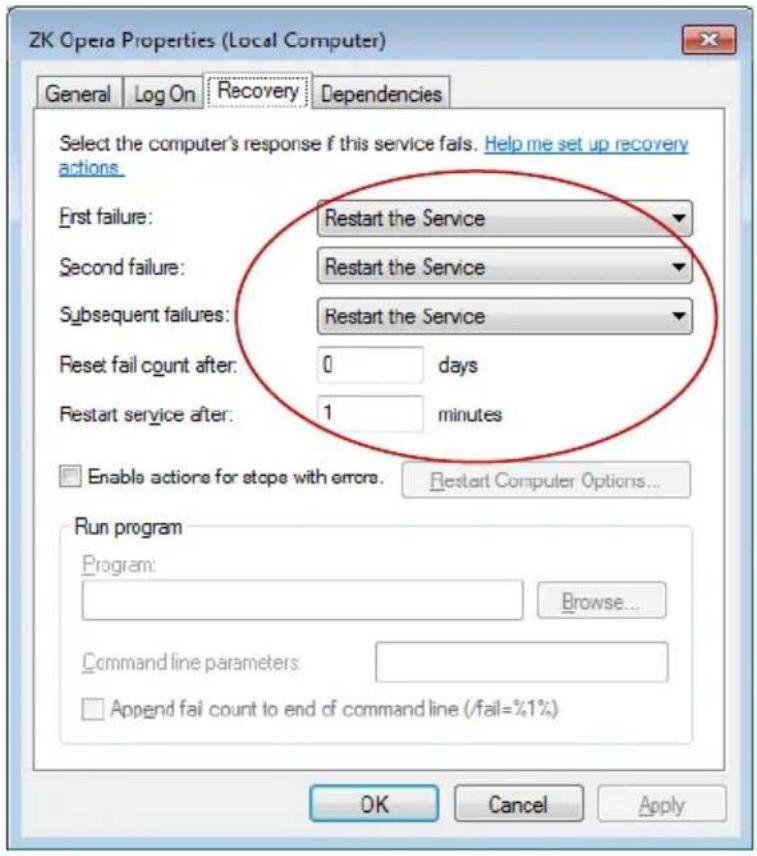
text_image
ZK Opera Properties (Local Computer) General Log On Recovery Dependencies Select the computer's response if this service fails. Help me set up recovery actions. First failure: Restart the Service Second failure: Restart the Service Subsequent failures: Restart the Service Reset fail count after: 0 days Restart service after: 1 minutes Enable actions for stop with errors. Restart Computer Options... Run program Program: Browse... Command line parameters: Append fail count to end of command line (/fail=%1%) OK Cancel ApplyThe service may then be started.
4.6 Troubleshooting

text_image
Opera Configuration Connection Status Service Started Service Connection Online Service Resync Idle Master OP-200 Online Resync NowThe Opera Configuration application also has a Status tab which shows:
The status of the ZK Opera Service (Started, stopped, etc.
Whether the configuration application is able to communicate with that service for additional status and actions
Whether a "Resync" between the OnGuard data and the service's data is in progress, and the ability to initiate a manual sync.
Whether the Master OP-200 is Online or Offline
Things are working properly if Active Badges from OnGuard show up as Credentials on the OP200. Also, if an unknown badge is swiped or an unknown finger is presented at the OP2000, a transaction will be logged through DataCondulT into OnGuard alarm monitoring.
For troubleshooting, there are two things to look at. The first is to make sure that the ZK Opera Service on the OnGuard Server machine is able to connect to OnGuard DataConduIT.
First make sure that the ZK Opera Service is running according to the previous instructions in this document.
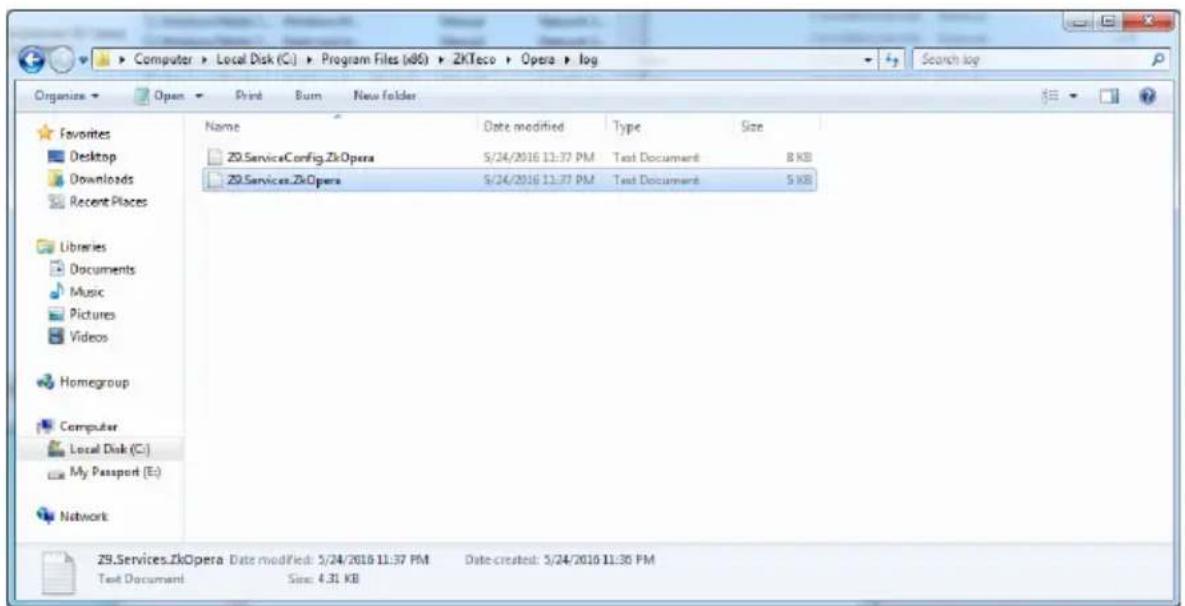
The log file Z9.Services.ZkOpera in C:\Program Files(x86)\ZKTeco\Opera\Log can be viewed.
text_image
Computer > Local Disk (C:) > Program Files (*.DS) > ZKTeco > Opera > log Organize > Open > Print Burn New folder Favorites Desktop Downloads Recent Places Libraries Documents Music Pictures Videos Homegroup Computer Local Disk (C:) My Passport (E:) Network Name Date modified Type Size ZKServiceConfig.ZkOpera 5/24/2016 11:37 PM Test Document 8 KB ZKServices.ZkOpera 5/24/2016 11:37 PM Test Document 5 KB ZKServices.ZkOpera Date modified: 5/24/2016 11:37 PM Date-created: 5/24/2016 11:30 PM Text Document Size: 4.31 KBAs part of its startup, the ZK Opera Service will connect to OnGuard DatacondulT to register for SoftwareEvents and to sync up all active badges (assuming resync on service start is configured). If proper connection has been
made, logging similar to the following is logged indicating a good connection:
015-12-17 09:54:02,193 [5] INFO Z9.Drivers.Lenel.OnGuardDriver Registering for SoftwareEvents in OnGuard...
2015-12-17 09:54:30,201 [5] INFO Z9.Drivers.Lenel.OnGuardDriver SoftwareEvents registered
2015-12-17 09:54:30,210 [5] INFO Z9.Drivers.Lenel.OnGuardDriver Initial sync of Creds From OnGuard...
2015-12-17 09:54:30,210 [5] INFO Z9.Drivers.Lenel.OnGuardDriver Removing Creds from middleware that are no longer in OnGuard...
2015-12-17 09:54:30,221 [5] INFO Z9.Drivers.Lenel.OnGuardDriver Queried a page of middleware Creds, count=0
2015-12-17 09:54:30,221 [5] INFO Z9.Drivers.Lenel.OnGuardDriver Removed 0 of 0 Creds from middleware
2015-12-17 09:54:30,221 [5] INFO Z9.Drivers.Lenel.OnGuardDriver Adding and Updating Creds from OnGuard...
2015-12-17 09:54:30,485 [5] INFO Z9.Drivers.Lenel.OnGuardDriver OnGuard Collection.Count: 997
2016-01-14 09:40:04,077 [5] INFO Z9.Drivers.Lenel.OnGuardDriver Done adding and updating 997 Creds from OnGuard. No change for 0 Creds
2016-01-14 09:40:04,077 [5] INFO Z9.Drivers.Lenel.OnGuardDriver Done with initial sync of Creds From OnGuard.
Otherwise, if errors logged, there is a problem connecting to OnGuard DataConduIT. Check the earlier steps in this document to set things up properly.
If the Master OP-200 is not online, check that the IP Address and Port for the master OP200 are properly configured. Make sure there is connectivity between the ZK Opera Service machine and the master OP200 machine. Make sure the port is not blocked.
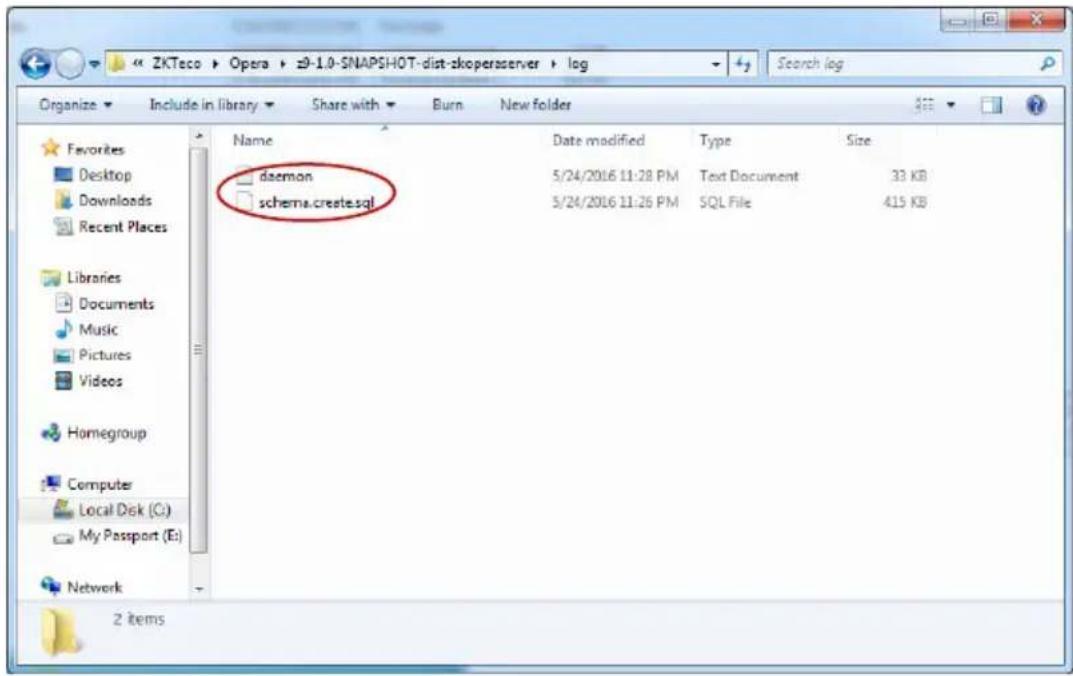
There is also a log file relating to the connection between the ZK Opera
Service and the master OP200 that can be viewed for troubleshooting purposes. It is the daemon.log in C:\Program Files(x86)\ZKTeco\Opera\v9-1.0-SNAPSHOT-dist-zkoperaserver\log

text_image
Local Disk (C:) > Program Files (x86) > 2KTeco > Opera > 3-10-SNAPSHOT-dist-zkoperaserver > log Organize Open Print Burn New Folder Favorites Desktop Downloads Recent Places Libraries Documents Music Pictures Videos Homegroup Computer Local Disk (C:) My Passport (E:) Network Name Data modified Type Size daemon 5/24/2016 11:37 PM Text Document 20 KB schema.create.sql 5/24/2016 11:37 PM SQL File 415 KB daemon Date modified: 5/24/2016 11:37 PM Date created: 5/24/2016 11:30 PM Test Document Size: 19.8 KBMake sure it is really trying to connect to the OP-200 at the address and port that you think it should be as in this example setup, where a master OP200 is at address 192.168.201.222 and listens for connections on port 9846 :
5 Amag-Symmetry Configuration
5.1 Overview
The ZK Opera Service is a Windows Service which communicates with access control systems in order to synchronize personnel and card records from those systems to Opera Personnel records on the master OP-200 Opera Reader. Support exists for Amag Symmetry as well as other Access Control systems. There is a common installation and service handling all systems, with the system selection (such as Amag) happening at installation time.
This document describes setup and configuration of this service to communicate with Amag Symmetry. It communicates using Amag's Data Connect feature in order to synchronize personnel records between Symmetry and Opera.
There is also a ZK Opera Service configuration tool which is used to specify the Host and Port of the master OP-200 to communicate with. This is also used to configure the host and credentials to communicate with Symmetry via Data Connect.
The ZK Opera Service can be installed on the Amag Server or on a separate Windows machine. Through Data Connect, the service will communicate directly with a SQL Server database on the Amag Server through either Windows authentication (SSI) or SQL authentication.
5.2 ZK Opera Service Installation
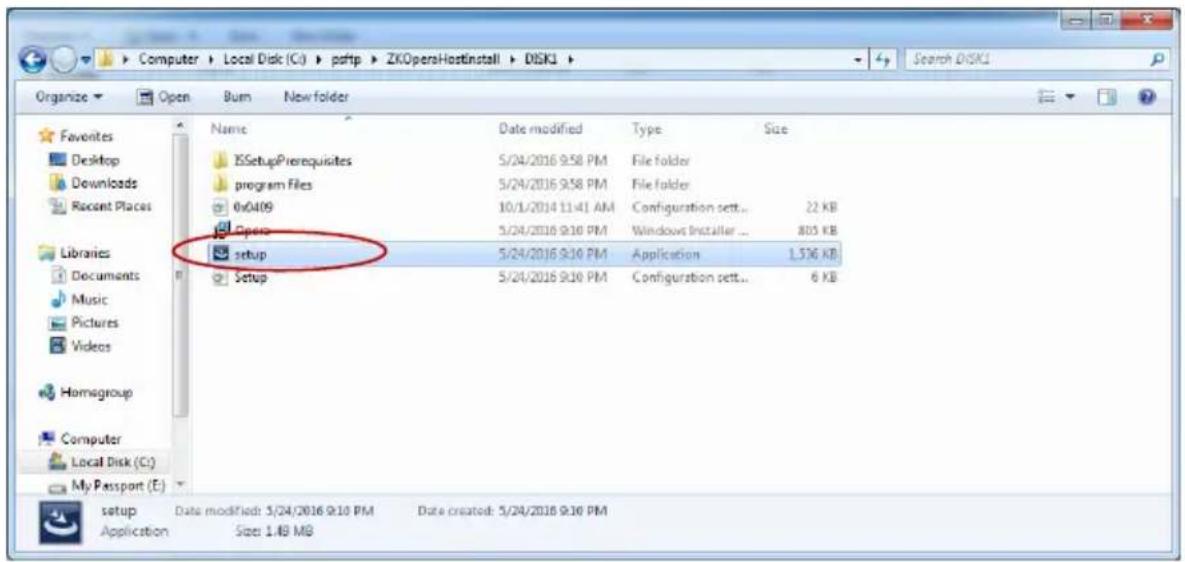
Extract the ZKOperaHostInstall zip file and run setup from ZKOperaHostInstall\DISK1 folder.
text_image
Computer > Local Disk (C:) > p4ftp > ZKOpensHostInstall > DISK1 Organize ▼ Open Burn New folder Favorites Desktop Downloads Recent Places Libraries Documents Music Pictures Videos Homagroup Computer Local Disk (C:) My Passport (E) setup Setup modified: 5/24/2016 9:10 PM Date created: 5/24/2018 9:10 PM Application Size: 1.48 MBThe installation is currently simple and self-explanatory.
When asked to choose a platform, select AMAG for an Amag integration

text_image
Opera - InstallShield Wizard Hardware Option Choose a hardware platform ○ Lenel ● AMAG InstallShield < Back Next > Cancel5.3 Basic Amag Symmetry Configuration
All Amag Symmetry related configuration is for Amag DataConnect support and is not specific to Opera. Data Connect is the Amag Symmetry feature which allows 3rd party applications, such as the Opera Service, to integrate
with Amag via its SQL Server database.
The Amag Data Connect Manual (9600-0458) should be reviewed.
5.3.1 Data Connect License
A separate Data Connect Module license from Amag is required for Data Connect support. This license must be acquired and installed on the Amag server.
5.3.2 Amag SQL Server configuration
Access to multiMaxExport database
Data Connect for Cardholders in Amag works by exporting cardholder data and changes (adds, modifies, deletes) from Amag to an export database within the Amag SQL Server. 3rd Party applications such as Opera will then read records from this database to perform the synchronization.
The administrator must choose and configure credentials (ether a Windows account or a SQL Server username and password) to use for the 3rd Party Data Connect applications to connect to the Amag multiMAXExport database and have read and write authority to the DataExportTable table within that database. This must be configured within the Amag SQL Server database using a tool such as SQL Server Management Studio. Contact Amag support for assistance. As part of the ZK Opera Service configuration, these credentials will be made known to Opera to use.
Note that Amag support has indicated that the 3rd Party Data Connect application is responsible for deleting rows from the DataExportTable once they are processed so that the table does not grow unbounded. Thus, the ZK Opera Service does this. Note, however, that this implies that only a single 3rd Party Data Connect application can integrate with a given Amag system for cardholder export.
5.3.3 Symmetry Unique Employee Reference
3rd Party applications such as Opera need a unique identifier for a cardholder record within Amag Symmetry so that when a record is modified or deleted, it can be mapped to the corresponding record that was created in Opera.
After discussion with Amag, the only possible reliable unique identifier in the Amag Symmetry system that is available to 3rd party applications is the
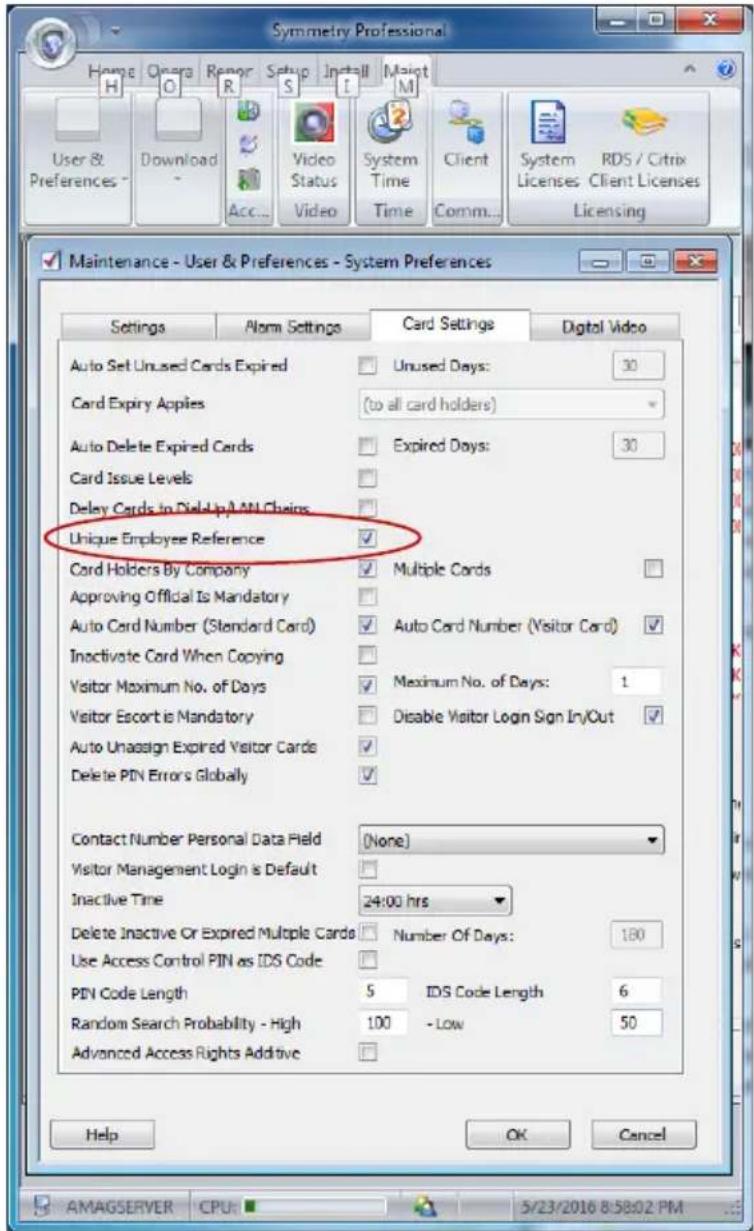
Cardholder Employee Reference. However, this is only a unique identifier if Symmetry is configured to have a Unique Employee Reference. By default this is not enforced. This must be configured for proper operation. This can be configured by selecting System Preferences from the Symmetry Maintenance screen. Under Card Settings, check Unique Employee Reference and hit OK.
text_image
Symmetry Professional Home Opora Report Setup Install Moist User & Downloads Download Video Status System Time Client System RDS / Citrix Preferences Acc... Video Status Time Comm... Licenses Client Licenses Licensing Maintenance - User & Preferences - System Preferences Settings Atom Settings Card Settings Digital Video Auto Set Unused Cards Expired Unused Days: 30 Card Expiry Applies (to all card holders) Auto Delete Expired Cards Expired Days: 30 Card Issue Levels Delay Cards to Die-Up AN Chains Unique Employee Reference ✓ Cord Holders By Company Multiple Cards Approving Official Is Mandatory Auto Card Number (Standard Card) Auto Card Number (Visitor Card) Inactivate Cord When Copying Visitor Maximum No. of Days Maximum No. of Days: 1 Visitor Escort is Mandatory Disable Visitor Login Sign In/Out ✓ Auto Unassign Expired Visitor Cards ✓ Delete PIN Errors Globally ✓ Contact Number Personal Data Field (None) Visitor Management Login is Default Inactive Time 24:00 hrs Delete Inactive Or Expired Multiple Cards Number Of Days: 100 Use Access Control PIN as IDS Code PIN Code Length 5 IDS Code Length 6 Random Search Probability - High 100 - Low 50 Advanced Access Rights Additive ✓ Help OK Cancel AMAGSERVER CPU 5/23/2016 8:58:02 PMThis will cause Amag to enforce that every cardholder must given a unique Employee Reference value.
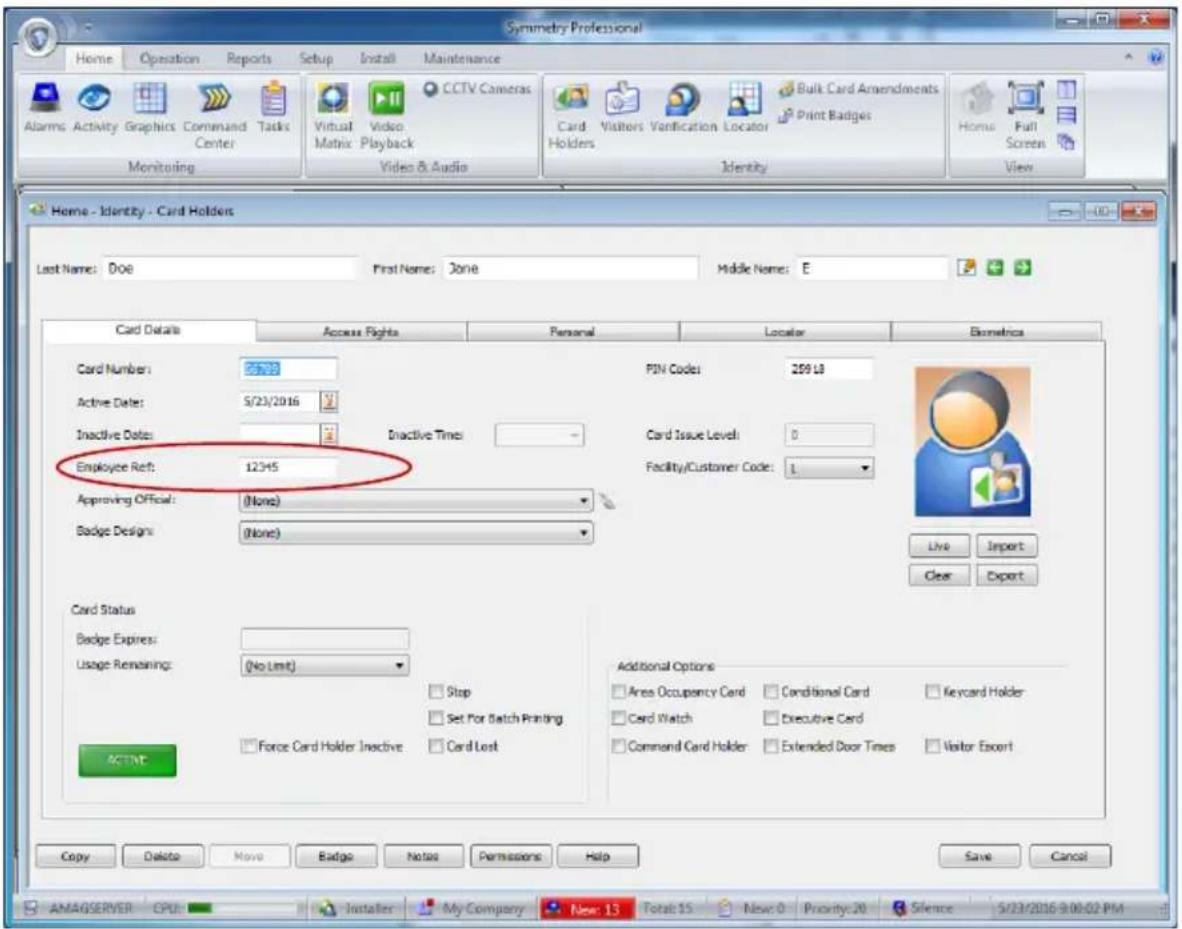
NOTE: Amag Symmetry will not allow a unique employee reference to be configured if any cardholders already exist in the system. Contact Amag support for assistance.
text_image
Symmetry Professional Home Operations Reports Setup Install Maintenance Alarms Activity Graphics Command Tasks Monitoring Virtual Video CCTV Cameras Virtual Matrix: Playback Video & Audio Card Holders Visitors Verification Locator Bulk Card Amendments Print Badges Identity Home Full Screen View Home - Identity - Card Holders Last Name: Doe First Name: Jone Middle Name: E Card Details Access Rights Personal Locator Biometrics Card Number: 05739 Active Dates: 5/23/2016 Inactive Dates: Inactive Times Employee Reft: 12345 Approving Official: (None) Badge Design: (None) PIN Codei: 259 L8 Card Issue Leveli: 0 Facility/Customer Codei: 1 Live Import Clear Export Card Status Badge Expires: Usage Remaining: (No Limit) Stop Set For Batch Printing Force Card Holder Inactive Card Lost Additional Options Area Occupancy Card Conditional Card Keycard Holder Card Watch Executive Card Command Card Holder Extended Door Times Visitor Escort ACTIVE Copy Delete Move Badge Notes Permissions Help Save Cancel AMAGSERVER CPU: Installer My Company New: 13 Total: 15 New: 0 Priority: 20 Silence 5/23/2016 9:00:02 PM5.3.4 Data Export Configuration
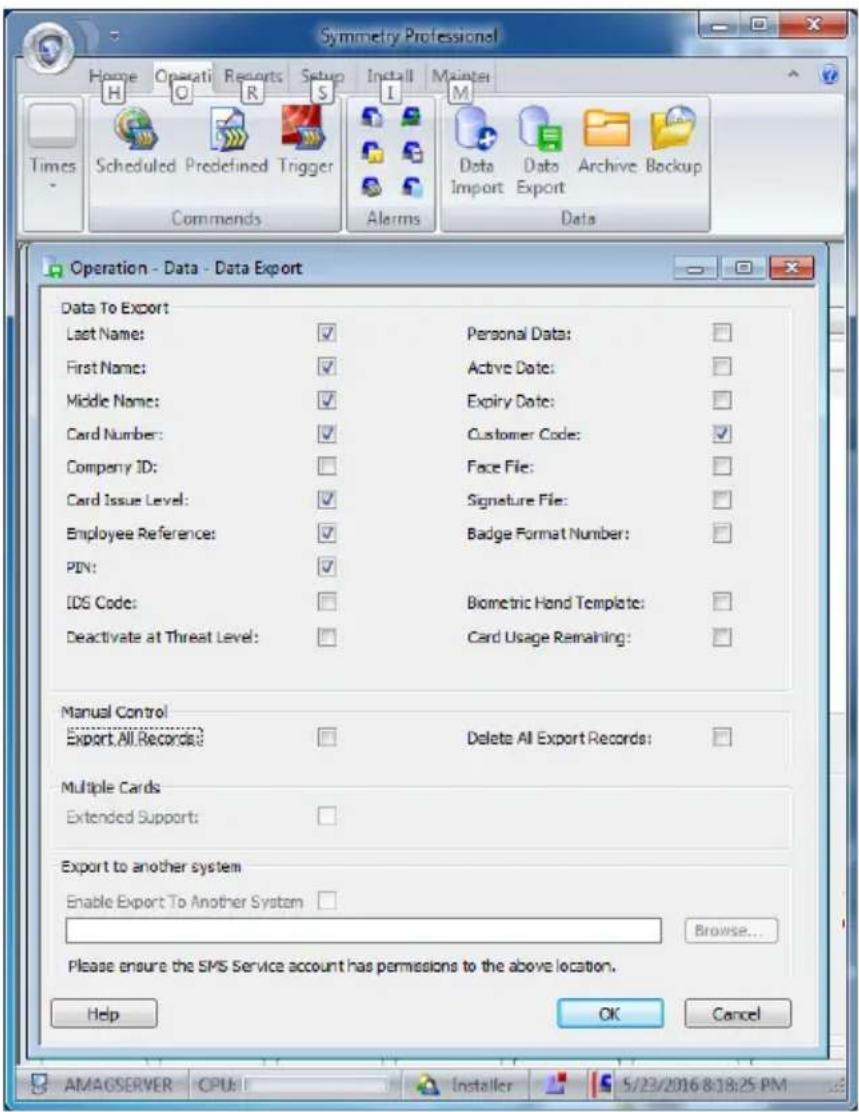
From the Symmetry Operation tab, Data Export is selected to configure the specifics of cardholder data export. Opera requires that the following fields be exported: Last Name, First Name. Middle Name, Card Number, Card Issue Level, Employee Reference, PIN, and Customer Code. Make sure that these fields are checked on the Data Export screen and hit the OK button. Other fields can be unchecked for efficiency.
text_image
Symmetry Professional Home Operating Reports Setup Install Mainte Times Scheduled Predefined Trigger Data Archive Backup Commends Alarms Import Export Operation - Data - Data Export Data To Export Last Name: ✓ Personal Data: First Name: ✓ Active Date: Middle Name: ✓ Expiry Date: Card Number: ✓ Customer Code: ✓ Company ID: Card Issue Level: ✓ Signature File: Employee Reference: ✓ Badge Format Number: PIN: ✓ IDS Code: Deactivate at Threat Level: Manual Control Export All Records: Delete All Export Records: Multiple Cards Extended Support: Export to another system Enable Export To Another System Browse... Please ensure the SMS Service account has permissions to the above location. Help OK Cancel AMAGSERVER CPU Installer 5/23/2016 8:18:25 PM5.3.5 Initial Export
When the Opera system is first brought online with an existing Amag system, Export All Records on the Export screen should be checked and the OK button pressed. This will cause an add record to be written to the export database for each existing Cardholder so that the ZK Opera Service may synchronize the initial set of cardholders in the system.
Export All Records can also be done at any time to ensure that Opera has all of the latest credentials from the Symmetry system. Since the Data Connect export database acts as a persistent queue with records existing until Opera processes them, this should generally only be needed in cases of losing Opera databases or when a problem with the Amag database is encountered and fixed.
5.3.6 ZK Opera Service Configuration
The ZK Opera Service configuration tool is used to specify the Host and Port of
the master OP-200 to communicate with. Run the configuration app to set the IP address and port of the master OP-200. This information is stored in the Windows registry where the ZK Opera Service will read it. As such, the configuration app needs to run as administrator or as another account with registry write permission.
The Service configuration tool is also used to configure the connection to the Symmetry database for Data Connect. This includes the host name or address of the Symmetry server as well as the credentials to use to connect to the database.
For Host, enter the hostname or IP address of the Symmetry server. If the ZK Opera Service is running on the same machine as the Symmetry server, localhost can be entered.
If Windows Authentication (SSI) has been setup for access to the multiMAXExport table on the Symmetry SQL Database, check the UseSSI checkbox.

text_image
Opera Configuration Connection Status AMAG Host localhost Username Password ✓ UseSSI Test Master OP-200 Host 192.168.201.134 Port 9846 SaveIn this case, the ZK Opera Service must run as the Windows Account that was given authority for read and write access to DataExportTable within the Amag multiMAXExport database.
text_image
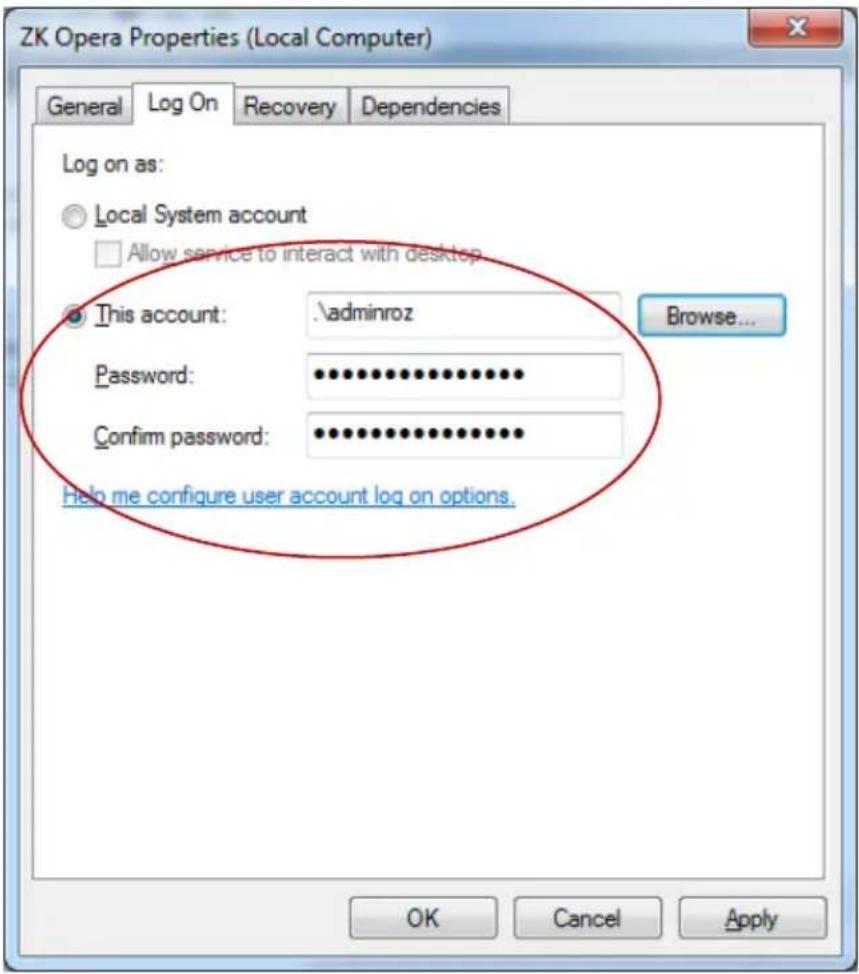
ZK Opera Properties (Local Computer) General Log On Recovery Dependencies Log on as: ○ Local System account □ Allow service to interact with desktop ● This account: .\adminroz Browse... Password: *.*.*.*.*.*.* Confirm password: *.*.*.*.*.*.* Help me configure user account log on options. OK Cancel ApplyThe Test button in the Configuration tool can be used to test the connection. However, this will only work with SSI if the windows account running the Configuration tool has been given access to the DataExportTable within the Amag multiMAXExport database.
Alternatively, if a SQL account has been created for access in the Amag Symmetry database, uncheck UseSSI and enter the proper Username and Password to match the Symmetry SQL Server configuration.

text_image
Opera Configuration Connection Status AMAG Host AMAGSERVER Username dataconnectuser Password ***** UseSSI Test Master OP-200 Host 192.168.201.134 Port 9846 SaveThe Test button in the Configuration tool can be used to test the connection
5.4 ZK Opera Service
Future versions of the installer may collect this information and automatically set it up, but currently the ZK Opera Service must be manually configured for the account that it will run under.
If SSI is to be used to connect to the Amag Symmetry database (see the above section on Symmetry Configuration), configure the ZK Opera Service to run under appropriate Windows Account.

text_image
ZK Opera Properties (Local Computer) General Log On Recovery Dependencies Log on as: ○ Local System account □ Allow service to interact with desktop ● This account: \adminroz Browse... Password: ************ Confirm password: ************ Help me configure user account log on options. OK Cancel ApplyOtherwise, the Local System account default is fine.
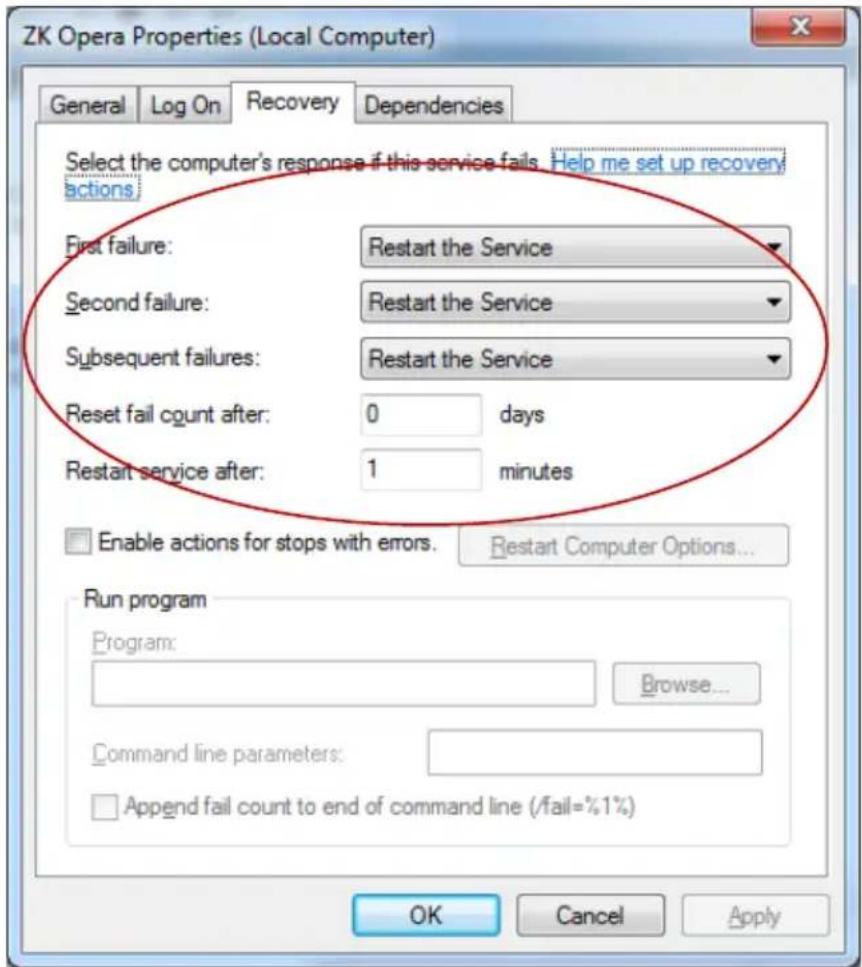
Future versions of the installer may also automatically set this up, but please ensure that the service is configured to be restarted on all failures and restarts after 1 minute.
text_image
ZK Opera Properties (Local Computer) General Log On Recovery Dependencies Select the computer's response if this service fails. Help me set up recovery actions. First failure: Restart the Service Second failure: Restart the Service Subsequent failures: Restart the Service Reset fail count after: 0 days Restart service after: 1 minutes Enable actions for stops with errors. Restart Computer Options... Run program Program: Browse... Command line parameters: Append fail count to end of command line (/fail=%1%) OK Cancel ApplyThe service may then be started.
5.5 Troubleshooting
text_image
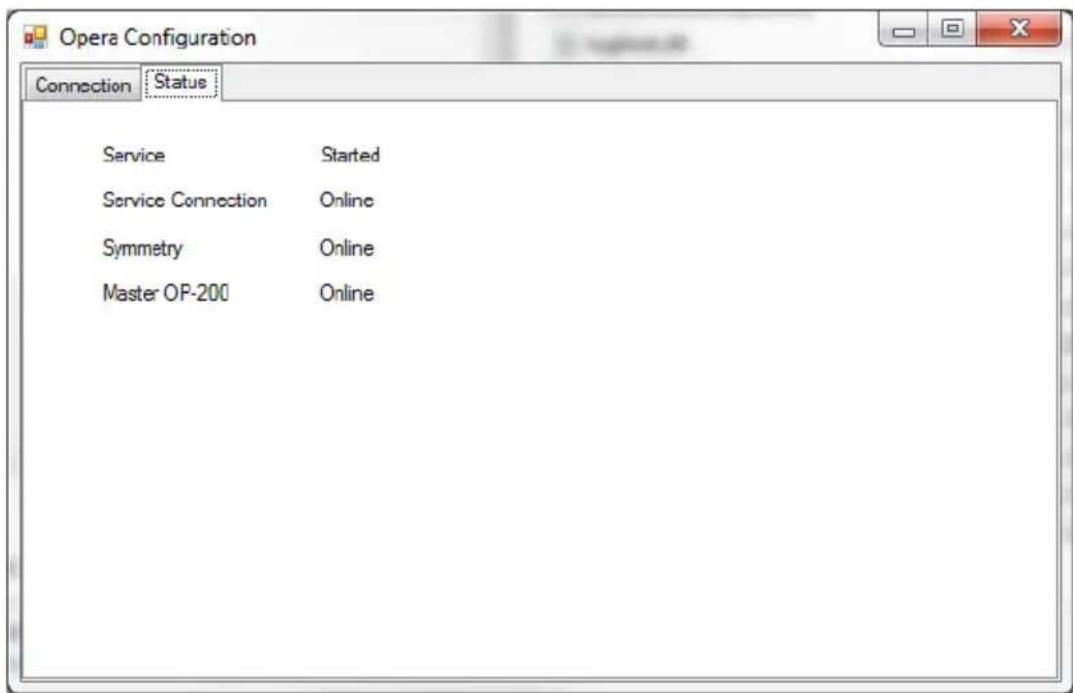
Opera Configuration Connection Status Service Started Service Connection Online Symmetry Online Master OP-200 OnlineThe Opera Configuration application also has a Status tab which for Amag integrations shows:
The status of the ZK Opera Service (Started, stopped, etc.)
Whether the configuration application is able to communicate with that service for additional status and actions
Whether the service application has a good active connection to the Symmetry system (to the Symmetry SQL database).
Whether the Master OP-200 is Online or Offline
Things are working properly if Active Badges from Symmetry show up as Credentials on the OP200.
Make sure that the ZK Opera Service is running according to the previous instructions in this document. Note the Service (should be "Started") and Service Connection (should be "Online") status in the Configuration tool.
Make sure that the ZK Opera Service is able to connect to the Symmetry database. Note the Symmetry status (should be "Online") in the Configuration tool. If the connection is not being made, check the credentials configured for AMAG on the connection screen of the configuration tool. Also check the Symmetry system itself (contact Amag support for help with Symmetry).
If the Master OP-200 is not online, check that the IP Address and Port for the master OP200 are properly configured. Make sure there is connectivity between the ZK Opera Service machine and the master OP200 machine. Make sure the port is not blocked.
There is also a log file relating to the connection between the ZK Opera Service and the master OP200 that can be viewed for troubleshooting purposes. It is the daemon.log in C:\Program Files(x86)\ZKTeco\Opera \z9-1.0-SNAPSHOT-dist-zkoperaserver\log
text_image
ZKTeco Opera ≥9-1.0-SNAPSHOT-dist-zkoperserver > log Organize Include in library Share with Burn New folder Search log Favorites Name Date modified Type Size Desktop daemon 5/24/2016 11:28 PM Text Document 33 KB Downloads schema.create.sql 5/24/2016 11:26 PM SQL File 415 KB Recent Places Libraries Documents Music Pictures Videos Homegroup Computer Local Disk (C:) My Passport (E:) Network 2 itemsMake sure it is really trying to connect to the OP-200 at the address and port that you think it should be as in this example setup, where a master OP200 is at address 192.168.201.134 and listens for connections on port 9846:
6 OP-200 Connect Lenel Software
6.1 Start the OnGuard software, local at the "System Tree":

text_image
System Administration - System/Account Application Edit View Administration Access Control Monitoring Video Additional Hardware Logical Access Window Help System Tree Hardware Holidays Timezones Access Levels Access Groups Card Formats6.2 Click the "Hardware" to add one "Access Panel":

text_image
192.168.18.273 - 运标桌面连接 System Tree NWP LNL-3000 LNL-2220 LNL-3210 LNL-2000 LNL-1000 LNL-500 HID Other Hardware car-panel car-reader1 car-reader2 Default Area Opens Holidays Timerories Access Levels Access Groups Card Formats Access Panel Workstation Car-panel ZKCI SOFTWARE-IPC Name: car-panel Online Location Connection Options Diagnosis Notes Connection type IPvt. IP address: 192 . 168 . 19 . 71 Port: 30016.3 Add OP-200:
(1) In "Additional Hardware", click "Data Conduit Sources...", then add "DataConduit Sources":
OP200 Quick Start Guide

text_image
Application Edit View Administration Access Control Monitoring Video Additional Hardware Logical Access Window Help System Tree Hardware Holidays Timeszones Access Levels Access Groups Card Formats DataConduit Sources DataConduit Devices DataConduit Sub-Devices Name Name Open Open Online World time zone: (GMT+08.00) Beijing, Chongqing, Hong Kong, Chongei Daylight savings Add Modify Delete Help Multiple Selection 1 of 1 selected(2) Add "DataConduIT OP-200s":
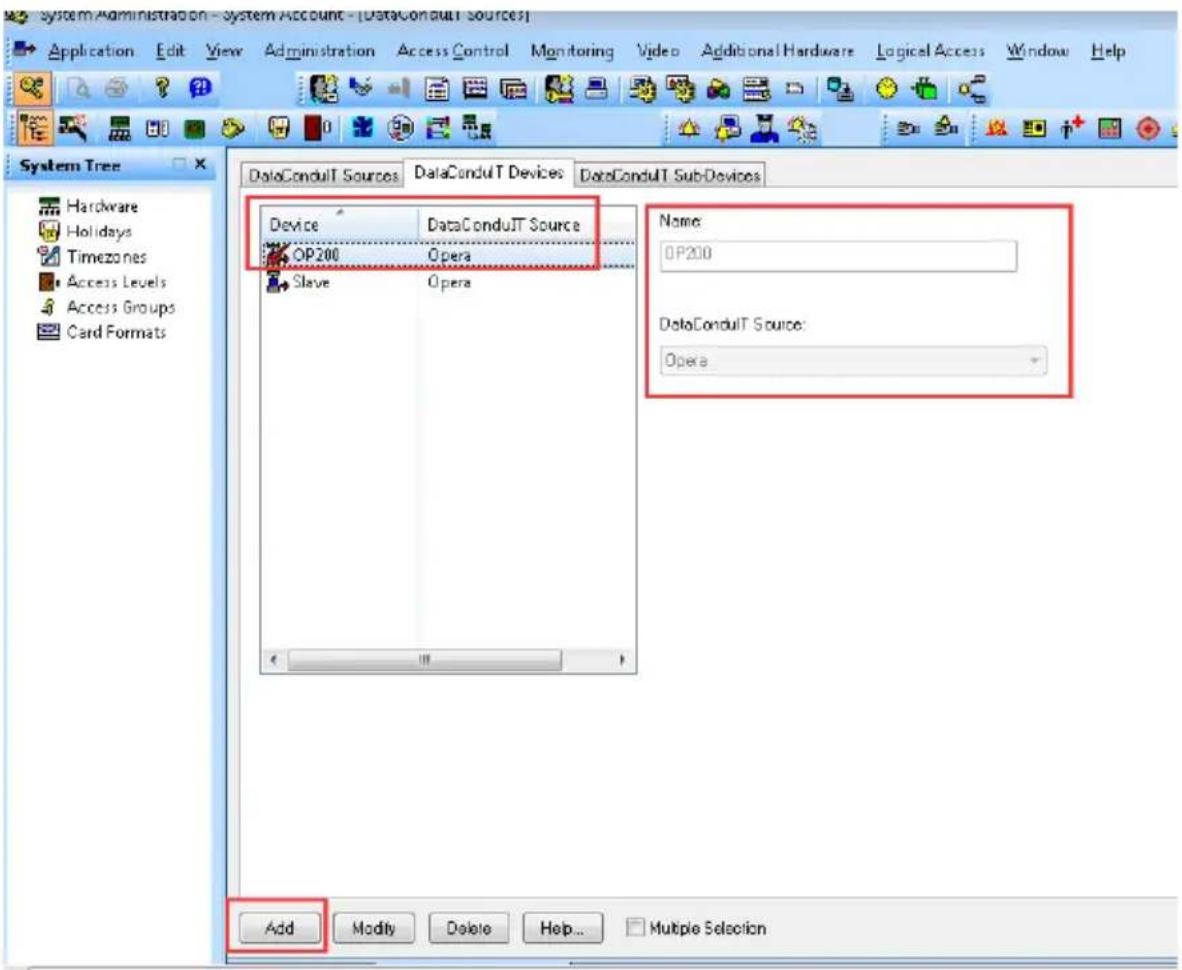
text_image
System Administration - System Account - [DataConduit Sources] Application Edit View Administration Access Control Monitoring Video Additional Hardware Logical Access Window Help System Tree Hardware Holidays Timezones Access Levels Access Groups Card Formats DataConduit Sources DataConduit Devices DataConduit Sub-Devices Device DataConduit Source Name: OP200 Opera Slave Opera DataConduit Source: Opera Add Modify Delete Help... Multiple SelectionNote: The name you enter here must match the name entered on the OP-200.
- Start the "ZKOperaHostInstall" middleware, add the IP address of OP-200 to the host, default Port: 9864, click "Save".

text_image
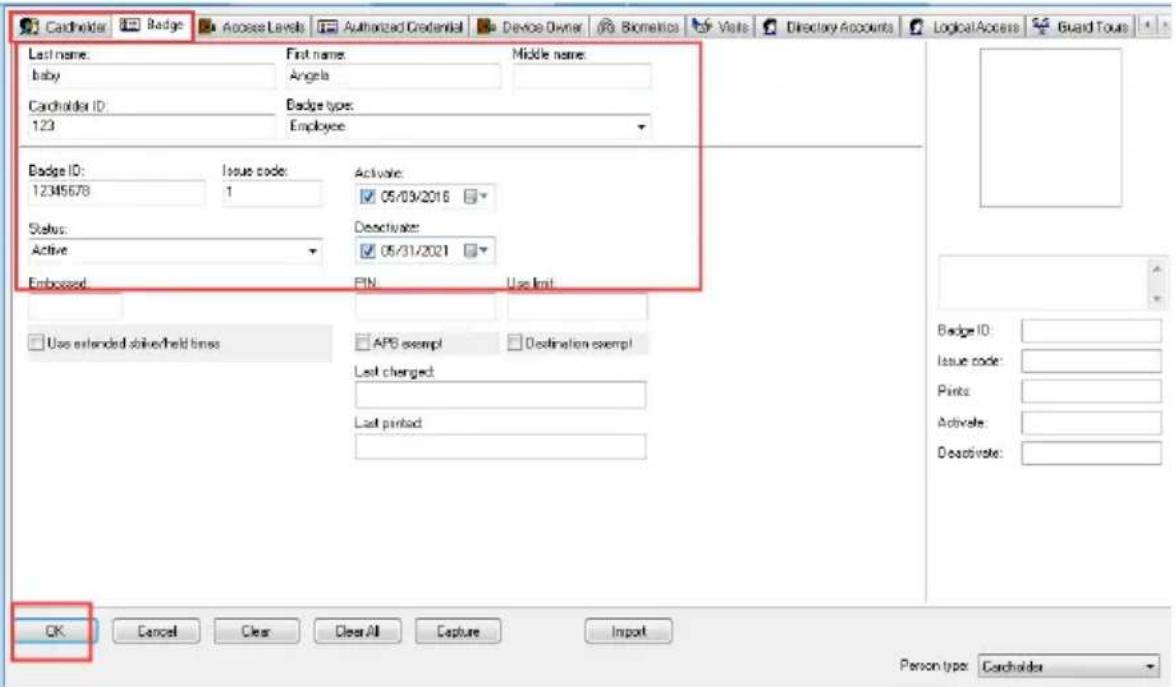
Opera OnGuard Connection Level OnGuard Host | Username Password Set to blanks for local connections. Test Master OP-200 Host 192.168.18.225 MAC Address Port 9846 Save- Click "Cardholders" to start user enrollment:

text_image
Cacholids Badge Access Levels Authorized Credential Device Dvines Bismelics Visits Directory Accounts Logical Access Guard Touch Last name: First name: Middle name: Cardholder ID: Badge type: Address: Title: City: Department: State: Zip code: Division: Phone: Birth date: Locations: Email: Building: Foot: Record last changed: Office phone: Extension: No Last Access Badge ID: Issue code: Prints: Activate: Delete:# Search Add Modify Delete Print Encode 0410OP200 Quick Start Guide
text_image
Cardholder Badge Access Levels Authorized Credential Device Owner Biometrics Visits Directory Accounts Logical Access Guard Tours Last name: baby Cardholder ID: 123 First name: Angela Middle name: Badge type: Employee Badge ID: 12345678 Issue code: 1 Status: Active Embossed: Active: 05/09/2016 Deactivate: 05/31/2021 PIN Use limit Use extended deliver/field times APB exempt Destination exempt Last changed Last printed OK Cancel Clear Clear All Capture Import Person type: CardholderNote: You have to assign the door access rights.
7 OP-200 Master Settings on Webserver
7.1 Install the SilkID driver.
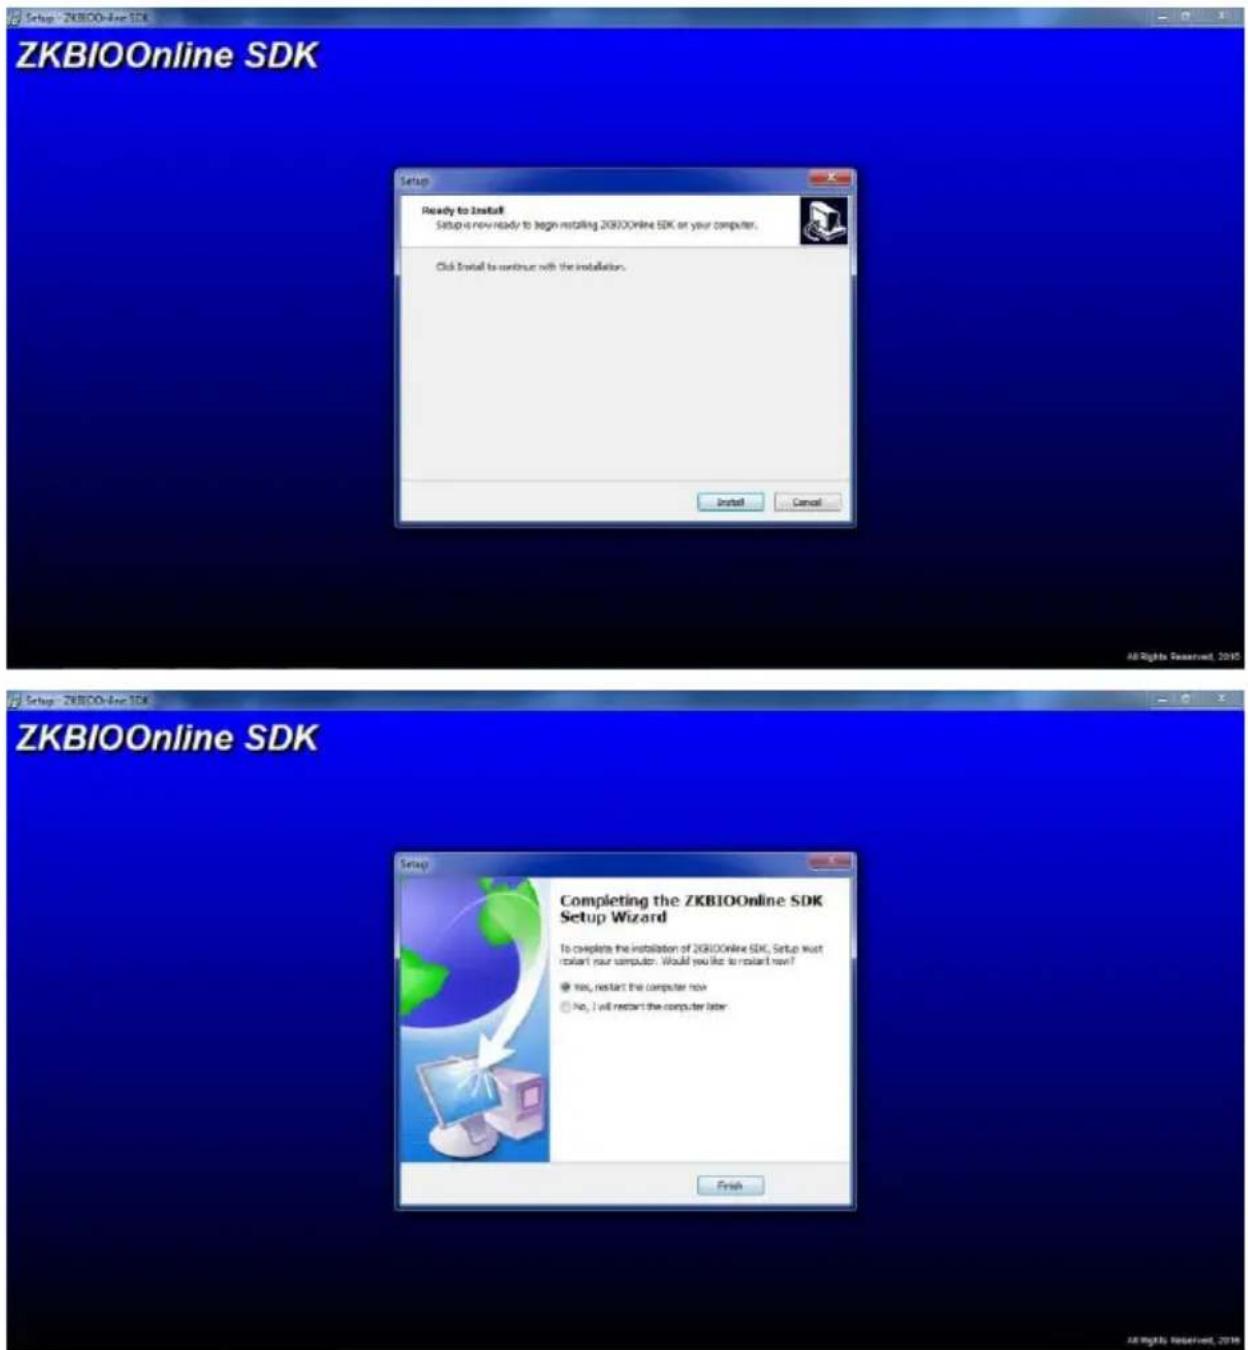
Find Setup – ZKBIOOnline SDK application program to install.
text_image
ZKBIOOnline SDK Setup Ready to Install Setup is now ready to begin installing ZKBIOOnline SDK or your computer. Click Install to continue with the installation. Install Cancel All Rights Reserved, 2016 ZKBIOOnline SDK Setup - ZKBIOOnline SDK Completing the ZKBIOOnline SDK Setup Wizard To complete the installation of ZKBIOOnline SDK. Setup must restart your computer. Would you like to restart new? Yes, restart the computer now No, I will restart the computer later Finish7.2 Configuration of SilkID driver for SSL (Optional)
7.2.1 Certificate Installation
Installing the Client:
xmzkteco.local.cer is bound with the domain name 127.0.0.1. Therefore, use
127.0.0.1 when calling the HTTPS interface.
Installing the Certificate:
- Double-click xmzkteco.local.cer, and install the certificate.

text_image
Certificate General Details Certification Path Certificate Information Windows does not have enough information to verify this certificate. Issued to: 127.0.0.1 Issued by: zkCA Valid from 2016/ 4/ 25 to 2116/ 4/ 1 Install Certificate... Issuer Statement Learn more about certificates OK- Install the certificate for all the users.
text_image
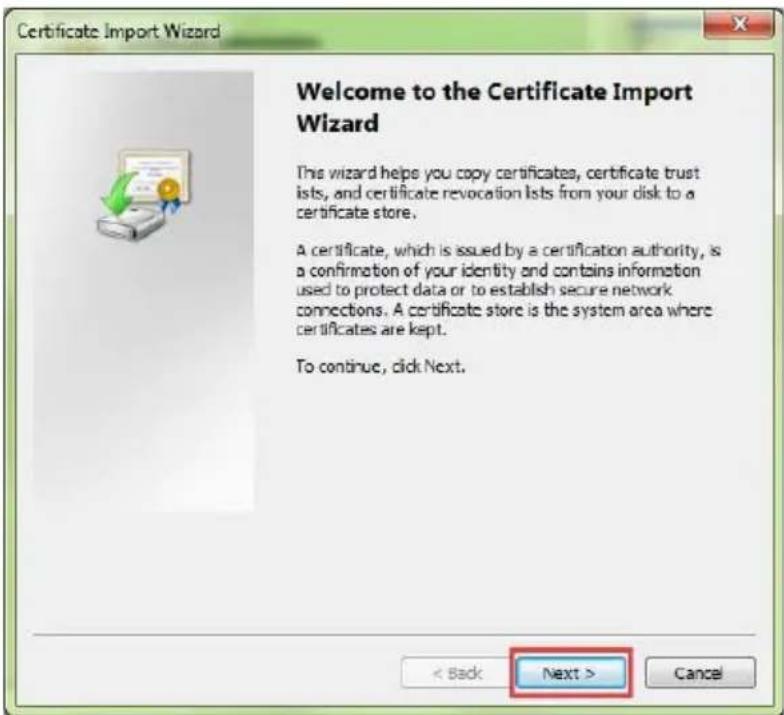
Certificate Import Wizard Welcome to the Certificate Import Wizard This wizard helps you copy certificates, certificate trust lists, and certificate revocation lists from your disk to a certificate store. A certificate, which is issued by a certification authority, is a confirmation of your identity and contains information used to protect data or to establish secure network connections. A certificate store is the system area where certificates are kept. To continue, click Next. < Back Next > Cancel- Install the certificate to [Trusted Root Certification Authorities].
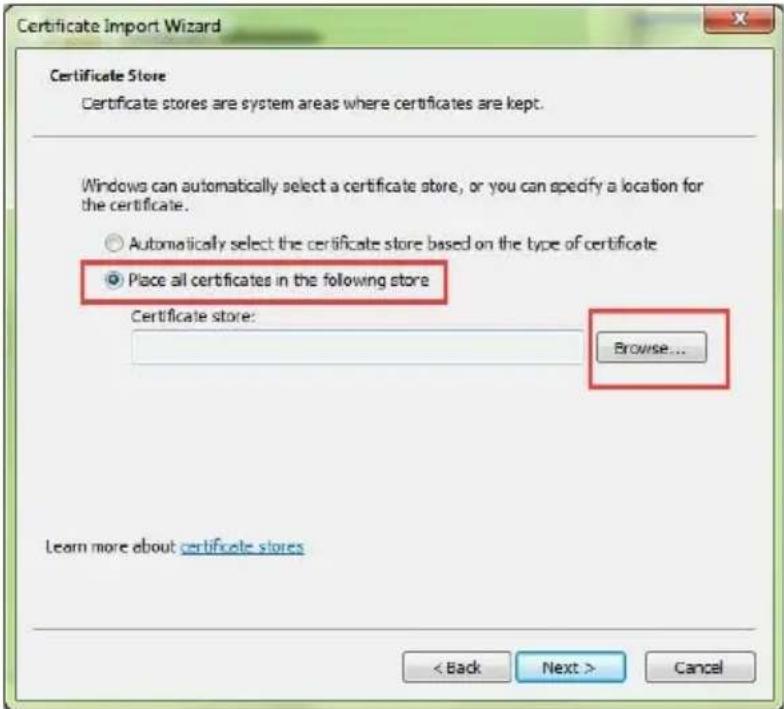
text_image
Certificate Import Wizard Certificate Store Certificate stores are system areas where certificates are kept. Windows can automatically select a certificate store, or you can specify a location for the certificate. ○ Automatically select the certificate store based on the type of certificate ● Place all certificates in the following store Certificate store: Browse... Learn more about certificate stores < Back Next > Cancel
text_image
Certificate Import Wizard Select Certificate Store Select the certificate store you want to use. Personal Trusted Root Certification Authorities Enterprise Trust Intermediate Certification Authorities Trusted Publishers Untrusted Certificates Show physical stores OK Cancel Browse... Learn more about certificate stores < Back Next > Cancel- Complete the installation.

text_image
Certificate Import Wizard Completing the Certificate Import Wizard The certificate will be imported after you click Finish. You have specified the following settings: Certificate Store Selected by User Trusted Root Certifica Content Certificate < Back Finish Cancel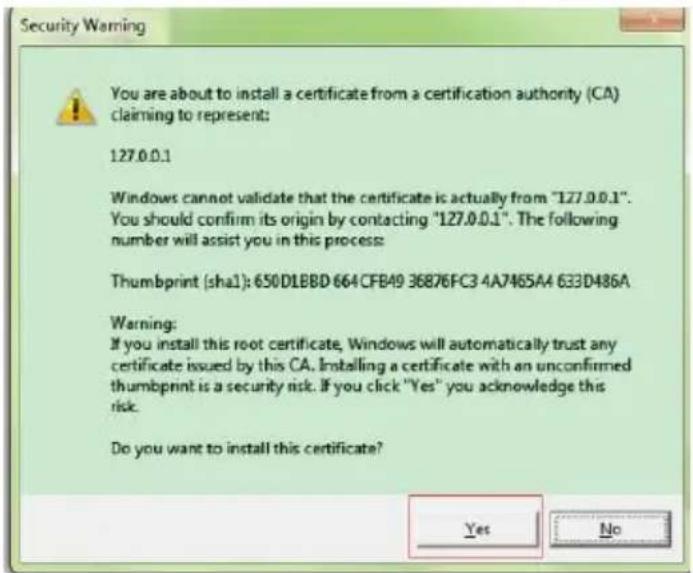
text_image
Security Warning You are about to install a certificate from a certification authority (CA) claiming to represent: 127.0.0.1 Windows cannot validate that the certificate is actually from "127.0.0.1". You should confirm its origin by contacting "127.0.0.1". The following number will assist you in this process: Thumbprint (sha1): 650D1BBD 664CFB49 36876FC3 4A7465A4 633D486A Warning: If you install this root certificate, Windows will automatically trust any certificate issued by this CA. Installing a certificate with an unconfirmed thumbprint is a security risk. If you click "Yes" you acknowledge this risk. Do you want to install this certificate? Yes No7.2.2 Configuring the Firefox Browser
Firefox of a higher version requires extra configuration of the certificate.
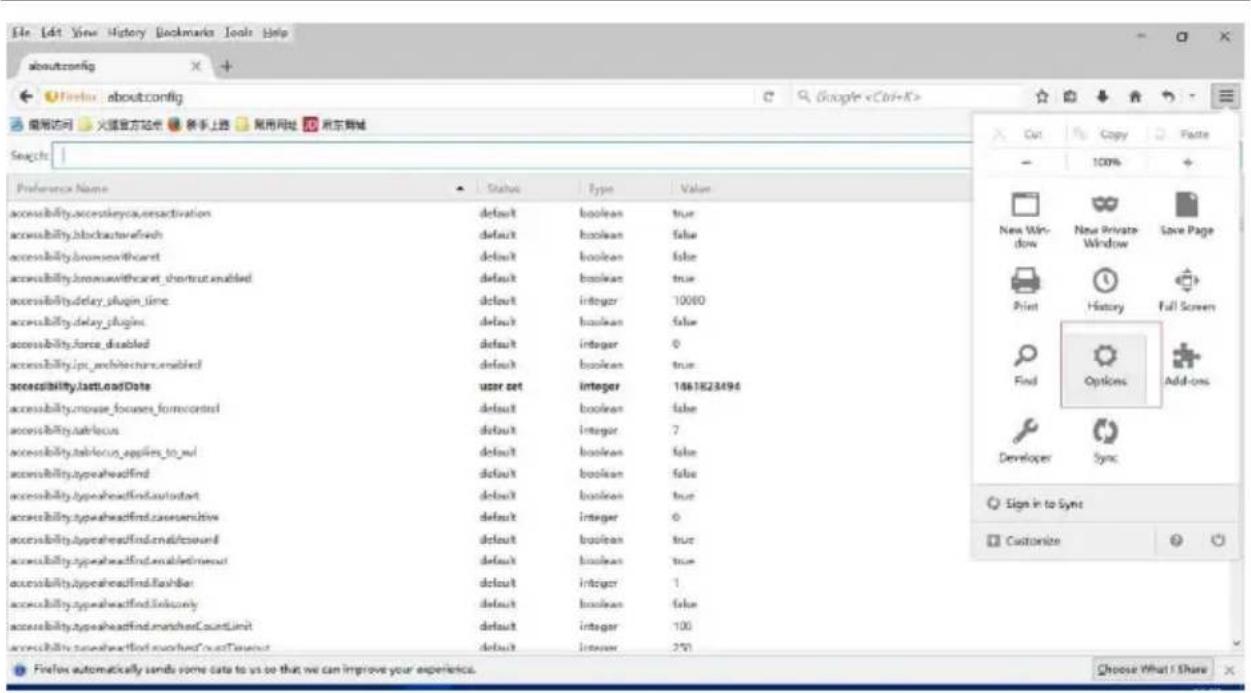
- Access the Firefox options.
OP200 Quick Start Guide
text_image
File Edit View History Bookmarks Tools Help about:config Find: about:config 编辑访问 火猫官方论坛 领导上路 帮用网址 京东商城 Search: Preference Name status Type Value accessibility.accesskeyca.resactivation default boolean true accessibility.blockactivebrush default boolean false accessibility.bromswithcoat default boolean false accessibility.bromwithcoat_shortout.enabled default boolean true accessibility.delay_plugin_time default integer 10000 accessibility.delay_plugins default boolean false accessibility.force_disabled default integer 0 accessibility.ipc_architecture.enabled default boolean true accessibility.last.DateDate user.set integer 1661823494 accessibility.mouse_focuses_formcontrol default boolean false accessibility Market access default integer 7 accessibility Market applications_to_wl default boolean false accessibility.typeheadfind default boolean false accessibility.typeheadfind.autotart default boolean true accessibility.typeheadfind cause sensitivity default integer 0 accessibility.typeheadfind.end/lossound default boolean true accessibility.typeheadfind.enabled/most default boolean true accessibility.typeheadfind deliver default integer 1 accessibility.typeheadfind deliver default boolean false accessibility.typeheadfind.matchedCountLimit default integer 100 accessibility.typeheadfind.matchedCountTarget default integer 291 Cut Copy Paste 100% New Window New Private Window Save Page Print History Full Screen Find Options Add-ons Developer Sync Sign in to Sync Customize Firefox automatically sends some data to us so that we can improve your experiences. Choose What I Share- Display the certificate settings.

text_image
Advanced General Data Choices Network Update Certificates Requests When a server requests my personal certificate: Select one automatically Ask me every time Query OCSP responder servers to confirm the current validity of certificates View Certificates Security Devices Firefox automatically sends some data to us so that we can improve your experience. Choose What I Share- Add the server exception.

text_image
Certificate Manager Your Certificates People Servers Authorities Others You have certificates on file that identify these servers: Certificate Name Server Lifetime Expires On (Unknown) (Not Stored) 127.0.0.1:22002 Permanent CNNIC MCSHOLDING TEST ^ Permanent 2015年4月3日 DigiNotar DigiNotar Cyber CA * Permanent 2011年10月4日 DigiNotar Cyber CA * Permanent 2013年9月20日 DigiNotar Root CA * Permanent 2025年4月1日 View... Import... Export... Delete... Add Exception... OK- Add the server address to the exception.
ZKBIOOnline exception settings:
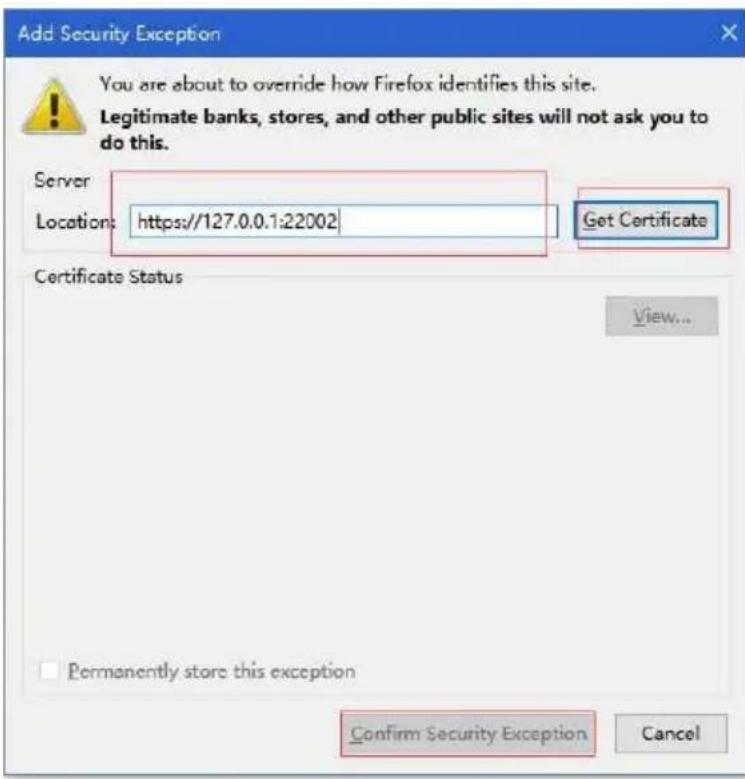
text_image
Add Security Exception You are about to override how Firefox identifies this site. Legitimate banks, stores, and other public sites will not ask you to do this. Server Location: https://127.0.0.1:22002 Get Certificate Certificate Status View... Permanently store this exception Confirm Security Exception CancelISSOnline exception settings:
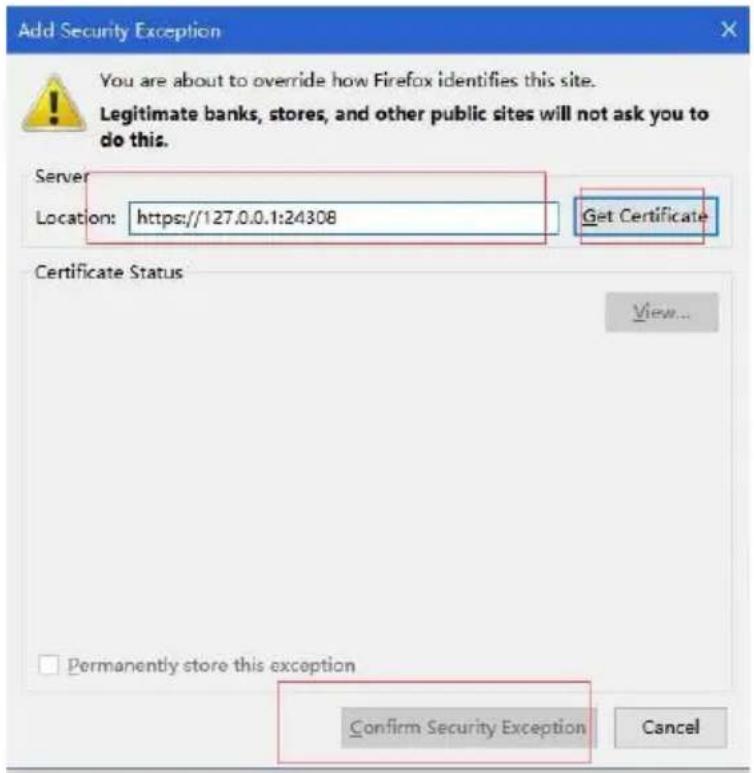
text_image
Add Security Exception You are about to override how Firefox identifies this site. Legitimate banks, stores, and other public sites will not ask you to do this. Server Location: https://127.0.0.1:24308 Get Certificate Certificate Status View... Permanently store this exception Confirm Security Exception Cancel7.3 OP-200 Webserver settings
7.3.1 Login Web Server
a. Connect the controller to the network or PC, start the browser, enter the IP address of the reader. Then you can visit the Web Server.

text_image
192.168.1.201 192.168.1.201 192.168.1.201b. When Web Server is used, "User Name" and "Password" should be set firstly. The default "username" is admin and "password" is pass.

text_image
ZKTeco [Sign In] Opera Sign In Username admin Password ••••• Sign In [About]We can set the relevant parameters by clicking on 1 or 2.
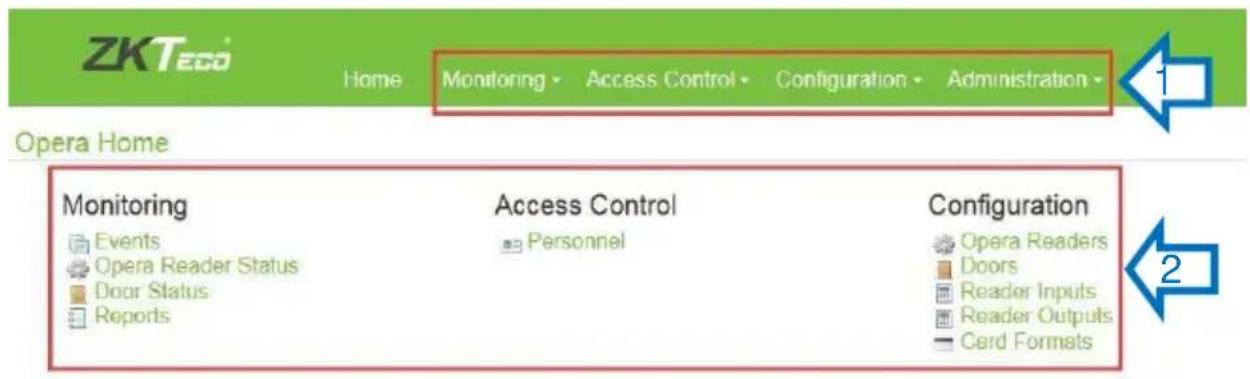
text_image
ZKTeco Home Monitoring Access Control Configuration Administration Opera Home Monitoring Access Control Configuration Events Personnel Opera Readers Opera Reader Status Doors Door Status Reader Inputs Reports Reader Outputs Card Formats7.3.2 Configuration- Name the Readers
Choose Configuration → Opera Readers Master OP200 Edit In Edit Opera Reader Interface, you can Configure the Readers name → Save.

text_image
ZKTeco Home Monitoring Access Control Configuration Administration Opera Home Monitoring Events Opera Reader Status Door Status Reports Access Control Personnel Configuration Opera Readers Doors Reader Inputs Reader Outputs Card Formats Opera Readers Name Model Address Master OP200 OP200 Opera Reader Name Master OP200 Model OP200 EditEdit Opera Reader
Name* Master OP200
Comments

Save
7.3.3 Set Card formats
Choose Configuration → Card Formats Create Card Format enter Card Format date → save to Create a new Card Formats. If your card is not 26 bit, or your card has different card format, you can create a new card format under this menu. For example the default 26 wiegand format:
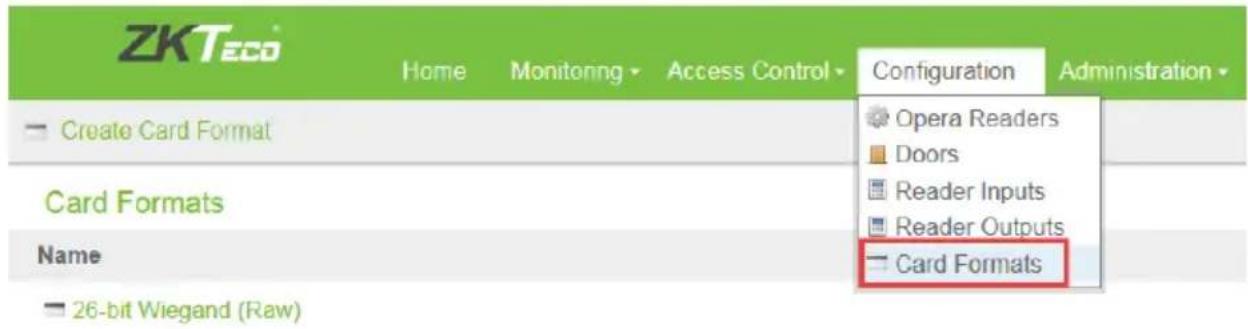
text_image
ZKTeco Home Monitoring Access Control Configuration Administration Create Card Format Opera Readers Doors Reader Inputs Reader Outputs Card Formats Name Card Formats 26-bit Wiegand (Raw)Edit Card Format
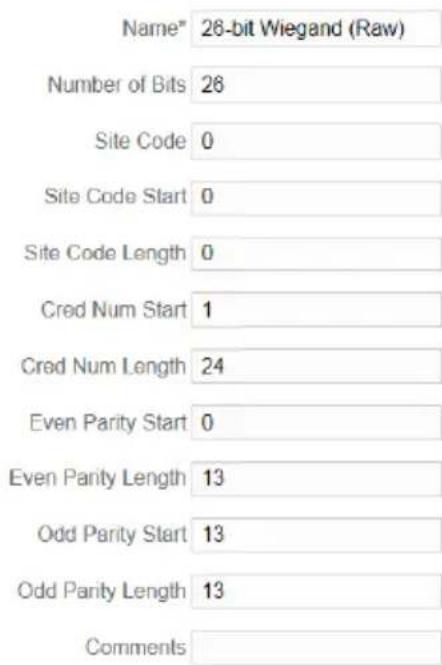
text_image
Name* 28-bit Wiegand (Raw) Number of Bits 26 Site Code 0 Site Code Start 0 Site Code Length 0 Cred Num Start 1 Cred Num Length 24 Even Parity Start 0 Even Parity Length 13 Odd Parity Start 13 Odd Parity Length 13 Comments
Save

Delete
7.3.4 Configure Door Settings
Choose Configuration → Doors → Door Edit to set verification mode.
Opera Home
| Monitoring | Access Control | Configuration |
| Events | Personnel | Opera Readers |
| Opera Reader Status | Doors | |
| Door Status | Reader Inputs | |
| Reports | Reader Outputs | |
| Card Formats | ||
| Doors | ||
| Name | Model | Address |
| Door | 0 | |
| Doors | ||
| Door | ||
| Name Door | ||
| Address 0 | ||
| Default Mode Card or Biometric | ||
| Physical Parent On-board I/O Controller | ||
| Logical Sub-Devices Door - Door Reader Input Door - Keypad Door - Reader Output | ||
| Edit | ||
Edit Door
Name* Door
Address 0
Default Mode Card or Biometric
Comments

Save
7.3.5 Reader Input and Output settings
Reader Input:
Choose Configuration → Doors → Door Door-Door Reader Input Edit to choose Card Formats.
You can set card format which you want the reader to support here.

Doors
Door
Name Door
Address 0
Default Mode Card or Biometric
Physical Parent On-board I/O Controller
Logical Sub-Devices Door - Door Reader Input
Door - Keypad
Door - Reader Output

Edit
OP200 Quick Start Guide

Reader Inputs
Reader Input
Name Door - Door Reader Input
Model ZK
Address 0
Communications Data0/Data1 (Wiegand)
Card Formats
Physical Parent On-board I/O Controller
Logical Parent Door

Edit
Edit Reader Input
Name Door - Door Reader Input
Model OP-200
Address 0
Communications Data0/Data1 (Wiegand)
All Data Layouts ☑
Card Formats
26-bit Wiegand (Raw)
Wiegand 34
Comments
1:N Fingerprint Threshold
(25,30,35,40,45,50, default: 35)
35
1:1 Fingerprint Threshold
(10,15,20,25,30,35, default: 15)
15

Save
Reader Output:
Choose Configuration → Doors → Door Door-Reader Output Edit to choose Card Formats.
You can set the format of wiegand output here.
OP200 Quick Start Guide

Doors
Door
Name Door
Address 0
Default Mode Card or Biometric
Physical Parent On-board I/O Controller
Logical Sub-Devices Door - Door Reader Input
Door - Keypad
Door - Reader Output

Edit
Reader Output
Name Door - Reader Output
Address 0
Communications Data0/Data1 (Wiegand)
Card Format 26-bit Wiegand (Raw)
Physical Parent On-board I/O Controller
Logical Parent Door

Edit
Edit Reader Output
Name Door - Reader Output
Address 0
In Service √
Communications Data0/Data1 (Wiegand)
Card Format 26-bit Wiegand (Raw)
Comments

Save
7.3.6 Backup Database
Back up the server data or configuration data of the device to the device.
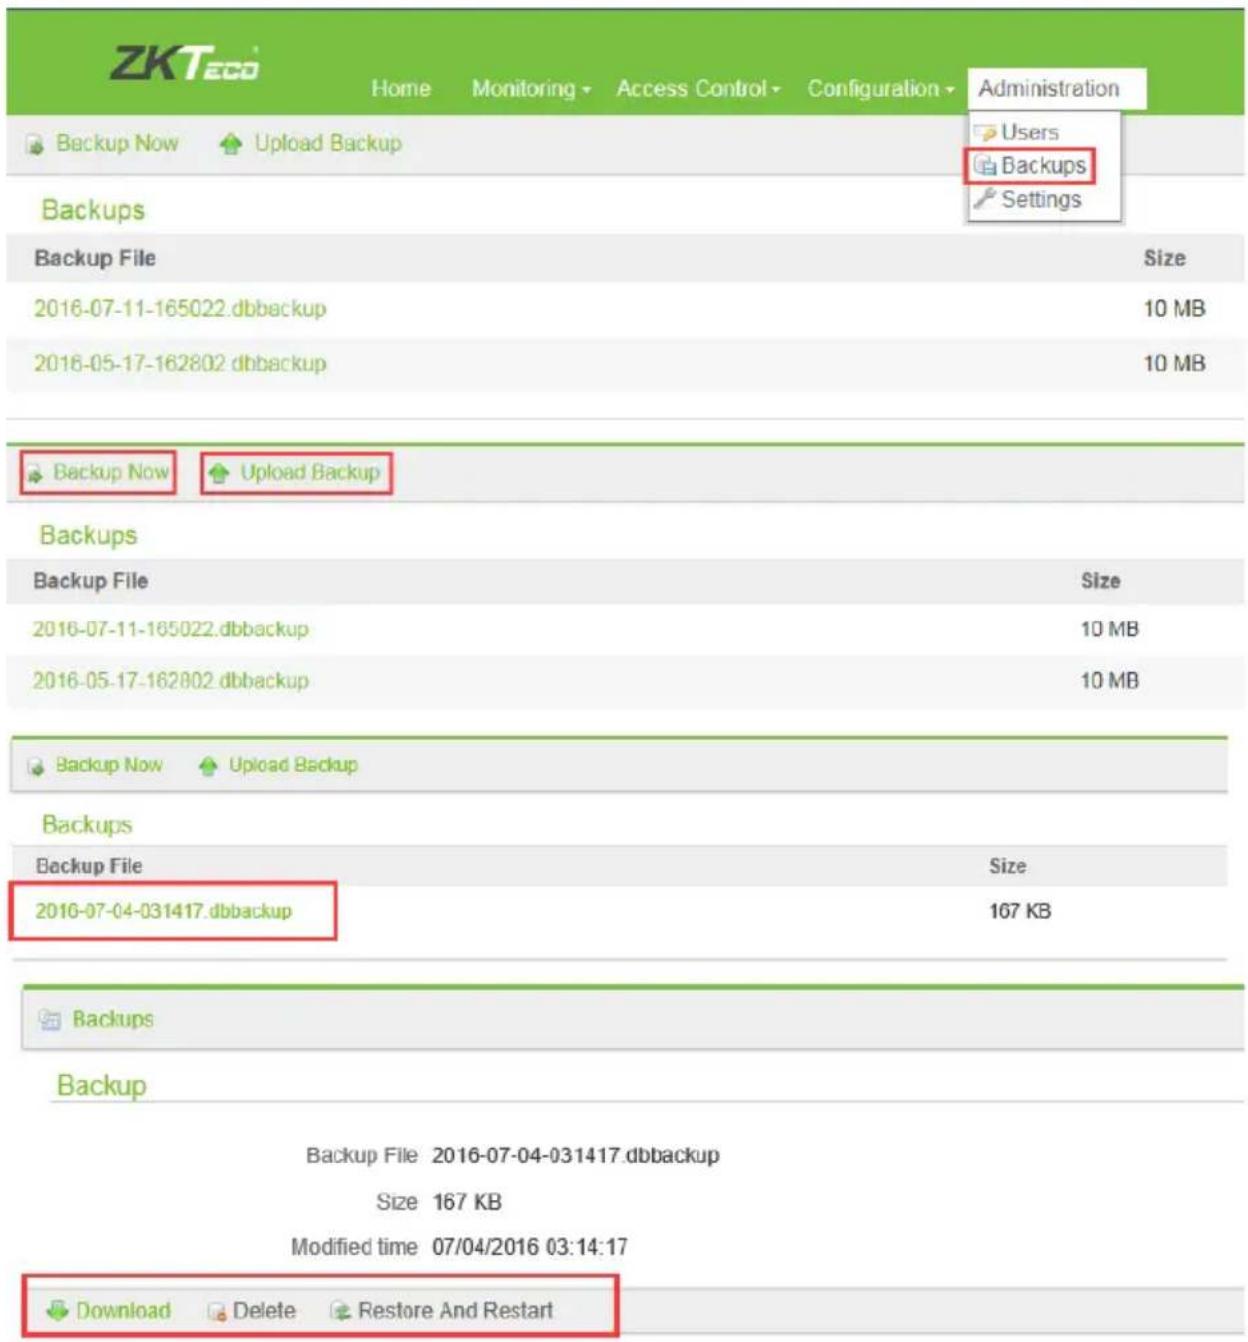
Choose → Administration Backups Backup Now, the device backup the data(user data and network settings) immediately.
text_image
ZKTec Home Monitoring Access Control Configuration Administration Backup Now Upload Backup Users Backups Backups Settings Backup File Size 2016-07-11-165022.dbbackup 10 MB 2016-05-17-162802 dbbackup 10 MB Backup Now Upload Backup Backups Backup File Size 2016-07-11-165022.dbbackup 10 MB 2016-05-17-162802 dbbackup 10 MB Backup Now Upload Backup Backups Backup File Size 2016-07-04-031417.dbbackup 167 KB Backup Backup Backup File 2016-07-04-031417.dbbackup Size 167 KB Modified time 07/04/2016 03:14:17 Download Delete Restore And RestartDownload: Download data to computer.
Delete: Delete data from the host(master reader).
Restore and restart: Select the backup data, you can restore it. If the backup data has been downloaded to your pc, then you first upload the backup data
as following.
Upload Backup:
Choose Administration → Backups Upload Backup, you can insert the data on your computer backed up past times.

text_image
Backup Now Upload Backup Backups Backup File Size 07/04/2016 03:13 [About]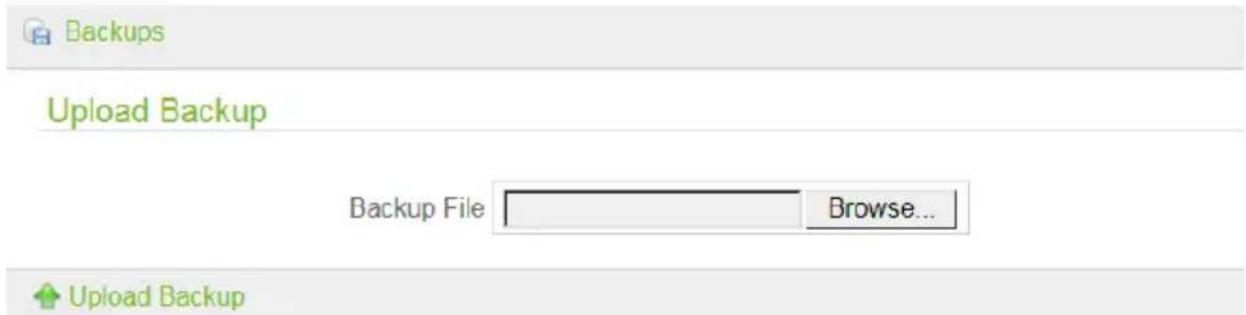
text_image
Backups Upload Backup Backup File Browse... Upload Backup7.3.7 Personnel management & fingerprint registration
User Management
Choose Access Control → Personnel edit that perpson and enroll fingerprint.

text_image
Opera Home Monitoring Events Opera Reader Status Door Status Reports Access Control Personnel Configuration Opera Readers Doors Reader Inputs Card Formats| Personnel | ||
| Name | Card Number | Active |
| kong | 892468204 | Active |
Person
Name kong
Personnel ID 1
Card Number 892468204
Created by admin
Created time 07/12/2016 09:46:47
Modified by admin
Modified time 07/12/2016 09:46:47

We need to register fingerprints three times on the SilkID fingerprint sensor.
Personnel
Enroll Fingerprints
Name person1
Fingerprints Please press the selected finger 3 times.

natural_image
Simple line drawing of two hands with one highlighted in yellow (no text or symbols)Save
OP200 Quick Start Guide

Personnel
Enroll Fingerprints
Name person1
Fingerprints Remaining fingerprint presses: 2

natural_image
Diagram showing hand and fingerprint patterns with colored markers (no text or symbols)
Save

Personnel
Enroll Fingerprints
Name person1
Fingerprints Remaining fingerprint presses: 1

natural_image
Diagram showing a hand and fingerprint pattern with a highlighted yellow object (no text or symbols)
Save

Personnel
Enroll Fingerprints
Name person1
Fingerprints Enrollment complete. Please select another finger.

natural_image
Diagram showing a hand with green highlight and a corresponding fingerprint pattern (no text or symbols)
Save
The following figure shows enroll fingerprint successfully.

Personnel
Person
Name person1
Personnel ID 123
Card Number 123
Enrolled Fingerprints 1
Created by admin
Created time 07/04/2016 03:17:51
Modified by admin
Modified time 07/04/2016 20:31:05

Edit

Enroll

Delete
8 Proper Fingerprint Enrollment
1) First select finger(s) to enroll
Best Practices suggests enrolling at least one finger from BOTH hands. This ensures the user can always gain biometric door access, even IF one of their fingers unexpectedly becomes no longer able to be recognized by the fingerprint reader (due to cuts, scrapes, dirt, etc. adversely affecting the fingerprint image quality).
ZKAccess fingerprint readers will give optimal results for fingerprint-matching if the following recommendations and suggestions are followed:
We recommend enrolling two index fingers (images 3 and 6) or two middle finger (images 2 and 7):


Avoid using the thumb, ring or little finger for enrollment. These fingers are often too difficult to correctly position on the fingerprint sensor and often result in poorer quality fingerprint reads.
2) Proper Finger Placement
The user's finger should be placed flat and completely cover the fingerprint sensor.

natural_image
Illustration of a finger pressing a square object with a circular outline (no text or symbols)Correct Method

natural_image
Close-up grayscale image of a human fingerprint pattern (no text or symbols)Good Image

natural_image
Illustration of a hand using a pen to mark a circular feature with crosshairs (no text or symbols)Wrong Method

natural_image
Close-up grayscale image of a human fingerprint pattern (no text or symbols)Poor Image
The user's finger should be placed flat (and not turned on its side). The finger also needs to be placed on the center of sensor.

Not Flat

Not Centered

Not Centered
3) Getting Good Fingerprint Images
The quality of fingerprint images is relative to the number of minutiae points captured by the fingerprint sensor. Fingerprint images not possessing an adequate number of minutiae points may be unreadable. For those few users whose fingerprint images lack sufficient minutiae points and cannot be read by the fingerprint sensor, it's advised to issue those few users an RFID card (or fob) or issue them a secret PIN code, instead.
Figure A-2 shows poor-quality fingerprints, characterized by smudged, faded or otherwise distorted areas on the fingerprint. These conditions can be caused by excessive dryness or wetness, excessive or insufficient pressure, or scarring of the skin at the fingertip.
Figure A-2

natural_image
Grayscale abstract pattern with no discernible text, symbols, or structured elementsDRY

WET

natural_image
Close-up grayscale image of a human fingerprint pattern (no text or symbols)SCARRED
4) Correcting wet or dry fingerprint images:
When the temperature is very cold or just after washing hands, fingerprints often become very dry. In this case, the user should "moisturize" their fingerprint simply by breathing on the fleshy pad of their fingertip prior to placing their finger on the sensor. Another way to "moisturize" their fingerprint is by gently rubbing their fingertip against their face or forehead for a second. The moisture from their breath or skin oil should improve the recognition of their fingerprint.
Conversely, too MUCH moisture can make it difficult to obtain a good fingerprint image, no differently than adding too much ink to a stamp creates a blurred image. To remedy having too much moisture, simply swipe the finger on a clean dry lint-free cloth.
5) How much pressure is required for a good-quality fingerprint?
If too much pressure is applied when pressing down on the fingerprint sensor, the finger's ridges become pressed together and create an indistinguishable image. Applying too much pressure (similar to fingerprints that are too wet) will create a "blurred" image which the fingerprint sensor might not recognize. It is similar to using too much ink on a stamp: the stamp will create a smeared image which is unrecognizable.
If too little pressure is applied, the resulting image will be similar to the dry fingerprint. Similar again to a stamp, if not enough ink is used, the image will be barely recognizable.
Issues related to moisture and pressure can be easily resolved. With a little practice, users will get the feel of it. When enrolling and authenticating, be sure to maintain contact with the fingerprint sensor for a 2 full seconds, until the fingerprint reader responds. Most ZKAccess fingerprint readers have both audio and visual indicators which respond when the reader senses a finger.
ZKAccess fingerprint readers are extremely accurate and fast-matching. And users remaining mindful of the relative moisture, proper placement and pressure of their finger on the sensor will further ensure positive results and user experience.
9 Enroll & Verification OP-200
text_image
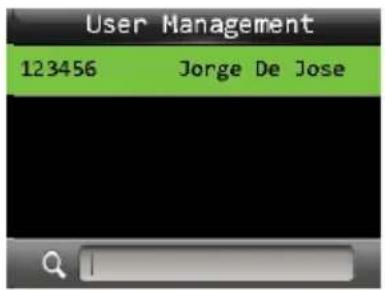
User Management 123456 Jorge De JosePress → Main Menu → User Management.
You can view the user information and edit the user's fingerprint.
Enroll the ingerprints on OP-200:

text_image
User Management 10739427 Angela baby 123525463 lenovo baby 13322637 jo jo 2141557699 Lucky baby
text_image
Edit : Angela baby User ID 1 Name Angela baby User Role Fingerprint 1 Badge Number 10739427
text_image
Enroll Fingerprint 0 1 2 3 6 7 8 9 4 5 Please select the finger to be enrolled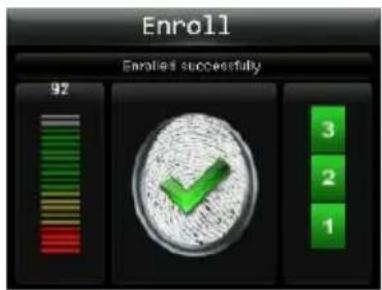
text_image
Enroll Enrolled successfully 92 3 2 1Press → Select an employee OP-200.
Fingerprint to Enroll the fingerprints on
When shown as Figure 4, the enroll is successful.
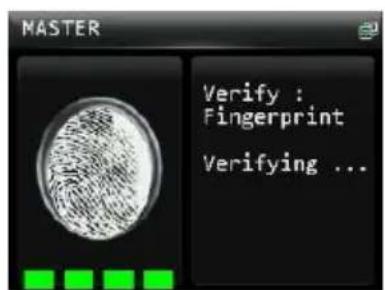
Vericaon on OP-200:
text_image
MASTER Verify : Fingerprint Verifying ...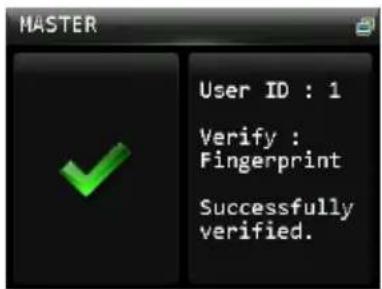
text_image
MASTER User ID : 1 Verify : Fingerprint Successfully verified.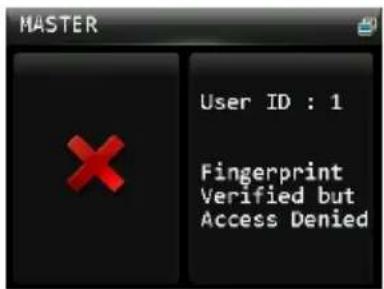
text_image
MASTER User ID : 1 Fingerprint Verified but Access DeniedNote:
- The OP-200 has to connect to the Lenel panel, and only if the panel has
authorization, then panel will tell the results; if the Panel Ack is set to ON, but without connection to the panel, then you will get "Fingerprint Verified but Access Denied" message on screen.
- If you do not connect OP-200 to the Lenel panel, then set "panel ack" to OFF in master/slave settings interface on the OP-200.
10 Trouble Shootings
here are some useful tips to help improve the reliability of your ZKAccess fingerprint reader(s):
- a previous successfully enrolled finger cannot be subsequently matched, then assume something has CHANGED since you last successfully enrolled that same user's fingerprint;
Finger is dirty (try cleaning it)
Finger has a scratch (try enrolling a different finger)
Sensor is dirty (try cleaning with a lint-free cloth)
Insufficient moisture on your finger (rub finger against your forehead or cheek to obtain oil from your skin and try again)
Biometric reader has become damaged
- But IF you CANNOT enroll any fingerprints... then try the following:
Make sure finger(s) are clean and free from cuts or scratches.
Rub the finger you wish to enroll against your forehead (or cheek) to obtain more oil from your skin and try again. This helps when in dry/cold environments.
➢ Lower the threshold setting on the reader (which desensitizes the fingerprint scanner)
Change from 1:N matching to 1:1 matching (1:1 matching requires the user first enter their User ID# prior to presenting their fingerprint).
IF ALL ABOVE TIPS FAIL
It's possible the condition of your workplace (i.e. dirty/dusty), weather (very cold/arid) or employee demographics (ages younger than 10 years or older than 65 years) may contribute to less than optimal fingerprint recognition results. If this is the case, inquire about alternative ZKAccess biometric technologies (i.e. facial, finger vein pattern, etc.).
Lastly, it's possible that based on your environment, users and/or budget that a traditional card-based access control system is best suited for you.
3. The Tamper Alarm rings?
To cancel the triggered alarm mode, carefully check whether the OP-200 and back plate are securely connected to each other.
4. Network Offline
If the network is offline, you can see red cross on the network icon as following:

text_image
MASTER 04:49 PM 05/10 TuesdayPlease check the network connection.
5. Door does not open
▶ Check Wiegand output format settings
Check Access Rights in Onguard/Symmetry software
Reader Power Off-Check the power supply
Reader not connecting- Check Network cable and settings