
P300S - Pizza oven BLACK & DECKER - Free user manual and instructions
Find the device manual for free P300S BLACK & DECKER in PDF.


| Product Type | Pizza Oven |
| Brand | Black & Decker |
| Model | P300S |
| Power Supply | 120 V ~ 60 Hz |
| Power | 1500 W |
| Capacity | Pizza up to 12 inches (30 cm) |
| Cooking Functions | 5 settings: Bake, Snacks, Regular Pizza, Rising Pizza, Deep Pizza |
| Maximum Temperature | Up to 315 °C (600 °F) |
| Ceramic Stone | Included, dishwasher safe (part # P300S-01) |
| Crumb Tray | Removable, part # P300S-03 |
| Tray Handle | With hooks, parts # P300S-02 and P300S-04 |
| Timer | Up to 30 minutes, automatic shut-off |
| Power Indicator Light | Yes |
| Safety | Grounded plug, tamper-resistant screw, automatic shut-off |
| Exterior Material | Stainless steel |
| Dimensions (approx.) | 35 x 30 x 25 cm |
| Weight (approx.) | 5 kg |
| Cleaning | Ceramic stone dishwasher safe; glass door and exterior with soft sponge |
| Warranty | 2 years limited (USA and Canada) |
| Spare parts available | Yes (ceramic stone, crumb tray, handle, hooks) |
| Repairability | No user-serviceable parts; contact authorized service center |
| Recommended Use | Not for greasy foods (bacon, sausages, hamburgers); use ceramic stone alone for Snacks, Regular Pizza, and Rising Pizza settings |
Frequently Asked Questions - P300S BLACK & DECKER
User questions about P300S BLACK & DECKER
0 question about this device. Answer the ones you know or ask your own.
Ask a new question about this device
Download the instructions for your Pizza oven in PDF format for free! Find your manual P300S - BLACK & DECKER and take your electronic device back in hand. On this page are published all the documents necessary for the use of your device. P300S by BLACK & DECKER.
USER MANUAL P300S BLACK & DECKER
natural_image
Top-down view of a colorful pizza with lettuce, black olives, and cherry tomatoes on a wooden surface (no text or symbols)use and care manual manual de uso y cuidado guide d'utilisation et d'entretien
P300SD
Should you have any questions or concerns with your new product, please call our Customer Service Line at 1-800-231-9786 (US and Canada). Please do not return to the store.
IMPORTANT SAFETY INSTRUCTIONS
When using your oven, basic safety precautions should always be followed, including the following:
- Read all instructions
- Do not use this appliance for other than intended use.
- Do not touch hot surfaces. Use handles or knobs. Internal cavity can reach up to 625°F (330°C).
• To protect against electrical shock do not immerse cord, plugs or appliance in water or other liquid. - Close supervision is necessary when any appliance is used by or near children.
- Unplug from outlet when not in use and before cleaning. Allow to cool before putting on or taking off parts.
- It is recommended to regularly inspect the appliance. Do not operate any appliance with a damaged cord or plug or after the appliance malfunctions or has been damaged in any manner. For service, repair or any questions regarding your appliance, please call our Customer Service Line at 1-800-231-9786 (US and Canada.)
- The use of accessory attachments not recommended by the appliance manufacturer may cause injuries.
- Do not use outdoors.
- Do not let cord hang over edge of table or counter, or touch hot surfaces.
- Do not place on or near a hot gas or electric burner, or in a heated oven.
- To disconnect, turn timer control to "OFF"; then remove plug from wall outlet.
- Do not clean with metal scouring pads. Pieces can break off the pad and touch electrical parts, creating a risk of electrical shock.
-
Oversized foods or metal utensils must not be inserted in a pizza oven, as they may create a fire or risk of electric shock.
-
A fire may occur if the pizza oven is covered or touching certain materials, including curtains, draperies, walls, and the like, when in operation. Do not store any item on top of the appliance when in operation and keep oven vents unobstructed.
- Use extreme caution while using containers constructed of materials other than metal or glass. Glass and metal containers should only be used on the Bake and Deep Dish settings of the appliance.
- Do not store any materials, other than the manufacturer's recommended accessories, in this oven when not in use.
- Do not place any of the following materials in the oven: paper, cardboard, plastic and other flammable materials.
- Do not cover crumb tray or any part of the oven with metal foil. This will cause overheating of the oven.
- This appliance is not intended for use by persons (including children) with reduced physical, sensory or mental capabilities, or lack of experience and knowledge, unless they have been given supervision or instruction concerning use of the appliance by a person responsible for their safety.
• Children should be supervised to ensure that they do not play with the appliance. - The appliance is not intended to be operated by means of an external timer or separate remote control system.
- This pizza oven is not a traditional toaster oven and it is not intended to be used as a toaster. Never try to toast bread as it may create a fire or risk of electric shock.
CAUTION:
- This oven has been designed and tested to cook pizza and certain other foods. This oven is not intended, and should not be used to cook foods with a tendency to splatter or drip grease, as this can pose a fire risk. Food such as (but not limited to) bacon, bratwursts, and burgers should be avoided.
- Use care when opening the oven door.
- Do not leave oven unattended when in operation. Food ignition may occur. If this happens, unplug unit but DO NOT open door.
- Before cleaning any part of the unit, be sure the unit is off, unplugged and completely cool. To reduce the risk of fire, keep oven interior completely clean and free of food residues, oil, grease and any other combustible materials.
- Do not use water on a grease fire.
- Do not cook with the door open.
- Do not place hands inside the appliance during operation.
WARNING:
- Only use provided Ceramic Tray and Tray Handle to cook and remove items from the oven. The Ceramic Tray must always be placed in the oven during operation. Standard oven safe pans, including but not limited to, metal and glass containers can only be used on Bake and Deep Dish settings.
- Do not set the hot foods or Ceramic Tray directly on the countertop.
- Do not attempt to heat or cook nonfood items in the oven.
• Children should always be supervised around the oven during operation and while the oven is cooling before cleaning.
- Do not use non-stick accessories such as pans and utensils while on the following settings: Regular, Snacks, and Rising.
SAVE THESE INSTRUCTIONS.
This product is for household use only.
SAFETY FEATURES
GROUNDED PLUG
As a safety feature, this product is equipped with a grounded plug, which will only fit into a three-prong outlet. Do not attempt to defeat this safety feature. Improper connection of the grounding conductor may result in the risk of electrical shock. Consult a qualified electrician if you are in doubt as to whether the outlet is properly grounded.
TAMPER-RESISTANT SCREW
Warning: This appliance is equipped with a tamper-resistant screw to prevent removal of the outer cover. To reduce the risk of fire or electric shock, do not attempt to remove the outer cover. There are no user-serviceable parts inside. Repair should be done only by authorized service personnel. For service, repair or any questions regarding your appliance, please call our Customer Service Line at 1-800-231-9786 (US and Canada).
ELECTRICAL CORD
1) A short power cord is provided to reduce the risk resulting from becoming entangled in or tripping over a longer cord.
2) Longer detachable power-supply cords or extension cords are available and may be used if care is exercised in their use.
3) If a long detachable power-supply cord or extension cord is used:
a) The marked electrical rating of the extension cord should be at least as great as the electrical rating of the appliance,
b) If the appliance is of the grounded type, the extension cord should be a grounding-type 3-wire cord
c) The longer cord should be arranged so that it will not drape over the countertop or tabletop where it can be pulled on by children or tripped over unintentionally.
Note: If the power cord is damaged, please contact the warranty department listed in these instructions.
GETTING TO KNOW YOUR PIZZA OVEN
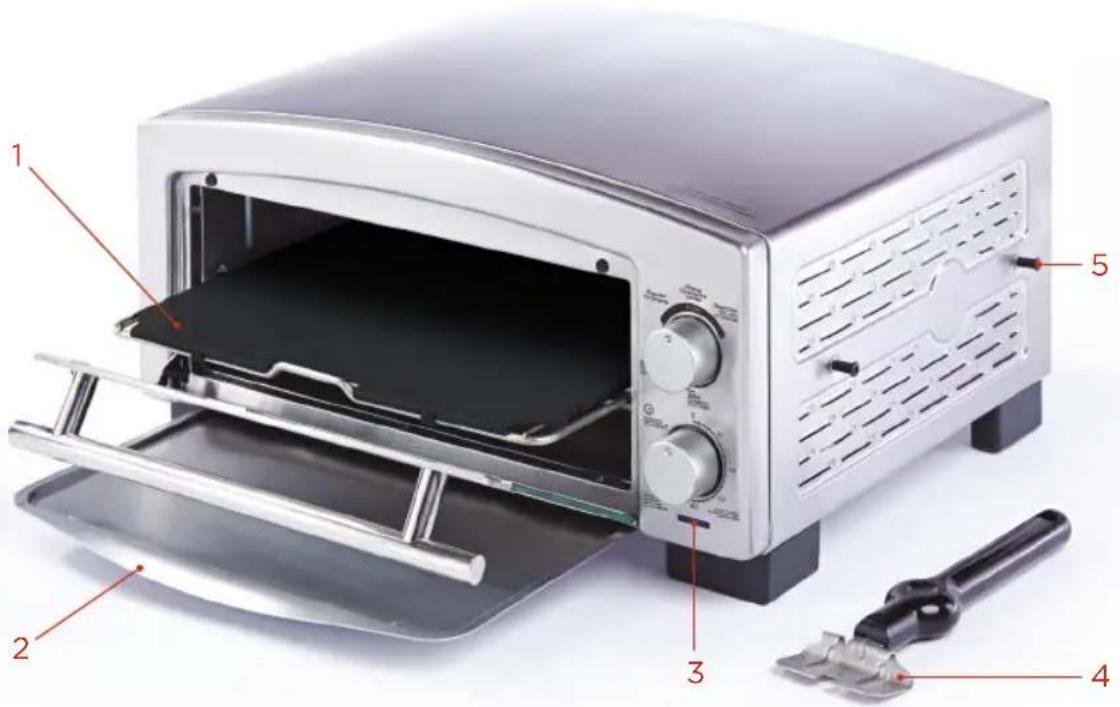
- Ceramic Tray (Part # P300S-01)
- Crumb Tray (Part # P300S-03)
- Power Light
- Tray Handle (Part # P300S-02)
- Tray Handle Hooks (Part # P300S-04)
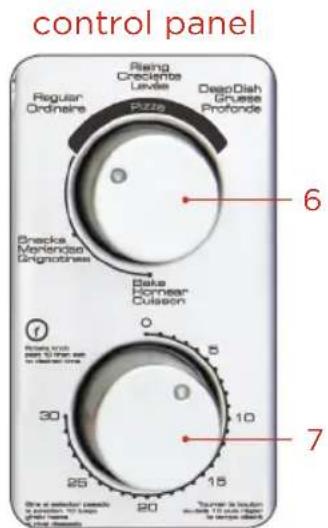
- Control Knob
- Timer and On/Off Knob
HOW TO USE
This product is for household use only.
GETTING STARTED
- Remove all packing material, any stickers, and the plastic band around the power plug.
- Go to www.prodprotect.com/applica to register your warranty.
- Wash all removable parts as instructed in CARE AND CLEANING.
-
Select a location where this unit is to be used. This unit should be placed on a stable, heat resistant surface, free from cloth, liquids and any other flammable materials. Allow enough space from back, front and sides of the unit and the wall to allow heat to flow without damage to cabinets and walls.
-
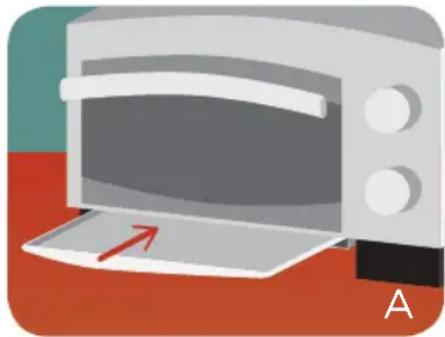
Insert crumb tray before use. (Fig A)
- Install handle external hooks, see "Installing Tray Handle Hooks" section.
- Plug unit into electrical outlet. To avoid circuit overload, do not operate another high wattage appliance on the same circuit.
natural_image
Illustration of a microwave oven with a red arrow pointing to the lid (no text or symbols)INSTALLING TRAY HANDLE HOOKS
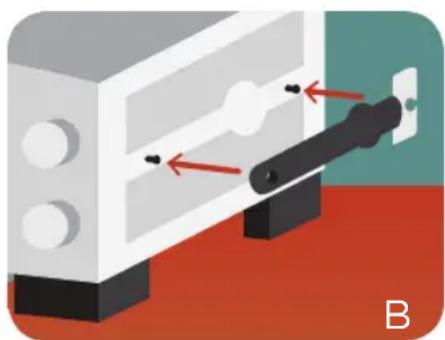
- Locate hook holes on both sides of the unit.
- Find a location for your Pizza Oven, and then decide which side of the unit you would like your Tray Handle to be located.
- Take the Handle Hooks, and screw them into the two holes on the desired side. Do not over tighten.
- Place Tray Handle in the hooks. (Fig B)
natural_image
3D illustration of a mechanical component with red arrows indicating movement or force, no text or symbols presentIMPORTANT INFORMATION ABOUT YOUR PIZZA OVEN
- This unit is designed to cook significantly faster than other cooking devices on most settings. Do not leave unit unattended while in use.
- This oven gets hot. When in use, always use oven mitts or potholders when touching any outer or inner surface of the oven.
- Do not use cooking sprays or oils on ceramic tray while using functions that have Medium or High IR intensity. See function chart on next page.
- During first few minutes of use you may notice smoke and a slight odor. This is caused by oil that may have been used during manufacturing of the unit and will not impact the performance of this oven.
- You must set the timer for the pizza oven to function.
- The heating elements will cycle on and off during operation to maintain even heat distribution.
- Do not cut foods directly on the provided Ceramic Tray.
- Do not use parchment paper, silicone mats, or other baking liners in this oven.
- Opening the door often or for extended periods of time could impact preheat and cook time. Keep door closed whenever possible to retain heat.
PREHEATING
• Always preheat the oven for at least 5 minutes before use.
- For items such as pizza, frozen snacks, etc; always preheat the Ceramic Tray along with the oven by putting the Ceramic Tray in place before the appliance starts heating.
- For more sensitive baked goods such as cookies, croissants, etc; preheating the Ceramic Tray can cause the food to cook too quickly and is not recommended.
- As a general rule, if the foods are being cooked on the lower heat settings (Bake and Deep Dish) preheating the Ceramic Tray is not needed. If the foods cook at higher temperatures, preheat the Ceramic Tray for optimal results.
- For crispier crusts on your pizza we recommend preheating the oven for 10 minutes before the first use, then an additional 3-4 minutes between pizzas.
CHOOSING THE RIGHT FUNCTION
This Pizza Oven & Snack Maker features 5 easy to use settings that were specially programmed to ensure optimal results for the foods being cooked.
BAKE: Set with a constant temperature at 375^ F ( 190^ C), enabling you to bake general items like cookies or pastries in the Pizza Oven. Please note that while you can bake a variety of items at this temperature you may need to adjust your baking time.
SNACKS: Optimized with high heat and high IR intensity to quickly cook basic frozen snack items in approximately half the time as a conventional oven. For best results insure all items being cooked are of the same type and general size. Please watch the cooking process closely as cooking times will vary depending on the item type and thickness.
PIZZA—REGULAR: This setting works with fresh or frozen pizza by optimizing the top and bottom heating elements to give you a crisp crust while melting the cheese on top. Depending on the thickness and number of toppings cooking times may vary so please watch the cooking process closely.
PIZZA—RISING: Developed with high heat but lowered IR intensity for both fresh and frozen rising crusts. This allows the crusts to rise appropriately. Please watch the cooking process closely as thickness and number of toppings may affect cook time.
PIZZA—DEEP DISH: Cooks the pizza more slowly at 375^ F ( 190^ C) to ensure warm gooey toppings all the way through the pizza. While it will cook more closely to standard cooking times for deep dish pizzas please monitor the cooking process closely.
| FUNCTION | IR INTENSITY | TEMP | RECOMMENDED BAKEWARE EXAMPLE FOODS | RECOMMENDED COOK TIMES* | ||
| Bake Low | 375°F (190°C) | Provided Ceramic Tray, or oven safe metal or glass pans on provided tray | Cookies 8 - 12 mins | |||
| Croissants 8 - 10 mins | ||||||
| Cinnamon Rolls 7 - 10 mins | ||||||
| Snacks High | +600°F (+315°C) | Provided Ceramic Tray only | Frozen Potato Skins 4 - 5 mins | |||
| Frozen Jalapeño Poppers 5 - 6 mins | ||||||
| Frozen Chicken Nuggets 4 - 5 mins | ||||||
| Frozen Fish Sticks 4 - 5 mins | ||||||
| PIZZA | Regular | High | +600°F (+315°C) | Provided Ceramic Tray only | Fresh Pizza Homemade Take and Bake** | 4 - 5 mins |
| Frozen Pizza 4 - 5 mins | ||||||
| Thin Crust Pizza | 4 - 5 mins | |||||
| Rising | Medium | +600°F (+315°C) | Provided Ceramic Tray only | Frozen Rising Crust Pizza | 10 - 14 mins time may vary depending on toppings | |
| Frozen Meal Pockets | 12 - 13 mins | |||||
| Deep Dish | Low | 375°F (190°C) | Provided Ceramic Tray, or oven safe metal or glass pans on provided tray | Deep Dish Pizza | 35 - 45 mins | |
| Pot Pie | 25 - 30 mins | |||||
| Lasagna | 50 - 60 mins | |||||
*Household voltages may vary, impacting cooking times
**If Take and Bake pizza comes with tray, do not use. Put pizza directly on Ceramic Tray.
- Turn the control knob to the desired function. See “Choosing the Right Function” section for guidance on settings.
- Turn the timer knob past 10, and then to desired cooking time.
- The power light will illuminate, indicating that oven is on and heating. The light will stay on until the timer counts down to the off position O.
Note: The cooking cycle can be stopped at any time by manually turning the timer counter-clockwise to O.
- Allow the Pizza Oven and Ceramic Tray to preheat for approximately 5 minutes. For crispier crust, preheat an extra 5 minutes on first pizza, and 3 - 4 minutes between pizzas.
Note: Preheat the Ceramic Tray along with the oven for frozen snacks, pizza, etc. For more sensitive baked goods, do not preheat the Ceramic Tray; instead insert the Ceramic Tray along with the food at the start of the baking time.
- Open the door, slide the Ceramic Tray out using the Tray Handle, place the food in the center of the Ceramic Tray and close the door. Adjust timer as needed for cooking time.
Note: Placing pizzas or other items off center on the tray may cause uneven results.
- At the end of the selected baking time the oven will ding and the power indicator light will go off, indicating the oven is no longer on.
- Remove the food using oven mitts or by using the provided Tray Handle to pull the Ceramic Tray out. Place on a heat resistant surface. Always use caution when removing hot foods from the oven.
- Unplug the appliance when not in use.
CARE AND CLEANING
This product contains no user serviceable parts.
CLEANING
Important: Before cleaning any part, be sure the oven is off, unplugged and completely cool. DO NOT clean the heating elements.
- Clean the glass door with a sponge, soft cloth or nylon pad using dish soap and water. Do not use a spray glass cleaner.
- Clean the stainless steel with a sponge, soft cloth or nylon pad using dish soap and water. To polish and shine the stainless steel, you may use a non bleach cleaner such as Barkeeper's Friend.
- Ceramic Tray is dishwasher safe, but can also be cleaned using dish soap and water with a polyester or nylon pad. Similar to a pizza stone some discoloration will occur over time on the ceramic tray.
-
Wipe crumb tray with a dampened cloth or paper toweling and dry thoroughly before inserting back into unit.
-
Due to the intense heat inside of the oven, over time a slight yellowing may occur around the oven door. Cleaners such as Barkeeper's Friend easily clean the surface to like-new condition. Only use these cleaners on the outside surfaces of the oven.
- After use, the pan may slightly season and discolor. This is normal and should not affect results.
TROUBLESHOOTING
| PROBLEMEXPLANATIONRECOMMENDATION | ||
| My Pizza cooked unevenly. | The heating element types and location have been specifically optimized to cook a perfect pizza from the center of the pan without needing to rotate. Being off center can cause one side to cook a little faster than the other. | When placing pizza on the tray, pull it out slightly with the tray handle to better see where the true center is.If while cooking you notice this; pull the tray out and use oven safe utensils (such as a spatula or tongs) to move the pizza back into center for the rest of the cook time. Rotating the pizza can also help if you are farther long in the cooking process. Please note that opening the door could impact the cook time. |
| The food took longer to cook than expected or lacked crisp. | Preheating the appliance properly can affect the results; if a pizza is cooked before the oven is at the proper temperature the pizza may take longer to cook and could lack crisp. | Always preheat the appliance for at least 5 minutes prior to cooking. |
| My Pizza didn't turn out on the Regular setting.orSome frozen snacks didn't turn out on the Snack setting. | As with a normal oven, thick foods will need more cooking time than thinner foods.Because this oven cooks so quickly on the Regular and Snack settings the following may happen:Pizzas with thicker crusts or more toppings may brown before the pizza is truly cooked all the way through. Some toppings may even overcook while the rest of the pizza needs more time.Frozen foods with various thicknesses may have some pieces done before others. Some piece may even overcook while others still need more time.Some thick or dense frozen snacks might cook unevenly. The higher heat and IR intensity could cause the food to overcook on the outside, but still need more time on the inside. | Inspect the food before choosing a setting:If the pizza crust looks thick or there are a lot of toppings (ex. supreme pizza), you may want to consider using the “Rising” setting. The lower IR intensity helps cook slightly slower, giving the pizza more time to cook all the way through.If frozen snacks have a large variation in thickness or size, you may want to consider using the “Rising” setting. The lower IR intensity helps cook slightly slower, giving the food more time to cook all the way through.If frozen foods are very dense or thick, you may want to try using the “Rising” setting. The lower IR intensity helps cook slightly slower, giving the food more time to cook all the way through.If while cooking you notice this, turn the control setting to “Rising” and allow it to cook until desired doneness. If needed, remove items that are finished cooking and allow underdone items more time to finish cooking. |
| I want crispier crust on my pizza. | As with a normal oven, getting crispier crust requires more time and in some cases higher temperatures. Allowing the pizza oven to preheat longer will enable your oven to reach a higher temperature for desired results. | Normal preheat is 5 minutes. Allow the oven to preheat for a full 10 minutes for crispier crust; follow the same cook times listed in cooking chart provided.If cooking more than one pizza, allow 3-4 minutes of preheat between pizzas in order to keep the pizza oven at the correct temperature. |
| The unit is smoking. | As with a normal oven, leftover food or debris can cause the appliance to smoke. | Always clean your oven between uses to avoid smoke and safety hazards.Upon first use you may notice a light odor or smoke. This is normal and will cause no harm. |
NEED HELP?
For service, repair or any questions regarding your appliance, please call our Customer Service Line at 1-800-231-9786. Please DO NOT return the product to the place of purchase. Also, please DO NOT mail product back to manufacturer, nor bring it to a service center. You may also want to consult the website listed on the cover of this pamphlet.
Warranty Information (Applies only in the United States and Canada)
What does it cover?
- Any defect in material or workmanship provided; however, Spectrum Brands' liability will not exceed the purchase price of product.
For how long?
- Two years from the date of original purchase with proof of such purchase.
What will we do to help you?
- Provide you with a reasonably similar replacement product that is either new or factory refurbished.
How do you get service?
- Save your receipt as proof of date of sale.
- Visit the online service website at www.prodprotect.com/applica, or call toll-free 1-800-231-9786, for general warranty service.
- If you need parts or accessories, please call 1-800-738-0245.
What does your warranty not cover?
• Damage from commercial use
- Damage from misuse, abuse or neglect
- Products that have been modified in any way
- Products used or serviced outside the country of purchase
- Glass parts and other accessory items that are packed with the unit
- Shipping and handling costs associated with the replacement of the unit
- Consequential or incidental damages (Please note, however, that some states do not allow the exclusion or limitation of consequential or incidental damages, so this limitation may not apply to you.)
How does state law relate to this warranty?
- This warranty gives you specific legal rights. You may also have other rights that vary from state to state or province to province.
natural_image
Top-down view of a tomato sauce dish on a wooden table with mushrooms, cherry tomatoes, and herbs (no text or symbols visible)COMO USAR
natural_image
Illustration of a microwave oven with a paper lid and red arrow pointing to the lid (no text or symbols)natural_image
Illustration of a mechanical switch or lever assembly with red arrows indicating direction (no text or symbols)natural_image
Close-up of a cut of pizza slices with visible toppings including lettuce, mushrooms, and red onion garnish, placed on a wooden surface (no text or symbols)IMPORTANTES CONSIGNES DE SÉCURITÉ
natural_image
Illustration of a microwave oven with a paper lid and red arrow pointing to the lid (no text or symbols)INSTALLATION DES CROCHETS DE LA POIGNÉE DU PLATEAU
natural_image
Illustration of a mechanical switch or lever assembly with red arrows indicating direction (no text or symbols present)RENSEIGNEMENTS IMPORTANTS SUR LE FOUR À PIZZA
Col. Centro, Cuauhtemoc,
México, D.F.
Tel. 01 800 714 2503
Nicaragua
LRM ELECTRONICA
Managua - Sinsa Altamira 1.5
kilómetros al norte
Nicaragua
Tel. (505) 2270-2684
Panamá
Supermarcas
City Market Nivel Plaza Local 153
Diagonal Hotel Melia,
Caracas
Tel. (582) 324-0969
www.applicaservice.com
servicio@applicamail.com
BLACK+DECKER and the BLACK+DECKER logo are trademarks of The Black & Decker Corporation and are used under license. All rights reserved
Made and Printed in People's Republic of China
natural_image
Top-down view of a cut of Italian pizza with visible toppings including cheese, tomatoes, and lettuce on a wooden surface (no text or symbols)www.BlackAndDeckerAppliances.com
- IMPORTANT SAFETY INSTRUCTIONS
- CAUTION:
- WARNING:
- SAVE THESE INSTRUCTIONS.
- This product is for household use only.
- SAFETY FEATURES
- GROUNDED PLUG
- TAMPER-RESISTANT SCREW
- ELECTRICAL CORD
- GETTING TO KNOW YOUR PIZZA OVEN
- HOW TO USE
- GETTING STARTED
- INSTALLING TRAY HANDLE HOOKS
- IMPORTANT INFORMATION ABOUT YOUR PIZZA OVEN
- PREHEATING
- CHOOSING THE RIGHT FUNCTION
- CARE AND CLEANING
- NEED HELP?
- Warranty Information (Applies only in the United States and Canada)
- What does it cover?
- For how long?
- What will we do to help you?
- How do you get service?
- What does your warranty not cover?
- How does state law relate to this warranty?
- COMO USAR
- IMPORTANTES CONSIGNES DE SÉCURITÉ
- INSTALLATION DES CROCHETS DE LA POIGNÉE DU PLATEAU
- RENSEIGNEMENTS IMPORTANTS SUR LE FOUR À PIZZA
- Nicaragua
- Panamá
Brand : BLACK & DECKER
Model : P300S
Category : Pizza oven