
CTO6335SC - Oven BLACK & DECKER - Free user manual and instructions
Find the device manual for free CTO6335SC BLACK & DECKER in PDF.


| Brand | Black & Decker |
| Model | CTO6335SC |
| Product type | Toaster oven / countertop oven |
| Dimensions (W x D x H) | 45.7 x 33.0 x 25.4 cm |
| Weight | 5.4 kg |
| Power supply | 1500 W, 120 V, 60 Hz |
| Interior capacity | 31.5 L |
| Main functions | Convection cooking, grilling, roasting, keep warm, defrost |
| Temperature settings | 65 °C to 230 °C (150 °F to 450 °F) |
| Timer | Up to 120 minutes with audible alarm |
| Controls | Rotary knobs and function selector |
| Included accessories | Drip tray, metal rack, baking sheet |
| Care and cleaning | Nonstick interior, removable crumb tray, clean with a damp cloth |
| Safety | Automatic shut-off, double-insulated exterior, overheat protection |
| Spare parts and repairability | Available on the official Black & Decker website and compatible spare parts |
| Warranty | 2 years (according to manufacturer's conditions) |
Frequently Asked Questions - CTO6335SC BLACK & DECKER
User questions about CTO6335SC BLACK & DECKER
0 question about this device. Answer the ones you know or ask your own.
Ask a new question about this device
Download the instructions for your Oven in PDF format for free! Find your manual CTO6335SC - BLACK & DECKER and take your electronic device back in hand. On this page are published all the documents necessary for the use of your device. CTO6335SC by BLACK & DECKER.
USER MANUAL CTO6335SC BLACK & DECKER
COUNTERTOP CONVECTION OVEN
FOUR À CONVECTION POUR LE COMPTOIR
Customer Care Line:
USA 1-800-231-9786
Accessories/Parts (USA)
1-800-738-0245
For online customer service
and to register your product, go to
www.prodprotect.com/applica
natural_image
Front view of a black and white instant cooktop oven with digital display and control panel (no visible text or symbols on the main body)Please Read and Save this Use and Care Book
IMPORTANT SAFEGUARDS
When using electrical appliances, basic safety precautions should always be followed, including the following:
○ Read all instructions.
○ Do not touch hot surfaces. Use handles or knobs.
To protect against electrical shock do not immerse cord, plugs or appliance in water or other liquid.
○ Close supervision is necessary when any appliance is used by or near children.
○ Unplug from outlet when not in use and before cleaning. Allow to cool before putting on or taking off parts.
Do not operate any appliance with a damaged cord or plug, or after the appliance malfunctions or has been damaged in any manner. Return appliance to the nearest authorized service facility for examination, repair or adjustment. Or, call the appropriate toll-free number on the cover of this manual.
- The use of accessory attachments not recommended by the appliance manufacturer may cause injuries.
○ Do not use outdoors.
- Do not let cord hang over edge of table or counter, or touch hot surfaces.
○ Do not place on or near a hot gas or electric burner, or in a heated oven.
- Extreme caution must be used when moving an appliance containing hot oil or other hot liquids.
- To disconnect, press I/O (on/off) button then remove plug from wall outlet.
○ Do not use appliance for other than intended use.
○ Use extreme caution when removing tray or disposing of hot grease.
O Oversized foods or metal utensils must not be inserted in a toaster oven, as they may create a fire or risk of electric shock.
○ A fire may occur if the toaster oven is covered or touching flammable material including curtains, draperies, walls and the like, when in operation. Do not store any item on top of the appliance when in operation.
○ Do not clean with metal scouring pads. Pieces can break off the pad and touch electrical parts resulting in a risk of electric shock.
- Extreme caution should be exercised when using containers constructed of other than metal or glass.
Do not store any material, other than manufacturer's recommended accessories, in this oven when not in use.
Do not place any of the following materials in the oven: paper, cardboard, plastic and the like.
○ Do not cover crumb tray or any part of this oven with metal foil. This will cause overheating of the oven.
SAVE THESE INSTRUCTIONS.
This product is for household use only.
GROUNDED PLUG
As a safety feature, this product is equipped with a grounded plug, which will only fit into a three-prong outlet. Do not attempt to defeat this safety feature. Improper connection of the grounding conductor may result in the risk of electric shock. Consult a qualified electrician if you are in doubt as to whether the outlet is properly grounded.
TAMPER-RESISTANT SCREW
Warning: This appliance is equipped with a tamper-resistant screw to prevent removal of the outer cover. To reduce the risk of fire or electric shock, do not attempt to remove the outer cover. There are no user-serviceable parts inside. Repair should be done only by authorized service personnel.
ELECTRICAL CORD
a) A short power-supply cord is to be provided to reduce the risk resulting from becoming entangled in or tripping over a longer cord.
b) Longer extension cords are available and may be used if care is exercised in their use.
c) If an extension cord is used,
1) The marked electrical rating of the cord set or extension cord should be at least as great as the electrical rating of the appliance, and
2) The cord should be arranged so that it will not drape over the countertop or tabletop where it can be pulled on by children or tripped over unintentionally.
If the appliance is of the grounded type, the extension cord should be a grounding-type 3-wire cord.
Note: If the power supply cord is damaged, it should be replaced by qualified personnel.
Product may vary slightly from what is illustrated.
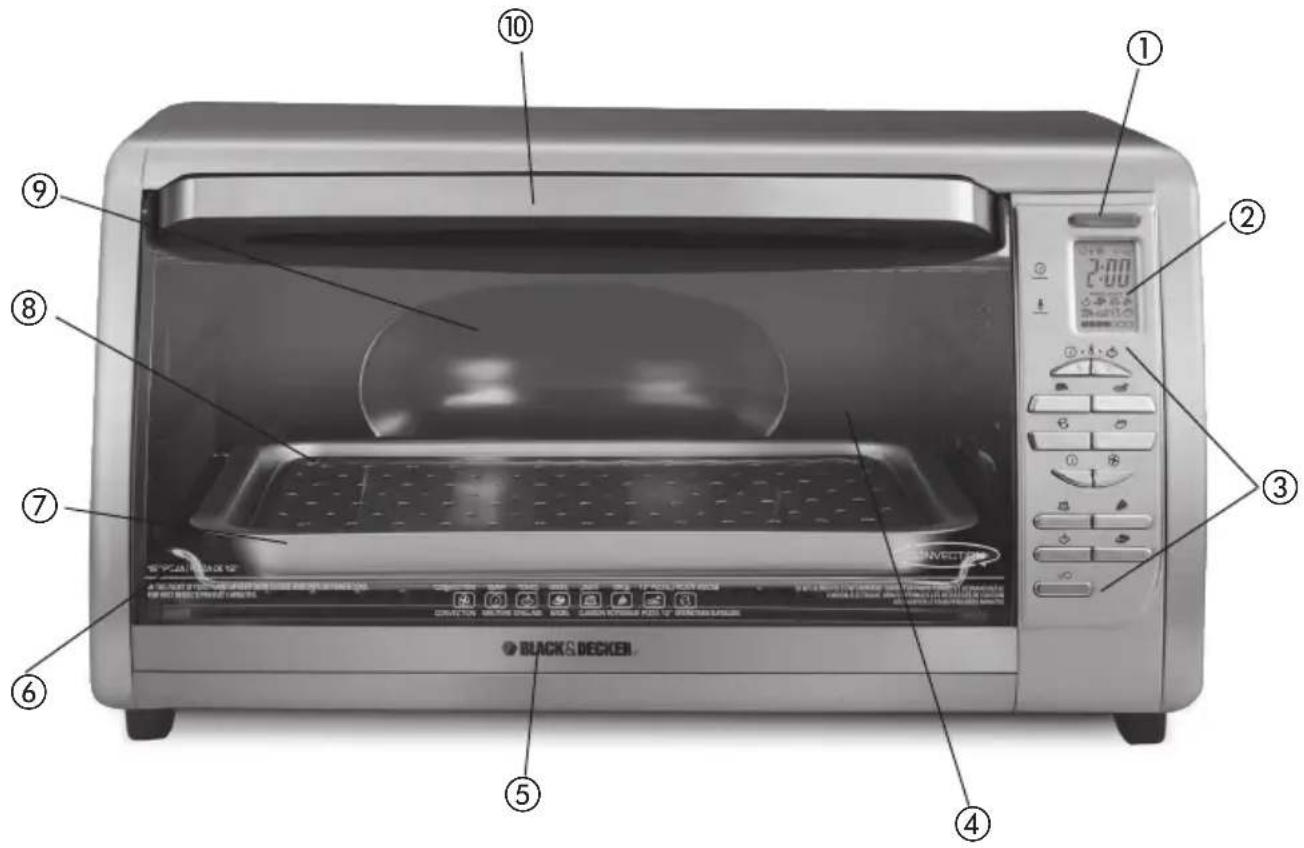
- On indicator light
- Digital display
- Electronic control panel
- Curved glass door
† 5. Slide-out crumb tray (Part # CT06335-01)
† 6. Slide rack (Part # CTO6335-02)
† 7. Bake pan (drip tray) (Part # CTO6335-03)
† 8. Broil rack (Part # CT06335-04) - Extra-deep curved interior
- Door handle
Note: indicates consumer replaceable/removable parts
How to Use
This product is for household use only.
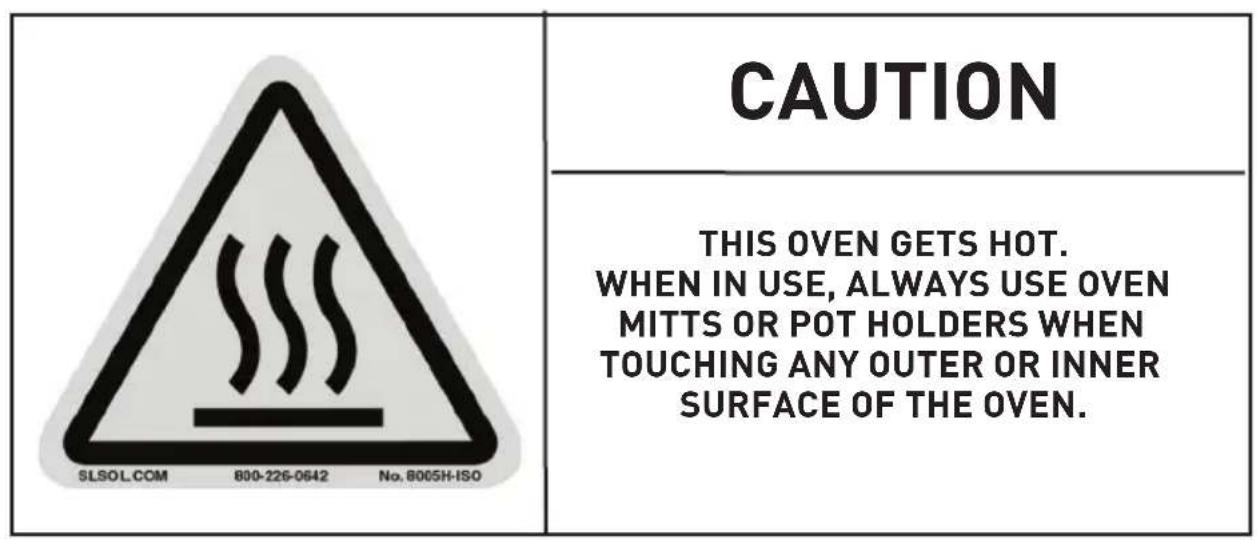
CAUTION
THIS OVEN GETS HOT. WHEN IN USE, ALWAYS USE OVEN MITTS OR POT HOLDERS WHEN TOUCHING ANY OUTER OR INNER SURFACE OF THE OVEN.
Caution: Do not leave oven unattended when in operation. Food ignition may occur. If this happens, unplug unit but DO NOT open door. To reduce the risk of fire, keep oven interior completely clean and free of food residues, oil, grease and any other combustible materials.
Caution: A fire may occur if the toaster oven is covered or touching flammable materials including curtains, draperies, walls and the like when in operation or after, when still hot. Do not place any of the following materials in the oven, on top of the oven, or in contact with the oven sides or bottom surfaces: paper, cardboard, plastic or the like.
GETTING STARTED
- Please go to www.prodprotect.com/applica to register your warranty.
- Wash all parts as instructed in CARE AND CLEANING.
- Select a location for the unit. Leave some space between the back of the unit and your wall to allow heat to flow without damaging cabinet and walls.
- Insert crumb tray underneath the bottom heating elements.
- Untie the cord and unwind it.
- Plug unit into electrical outlet. 0 00 shows on the digital display.
Important: During the first few minutes of use, you may notice smoke and a slight odor. This is normal and is not a cause for concern.
HELPFUL INFORMATION ABOUT YOUR OVEN
- You can change the temperature from °F to °C by pressing the ▲ and ▼ buttons simultaneously.
- For your convenience, the unit always remembers the last selected setting unless unplugged. You can change this setting before the oven begins preheating or once it has reached the preset temperature and time.
- You cannot change the temperature or time during the preheat cycle. Once the set temperature is reached, you can then change the time at any time.
- If using convection bake, remember to lower the suggested temperature of a recipe or package by 25^ F.
Caution: Unit gets hot. NEVER touch outer surfaces, including the glass door. Always use oven mitt or pot holder.
SLIDE RACK POSITIONS
There are 4 possible positions for the slide racks. There is an upper and a lower slot; the rack can also be inverted for 2 additional positions.
Position 1: Use lower slots along oven walls. Insert rack using a rack-down position.
Position 2 : Use lower slots along oven walls. Insert rack using a rack-up position.
Position 3: Use upper slots along oven walls. Insert rack using a rack-down position.
Position 4 : Use upper slots along oven walls. Insert rack using a rack-up position.
Caution: Unit gets hot. NEVER touch outer surfaces, including the glass door. Always use oven mitt or pot holder.
Note: You have 10 seconds for selecting the temperature and time. If you exceed this time, the display will change back to the default (0 00) temperature and time; simply repeat steps 1 - 5 below to begin again.
Note: You can stop the cooking at any time by pressing the I/O button.
BAKE FUNCTION
Selecting Cooking Temperature and Time
- Press BAKE button. The unit beeps, On indicator light blinks and 350^ F ( 180^ C) default temperature flashes on the digital display.
- To change the temperature, immediately press ▲ or ▼ button until you reach desired temperature.
Note: Cooking temperature can be adjusted from 200^ F to 450^ F ( 93^ C - 232^ C). - Tap button and release to change in increments of 5 degrees.
- Press and hold button to change rapidly in increments of 25 degrees.
- To set the cooking time, press the TIME ⏻ button. If you just plugged in the unit, the default cooking time of 0:30 (30 minutes) flashes on the display; otherwise it will display the last selected time.
- Immediately press ▲ or ▼ button to select desired time up to a maximum of 2 hours.
- Tap button and release to change in one-minute increments.
- Press and hold button to change rapidly in 10-minute increments.
- Once you have set desired temperature and time, press I/O button.
- Digital display flashes LO and PREHEAT until the unit reaches 150^ F ( 65^ C), then it flashes temperature until the set temperature is reached.
- Open oven door. Insert food to be cooked or heated on bake pan or pizza pan into the oven.
- Close oven door.
Important: You cannot change the temperature or time during the preheat cycle. Once unit reaches selected temperature, then you can change them at any time. For your convenience, the unit always remembers the last selected setting, unless unplugged.
- When unit reaches set temperature, it beeps and the display alternates between temperature and time during the entire cooking cycle.
- The time will count down in one-minute increments until it reaches 59 seconds, then it counts down in one-second increments.
- At the end of the cooking cycle, the unit beeps 3 times and cooking stops.
- To open the oven door, use an oven mitt to grip handle and gently pull forward to bring door down until it rests on the counter.
CONVECTION COOKING FUNCTION
The CONVECTION function uses an internal fan to distribute heat evenly. You can only use this feature with the BAKE function.
-
To turn on the fan ✿ for convection cooking:
-
After you have selected the desired temperature and time, press I/O button then press the CONV 🧑 button. You will hear the fan running and the digital display shows the fan symbol throughout the cooking cycle.
- When baking using convection, the temperature selected should be 25^ (10 °C) lower than recommended temperature for conventional cooking.
- Watch cooking time as some foods will bake faster.
QUICK BAKE FUNCTIONS
These functions allow you to cook certain foods at preset cooking temperatures and times, or can be adjusted as desired.
COOKIES FUNCTION
Preset Temperature: 350^ F ( 180^ C).
Preset Time: 12 minutes
Rack Position: 2 or 3. Place in the center of the oven.
PizzA FUNCTION
Preset Temperature: 400°F (204°C)
Preset Time: 20 minutes
Rack Position: 2 or 3
FROzEN SNACKS FUNCTION
Preset Temperature: 400^ F ( 204^ C)
Preset Time: 6 minutes
Rack Position: 2 or 3
POTATO FUNCTION
Preset Temperature: 400°F (204°C)
Preset Time: 45 minutes
Rack Position: 2 or 3
- Press the desired Quick Bake Function button.
-
To change the temperature, immediately press ▲ or ▼ buttons. Tap button and release to change in increments of 5 degrees. Press and hold button to change in increments of 25 degrees.
-
To change the time, press the TIME button. Tap button and release to change in one-minute increments. Press and hold button to change in 10-minute increments.
-
Press I/O button.
-
Digital display flashes LO and PREHEAT until 150°F temperature is reached. Then it flashes temperature and PREHEAT until the set temperature is reached.
- Once unit reaches set temperature, it beeps and the display alternates between temperature and time during the entire cooking cycle.
- The time will count down in one-minute increments until it reaches 59 seconds, then it counts down in one-second increments.
- At the end of the cooking cycle, the unit beeps 3 times and cooking stops.
- Open oven door using oven mitt or pot holder and carefully remove food.
BROIL FUNCTION
Note: Broiling temperature is preset at 450^ F ( 232^ C). You do not need to preheat the oven.
- Place the broil rack in the bake pan.
- Place food to be cooked on broil rack.
- Open oven door.
- Insert slide rack into oven. Use rack position 2.
- Place bake pan on slide rack.
Important: Allow at least 2 inches between the food and the top heating elements.
- Close oven door.
- Press BROIL button. On indicator light blinks and 450°F default temperature flashes on the digital display.
-
To set cooking time, press the TIME button then immediately press ▲ or ▼ button. Tap button and release to change in one-minute increments. Press and hold button to change in 10-minute increments.
-
Digital display alternates between cooking temperature and set time during the entire cooking cycle.
- The time will count down in one-minute intervals until it reaches 59 seconds, then it counts down in one-second increments.
-
At the end of the cooking cycle, the unit beeps 3 times and cooking stops.
-
Open oven door.
Caution: The unit gets hot! Always use an oven mitt to open or close the door. TOASTING BREAD OR BAGELS
- Open oven door.
- Place slices of bread or bagel halves (cut side up for bagels) on the slide rack. Temperature and time are preset. It is not necessary to preheat the oven for toasting.
-
For best performance, use rack position 2.
-
Close oven door.
- For toasting bread, press TOAST button. For bagels, press BAGEL button. For both functions, the On indicator blinks and the digital display shows 4 flashing (medium setting). This is the preset shade level.
Note: The bagel function toasts the top side and gently warms the bottom.
- To change shade level (1 - 7), immediately press ▲ or ▼ button. For best results, select the medium setting (4) for your first cycle, then adjust lighter or darker to suit your taste.
- Press the I/O button.
- Once toasting cycle is finished, the unit beeps 3 times and cycle ends.
Note: For your convenience, the unit will remember the last selected shade level, unless unplugged.
- Open oven door using oven mitt or pot holder, slide out the rack to remove bread or bagels.
Care and Cleaning
This product contains no user serviceable parts. Refer service to qualified service personnel.
CLEANING
- Turn off unit, unplug from wall outlet and let it cool before cleaning.
- Clean the glass door with a nylon pad and sudsy water. Do not use a spray glass cleaner.
- To remove slide rack, open the door, pull the rack forward and out. Wash in warm, sudsy water or in a dishwasher. To remove stubborn spots, use a polyester or nylon pad. To replace the slide rack, open the door completely, slide into the rail and close the door.
- Wash the bake pan, broil rack and pizza pan in warm, sudsy water or in the dishwasher. To minimize scratching, use a polyester or nylon pad.
- To remove the crumb tray, grasp the handle at the front of the oven and pull it out. Dispose of crumbs and wash the tray in hot, sudsy water. Remove stubborn spots with a nylon mesh pad. Be sure to dry thoroughly before inserting the tray back into the oven.
ExTERIOR SURFACES
Let the oven cool completely before cleaning any outer surface. Wipe with a damp cloth
or sponge and dry with paper towel or soft cloth.
COOKING CONTAINERS
- Metal, ovenproof glass or ceramic bakeware without glass lids can be used in your oven. Follow manufacturer's instructions.
- Be sure the top edge of the container is at least 2" away from the upper heating elements.
NEED HELP?
For service, repair or any questions regarding your appliance, call the appropriate 800 number on cover of this book. Please DO NOT return the product to the place of purchase. Also, please DO NOT mail product back to manufacturer, nor bring it to a service center. You may also want to consult the website listed on the cover of this manual.
Two-Year Limited Warranty
(Applies only in the United States and Canada)
What does it cover?
- Any defect in material or workmanship provided; however, Applica's liability will not exceed the purchase price of product.
For how long?
- Two years from the date of original purchase with proof of such purchase.
What will we do to help you?
- Provide you with a reasonably similar replacement product that is either new or factory refurbished.
How do you get service?
- Save your receipt as proof of date of sale.
- Visit the online service website at www.prodprotect.com/applica, or call toll-free 1-800-231-9786, for general warranty service.
- If you need parts or accessories, please call 1-800-738-0245.
What does your warranty not cover?
• Damage from commercial use
- Damage from misuse, abuse or neglect
- Products that have been modified in any way
- Products used or serviced outside the country of purchase
- Glass parts and other accessory items that are packed with the unit
- Shipping and handling costs associated with the replacement of the unit
- Consequential or incidental damages (Please note, however, that some states do not allow the exclusion or limitation of consequential or incidental damages, so this limitation may not apply to you.)
How does state law relate to this warranty?
- This warranty gives you specific legal rights. You may also have other rights that vary from state to state or province to province.

is a trademark of The Black & Decker Corporation, Towson, Maryland, USA
Made and Printed in People's Republic of China
- COUNTERTOP CONVECTION OVEN
- FOUR À CONVECTION POUR LE COMPTOIR
- Please Read and Save this Use and Care Book
- IMPORTANT SAFEGUARDS
- SAVE THESE INSTRUCTIONS.
- This product is for household use only.
- GROUNDED PLUG
- TAMPER-RESISTANT SCREW
- ELECTRICAL CORD
- Product may vary slightly from what is illustrated.
- How to Use
- CAUTION
- GETTING STARTED
- HELPFUL INFORMATION ABOUT YOUR OVEN
- SLIDE RACK POSITIONS
- BAKE FUNCTION
- Selecting Cooking Temperature and Time
- CONVECTION COOKING FUNCTION
- QUICK BAKE FUNCTIONS
- COOKIES FUNCTION
- PizzA FUNCTION
- FROzEN SNACKS FUNCTION
- POTATO FUNCTION
- BROIL FUNCTION
- Important: Allow at least 2 inches between the food and the top heating elements.
- Caution: The unit gets hot! Always use an oven mitt to open or close the door. TOASTING BREAD OR BAGELS
- Care and Cleaning
- CLEANING
- ExTERIOR SURFACES
- COOKING CONTAINERS
- NEED HELP?
- Two-Year Limited Warranty
- (Applies only in the United States and Canada)
- What does it cover?
- For how long?
- What will we do to help you?
- How do you get service?
- What does your warranty not cover?
- How does state law relate to this warranty?
Brand : BLACK & DECKER
Model : CTO6335SC
Category : Oven