5553L - Screen ELO - Free user manual and instructions
Find the device manual for free 5553L ELO in PDF.


| Product Type | Interactive Digital Signage (IDS) Display |
| Brand | Elo |
| Model | 5553L |
| Display Size | 55 inches (diagonal) |
| Native Resolution | 3840 x 2160 (4K UHD) |
| Aspect Ratio | 16:9 |
| Touch Technology | Projected Capacitive (TouchPro) up to 40 touches; Infrared up to 20 touches |
| Video Inputs | HDMI 2.0 (x2), DisplayPort |
| Touch USB | USB Type B (upstream) |
| Serial Interface | RS-232 via 3.5mm to DB9 cable |
| Audio Output | 3.5mm headphone jack, built-in speakers |
| Power Supply | 100-240 VAC, 50/60 Hz |
| Power Consumption | Low power in Sleep and Off modes (see tech specs) |
| VESA Mount | 400 x 400 mm (M6) and 600 x 600 mm (M8) |
| Supported Orientations | Landscape, Portrait, Tabletop (up to 15° tilt) |
| Operating Temperature | 0°C to 40°C (landscape/portrait); 0°C to 35°C (tabletop) |
| Storage Temperature | -20°C to 50°C |
| Humidity (Operating) | 20% to 80% non-condensing |
| Energy Star | Yes (ET5553L meets Energy Star 8.0) |
| Special Features | Real Time Clock (RTC), Intelligent Brightness & Color Sensor, Wake-on-Touch, CEC, OSD Remote, Elo Computer Module compatible |
| Included Accessories | HDMI cable, USB 3.0 cable (A to B), power cords (NA, EU/KR, UK), serial cable, Quick Install Guide |
| Maintenance | Clean with soft, dry cloth; do not use solvents |
| Safety | Use grounded outlet; two people required for handling; do not disassemble |
Frequently Asked Questions - 5553L ELO
User questions about 5553L ELO
0 question about this device. Answer the ones you know or ask your own.
Ask a new question about this device
Download the instructions for your Screen in PDF format for free! Find your manual 5553L - ELO and take your electronic device back in hand. On this page are published all the documents necessary for the use of your device. 5553L by ELO.
USER MANUAL 5553L ELO
Copyright © 2022 Elo Touch Solutions, Inc. All Rights Reserved.
No part of this publication may be reproduced, transmitted, transcribed, stored in a retrieval system, or translated into any language or computer language, in any form or by any means, including, but not limited to, electronic, magnetic, optical, chemical, manual, or otherwise without prior written permission of Elo Touch Solutions, Inc.
Disclaimer
The information in this document is subject to change without notice. Elo Touch Solutions, Inc. and its Affiliates (collectively "Elo") makes no representations or warranties with respect to the contents herein, and specifically disclaims any implied warranties of merchantability or fitness for a particular purpose. Elo reserves the right to revise this publication and to make changes from time to time in the content hereof without obligation of Elo to notify any person of such revisions or changes.
Trademark Acknowledgments
Elo, Elo (logo), Elo Touch, Elo Touch Solutions, and EloView are trademarks of Elo and its Affiliates.
Table of Contents
Section 1: Introduction ...... 4
Section 2: Unpacking .... 5
Section 3: IDS Display Installation 8
Section 4: Mounting Information .... 11
Section 5: Operation .... 18
Section 6: Maintenance Information ...... 29
Section 7: Technical Support .... 30
Section 8: Regulatory Information....31
Section 9: Warranty Information....38
Section 10: Appendix A....39
Section 1: Introduction
Product Description
Your new Interactive Digital Signage (IDS) Display combines Elo Touch Solutions reliable performance with the latest developments in touchscreen technology and display design. This combination of features creates a natural flow of information between a user and the IDS Display.
This IDS Display incorporates a 10-bit color, active matrix thin-film-transistor, and digital signage LCD panel to provide superior display performance. It outputs 4K resolution (3840 x2160) suitable for displaying graphics and images. Other features that enhance this LCD monitor's performance are Plug & Play compatibility, built-in speakers and headphone output capability, Touch On-Screen Display (OSD) controls, and a family of IDS computer modules.
Elo Computer modules can be installed to the back of the IDS Display to convert it into an IDS All-in-One touchcomputer.
Precautions
Follow all warnings, precautions and maintenance as recommended in this user manual to maximize the life of your unit and prevent risks to user safety.
For your health and safety, it is strongly recommended that at least two people handle, lift, and/or move these IDS Displays.
This manual contains information that is important for the proper setup and maintenance of the IDS monitor. Before setting up and powering on your new IDS Display, read through this manual, especially the Installation, Mounting, and Operation chapters.
CAUTION: Risk of Explosion if Battery is replaced by an Incorrect Type. Dispose of Used Batteries According to the Instructions.
Section 2: Unpacking
Unpacking the Interactive Digital Signage (IDS) Display
To unpack the IDS, follow these steps:
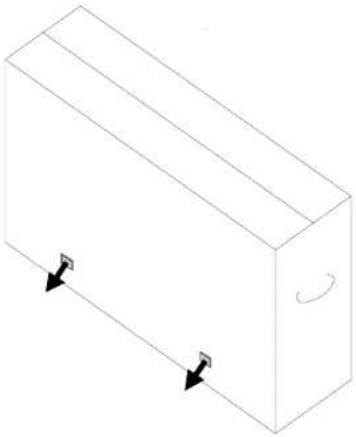
- The carton should be oriented in the manner according to its labeling. The hinged plastic locks should be at the 'bottom'.
- Unlock and remove all 4 hinged plastic locks.
natural_image
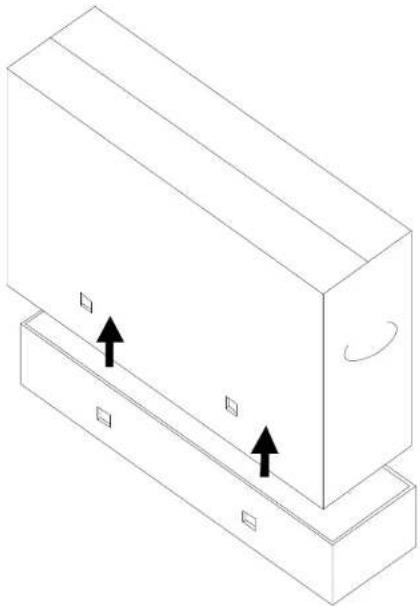
Isometric line drawing of a rectangular block with two black arrows pointing downward on its side (no text or symbols)- Once the locks are removed, lift the cartons top lid off the bottom frame.
natural_image
Isometric line drawing of a rectangular block with two arrows pointing inward, placed on a base (no text or symbols)- With the top lid removed, you now have access to the IDS Display and the included accessories.
Verify that the box contains:
• IDS ET6553L/ET5553L IDS Display:
- HDMI 2.0 cable
• USB 3.0 cable (Type A plug to Type B plug)
• power cable, IEC 60320-C13 to NA plug
• power cable, IEC 60320-C13 to EU/KR plug
• power cable, IEC 60320-C13 to UK plug
- Serial 3.5mm male to Serial DB9 female cable
• Energy label according to EU Regulation 1062/2010
- Quick Install Guide
Section 3: IDS Display Installation
Connector Panel and Interfaces
Remove the cable cover located on the back-right side of the IDS Display (when viewed in landscape orientation) to access the connector panel.
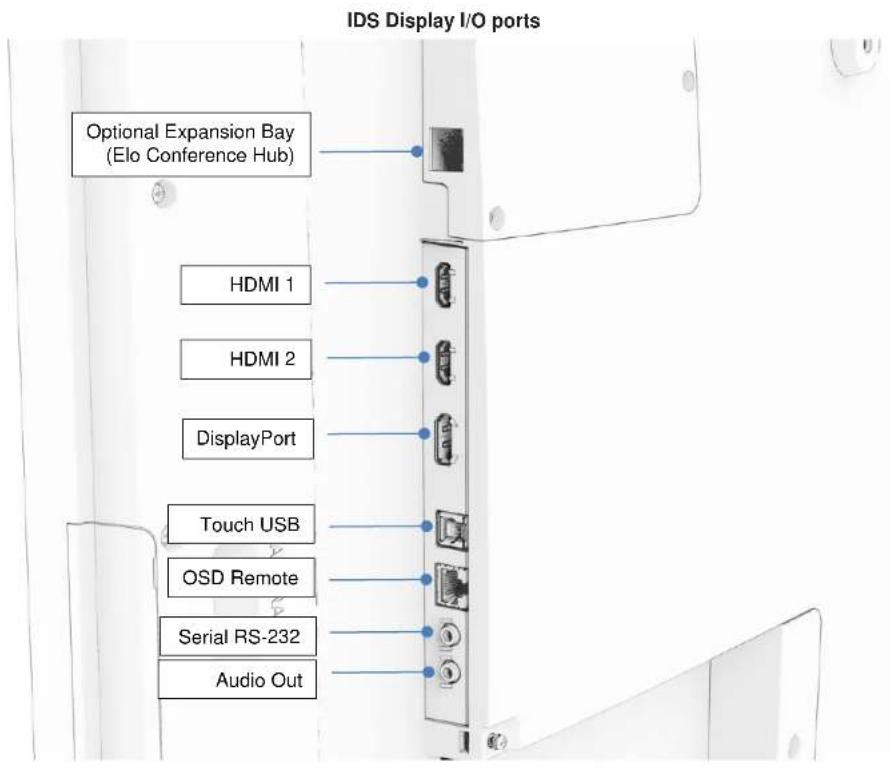
IDS Display: Connecting to an External Computer
- Connect the included HDMI cable (or your own or DisplayPort cable) between the monitor and the video source.
- Connect the USB touch cable between the monitor and your host PC.
- Select the correct power cable for your region. Connect the cable from the IDS Display POWER IN connector to the AC power source.
- As soon as power is detected, the monitor will turn on.
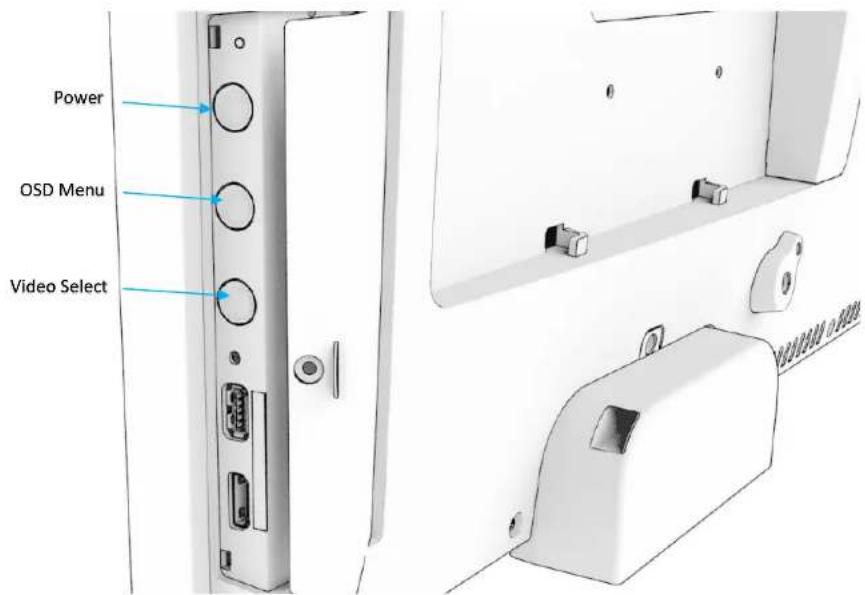
- In order to access the power, OSD menu and Video Select button, open the door that is located on the right side of the monitor.
IDS Display: Connecting to the Elo Computer Module (ECM)
- Remove the cover in order to expose the computer module docking area.
- Slide the Elo Computer Module into the bay and secure the ECM with the locking screws.
a. Note: The ECM can be plugged in while there is power the monitor. - As soon as video is detected, the monitor will begin to display the content.
Visit the Elo Touch Solutions website www.elotouch.com for:
- Updates to the monitor firmware
• Detailed driver installation guides - Touch drivers for other operating systems
TouchPro and Infrared units are HID compatible and do not require an Elo touch driver. If an Elo touch driver has previously been installed on the host computer, remove this driver by opening Control Panel and selecting the option to remove the driver completely.
Section 4: Mounting Information
Note: It is strongly recommended that at least two people handle, lift, or move the IDS Display.
Note: Do not leave the IDS Display facing down for long periods of time as this will cause permanent damage to the LCD panel.
Mounting Orientations
The following mounting orientations are supported: landscape, portrait and tabletop.
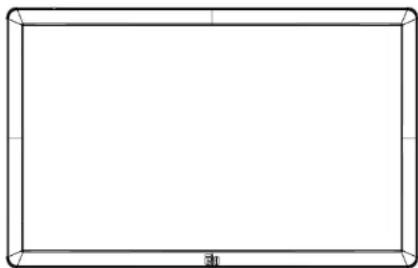
Landscape Orientation
When mounting the IDS Display in landscape orientation, ensure that the Elo logo appears in the same location as the pictures below.
natural_image
Empty rectangular frame with rounded corners and a small '31' label at the bottom (no text or symbols within the frame)Portrait Orientation
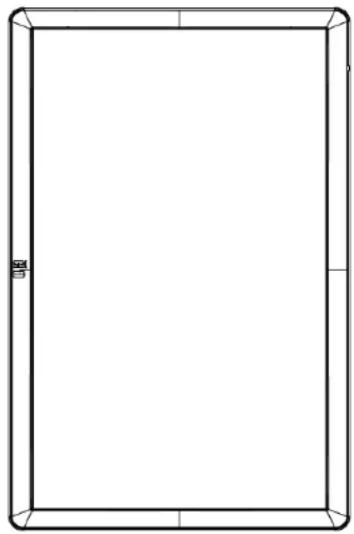
When rotating the IDS Display to portrait orientation, ensure that the Elo logo appears in the same location as the pictures below. The IO ports will be located at the bottom.
natural_image
Empty rectangular frame with dashed border and corner markers (no text or symbols)Tabletop
When the IDS Display is used in tabletop application, support the IDS Display using the VESA mounting pattern on the rear to support the weight of the IDS Display. Additional support around the edge may also be added if desired to maintain flatness of the touch screen.

natural_image
Pure technical line drawing of a mechanical component or assembly without any text, numbers, or symbolsCooling methods must be put in place to ensure that the air temperature beneath the monitor does not exceed the operating specifications. Refer to the Operating & Storage Conditions section for tabletop mode requirements.
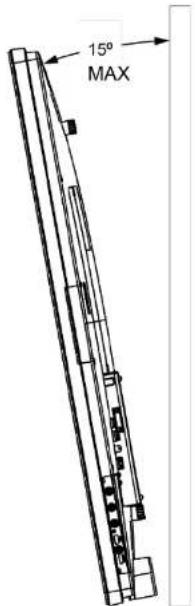
Tilt Mode
The IDS Display can support a tilt of 15^ .
Rear VESA Mount
A four-hole, 600x600mm and 400x400mm mounting pattern is provided on the rear of the IDS Display.
The VESA FDMI-compliant mounting are coded
- VESA MOUNT PER MIS-F, 400 x 400mm, M6
- VESA MOUNT PER MIS-F, 600 x 600mm, M8
Refer to www.elotouch.com for dimensional drawings.
Optional Mounting Methods
An optional low profile wall-mount kit is available for the IDS ET6553L/ET5553L Displays. Detailed information is available on the marketing specification drawing at www.elotouch.com.
Elo Low Profile Wall Mount kit:
P/N E282876 and Drawing MS602094 for IDS ET6553L
P/N E727774 and Drawing MS602320 for IDS ET5553L
Consult the wall mount user guide for detailed installation information.
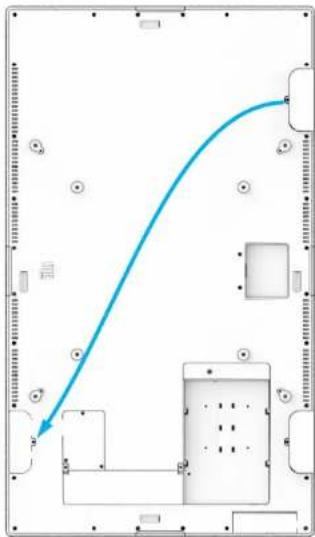
Audio speaker mounting in portrait orientation (optional)
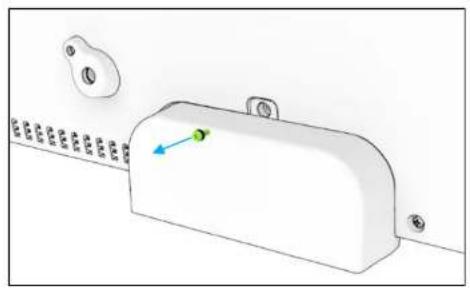
When the IDS display is mounted in portrait mode, relocate the top-right side speaker to the lower-left side to have better natural stereo performance.
flowchart
graph TD
    A["Start"] --> B{Decision}
    B -->|Yes| C["Process"]
    B -->|No| D["End"]
- Remove the mounting screw of the speaker and slide the speaker downward to disengage the mounting hooks. Pull the speaker downward enough so the cable connector is exposed and disengage the connector.
natural_image
3D diagram of a white mechanical component with a blue arrow pointing to a green dot, and a row of circular features on the left (no text or symbols)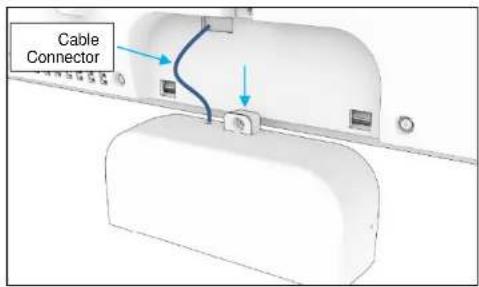
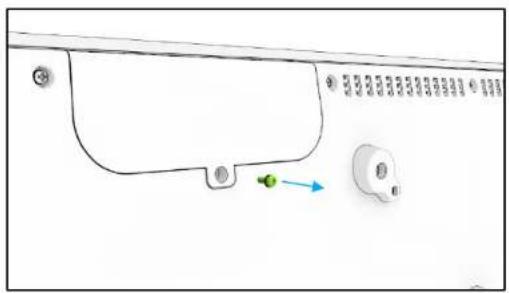
- Remove the mounting screw from the mounting cover on the top right of the IDS Display and slide the cover downward to disengage the mounting hooks.
natural_image
Pure diagram of a mechanical component with no text, numbers, or symbols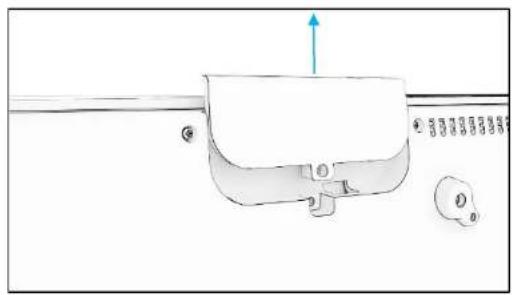
natural_image
Diagram of a mechanical component with an upward arrow and circular base (no text or symbols)- Install the speaker into the new location by connecting the speaker cable connector. Then insert the cable and connector through the hole and slide the speaker down from the top so both hooks are engaged with the slots in the back cover. Reinstall the mounting screw.
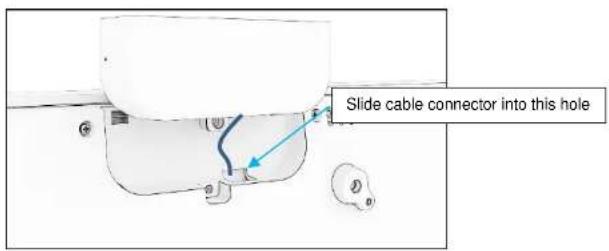
- Install the cover removed in step 2 in the old speaker location by sliding it in so the hooks engage the slots in the back cover and then install the mounting screw.
Section 5: Operation
Power
To turn the IDS Display on or off, press the power button once. If a computer module is installed, then the computer module will also turn on with the monitor.
For proper shut down of the computer module, follow the computer modules operating systems normal power off procedure.
The system consumes low power when in SLEEP and OFF modes. For detailed power consumption specifications, refer to technical specifications available on the Elo website www.elotouch.com.
Touching the screen will bring the system out of MONITOR SLEEP mode.
If long periods of disuse are planned, unplug the AC power cable to save power.
The maximum voltage, frequency and current for the IDS Display are provided in the power ratings table below:
| Operating Voltage Range | Operating Frequency Range |
| 100 - 240Vac | 50/60 Hz |
Usage Duty Cycle
In order to save energy and extend life of the display, Elo recommends shutting off the display when not in use. A number of tools, such as Content Management System (CMS) player applications, Operating System settings and the Real Time Clock feature on the On-Screen Display Menu (OSD) within the IDS display can be used for this task.
Touch Technology
When connected to Windows 10 computer, the IDS Display will report simultaneous touches per the product specification.
TouchPro supports up to 40 touch
Infrared support up to 20 touch
The IDS Display product specification can be found by visiting https://www.elotouch.com/
Video Information
An LCD panels native resolution is its width and height measured in number of pixels.
In almost all cases, an image displayed on an LCD monitor will look best when your computers output resolution matches the LCD panels native resolution. See the display specifications on the Elo website www.elotouch.com to find your IDS Displays native resolution. Operating in other resolutions will degrade video performance and is not recommended.
For computer output resolutions at non-native resolutions, the monitor will scale the video to panel's native resolution. For smaller input video resolutions, this involves "stretching" the input image in the X- and Y-dimensions to fit the panel. For larger input video resolutions, this involves "compressing" the input image in the X- and Y-dimensions to fit the panel. An unavoidable byproduct of the scaling algorithms is a loss of fidelity when the computers output video image is scaled by the monitor to fit the display. This loss of fidelity is most apparent when viewing feature-rich images at close distances (for example images containing small-font text).
Your IDS Display will likely not require any video adjustments.
Touch On-Screen Display (OSD)
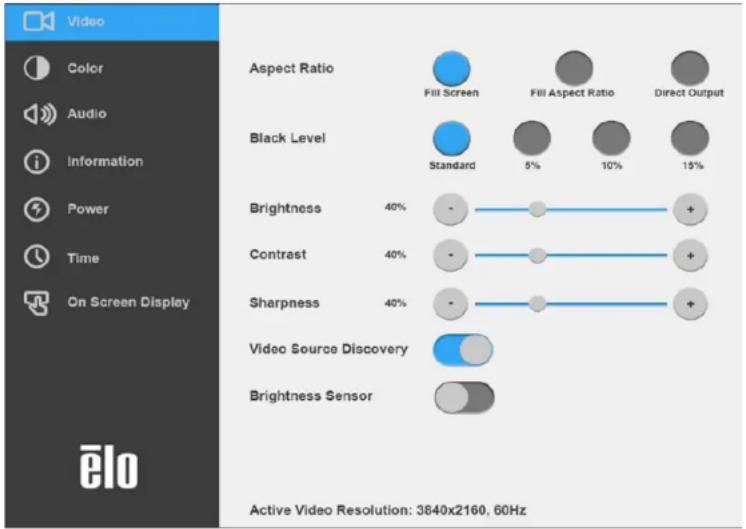
This monitor uses an easy-to-navigate Touch OSD interface. Use the settings menu in the sidebar to adjust the IDS Display settings
Example of the Popup OSD Menu:
All IDS Display adjustments made through the OSD are automatically stored as soon as they are entered. This feature saves you from having to reset your choices every time the IDS Display is unplugged or powered off and on or if there is a power failure.
| Parameter | Available Adjustment | |
| On Boot Up | Let's Get Started | On first boot up, the Language, Time and Time Zone must be selected |
| Video | Video Port Discovery | When enabled, the monitor will automatically switch if a new video port is connected.Default: Enabled |
| Brightness | Adjust the brightness of the display.Default: 70 | |
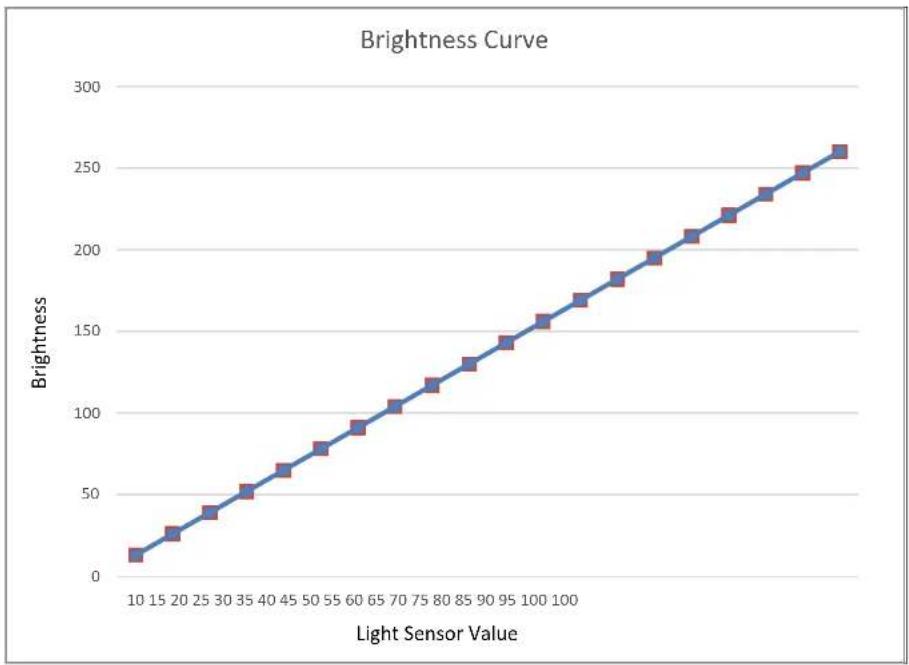
| Brightness Sensor | The light sensor can be toggled on or off. When the light sensor is enabled, the brightness cannot be changed manually.Table for light sensor is in Section 10: Appendix A | |
| Contrast | Adjust the contrast of the display.Default: 50 | |
| Black Level | The user can choose between Standard, 5%, 10% or 15% black level offset.The saturation level of the colors change according to the chosen black level offset. | |
| Sharpness | Adjusts sharpness of the displayed images.Default: no sharpness adjustmentSharpness function is disabled when the input source ratio is the same as the panels native ratio | |
| Aspect Ratio | Adjusts aspect ratio of the display.Default: Fill ScreenFill Screen – scales the X- and Y-dimensions of the input video (up or down as needed) to the display's native resolution.Fill Aspect Ratio – Assuming a landscape orientation and an input video with aspect ratio smaller than 16:9, scales the Y-dimension of the input video (up or down as needed) to the display's Y-resolution, and scales the X-dimension to maintain the aspect ratio (and fills the rest of the display with equal black bars on the left and right).Direct Output – 1:1, Depends on whether the scalar can support it | |
| Color | Color Temperature | Adjusts color temperature. Color temperature options shall be 9300K, 7500K, 6500K, 5500K, and User Defined.Default: User Defined |
| Color Sensor | Adjust the color based on ambient colors | |
| User Preset | If the User Preset option is selected, the user can change the color temperature by changing individual R, G, and B gains on a scale from 0 to 100.If the color space is YUV mode, then Hue and Saturation can be varied in this menu. | |
| Picture Modes | Preset color modes that change the color parameters to enhance color definitions. Available modes are: Standard, Movie, Gaming, Photo, Line mode, Color Enhance Default: Standard | |
| HDMI Full Color Range | When enabled, displays full color range of HDMI (0-255) When disabled, displays the legacy color range (16-255) Default: enabled | |
| Audio | Audio Selections | Audio Output: Sets where audio should play from When set to internal-PC, the audio comes out from the line out on the ECMG4 When set to Monitor, the audio comes out from the line out on the monitorMute: enables or disables the audioDefault OffVolume: Adjust the audio from 0 – 100Default: 50 |
| Power | Power Loss Behavior | When power to the monitor is lost and regained, the behavior that is chosen will be executed.Always OnAlways OffLast StateDefault: Last State |
| Power Lock | When enabled, the monitor will remain ON even if the power button is pressed.If this feature is enabled and power to the monitor is lost, when power is regained, pressing the power button will turn on the monitor.Default: Disabled | |
| Energy Savings Mode | When Enabled, the monitor must adhere to Energy Star regulations.Default: Enabled | |
| Power Status Light | Enable or disable the power status lightDefault: Enabled | |
| Time | Time Set | Option to set the current time |
| On/Off Schedule | Set the monitor to turn off and on at specific times.Default: EverydayOff: 01:00:00On: 07:00:00 | |
| On Screen Display | Recall Defaults | Selecting “Recall Defaults” restores all factory default settings for OSD-adjustable parameters (except OSD Language and OSD Time Settings) and for Preset Video Mode timings. |
| OSD Timer | Adjusts how long a period of OSD button inactivity the IDS Display will wait before closing the OSD. The adjustable range is between 5 and 60 seconds.Default: 15 seconds | |
| OSD Language | Selects which language the OSD information is displayed in. The available languages are: English, French, Italian, German, Spanish, Russian, Simplified Chinese, Traditional Chinese, Japanese and Korean.Default: English. | |
| OSD Lock | When selected, the OSD will not popup when the Menu button is pressed.If the OSD needs to be unlocked, press and hold the Menu button for five (5) seconds. This will cause the monitor to unlock the OSD menu. | |
| OSD Portrait Rotation | Adjusts the OSD orientation between Portrait and Landscape mode | |
| Information | Monitor Information | Displays the IDS Display model and the monitor and touchscreen serial # information |
| System Temperature | Displays the real-time temperature of the Video BoardNote: CPU Sensor temperature is only available if the feature is supported by the computer module. | |
| Help & Support | Display information regarding Elo Touch Solutions contact information. |
On-Screen Display (OSD) (Optional Elo Part Number – E483757)
Connected Through the RJ45 Connection
Five OSD buttons can be found on the OSD remote. There is an LED light which shows the current state of the monitor. The following are the functions that relate to the designated button.
Note: Opening the OSD menu from the remote will disable the touch functions on the OSD menu.
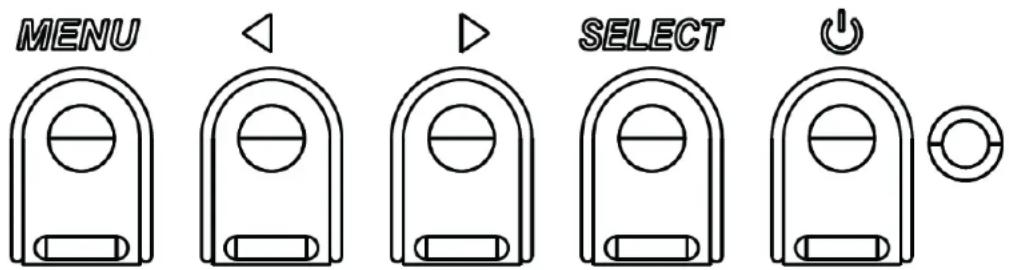
The buttons and their functionality are:
| Button | Function when OSD is not displayed: | Function when OSD is displayed: |
| Menu | Display OSD main menu | Return to previous OSD menu |
| n/a | Increase value of selected parameter / select next menu item | |
| Power for the monitor | Toggles the power status of the monitor | |
| n/a | Decrease value of selected parameter / select previous menu item |
Audio
Audio can be output from the following locations:
-
From the IDS Display speakers via the video channel
-
The Line Out port on the IDS IO ports
-
From the computers Line Out port (If an Elo Computer Module is installed)
See the "Audio" OSD parameter for details.
Note: When headphone is plugged into the headphone output jack, the internal speakers turn off and audio is played over the headphone.
Volume and muting of the speaker and headphone outputs are controlled by the OSD.
Controlling the IDS Display remotely
The IDS Display allows remote access from a host application. This is done using either the VESA Display Data Channel Command Interface (DDC/CI) or the Multiple Display Control command sets. Users can communicate with the monitor through either of these protocols. The host application can send a variety of different commands which will be executed on the IDS Display. For detailed information regarding the command set, refer to the application note available here.
CEC Functionality (Consumer Electronic Control)
The IDS Display is equipped with CEC capability. If a host device (with CEC built in) is connected to the monitor through HDMI, the monitor can be turned on by only turning the host device on.
Real Time Clock (RTC) Functionality
This IDS Display has real time clock functionality. In the OSD menu, there is a sub-menu called RTC Settings.
To utilize the RTC functionality:
The user must set up the Time setting for their specific time zone.
When the On/Off Schedule is Enabled, the user can choose when to leave the monitor on and when it should be off. Individual or multiple days can be chosen.
Example:
Have the monitor ON for Monday, Wednesday and Friday between 9:00AM and 5:00PM. All other days and time, the monitor shall be OFF.
○ Enable the On/Off Schedule
○ Select M W F
- Set the ON time for 09:00:00 and the OFF time for 17:00:00
*Note that all of time settings operate on the 24-hour clock.
Wake-On-Touch
The touch display supports wake-on-touch functionality when the PC is in sleep mode. To enable this, please ensure that the BIOS settings have enabled USB support during the S4 sleep cycle.
Intelligent Brightness Control and Color Sensor Functionality
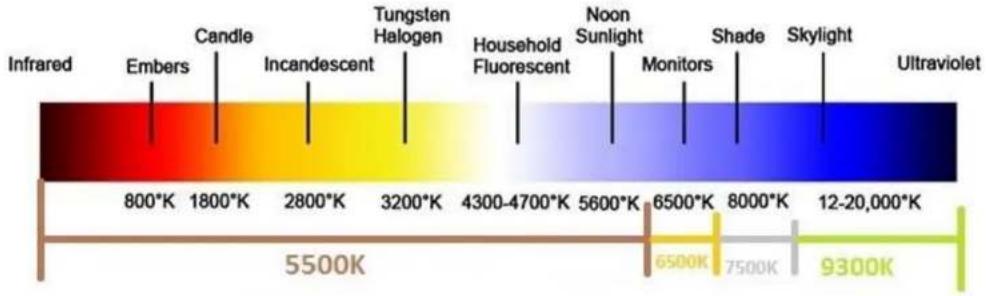
This IDS Display includes a light and color sensor that can adjust the brightness of the screen and the color of the display to meet the ambient light and color levels. Details of the functionality can be found in the Section 10, Appendix A.
The light sensor can be used to wake the monitor from sleep mode. This will happen when there is a change in the amount of light from very dim (<50 lux) to bright (>200 lux). To enable this feature, ensure that the power saving mode for the monitor is disabled.
Energy Saving Mode
IDS ET6553L can meet Energy Star 7.1 requirements, if Energy Saving Mode is enabled. IDS ET5553L can meet Energy Star 8.0 requirements, if Energy Saving Mode is enabled.
When Energy Saving Mode is enabled, four side peripheral ports, MDC command and Auto Display Wake Up function will be limited. To restore full functionality of the IDS Display, disable the Energy Saving Mode.

ENERGY STAR is a program run by the U.S. Environmental Protection Agency (EPA) and U.S. Department of Energy (DOE) that promotes energy efficiency.
This product qualifies for ENERGY STAR in the “factory default” settings and this is the setting in which power savings will be achieved. Changing the factory default picture settings or enabling other features will increase power consumption that could exceed the limits necessary to qualify for ENERGY STAR rating.
For more information on the ENERGY STAR program, refer to energystar.gov.
Stylus (Active and Passive)
Elo provides active stylus pens that can be used on the projected capacitance version of the monitor. Elo Active Stylus Part Number: E216215 Note: The minimum distance between two monitors should be 72cm (28.35in) ±10%
Features of the stylus include Auto power off, pressure detection, right click, erase and pen priority.
To use pressure sensing, apply pressure to the screen and the object that is being drawn will become thicker. Release pressure to make the object thinner.
To use the right click feature, press the button closest to the tip of the stylus.
To use the erase feature, press the button away from the tip of the stylus.
Side buttons follow Microsoft HID digitizer specification and functionality depends on applications definition.
Pen priority – Touch priority is given to the stylus. If a stylus and finger are present, then the touch will follow the stylus.
A custom API must be created in order to use two stylus pens at the same time.
Elo also provides passive stylus pens that be used on the Infrared version of the monitor which can be used simultaneously with finger for touch. Elo Passive Stylus Part Number: E727568
Elo Edge Connect micro-USB peripheral ports
Available on all four sides of the monitor. The micro USB ports are designed for Elo's optional peripherals. See www.elotouch.com for the optional peripherals that work with the IDS ET6553L/ET5553L display.
The pinout is as follows:
Pin1: 5V Power
Pin2: USB D-
Pin3: USB D+
Pin4: NC
Pin5: Ground
Conference Camera (Optional)
Elo provides an optional camera module (P/N E277819) which has a built-in microphone. This camera is designed for video conferencing meetings and supports 1080P Full HD video output.
When using the camera on either the top, left or right sides of the monitor when the monitor is in landscape mode, the USB camera identification will be Elo Conference Camera. When the camera is mounted on the bottom in landscape mode, the USB camera identification will be Elo IDS Camera.
Whiteboard Software (Optional)
Qwizdom Octopus – Can be used for whiteboard applications and presentations. The user guide for this software is available at https://qwizdomoktopus.com/user-guide/
Section 6: Maintenance Information
To avoid risk of electric shock, follow all safety notices and do not disassemble the IDS Display or Computer Module. They are not user serviceable.
Do not block or insert anything inside any of the ventilation slots.
The IDS Display is equipped with a 3-wire, grounding power cord. The power cord plug only fits into a grounded outlet. Do not fit or modify the plug into an outlet that has not been configured for this purpose. Do not use a damaged power cord. Only use the power cord that came with your Elo IDS Display. Use of an unauthorized power cord may invalidate your warranty.
Ensure that the system is maintained and runs within the specified environmental conditions listed in the products specifications available on the Elo Touch Solutions website www.elotouch.com.
Section 7: Technical Support
Technical Assistance
Technical Specifications
visit www.elotouch.com/products for technical specifications for this device
Support
visit www.elotouch.com/support for technical support
Refer to last page for worldwide technical support phone numbers.
Section 8: Regulatory Information
Waste Electrical & Electronic Equipment Directive (WEEE)

This product should not be disposed of with household waste. It should be deposited at a facility that enables recovery and recycling.
Elo has put in place recycling arrangements in certain parts of the world. For information on how you can access these arrangements, please visit www.elotouch.com/e-waste-recycling-program/.
Electrical Safety Information
Compliance is required with respect to the voltage, frequency, and current requirements indicated on the manufacturer's label. Connection to a different power source than those specified herein will likely result in improper operation, damage to the equipment or pose a fire hazard if the limitations are not followed.
There are no operator serviceable parts inside this equipment. There are hazardous voltages generated by this equipment which constitute a safety hazard. Service should be provided only by a qualified service technician.
Contact a qualified electrician or the manufacturer if there are questions about the installation prior to connecting the equipment to mains power.
Emissions and Immunity Information
Notice to Users in the United States. This equipment has been tested and found to comply with the limits for a Class A digital device, pursuant to Part 15 of the FCC Rules. These limits are designed to provide reasonable protection against harmful interference when the equipment is operated in a commercial environment. This equipment generates, uses, and can radiate radio frequency energy and, if not installed and used in accordance with the instruction manual, may cause harmful interference to radio communications. Operation of this equipment in a residential area is likely to cause harmful interference in which case the user will be required to correct the interference at his own expense. This device complies with Part 15C of the FCC Rules. Operation is subject to the following two conditions:
1) This device may not cause harmful interference; and
2) This device must accept any interference, including interference that may cause undesired operation of the device.
Notice to Users in Canada:
This equipment complies with the Class A limits for radio noise emissions from digital apparatus as established by the Radio Interference Regulations of Industrial Canada.
CAN ICES3(A)/NMB3(A)
This device complies with Industry Canada's license-exempt RSSs. Operation is subject to the following two conditions:
(1) This device may not cause interference; and
(2) This device must accept any interference, including interference that may cause undesired operation of the device.
Notice to Users in the European Union: Use only the provided power cords and interconnecting cabling provided with the equipment. Substitution of provided cords and cabling may compromise electrical safety or CE Mark Certification for emissions or immunity as required by the following standards:
This Information Technology Equipment (ITE) is required to have a CE Mark on the Manufacturer's label which means that the equipment has been tested to the following Directives and Standards: This equipment has been tested to the requirements for the CE Mark as required by EMC Directive 2014/30/EU as indicated in European Standard EN 55032 Class A and the Low Voltage Directive 2014/35/EU as indicated in European Standard EN 60950-1.
General Information to all Users: This equipment generates, uses and can radiate radio frequency energy. If not installed and used according to this manual, the equipment may cause interference with radio and television communications. There is, however, no guarantee that interference will not occur in any particular installation due to site-specific factors.
- In order to meet emission and immunity requirements, the user must observe the following:
a. Use only the provided I/O cables to connect this digital device with any computer.
b. To ensure compliance, use only the provided manufacturer's approved line cord.
c. The user is cautioned that changes or modifications to the equipment not expressly approved by the party responsible for compliance could void the user's authority to operate the equipment.
- If this equipment appears to cause interference with radio or television reception, or any other device:
a. Verify as an emission source by turning the equipment off and on. If you determine that the equipment is causing the interference, try to correct the interference by using one or more of the following measures:
i. Move the digital device away from the affected receiver.
ii. Reposition (turn) the digital device with respect to the affected receiver.
iii. Reorient the affected receiver's antenna
iv. Plug the digital device into a different AC outlet so the digital device and the receiver are on different branch circuits.
v. Disconnect and remove any I/O cables that the digital device does not use.
(Unterminated I/O cables are a potential source of high RF emission levels.)
vi. Plug the digital device into only a grounded outlet receptacle. Do not use AC adapter plugs. (Removing or cutting the line cord ground may increase RF emission levels and may also present a lethal shock hazard to the user.)
If you need additional help, consult your dealer, manufacturer, or an experienced radio or television technician.
Agency Certifications
The following certifications and marks have been issued or declared for the IDS ET6553L/ET5553L monitor:
- UL, FCC (US) - Class A
• cUL, IC (Canada)
• CB (International safety)
• CE (Europe) - Class A - RCM (Australia)
• VCCI (Japan)
• CCC (China) (for TouchPro version only) - NOM (Mexico)
China RoHS
In accordance to Chinese law (Management Methods for the Restriction of the Use of
Hazardous Substances in Electrical and Electronic Products), the section below lists out the name and amount of the toxic and/or hazardous materials that this product may contain.
Hazardous Substances
| Component Name | Lead (Pb) | Mercury (Hg) | Cadmium(Cd) | Hexavalent Chromium (Cr6+) | Polybrominated Biphenyls (PBB) | Polybrominated Diphenyl Ethers (PBDE) |
| Plastic Parts | ||||||
| Wire and Cable Assembly | ||||||
| PCBA | X |
This table is prepared in accordance with the provisions of SJ/T 11364
O: Indicates that said hazardous substance contained in all homogenous materials for this part is below the limit requirement of GB/T 26572.
X: Indicates that said hazardous substance contained in at least one of the homogenous materials used for this part is above the limit requirement of GB/T 26572.
For items marked with X, exemptions were taken according to EU RoHS.
Explanation of Markings
In accordance with the SJ/T11364 requirement, electrical and electronic products are marked with the following pollution control logo.
The Environment-Friendly Use Period for this product is 10 years. The product will not leak or mutate under normal operating conditions listed below, so that the use of this electronic information product will not result in any severe environmental pollution, any bodily injury, or damage to any assets.

Operating Temperature: See table on next page.
Storage Temperature: See table on next page.
It is encouraged and recommended that product packaging be recycled and reused according to local laws.

Power Specifications
Electrical Ratings
| Input | 100 - 240 VAC 50/60Hz |
Operating & Storage Conditions
Operating Conditions
| Temperature | Portrait/Landscape/Tiit (≤15°) 0°C - 40°C |
| Tabletop 0°C - 35°C | |
| Humidity | 20% to 80% (non-condensing) |
Storage Conditions
| Temperature | -20°C - 50°C |
| Humidity | 10% to 95% (non-condensing) |
Section 9: Warranty Information
For warranty information, go to http://support.elotouch.com/warranty/
Section 10: Appendix A
Light Sensor Curve
line
| Light Sensor Value | Brightness | | ------------------ | ---------- | | 10 | 15 | | 15 | 25 | | 20 | 35 | | 25 | 45 | | 30 | 55 | | 35 | 65 | | 40 | 75 | | 45 | 85 | | 50 | 95 | | 55 | 105 | | 60 | 115 | | 65 | 125 | | 70 | 135 | | 75 | 145 | | 80 | 155 | | 85 | 165 | | 90 | 175 | | 95 | 185 | | 100 | 195 | | 105 | 205 | | 110 | 215 | | 115 | 225 | | 120 | 235 | | 125 | 245 | | 130 | 255 | | 135 | 265 |Color Sensor
The color sensor functions according to the following chart:
heatmap
| Observation Type | Temperature Range | | ---------------------- | --------------------- | | Infrared | 800°K - 1800°K | | Embers | 800°K - 1800°K | | Candle | 1800°K - 2800°K | | Incandescent | 2800°K - 3200°K | | Tungsten Halogen | 3200°K - 4300°K | | Household Fluorescent | 4300-4700°K | | Noon Sunlight | 5600°K - 6500°K | | Monitors | 6500°K - 8000°K | | Shade | 8000°K - 12-20,000°K | | Skylight | 12-20,000°K | | Ultraviolet | 12-20,000°K |www.elotouch.com
Visit our website for the latest
• Product Information
- Specifications
- Upcoming Events
- Press Releases
- Software Drivers
• IDS Display Newsletter
To find out more about our extensive range of Elo touch solutions, go to www.elotouch.com, or call the office nearest you.
North America
Tel +1 408 597 8000
Fax +1 408 597 8001
customerservice@elolouch.com
Europe
Tel +32 (0) 16 70 45 00
Fax +32 (0)16 70 45 49
elosales@elotouch.com
Asia-Pacific
Tel +86 (21) 3329 1385
Fax +86 (21) 3329 1400
www.elolouch.com.cn
Latin America
Tel +54 11 4785-9129
www.elotouch.com

- Disclaimer
- Trademark Acknowledgments
- Table of Contents
- Section 1: Introduction
- Product Description
- Precautions
- Section 2: Unpacking
- Unpacking the Interactive Digital Signage (IDS) Display
- Section 3: IDS Display Installation
- Connector Panel and Interfaces
- IDS Display: Connecting to an External Computer
- IDS Display: Connecting to the Elo Computer Module (ECM)
- Section 4: Mounting Information
- Mounting Orientations
- Landscape Orientation
- Portrait Orientation
- Tabletop
- Tilt Mode
- Rear VESA Mount
- Optional Mounting Methods
- Audio speaker mounting in portrait orientation (optional)
- Section 5: Operation
- Power
- Usage Duty Cycle
- Touch Technology
- Video Information
- Touch On-Screen Display (OSD)
- On-Screen Display (OSD) (Optional Elo Part Number – E483757)
- Connected Through the RJ45 Connection
- Audio
- Controlling the IDS Display remotely
- CEC Functionality (Consumer Electronic Control)
- Real Time Clock (RTC) Functionality
- To utilize the RTC functionality:
- Example:
- Wake-On-Touch
- Intelligent Brightness Control and Color Sensor Functionality
- Stylus (Active and Passive)
- Elo Edge Connect micro-USB peripheral ports
- Conference Camera (Optional)
- Whiteboard Software (Optional)
- Section 6: Maintenance Information
- Section 7: Technical Support
- Technical Specifications
- Support
- Section 8: Regulatory Information
- Waste Electrical & Electronic Equipment Directive (WEEE)
- Electrical Safety Information
- Emissions and Immunity Information
- CAN ICES3(A)/NMB3(A)
- Agency Certifications
- China RoHS
- Explanation of Markings
- Power Specifications
- Operating & Storage Conditions
- Section 9: Warranty Information
- Section 10: Appendix A
- Color Sensor
- www.elotouch.com
- North America
- Europe
- Asia-Pacific
- Latin America
Brand : ELO
Model : 5553L
Category : Screen